
 by Tom Gurney
Tom Gurney BSc (Hons) is an art history expert with over 20 years experience
Published on June 19, 2020 / Updated on November 6, 2026
Email: tomgurney1@gmail.com / Phone: +44 7429 011000
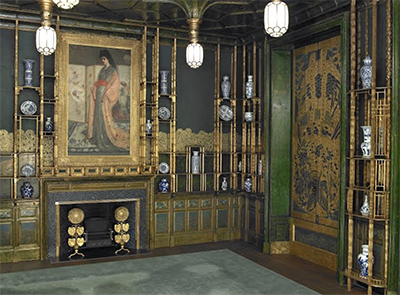
James McNeill Whistler's Harmony in Blue and Gold: The Peacock Room is not a painting of a room. It is the room itself: a transported architectural interior whose walls, shutters, ceiling, shelving and fittings were joined by paint and metallic ornament into one sustained decorative work. Made in 1876–77 for the dining room of the Liverpool shipowner Frederick Richards Leyland at 49 Princes Gate in London, it survives in the National Museum of Asian Art in Washington, DC, as Smithsonian accession F1904.61. Its familiar short name, The Peacock Room, is convenient, but Whistler's fuller musical title matters. It directs attention towards the repeated exchanges of blue and gold that move across wood, embossed leather, metal, glass, mosaic, canvas and ceramic display.[1][2][3]
That unity was never the achievement of one maker working on an empty box. Thomas Jeckyll designed the room, its shelving and fittings; Richard Norman Shaw directed the reconstruction of the house; dealers and advisers helped assemble the Chinese porcelain and antique gilt leather; assistants and tradesmen carried out parts of the painting and gilding; and Leyland supplied the property, collection and money that made the commission possible. Whistler radically transformed Jeckyll's interior and gave it the pictorial identity by which it is now known. A responsible history therefore has to hold two truths together: the ensemble is Whistler's most ambitious surviving work of interior decoration, and it is also a collaborative, contested object whose material and architectural foundations were not his alone.[1][2][4][19]
The room is equally inseparable from its later lives. Leyland kept it after his bitter dispute with Whistler. Blanche Watney preserved it through changes to the London house. Charles Lang Freer bought and dismantled it in 1904, installed it in Detroit, and filled its shelves with a collection unlike Leyland's. After Freer's death it travelled to Washington, where it has been open to museum visitors since 1923. Repairs, reconstruction, cleaning and conservation have altered the relationship between original material and later support, while successive displays have changed what the shelves mean. The object encountered today is consequently neither a perfect Victorian time capsule nor a modern imitation. It is a surviving nineteenth-century interior whose history of ownership, movement, interpretation and care is visible within its fabric.[1][4][11][14][16]
At a Glance
- CatalogueYMSM 178 / Smithsonian F1904.61
- Date and site1876–77; 49 Princes Gate, London
- Object typeArchitectural interior and mixed-media decorative ensemble
- Architect and fittingsThomas Jeckyll
- DecorationWhistler with assistants and specialist trades
- MaterialsOil paint and gold leaf on canvas, leather, mosaic tile, glass and wood
- Dimensions421.6 × 613.4 × 1026.2 cm
- Related paintingYMSM 050 / Smithsonian F1903.91a-b, catalogued separately
- CollectionNational Museum of Asian Art, Freer Collection
- DisplayWest Building, Gallery 12, checked 26 August 2026
Contents
- Establishing the object
- Before Whistler: a room made for Leyland's porcelain
- From colour advice to an encompassing scheme
- Walking through blue and gold
- Pattern, reversal and the musical title
- Drawings, transfer and work on site
- Materials, assistants and divided authorship
- Art and money: reconstructing the dispute
- Publicity, access and early response
- Watney, the market and Freer's purchase
Establishing the object
The present Smithsonian record describes F1904.61 as an architectural element or interior, made in 1876–77 from oil paint and gold leaf on canvas, leather, mosaic tile, glass and wood. It measures 421.6 centimetres high, 613.4 centimetres wide and 1026.2 centimetres deep. Those values should be read in the museum's stated order of height, width and depth. The online catalogue raisonné of Whistler's paintings, where the room is YMSM 178, gives the older figures 425 by 1010 by 608 centimetres and a shorter material description of oil paint and gold leaf on leather and wood. The records reflect different measurement conventions and stages of cataloguing, not two different rooms. For a current object summary, the Smithsonian's fuller material statement and current dimensions govern.[1][2][4]
The distinction between an interior and an easel painting corrects the most persistent confusion surrounding the work. La Princesse du pays de la porcelaine, generally called The Princess from the Land of Porcelain, is the tall canvas that hung above the fireplace and became the room's principal painted focus. It is a separate object, YMSM 050 and Smithsonian F1903.91a-b, created in 1863–65 with Christina Spartali as the model. Leyland owned it, and its colours helped prompt the changes that Whistler first proposed for the dining room. Yet the woman on that canvas is not “the Peacock Room”, and the room is not a frame enlarged around a picture. Their histories diverged after Leyland's death before Freer reunited them. Treating the two as identical erases both the architecture around the painting and the painting's independent career.[1][13]
The title also needs care. Whistler promoted the full form Harmony in Blue and Gold: The Peacock Room, linking this interior to the arrangements, symphonies and nocturnes through which he asked viewers to attend to pictorial relations before demanding a story. The phrase did not dissolve the dining room into pure colour. Shelves still held costly ceramics; a patron still owned the house; a fireplace, windows and gas fittings still ordered use; and a furious argument about payment eventually became imagery on the south wall. “Harmony” names an organising ambition, not an escape from materials or history.[2][3][20]
There is no conventional written inscription. Instead, four butterfly devices, Whistler's emblematic signature form, are distributed within the decorative system: one on the right shutter of the central window, one on the south-western part of the ceiling, one on an upper-left panel at the top of the sideboard, and another at the left end of the long panel above it. They do not function like a signature placed at the corner of a portable canvas. Moving among ceiling, shutter and furniture, they claim the environment by becoming part of its pattern.[3]
Before Whistler: a room made for Leyland's porcelain
The dining room began with Leyland's London house and collection. During the rebuilding of 49 Princes Gate, Richard Norman Shaw oversaw the wider architectural work and Thomas Jeckyll developed a dining-room scheme around the display of Chinese blue-and-white porcelain. Leyland's ceramics were associated especially with the Kangxi period, the 1662–1722 reign whose blue-and-white wares had become intensely desirable in nineteenth-century Britain. Murray Marks, a dealer closely connected with Whistler and the Leyland circle, helped source ceramics and decorative material. The shelves were not neutral storage. Their ranks, intervals and changes of height made individual vessels participate in a wall-wide order.[1][2][17][19]
Jeckyll's design joined this ceramic display to older-looking European materials. The walls were covered with embossed and gilded Dutch leather dating from around the eighteenth century, patterned with ribbons, roses and summer flowers. Later descriptions sometimes turned it into Spanish leather, Tudor leather or a field of pomegranates, but close technical and documentary study does not support those labels. Jeckyll also created the sideboard, the shelving, a ceiling structure associated with Jacobean design and gas lighting, and distinctive sunflower andirons. Whistler worked upon this existing ensemble; there is no sound basis for attributing the sideboard itself to him.[3][4][19]
Two Whistler paintings were expected to contribute to the interior. The Princess from the Land of Porcelain was installed over the fireplace in a frame integrated with the wall. The unfinished Three Girls was intended for another place in the room but never became an equivalent permanent anchor. This plan already blurred distinctions between picture display, furniture and architecture before Whistler covered the larger environment in blue and gold. It also helps explain why he was consulted. The colours surrounding The Princess did not satisfy him, and in April 1876 his intervention began as advice on bringing the room into better relation with the painting.[2][3][13]
Jeckyll's illness changed the circumstances. As his health collapsed, Whistler gained access to the unfinished interior while Leyland was away. Whistler stayed or worked extensively at the house during the summer. Matthew Robinson Elden assisted him; Henry and Walter Greaves probably did so as well; specialist work was also performed by gilders and other tradesmen. The project thus expanded during a period when its architect could not continue to supervise and its owner was not present to approve each decision. That unusual vacancy is central to what followed. It gave Whistler freedom to turn colour adjustment into environmental transformation, but it also left scope, authority and price dangerously undefined.[2][4][17]
From colour advice to an encompassing scheme
The transformation was not planned at full scale from the first consultation. Whistler initially proposed relatively restricted changes: touches of yellow around The Princess and a blue wave or related band that would connect painting and room. His experiments were not always successful. In August 1876 he reported that blue applied to the gilt leather had proved injurious and had been erased. The episode complicates any story in which a complete peacock vision arrived instantly and was executed without hesitation. Colour had to be tested against uneven, reflective, already ornamented surfaces.[1][2][4]
Leyland's letter of 17 August shows approval rather than immediate alarm. He liked the ornament around the cove, believed the room would be a great success and asked Whistler to write what further amount was owed. The letter is important because it proves that Leyland knew work beyond the most minimal consultation had occurred and invited a statement of cost. It is not, however, a contract specifying every subsequent shutter, ceiling, wall and mural. The scheme continued to grow after it was written, and the lack of a settled written scope later allowed both men to interpret the same invitation in incompatible ways.[8]
By September the peacock had become the governing motif. A report in the Academy on 2 September described primrose touches, peacock-feather designs, deep blue and gold, and full-sized birds. Alan Summerly Cole, whose diary provides a contemporary sequence of visits, recorded seeing the room in September, repeated progress during October, blue over a brown feather-pattern ground in November and golden peacocks near the end of that month. His notes do not offer a conservator's account of every layer, but they show a work changing over weeks rather than the instantaneous performance that Whistler later preferred to describe.[2][7]
Leyland returned by the middle of October to find an intervention far larger than the one he believed he had authorised. The disagreement that followed did not immediately stop the work. Whistler continued to modify surfaces, direct assistants and develop the most confrontational imagery. By early December the principal golden peacocks were complete. A newspaper report disclosed the scale of the room to a broader public, intensifying Leyland's anger at both cost and unauthorised access. Further publicity continued into early 1877; a press view took place on 9 February and Thomas Way printed a small descriptive text in which Whistler mapped the eyes, breasts and throats of his feather patterns.[2][7][20]
The final phases extended into March 1877. Whistler made last changes to the shutters on 5 March and then left 49 Princes Gate, never to see the completed room again. This stark ending can make the commission appear to have been nothing but conflict. Yet Leyland did not destroy or disperse it. He kept the interior substantially intact for the rest of his life, preserving the very transformation whose authorship, price and publicity he resented.[2][3]
Walking through blue and gold
The room rewards a slow circuit because its identity lies in relations among surfaces rather than in a single privileged view. Museum photographs usually show one wall frontally, compressing the experience into an image. Inside, the viewer turns between fireplace, windows, shelves, ceiling and sideboard. Motifs disappear around corners and return in altered colours. Ceramics interrupt painted fields. Natural or artificial light makes gold alternately flare and recede. The composition is environmental in the literal sense: it surrounds a body that must move to apprehend it.[1][3]
The fireplace and north wall
The north wall is organised around the fireplace and the tall vertical of The Princess from the Land of Porcelain. The painting's pale dress, patterned robe and Japanese-associated props supplied a chromatic and imaginative point of departure, but its rectangular surface is embedded within shelving and ornamental structure. Blue-and-white vessels stand to either side and above, so the figure is not isolated as she would be on a plain gallery wall. The eye moves between painted costume, porcelain glaze, dark blue surround and gold framework.[1][13]
The fireplace makes this the room's visual and functional centre. Mosaic, glass, wood, metal and canvas meet there, each handling reflected light differently. Jeckyll's sunflower andirons introduce organic forms at floor level while Whistler's repeated feather eyes spread across the surrounding structure. Gold is not one colour laid uniformly over everything. It appears as leaf, metal, aged gilt leather and painted effect, producing differences that change with the angle of view.[3][4]
The wall also demonstrates why the ceramics cannot be treated as optional accessories. Their white bodies interrupt the dense blue field; cobalt marks produce small internal landscapes, figures and patterns; curved profiles alternate with straight shelf edges. Emptying the shelves would not reveal a complete Whistler composition beneath them. It would remove one of the rhythmic systems for which the architecture was designed.[1][11]
Shelves, sideboard and the long walls
Along the east and west sides, shelf divisions create a changing cadence. Large jars occupy broad intervals while bowls, bottles and smaller vessels form tighter groups. Uprights subdivide the walls without sealing them into independent panels. Whistler's blue crosses Jeckyll's woodwork and the older leather, visually reducing the difference between support and background even though their textures remain distinct. Gold edges and feather patterns then pull selected parts forward.[1][3]
The sideboard is especially important to the division of authorship. Its mass, storage function and display ledges belong to Jeckyll's architectural-furniture scheme. Whistler's colour and ornament make it answer the rest of the room, but that transformation does not convert him into its cabinetmaker or original designer. Above it, long painted fields and rows of ceramics create horizontal movement against the room's vertical shutters and vessels. The result depends on overlay: Jeckyll's object remains legible within Whistler's envelope.[3][19]
The original Dutch leather complicates the apparent flatness. Its embossed flowers and ribbons persist beneath and through later colour. When blue or gold covers this relief, light catches the raised pattern independently of the painted peacock vocabulary. The wall therefore carries two ornamental histories at once: an eighteenth-century floral skin and a nineteenth-century intervention that partly suppresses, partly recruits it.[4][16]
Shutters, windows and changing light
Whistler treated the window shutters as mobile pictures. When closed, they extend the blue-and-gold enclosure and bring feather eyes into a more continuous alignment. When opened, daylight breaks that continuity and the exterior-facing surfaces enter view. One retrospective account claimed that the room appeared at its best with shutters closed and artificial light. That recollection fits the work's nocturnal intensity but cannot be turned into a timeless rule. The interior has always shifted with light, and the present museum setting differs fundamentally from Leyland's house.[3]
The museum windows, vents and surrounding building fabric are not all surviving parts of the London room. In Washington they mediate climate, conservation and visitor experience. The shutter pairs were even installed in reversed north-south positions in 1920, an error corrected only during the conservation work of the 1990s. Such facts matter to looking: they show that what seems like a stable total artwork has repeatedly been taken apart, interpreted and reassembled.[4][14]
Ceiling, gaslight and the upper field
Above eye level, Jeckyll's gas-light structure and Whistler's ornament form a darker, denser canopy. Feather eyes recur in blue-on-gold and gold-on-blue reversals. From the floor they are read less as individual birds than as a patterned pressure that closes the room overhead. The ceiling's repeated forms connect the full-sized peacocks to the smaller abstractions spread elsewhere, making scale itself part of the rhythm.[3][20]
Artificial illumination was not incidental. Gaslight would have struck metal, leaf, varnish, glass and glaze in uneven flashes, activating an interior whose deepest blues could otherwise absorb detail. The modern museum controls light for different reasons and with different technologies. Any attempt to imagine the 1870s appearance must therefore acknowledge that the same surviving surface can behave differently under changed illumination.[1][14]
The south wall and the fighting peacocks
The south wall converts decoration into confrontation. Two large peacocks face one another amid scattered gold forms in the mural known as Art and Money; or, The Story of the Room. Their bodies are built from sweeping tails, tense necks and concentrated feather patterns, yet they also carry caricatural identities. The right-hand bird alludes to Leyland: its ruffled breast recalls a formal shirt-front, while coin-like forms around it make money impossible to ignore. The opposing bird performs Whistler's image of the artist—elegant, combative and unwilling to accept the patron's valuation.[2][3][19]
This symbolism should not be stretched until every spot becomes a cipher. Its power comes from the way personal satire remains ornamental. From across the room, the birds complete the blue-and-gold system. At closer range, their opposition replays the argument that shaped the final work. Beauty and grievance occupy the same paint. The mural does not sit outside the harmony as explanatory illustration; it makes conflict one of the means by which the harmony was completed.[3][17]
Pattern, reversal and the musical title
Whistler's pamphlet for the 1877 press view offers a period vocabulary for the room. It distinguishes patterns derived from the eye, breast and throat of the peacock and describes their distribution in alternating relations. On some surfaces blue figures appear against gold; elsewhere gold returns against blue. These exchanges do more than repeat a recognisable feather. They prevent either colour from settling permanently into the role of figure or ground. What advances in one panel recedes in another.[20]
The principle operates across real materials as well as painted motifs. A gold-painted line on blue wood is not optically identical to light passing over old gilt leather. Cobalt ornament on a white porcelain vessel differs from the dark blue around it, even when both are casually called blue. Glass, mosaic and metallic fittings introduce highlights that Whistler could position but not wholly standardise. The “harmony” is therefore not a perfectly matched colour chart. It is a controlled family of differences, held together by repetition, adjacency and changed scale.[1][3][4]
Peacock imagery helps mediate between description and abstraction. A full bird remains legible on the south wall, while a feather eye can be detached, enlarged, mirrored and reduced until it becomes a near-geometric unit. Tails become long directional sweeps; breasts become compact patterned fields; isolated eyes become dots within wider bands. The viewer repeatedly recognises the animal and then loses it into ornament. This oscillation is one reason the room can sustain attention after its famous anecdote has been told.[3][20]
Musical naming gives that process an intellectual frame. Whistler's harmonies and symphonies did not claim that pictures literally produce sound. They proposed that colours and forms could be organised through relations analogous to notes within a composition. In the room, this metaphor becomes spatial. No single ceramic or feather is the subject in the way a protagonist governs a narrative painting. Each takes value from its position in a larger sequence. Yet the metaphor has limits: music cannot explain who owned the porcelain, who applied the gold or why two birds fight over scattered coins. The title guides seeing, while the material history keeps that seeing accountable.[3][17]
The blue-and-gold system also disciplines variety. The ensemble contains Chinese ceramic painting, European embossed leather, Japanese-associated bird and feather imagery, a British architectural shell, a portrait-like fantasy figure, Victorian gas lighting and Whistler's butterfly. Without a strong chromatic order these components might look like a cabinet of unrelated tastes. Repeated blue suppresses some differences; gold draws out others. The unity is persuasive precisely because the ingredients remain heterogeneous.[1][4][17]
Drawings, transfer and work on site
Whistler later encouraged the idea that the room emerged directly from inspired performance. The surviving preparation makes that claim untenable as a literal account. A full-scale cartoon for the fighting peacocks, now in the Hunterian Art Gallery as GLAHA 46071 and catalogued M.0584, measures roughly 181 by 389 centimetres. Made in chalk and wash on brown wove paper, it was pricked so that principal contours could be transferred to the wall. At almost four metres wide, this is not a casual note. It is a working instrument made at the scale of architectural execution.[5]
The cartoon does not prove that Whistler mechanically copied a finished design. Its incised lines, changed contours and pentimenti reveal active revision. Heads, wings and tails moved as he developed the combat between the birds. Pricking established coordinates, but the final painted forms acquired stylised detail and altered emphasis on the wall. Preparation and improvisation are therefore not opposites here. The cartoon carried a designed structure into the room; brushwork and adjustment completed it in relation to the actual surface.[4][5]
Smaller drawings extend the evidence. A sheet now in the British Museum, M.0579 and accession 1958,0208.3-36, uses pen and dark brown ink on Whatman laid paper to plan feather ornament for ceiling and panels. Other related studies trace birds, tails and patterned divisions. Together they show Whistler thinking across scales: from the repeated cell of a feather eye, through the subdivision of a panel, to two bodies large enough to dominate a wall.[4][6]
This archive changes how the finished room should be interpreted. The apparent flow of the decoration is not evidence that it lacked design. Seamless movement can be the outcome of extensive adjustment. Nor does the presence of drawings make the result rigid. The plan had to meet shelves, joins, relief leather, shutters and corners that could not be solved on paper alone. Whistler's achievement lies partly in making preparation disappear into an environment that feels continuous.
The possible visual sources require equal precision. The catalogue raisonné relates the fighting birds, with appropriate caution, to a plate in George Ashdown Audsley and James Lord Bowes's Keramic Art of Japan of 1875. The comparison supports a probable point of reference rather than proof of direct copying. Peacock and bird imagery circulated widely, and the wall is a transformed composition rather than a traced book illustration. The source also belongs to a Japanese-design publication, whereas the shelf ceramics central to Leyland's collection were Chinese. Collapsing both into an undefined “Oriental” influence would repeat a Victorian generalisation rather than explain the room.[4][21]
Materials, assistants and divided authorship
The work's physical complexity makes workshop labour unavoidable. Oil paint and metallic leaf had to adhere to wood, canvas and old embossed leather. Shelves created many narrow edges. Ceiling work required awkward access. Large fields needed broad application, while feather eyes, outlines and finishing touches demanded smaller brushes. The technical record identifies both fine and large brushes and preserves Whistler's instructions concerning metal leaf and gilding. An interior of this scale could not be executed like one modest canvas on an easel.[4]
Matthew Robinson Elden's assistance is documented, and Henry and Walter Greaves probably worked on the scheme. Tradesmen carried out repeated preparation and gilding under direction. Later recollections, including Louise Jopling's memory of adding touches, add texture but should not be allowed to replace the firmer contemporary evidence. Nor should assistants be named as authors of specific passages where no wall-by-wall division survives. The sound conclusion is more modest: Whistler conceived and directed the decorative transformation, worked extensively with his own hand, and relied on others for part of its execution.[2][4]
That model of authorship also protects Jeckyll's contribution. Whistler painted over and visually absorbed architectural furniture, but the underlying spatial solution remained Jeckyll's. Shelves determined where ceramics could stand. The sideboard controlled the long wall. The windows and shutters created changing fields. The ceiling apparatus gave the overhead ornament its framework. Whistler's blue makes these elements seem born together; historical analysis has to separate them long enough to understand how that unity was made.[3][19]
Old material survives beneath new decisions. The Dutch leather, already embossed and gilded, offered a relief that Whistler partly covered rather than a blank wall he created. Its ageing, flexing and later conservation differ from the behaviour of adjacent wood. Metallic leaf has changed, coatings have yellowed or been removed, and retouching has sometimes obscured original detail. Present colour cannot simply be projected backwards as an exact photograph of 1877.[4][16]
One technical caution is particularly important. Walter Greaves later remembered a “verdigris blue” in connection with Whistler, but the relevant recollection concerns a different painting, not an analysed recipe for the Peacock Room. Transferring it here would turn verbal association into false pigment evidence. The responsible account stays with the object-specific record: heterogeneous supports, oil paint, gold or metallic leaf, varied brushes, preparatory transfer and extensive later treatment.[4]
Art and money: reconstructing the dispute
The quarrel between Whistler and Leyland is often retold as a neat parable. In one version, an enlightened artist creates a masterpiece while a philistine patron refuses to pay. In the reverse version, an irresponsible decorator invades a house, exceeds his instructions and demands an outrageous sum. The surviving letters support neither extreme in isolation. They reveal an expanding commission without a final written agreement, an owner who expressed approval before objecting, an artist who treated aesthetic authority as permission to continue, and two men who valued scope and obligation differently.[8][9][10]
The chronology matters. Whistler's intervention began with colour advice and limited adjustment. By 17 August 1876, Leyland had seen or heard enough to praise the cove decoration and invite Whistler to state what more was owed. Work nevertheless continued and became far more extensive. When Leyland returned in October, Whistler sought 2,000 guineas. Leyland refused. Discussion included a possible figure of £1,200 if shutters were removed from the account, and by 30 October Whistler had received a total of £1,000, including an earlier advance or loan. To say merely that Leyland “would not pay” is therefore wrong. To say that the August letter settled the full later price is equally unsafe.[2][8]
The units should not be blurred. A guinea was twenty-one shillings, slightly more than a pound, and carried associations with professional fees and luxury transactions. Whistler's 2,000-guinea demand and the £1,000 total he received are not numerical halves in the simplest sense. The distinction would have been understood by the participants and forms part of the language of status surrounding the commission.
Leyland's long letter of 24 July 1877 states his case with remarkable hostility. He insists that he paid £1,000, alleges that Whistler enlarged the scheme without consultation, attacks the price and condemns the publicity as self-promotion. His insults demonstrate how thoroughly a business disagreement had become a struggle over character. They do not independently prove every point he makes. Written months after completion, the letter is an interested reconstruction by an aggrieved patron.[9]
Whistler replied the next day. He maintained that the room was finished, treated Leyland's August invitation to name an amount as authorisation, and accepted the possibility of arbitration. This response is no more neutral. It converts an open request made during an earlier stage into support for the final enlarged claim and minimises the owner's control over his house. Read together, the letters establish the dispute's terms more securely than they establish a winner.[8][9][10]
The south-wall peacocks are Whistler's pictorial intervention in that argument. Coin forms, costume-like plumage and fighting postures turn finance into decoration. The mural retaliates against the person who owned the surface on which it was painted. That fact makes the work ethically and historically difficult. Artistic daring cannot erase the patron's property rights, while property rights cannot make the resulting image aesthetically negligible. The room preserves the collision instead of resolving it.[2][3][17]
No documented lawsuit between Whistler and Leyland decided the fee. Their conflict should not be confused with Whistler's later libel action against John Ruskin, which concerned published criticism of Nocturne in Black and Gold: The Falling Rocket. The Peacock Room belongs to the wider financial and professional pressures that shaped Whistler's late-1870s life, but it did not single-handedly cause his bankruptcy. Construction costs for his White House, debts, the art market and litigation formed a larger network of causes.[2][17]
Publicity, access and early response
Whistler understood that press attention could increase the room's value as an artistic event. Leyland saw the same publicity as an invasion of privacy and a challenge to his control. The Morning Post report of 8 December 1876 was a turning point because it made the transformation publicly knowable while the owner was already disturbed by its scale. Cole's diary records Leyland's reaction immediately after the notice. The struggle was consequently about who could authorise looking as well as who should pay for making.[2][7]
Whistler continued to cultivate viewers. Journalists and critics were admitted, a formal press view occurred on 9 February 1877, and Thomas Way printed the descriptive pamphlet that gave the feather vocabulary Whistler wanted repeated. Leyland eventually demanded that viewings stop. The room had become an artwork with a public reputation while remaining part of a private dining room. That unstable status—publicised but not publicly accessible—helped produce its aura.[2][20]
Early response was not simply ridicule. Reports admired the colour, novelty and completeness of the effect, even when writers found Whistler's aesthetic manner provocative. The 2 September Academy notice had already described the evolving scheme with interest. By the press view, the musical title and peacock imagery supplied critics with a coherent way to discuss it. Leyland's objections concerned authorisation, price and access; they do not show that every visitor considered the room a failure.[2][3]
The publicity also strengthened Whistler's persona. He appeared as an artist capable of extending his principles beyond the frame, controlling a whole environment and defending his valuation against a wealthy collector. This image was useful, but it was selective. It minimised Jeckyll, assistants and tradesmen, and it turned an ambiguous commission into a story of sovereign invention. The surviving room is more interesting when those suppressed contributors and conditions are restored.[4][17][19]
Leyland's room after Whistler left
Whistler's final work on the shutters in March 1877 ended his physical involvement, but not the room's first life. Leyland continued to own 49 Princes Gate and retained the decoration until his death in 1892. This choice deserves emphasis. A patron who regarded the artist's behaviour as intolerable nevertheless preserved the result. He did not have the fighting peacocks painted out or strip the blue from the leather. Resentment and recognition could coexist.[1][2]
The room remained domestic and selective rather than continuously open to the public. It served a house, collection and social world. Dining, artificial light and the arrangement of ceramics produced conditions unlike modern gallery circulation. Visitors entered at the owner's invitation rather than through a museum timetable, and the shelves presented Leyland's taste rather than a curator's thesis.[11][17]
After Leyland's death, the estate held the room until 1894, when Blanche Watney acquired the house. She remodelled parts of 49 Princes Gate but kept the interior. The survival was therefore not automatic. Embossed leather, integrated furniture and painted panels could easily have been damaged or dispersed during alteration. Watney's decision preserved the ensemble long enough for it to enter the international art market as an architectural object.[1][3]
Watney, the market and Freer's purchase
By the beginning of the twentieth century, the room could be valued and sold as a coherent work even though it was attached to a building. Watney asked 10,000 guineas in 1903. Obach & Co. handled negotiations, and on 17 February 1904 an offer to Charles Lang Freer stated 8,500 guineas, including the costs of disassembly and packing. The involvement of Brown and Phillips within the transaction is not completely clear in the surviving provenance record, so a tidy dealer chain would overstate the evidence. What is secure is that Freer acquired the ensemble in 1904 and removed it from Princes Gate.[1]
Sale required the transformation of architecture into components. Panels, leather-covered sections, shutters, shelves and fittings had to be labelled, detached and packed. What had seemed indivisible in Leyland's dining room became a collection of transportable pieces whose future coherence depended on records and reassembly. This conversion is one reason the room's later history belongs within interpretation rather than after it. Mobility was not merely something that happened to a finished artwork; it changed the conditions under which the artwork could survive.[4][16]
Freer's purchase also reunited the room with The Princess from the Land of Porcelain. The painting had left Leyland's collection after his death and passed through other ownership before Freer acquired it in 1903. The room followed a year later. Their reunion can look inevitable from the perspective of the current museum, but it was the result of two distinct transactions involving separately mobile objects.[1][13]
Freer was not trying simply to recover Leyland's household. His collecting crossed periods, regions and media, and he understood Whistler's work through relationships with Asian art that he developed in his own way. The room offered both a major work by an artist he supported and an environment in which collections could be placed in dialogue. This new purpose would become visible when it was installed in Detroit.[11][17]
Detroit: a new collection inside an old room
The Peacock Room was installed in Freer's Detroit house by 1906. Its architectural shell and painted surfaces evoked Princes Gate, but its ceramic contents changed. Freer displayed objects that ranged beyond Leyland's Kangxi blue-and-white porcelain, including wares associated with Raqqa, Han-period objects and Korean celadon. Muted glazes, varied forms and different cultural histories replaced the stronger consistency of Leyland's shelves. The room became a setting for Freer's comparative collecting rather than a reconstruction of one Victorian porcelain arrangement.[11]
This distinction changes colour perception. A white vessel painted in cobalt intensifies the blue-and-gold structure differently from a pale green celadon or an earthenware object. Freer's display could bring quiet tonal correspondences to the foreground and make Whistler's environment appear prophetic of the collector's own aesthetic. Leyland's installation, by contrast, joined the room to a particular British passion for Chinese blue-and-white. Neither arrangement is neutral. Each uses ceramics to make an argument about the interior.[11][17]
Freer also changed the room's social function. In London it had been a shipowner's dining room and a site of contested patronage. In Detroit it became part of another wealthy collector's house, but one increasingly oriented towards the formation of a public legacy. Freer's original deed of gift dates to 1906. The room's future in a national collection was therefore being planned even as it was experienced domestically.[1]
Freer died in 1919. The Smithsonian received the collection in 1920, and the interior was again dismantled and transported, this time to Washington. Its route from London to Detroit to the United States capital is sometimes described as if the room travelled intact. In physical terms, each move meant separation and reconstruction. The current wall-wide harmony has survived because many individual pieces were repeatedly made to fit together again.[1][4][11]
Washington: permanent display and changing reconstruction
The Freer Gallery opened in 1923, and the Peacock Room has remained a central public installation there. “Permanent”, however, describes institutional commitment rather than unchanging material arrangement. The Washington setting includes elements belonging to the museum building. Windows, vents, adjacent floor construction and environmental controls are not simply pieces lifted from 49 Princes Gate. They allow the nineteenth-century fabric to function inside a twentieth-century museum.[11][14]
The history of the shutters makes the interpretive work of installation unusually clear. During the 1920 reconstruction, pairs from the north and south were reversed. For decades the room was viewed in that mistaken arrangement. Research and conservation in the late twentieth century identified the problem, and the shutters were returned to their correct positions during the 1990s. The correction did not create an absolutely untouched original; it produced a better evidence-based reconstruction.[4]
Freer's ceramic choices initially remained influential in Washington. Later curators have changed the shelves to explore different aspects of the room's history: Whistler's relation to Asian art, Leyland's blue-and-white enthusiasm, Freer's comparative collecting and the modern problem of reconstructing absent objects. These installations can seem secondary because the ceramics are removable. In practice, they alter the pattern, density, scale and cultural meaning of every wall.[11][12]
The museum presentation also changed how people move. A private dining room admits a limited company who can sit, eat and handle nearby things. A public gallery channels larger numbers through thresholds and barriers. Visitors bring moisture, dust and accidental contact. Sightlines are managed; doors and gates protect vulnerable edges. Conservation is thus inseparable from the conversion of domestic space into public monument.[14][15]
Conservation and material time
Repeated movement placed stress on joints, leather, paint and metallic surfaces. The room has been disassembled and moved four times, and repairs were recorded as early as 1926. By 1942 its condition had become unstable enough to require a major response. Between 1947 and 1949, Charles Finlayson oversaw a campaign that mounted the leather hangings on plywood with wax, worked on the ceiling and leather, and included retouching or repainting. The room was reinstalled in 1949.[4][18]
That mid-century treatment helped keep fragile material in place, but it also changed the visible surface. Wax mounting fixed flexible leather to rigid backing. Retouching and coatings adjusted colour. Later observers could not assume that every dark or yellowed passage came directly from Whistler's brush. Conservation had become another historical layer, at once protective and interpretive.[4][16][18]
Investigation in 1989 prepared the way for a large cleaning and conservation programme in 1990–92. Work associated with Wendy Samet, Joyce Hill Stoner and Richard Wolbers used analysis of original materials, coatings and later additions to develop treatment. Dirt, yellowed varnish and areas of repaint were reduced or removed where appropriate. The project also corrected the shutter orientation. It revealed distinctions that the apparently uniform gold and blue had concealed, including greener gold effects and feather detail. Some original information, including at least one butterfly, had been obscured by earlier interventions.[4][16][18]
The aim was not to make the room look newly painted. Cleaning an architectural ensemble means balancing many surfaces with unequal histories and sensitivities. Old Dutch leather cannot be treated like varnished wood. Metallic decoration may be thin, worn or chemically changed. A solvent or moisture level safe for one component can endanger another. The specialist record is valuable precisely because it replaces the fantasy of a single restorative recipe with material-specific decisions.[16]
In 2022 the museum undertook the first large-scale treatment in about thirty years. Conservators addressed accumulated grime, shutters, window surrounds, vents and damage associated with heavy visitation. Varnished wooden surfaces could be cleaned locally with cotton dampened in deionised water, while complex spindles were dry-cleaned with polyurethane sponges. The uncoated embossed leather was more vulnerable: soft brushes removed loose dust, and unstable areas required local adhesion rather than general wet cleaning.[14][15]
The treatment also sharpened distinctions between original and later work. Much of the painted interior survives, but surfaces close to doors and windows have experienced replacement or intervention. The exterior faces of the shutters cannot securely be presented as original Whistler painting and appear to have been overpainted before the modern campaigns. Monthly opening of the shutters, begun in 2012 to let visitors see the room in natural light, created patterns of wear that required attention. A gate was modified to reduce contact damage around a doorway.[14][15]
Floor history is another reminder that total appearance changes beyond the painted walls. Carpet and a wooden floor were removed in 2016, altering colour, reflection and the visitor's sense of the lower boundary. The current museum floor is part of a continuing presentation, not proof of Leyland's precise dining-room finish. A truthful description can celebrate the survival of Whistler's scheme while naming the modern structure that makes survival possible.[14]
Conservation therefore complicates the desire to see “Whistler's original colours”. Analysis and cleaning can bring the present surface closer to earlier relationships by removing grime and discoloured coatings. They cannot reverse every chemical change, restore every lost mark or erase the fact of four disassemblies. The room's authenticity resides in substantial surviving material joined to a documented history of care, not in an impossible claim that time has left it untouched.[4][16]
Chinese porcelain, Japanese-associated design and Victorian collecting
The Peacock Room is routinely associated with Japonisme, but the objects and visual sources need more exact names. Leyland's primary shelf collection was Chinese blue-and-white porcelain, much of it linked to the Kangxi period. Its cobalt decoration and white bodies strongly affected the room's visual rhythm. The probable published analogue for Whistler's fighting birds, by contrast, appears in a British book on Japanese ceramic art. Japanese-associated composition, Chinese objects and European interpretations meet in the same interior without becoming interchangeable.[1][4][21]
Whistler's earlier paintings had already used Japanese fans, screens, robes and compositional devices. In the Peacock Room, such interests entered an environment built around collecting. That change is significant. A painted prop can be moved or invented within a picture; Leyland's ceramics were commodities with their own histories of manufacture, export, sale and prestige. Shelving converted possession into spectacle. The room made a private collection look coherent and abundant.[17][19]
Nineteenth-century enthusiasm for blue-and-white porcelain was tied to connoisseurship, fashion, trade and imperial access. The objects were admired for form, glaze and brushwork, but they also reached British interiors through commercial networks shaped by unequal power. The room should not be reduced to an indictment of collecting, nor should “art for art's sake” make those networks disappear. Its beauty was enabled by wealth, shipping, dealership and the movement of cultural objects across borders.[17]
Leyland's own fortune came from shipping. That fact does not assign a single political message to every feather, but it places the room's costly materials and ceramics within a global economy. The conflict between Art and Money on the south wall is therefore larger than a disagreement over one bill. It exposes a structural dependence: the artist's claim to aesthetic freedom was exercised inside a patron's property and supported by capital, goods and labour he did not control.[3][17]
Freer's later collecting shifted the cultural frame again. By displaying Korean celadon, ancient Chinese material and West Asian ceramics, he made the room support a broader comparative aesthetic. Modern museum installations can in turn choose to foreground Leyland, Freer, ceramic manufacture or reconstruction. These changes do not merely add educational labels around a fixed masterpiece. They demonstrate that the shelves have always participated in making the room's meaning.[11][12]
The Peacock Room in Blue and White today
On the dated check of 26 August 2026, the room is on view in West Building Gallery 12 in the installation The Peacock Room in Blue and White, which opened on 27 September 2025 and is listed as ongoing. The display returns blue-and-white ceramics to visual prominence, but it does not claim to have recovered every vessel owned by Leyland. Instead, it makes reconstruction itself visible.[1][12]
The north and east walls hold actual Kangxi-period porcelains from the National Museum of Asian Art. The south and west walls carry recent reproductions made through work with potters in Jingdezhen, the Chinese centre historically central to porcelain manufacture. This distribution allows visitors to compare period objects with modern acts of skilled remaking. The reproductions must not be called Leyland's originals, and their presence should not be hidden behind the general phrase “Chinese porcelain”. They are contemporary works used to explore the appearance and labour of a lost arrangement.[12]
The installation alters the room from photographs showing Freer's more varied shelves. White bodies and cobalt marks now repeat across all four walls, intensifying the chromatic logic suggested by the title. At the same time, the division between historic objects and new reproductions prevents the display from becoming a deceptive stage set. The museum acknowledges that reconstruction requires choices and that some original contents cannot simply be summoned back.[12]
Visitors may sometimes encounter the shutters open, when daylight changes the gold and reveals surfaces usually folded away. Such events are scheduled by the museum and can change; an evergreen account should therefore direct readers to current visitor information rather than promise a fixed date. Whether the shutters are open or closed, close looking should move between the whole and its parts: the fighting birds, the relief beneath blue paint, the shelf rhythms, the independent Princess canvas, the ceiling, and the joins where London fabric meets Washington reconstruction.[1][12][14]
The Smithsonian object record includes a broad geography field naming the United States. That metadata reflects the object's present institutional context or cataloguing system; it does not relocate its creation. The historical record is unequivocal that Whistler decorated the room at 49 Princes Gate in London. The object now belongs to an American national museum, but its making is British, its ceramics connect it to China, its design sources include Japanese-associated material, and its later biography crosses the Atlantic. No single geography field can contain that history.[1][2][11]
Why the Peacock Room still matters
The room is often celebrated as a complete expression of Aestheticism, and the description is justified if completeness is not confused with simplicity. Whistler extended painting beyond a portable rectangle, made colour organise architecture and objects, and created an interior in which pattern can be read at the scale of a feather, a bird, a wall and a whole room. The result remains sensuously persuasive. Blue absorbs, gold flashes, porcelain interrupts, and repeated eyes appear to watch as the viewer turns.[3][20]
Its history also challenges the myth of autonomous creation. Jeckyll's design made Whistler's transformation possible. Assistants and tradesmen helped execute it. Leyland's collection and capital supplied its conditions. Watney preserved it, dealers detached it, Freer recontextualised it, and generations of museum staff reconstructed and conserved it. None of these facts diminishes Whistler's invention. They show the scale of the social and material system that invention required.[1][4][17][19]
The fighting peacocks give that system a memorable image. Art and money do not stand peacefully apart; they confront one another while forming the room's most compelling wall. Whistler's retaliation against Leyland is both personal and structural, an assertion that artistic value cannot be set solely by the person paying the bill. Yet it was painted on that person's property after a scope and fee dispute. The mural keeps the artist's claim brilliant and compromised at once.[2][3][9][10]
Movement and conservation deepen the paradox. A work designed to be inseparable from one London dining room survives because it was separated into pieces. It became widely accessible because a private collector moved it into another private house and then a public institution. It appears coherent because curators and conservators have repeatedly intervened in its supports, surfaces, shutters and displays. Preservation has depended on change.[4][11][14][16]
The best way to understand Harmony in Blue and Gold: The Peacock Room is therefore to resist choosing between visual experience and documentary history. The title, feather reversals and chromatic envelope explain how the room holds together. Letters, drawings, invoices, ownership records and treatment reports explain why that unity is neither spontaneous nor untouched. Seen through both kinds of evidence, the room becomes more than the setting for a famous quarrel. It is a living material argument about painting, architecture, collecting, labour, ownership and the difficult price of making art appear whole.
Discussion
How does the room change when it is read as architecture, decoration, labour and property at once?
Follow one wall, material or repeated motif, then compare Whistler's unified surface with Jeckyll's fittings, the tradespeople's work and Leyland's ownership.
Reader Insights
Which effects depend on moving through the interior rather than viewing a single picture?
Where does individual authorship obscure architecture, assistants and specialist trades?
How did patronage and payment shape the room's meaning and later publicity?
Join the Conversation
Share a close observation or an object-history question.
References
- National Museum of Asian Art, Smithsonian Institution, “Harmony in Blue and Gold: The Peacock Room”, F1904.61, collection record, accessed 26 August 2026, https://asia.si.edu/explore-art-culture/collections/search/edanmdm:fsg_F1904.61/.
- Margaret F. MacDonald and Grischka Petri, “Harmony in Blue and Gold: The Peacock Room”, YMSM 178, The Paintings of James McNeill Whistler: A Catalogue Raisonné, date and main record, University of Glasgow, https://whistlerpaintings.gla.ac.uk/catalogue/display/?mid=y178.
- MacDonald and Petri, YMSM 178, title and subject record, University of Glasgow, https://whistlerpaintings.gla.ac.uk/catalogue/display/?mid=y178&xml=sub.
- MacDonald and Petri, YMSM 178, materials, technique and conservation record, University of Glasgow, https://whistlerpaintings.gla.ac.uk/catalogue/display/?mid=y178&xml=tec.
- Hunterian Art Gallery, “The Fighting Peacocks”, GLAHA 46071 / M.0584, technical record in The Paintings of James McNeill Whistler: A Catalogue Raisonné, University of Glasgow, https://whistlerpaintings.gla.ac.uk/catalogue/names/display/?mid=m584&nid=&xml=tec.
- British Museum, “Designs for the Peacock Room”, 1958,0208.3-36 / M.0579, catalogue record, https://whistlerpaintings.gla.ac.uk/catalogue/display/?mid=m0579.
- Alan Summerly Cole, diary entries concerning the Peacock Room, 1876–77, Glasgow University Whistler correspondence 03432, https://www.whistler.arts.gla.ac.uk/correspondence/people/display/?cid=3432.
- Frederick Richards Leyland to James McNeill Whistler, 17 August 1876, Glasgow University Whistler correspondence 02569, https://www.whistler.arts.gla.ac.uk/correspondence/subject/display/?cid=2569.
- Frederick Richards Leyland to James McNeill Whistler, 24 July 1877, Glasgow University Whistler correspondence 02593, https://www.whistler.arts.gla.ac.uk/correspondence/subject/display/?cid=2593.
- James McNeill Whistler to Frederick Richards Leyland, 25 July 1877, Glasgow University Whistler correspondence 02596, https://www.whistler.arts.gla.ac.uk/correspondence/subject/display/?cid=2596.
- National Museum of Asian Art, “The Room Travels”, The Peacock Room Comes to America, https://asia.si.edu/explore-art-culture/interactives/peacock-room/the-room-travels/.
- National Museum of Asian Art, “The Peacock Room in Blue and White”, exhibition page, accessed 26 August 2026, https://asia.si.edu/whats-on/exhibitions/the-peacock-room-in-blue-and-white-2025/.
- National Museum of Asian Art, “La Princesse du pays de la porcelaine”, F1903.91a-b, collection record, https://asia.si.edu/explore-art-culture/collections/search/edanmdm:fsg_F1903.91a-b/.
- National Museum of Asian Art, “Conserving the Peacock Room”, https://asia-archive.si.edu/conserving-the-peacock-room/.
- National Museum of Asian Art, “Party Like It's 1908”, Peacock Room conservation report, https://asia-archive.si.edu/party-like-its-1908/.
- Wendy Samet, Joyce Hill Stoner and Richard Wolbers, “The Conservation of Whistler's Peacock Room”, Studies in Conservation 35, supplement 1 (1990), https://doi.org/10.1179/sic.1990.35.s1.002.
- Linda Merrill, The Peacock Room: A Cultural Biography (Washington, DC, and New Haven: Freer Gallery of Art and Yale University Press, 1998).
- Linda Merrill, “The Peacock Room”, National Museum of Asian Art institutional history, https://archive.asia.si.edu/exhibitions/online/peacock/images/PeacockRoom.pdf.
- National Museum of Asian Art, “Making the Peacock Room”, https://asia.si.edu/explore-art-culture/interactives/peacock-room/making-the-peacock-room/.
- James McNeill Whistler, Harmony in Blue and Gold: The Peacock Room, descriptive pamphlet printed by Thomas Way (London, 1877), discussed and transcribed in YMSM 178.
- George Ashdown Audsley and James Lord Bowes, Keramic Art of Japan (Liverpool: the authors, 1875), plate L; probable relationship discussed in YMSM 178.


