 by Tom Gurney
Tom Gurney BSc (Hons) is an art history expert with over 20 years experience
Published on June 19, 2020 / Updated on August 21, 2026
Email: tomgurney1@gmail.com / Phone: +44 7429 011000
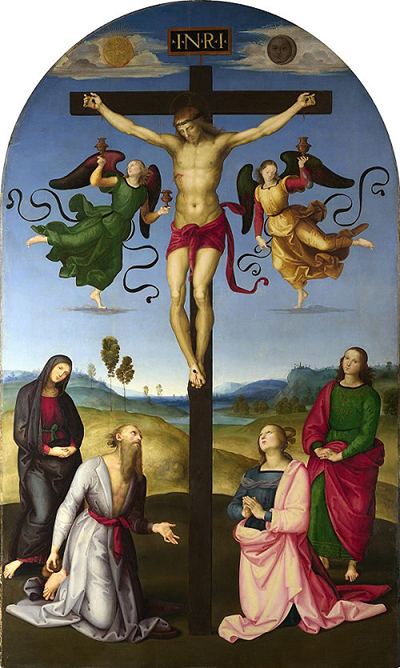
Raphael's Mond Crucifixion presents Christ's death with a calm so complete that suffering seems held within a larger sacramental order. Christ hangs against a luminous Umbrian sky. Two angels hover beside him, gathering blood from his wounds in golden chalices. Below, the Virgin and Saint John face outward while Mary Magdalene and Saint Jerome kneel and look toward the cross.[1]
Painted about 1502–03, the large panel was commissioned by Domenico Gavari, a wool merchant and banker, for his burial chapel dedicated to Saint Jerome in San Domenico at Città di Castello. Its present nickname honours Ludwig Mond, who later owned it and left it to the National Gallery in 1924.[1]
The painting is an early masterpiece of relation: image to altar, blood to Eucharistic wine, patron to patron saint, landscape to sacred history, Perugino's example to Raphael's emerging authority. Its smooth order can look effortless. Technical examination tells a different story—one of ruler and compass, reserved silhouettes, metallic leaf, hatched shadows and even the artist's fingerprints pressed into wet paint.[1]
At a Glance
- ArtistRaphael
- Full titleThe Crucified Christ with the Virgin Mary, Saints and Angels
- Common titleThe Mond Crucifixion
- Dateapproximately 1502–03
- Mediumoil on identified poplar panel
- Dimensions283.3 × 167.3 cm
- PatronDomenico di Tommaso Gavari
- Original locationGavari burial chapel dedicated to Saint Jerome, San Domenico, Città di Castello
- Principal figuresChrist, two angels, the Virgin Mary, Saint John the Evangelist, Mary Magdalene and Saint Jerome
- Signed
RAPHAEL / VRBIN / AS / .P.[INXIT] - Original frame date1503, preserved in the chapel
- Sold from San Domenico1818
- Bequeathed to the National Gallery1924
- Current locationNational Gallery, London
- Inventory numberNG3943
Contents
- An altar for Domenico Gavari's burial chapel
- Christ against the Umbrian sky
- Angels catching blood in chalices
- The Virgin and Saint John
- Mary Magdalene at the foot of the cross
- Saint Jerome and the stone
- Sun, moon and sacred darkness
- An Umbrian Calvary
- Raphael and Perugino
- Geometry without a visible grid
An altar for Domenico Gavari's burial chapel
The Latin inscription on the original stone frame states that Domenico di Tommaso Gavari had the work made in 1503. That frame remains in San Domenico even though the painting left the church in the nineteenth century.[1]
Gavari commissioned the image for a chapel where he expected to be buried and where Masses could be said for his soul. The Crucifixion was therefore not simply a historical scene. It stood above an altar where bread and wine were consecrated and where the benefits of Christ's sacrifice were invoked for the dead.
The patron was a wool merchant and banker, part of the civic world in which Raphael found his first major opportunities. He was also a close friend of Andrea Baronci, patron of Raphael and Evangelista da Pian di Meleto's earlier Saint Nicholas altarpiece. The National Gallery suggests that this connection probably helped Raphael secure the Gavari commission.[1]
Documents bind the two chapel projects further. When Baronci's widow made Gavari her heir in 1512, her will was witnessed before Raphael's “altar of the Crucifix.”[1] The phrase locates the painting within lived legal and devotional space rather than later connoisseurship.
The chapel dedication to Saint Jerome explains a figure who was not present at Calvary. His inclusion is patronal and intercessory. Sacred history, local devotion and Gavari family memory meet around the cross.
Christ against the Umbrian sky
Christ's body hangs in near-perfect vertical alignment. His arms extend across the upper field while the cross divides the landscape and sky. The inscription above him reads I.N.R.I., an abbreviation of the Latin for “Jesus of Nazareth, King of the Jews.” John's Gospel describes Pilate placing that charge on the cross.[2]
Raphael avoids the crowded violence of an execution scene. No soldiers, thieves or jeering spectators appear. The event has been reduced to the dead Christ, heavenly ministers and a small devotional company.
This concentration changes time. The painting is not a report of everything that happened at Golgotha. It is a prolonged contemplation in which historical witnesses and later saints can coexist.
Christ's body is idealised but not weightless. The head falls, the ribcage and abdomen register tension, and blood runs from hands, feet and side. The body's quiet symmetry makes each deviation—tilted head, bent knees, streams of blood—more affecting.
Behind the cross, an Umbrian landscape extends toward Città di Castello.[1] Raphael translates Jerusalem into familiar central Italian distance. Sacred history becomes locally imaginable without losing its universal claim.
Angels catching blood in chalices
Two angels balance on narrow slips of cloud. Ribbons turn around their bodies while they hold golden vessels beneath Christ's wounds.[1]
The chalices make Eucharistic meaning explicit. At Mass, wine consecrated at the altar below was understood as Christ's blood. Above it, the painted angels gather that blood into vessels resembling those used in worship.[1]
This vertical relation was especially powerful in a funerary chapel. The Crucifixion was not only remembered; its saving sacrifice was made present through liturgy. The image joined the historical body on the cross to the sacramental cup.
Gavari's own concern with chalices sharpens the connection. The National Gallery notes that early wills left funds to provide new chalices for every chapel he endowed.[1] An object important to his patronage appears transformed within the heavenly action.
The angels also stabilise the composition. Their paired positions balance the cross without becoming rigid duplicates. Ribbons, bent knees and angled vessels create movement around Christ's stillness.
They occupy a different order of space from the figures below. Mary, John, Magdalene and Jerome stand or kneel on earth; the angels require only cloud. Yet the blood crossing that interval binds heaven, body and altar together.
The Virgin and Saint John
The Virgin stands at the left of the cross in a purplish-black garment associated with mourning. Saint John stands at the right. Both turn their faces toward the viewer and wring their hands.[1]
John's Gospel places Jesus' mother and the beloved disciple beside the cross, where Christ entrusts them to one another.[2] Raphael's figures belong to that scriptural relationship, but their outward gaze addresses the worshipper directly.
They do not look up like Magdalene and Jerome. Their grief is turned into invitation: behold what has happened and enter the act of mourning.
The paired hand gestures contribute to the painting's symmetry. Yet differences of colour, age and facial type preserve identity. Mary embodies maternal sorrow; John represents youthful discipleship and future witness.
Their upright bodies also form intermediate supports between the kneeling saints and elevated Christ. The composition rises through levels without requiring literal steps.
The Virgin's dark clothing gives the left side visual weight. John's contrasting mantle answers it across the cross, while the repeated gestures make the pair feel joined by a common grief.
Mary Magdalene at the foot of the cross
Mary Magdalene kneels close to the cross and gazes upward. Her pose draws devotion from the foreground toward Christ's body.
The Gospels place Mary Magdalene among the women who witnessed the death, although accounts differ in details of position and company.[2][3] Raphael gives her an intimacy suited to later devotional tradition.
Her kneeling posture distinguishes her from the standing Virgin and John. It also mirrors Jerome across the central axis, creating a lower pair who model reverence and pity.[1]
A drawing at the Ashmolean has been connected with her figure, according to the National Gallery.[1] The relation suggests that the apparent ease of the final pose emerged from separate study.
Magdalene's upward gaze helps bridge the two halves of the painting. The standing pair address the viewer; she turns that attention back to Christ. Looking becomes circular: painting to worshipper, worshipper to saint, saint to cross.
Her position near the wood also recalls her later association with Christ's tomb and Resurrection. In a funerary chapel, the follower who mourns death and encounters the risen Christ carries particular force.
Saint Jerome and the stone
Jerome kneels opposite Magdalene. He holds the stone with which, according to devotional tradition, he beat his breast while living as a hermit.[1]
He was not an eyewitness to the Crucifixion. His presence comes from the chapel's dedication and his role as patron saint. Raphael brings a later Christian into the sacred event as a model of penitence.
Jerome also gestures toward the cross. The stone marks bodily discipline; the raised attention directs that discipline toward Christ's sacrifice.
Gavari may have chosen the dedication partly because his first-born son was named Girolamo, the Italian form of Jerome.[1] The saint therefore connected donor, family and chapel.
Pairing him with Magdalene creates a community across time. A Gospel follower and a fourth-century scholar-hermit kneel together. Their historical difference matters less than their shared devotion.
The figures below are not merely labels added to a Crucifixion. Their postures define ways of responding: outward mourning, upward contemplation, penitence and intercession.
Sun, moon and sacred darkness
Both sun and moon appear in the sky. Raphael used gold leaf for the sun and silver leaf for the moon, incising their circular forms with compasses.[1]
The paired lights refer to the darkness associated with Christ's death. Matthew says darkness covered the land from noon until about three in the afternoon.[3] Renaissance imagery could express the cosmic event through simultaneous celestial bodies.
Gold and silver would have responded differently to chapel light. Their material gleam distinguished the signs from the painted blue around them and introduced precious substance into the sky.
The moon's silver may have changed through oxidation, while the gold retains a different brilliance. Material ageing therefore affects the cosmic balance modern viewers see.
The two discs echo the painting's broader symmetry: angel against angel, standing mourner against standing mourner, kneeling saint against kneeling saint. Yet sun and moon are not interchangeable. Their different metals preserve distinction inside balance.
They also widen the Passion beyond the human group. Landscape, sky and celestial bodies acknowledge the death below.
An Umbrian Calvary
The cross rises from brown foreground earth into a landscape of water, hills, buildings and distant atmosphere. Città di Castello is identifiable in the distance according to the National Gallery.[1]
Relocating the view does not claim that the Crucifixion happened in Umbria. It allows chapel viewers to imagine sacred history entering their own visual world.
The calm landscape contrasts with bodily suffering. Nothing in the distant countryside is turbulent. Raphael lets theological significance arise through ordered clarity rather than violent weather.
Depth also separates the lower figures. Their silhouettes read against pale distance instead of dark enclosure. The cross remains dominant because it extends through the horizon into open sky.
The local view connects patronage to place. Gavari's altar, Raphael's early career and the town beyond the cross all belong to Città di Castello.
When the panel later travelled through Rome, Paris and British collections, that landscape carried a memory of the chapel it had left.
Raphael and Perugino
The design is strongly related to Crucifixions by Perugino, especially an altarpiece for San Francesco al Monte in Perugia. Angels with fluttering ribbons catch blood in chalices; the Virgin and John use comparable types; Magdalene appears in a reversed version of a similar pose.[1]
Raphael also adopts Perugino's oval faces, stylised hands, symmetry and lucid spacing. These qualities made large sacred images readable and emotionally controlled.
The direction of borrowing is not simple. The National Gallery notes uncertainty about who copied whom in aspects of the related works because dates and workshop access overlap.[1]
Raphael probably saw designs in Perugino's workshop before all finished panels were publicly installed. Workshop knowledge could precede formal unveiling.
The young painter's individuality emerges through softness, integration and technical assurance. The composition feels less like an assembly of quoted figures than a complete system built for one chapel.
Vasari later remarked that without Raphael's signature the panel might have been taken for Perugino's.[1] The anecdote testifies both to closeness and to the importance later writers attached to authorship.
Geometry without a visible grid
Raphael often incised construction grids into early panels. No such grid is visible in the Mond Crucifixion, although its strong symmetry suggests comparable geometric planning may have occurred at an earlier stage.[1]
The distinction matters. Visual order is not itself proof of a surviving grid. Technical observation must set the boundary between what can be seen and what can be inferred.
A ruler and compass were used to incise the cross, and compasses marked sun and moon.[1] The central instrument of execution was therefore drawn with literal instruments of measure.
Raphael reserved unpainted spaces for figures and made no major revisions while painting. This points to a detailed preparatory design transferred with confidence.[1]
The effect is one of inevitability. Bodies and cross appear to have found their permanent places, but that permanence was secured before the final paint through careful planning.
Geometry also carries meaning. Christ establishes the main vertical and horizontal axes. The symmetrical devotional company gathers around a cross that orders both picture and salvation.
Hatching, fingers and the painted surface
Dark hatched brushstrokes reinforce shadows, especially in drapery. The method derives from Perugino and preserves something of drawing within paint.[1]
At the same time, Raphael used hands and fingers to blot and model wet passages. Fingerprints and palm prints survive in shadowed heads, particularly Christ's hair, face and beard.[1]
These traces make the surface unexpectedly physical. A painting celebrated for polished spiritual calm contains direct contact between artist and wet pigment.
Finger work could soften transitions or break the regularity of brush marks. It brings touch into the modelling of hair and flesh without disrupting the overall finish.
The contrast between incised geometry and fingerprints is revealing. Raphael moves from ruler and compass to palm and fingertip, combining exact construction with immediate manipulation.
Technical evidence therefore deepens rather than demystifies grace. The work's calm depends on many kinds of labour coordinated so well that none dominates ordinary viewing.
Raphael's scratched signature
At the foot of the cross, Raphael scratched through brown paint to expose silver leaf beneath. The inscription identifies him as Raphael of Urbino and states that he painted the work.[1]
The signature is materially embedded rather than laid over the surface. Light catches metal in the incised letters, connecting authorship to the ground beneath the cross.
“Of Urbino” asserts origin in a commission made elsewhere. It links the young painter to the courtly culture in which his father had worked.
The act of signing was especially meaningful given the close relation to Perugino. Raphael names himself within a visual language viewers might associate with the older master.
The inscription also survives as part of the painting's physical history. It is not merely a documentary label; it is an intervention in layers of paint and metal.
The predella beneath the Crucifixion
The main panel once stood above a predella illustrating miracles connected with Christ's death and Saint Jerome. Two scenes survive, while at least one other is lost.[1]
The North Carolina Museum of Art holds a small oil-on-poplar scene known as A Miracle of Saint Jerome. It belonged to the Gavari ensemble and measures only 25.7 by 41.9 centimetres.[4]
Another surviving compartment is in Lisbon. The National Gallery identifies both as parts of the original base and notes the probability of at least one additional scene.[1]
The predella extended the chapel programme narratively. Above, the Crucifixion offered a timeless devotional focus. Below, smaller episodes could reward close approach and develop miracle, death and intercession through action.
The original stone frame still in San Domenico helps establish how the ensemble related to chapel architecture.[1][4] Even with the painted parts dispersed, the empty setting preserves dimensions and local memory.
The Mond Crucifixion should therefore not be imagined as having always ended at its lower painted edge. Frame, altar and base completed its first visual body.
From Città di Castello to the National Gallery
The main panel was sold from San Domenico in 1818 to Cardinal Joseph Fesch. It was kept first in Paris and later taken to Rome.[1]
After the Fesch sale, the picture passed through the collection of the Prince of Canino to Lord Ward, later Earl of Dudley. It appeared in important British exhibitions during the nineteenth century.[1]
At the Dudley sale of 1892, an agent bought it for Ludwig Mond. Mond was a chemist, industrialist and collector whose name became attached to the picture.
His 1924 bequest brought the altarpiece to the National Gallery.[1] A work made for one merchant-banker's burial chapel entered a national collection through another industrial patron's gift.
The present frame is a twentieth-century replica based on a sixteenth-century Italian example, not Gavari's surviving stone surround.[1] Museum presentation can suggest historical completeness, but the original frame remains in Umbria and the base is dispersed.
How to look at the Mond Crucifixion
Begin with the two chalices. Follow the streams of blood from Christ's wounds into the vessels, then imagine the altar that once stood below.
Compare the standing mourners with the kneeling saints. Mary and John look outward; Magdalene and Jerome direct attention upward.
Find the gold sun and silver moon, then notice how their circles balance without matching materially.
Move close enough to consider fingerprints in Christ's shadowed head and the scratched signature at the foot of the cross.
Finally, look beyond Calvary to Città di Castello. Raphael places a universal sacred event within the patron's familiar world.
Why the painting matters
The Mond Crucifixion shows Raphael mastering a central Italian altarpiece language while making it answer a particular patron, chapel and liturgy.
Its serenity is neither emotional emptiness nor technical simplicity. Geometry, metal, touch, local landscape and differentiated grief are held within an image designed for sustained prayer.
The panel also preserves a young artist's declaration of identity. Close to Perugino yet signed by Raphael of Urbino, it marks the moment when inherited harmony became a foundation for one of the Renaissance's most consequential careers.
Artist Up Close
Look at Christ's beard and remember that fingers helped model its shadows.
Find the thin clouds supporting the angels. Their delicacy makes the golden vessels seem to hover at the wounds.
Then examine the brown earth below the cross, where scratched letters expose silver and turn the painter's name into reflected light.
Frequently Asked Questions
Discussion
What detail most changes how you read The Mond Crucifixion?
Reader Insights
Which source detail gives the page its strongest anchor?
Which visual or historical distinction should readers keep in mind?
How does this page change the wider picture of Raphael's career?
Join the Conversation
Share your reading below.
References
- National Gallery, London, “The Mond Crucifixion,” NG3943. View source.
- United States Conference of Catholic Bishops, “John, Chapter 19.” View source.
- United States Conference of Catholic Bishops, “Matthew, Chapter 27.” View source.
- North Carolina Museum of Art, “Predella Panel from the Gavari Altarpiece (The Mond Crucifixion): A Miracle of Saint Jerome,” G.65.21.1. View source.