


 by Tom Gurney
Tom Gurney BSc (Hons) is an art history expert with over 20 years experience. Updated September 24, 2026.
Introduction
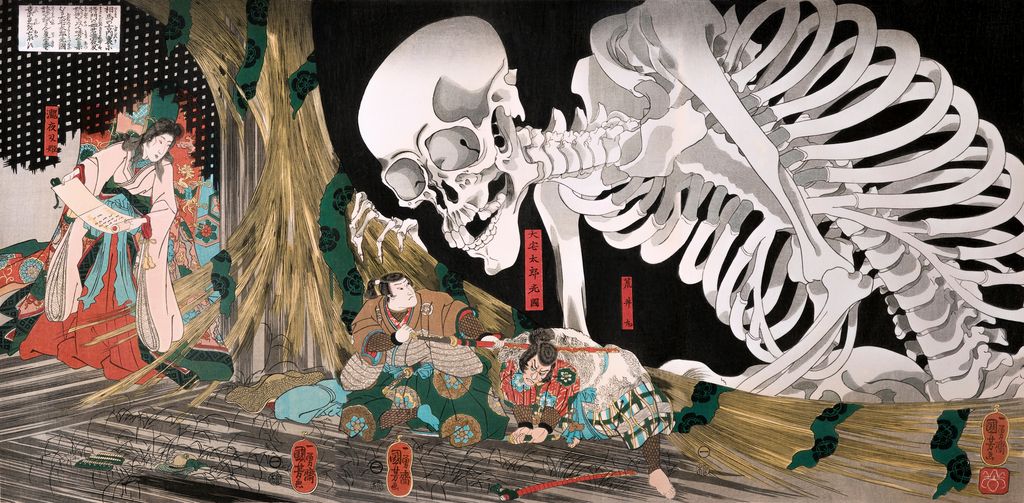
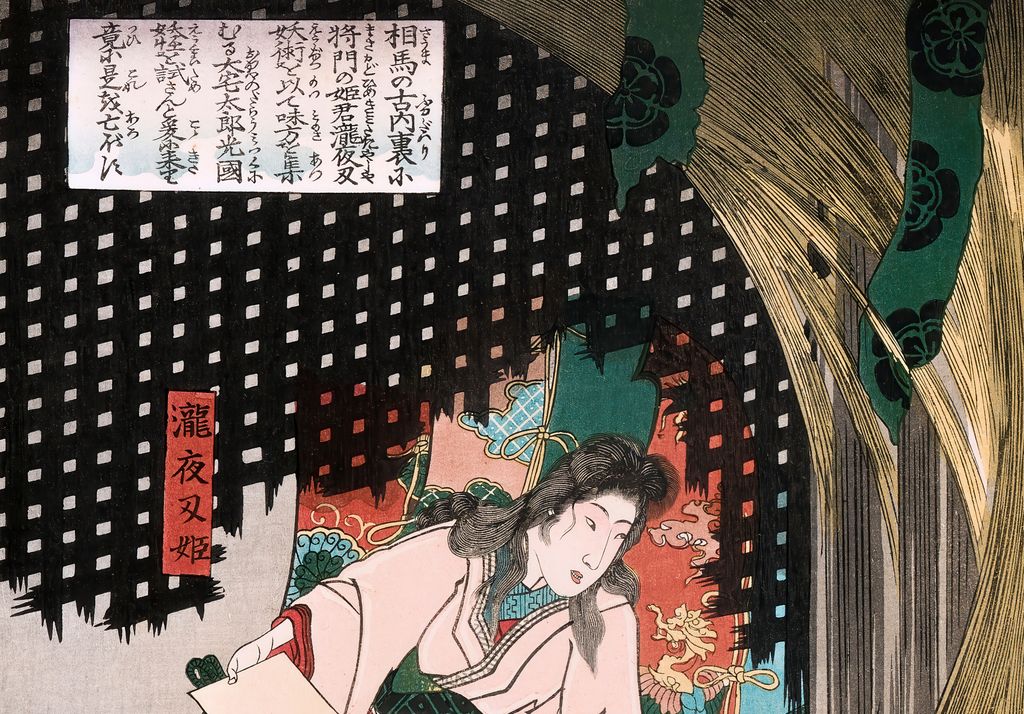
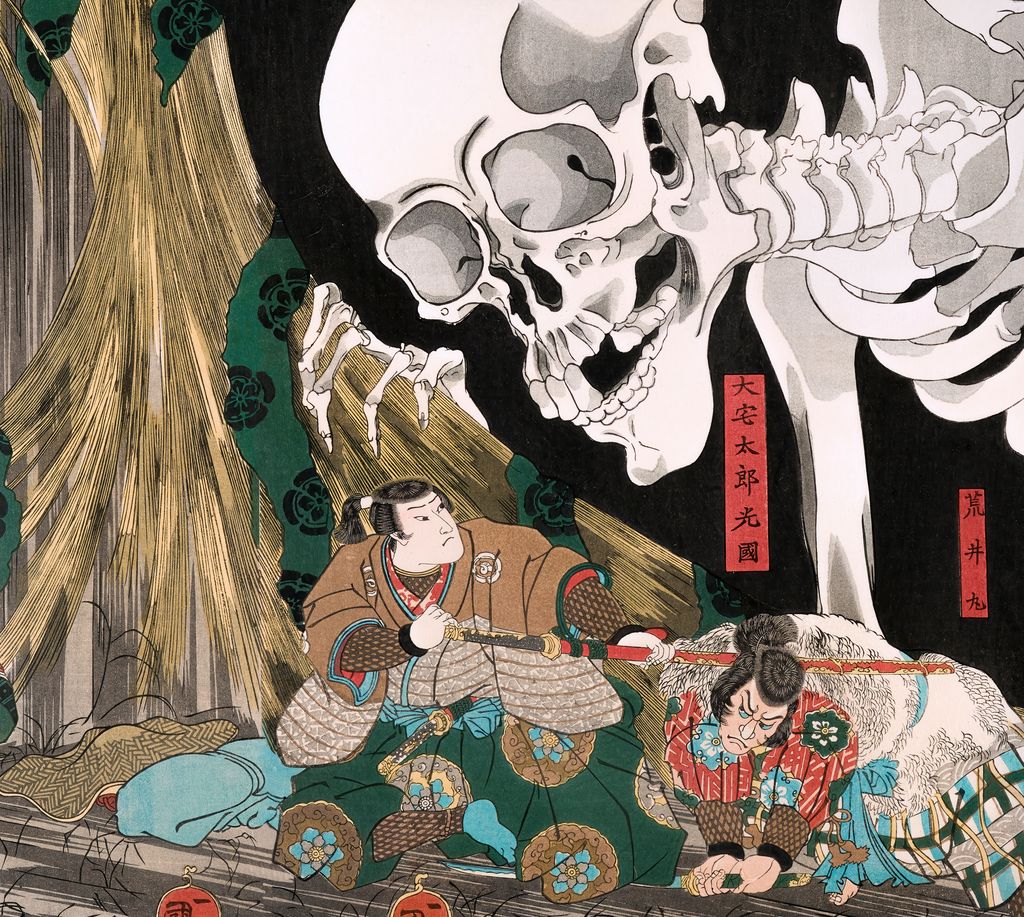
A giant skeleton pushes through torn blinds into a ruined building. On the left, Princess Takiyasha stands with a scroll; below the spectre, two men struggle. Utagawa Kuniyoshi's three-sheet colour woodblock print is usually called Sōma no furudairi (相馬の古内裏), or The Old Palace at Sōma. English collection titles often lead with Princess Takiyasha and the skeleton. The short title names a place within a story, not a documented view of an actual ruin. A visitor who looks only at the enormous bones misses the small confrontation that gives the apparition its purpose. The British Museum's detailed object record [1], Chiba City Museum of Art's own impression [3] and the Tokyo Fuji Art Museum's print [4] let us read that encounter with more care.
The design belongs to the mid-1840s. Several Japanese collections date their own sheets to about 1845–46, while one British Museum record uses about 1844. A useful heading date is therefore mid-1840s, usually about 1845–46. The picture was designed for a print made from carved blocks and assembled from three large sheets. It is not an original painting reproduced only once. Museums preserve separate impressions, and their present colours, trimming and dimensions describe those particular surviving objects. The owner-supplied composite used for the annotations on this page is a high-resolution image of the design whose exact physical impression has not yet been identified; no museum accession or precise museum date is assigned to that file.
Contents
- Introduction
- First read the three sheets as one scene
- Who is Princess Takiyasha?
- The 1806 book behind the print
- The inscription and the short title
- Mitsukuni, Araimaru and the action below the bones
- Why a skeleton that fills the room?
- Theatre, publication controls and the limits of a plausible story
- One design, several physical impressions
- How to use the annotated image
- Explore the annotated triptych
- What this image can and cannot tell us
This page follows four questions. What story are we seeing? Why does the skeleton fill nearly two sheets? What do the figures and writing actually identify? And what can surviving prints tell us about an image that travelled far beyond its original publication? Each answer is stronger when the visual evidence is separated from later retellings. The monster is memorable, but Kuniyoshi's decisions about scale, sheet joins, inscriptions and bodily movement make the design worth a longer look.
At a glance
- Artist and mediumUtagawa Kuniyoshi, colour woodblock print assembled as an ōban triptych. Chiba City Museum [3] and Tokyo Fuji Art Museum [4] hold identified impressions.
- DateUsually about 1845–46 for the Chiba and Tokyo Fuji objects. The British Museum's 1915 transfer object [1] says about 1844; its Miller Collection example [2] says 1845–46.
- StoryAdapted from Santō Kyōden's Utō Yasukata Chūgiden, whose 1806 first part was illustrated by Kuniyoshi's teacher Toyokuni I. CiNii's book record [6] establishes those roles.
- Main figuresTakiyasha at left, court-side warrior Ōya Tarō Mitsukuni amid the central struggle, and Takiyasha's henchman Araimaru. British Museum [1]; Kumon Institute's descriptive record [8].
- Main inventionThe novel's multiple skeletons become a single huge apparition spanning the sheet joins. Tokyo Fuji [4]; Chiba [3].
- Image shown hereOwner-supplied public-domain composite of the design; physical impression unidentified. Annotation crops come from the retained 300 dpi source, not an enlarged web thumbnail.
First read the three sheets as one scene
The skeleton seems to belong to a space behind the blinds. Its skull and jaw press forward, one arm grips the damaged screen, and ribs expand across the right side. Because its scale is so extreme, the figure can appear like a separate horror illustration added to an unrelated human fight. But the architecture, the direction of its lunge and the placement of the combatants tie the parts together. The monster enters the same room in which Takiyasha's challenger is already grappling with her ally. The British Museum [1] describes the spectre as summoned to frighten Mitsukuni while he subdues Araimaru.
Each large sheet could have been seen individually during sale, handling or later collecting. Yet a triptych asks for the pictures to be brought together in order. Chiba City Museum notes that three-sheet designs often leave enough structure for each panel to stand on its own; in this case Kuniyoshi resists that convention. The skeleton does not politely stop at a seam. Its skull, shoulders and ribs use the whole width, and the human action at the centre connects the apparition to Takiyasha at the left. The Chiba museum's explanation [3] is especially valuable because it describes what the three-sheet format makes possible rather than calling the picture merely “dramatic.”
The ruined palace is a stage-like setting, but “stage-like” should not be confused with a documented theatrical commission. Broken timber, torn blinds and a strong contrast between dark interior and coloured clothes make the viewer cross from a recognisable interior into a scene of impossible scale. The skeleton's pale surfaces are partly a visual counterweight to the red, green and patterned garments below. The image can be followed left to right, from the princess and her scroll to the struggle and then the towering answer to her spell. It can also be read from the monster back to the small person whose action calls it forth. Those are observations about this composition, not claims that one path was prescribed to every original buyer.
Who is Princess Takiyasha?
The story gives Takiyasha a lineage and a motive. She is presented as a daughter of Taira no Masakado, the tenth-century rebel who set up a rival court in eastern Japan. After his defeat, the tale places his children at the ruined Sōma residence, gathering supporters to continue his cause. The investigator Ōya Tarō Mitsukuni comes to expose the conspiracy; Takiyasha responds with sorcery. Tokyo Fuji Art Museum [4] gives this outline for its impression, and the National Diet Library's Image Bank [7] likewise places the prince Ryōmon and princess in the abandoned complex. This is a nineteenth-century story world built around a remembered historical figure. The print is not evidence for the actual existence of a sorceress at a tenth-century palace.
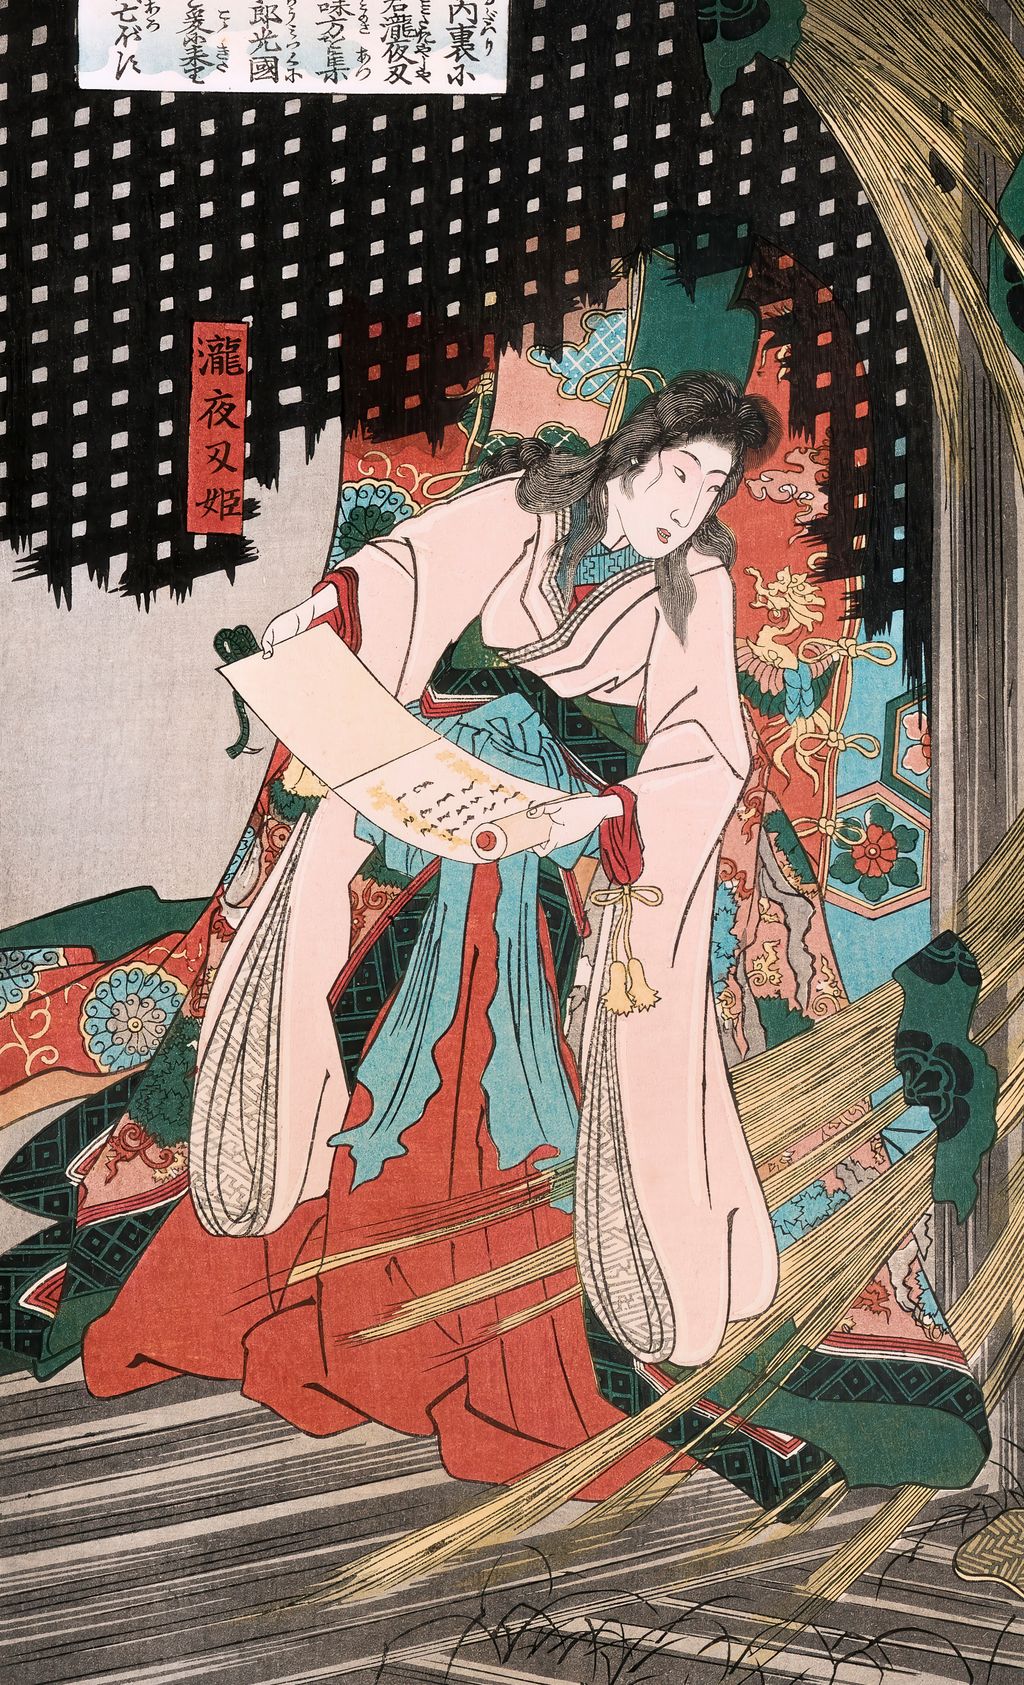
The printed woman is more than a decorative introduction to the skeleton. Standing to the left, she holds the scroll that helps identify her magical action. Her figure is much smaller than the bones she calls up, but her placement gives her authority over the centre of the picture. The monster is an instrument in her confrontation with Mitsukuni, not simply an independently roaming creature. The Kumon Institute's detailed record [8] describes the scroll-bearing figure as Takiyasha and the two men as Mitsukuni and Araimaru. Because the Kumon object is labelled a reproduction or later impression, its descriptive account helps identify the design without supplying the provenance for our owner's image.
Calling her a “witch” follows one English museum title, but that single word can flatten the story. In Japanese sources she is 滝夜叉姫, the princess who has learned 妖術, a fictional practitioner's supernatural arts. Her claim as Masakado's daughter explains why she has allies and why a warrior would be sent to the old residence. A responsible caption gives the viewer those relationships before applying modern fantasy categories. The picture is a scene of opposing human plans even though the supernatural figure dominates its area.
The 1806 book behind the print
The immediate literary source named by Tokyo Fuji [4] and Chiba [3] is Santō Kyōden's illustrated prose fiction Utō Yasukata Chūgiden (善知安方忠義傳). Its 1806 first part survives as a separately catalogued book. CiNii's Japanese academic-library record [6] names Kyōden as author, Utagawa Toyokuni I as illustrator and Tsuruya Kiemon as publisher. That last distinction matters: Toyokuni, who later taught Kuniyoshi, supplied pictures for the earlier book. Kuniyoshi made the later triptych. They did not collaborate on the 1806 edition, and the triptych should not be called a page from that book.
The museums' descriptions point to a specific change between text and print. In the book, numerous skeletons confront the hero. Kuniyoshi concentrates their effect into a single skeleton so large that its head, arms and ribs turn three sheets into a single field. The Tokyo Fuji explanation [4] says multiple skeletons become one; Chiba [3] describes the novel's hundreds of fighting bones. Those accounts agree on the transformation even where their wording for the count differs. It is safer to say “many” when discussing the literary scene than to claim that one exact number is visibly copied from a particular page.
What does that transformation achieve? A crowd of enemies would divide attention among bodies. One impossible body instead makes the architecture fail: the broken blind becomes a threshold and the whole right half of the print becomes a single threat. The size difference makes Mitsukuni's human-scale struggle feel precarious while emphasizing Takiyasha's reach. This is an interpretation grounded in what the composition visibly does, rather than a claim about a hidden symbol. We do not need to treat the skeleton as a literal depiction of a species of monster named in the book; its scale is the printmaker's visual solution to a narrative problem.
The inscription and the short title
Most reproductions crop or reduce the writing to a texture. Yet the text helps a viewer identify the setting and people. The Kumon Institute record [8] transcribes the main explanation: Takiyasha gathers allies by magic at the old Sōma palace; Ōya Tarō Mitsukuni comes to test the apparition and ultimately defeats it. The museum's transcription should be cited as a transcription of that design, not silently treated as our own deciphering of every character in the owner image. Japanese spelling may vary across catalogues and older lettering, so the local annotated crop should show what the reader is being asked to inspect.
The work's common short title, Sōma no furudairi, is in Japanese object catalogues, while the National Diet Library [9] files its own three-sheet item under the supplied descriptive title “[Picture of Princess Takiyasha and a Skeleton]” and gives Sōma no furudairi as an alternative. Its search guide [10] warns that an exact search for one modern title and artist form can miss a print recorded under the signature 一勇斎国芳. This is a useful lesson for studying ukiyo-e: a title can be printed on the sheet, supplied by a museum, translated for an exhibition or standardized later for search. These are related but not interchangeable claims.
The English titles are even more variable. One British Museum object [1] leads with Princess Takiyasha summoning a skeleton, while Chiba [3] translates the Japanese place title as The Ancient Dairi of Sōma. Neither difference means the museums have mistaken the main design. It means the English caption is choosing whether to foreground location, heroine or action. This page uses the Japanese short title alongside a descriptive English title and keeps a link to each institution's exact record when discussing its impression.
Mitsukuni, Araimaru and the action below the bones
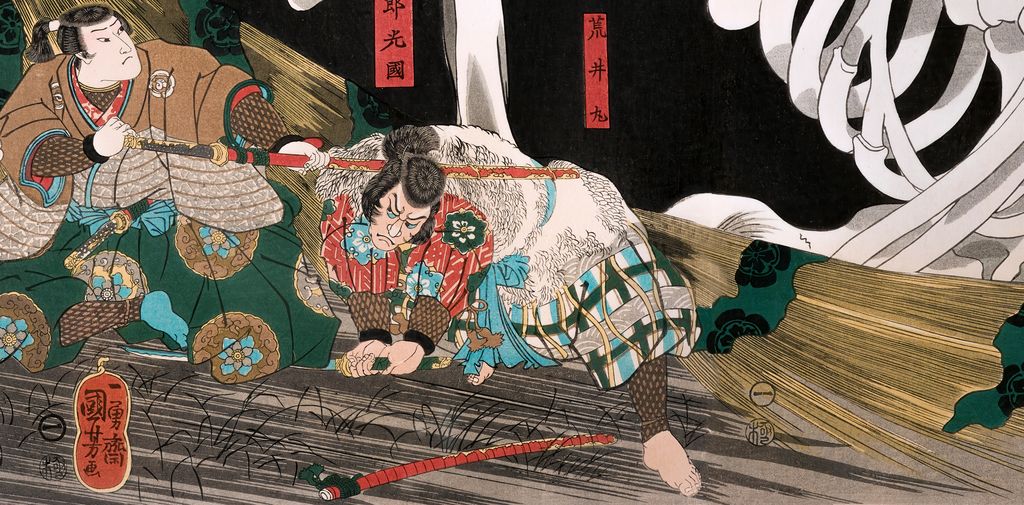
The human figures can be easy to misread at normal webpage size. British Museum cataloguing [1] identifies Mitsukuni as the warrior opposing Takiyasha and Araimaru as her henchman. It describes Mitsukuni pinning Araimaru's sword with his body and using a scabbard to subdue him. The Kumon explanation [8] likewise places their struggle at the centre beneath the apparition. Before naming a coloured sleeve or weapon in an annotation, the high-resolution crop and the sheet's own labels should be checked; costume colours alone are a poor way to determine identity across different impressions and reproductions.
The collision of actions matters to the story. The skeleton is frightening, but the earthly fight has not stopped. Mitsukuni's body and Araimaru's resistance make a second, smaller diagonal pattern beneath the large arc of bones. Looking closely at that lower band reveals how Kuniyoshi keeps a warrior print's physical energy inside a supernatural picture. The skeleton need not strike a person on the sheet for the moment to be tense. The image holds the fight and the apparition together just before their outcome becomes clear.
Mitsukuni is described in the story as a retainer of Minamoto no Yorinobu, not as a portrait of a documented sitter encountered by Kuniyoshi. A historian could trace the names in literary and performance traditions, but this particular print provides a scene from a work of fiction. The Tokyo Fuji catalogue [4] summarizes Mitsukuni's investigation and defeat of the conspiracy. When reading the printed design, it is enough to keep each figure's role straight and to avoid recasting the scene as a historical eyewitness picture.
Why a skeleton that fills the room?
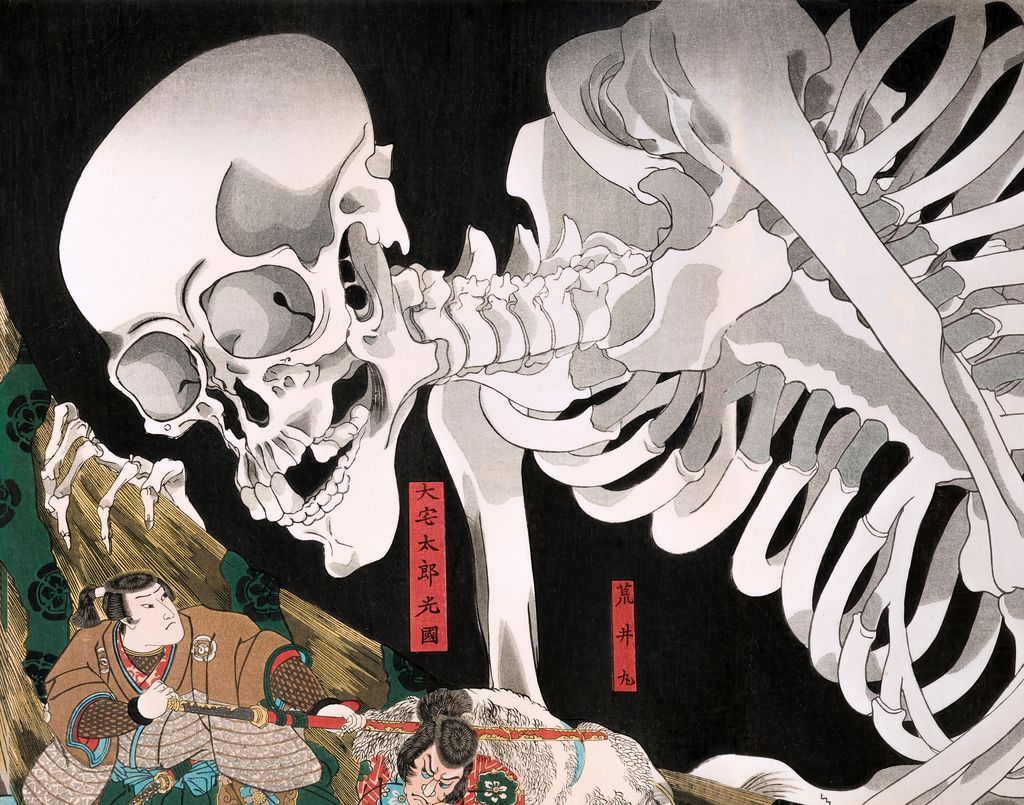
The most effective close-looking question is not simply “How accurate is the anatomy?” but “What does the skeleton do to the triptych?” Its skull meets the eye first in many reproductions. The ribcage sweeps across the right, and the fingers at the blind make a convincing point of contact between creature and architecture. A sheet seam falls within the body rather than separating the monster from the people. If the monster were divided into three small figures, the same broken interior would be a backdrop. At this size, the building becomes too small to contain what Takiyasha calls up. That is the compositional difference the Chiba museum [3] identifies when it contrasts this work with more independently arranged triptych panels.
The skeleton has invited guesses about its source. The British Museum's older catalogue commentary [1] suggests that Kuniyoshi may have used a Western medical illustration, noting his apparent anatomical observation and interest in imported prints. The Kumon record [8] calls the anatomy strikingly precise but says the model has not been identified. Those statements should be kept side by side. Anatomical resemblance does not name a specific book, print, artist, date of access or act of copying. The bones can be discussed as a visual effect without claiming an unproven European source.
Nor is the monster's name printed as “gashadokuro” in the authoritative object records consulted here. This is a modern name that readers often associate with the famous giant skeleton, but the short work title and the nineteenth-century tale refer to the Sōma setting and the spectre. The Chiba record [3], Tokyo Fuji record [4] and NDL catalogue [9] provide the historically grounded names for this specific design. Using a later keyword for discoverability should never become a claim that Kuniyoshi wrote it into the print.
Theatre, publication controls and the limits of a plausible story
The British Museum's 1915 object record [1] connects the Mitsukuni and Takiyasha story with a Kabuki play performed in 1836 and another version staged in 1844. It suggests the 1844 revival may have renewed public interest just as Tenpō-era restrictions limited direct actor and stage depiction in colour prints. The triptych's quasi-historical presentation could have served audiences who knew a theatrical version of the tale. That is a careful institutional hypothesis, not proof that a theatre commissioned the design, that a particular actor is hidden in one figure, or that Kuniyoshi saw a specified performance.
This difference matters because the visual design makes the theatrical link tempting. The torn blinds resemble a dramatic reveal; Takiyasha stands at the side like a performer commanding a scene; the apparition offers a moment of spectacle. Such comparisons can help a modern reader notice staging. But the book's 1806 publication record [6] and Japanese museum descriptions also establish a literary source. A print can draw from a book and resonate with a play at the same time. We need not choose one exclusive origin where the evidence supports several layers of reception.
The Tenpō reforms also provide context, not a universal key that unlocks Kuniyoshi's intentions. MFA Boston's comparison of Kuniyoshi and Kunisada [11] explains the period's pressure on print subjects. For this work, the most concrete claim remains the British Museum's proposed connection with a 1844 theatrical revival. The print itself does not come with a surviving sales ledger stating why its publisher approved the image. A careful article should make the possibility useful without turning it into certainty.
One design, several physical impressions
What the printed medium contributes
The apparition's strength depended on more than Kuniyoshi's drawing. A commercial colour woodblock print required a publisher, a carver who translated the design's lines into a key block, further blocks for colour and a printer who registered successive impressions on paper. British Museum curator Alfred Haft's printmaking guide [13] explains those divisions of labour. The design that we admire today passed through several sets of skilled hands. An article about “Kuniyoshi's print” can name him as designer without pretending he carved every rib or rubbed every sheet himself.
This matters especially to the triptych. Three sheets had to work together visually while each sheet was printed separately. The continuous sweep of the skeleton depended on lines and colour fields meeting intelligibly across joins after the sheets were aligned. At full size, the join is part of the way the image was made, not a flaw to remove in a digital composite. The distance between the sheets in a mount, the amount trimmed from an edge or a photographic edit can change how continuous a modern viewer thinks the body looks. The Chiba City Museum's explanation [3] concerns the design's unusual dependence on the whole triptych; it does not require us to claim that every surviving copy was always displayed with perfectly touching edges.
The prints were made for circulation, not only for museum walls. A buyer might have encountered individual sheets in a print seller's stock and assembled the episode on a wall or album page; later collectors and institutions preserved examples under different conditions. The British Museum's general account of woodblock production [14] explains the publisher's role in choosing and commissioning subjects and the carver's and printer's separate work. We do not have a publisher's surviving instruction sheet for this particular edition in the records used here. Thus the page can explain the normal print economy without inventing its print run, price or first audience.
Colour deserves similar restraint. In the owner image, the pale skeleton stands out against a dark interior while Takiyasha's clothing and the lower figures carry denser colour. That contrast is visible. A precise claim about pigments or the order of blocks would require technical examination of an identified physical impression, not a web JPEG. Different digitizations can also change apparent red, black and white. The annotation should point out how colours direct attention and leave material analysis to a source that has actually measured the sheet.
Another solution to a supernatural triptych
Kuniyoshi did not always depict an apparition as a solid anatomical body. The Metropolitan Museum's Ghosts of the Taira at Daimotsu Bay, JP1115.2a–c [15], dated 1849–52 for that impression, uses soft, flowing ghost forms emerging from the sea against clearer foreground warriors. The museum describes a contrast between the apparitions' fluid shapes and the sharp colour of living figures. In Sōma no furudairi, by contrast, the skeleton is emphatically hard-edged and weighty: it grips a blind and seems to occupy the ruined room. Both designs span three sheets and set threatened human beings against an overwhelming force, but the forces are rendered differently. This comparison makes the Sōma skeleton's physicality more noticeable without making either print a sketch or sequel for the other.
The comparison also shows why “ghost print” is too broad a category to explain what a viewer sees. The Taira figures arise from a sea battle story and blur into weather and water. Takiyasha summons an apparition inside a palace from a different prose tale. Their dates, source stories and physical object numbers must remain attached to them. In the body of this page, a second image is useful only if it helps the reader see those differences; it should never be presented as another impression of the Sōma design.
Museum dimensions demonstrate why a “same print” caption needs precision. Tokyo Fuji Art Museum [4] reports three separate sheets around 37.4–37.5 cm high; Chiba [3] records right, centre and left sheets with slightly different measurements; the British Museum's Miller Collection example [2] gives a complete impression measuring 36.8 by 74.1 cm. The NDL's print [9], shelfmark 寄別7-3-1-2, has a three-sheet catalogue entry and distinguishes the main image paper from the larger mounted dimensions. These are records of objects, not four competing specifications for an ideal original.
For reproduction, the object's rights record matters as much as its title. Japan Search's item for Tokyo Fuji [12] marks that museum's digital image CC0, including commercial reuse. The NDL record marks its own image as public-domain material. Neither statement changes the origin of the owner-supplied composite: it remains a different, unprovenanced file of an identifiable design. Any alternate museum image added here must retain its own source URL, object identity, original file and licence wording.
Prints can be trimmed, mounted, photographed under different light, repaired, reprinted or described according to different cataloguing conventions. Those general possibilities do not prove any one listed impression has undergone a particular intervention. They explain why this page does not take Chiba's exact centimetres and place them beneath the owner's composite. Its design is identifiable; the particular sheet source is not. If another museum's CC0 image is shown for comparison, its caption must name that museum and its own object record. A reader can then look for visible differences without being invited to assume that all colour changes mark an edition or state.
The NDL search guide [10] gives an additional practical lesson. Japanese signatures, modern artist names and titles differ in the search index. Finding an NDL sheet under “[Takiyasha-hime to gaikotsu no zu]” does not make it a separate design from Sōma no furudairi. Conversely, matching the same story and title does not prove that a photograph shows the identical physical impression. For ukiyo-e research, the accession or shelfmark belongs beside the image, and the original file and rights statement belong in the production ledger.
How to use the annotated image
Start at the princess and follow her gaze and scroll. Then look at the torn blind, where the skeleton crosses from a dark background into the human room. Move down to the struggle and inspect the labels near the figures. Finally step back to see where the sheet joins fall through the creature's body. The numbered details below are extracted from the retained 8136 × 4000-pixel, 300 dpi owner-supplied master, while the page image and each popup detail follow the site's 1024-pixel, JPEG quality 80 and 144 dpi display standard. These notes explain visible areas of this supplied image; they are not evidence that its unidentified physical impression is the one catalogued in any museum.
The details should do more than identify objects. A useful annotation explains how a detail changes the reading of the whole: the scroll relates the human figure to the monster; the torn blind makes the impossible scale convincing; the lower fight tells us why the monster has been summoned; the inscription names the setting and outcome. These are propositions that a viewer can test by moving between a crop and the complete triptych. The site-wide annotation pattern keeps the numbered point, the explanation below and the enlarged image together for desktop and mobile readers.
Explore the annotated triptych
Select a number to read its explanation below, then select a detail image to enlarge it. Crops come from the retained 8136 × 4000-pixel, 300 dpi owner-supplied master.
Annotated image details
Takiyasha and her scroll
The scroll-bearing princess at the left calls up the apparition against Mitsukuni. Her fictional descent from Masakado gives the confrontation its motive.
Skeleton and broken blinds
The skull, hand and ribs push through the blind. Kuniyoshi concentrates the story’s many skeletons into one body that overwhelms the room.
Mitsukuni and Araimaru
The small fight under the bones gives the huge apparition its target. Museum records identify Mitsukuni resisting Takiyasha’s henchman Araimaru.
The explanatory inscription
The writing identifies the old Sōma palace, Takiyasha’s recruitment by magic and Mitsukuni’s challenge. Read a transcribed text alongside the print.
A body across the sheet joins
The skeleton and ruined interior carry the action across separate printed sheets. The full-width scene is part of the design, not a later collage.
What this image can and cannot tell us
The work offers unusually strong evidence for Kuniyoshi's ability to convert a prose episode into one continuous wide picture. It shows what this design asks a viewer to see: a magic-working princess, a contest at an abandoned palace, a human fight and one overwhelming skeleton. Museum records connect those figures to an 1806 story and date several extant impressions to the middle 1840s. The named institutions' measurements establish that multiple physical examples survive. A comparative reading can also situate the print within Kuniyoshi's other spectral triptychs and warrior work, provided each comparison keeps its own object identity.
It does not establish the exact day of publication, the owner of the first impression, the medical plate that may or may not have informed the anatomy, Kuniyoshi's political opinion, or the theatre performance that every buyer might have attended. The monster's later nickname is part of modern reception, not a substitute for the print's title. Keeping these limits visible makes the close reading richer: the documented choices in format, scale and narrative compression are striking enough without an invented secret history.
Frequently asked questions
Usually about 1845–46. Chiba City Museum [3], Tokyo Fuji Art Museum [4] and the Ōta Memorial Museum checklist [5] use that dating for their recorded examples. A British Museum impression [1] is catalogued about 1844, so “mid-1840s” is the safe design-level description.
Princess Takiyasha, daughter of Masakado in the story. She holds a scroll and calls up the skeleton against Mitsukuni. See the British Museum [1] and Kumon Institute [8] descriptions.
The institutional records consulted identify a giant skeleton or skeleton spectre and title the design Sōma no furudairi. They do not document “gashadokuro” as its printed title or inscription. NDL's catalogue [9] uses a descriptive Princess Takiyasha and skeleton title with Sōma no furudairi as an alternative.
No. The print draws on Santō Kyōden's Utō Yasukata Chūgiden [6], issued decades earlier and illustrated in its 1806 first part by Toyokuni I. Kuniyoshi's major visual invention was to replace the story's many skeletons with one enormous apparition, according to Tokyo Fuji Art Museum [4].
References
- British Museum, triptych 1915,0823,0.915-916.
- British Museum, Miller Collection triptych 2008,3037.20106.
- Chiba City Museum of Art, Sōma no furudairi, object 2003002.
- Tokyo Fuji Art Museum, Sōma no furudairi, object 09164.
- Ōta Memorial Museum of Art, 2024 supernatural-print checklist.
- National Institute of Informatics, CiNii bibliographic record for Utō Yasukata Chūgiden.
- National Diet Library Image Bank, ghost-story column.
- Kumon Institute, Sōma no furudairi descriptive record.
- National Diet Library, Takiyasha and skeleton print, shelfmark 寄別7-3-1-2.
- National Diet Library, research guide to searching Edo-period prints.
- MFA Boston, Kuniyoshi and Kunisada under Tenpō-period restrictions.
- Japan Search, Tokyo Fuji object rights metadata.
- British Museum, Alfred Haft, woodblock production guide.
- British Museum, illustrated guide to Japanese woodblock printmaking.
- Metropolitan Museum of Art, Ghosts of the Taira at Daimotsu Bay, JP1115.2a–c.
