



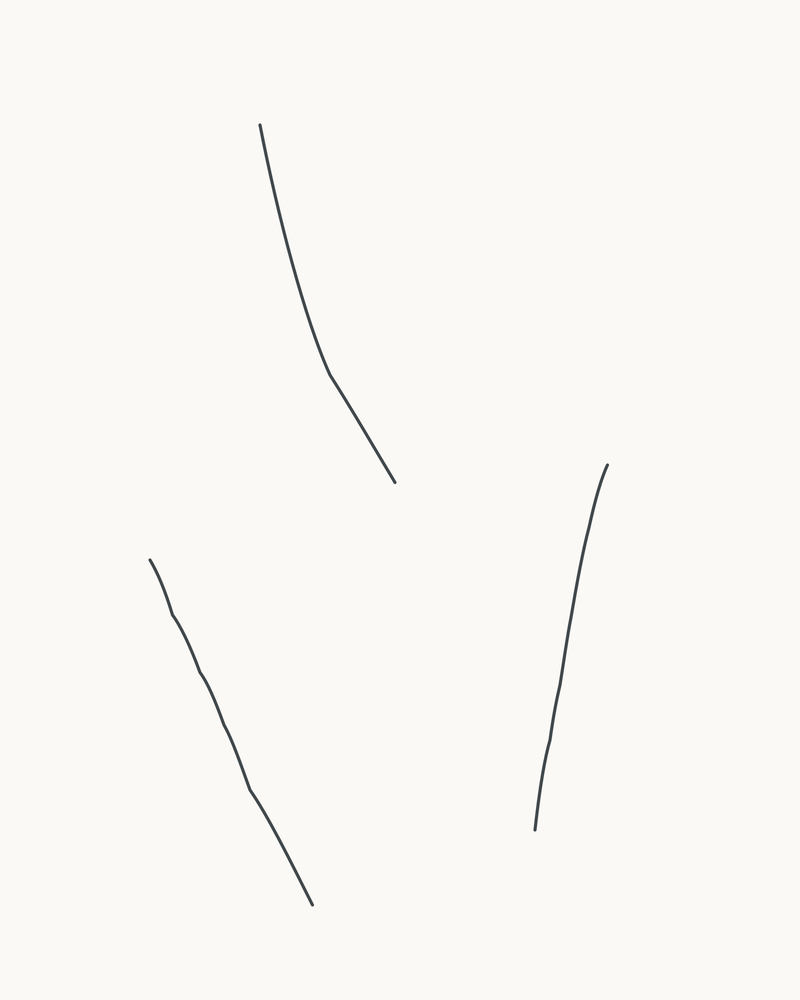
Draw three different autumn leaves in eight permanent line stages: a broad five-lobed maple-type leaf, a long rounded-lobed oak-type leaf and a smaller serrated birch-type leaf. You will use the main veins as landmarks for each outer edge, then finish with a few short secondary branches. The result is a complete pencil line study with three separate fallen leaves—not a coloured or shaded botanical plate.
Difficulty: Beginner, with a moderately detailed maple edge
Time: Allow about 40–55 minutes. This is an untested estimate, so pause for longer when you compare the maple lobes.
Medium: HB pencil on smooth white paper
Start with three different structures
The finished study compares three ways a leaf can be organised. The large maple-type leaf has five main directions that spread from one point. The oak-type leaf has a central midrib with branches on each side and a softly lobed edge. The smaller birch-type leaf also has a midrib, but its outer edge is triangular and lightly serrated.
Each first line has two permanent jobs. The part outside a blade is its stalk, or petiole; the part inside becomes the midrib. The later veins and edges are placed around it. Nothing in the stage images is a hidden oval, a line scheduled for erasure or a temporary framework.
The three leaves are deliberately separate. The maple sits high and left, the oak rises through the lower right, and the smaller birch points up-left from the lower part of the page. White space between them keeps every margin and vein readable.
Materials
- One sharpened HB or No. 2 pencil.
- Smooth white drawing paper or a sketchbook page in portrait orientation. Unlined printer paper is fine for a practice attempt.
- A clean eraser for correcting one newly misplaced local mark.
- A pencil sharpener.
- Optional: three fallen leaves or clear reference photographs to compare width, tilt and edge irregularity. Keep the supplied drawing as the target for these eight stages.
You do not need coloured pencils, blending tools, specialist paper, ink, tracing paper or a ruler. Keep the line even and clear rather than trying to imitate grain or smudged graphite.
Before you draw
Turn the page upright. The maple will occupy the upper-left half and be the broadest form. The oak will be a little smaller but longer and narrower at lower right. The birch will be the smallest, low on the left. None touches another.
Use the optional 8×10 grid only as a viewing aid. It is switched off by default and is not part of the artwork. The separate Stage 1 cue marks the three directions; it does not ask you to draw a box, dot or arrow on the paper.
The final drawing contains no light or shade. Preserve the white interiors, keep the outer margins clear, and let the shorter final veins remain visually quieter because of their length and spacing. Every mark shown at one stage stays in all the later stages.
Darker lines are new in the current stage. Earlier marks remain visible at reduced strength.
1. Place the three leaf axes
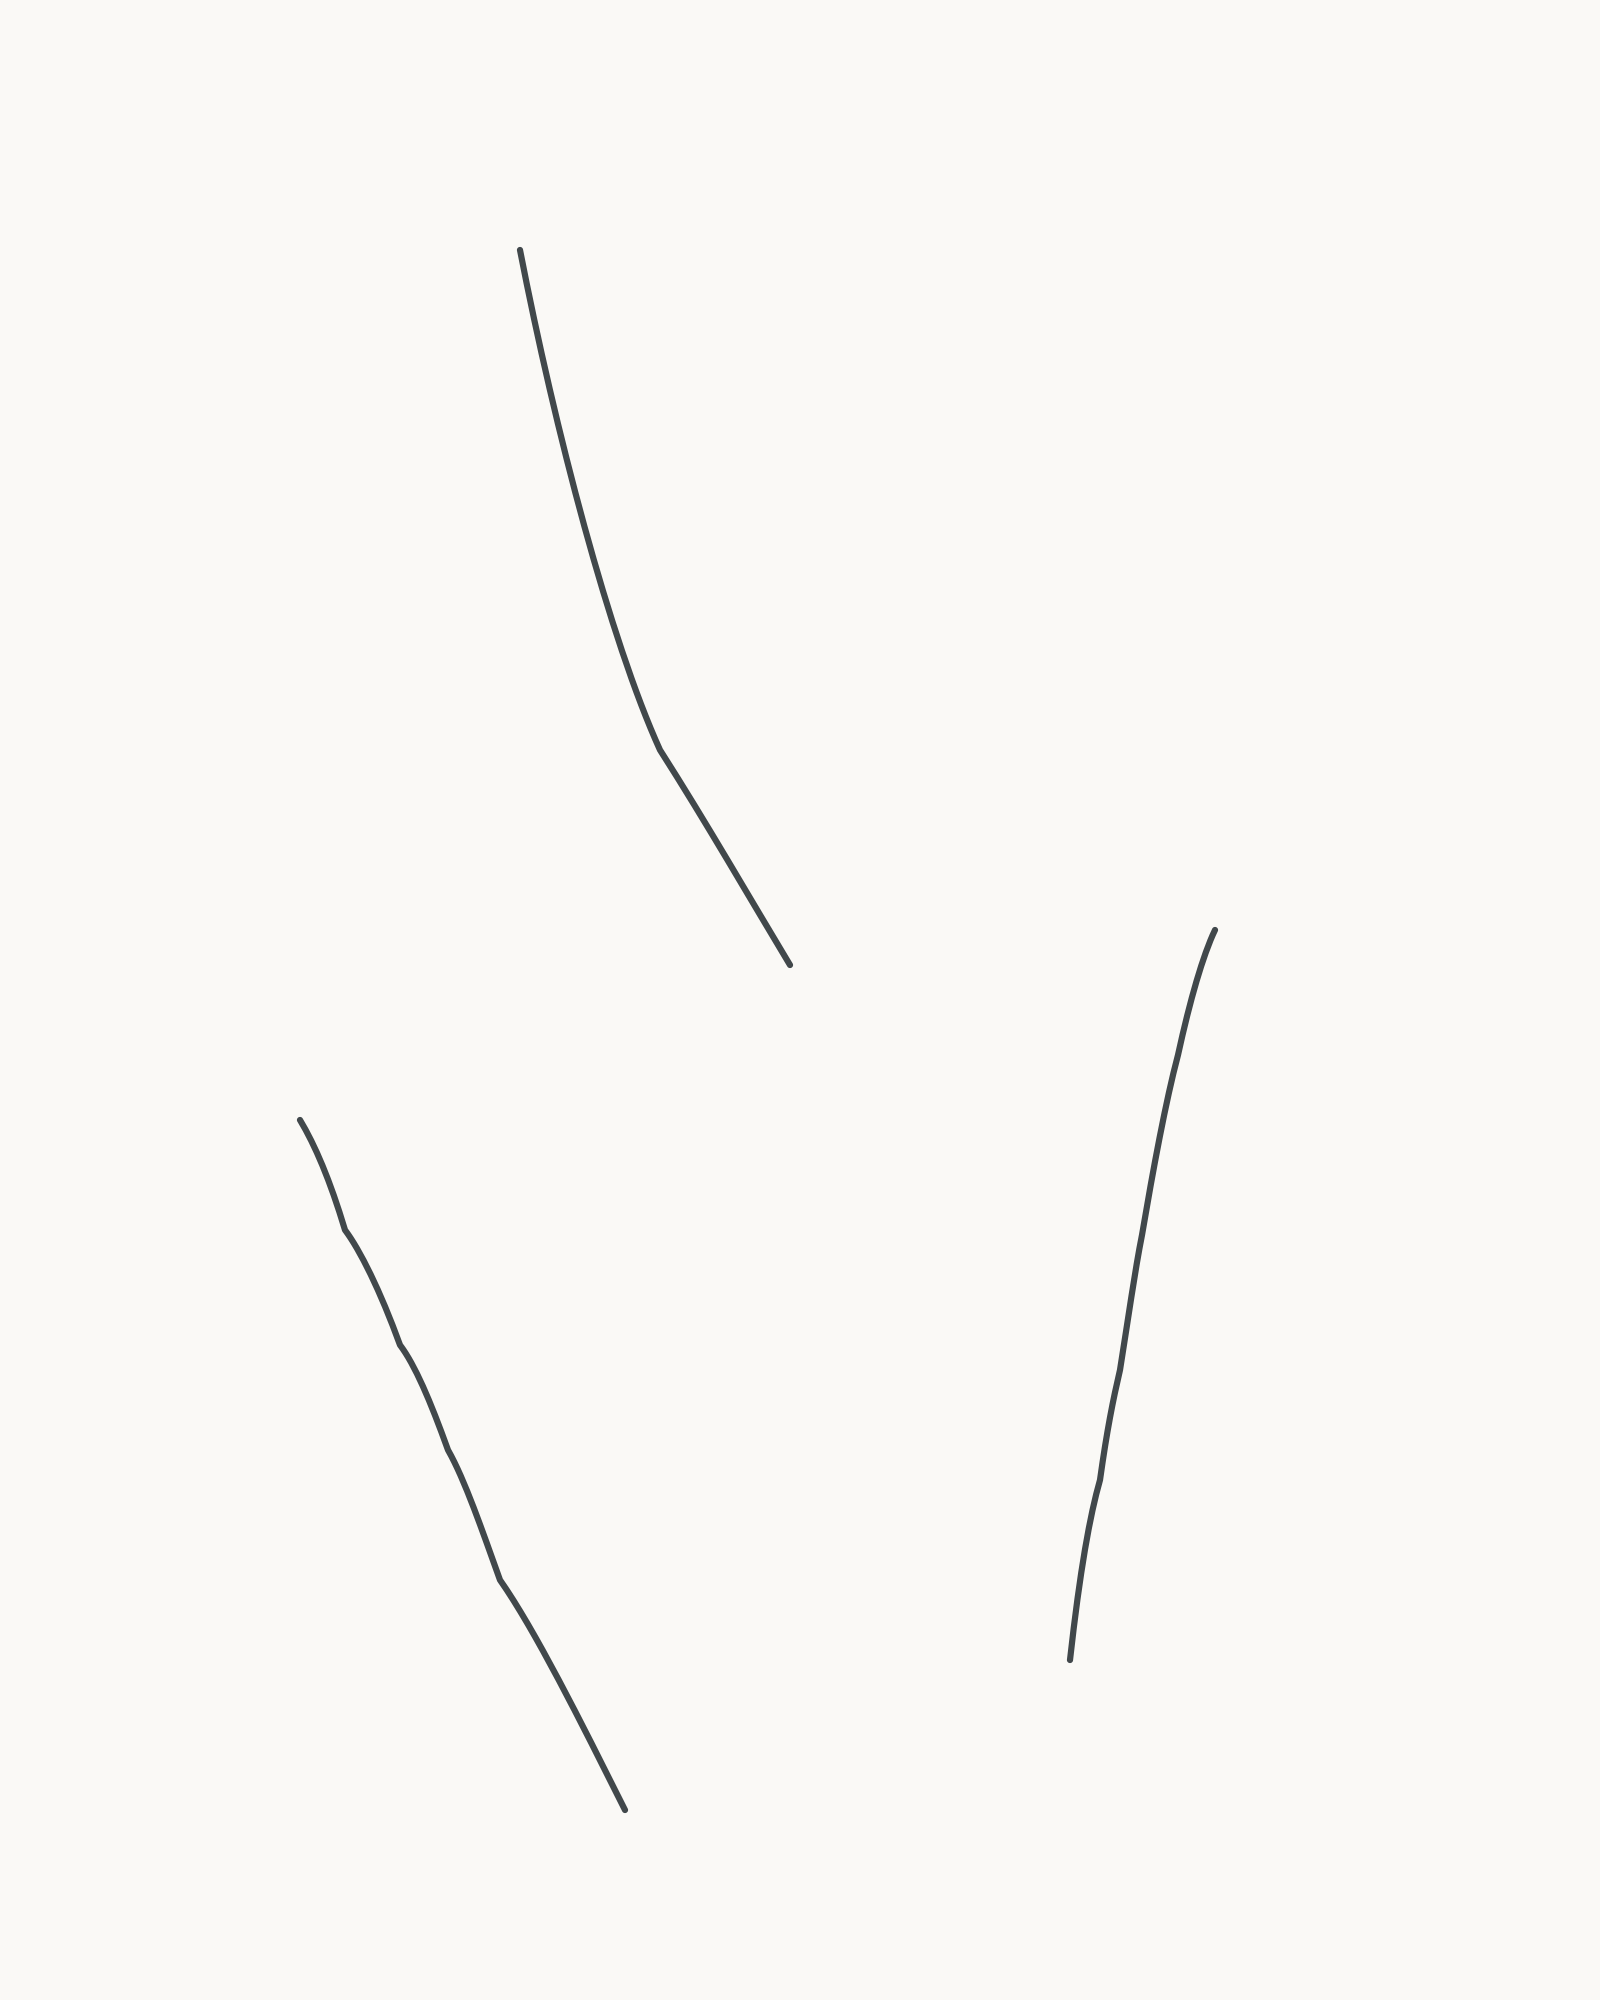
Stage 1 of 8. Three permanent centre lines set the scale, direction and separation of the whole study. 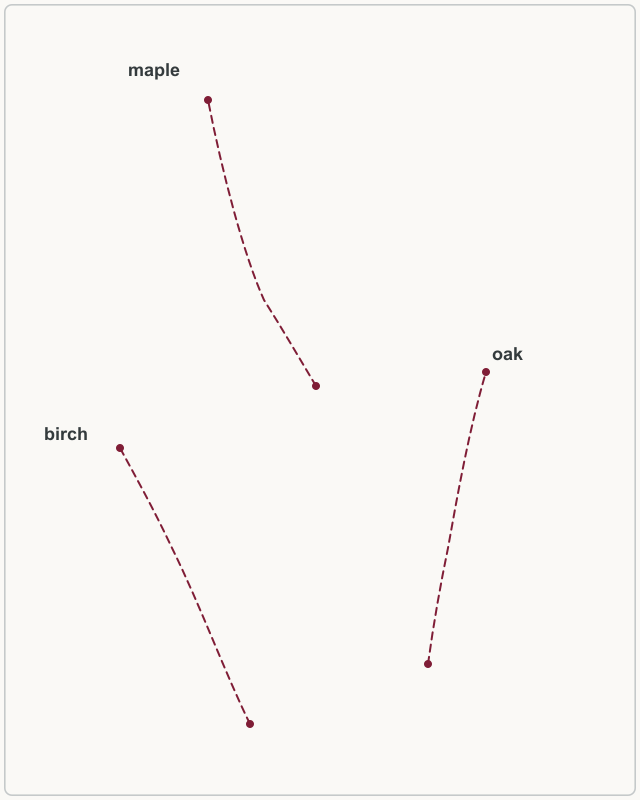
Placement cue: set the maple high and left, the longest oak at lower right and the smallest birch at lower left. Copy the three directions, not the frame, dots or labels. Use the separate cue and place three centre lines in this order.
First draw the maple axis. Start just left of the page centre and a little below halfway, then travel up-left to a tip near the upper quarter. Give the line a gentle change of direction; the lower portion will remain the visible petiole.
Next place the oak at lower right. Begin near the lower-right third and curve upward, ending a little right of centre. Make this the longest centre line, with plenty of white space below the maple.
Finally add the birch. Start near the lower edge, left of centre, and travel up-left. It is shorter than the oak and sits between the maple's petiole and the left edge without touching either.
These are permanent marks, so use one calm stroke for each rather than building a dark bundle of corrections.
Look for this before moving on: the three axes form a loose triangle; maple is highest, oak is longest, birch is shortest, and open white corridors separate all three.
If it goes wrong: keep the two lines that agree with the cue. Erase and replace only the newest crowded, parallel or wrongly sized axis before adding a vein to it.
2. Fan the maple's primary veins
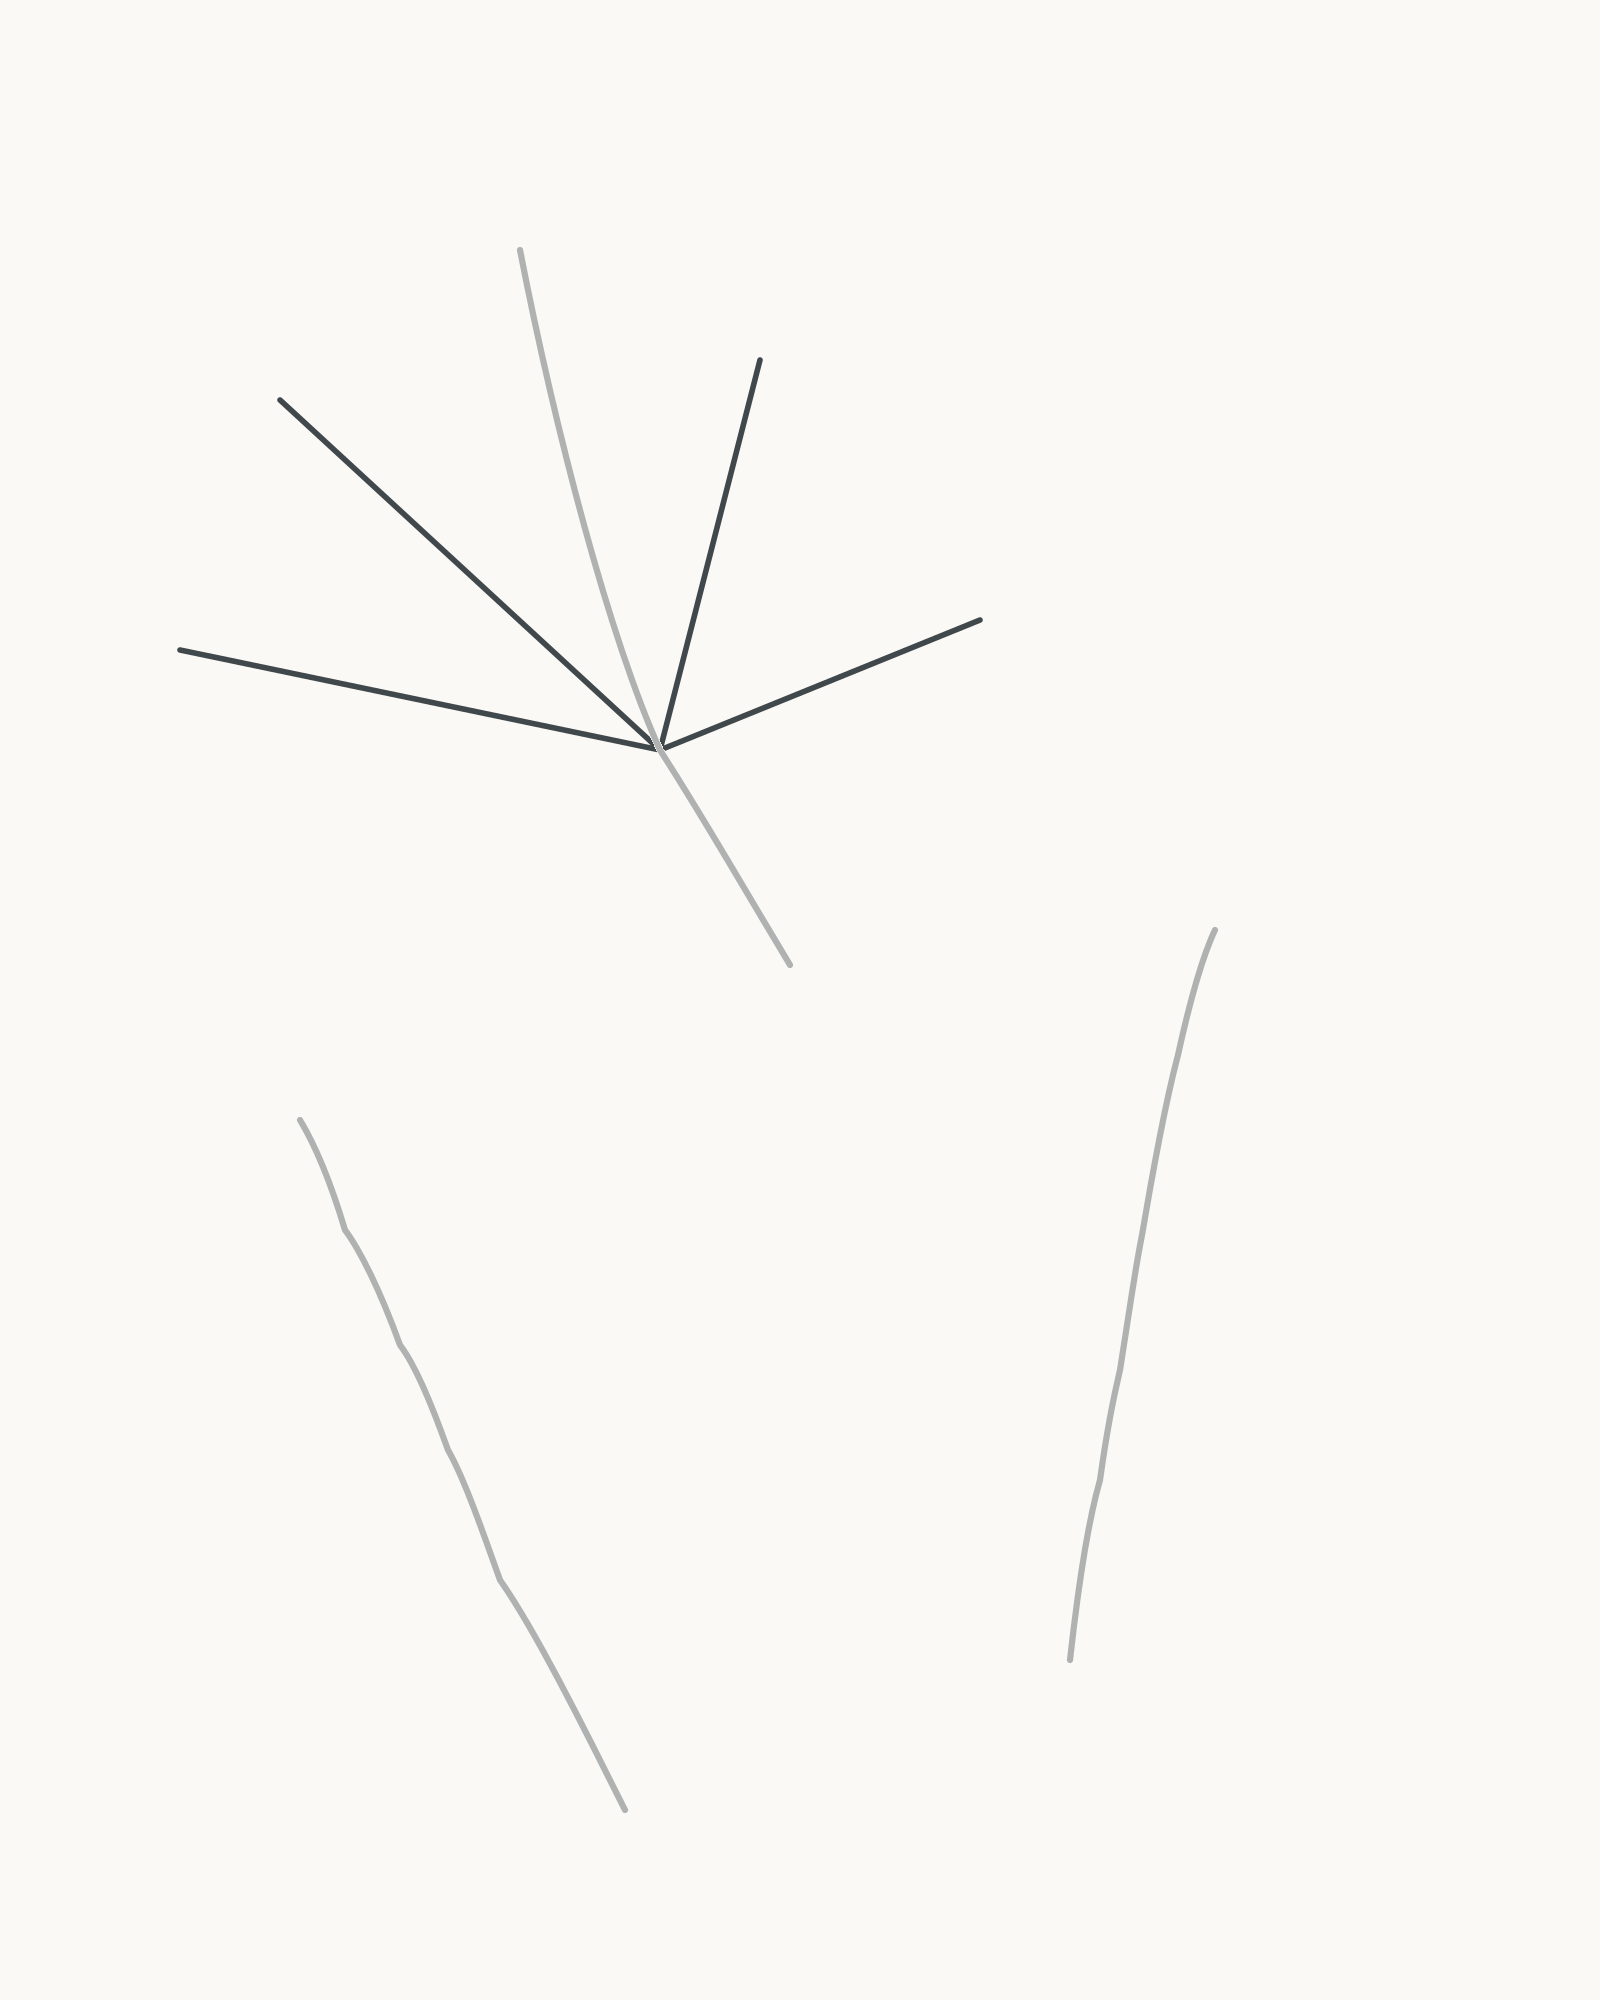
Stage 2 of 8. Four side veins join the centre line to make five unequal maple lobe directions. - Lower-left
- Upper-left
- Upper-right
- Lower-right
Find the point where the maple blade will meet its petiole, a little above the lower end of the first axis. Four side veins spread from this one junction around the existing centre line.
Add them in a fixed order. Aim the first towards the far lower-left lobe, then the second more steeply towards the upper left. Cross to the other side for a shorter upper-right direction, then finish with a longer lower-right ray. With the original centre line, you now have five lobe-tip directions.
Do not make opposite rays equal. The central direction remains longest, the lower pair are broad and unequal, and the upper side pair sit at different angles.
Look for this before moving on: five maple directions radiate from exactly one point, none floats above the junction, and the two sides are clearly related without being mirrored.
If it goes wrong: preserve the axis and the side veins that meet it cleanly. Replace only the newest ray if it misses the junction, copies its opposite or crowds another direction.
3. Close the maple margin
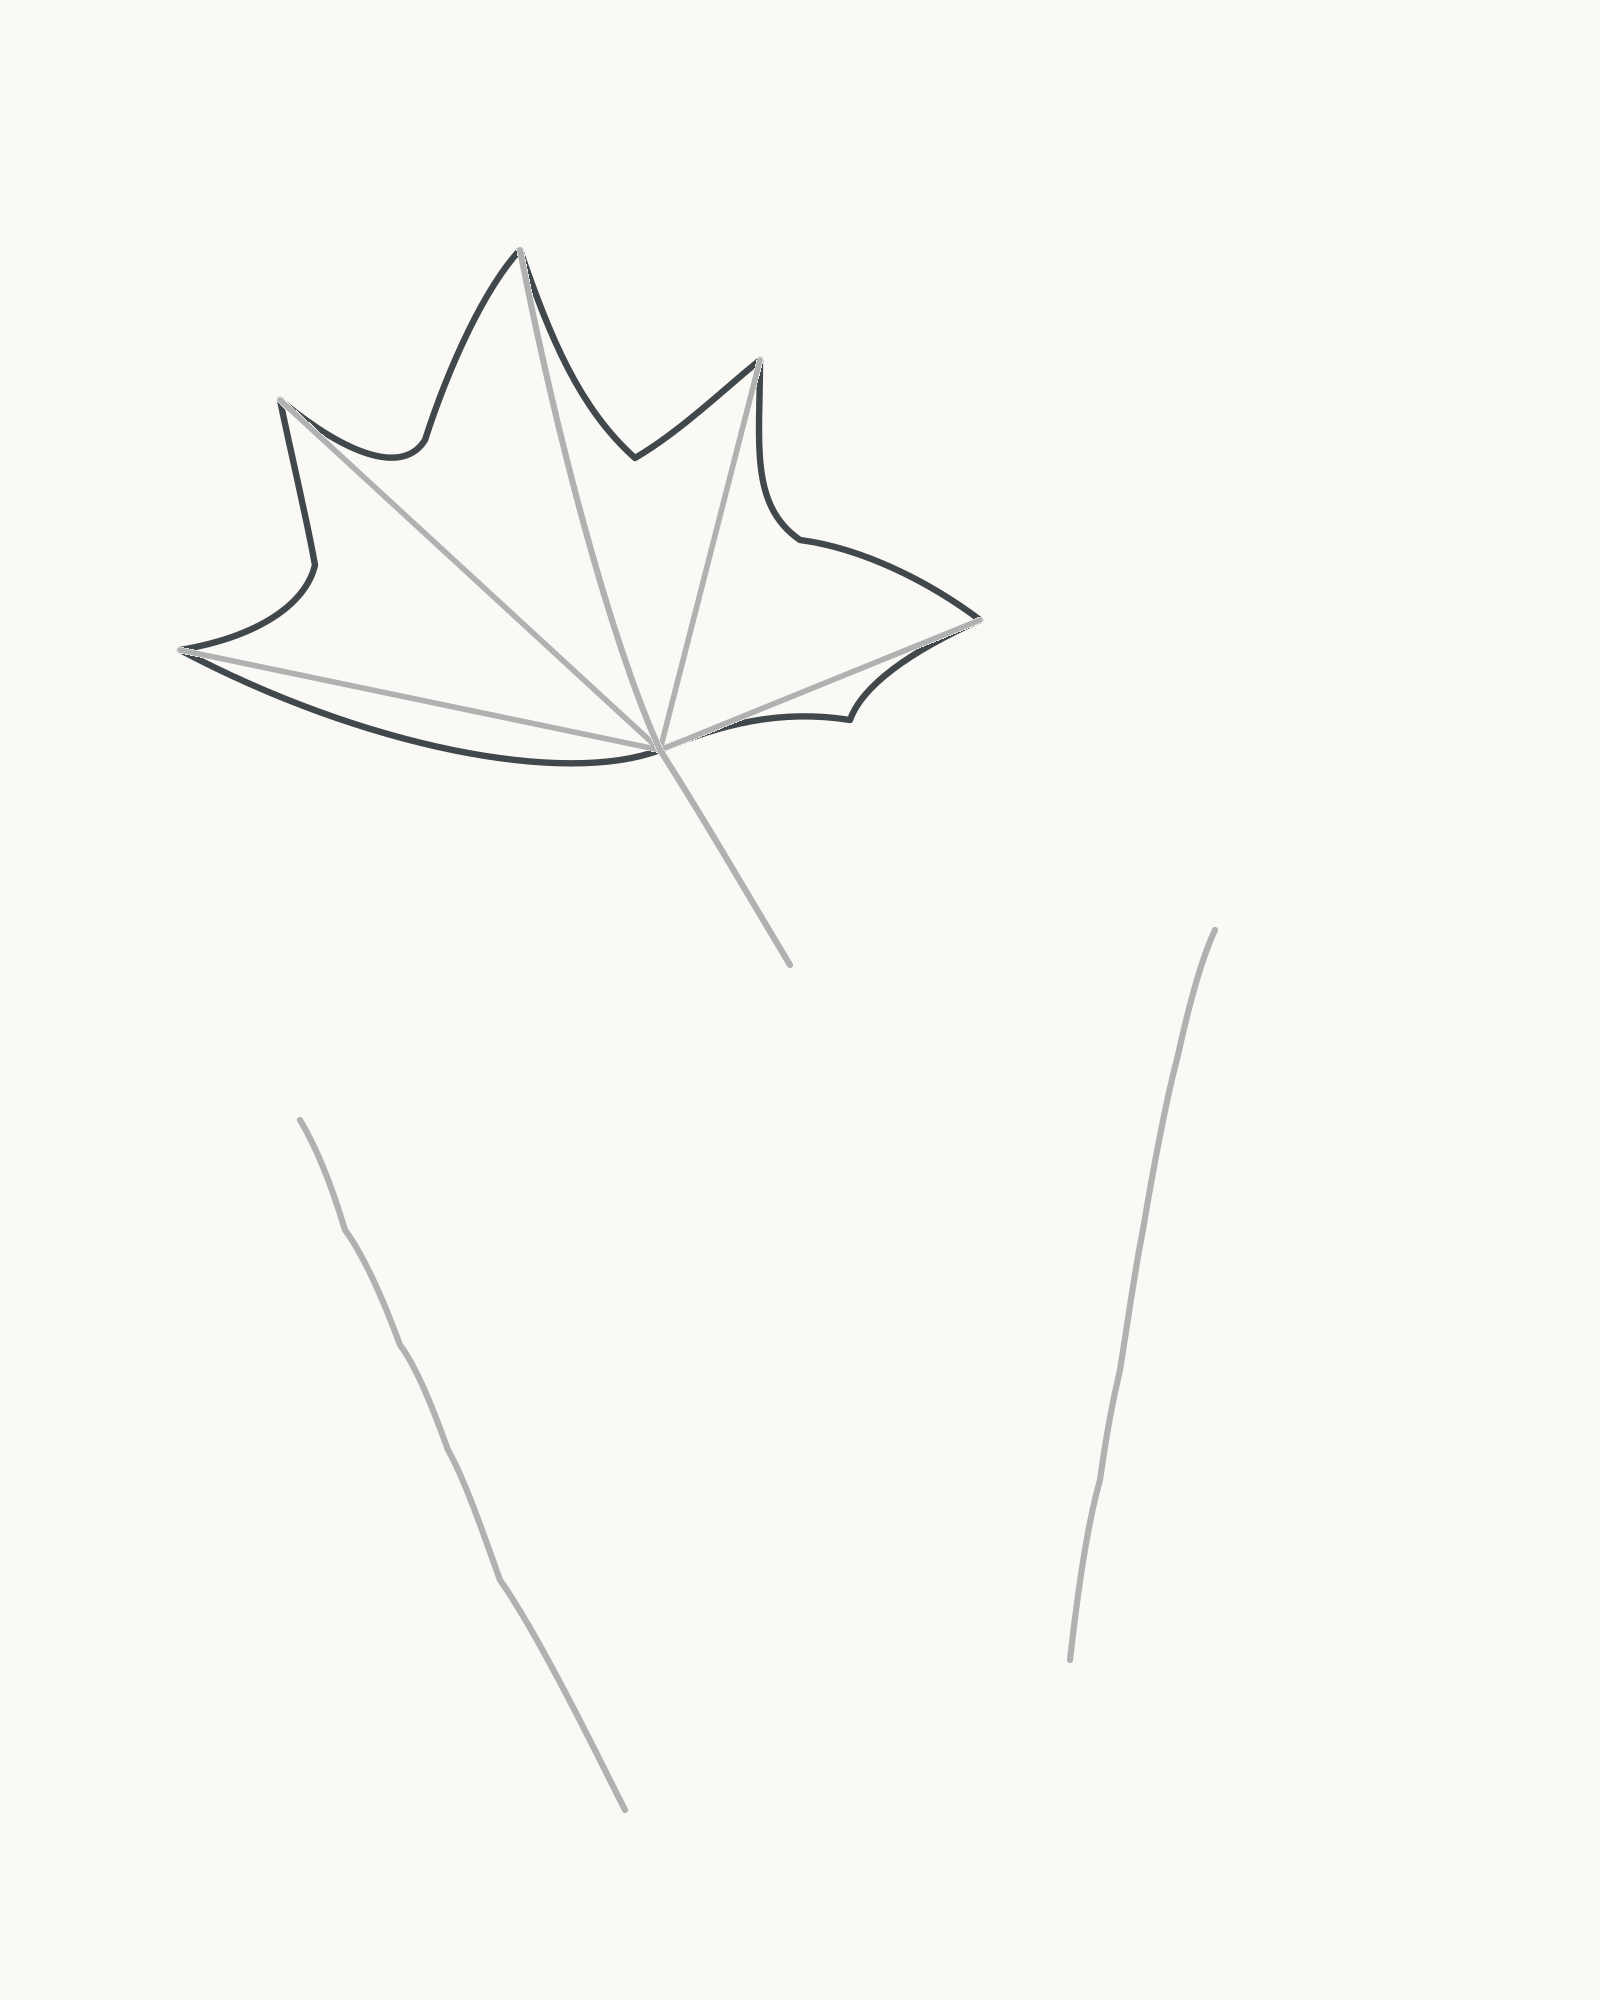
Stage 3 of 8. One continuous, asymmetric margin turns the five-ray framework into the maple-type leaf. Begin at the maple blade base beside the common vein junction. Work clockwise as one continuous outer edge. Travel first to the broad lower-left lobe, turn inward to a shallow notch, then climb around the upper-left lobe. Dip again before forming the tall central lobe.
On the right, make the upper lobe narrower and slightly lower than its opposite. Ease into the long lower-right lobe, then return to the blade base. The notches should point generally towards the vein junction, but they do not need the same depth.
The margin surrounds the five vein tips; it does not replace or retrace them. Let the two basal edges meet the original line so a narrow petiole remains below the blade.
Look for this before moving on: the maple has five readable, unequal lobes; the central lobe is tallest; every vein points into its intended lobe; and the outer edge reconnects cleanly at the petiole.
If it goes wrong: stop at the two nearest lobe tips that still look right. Lift only the fresh contour section between them and redraw that short interval; do not move a vein or copy the whole opposite side.
4. Branch the oak's primary veins
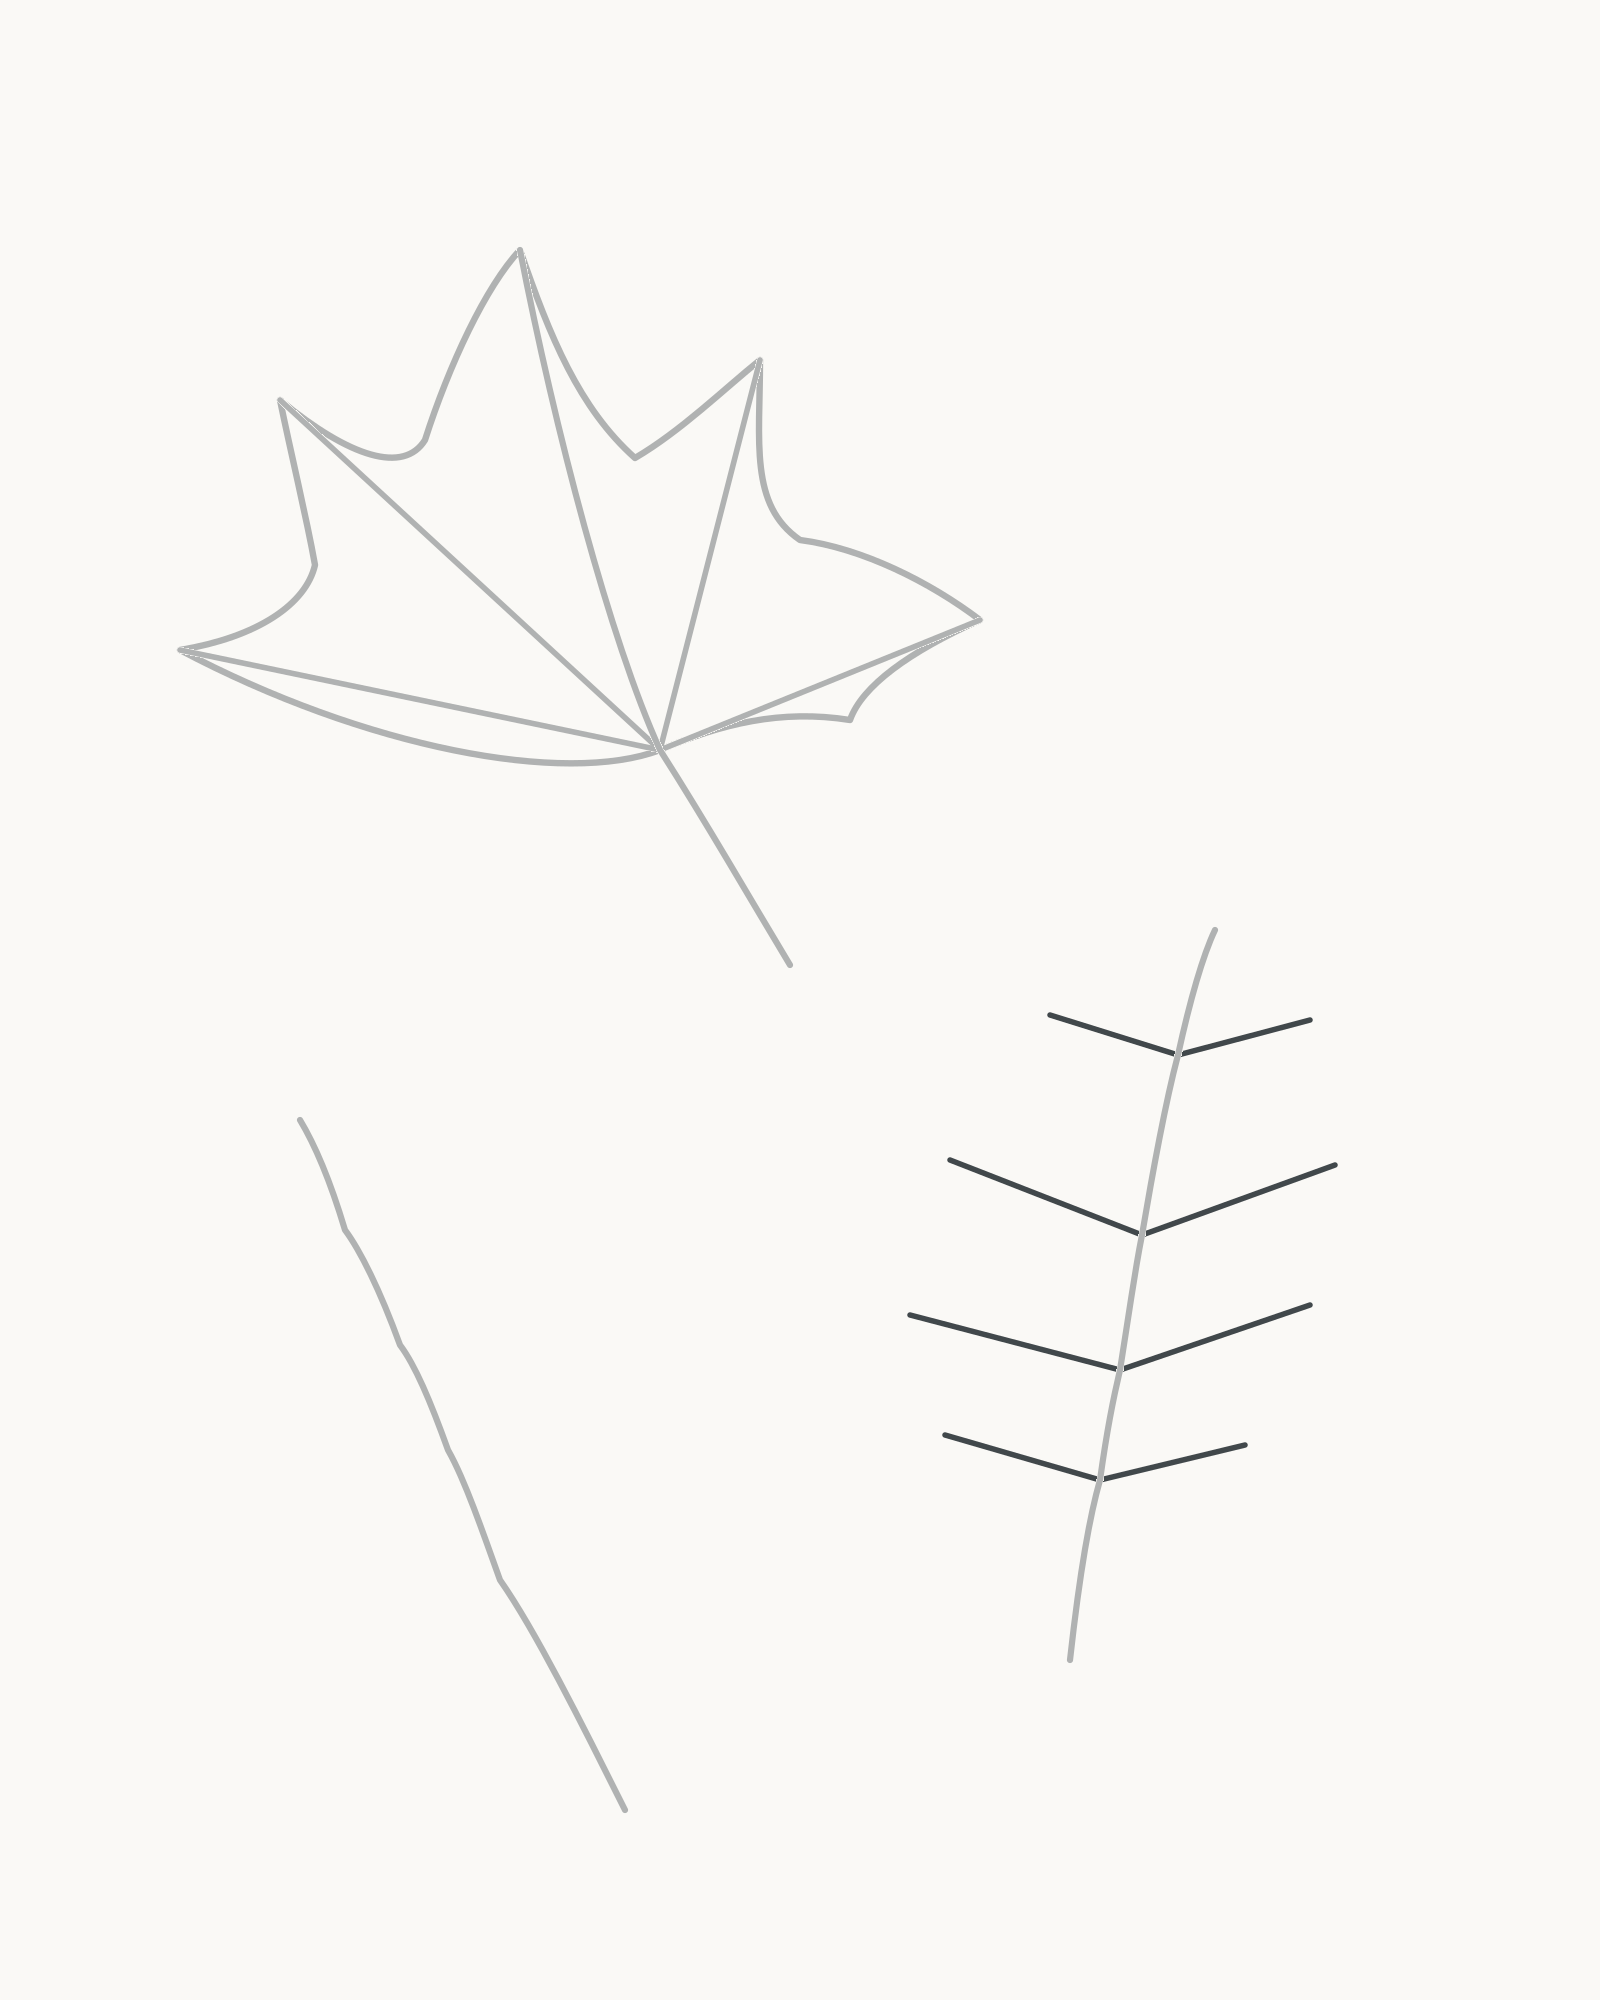
Stage 4 of 8. Four unequal vein pairs establish a pinnate rhythm for the oak-type leaf. Move to the long lower-right axis. The blade begins above the lower end, leaving a visible length of petiole. Add four pairs of primary veins from its midrib, working upward from the blade base.
For each pair, draw the left branch first and then the right, but vary their reach. The lowest pair is broad and low. The next pair opens more widely. The third sits closer to the upper half, and the top pair is shortest. All eight branches rise gently towards the tip rather than forming flat rungs.
These endpoints are guides for rounded lobes, so leave breathing room between one pair and the next.
Look for this before moving on: four vein pairs begin directly on the oak midrib, their lengths and angles vary, and the structure narrows towards the top.
If it goes wrong: keep the midrib and earlier pairs. Replace only the newest branch if it starts beside the centre line, points backwards or makes a mechanical match with its partner.
5. Close the oak margin
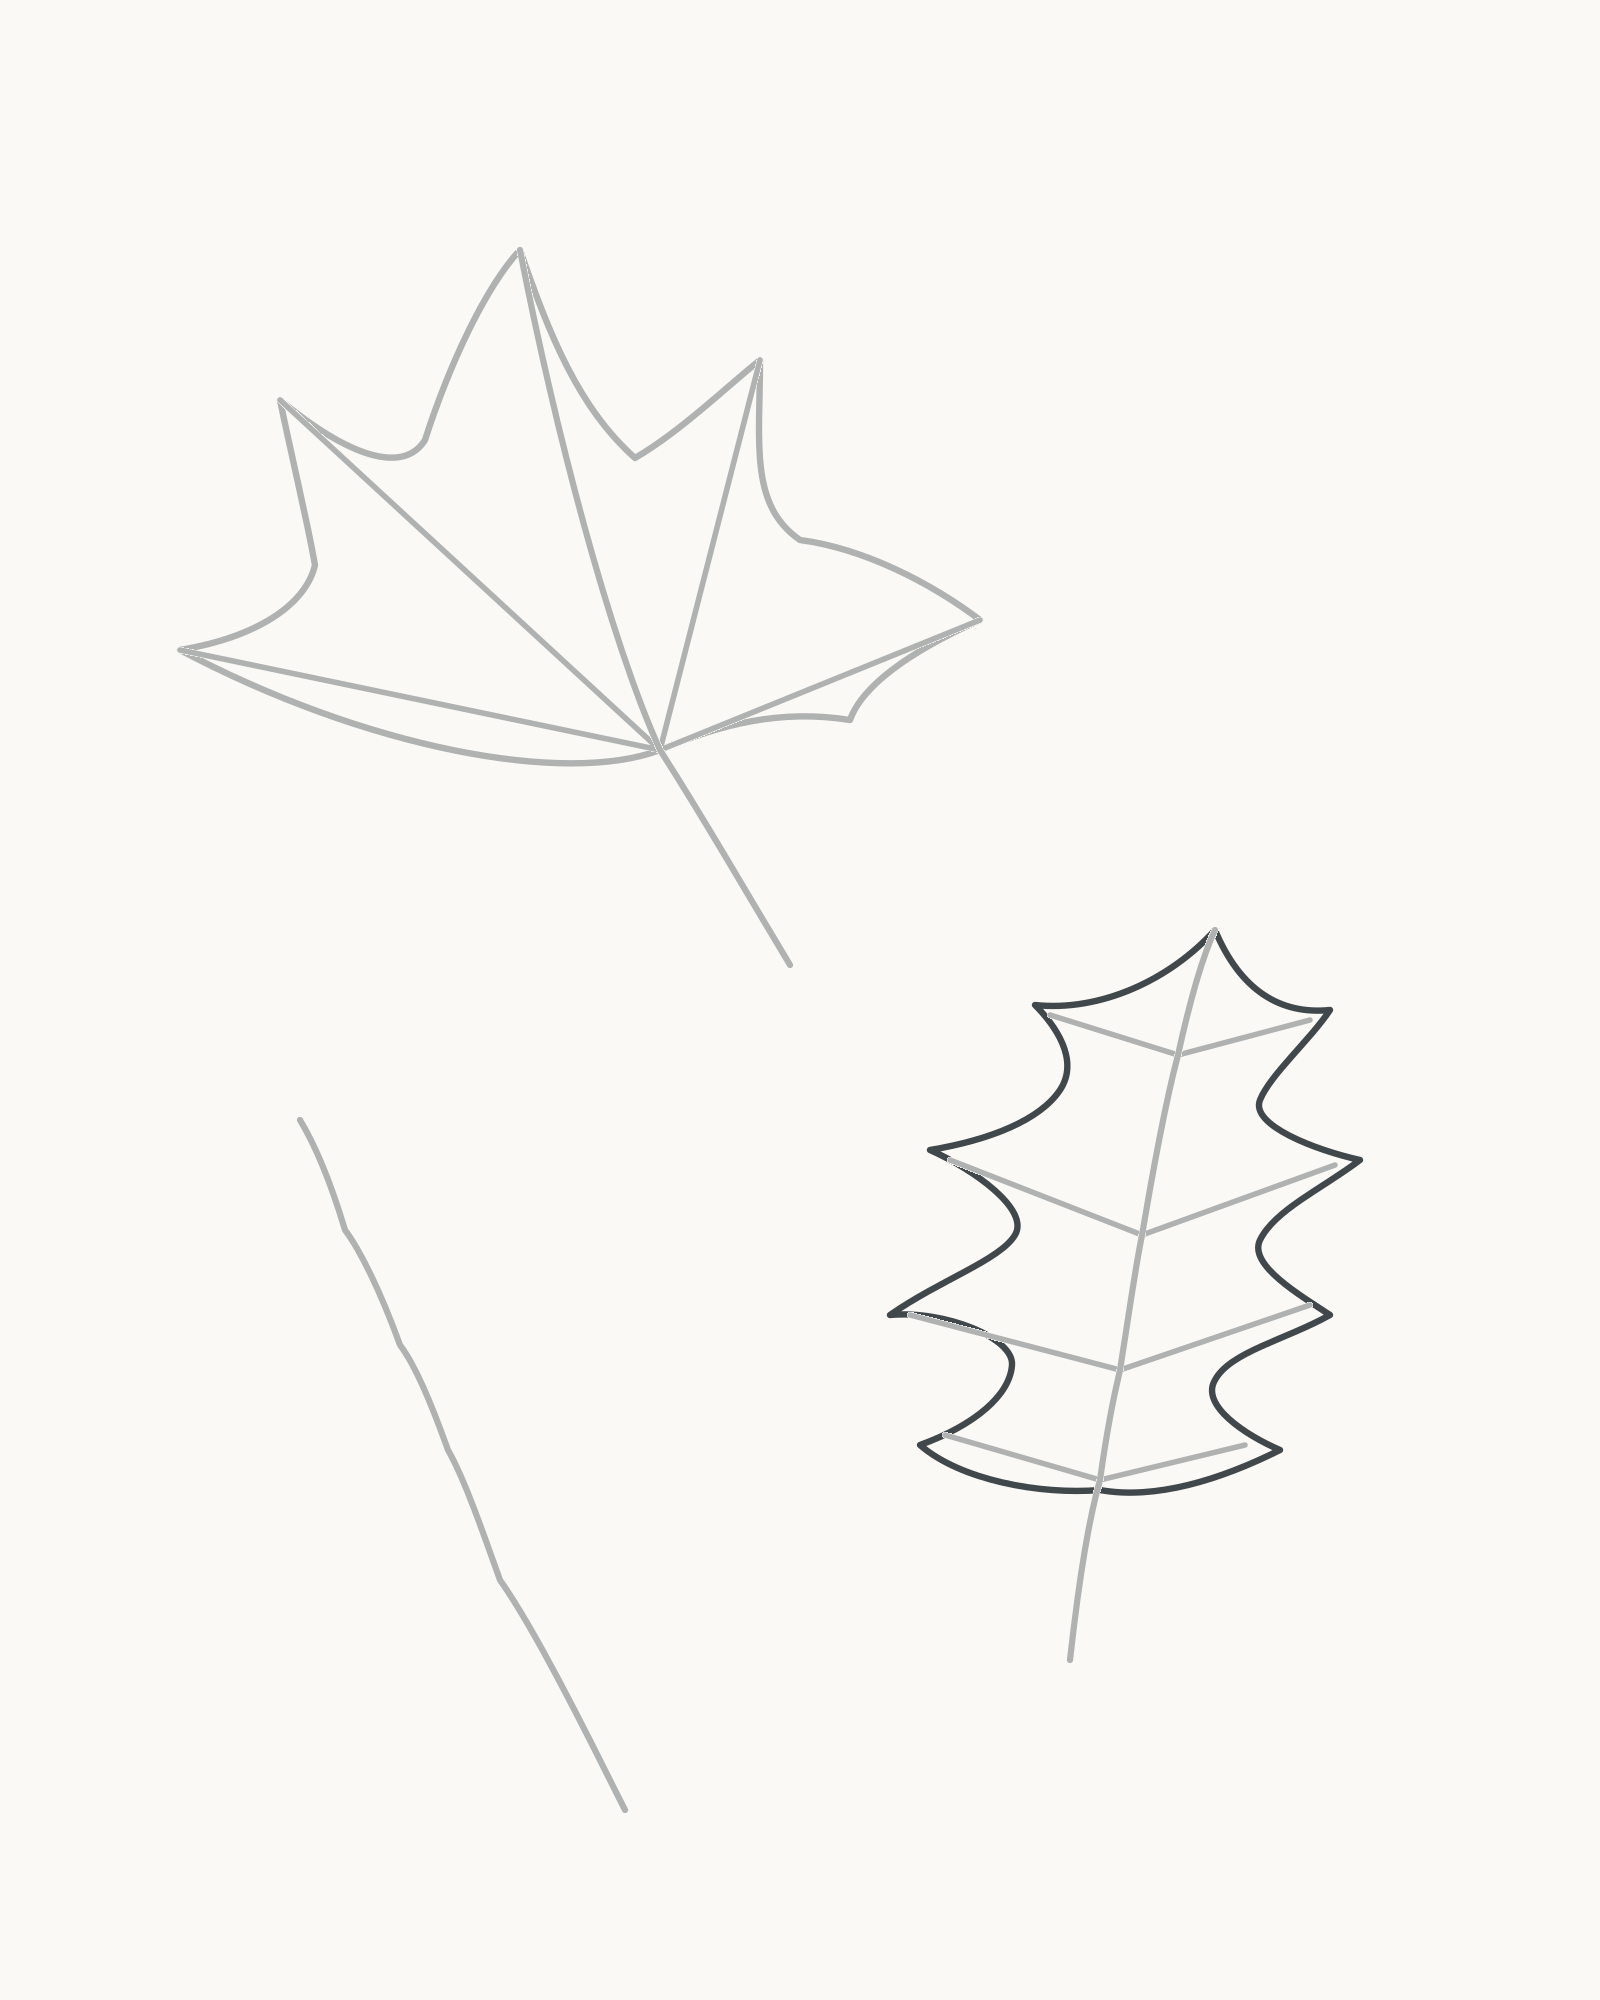
Stage 5 of 8. A varied rounded margin completes the oak-type blade without holly-like points. Start at the oak blade base. On the left, move through four broad rounded lobes, letting the edge curve inward between the vein endpoints without making deep cuts. Continue to the pointed tip. Return down the right side with a different rhythm—do not copy the first half.
The lobe ends should feel soft, not thorny. Vary how far each one projects and where the inward curves begin. The blade remains longer than it is wide and tapers at both tip and base.
Join the two sides around the original centre line. The lower portion of that line stays visible as one simple petiole; no second edge or darkening pass is added.
Look for this before moving on: the oak has one continuous rounded-lobed edge, each primary vein sits inside an intended lobe, and the sides differ without making the blade lopsided.
If it goes wrong: keep the midrib and branches. Replace only the latest arc between two neighbouring vein landmarks if it became a sharp point, repeated scallop or deep holly-like notch.
6. Branch the birch's primary veins
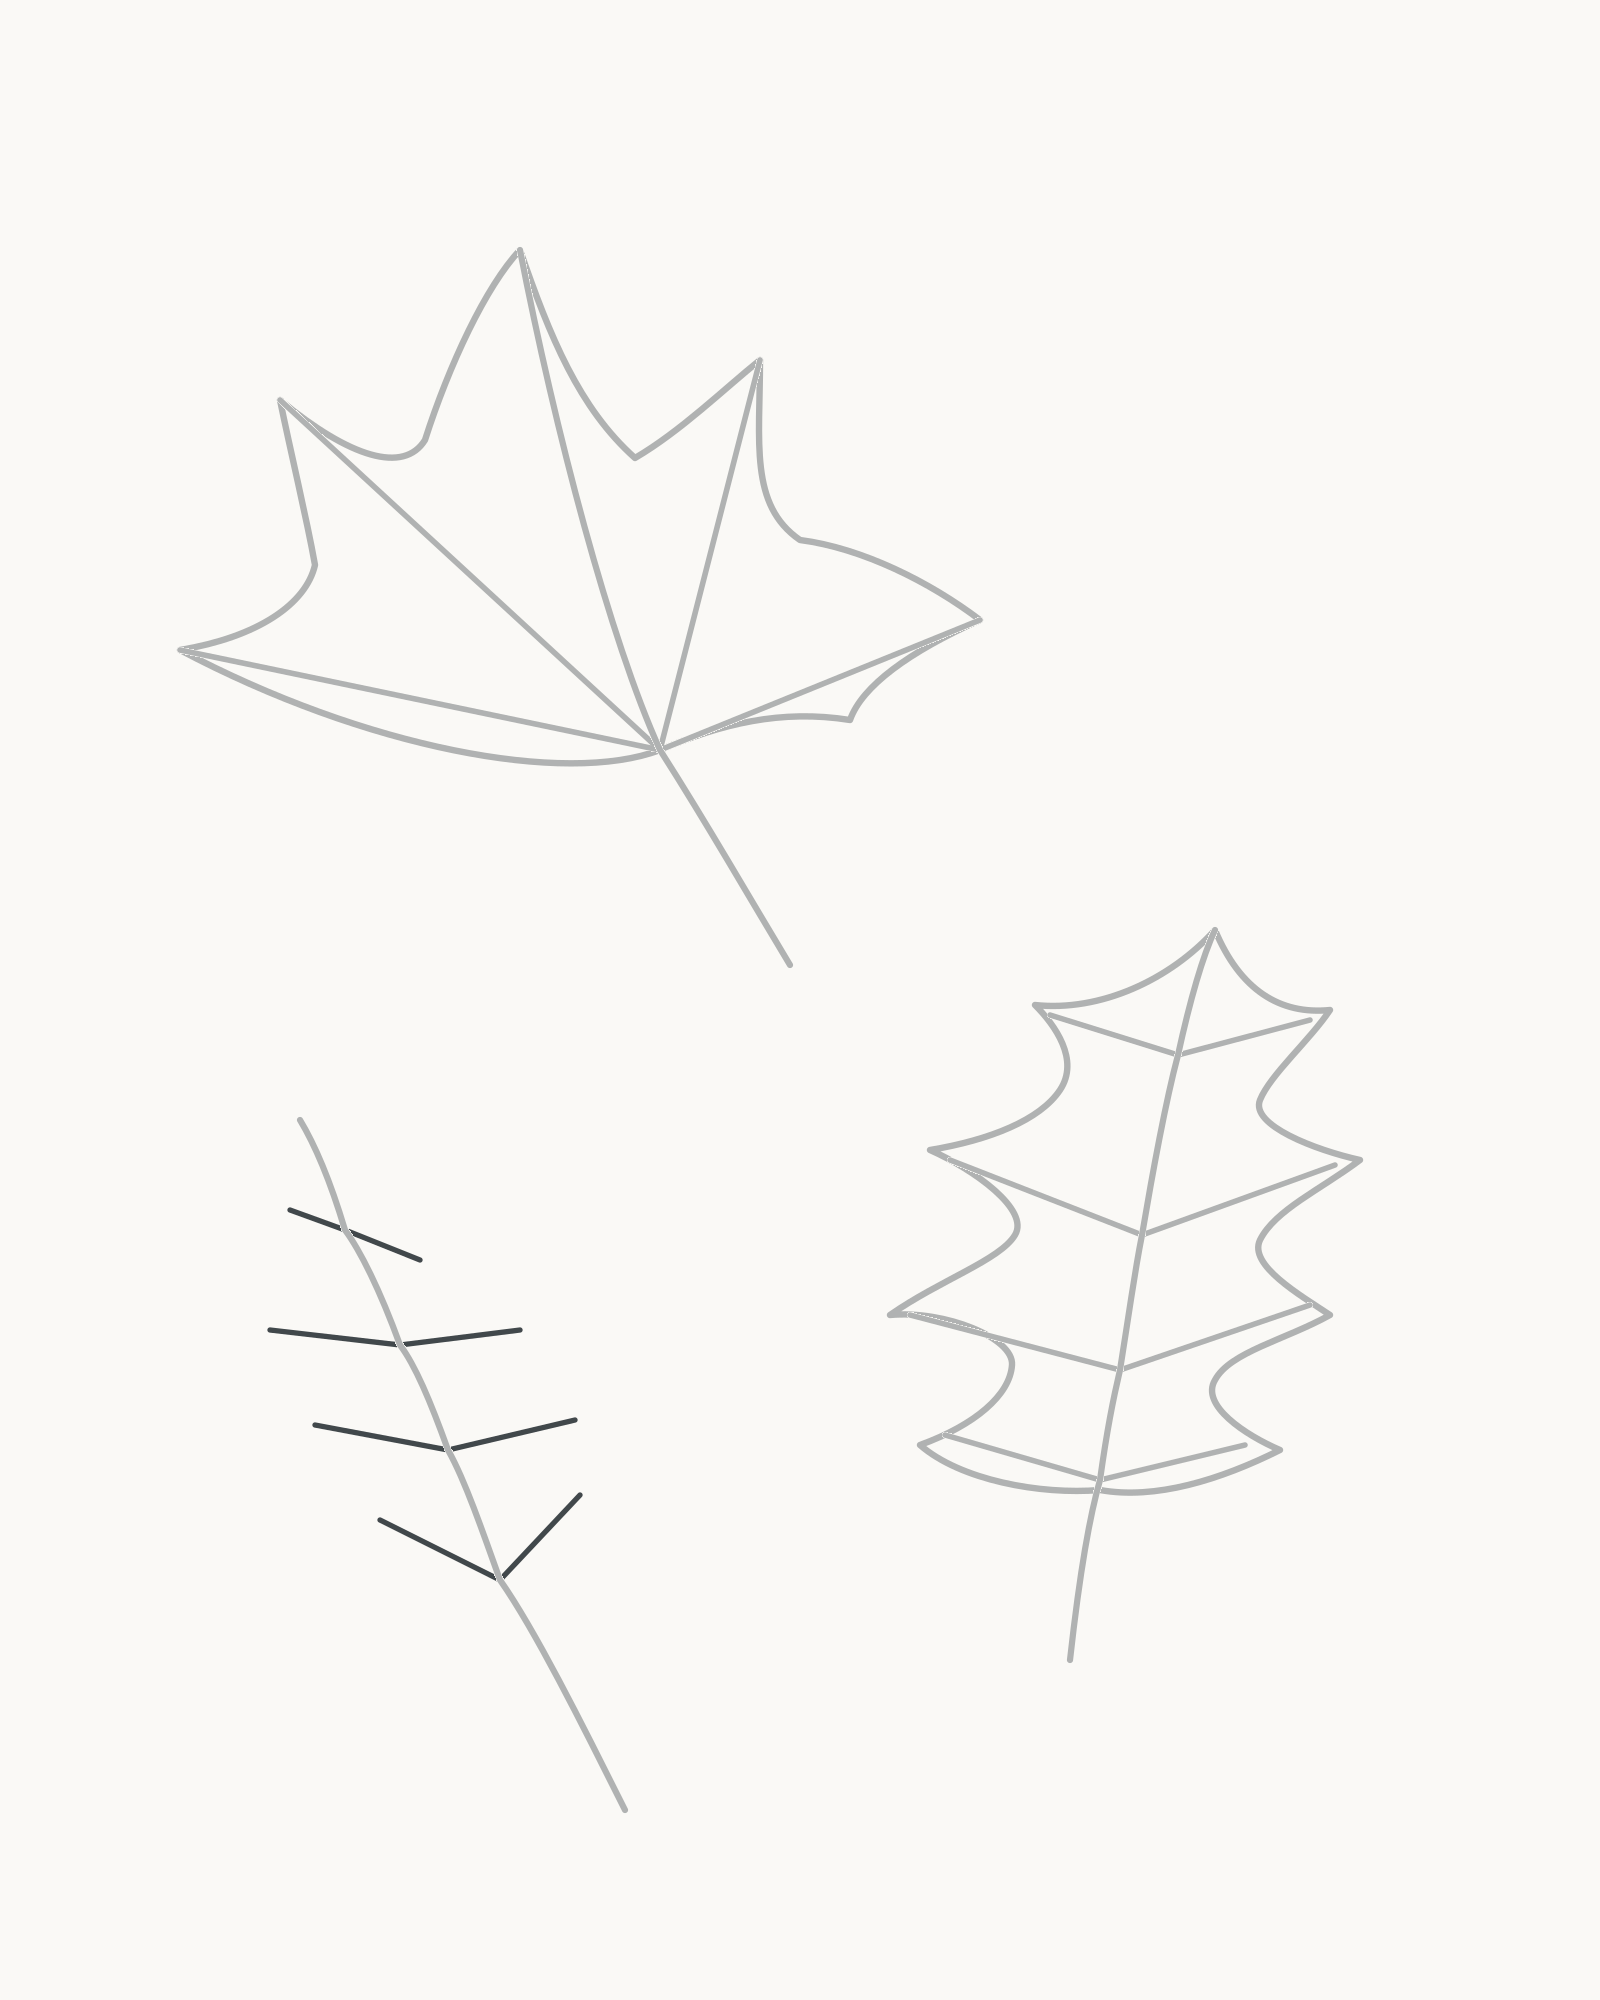
Stage 6 of 8. Four compact vein pairs set the width and tooth directions of the birch-type leaf. Use the small lower-left axis. Leave its lower portion open as the petiole, then add four pairs of side veins from the midrib. Work from the blade base towards the tip.
The lower pair is widest, and the upper pairs become progressively shorter. Let every branch rise in the general direction of the leaf tip. Keep the left and right marks unequal: the future blade is fuller on its right side and should not become a diamond.
Because this leaf is small, leave clear space between the pairs. The outer teeth will be built around these directions in the next stage.
Look for this before moving on: eight small branches meet the birch midrib, the lowest pair has the greatest reach, and the open framework is wider below its midpoint.
If it goes wrong: shorten or replace only the newest crowded or horizontal branch. Do not lengthen the opposite side to force a matching pair.
7. Close the birch margin
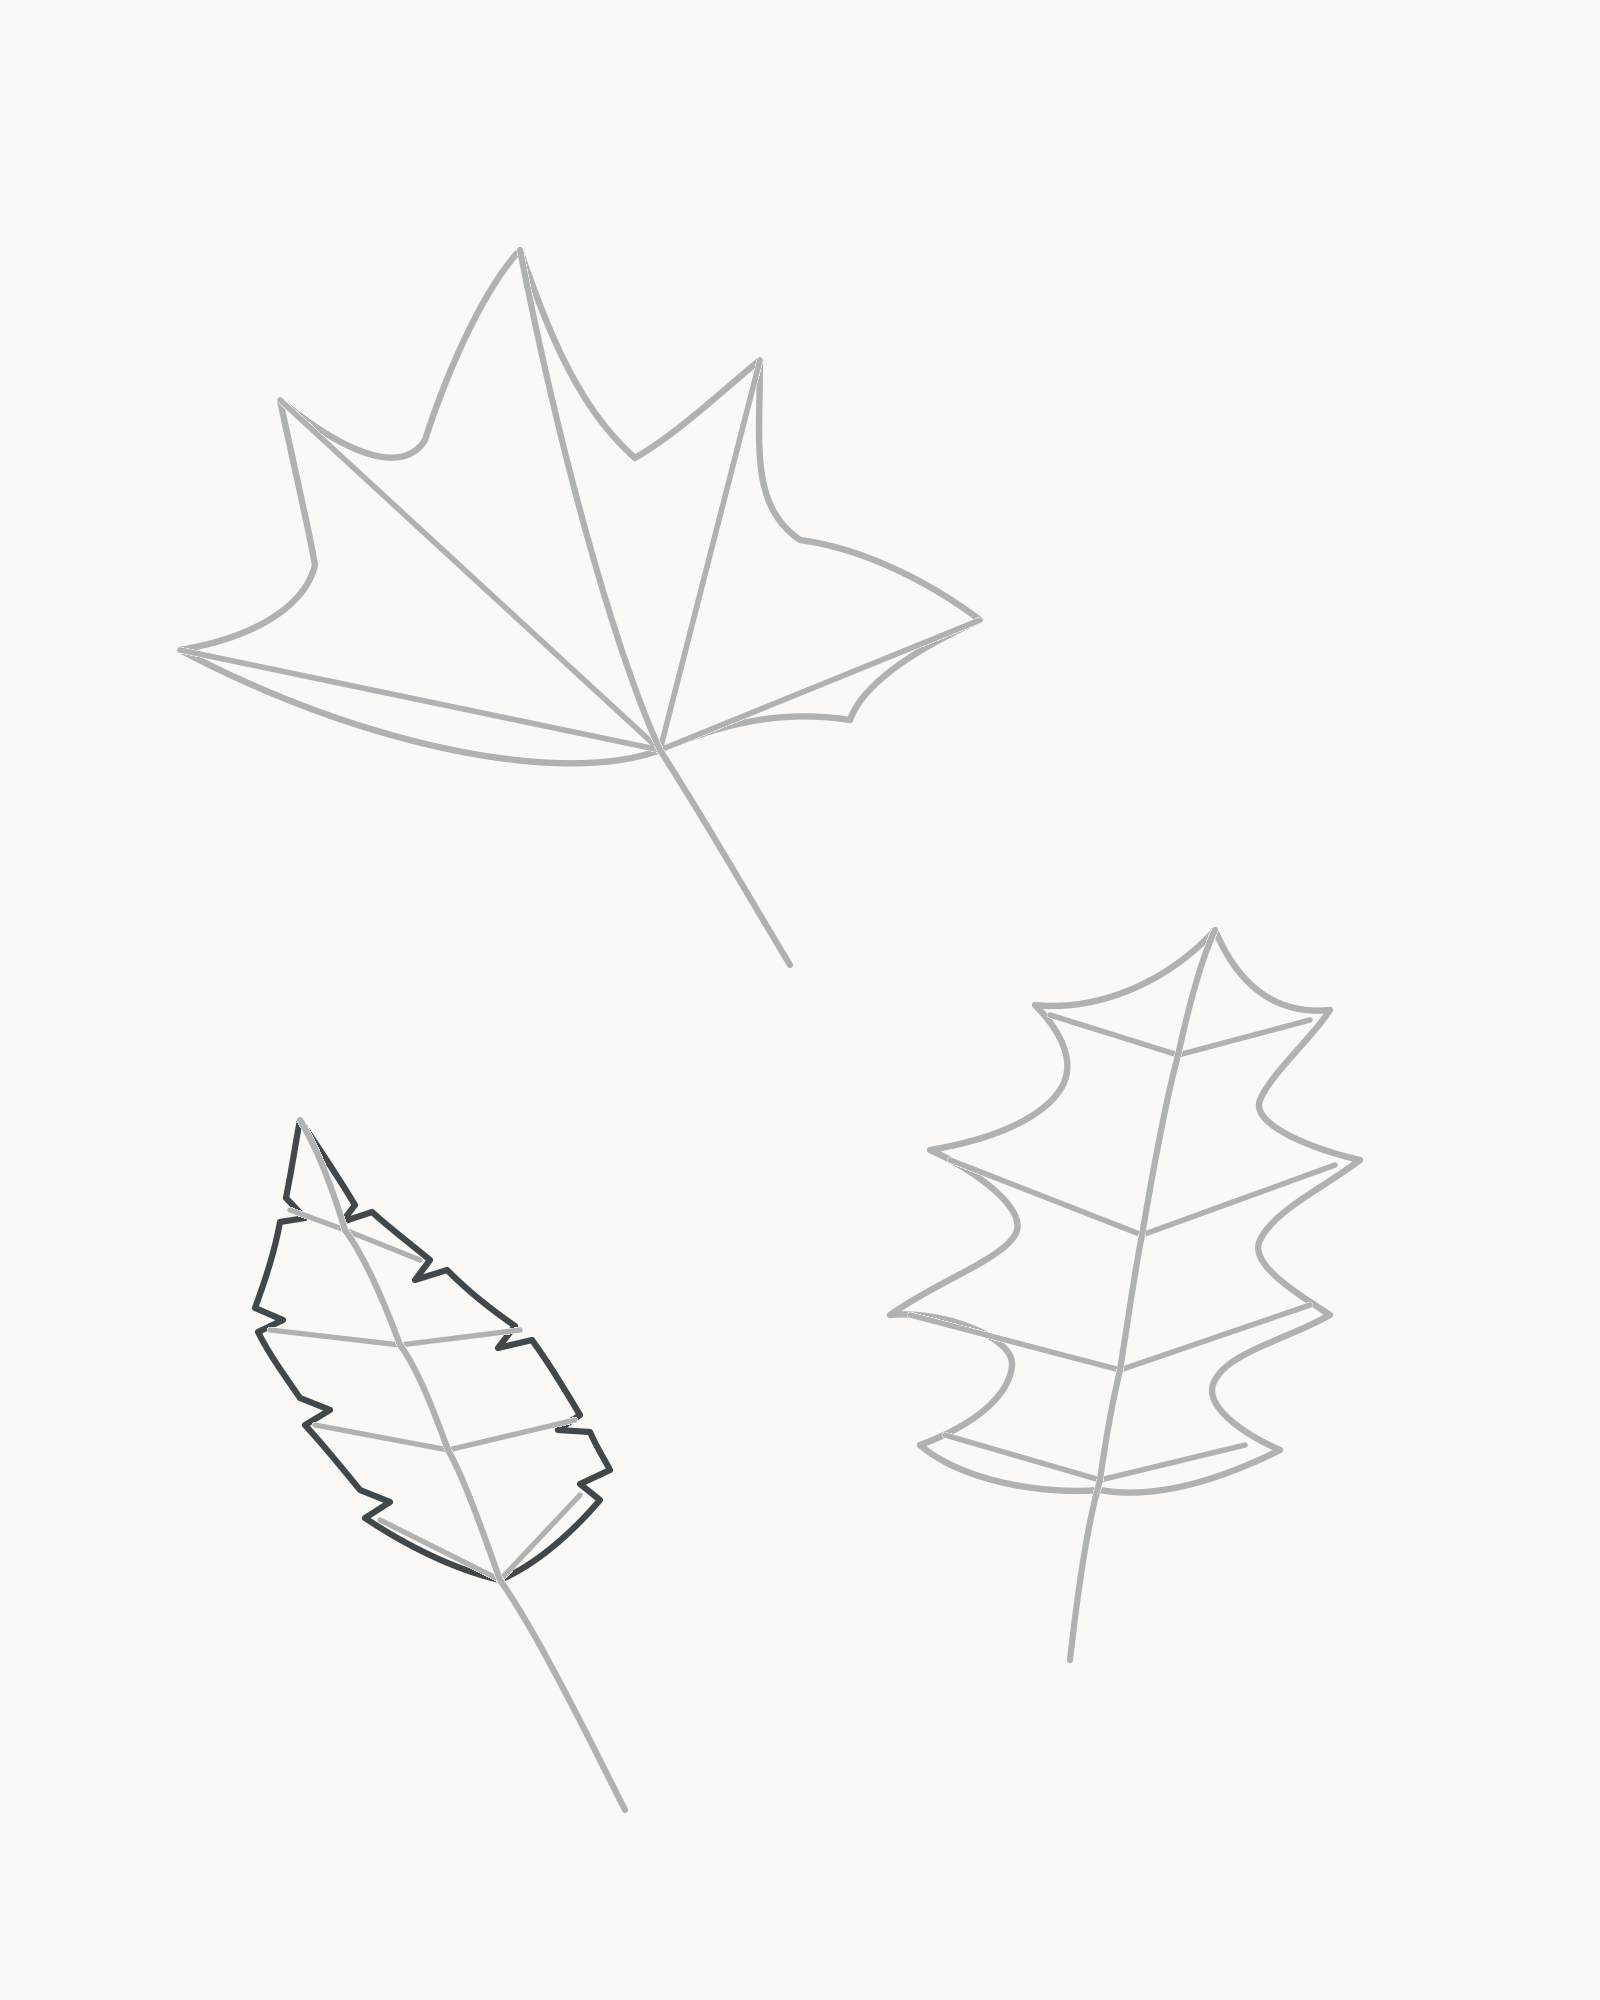
Stage 7 of 8. A continuous, lightly serrated edge completes the smallest leaf. Begin at the blade base and travel up the left side towards the tip. Use a gently widening triangular-ovate shape, but break the edge with a few small, unequal teeth as you go. Round the direction changes slightly instead of drawing a geometric zigzag.
Turn around the pointed tip and come down the fuller right side. The teeth remain shallow and irregularly spaced. They belong to the continuous margin; do not draw a smooth outline and then add separate spikes over it.
Return to the base around the existing midrib, leaving its lower length visible as the petiole.
Look for this before moving on: the birch is the smallest leaf, widest below halfway, tilted up-left and lightly serrated; the teeth are varied and the blade does not read as a triangle or saw blade.
If it goes wrong: keep the veins and the edge sections that follow them. Replace only the newest interval between two vein landmarks if its teeth become equal, crowded or too deep.
8. Add sparse secondary veins
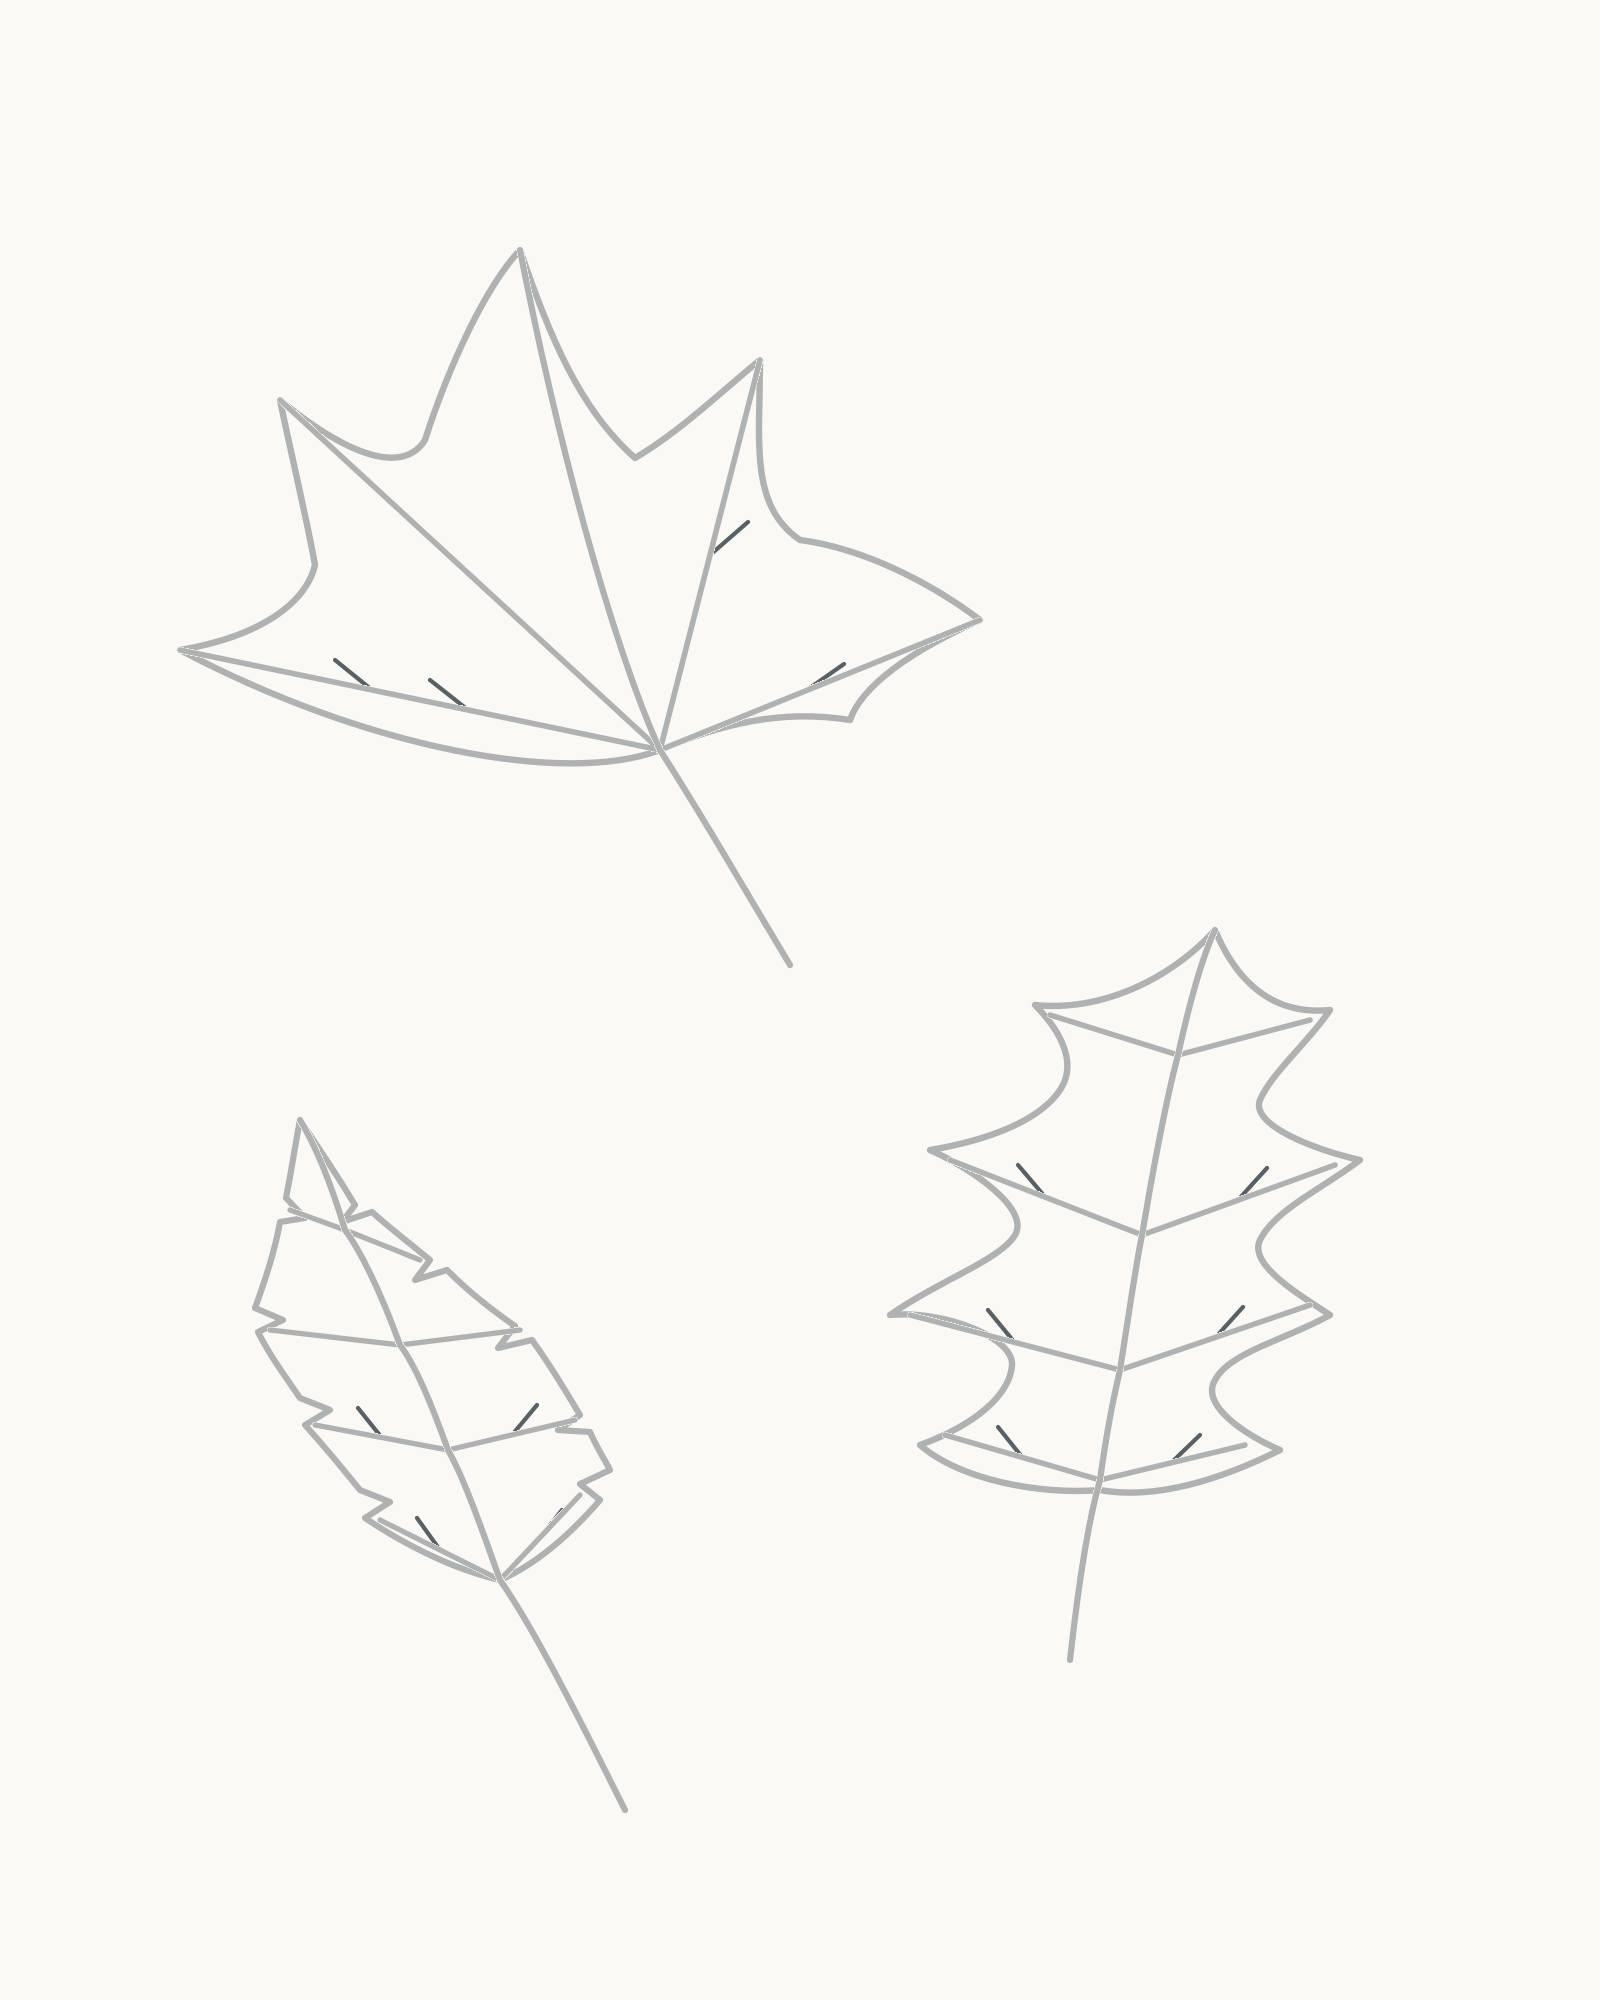
Stage 8 of 8. Sixteen short secondary branches finish the structure without colour or shading. Finish with sixteen short offshoots, placed selectively rather than filling every gap.
On the maple, add six: two from the broad lower-left vein, two from the upper-left vein, one from the upper-right vein and one from the lower-right vein. On the oak, add one short offshoot to each side of the lower three vein pairs; leave the top pair alone. On the birch, add one to each side of the lower two pairs and leave the upper half open.
Every offshoot starts on an existing primary vein, angles generally towards the leaf tip and stops well before the margin. These are branch lines, not hatch marks. Do not retrace a contour, add colour or shade the spaces between them.
Look for this before moving on: maple has six new short branches, oak has six and birch has four; each touches a parent vein, no endpoint reaches an outer edge, and open white paper still dominates each blade.
If it goes wrong: lift or shorten only the newest offshoot that floats, touches the margin or repeats a neighbour too closely. Do not darken the surrounding leaf to disguise it.


Common mistakes and small fixes
The three leaves feel like a row of symbols. Compare their scale, angle and spacing. On a new attempt, keep the maple high, separate the oak at lower right and make the birch distinctly smaller instead of lining up their tips or petioles.
The maple looks perfectly balanced. Its lobes do not need matching widths or heights. Correct the newest contour interval against its own vein direction rather than reflecting the opposite edge.
A maple notch points away from the centre. The inward turns should aim generally towards the common fan junction. Redraw only that notch between its two neighbouring lobe tips.
The oak looks like holly. Soften the newest point into one rounded outward curve and a shallow inward turn. Preserve the primary vein inside it.
The oak edge repeats like a wave pattern. Change the reach and breadth of the next lobe. Nature does not require identical scallops from bottom to top.
The birch resembles a saw. Reduce the number or depth of the newest teeth. A few small unequal changes are enough to suggest a serrated margin.
A vein floats inside the blade. Return its inner endpoint to the midrib or parent vein. Do not bridge the gap with a dark knot; replace that one new mark cleanly.
The drawing became shaded by accident. Secondary veins should be separate structural lines. Remove the newest repeated strokes and restore open white space rather than adding more tone elsewhere.
Practise from one real leaf
Choose one fallen leaf whose edge you can see clearly. Set it beside the drawing and compare only four things: overall length, widest point, midrib direction and margin. Begin a fresh sketch with one permanent petiole-to-tip line. Add the main side veins before attempting the edge, using the same structure-first order as the lesson.
Do not force your specimen into one of the three examples. A damaged edge, uneven lobe or curled tip can be recorded as it appears. The exercise is to observe a relationship, not to produce a species label.
The Royal Horticultural Society describes field maple leaves as five-lobed, oak leaves as rounded-lobed and silver birch leaves as small, triangular and serrated. [1] The University of Minnesota's horticulture text explains the structural difference behind the drawing: maple's major veins radiate from the petiole attachment, while oak's branch from a dominant midrib. [2] Those observations are useful here because they give the contour a framework rather than a decorative recipe.
Frequently Asked Questions
What is the easiest autumn leaf to draw first?
A small simple leaf with one midrib is usually the least complicated. In this lesson, however, all three centre lines are placed first so the full composition is stable before any outline begins.
How do I draw a maple leaf without making both sides identical?
Place five unequal vein directions from one junction, then shape each contour interval around its own pair of landmarks. Do not finish one half and copy it as a mirror.
Why do the maple veins spread from one point?
Maple leaves have palmate venation: the major veins radiate from the area where the petiole meets the blade. That fan gives the five lobes clear directions.
How can I make an oak leaf look different from holly?
Keep the outer lobes rounded and the inward curves shallow. Sharp thorns or repeated pointed teeth will push the silhouette towards holly.
How many veins should I draw in a leaf?
Only enough to explain the form. This study uses the main structural veins and a sparse final selection of secondary branches; it does not copy the complete natural network.
Do autumn leaves need colour or shading to look seasonal?
No. This lesson uses three recognisable detached deciduous forms and a fallen-leaf arrangement. The intended result is complete as a line drawing, with no colour or shading stage.
References
- How to identify trees by their leaves, Royal Horticultural Society — View source.
- The Science of Plants: 3.1 Leaves, University of Minnesota Libraries Publishing — View source.
More DRAWING Guides

How to Draw a Rose: A Step by Step Guide

How to Draw a Tree: A Step by Step Guide

How to Draw Eyes: A Step by Step Guide

How to Draw Leaves: A Step by Step Guide

How to Draw Autumn Leaves: A Step by Step Guide

How to Draw Flowers: A Step by Step Guide

How to Draw a Lily: A Step by Step Guide

How to Draw a Sunflower: A Step by Step Guide

How to Draw a Tulip: A Step by Step Guide

How to Draw a Hibiscus: A Step by Step Guide

How to Draw a Daisy: A Step by Step Guide
