




Draw one complete daisy in eight permanent line stages. You will set a shallow centre, arrange sixteen unequal rays in three depth layers, attach a slim curved stem and finish with two different toothed leaves. Each stage keeps every accepted mark, so there is no hidden guide-circle removal, cleanup or shading pass.
Difficulty: Beginner; the main challenge is varying many narrow rays without losing their shared centre
Time: Allow about 25–40 minutes. This is an untested estimate, and the bloom makes a sensible stopping point.
Medium: HB or No. 2 pencil, line only
Read the daisy as a centre with separate rays
A daisy head is not one flower surrounded by decorative petals. It contains many small central disc florets, with the familiar white ray florets around them.[1][2] That observation is useful for drawing: make the centre a shallow clustered form, then treat every ray as a separate shape travelling away from its rim.
This exercise uses sixteen rays because the number is full enough to feel daisy-like but still easy to count and compare. It is a designed drawing exercise, not an exact floret census or a species-identification plate. The three depth groups—front, side and rear—turn a flat wheel into one slightly tilted head.
Materials
- One pointed HB pencil. A No. 2 classroom pencil is an everyday equivalent.
- A vertically oriented sheet with a smooth white or warm-white surface. Printer paper or an unlined sketchbook page is suitable for practice.
- A clean eraser for correcting only the newest misplaced curve.
- For a wooden pencil, keep a sharpener nearby.
- Optional: a clear reference photograph showing one open daisy at a modest angle. Study it for unequal ray lengths and head tilt; use the supplied drawing as the target for this sequence.
Leave the compass, ruler, ink, marker, blending stump, colour, specialist paper, tracing equipment and tablet aside. If a narrow consistent line suits you, a 0.5–0.7 mm mechanical pencil works well.
Before you draw
Imagine a portrait frame four units wide and five high. The centre of the flower sits at about 48% of the page width and 29% of its height. Let the bloom fill the upper third, preserving a long open route below for its support and stem; the leaves will branch into that space later.
Use the separate Stage 1 placement panel to judge that position. Its oval envelope, percentages and stem corridor are measuring aids, not lines to put on your paper. The optional page grid is also a viewing aid: turn it on to compare the centre, ray tips or leaf attachments with a cell, then draw freehand without copying the grid itself.
Keep the outside contours calm and visible. The short ray folds, centre marks and leaf veins can be finer. Nothing in the sequence is scheduled for erasure, and the final stage does not ask you to darken every outline. Upper-left is the notional light direction, expressed only by leaving slightly more space between centre marks on that side; the result remains an unshaded line drawing.
1. Place the shallow centre

Stage 1 of 8. A shallow centre fixes the head tilt and reserves the stem corridor. 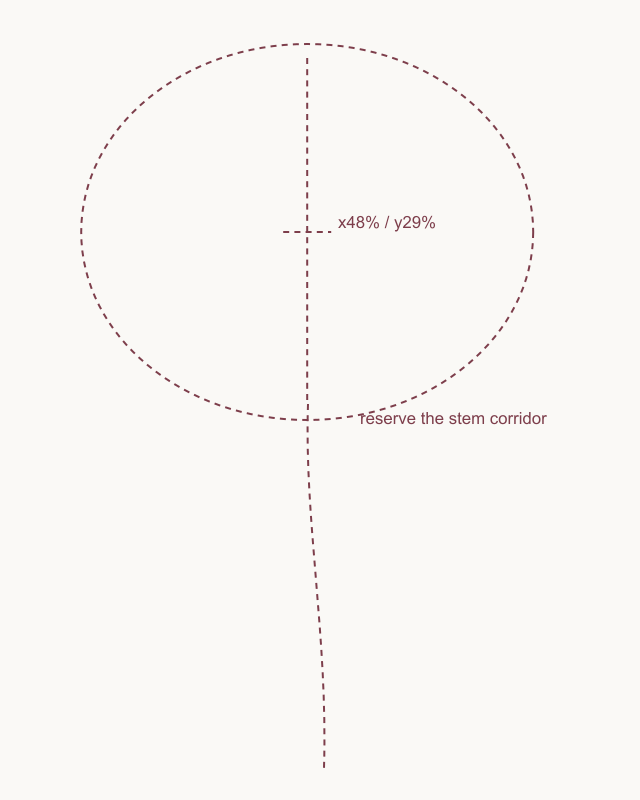
Placement cue: locate the centre around x48% and y29%. Reserve the broad head envelope and lower stem corridor, leaving every cue mark off the drawing. At the x48%/y29% position, draw one low oval. Start with the upper arc and return along a slightly fuller lower arc. Let the right end sit a touch higher than the left so the shape feels gently turned rather than mechanically horizontal.
This is the permanent outside edge of the central disc. Keep it wider than it is high and resist correcting it into a perfect circle. Most of the sheet should still be empty, especially the corridor directly beneath it.
Look for this before moving on: one shallow centre sits near x48%/y29%, is visibly wider than high and leaves room for a broad head plus a long stem below.
If it goes wrong: preserve the more useful arc. Remove only the newest round, oversized or sharply pointed section, then reconnect it between the same two stable points.
2. Add the four front rays
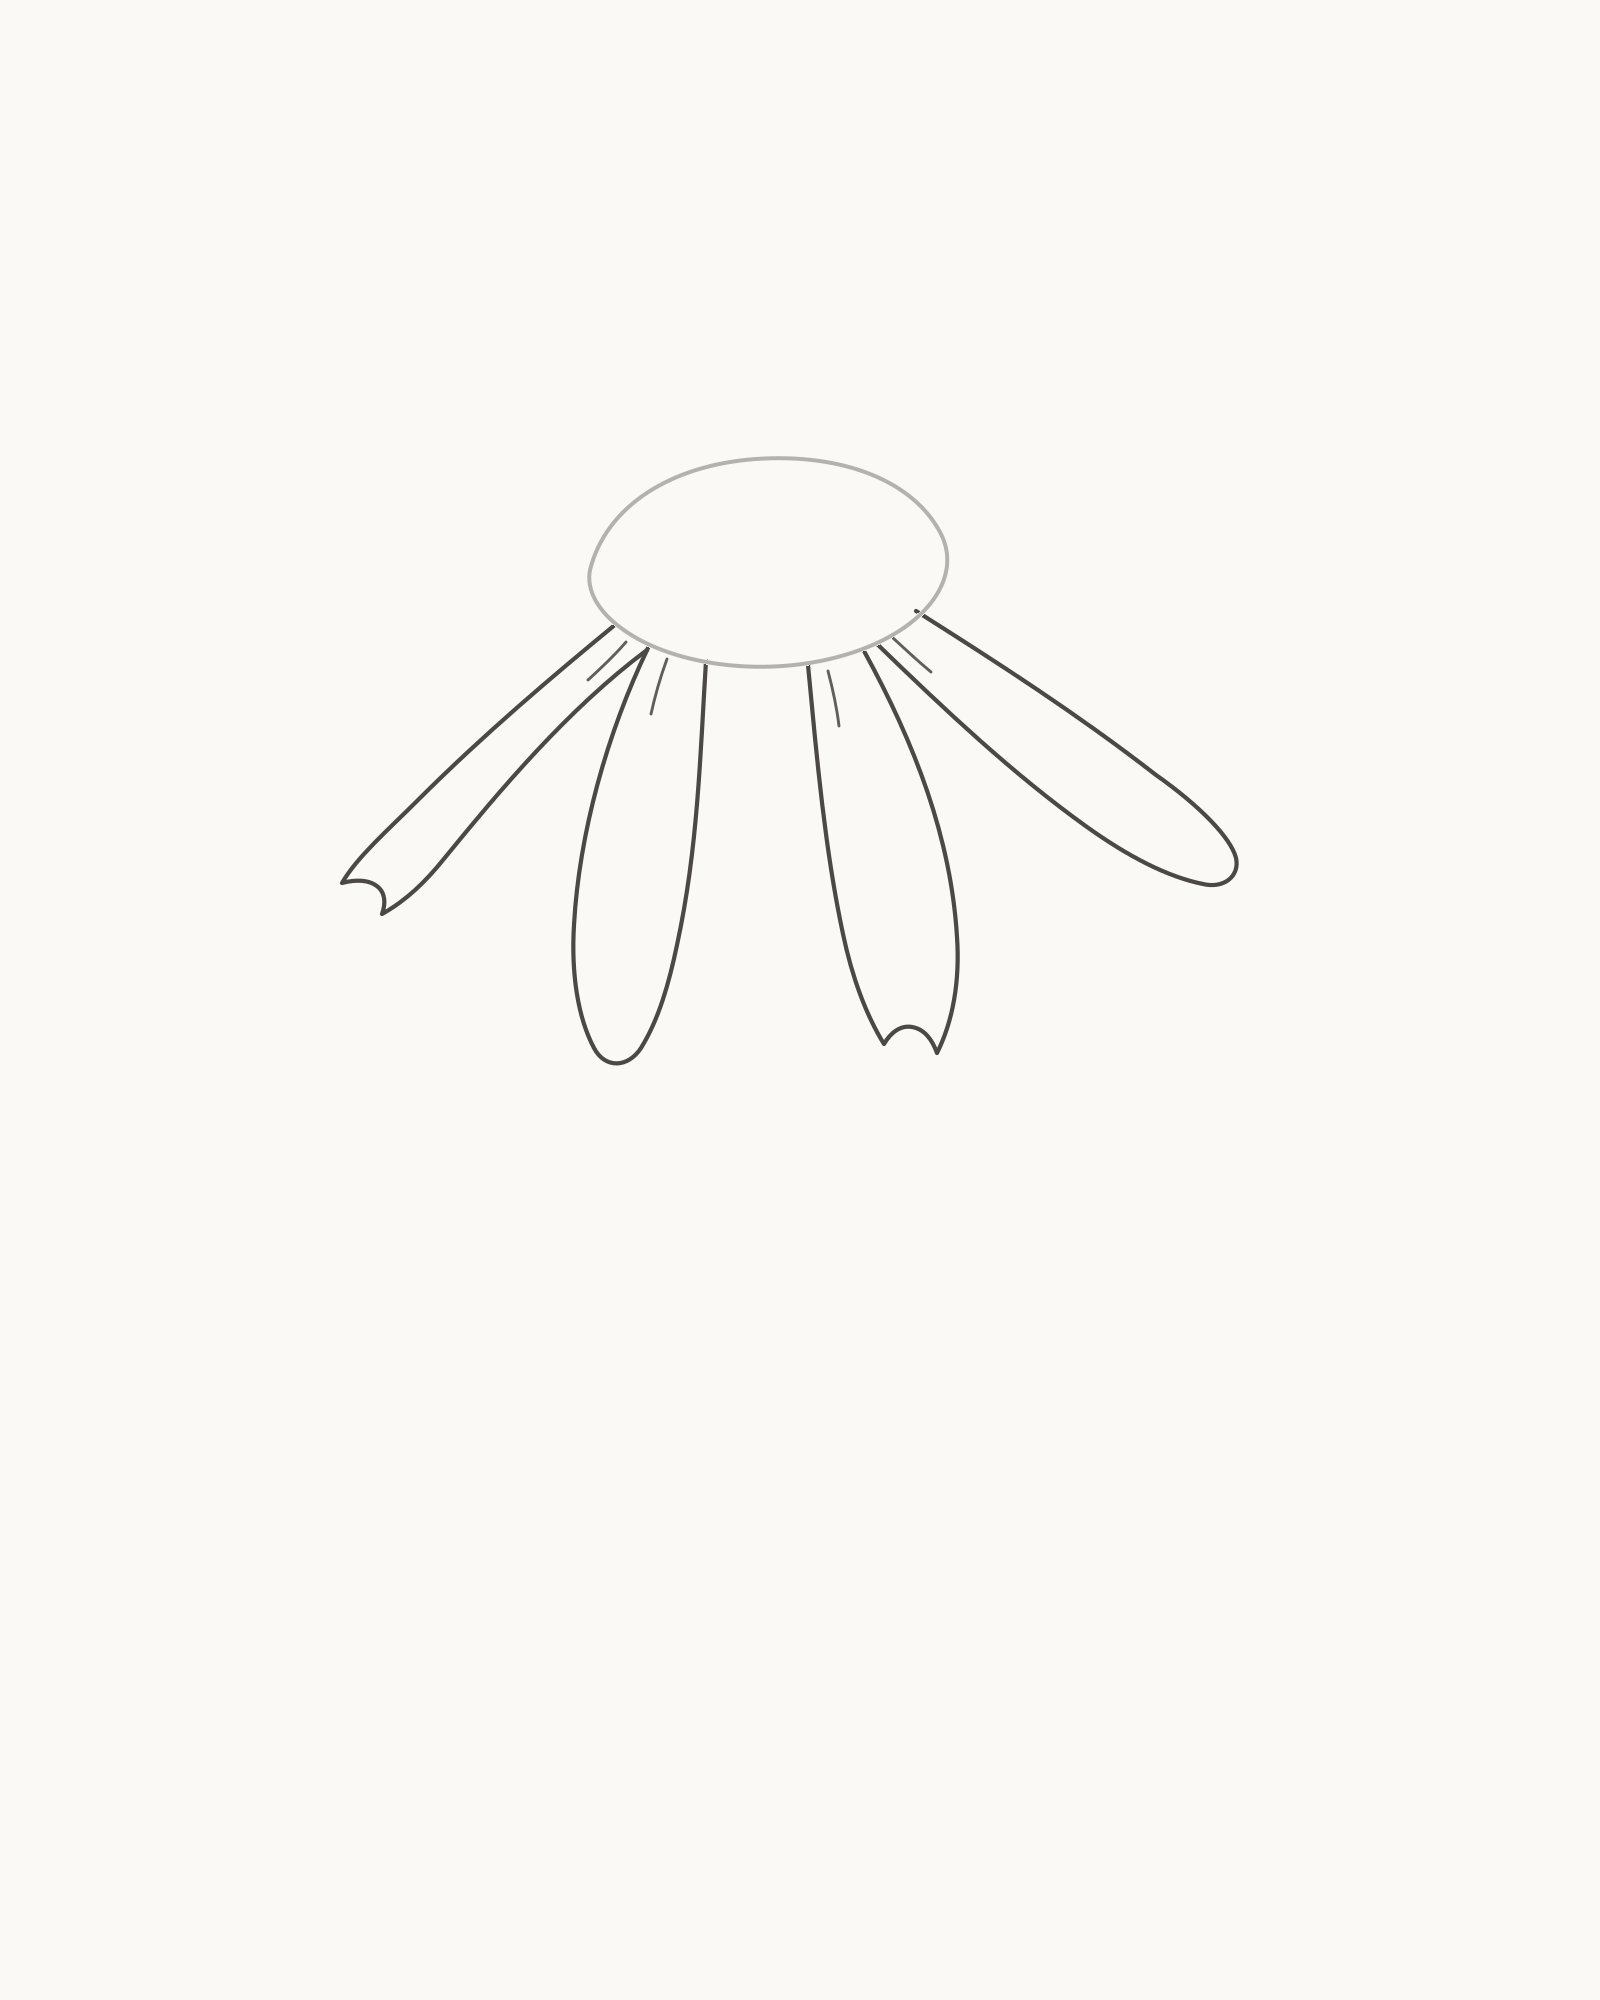
Stage 2 of 8. Four unequal rays establish the nearest tier. - Outer-left ray
- Longer inner-left
- Longer inner-right
- Outer-right ray
Work across the lower edge in a clear order: the outer-left ray, the longer inner-left ray, the longer inner-right ray and the outer-right ray. For each one, leave the disc at one point, travel around a narrow strap shape and return to a separate point on the lower rim.
Do not copy one ray four times. Change the lean, width and tip: one front ray may finish with a tiny irregular turn, while another can stay smoothly rounded. Add one short inner line close to the disc and aim it along each ray. These four fold roots are permanent details, not hidden construction spokes.
Look for this before moving on: exactly four lower rays are countable, the inner pair reaches farther down than the outer pair, all eight contour ends meet the disc and each ray has one short fold root.
If it goes wrong: keep the disc and completed rays. Lift only the latest repeated, pinched or floating contour back to its last secure contact, then change its widest point or tip before returning it to the rim.
3. Spread six rays to the sides
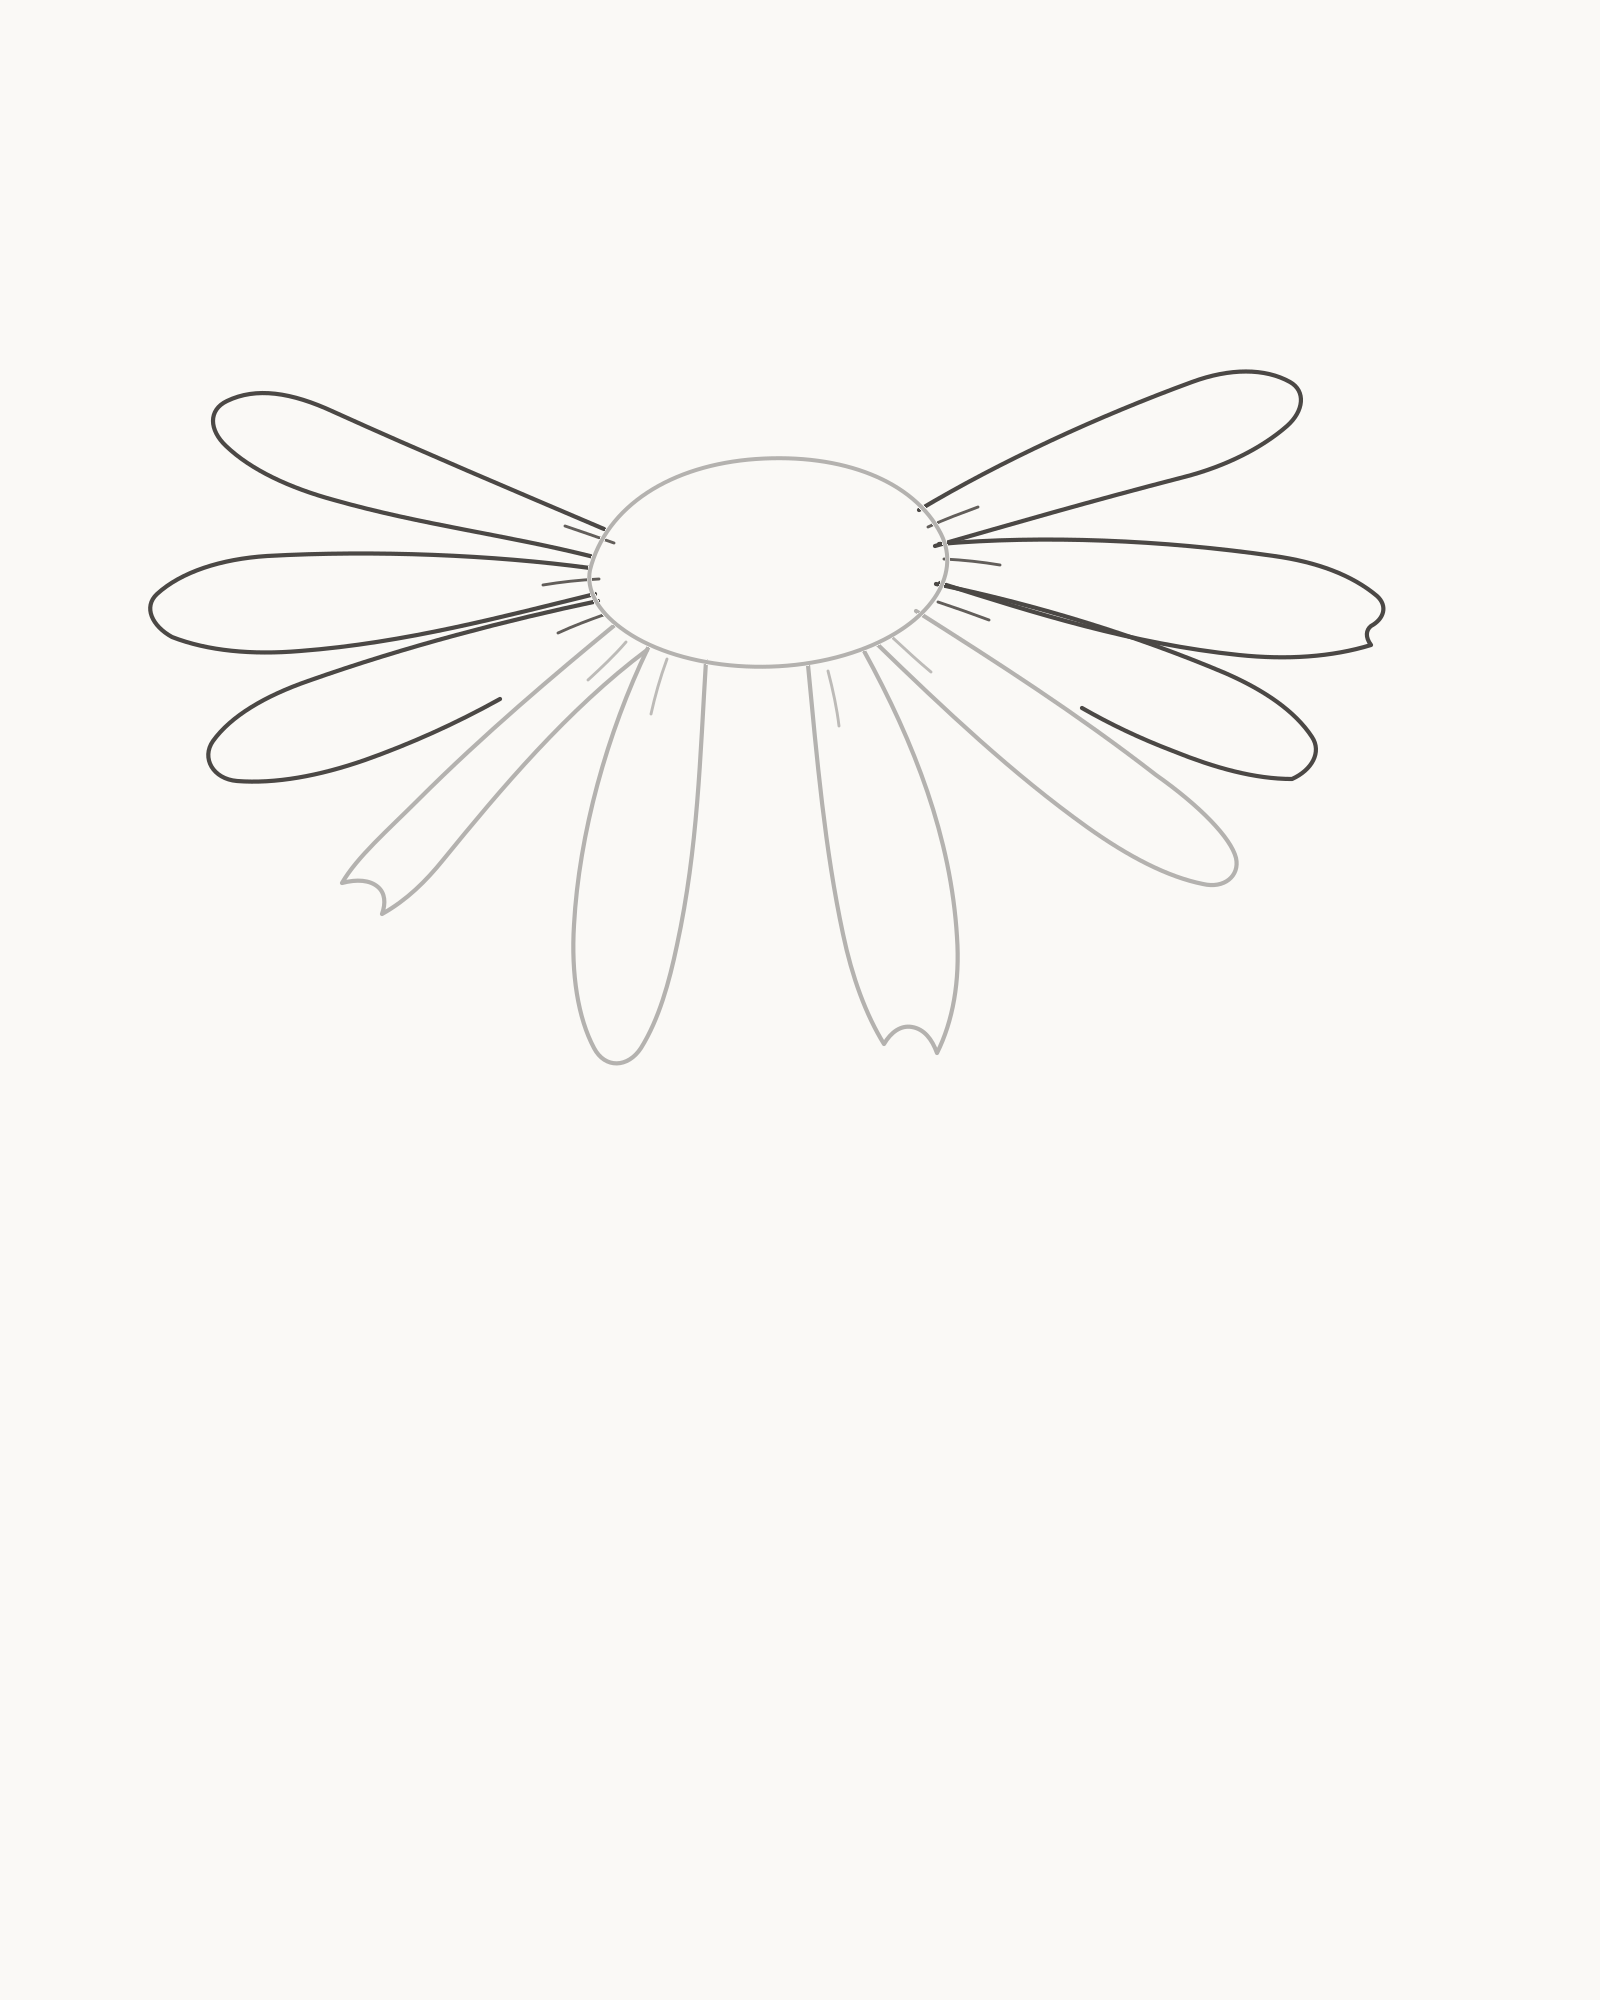
Stage 3 of 8. Six side rays broaden the head without making a mirrored fan. - Left three, low to high
- Right three, high to low
- Check ten rays
Add three rays on the left from low to high. Then add three on the right from high to low. Their sideward reach should broaden the head without creating two mirrored fans. Let the left and right groups disagree slightly in height, width and spacing.
Most exposed bases touch the side of the disc. Where a return edge disappears behind a front ray, stop it at that accepted contour rather than drawing through it. Give each new ray one short fold root near the centre, following the direction of its own shape.
Look for this before moving on: ten rays are now countable, with three new forms on each side; the two side groups differ, and every visible endpoint meets either the disc or an intentional front-layer contact.
If it goes wrong: leave the front tier and sound side rays untouched. Replace only the newest ray from its stable start to its stop; shorten a crossing return edge instead of covering it with another line.
4. Close the bloom with six rear rays
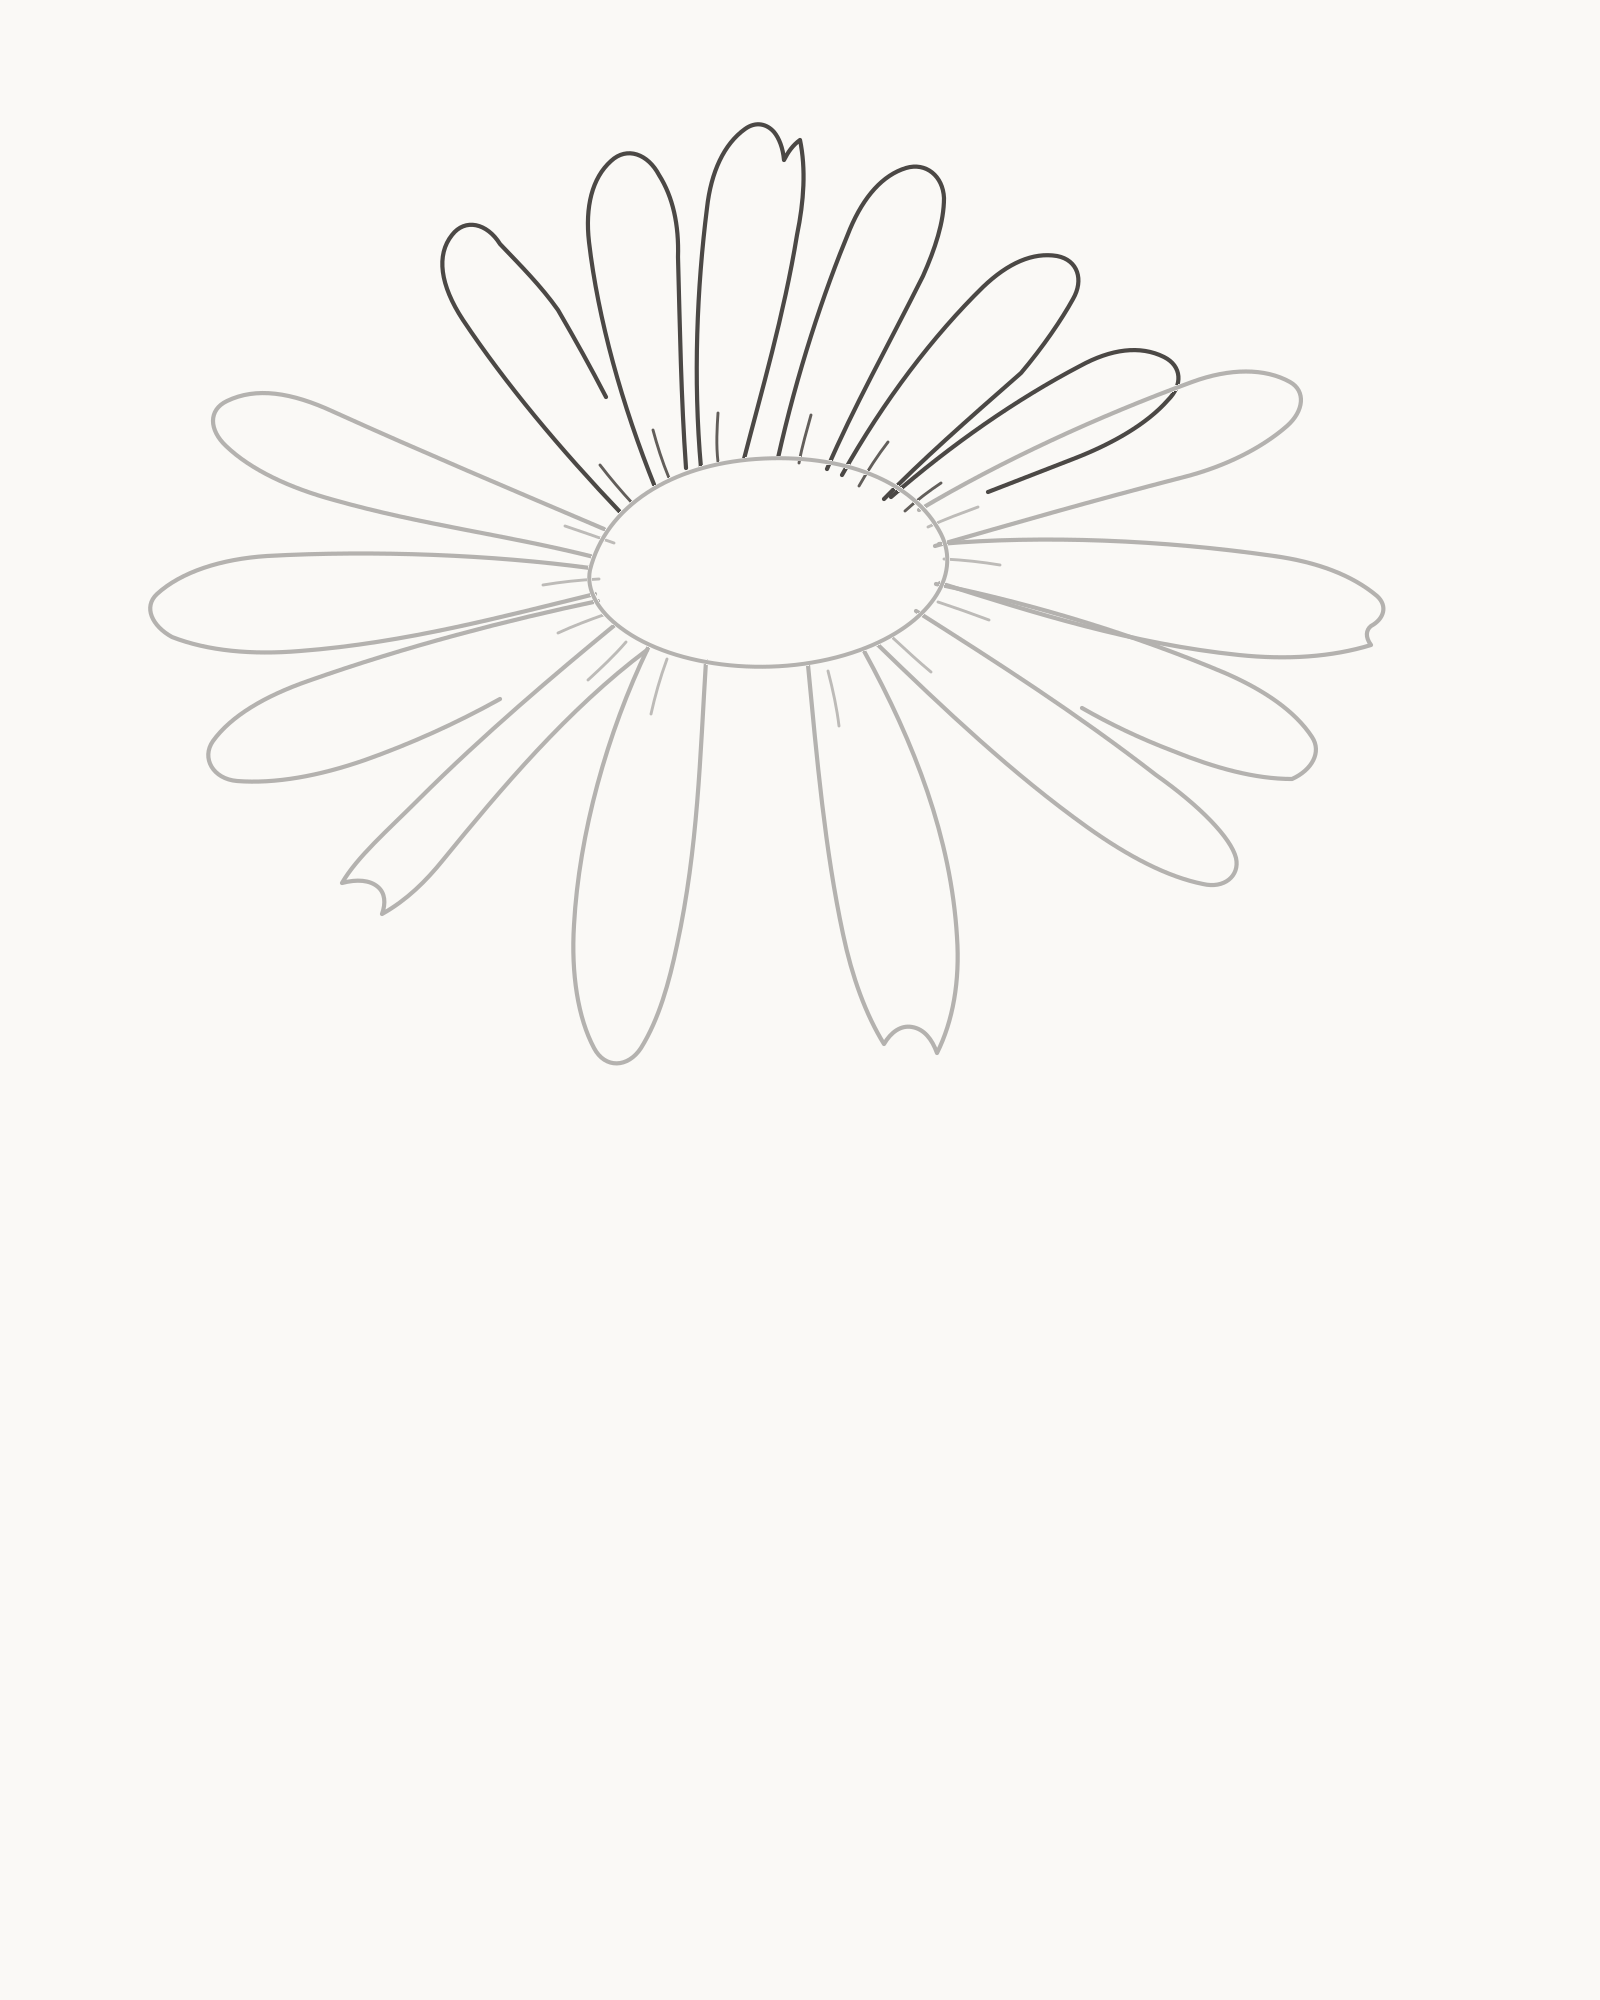
Stage 4 of 8. Six shorter rear rays complete the oblique flower head. - Work left to right
- Keep the upper tier shorter
- Count sixteen rays
Move from left to right across the upper rim, adding six narrower rear rays. Keep them shorter overall because this side of the head tilts away. Vary their lean and length, and allow two restrained tip irregularities among the smoother rounded ends.
Each visible contour must return to the upper disc or finish where an existing side ray hides it. Add one short fold root per ray. Count the whole head after the sixth addition: four front, six side and six rear rays make sixteen.
Look for this before moving on: exactly sixteen rays form one shallow oval head, the six upper rays are shorter than the front group, and no loose line crosses the disc or suggests a seventeenth ray.
If it goes wrong: preserve the completed lower and side tiers. Remove only the newest rear contour or fold root; rebuild it with a different lean rather than squeezing an extra ray into a narrow gap.
5. Give the centre a clustered surface

Stage 5 of 8. Sparse curved marks turn the empty oval into a clustered disc. - Upper broken arc
- Lower broken arc
- Eighteen open curves
Inside the oval, add two loose broken arcs: one across the upper half and one curving through the lower half. They should guide the eye around the disc without closing into target rings.
Next place eighteen small curved marks in staggered rows. Think of shallow commas or tiny arches rather than dots. Keep the upper-left area a little more open and bring the lower-right marks slightly closer together. This difference suggests direction without creating a dark patch or a separate shading step.
Look for this before moving on: two broken arcs and eighteen small curved marks remain individually legible inside the disc, with calmer spacing upper-left and no filled or heavily darkened area.
If it goes wrong: keep every clear mark. Remove only the newest dot-like, crowded or escaped curve, then replace it with a small open arch inside the nearest gap.
6. Attach the bracts and curved stem
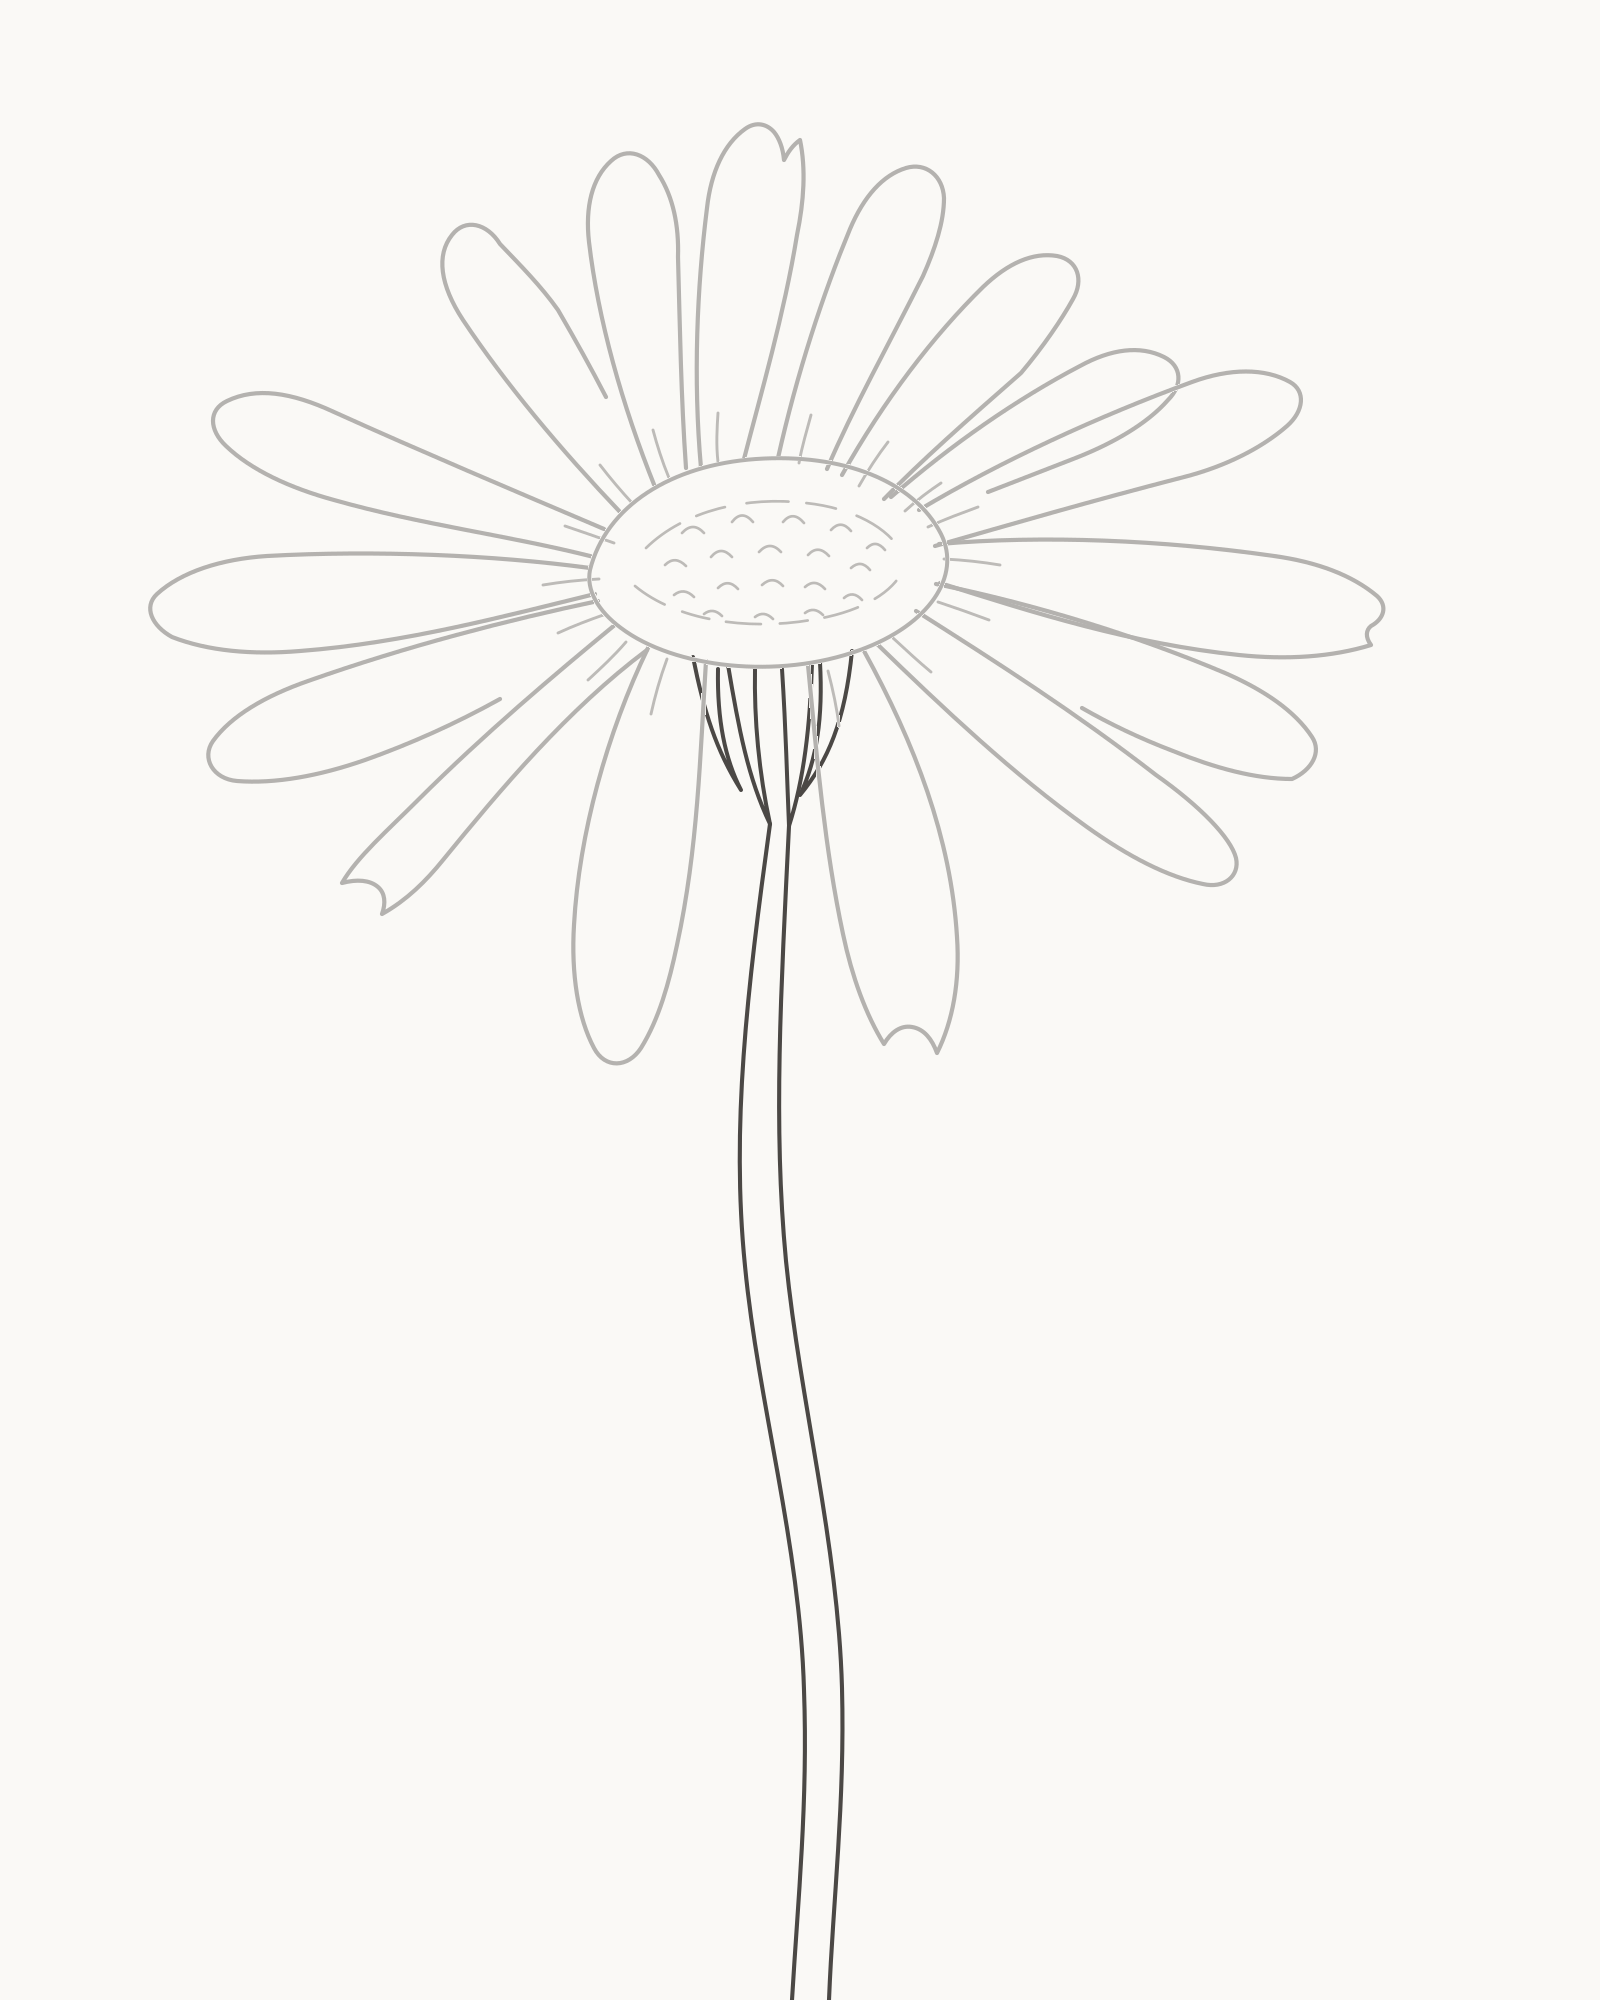
Stage 6 of 8. Four bracts and a slender curved stem support the head. - Four unequal bracts
- First stem edge
- Second stem edge
Below the disc, place four slim unequal bracts behind the lowest rays. Let their points descend to different levels so they read as a compact support rather than four more matching petals.
From two separate points beneath that group, draw the edges of the stem. Both follow the same relaxed reverse-S movement to the bottom crop, narrowing and widening only slightly. Draw the first edge in one calm sweep, then use it to judge the second without tracing a perfectly parallel tube.
Look for this before moving on: four bracts are countable beneath the head, and two separate non-crossing stem edges meet them before following one continuous, gently changing curve to the lower edge.
If it goes wrong: retain the better bracts and stem edge. Correct only the newest point or curve from its last secure contact; do not thicken the junction or run a stem line through a front ray.
7. Build the larger left leaf
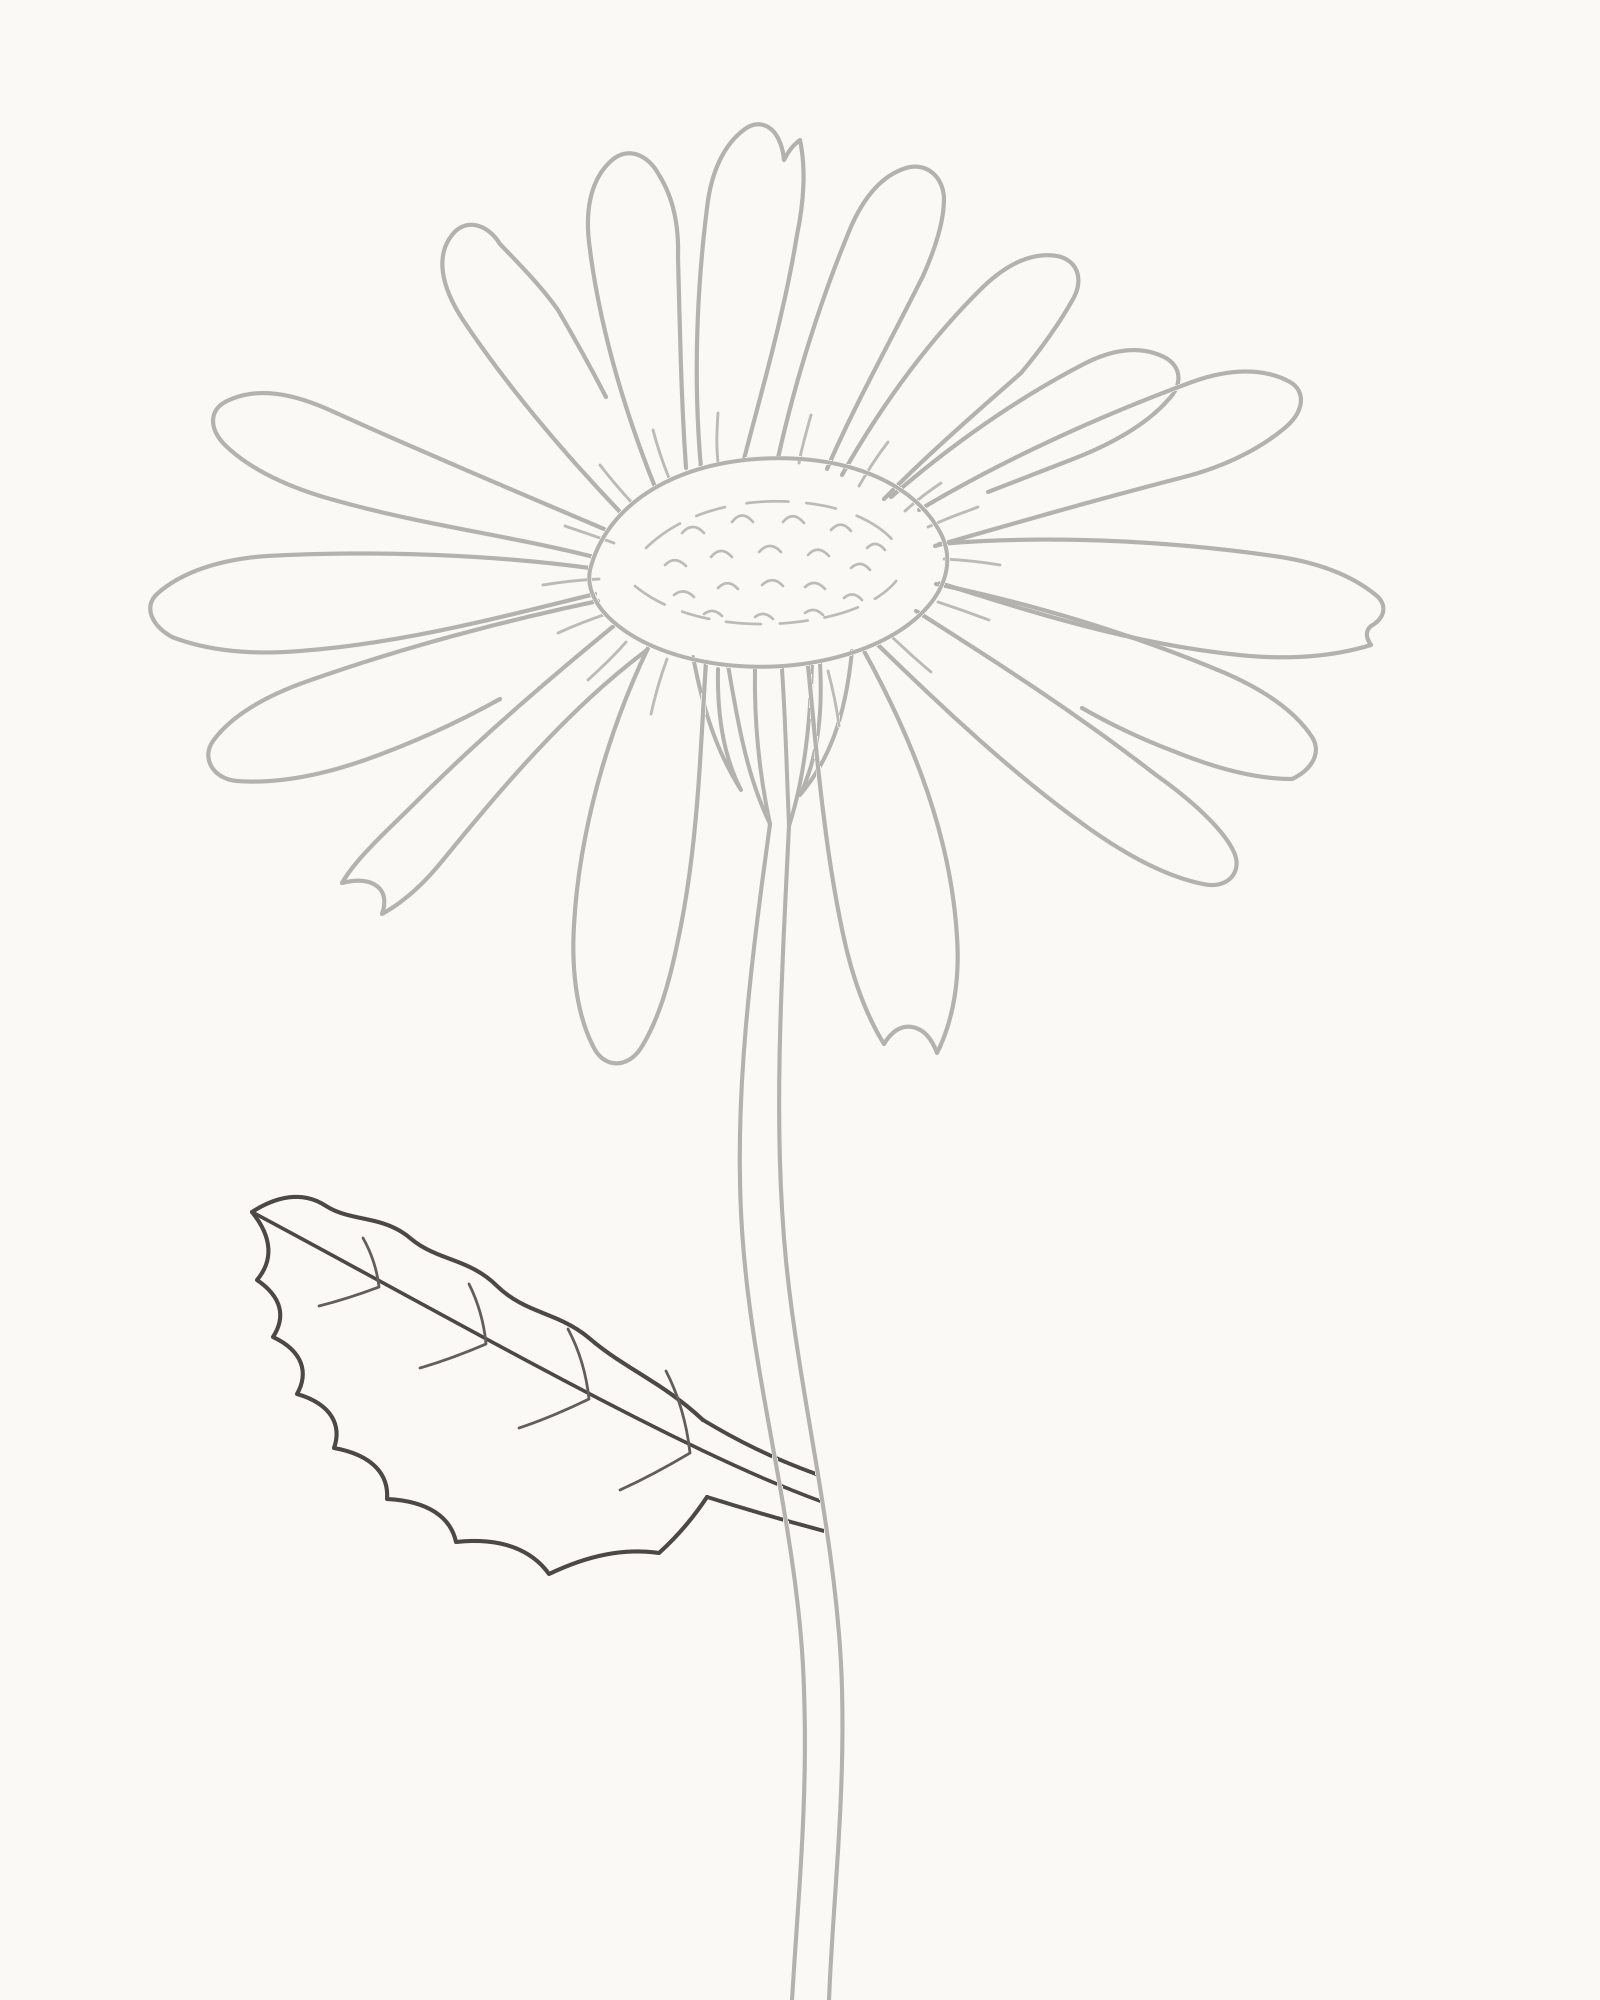
Stage 7 of 8. The larger toothed leaf attaches low on the left. - Two attachment lines
- Midrib and blade
- Four vein pairs
Choose two nearby attachment points on the lower-left side of the stem. From them, build a short two-edge stalk leading into one midrib that travels up and left to a pointed tip.
Close the blade around that line with two unequal toothed edges. Let the teeth change in size and spacing instead of becoming a neat scalloped border. Add four short vein pairs from the midrib, and stop every branch before it reaches the outside contour. Read the firmer stalk lines as attachment landmarks, not shading or a value change.
Look for this before moving on: the larger leaf has two stem contacts, one continuous midrib, one left-pointing tip, an uneven toothed edge and exactly four vein pairs ending inside the blade.
If it goes wrong: keep the attachment and midrib if they point cleanly to the tip. Replace only the latest awkward tooth or outer segment between stable turns; shorten just the newest vein if it touches the edge.
8. Add the smaller right leaf
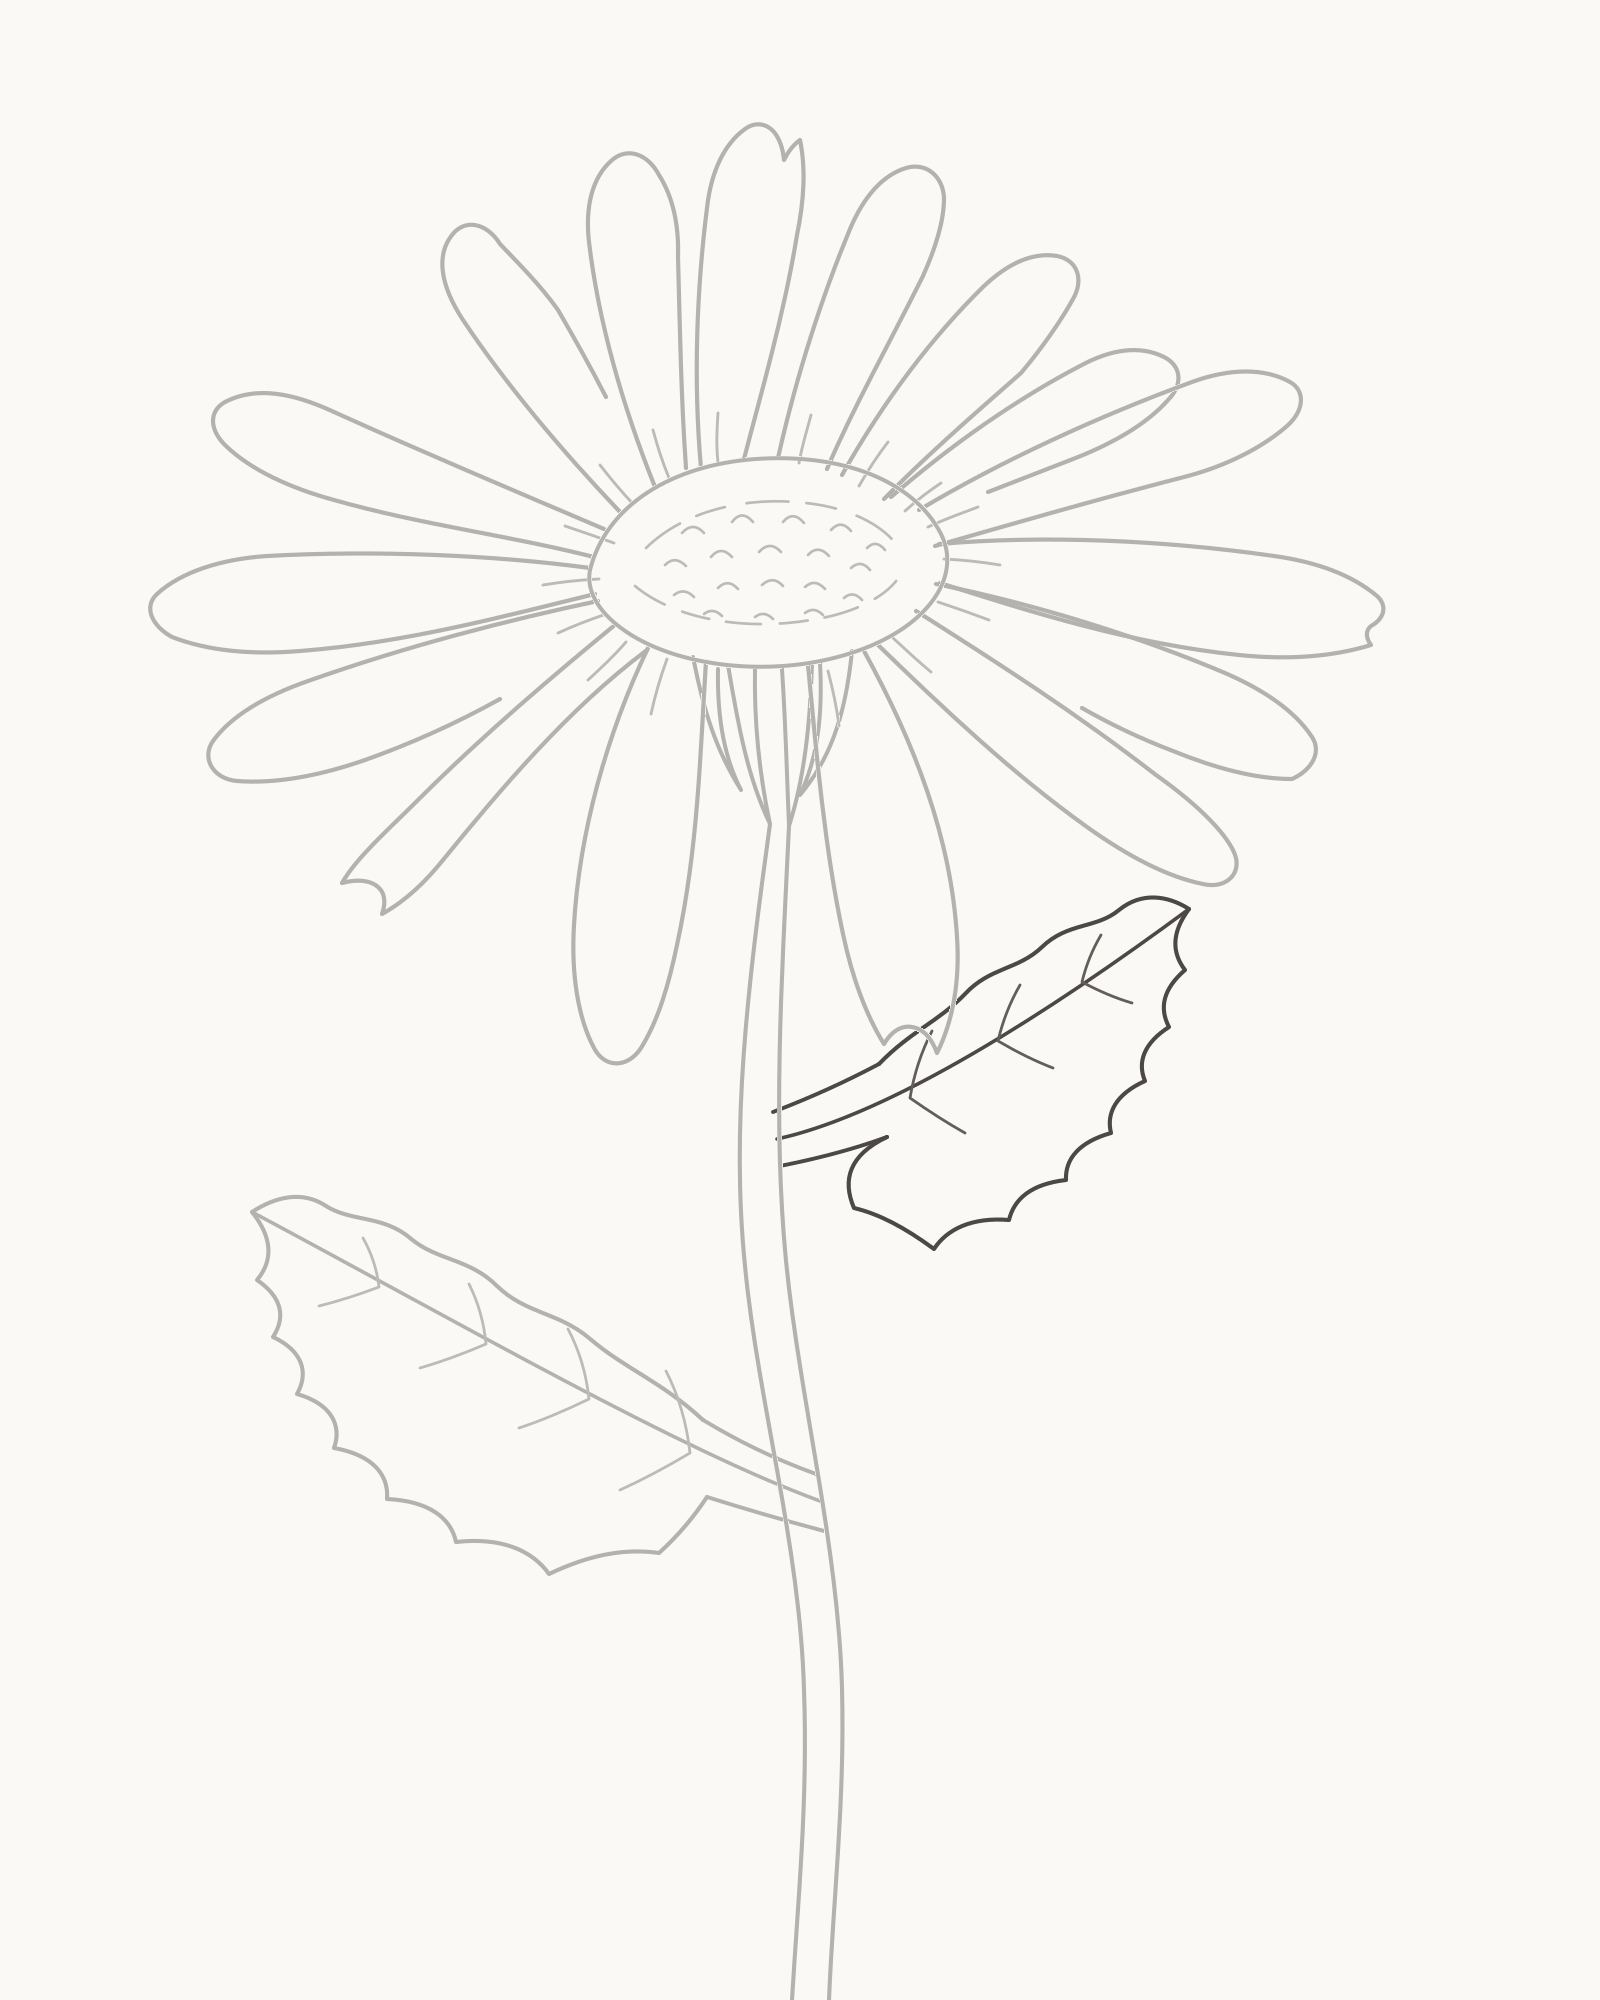
Stage 8 of 8. A smaller higher leaf completes the line drawing. - Higher attachment
- Midrib and blade
- Three vein pairs
Set the second attachment higher on the right side of the stem. Aim its shorter midrib up and right. Surround it with a narrower blade whose lean, fullest point and tooth rhythm differ from the first leaf.
Finish with three short vein pairs. Those are the final additions: there is no shading option, cleanup stage or outline-darkening pass. The original disc edge, all sixteen rays and folds, the four bracts and both stem edges remain visible in their earlier form.
Look for this before moving on: the right leaf is smaller, higher and differently angled, with two clear stem contacts and exactly three vein pairs; the complete drawing remains line only.
If it goes wrong: preserve the stalk and midrib when they attach securely. Redraw only the newest blade section or vein, changing its bow or length without altering the stem or larger leaf.


Common mistakes and local fixes
The bloom looks like a wheel. Compare only neighbouring rays. Change the newest repeated width, lean or tip; avoid adding wrinkles or scallops to every ray.
The centre looks face-on. Keep the lower arc and flatten only the newest overly tall upper section. A shallow ellipse carries the viewpoint more clearly than extra shading.
A gap looks like another ray. Count the four front, six side and six rear forms. Repair the newest loose endpoint so it meets the disc or stops cleanly behind the correct layer.
The disc has become a dark button. Leave the clear arcs and open curves. Remove only the newest crowded marks until warm paper is visible between every group.
The flower seems pasted onto the stem. Check the four bracts first. Reconnect only the newest support or stem edge beneath them instead of extending a line through the bloom.
The leaves look like twins. Keep the larger lower-left leaf. Preserve the newer leaf's high stem contact while adjusting only its length, angle or rhythm of teeth.
Practise a more tilted flower
On a fresh area of paper, repeat Stages 1–5 with a flatter centre. Shorten the six rear rays a little more and let the four front rays extend farther. Keep the sixteen-ray count, but change which tips turn or split. This variation practises foreshortening through proportion and overlap without introducing a new shading method.
For more practice with attached blades and vein spacing, try How to Draw Leaves. To organise more than one bloom, continue with How to Draw Flowers. The completed Sunflower guide offers a denser, larger disc challenge. The How to Draw page returns to the practical index, while the separate Flower drawings gallery remains the home of historical examples rather than this procedure.
Frequently Asked Questions
What is the easiest way to start a daisy drawing?
Start with one shallow oval for the centre, placed high enough to leave room for the stem. Add the rays in small depth groups—front, sides and rear—so you never have to guess the whole ring at once.
How many petals should I draw on a daisy?
This exercise uses sixteen visible ray shapes: four front, six side and six rear. Real daisy heads contain many ray florets and vary, so sixteen is a manageable drawing decision rather than a botanical rule.[1][2]
How do I keep the rays from looking identical?
Change three things deliberately: each ray's lean, where it is widest and how its tip turns. Compare the newest ray with only its two neighbours instead of trying to randomise the entire flower.
How can white daisy petals show on white paper?
Use the outside contours, short root folds and clean overlaps. You do not need to fill the rays; the untouched paper becomes their light surface.
Where should the stem join the flower?
Place four small bracts beneath the lower ray tier, then begin the two stem edges from separate contacts under that support. The stem should not run through the centre or attach as one floating line.
Do I erase the first oval or the short fold lines?
No. The oval remains the outside of the disc, and the sixteen short folds remain at the ray roots. Use the eraser only on the newest faulty segment before accepting that stage.
Does this drawing include shading?
No. This version finishes as a line drawing. Its on-page switch can make earlier work paler so the latest addition is easier to see; switching views never changes the cumulative artwork.
How do I stop the leaves dominating the flower?
Keep their midribs narrow and their vein branches short. Make the right leaf smaller than the left, and repair only the newest outer section if either blade spreads too far.
References
- Kew Science, Bellis perennis L.. View source
- Kew Grow Wild, Oxeye daisy. View source
More DRAWING Guides

How to Draw a Rose: A Step by Step Guide

How to Draw a Tree: A Step by Step Guide

How to Draw Eyes: A Step by Step Guide

How to Draw Leaves: A Step by Step Guide

How to Draw Autumn Leaves: A Step by Step Guide

How to Draw Flowers: A Step by Step Guide

How to Draw a Lily: A Step by Step Guide

How to Draw a Sunflower: A Step by Step Guide

How to Draw a Tulip: A Step by Step Guide

How to Draw a Hibiscus: A Step by Step Guide

How to Draw a Daisy: A Step by Step Guide
