




Draw one complete sunflower in eight permanent line stages: an off-round disc, two depths of unequal rays, three small supporting bracts, a sturdy curved stem and two broad leaves. The first marks remain visible in the finished image, so you can follow the construction without waiting for a cleanup or shading stage.
Difficulty: Beginner, with a counted petal sequence
Time: Allow about 35–50 minutes. This is an untested estimate; the two ray stages are sensible places to pause.
Medium: HB or No. 2 pencil, line only
Read the large centre first
A sunflower head is a cluster of many small flowers rather than one flower surrounding a seed button. Ray flowers form the familiar outer shapes, while disc flowers occupy the centre.[1] That distinction gives this drawing its useful order: establish a large two-part disc, build one visible ray layer, tuck a shorter layer behind it, then add only enough centre marks to suggest the clustered surface.
The result is a general common-sunflower observation exercise, not a botanical plate. The ray count is a drawing decision for this image, not a universal count for every sunflower. The broad, slightly uneven leaves help separate the result from a simple sun symbol or a daisy-like bloom.
Materials
- One pointed HB pencil. A No. 2 classroom pencil makes a similar mid-grey line.
- An upright sheet of smooth white paper; a plain sketchbook or printer sheet is fine for a first attempt.
- A clean eraser, reserved for the most recently drawn faulty section.
- A sharpener, so the short centre marks do not become heavy dashes.
- Optional: one clear near-front sunflower photograph that includes the head, stem and at least one leaf.
You do not need a compass, ruler, blending stump, ink pen, coloured pencil or a set of graphite grades. A mechanical pencil between 0.5 and 0.7 mm is a useful substitute when you want an even narrow edge.
Before you draw
Imagine a tall 4:5 frame. Place the centre of the flower head at about 50% of the width and 28% of the height. The outer disc is roughly one third of the completed head's width. Leave the lower half open for the stem and unequal leaves.
Use the separate Stage 1 placement cue to compare the disc envelope, completed head envelope and lower space. The cue is not part of the drawing. The optional page grid is only a measuring aid: compare the head's position against its cells, but leave those lines off the paper.
Keep the disc boundaries and ray contours light but clear. The stem and leaf midribs may be slightly firmer because they are attachment landmarks. There is no scheduled erasure or final retracing pass. The upper-left light direction is only an observation convention here: this line result contains no tone or shading.
1. Place the two-part disc

Stage 1 of 8. Two unequal permanent rings establish the flower head. 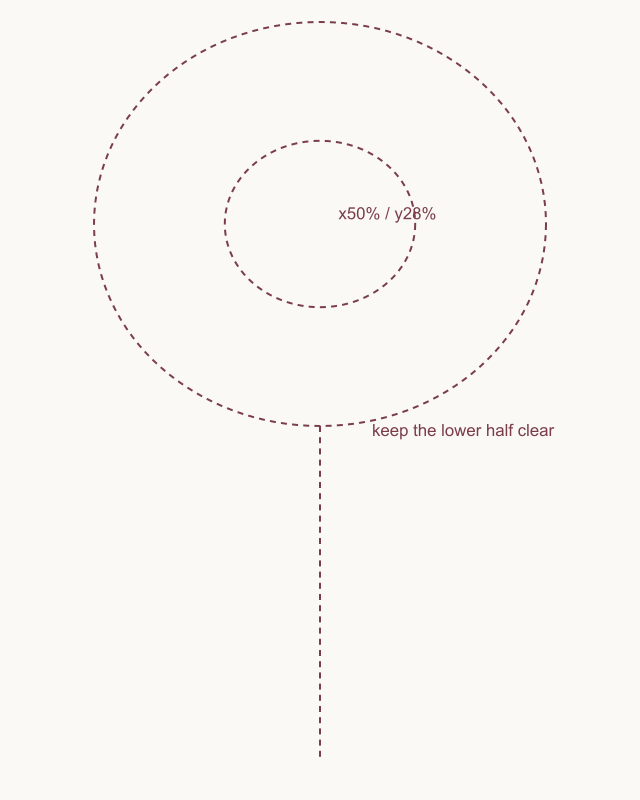
Placement cue: locate the disc centre around x50% and y28%. Keep the lower half for the stem and leaves, and leave every cue mark off the drawing. Draw the larger disc boundary first, high in the frame around the x50%/y28% cue. Let it be gently wider than it is tall, with a small change in curvature rather than a compass-perfect circle.
Add the smaller core inside it. Keep that boundary slightly offset and leave a broad, unequal band between the two rings. Both lines are permanent. They organise the two centre-texture zones used later, so do not make them faint construction marks that you plan to erase.
Look for this before moving on: two complete unequal rings sit high in the frame, the smaller one stays clear of the outer boundary, and more than half the page remains open below.
If it goes wrong: keep the sound part of the newest ring. Remove only the section that flattens, touches the other boundary or makes the centre too small, then close that section between the same two stable endpoints.
2. Add eleven front rays

Stage 2 of 8. Eleven complete varied rays form the visible front layer. - Top anchor
- Right anchor
- Lower-right anchor
- Left anchor
Build the first ray layer in a clear order. Add four unequal anchors first: one towards the top, one towards the right, one towards the lower-right and one towards the left. Each ray begins with a narrow base on the outer disc, widens through the middle and closes at one pointed tip.
Fill the spaces clockwise with seven more complete rays, stopping at eleven. Compare each new ray with its neighbours before closing it. Change the reach, width and lean a little; do not repeat one leaf-shaped template around the ring. Neighbouring contours may approach one another, but they must not cross.
Look for this before moving on: exactly eleven complete rays can be traced from two separate disc contacts to one tip, every base touches the disc, and the tips form an irregular rhythm without one accidental empty side.
If it goes wrong: preserve the disc and every finished ray. Lift only the newest side back to its disc contact, then redraw that side around the same tip; do not widen the base by cutting across the neighbouring ray.
3. Fit ten rear rays into the gaps

Stage 3 of 8. Ten shorter visible tips create a second, concealed ray layer. Start near the top and work clockwise through selected gaps. In each one, draw only the visible sides and tip of a shorter rear ray. Let each side disappear where the front layer hides its base. A rear ray should look tucked behind its two neighbours, not drawn across either one.
Count ten rear tips and leave the lower support gap open. Vary their lengths just as you varied the front layer. These rays create depth because they are shorter and partially concealed, not because they receive different shading.
Look for this before moving on: ten new tips are countable, every visible side finishes at a believable front-ray contact, no line crosses the first layer, and the lower support gap remains clear.
If it goes wrong: keep both neighbouring front rays. Remove only the newest rear side from its tip to the first secure overlap contact, then reconnect it there; do not extend the line through a front ray to reach the disc.
4. Support the head and draw the stem
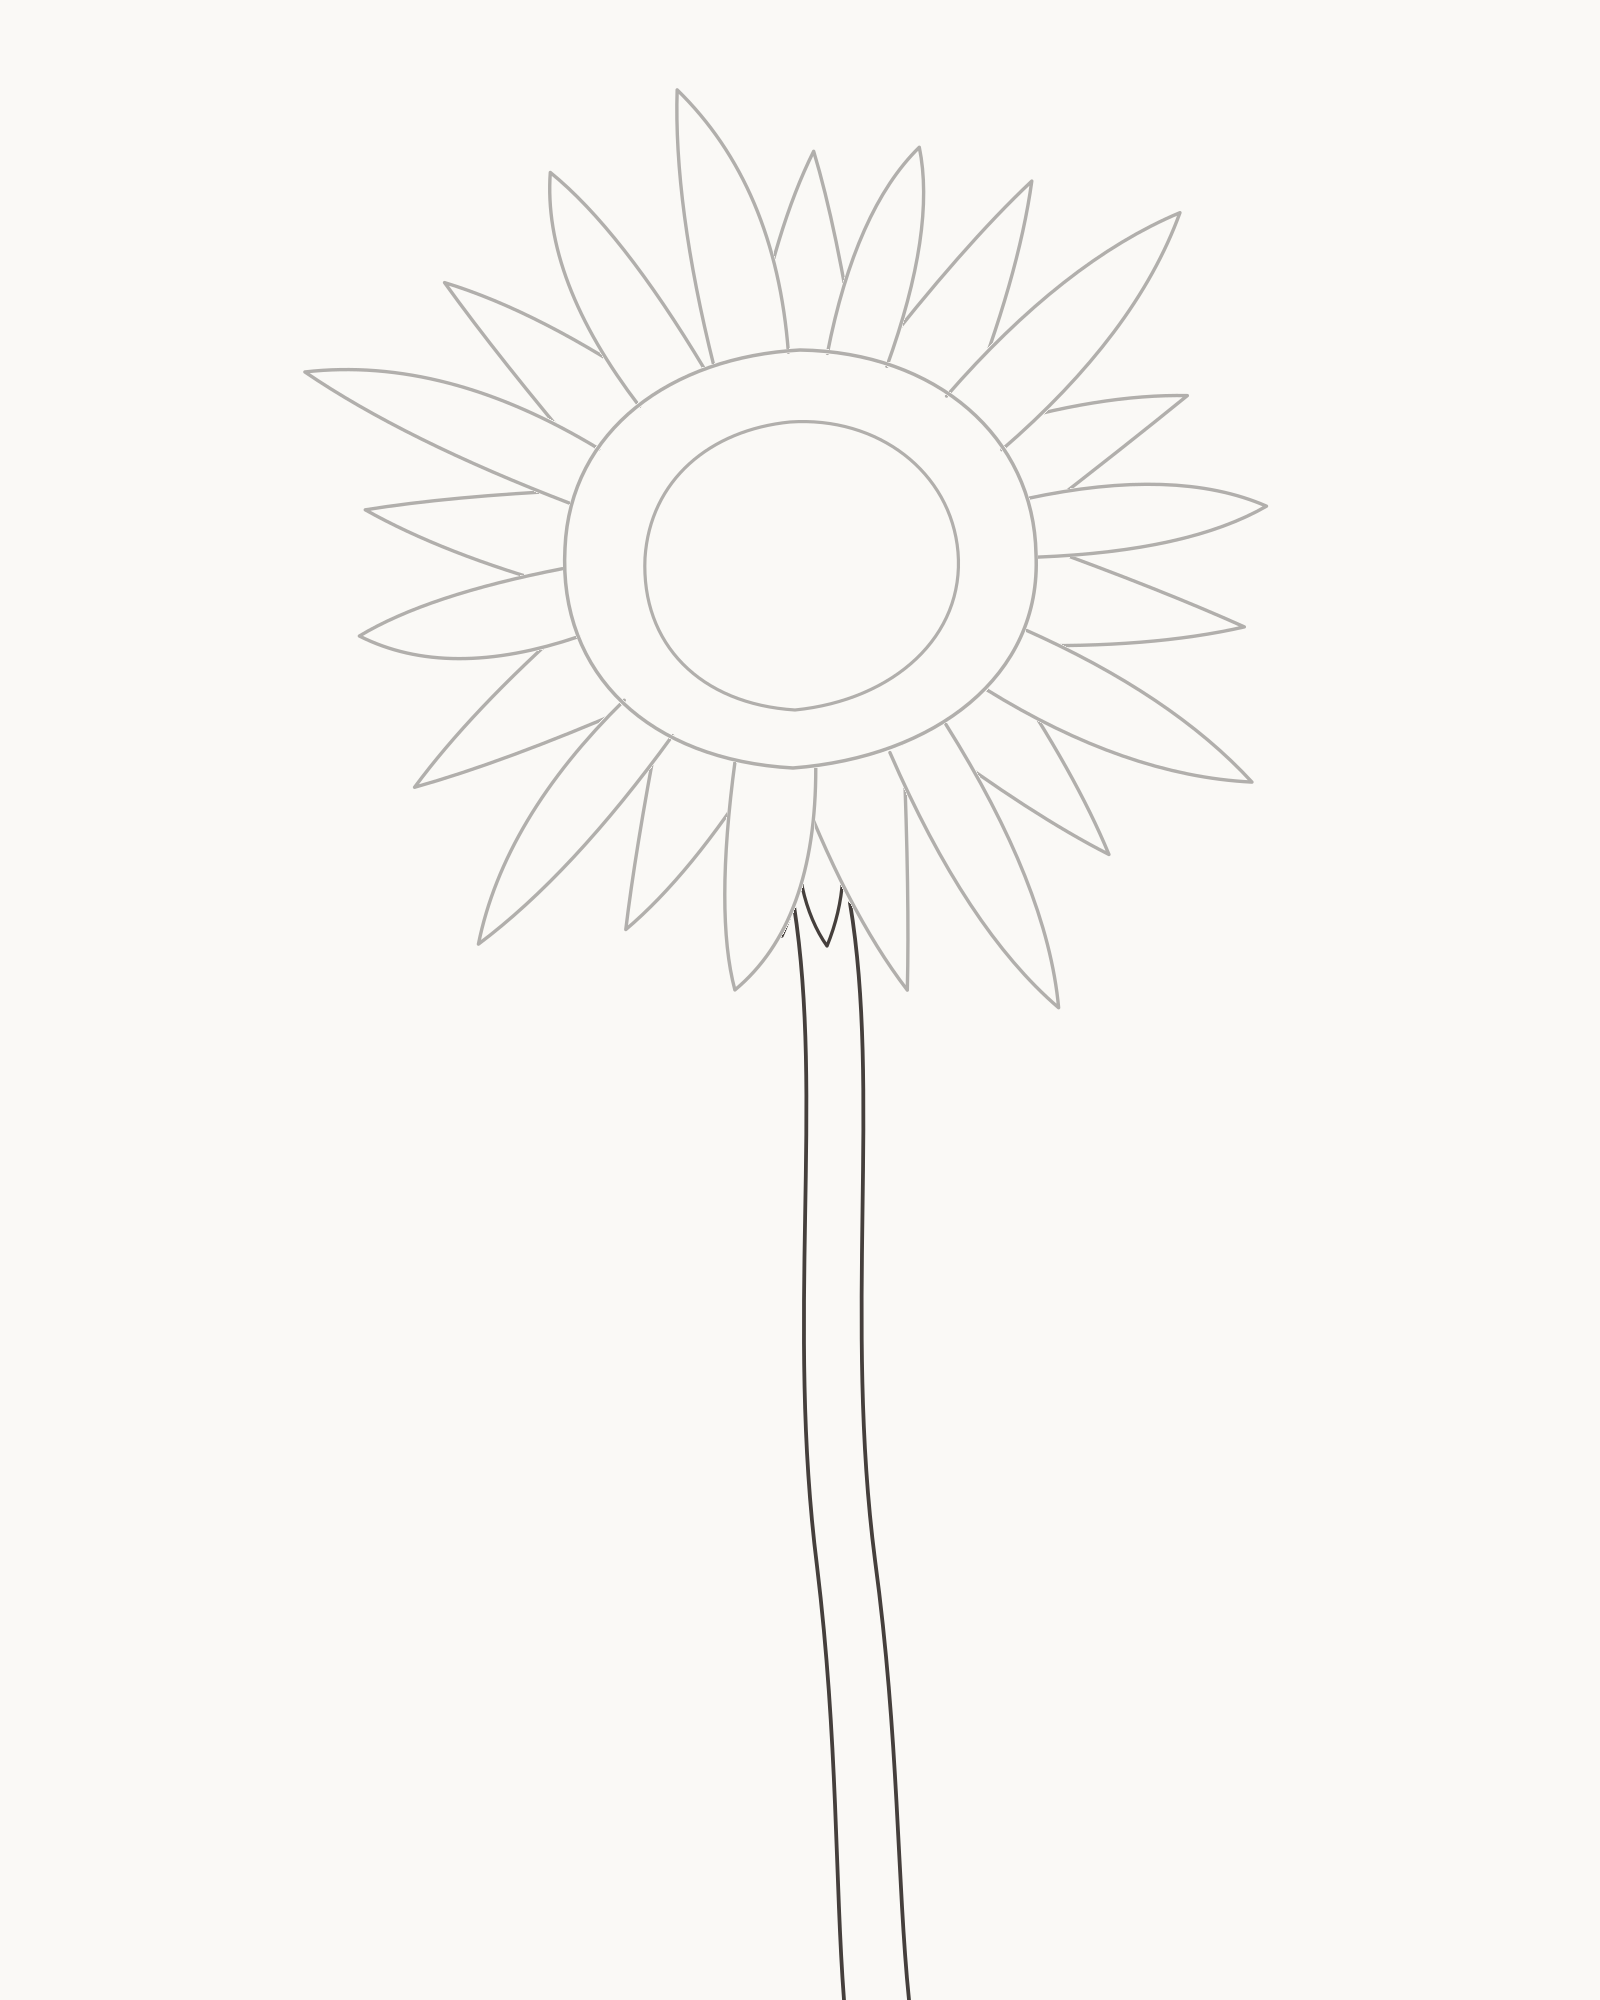
Stage 4 of 8. Three bracts and a sturdy curved stem support the wide head. - Centre bract
- Left bract
- Right bract
Under the lower rays, add three small unequal bracts in this order: centre, left, then right. Keep them restrained. They should gather beneath the head rather than forming another decorative petal crown.
From that support, draw the left stem edge down to the bottom crop with a gentle reverse curve. Add the right edge close beside it, following the same overall movement without becoming a rigid parallel tube. The stem is deliberately substantial enough to carry the wide head.
Look for this before moving on: three bracts attach beneath the lower rays, both stem edges begin below them, and one continuous sturdy stem reaches the bottom without crossing or changing width abruptly.
If it goes wrong: keep the bracts and the better stem edge. Remove only the newest edge back to its support contact, then redraw it using the first edge as a distance guide; do not attach it to a ray tip.
5. Add the large left leaf
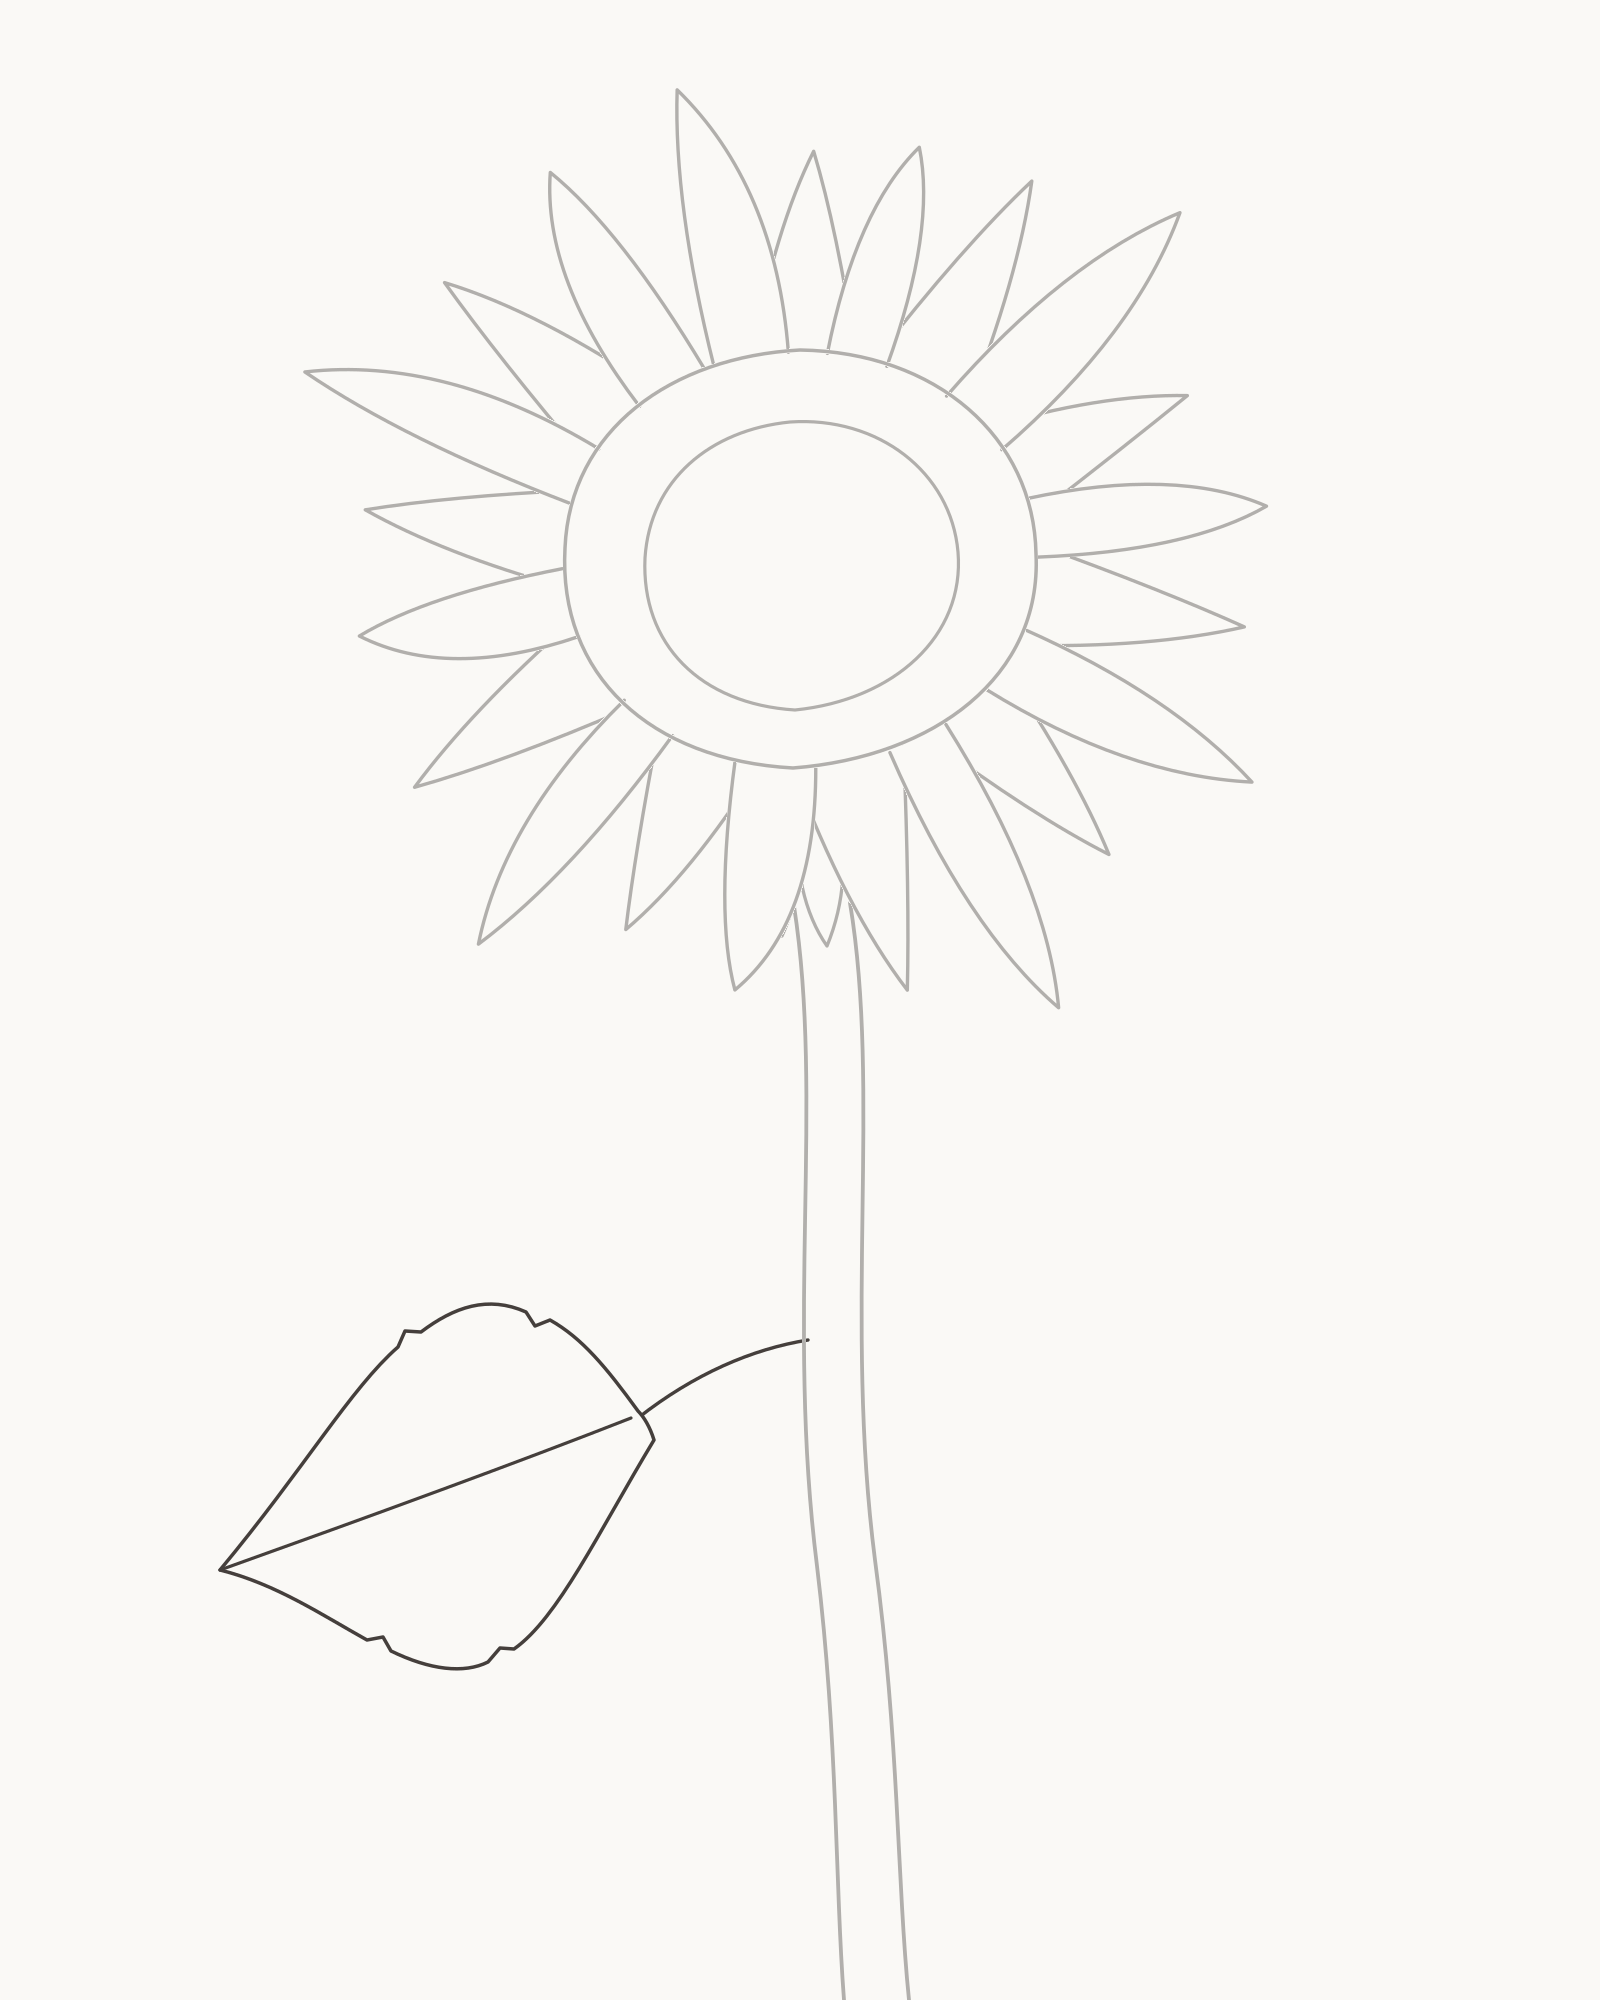
Stage 5 of 8. A broad lower-left leaf attaches directly to the stem. Begin near two thirds of the page height on the left stem edge. Draw a short petiole outwards, then continue its direction as the permanent midrib towards the lower-left leaf tip.
Enclose that line with two broad returning sides. Let the blade become full near its middle, then narrow into the tip. The few shallow edge changes suggest a coarse leaf without turning it into holly teeth. Both sides return to the same attachment area.
Look for this before moving on: one stem attachment leads through a short petiole and single midrib to the pointed tip, the broad blade closes at that attachment, and no contour crosses the stem.
If it goes wrong: preserve the stem, petiole and midrib. Replace only the newest outside arc between the attachment and tip, reducing any sharp tooth or swollen section rather than redrawing the whole leaf.
6. Add the smaller right leaf
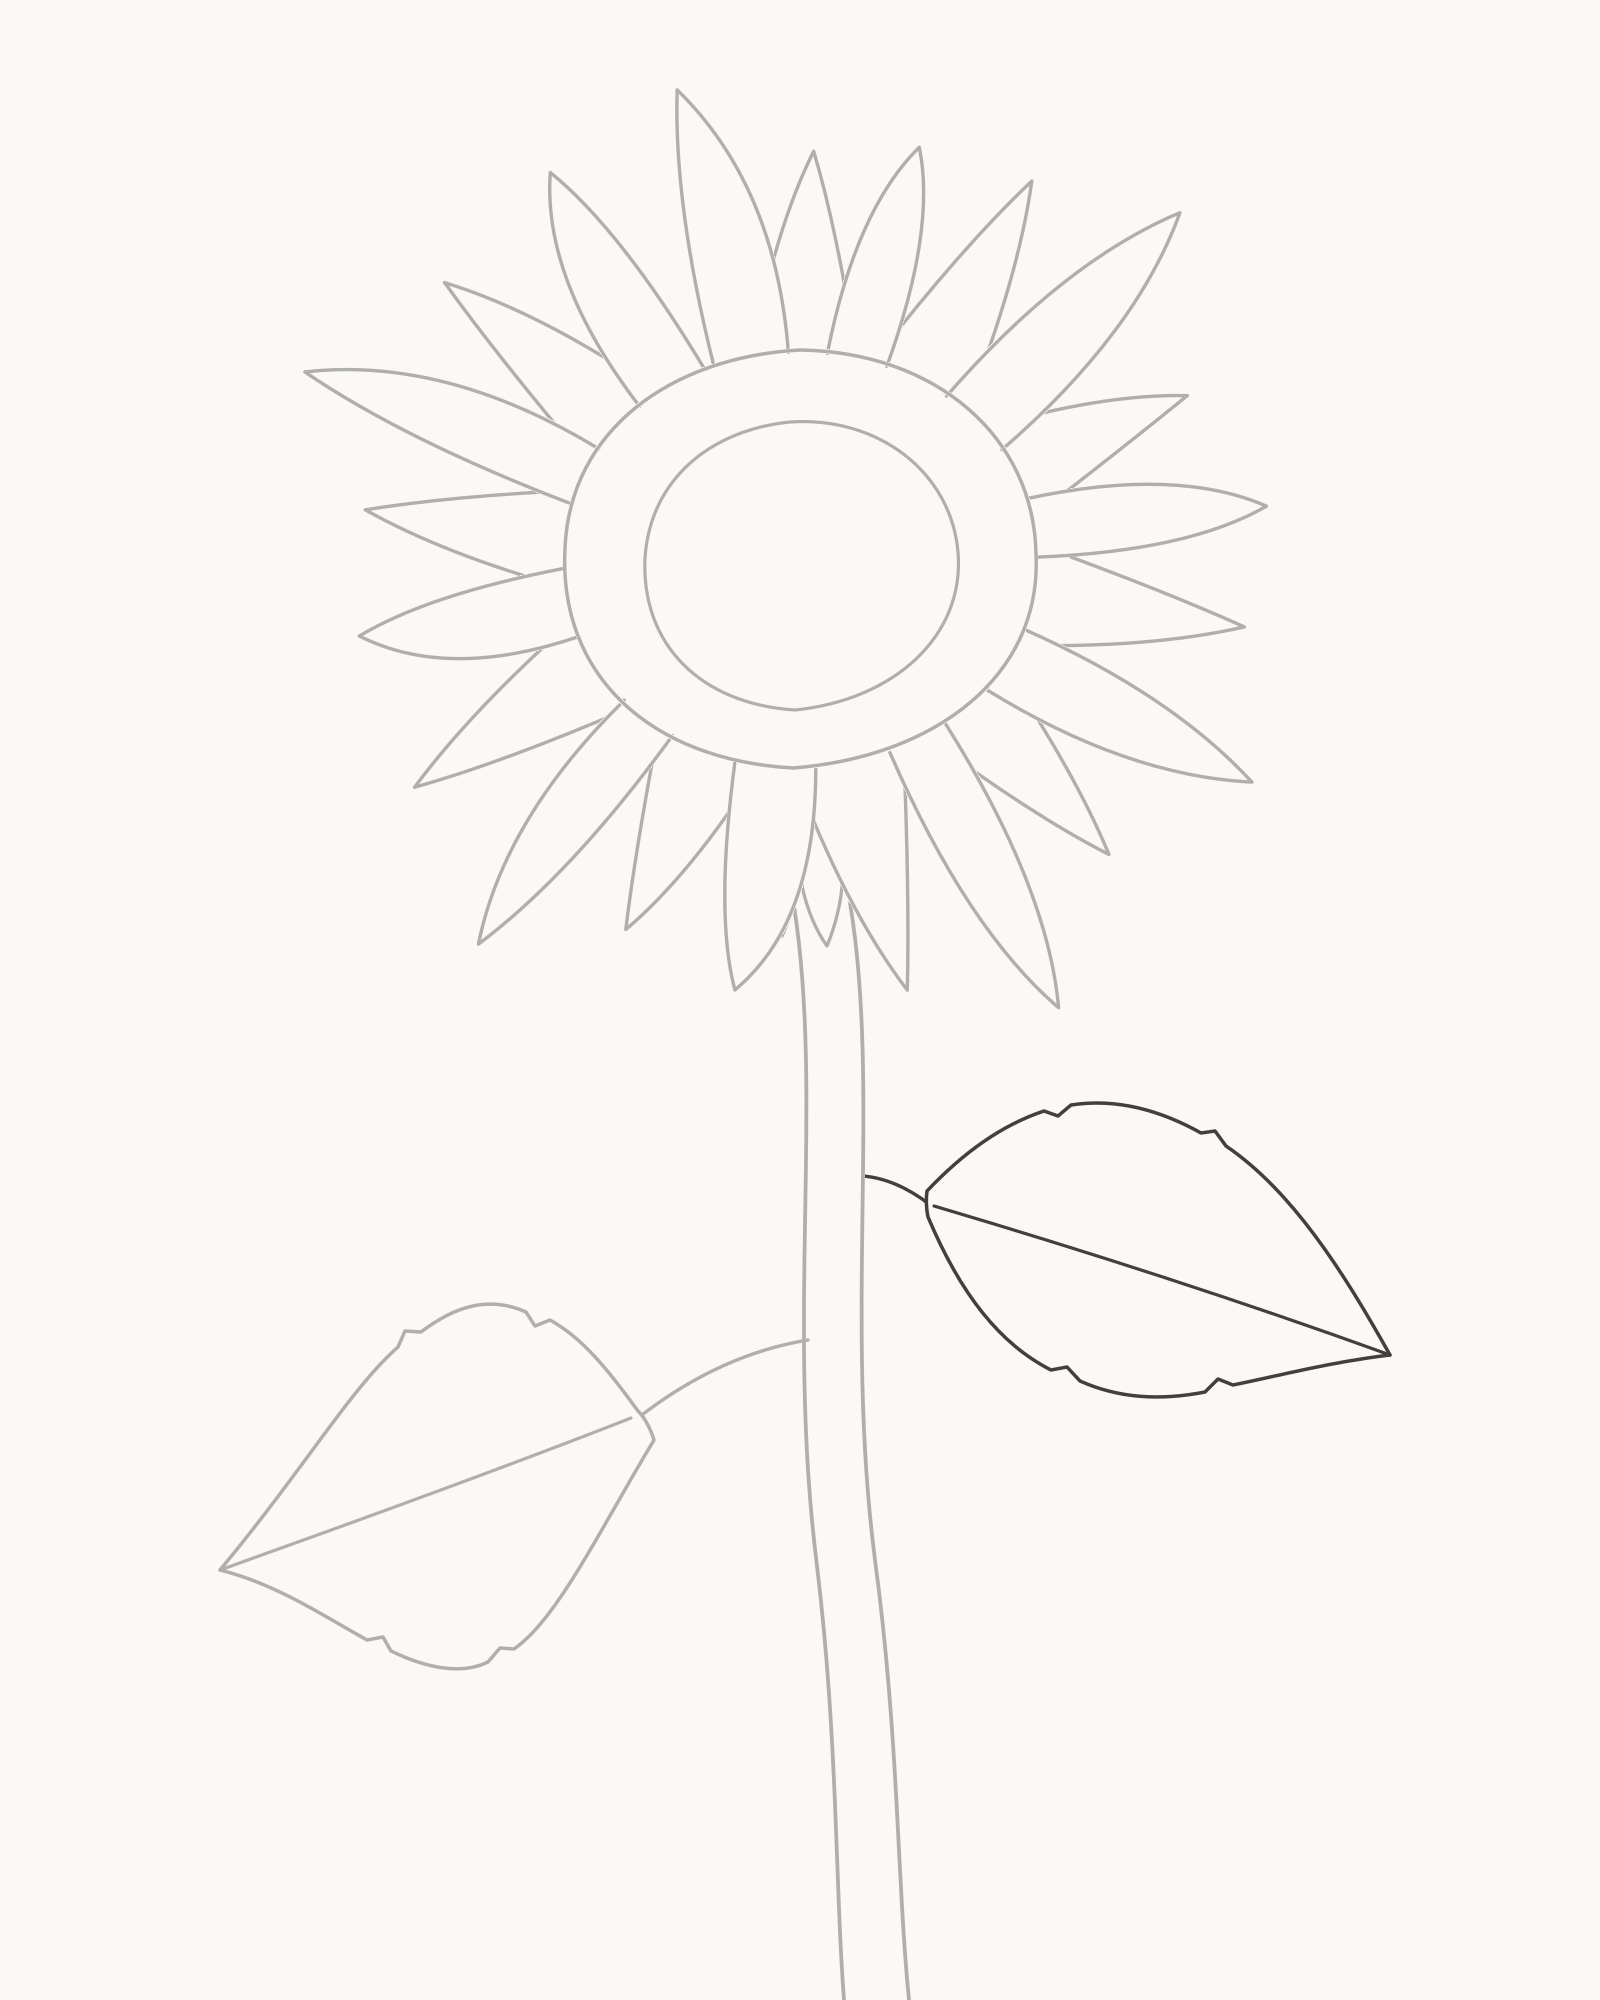
Stage 6 of 8. A smaller higher leaf balances the plant without mirroring. Place the second attachment higher on the right stem edge. Take a short petiole up and out, then continue through the blade as one midrib pointing towards the upper-right tip.
Close a smaller, narrower blade around it. Give this leaf a different tilt and fullest point from the left leaf. It should relate to the same plant without becoming a reflected copy.
Look for this before moving on: the new leaf attaches higher, remains visibly smaller, points on a separate angle and closes at one clean stem junction around its retained midrib.
If it goes wrong: keep the stem junction and midrib. Remove only the newest contour side, then close it with a different width from the large leaf; do not move the attachment or mirror the opposite blade.
7. Organise the disc flowers
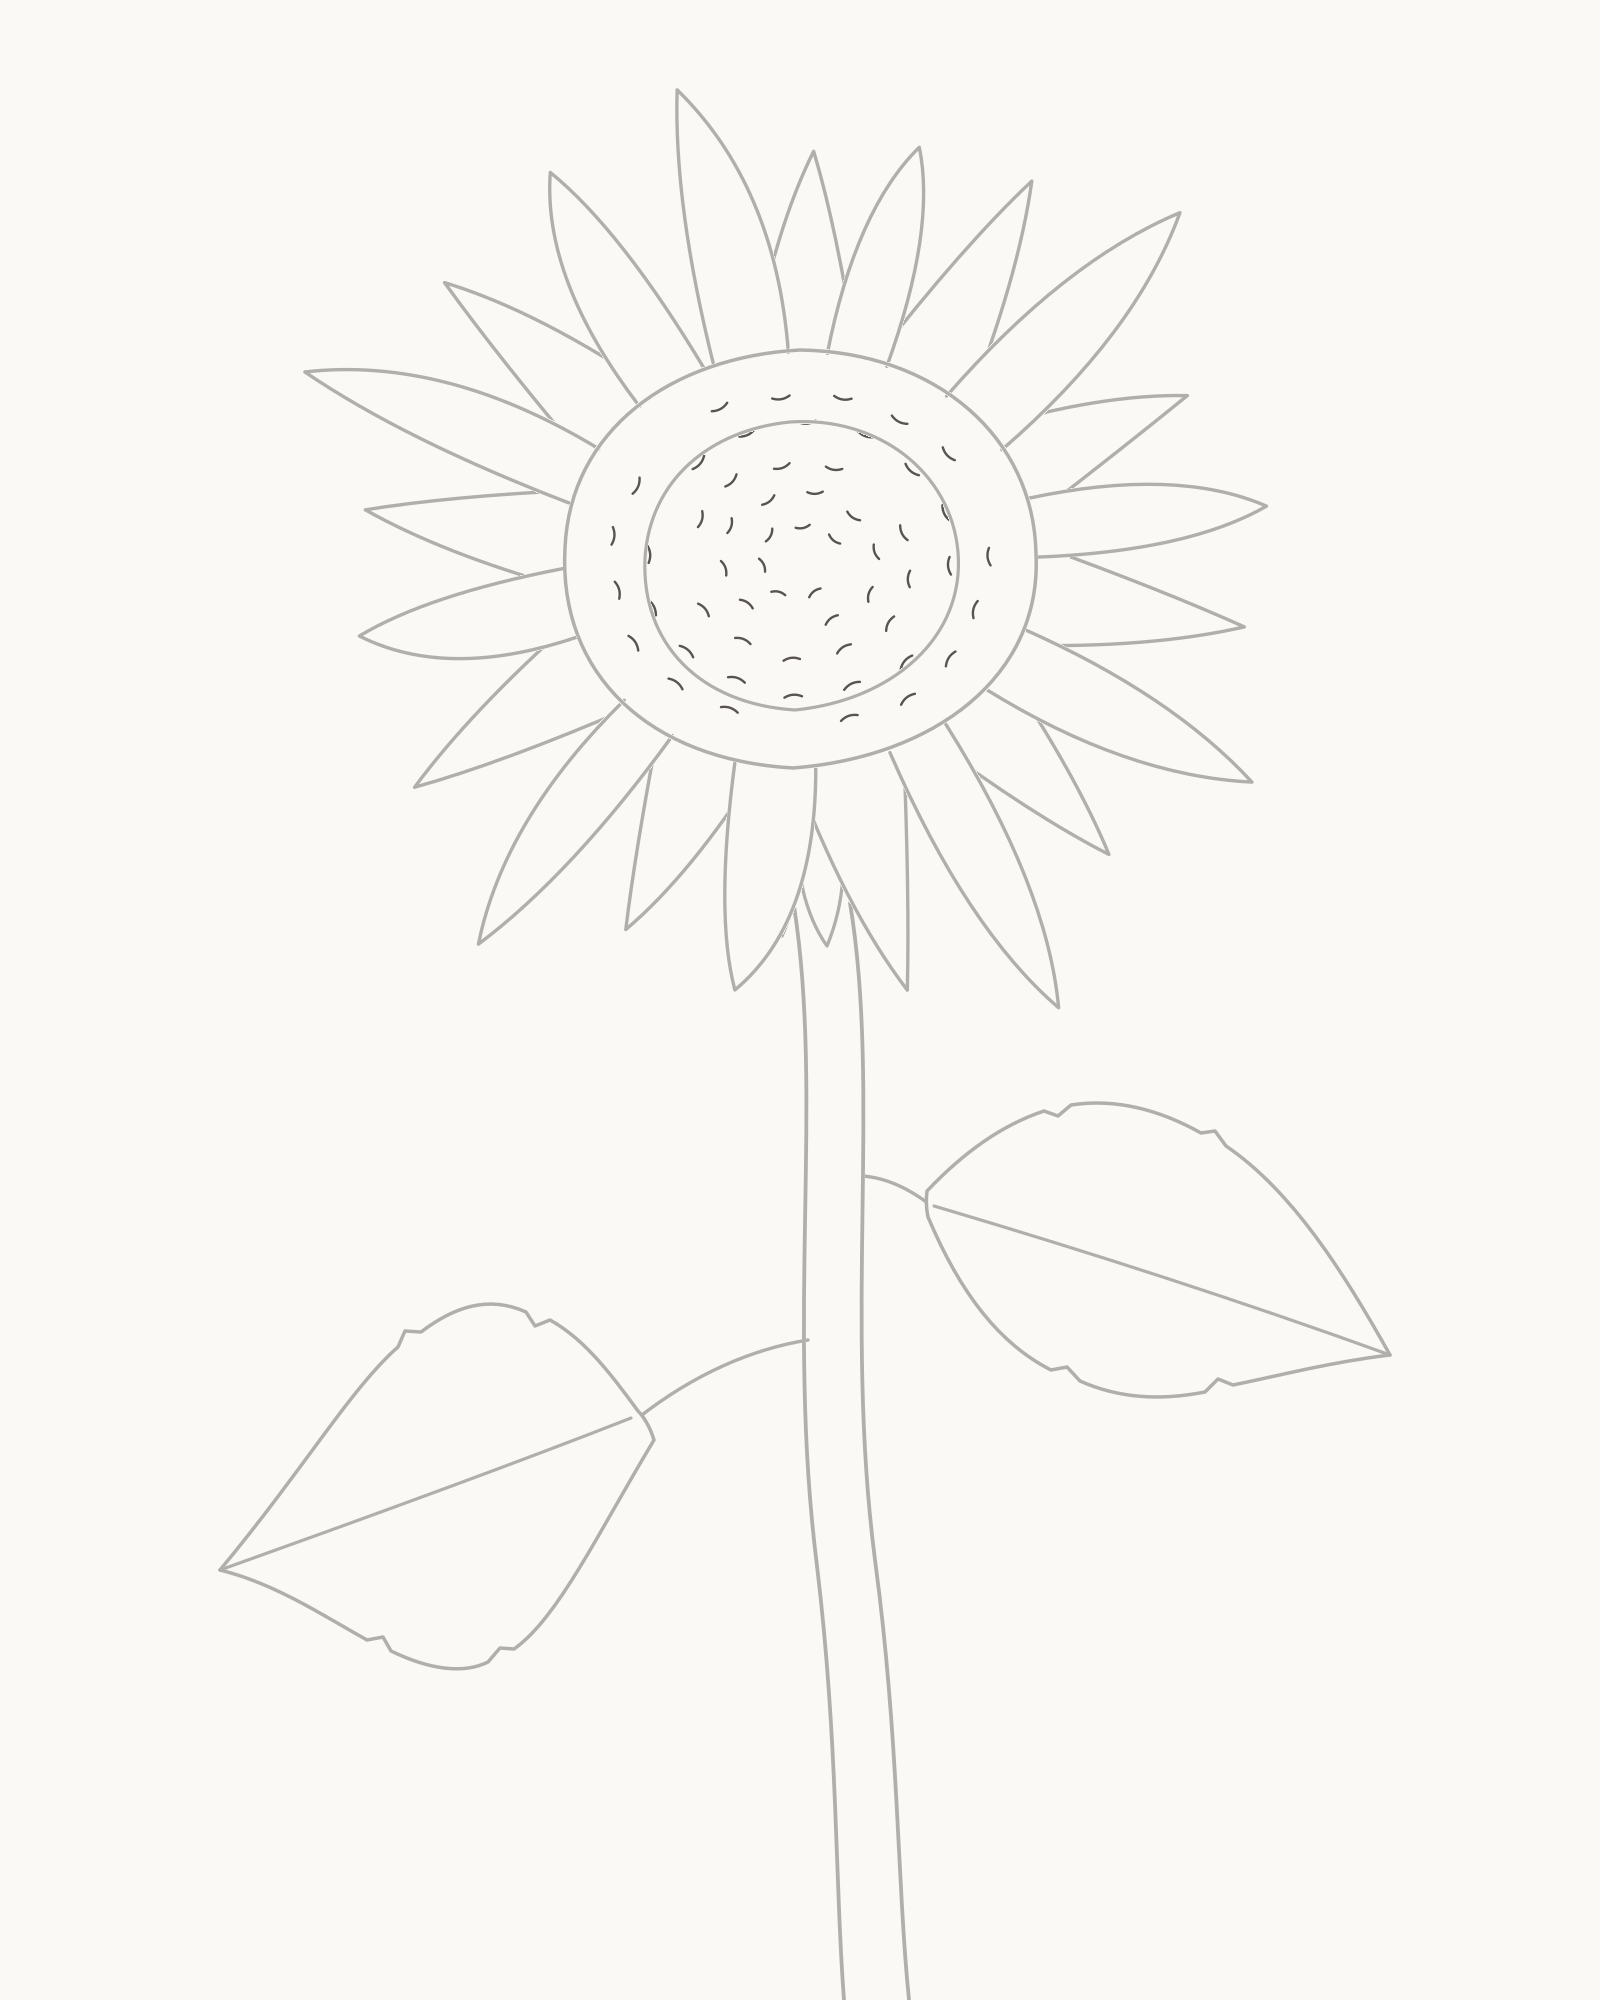
Stage 7 of 8. Five broken bands suggest the clustered disc flowers. Work from the small core outwards. Add three broken curved bands of short, gently turning marks inside the inner boundary. Leave white gaps between the marks and rotate their direction gradually as you travel around the centre.
Add two looser broken bands in the broad outer zone. Stop after five readable bands in total. The aim is a clustered centre, not hundreds of seeds, a regular dot grid or a solid dark mass.
Look for this before moving on: three broken bands sit inside the core, two sit in the outer zone, the direction turns gradually, and clear white paper remains between every group and boundary.
If it goes wrong: leave the disc boundaries and complete bands untouched. Remove only the newest crowded or boundary-touching mark, then replace it with a shorter curve that follows the local turn.
8. Add sparse direction lines
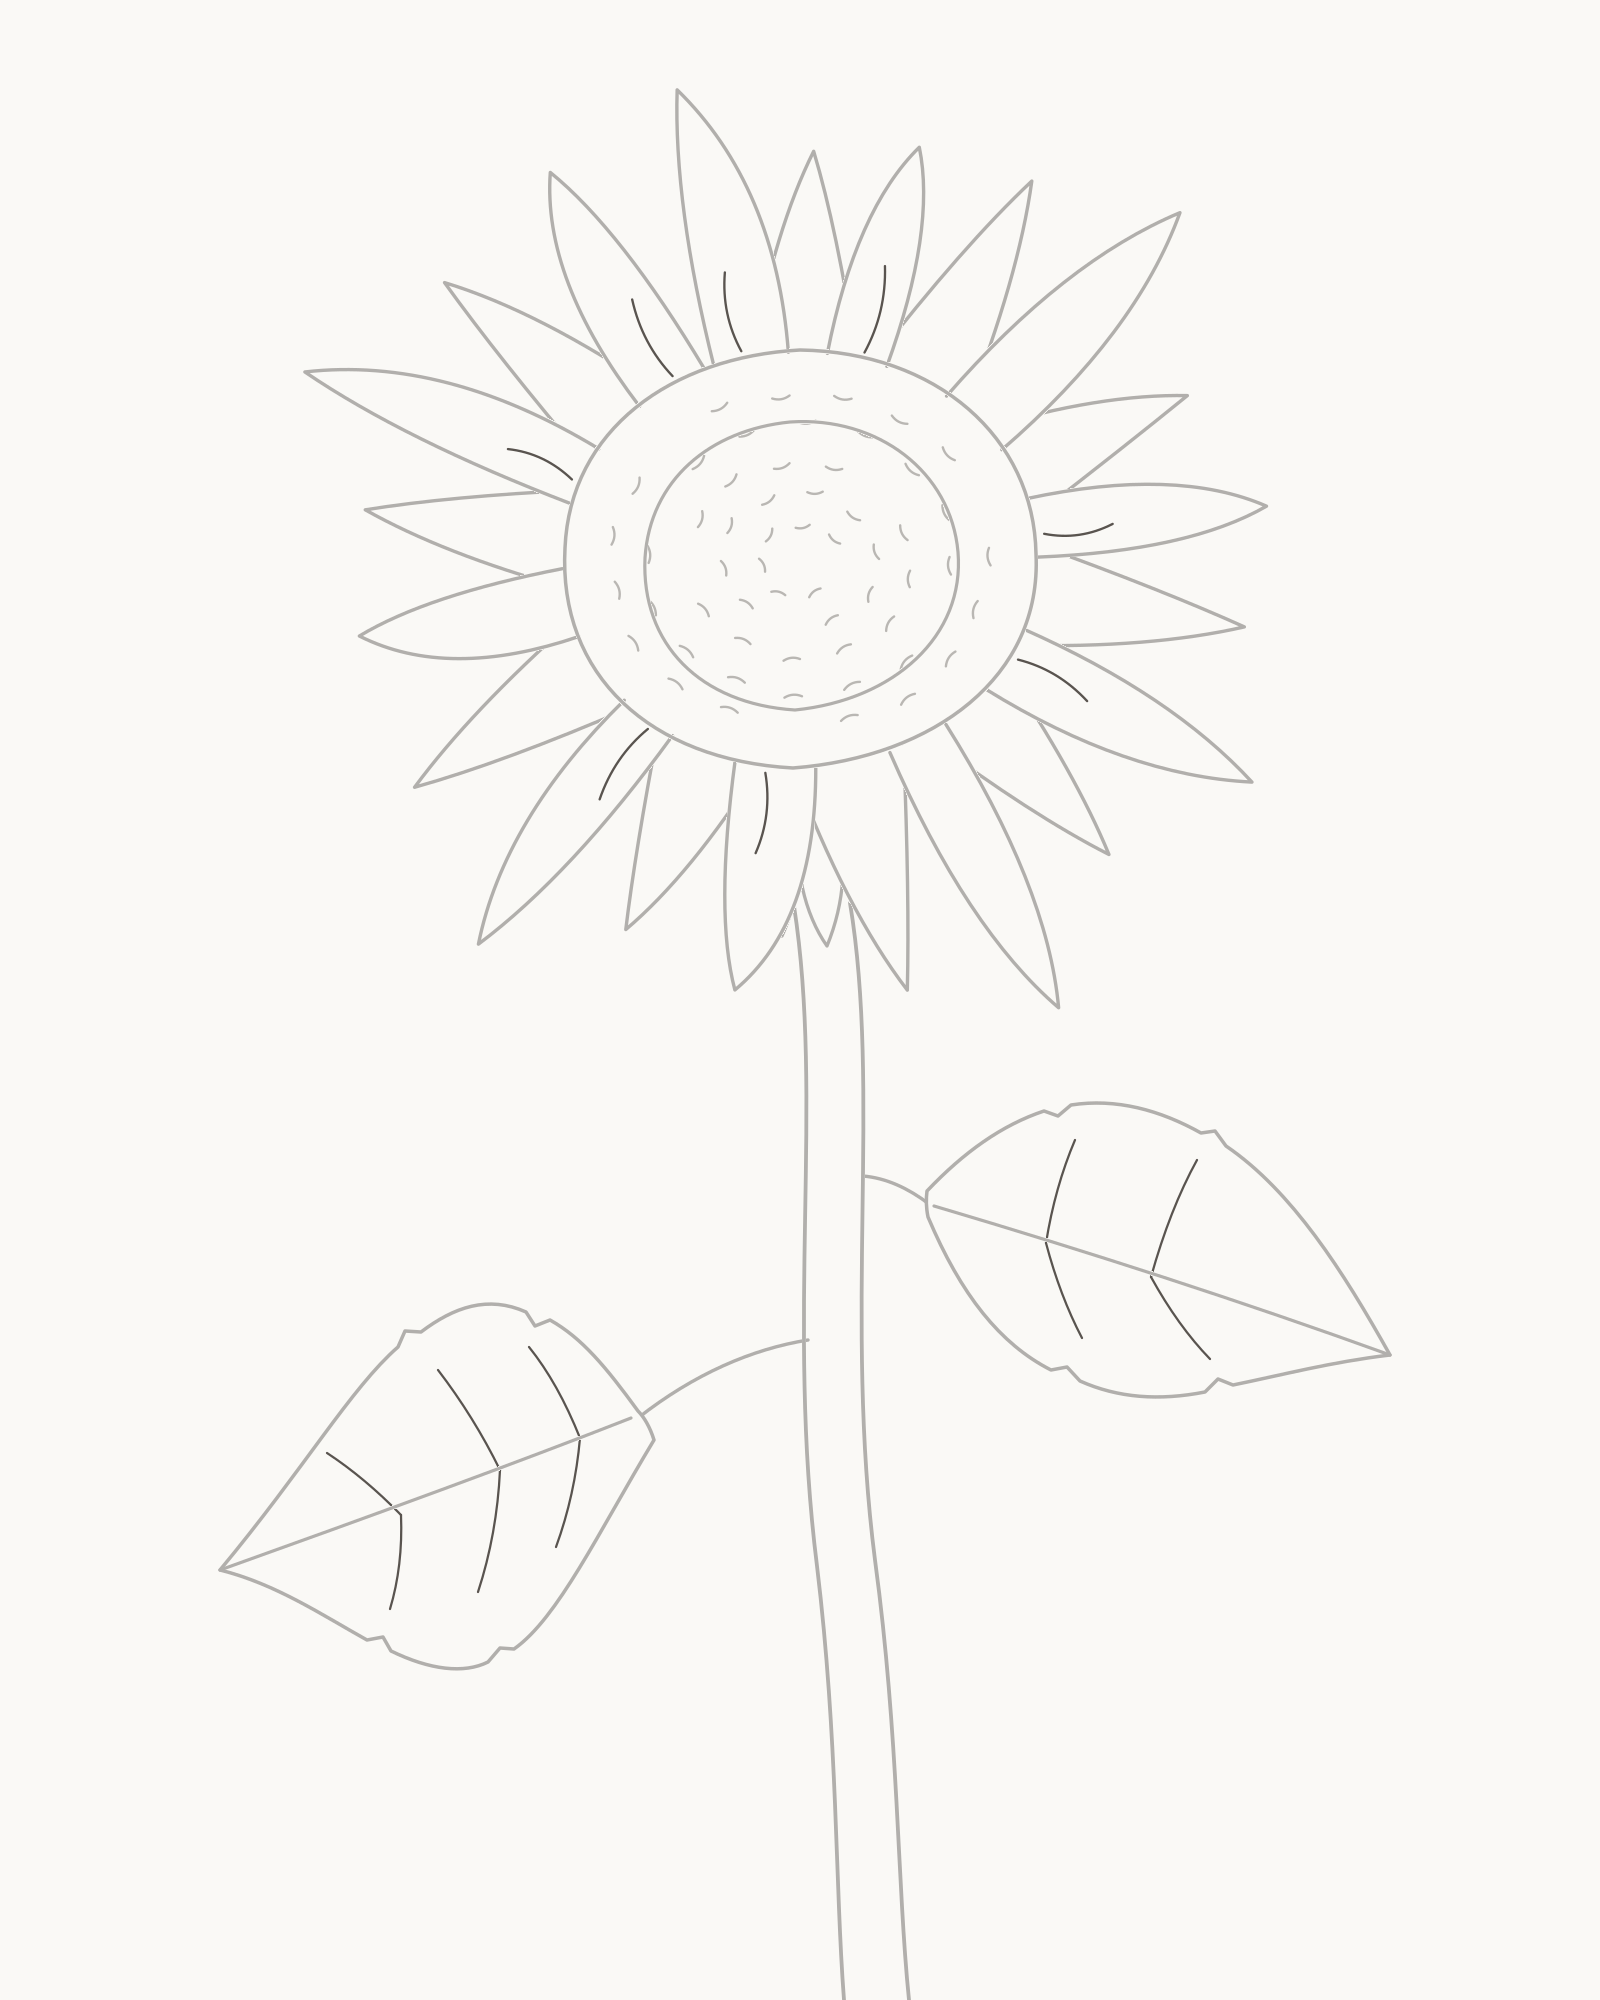
Stage 8 of 8. Sparse countable interior lines complete the line-only sunflower. Add one short fold near the base of eight selected front rays. Let each line follow its ray towards the tip, but stop well before the outer contour. Leave the other front rays plain so the finish does not become striped.
Finish the foliage with countable secondary veins. On the large leaf, add three short veins on each side of the midrib. On the smaller leaf, add two on each side. Angle them towards the outer edges and stop before touching the contour. These marks describe direction; they are not hatching or shading.
Look for this before moving on: exactly eight front rays contain one short fold, the large leaf has six secondary veins, the small leaf has four, and every new line ends inside its host shape.
If it goes wrong: keep the outer contours and midribs. Shorten or remove only the newest interior line if it hits an edge, duplicates its neighbour or begins to make a dark patch.


Common mistakes and small fixes
The centre looks like a target. Compare the two boundaries rather than retracing them. On the next attempt, offset the core slightly and vary the width of the outer band.
The flower looks like a sun symbol. Count the front rays, then compare their lengths, widths and lean. Change only the newest repeated ray instead of adding decorative points between all of them.
The rear layer looks pasted on. End each newest side at the first believable overlap with a front ray. Do not draw the hidden base through the visible layer.
The stem looks too thin for the head. Keep the sound edge and move only the newer one outwards through its middle section. Both lines should still meet the same support area.
The leaves look like mirrored flags. Preserve their different attachments and midribs. Adjust only the newest blade's fullest point, edge rhythm or angle.
The centre turns into noise. Return to five broken bands with white gaps. Remove the newest random dots or crowded marks instead of darkening the whole core.
The final lines look like shading. Keep eight ray folds and the countable leaf veins only. Any repeated parallel marks beyond that stopping rule can be removed without disturbing the construction.
Practise the overlap at a slight turn
On a fresh part of the page, repeat only Stages 1–3 with the disc made slightly narrower and one side of the head shortened. Keep the front count at eleven and the rear count at ten, but compress the rays on the turned-away side and lengthen a few on the near side. This practises overlap and direction without adding another full plant or a shading exercise.
For another multi-flower construction, try How to Draw Flowers. To practise midribs, attachments and unequal contours in more detail, use How to Draw Leaves. The How to Draw page returns to the complete practical guide index. The separate Flower drawings gallery remains the place for historical examples rather than step-by-step instruction.
Frequently Asked Questions
What is the easiest way to start a sunflower drawing?
Start with the two unequal disc boundaries high in the page. Their size and position control the completed head, while the open lower half reserves room for the stem and leaves.
How many petals should I draw on a sunflower?
For this exact exercise, draw eleven complete front rays and ten shorter rear rays. Real sunflower heads vary, so treat those numbers as a clear drawing system rather than a botanical rule.[3]
How do I stop the rays looking too even?
Place four unequal anchors, fill the remaining spaces clockwise, and compare each new ray with its neighbours. Change its reach, width or lean before closing it instead of repeating one template.
Do I need to draw every seed in the centre?
No. Three broken bands in the core and two looser bands in the outer disc are enough for this line drawing. White gaps keep the centre readable.
What shape are sunflower leaves?
Common-sunflower leaves are broadly oval to heart-like and can have coarse or toothed edges.[2][3] This lesson simplifies that observation into two unequal broad blades with restrained edge changes.
Should I erase the first circles?
No. Both disc boundaries are permanent parts of the finished construction. Use the eraser only on the newest misplaced section.
Does this lesson include shading?
No. The finished result is a line drawing. The upper-left light direction is not rendered as tone, and the Stage 8 interior lines describe form rather than shadow.
Is a sunflower difficult for a beginner?
The main challenge is keeping the two ray layers irregular and readable. The counted order, completion checks and newest-mark repairs divide that problem into manageable parts; the 35–50 minute time is an untested estimate, not a promise.
References
- Iowa State University Extension, Common Sunflower. View source
- Royal Horticultural Society, Helianthus annuus. View source
- NC State Extension, Helianthus annuus. View source
More DRAWING Guides

How to Draw a Rose: A Step by Step Guide

How to Draw a Tree: A Step by Step Guide

How to Draw Eyes: A Step by Step Guide

How to Draw Leaves: A Step by Step Guide

How to Draw Autumn Leaves: A Step by Step Guide

How to Draw Flowers: A Step by Step Guide

How to Draw a Lily: A Step by Step Guide

How to Draw a Sunflower: A Step by Step Guide

How to Draw a Tulip: A Step by Step Guide

How to Draw a Hibiscus: A Step by Step Guide

How to Draw a Daisy: A Step by Step Guide
