



Draw a complete deciduous tree in seven permanent line stages: begin with the trunk and root flare, build attached branches from thick to thin, then arrange five overlapping foliage groups around the structure. The result is a simple, natural-looking pencil outline rather than a shaded study or a drawing of every leaf.
The branches carry the crown, so this lesson draws the load-bearing structure first. Follow each small branch into a thicker parent, then back to the trunk. The foliage comes afterwards as five unequal masses, which is easier to judge than one large cloud with branches fitted inside it.
Difficulty: beginner
Time: allow about 30–45 minutes; this is an untested estimate
Medium: HB or No. 2 pencil, line only
Outcome: Stage 7 is the complete line drawing
Materials
- One sharpened HB or No. 2 pencil.
- One sheet of plain uncoated paper, used upright. A4, US Letter or a similar proportion is suitable.
- A clean eraser for small local corrections.
- A scrap sheet on which to practise one tapered fork.
A 0.5–0.7 mm mechanical pencil can replace a wooden pencil. A kneaded, vinyl or ordinary plastic eraser will all do the limited correction work needed here. You do not need a ruler, compass, blending stump, marker, colour pencil or several grades of graphite.
Before you draw
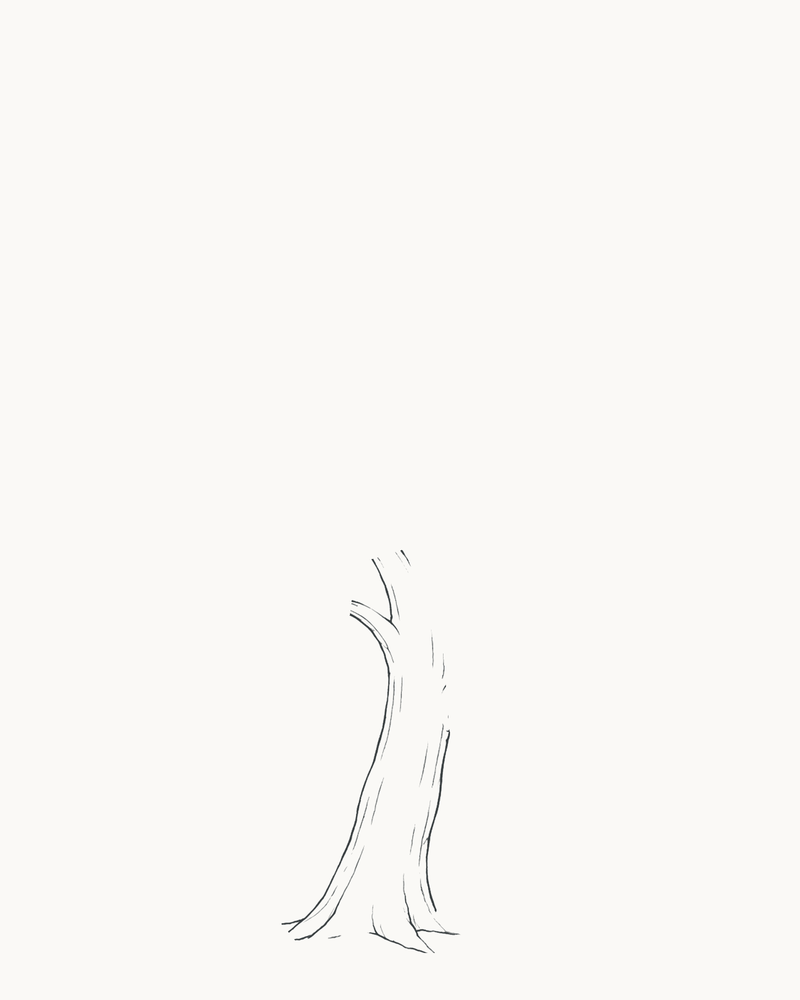
Keep the tree inside a tall 4:5 area. The crown occupies about the upper two-thirds, while the root flare ends above the bottom edge. The centre of the root base sits at approximately 49% of the paper's width and 88% of its height. The separate placement cue shows that point; copy only its position, not its frame or crosshair.
The trunk leans gently to the right and narrows as it rises. Each child branch must be thinner than its parent. Make forks unequal rather than matching both sides, and join branches with a flowing narrow wedge instead of a blunt T. Drawing teachers similarly separate branch structure from later foliage masses and stress natural taper. [1][2]
Use a medium line for the trunk and major limbs, a lighter line for smaller branches, and a medium-light line for the foliage contours. The marks are permanent. There is no construction oval to erase, no tracing pass and no shading.
Darker lines are new in the current stage. Earlier marks remain visible at reduced strength.
1. Place the trunk and roots
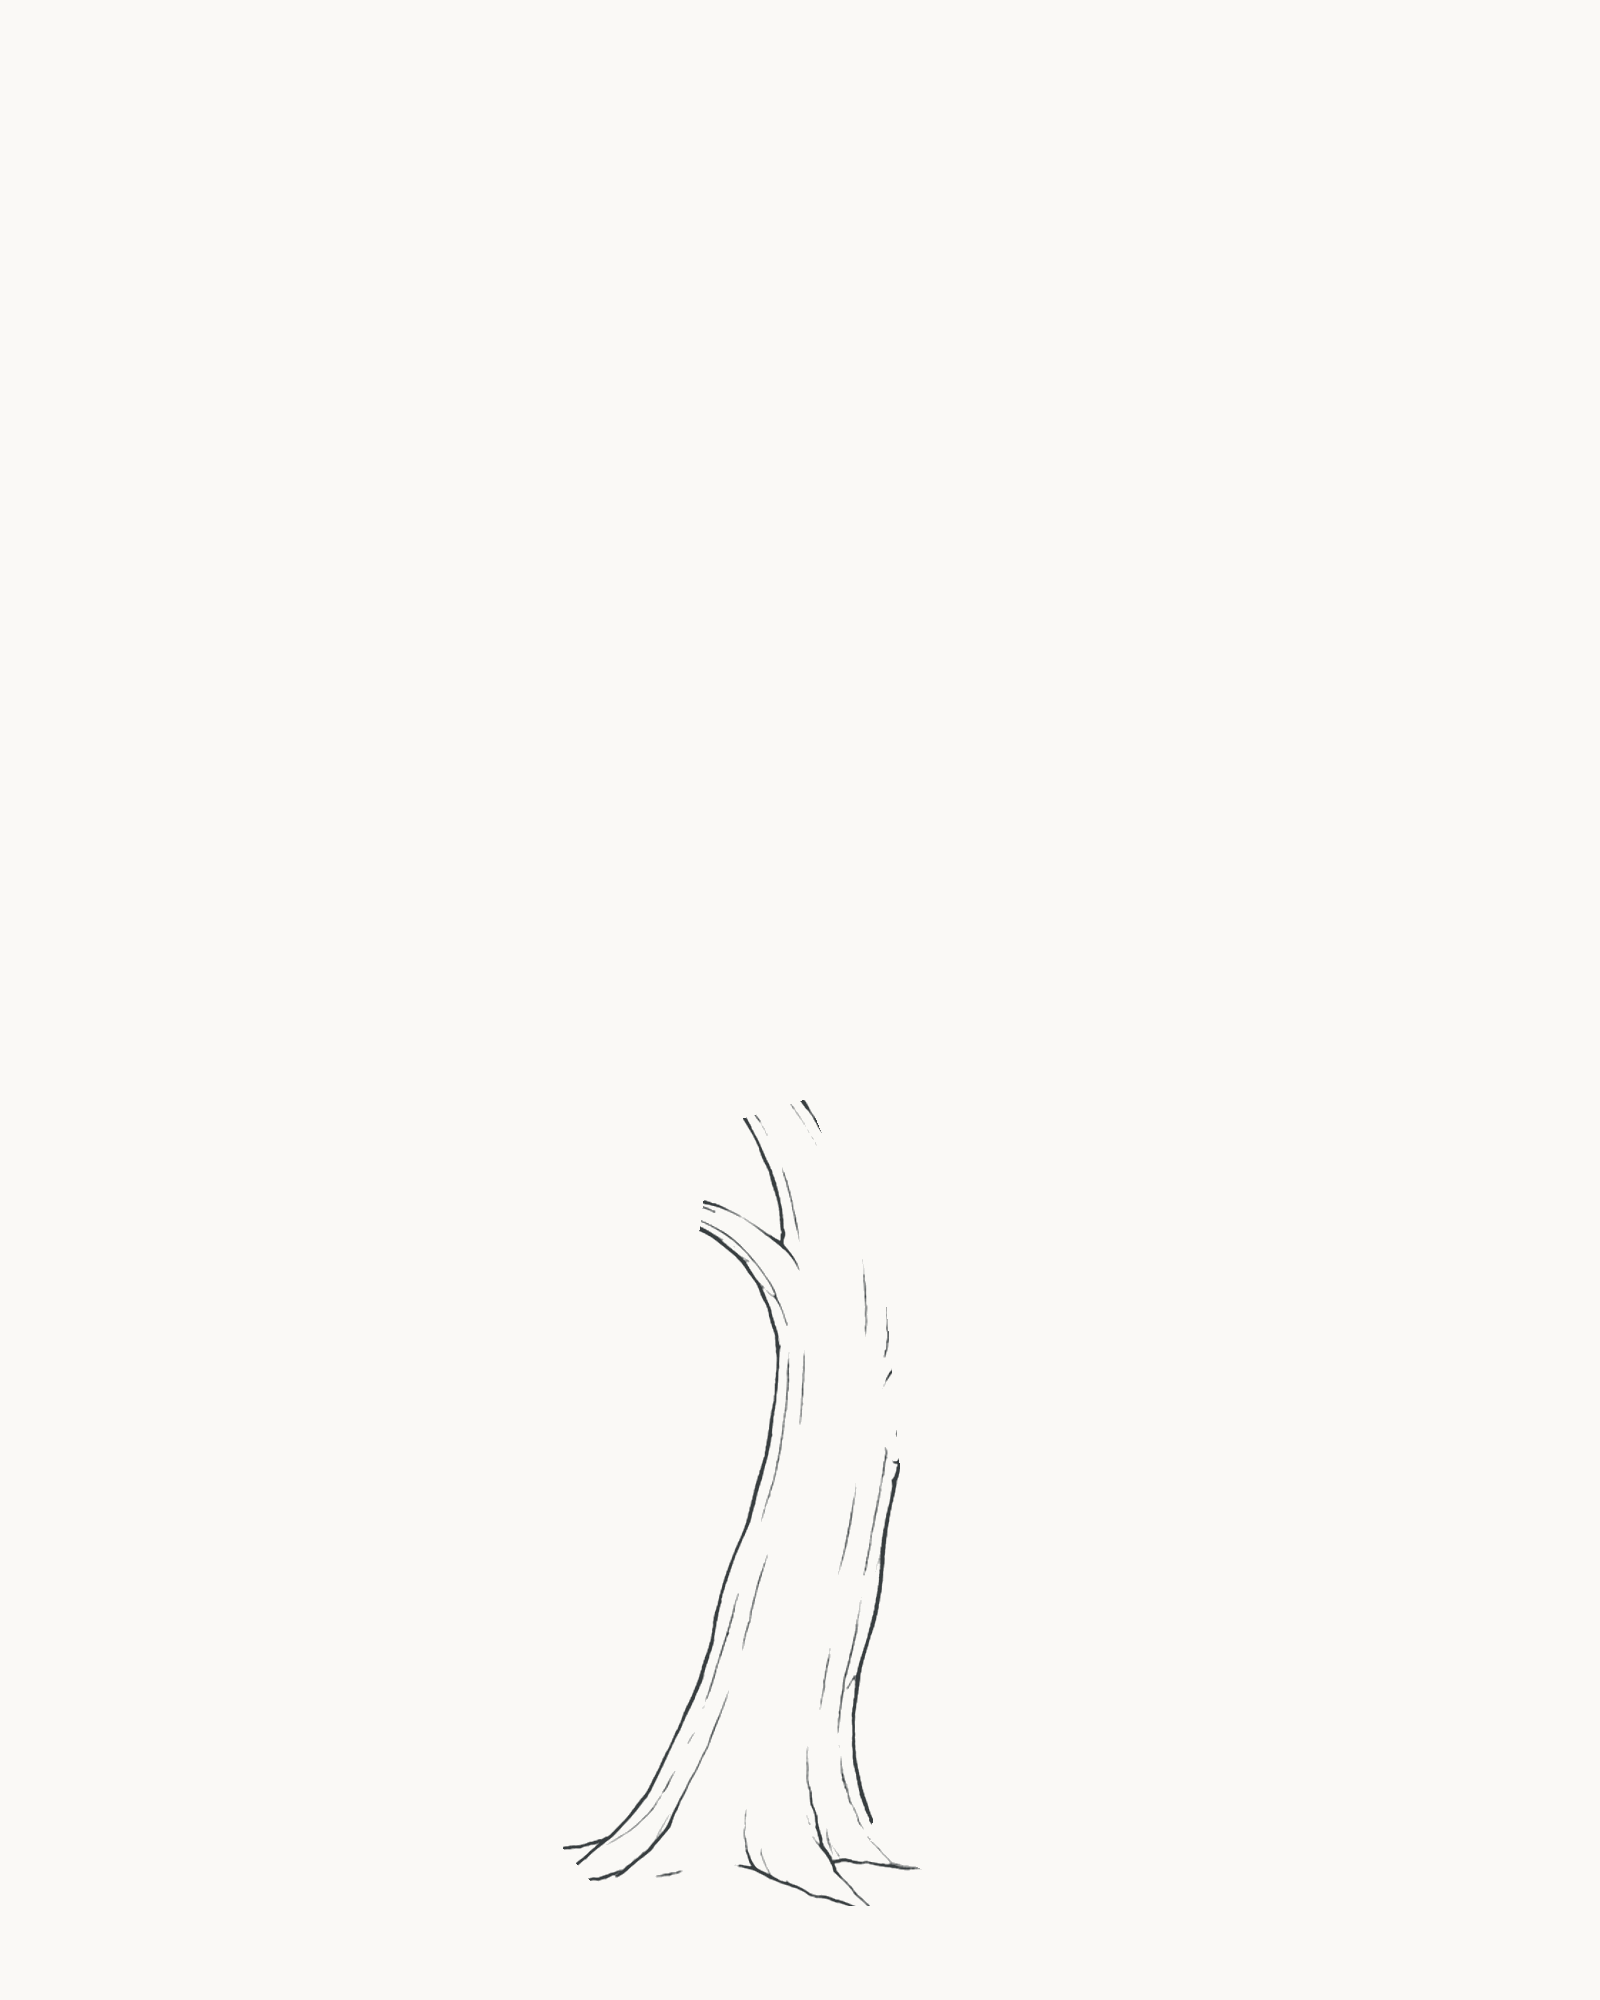
Stage 1 of 7. Place the permanent trunk and root structure at the lower-page anchor. 
Placement cue: x49%, y88%. Copy the position, not the frame or marker. Start at the placement point near the lower centre. Draw the left side of the trunk upward in a gentle rightward curve, stopping below the middle of the page. Return to the base and add the right side so the trunk is widest at the roots and gradually narrower at the top. Let the two sides differ slightly rather than running as parallel lines.
Open the base into three short root toes. Keep their ends inside the page. Add the few light inner seams visible in the stage, following the same upward direction as the trunk; they are part of the final structure, not guides that will be erased.
Look for this before moving on: The root flare is the widest part, the trunk narrows as it rises, and its two sides do not make a straight tube.
If it goes wrong: Keep the better side. Erase only the parallel section of the other contour or one awkward root toe, then replace that short part with a gentler taper.
2. Add the two primary limbs
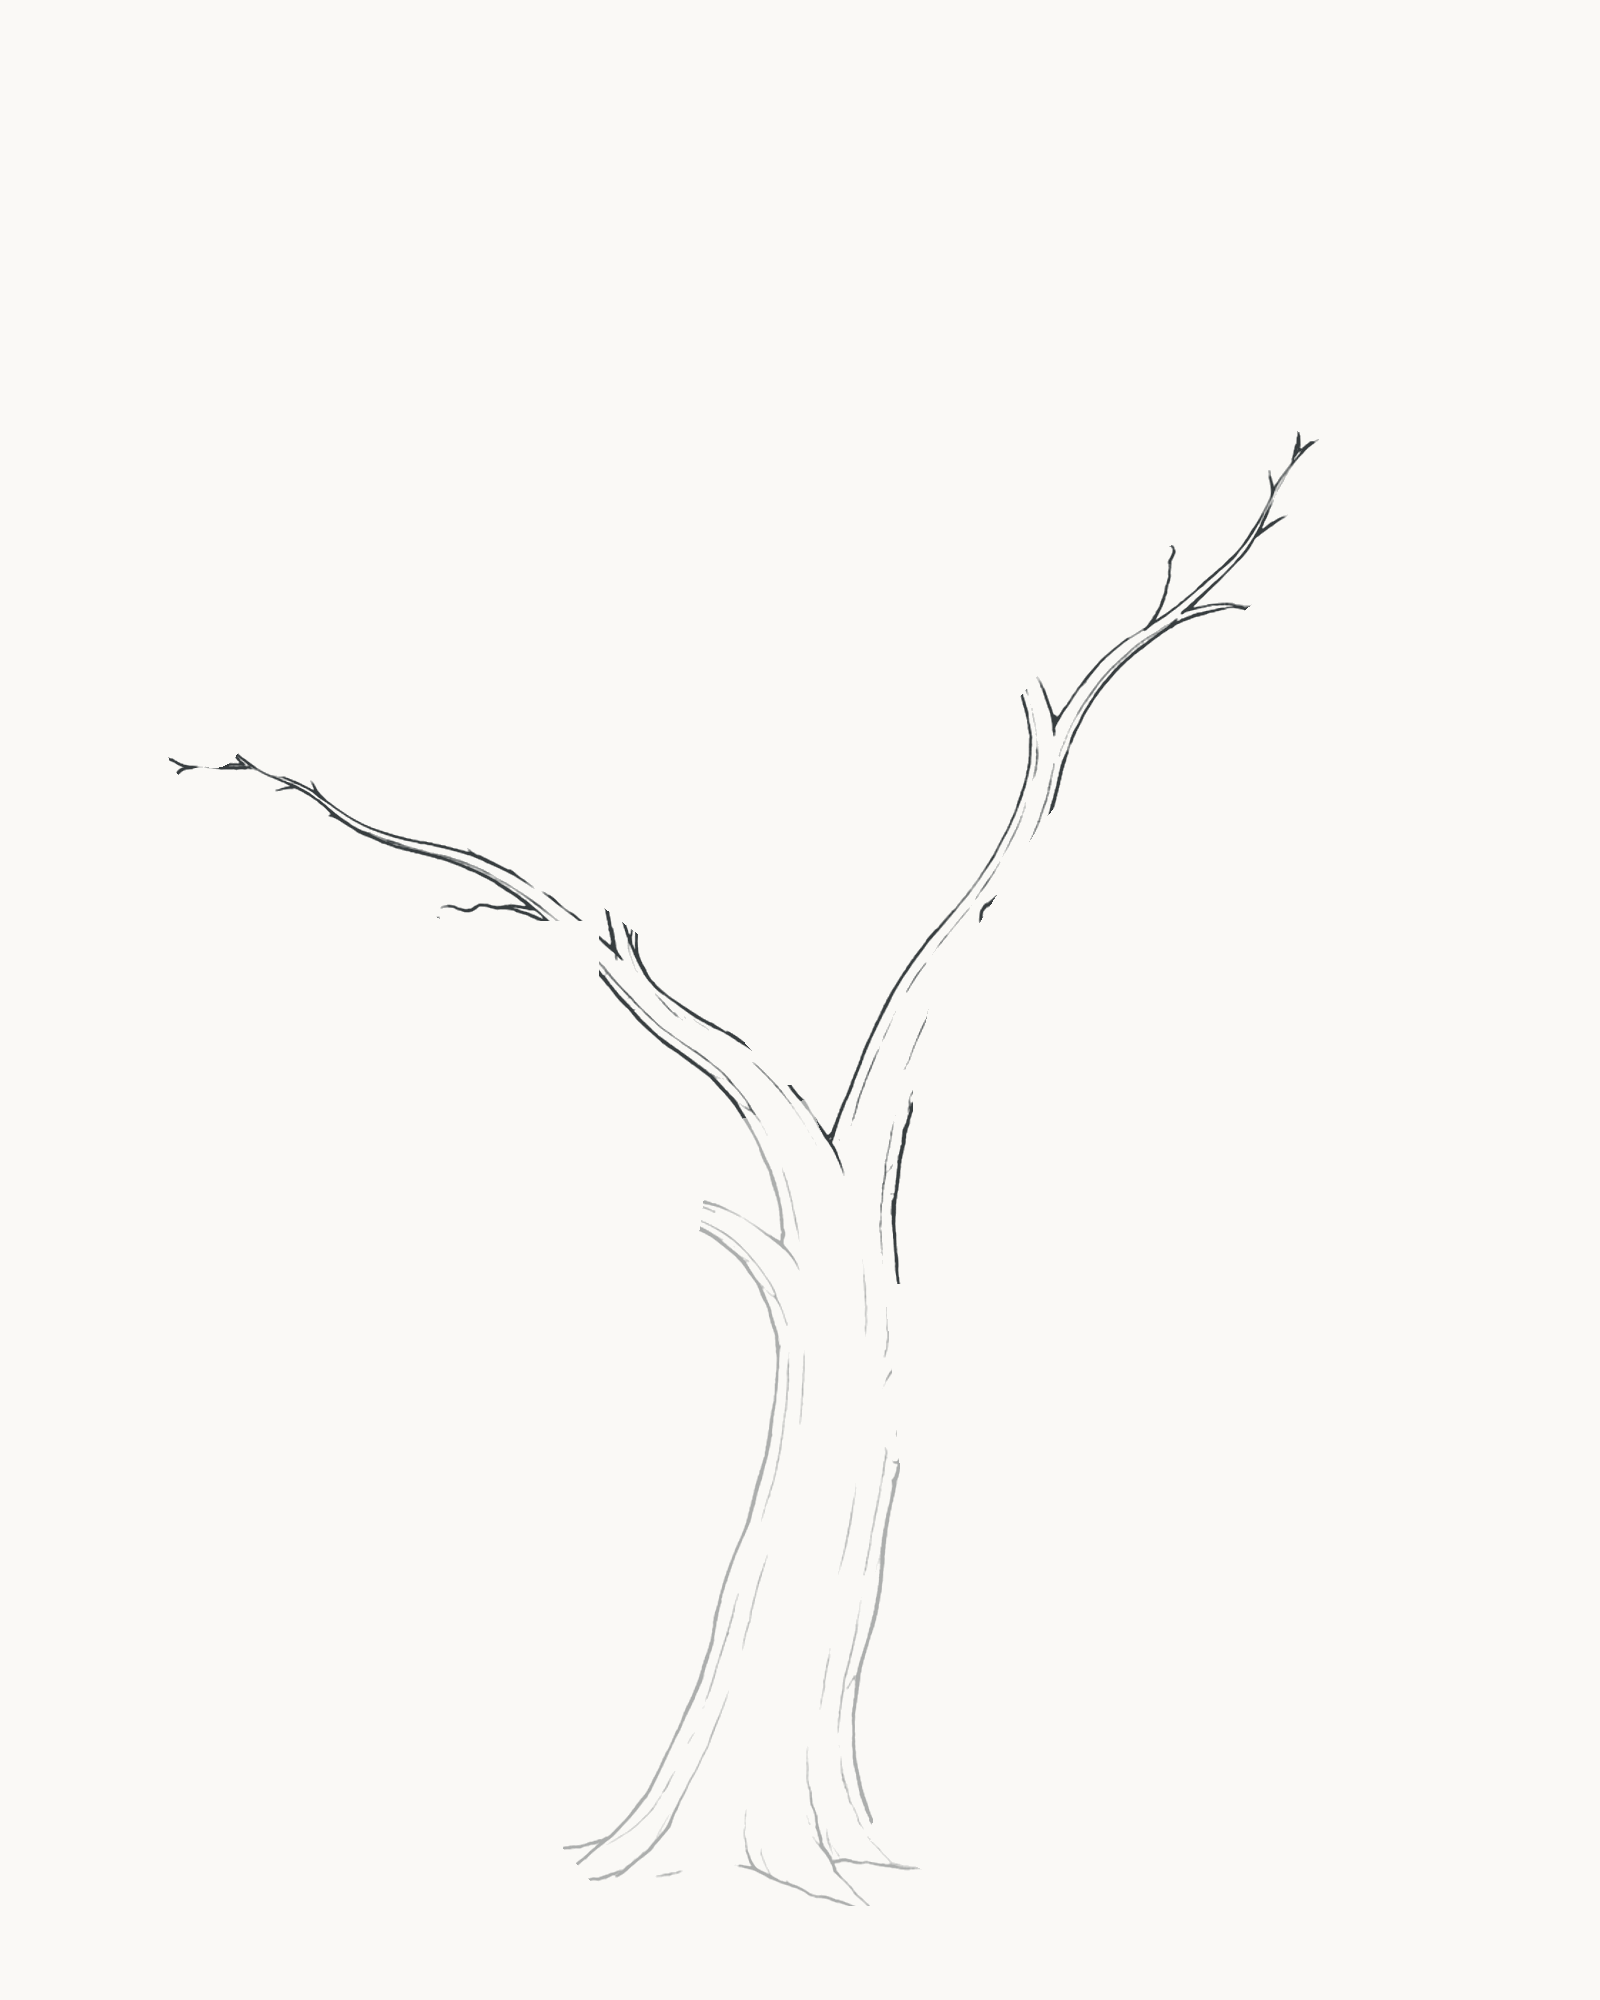
Stage 2 of 7. Add the lower-left limb first and the higher-right limb second. - Lower-left limb
- Higher-right limb
Build the two largest limbs in this order. First, from the upper left side of the trunk, sweep a broad limb towards the left. Give it two contours that narrow as they travel away from the trunk. Second, higher on the trunk, take a narrower limb up and to the right. Its attachment begins above the left limb and its tip finishes higher.
At each join, let the branch edge merge into the trunk's direction. Do not draw a separate branch across the trunk as if it were pasted on top. Let each visible limb end divide into the simple unequal split shown; the remaining fine terminal forks arrive in Stage 4.
Look for this before moving on: The lower-left limb is broader, the upper-right limb is narrower, and both can be followed into the trunk without a blunt T-shaped join.
If it goes wrong: Repair only the faulty edge near its attachment or the last part of a tip. Leave the sound limb and the Stage 1 trunk untouched.
3. Add the secondary branches
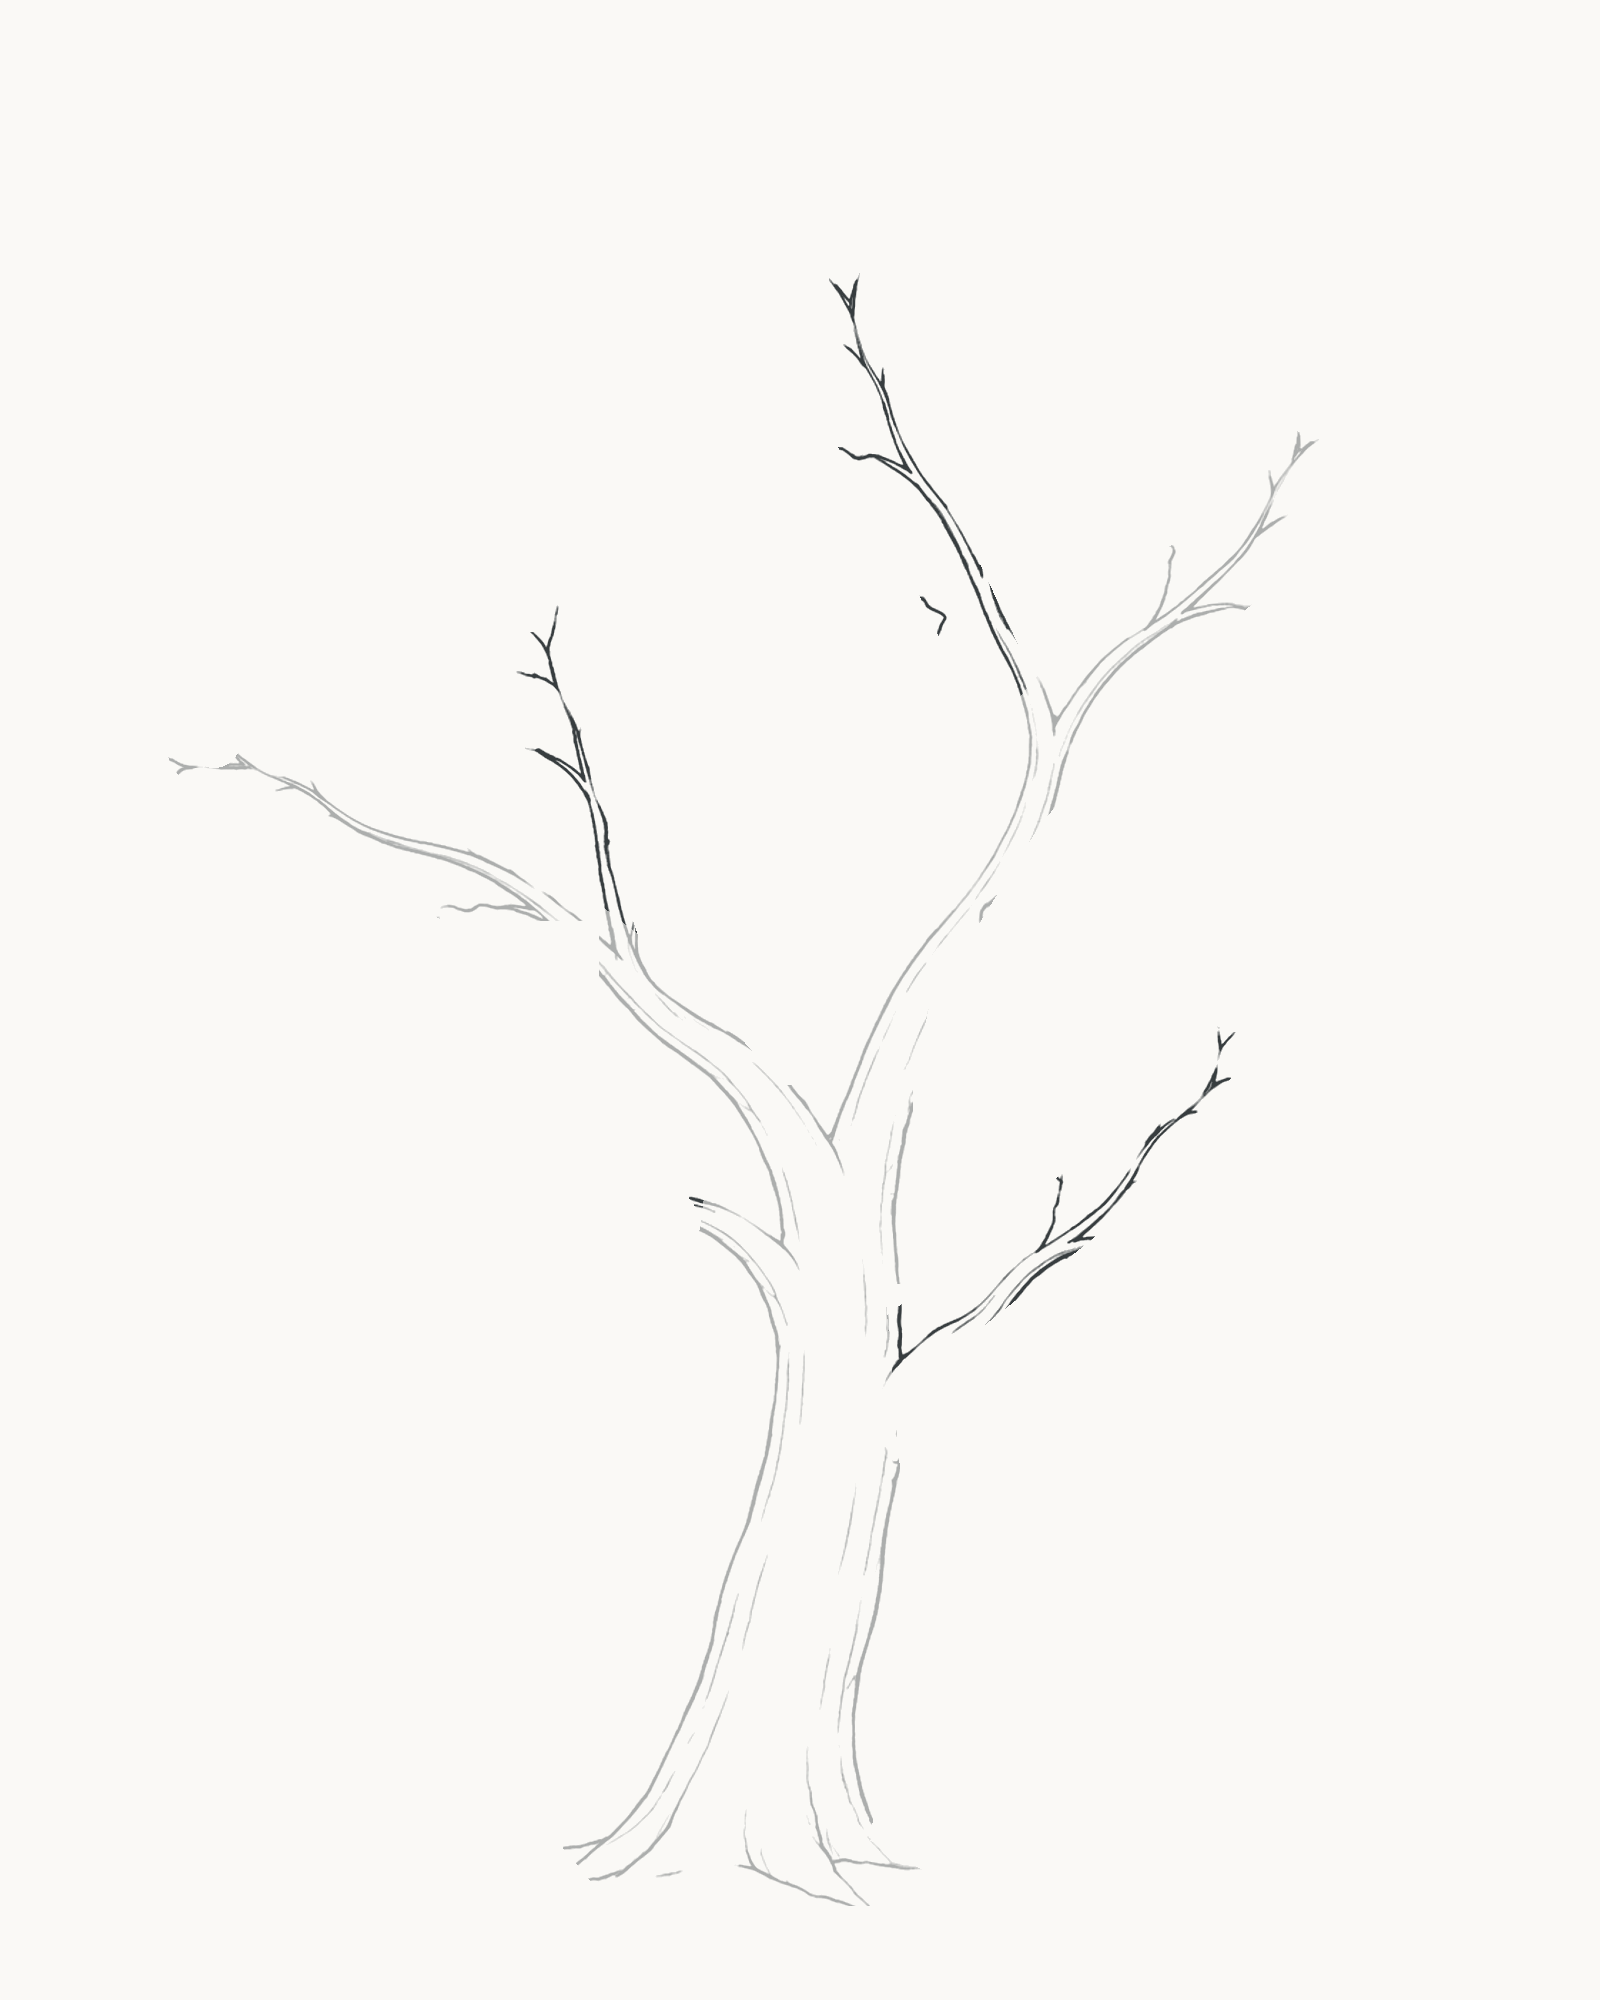
Stage 3 of 7. Three smaller offshoots extend the load-bearing structure. Add three smaller offshoots at different heights. One rises from the left limb, one continues upward near the main division, and one bends to the right from the lower-right side. Each begins thinner than the limb that carries it and narrows towards its end.
Vary the angles. A smaller branch may echo its parent, but it should not make a matching pitchfork with the branch beside it.
Look for this before moving on: There are three new endpoints in unequal positions, and every one has a visible route through a thicker parent to the trunk.
If it goes wrong: Erase only the floating, crossing or symmetrical offshoot. Rejoin it to its parent as a narrow, unequal Y while preserving the surrounding structure.
4. Add the remaining fine terminal branches
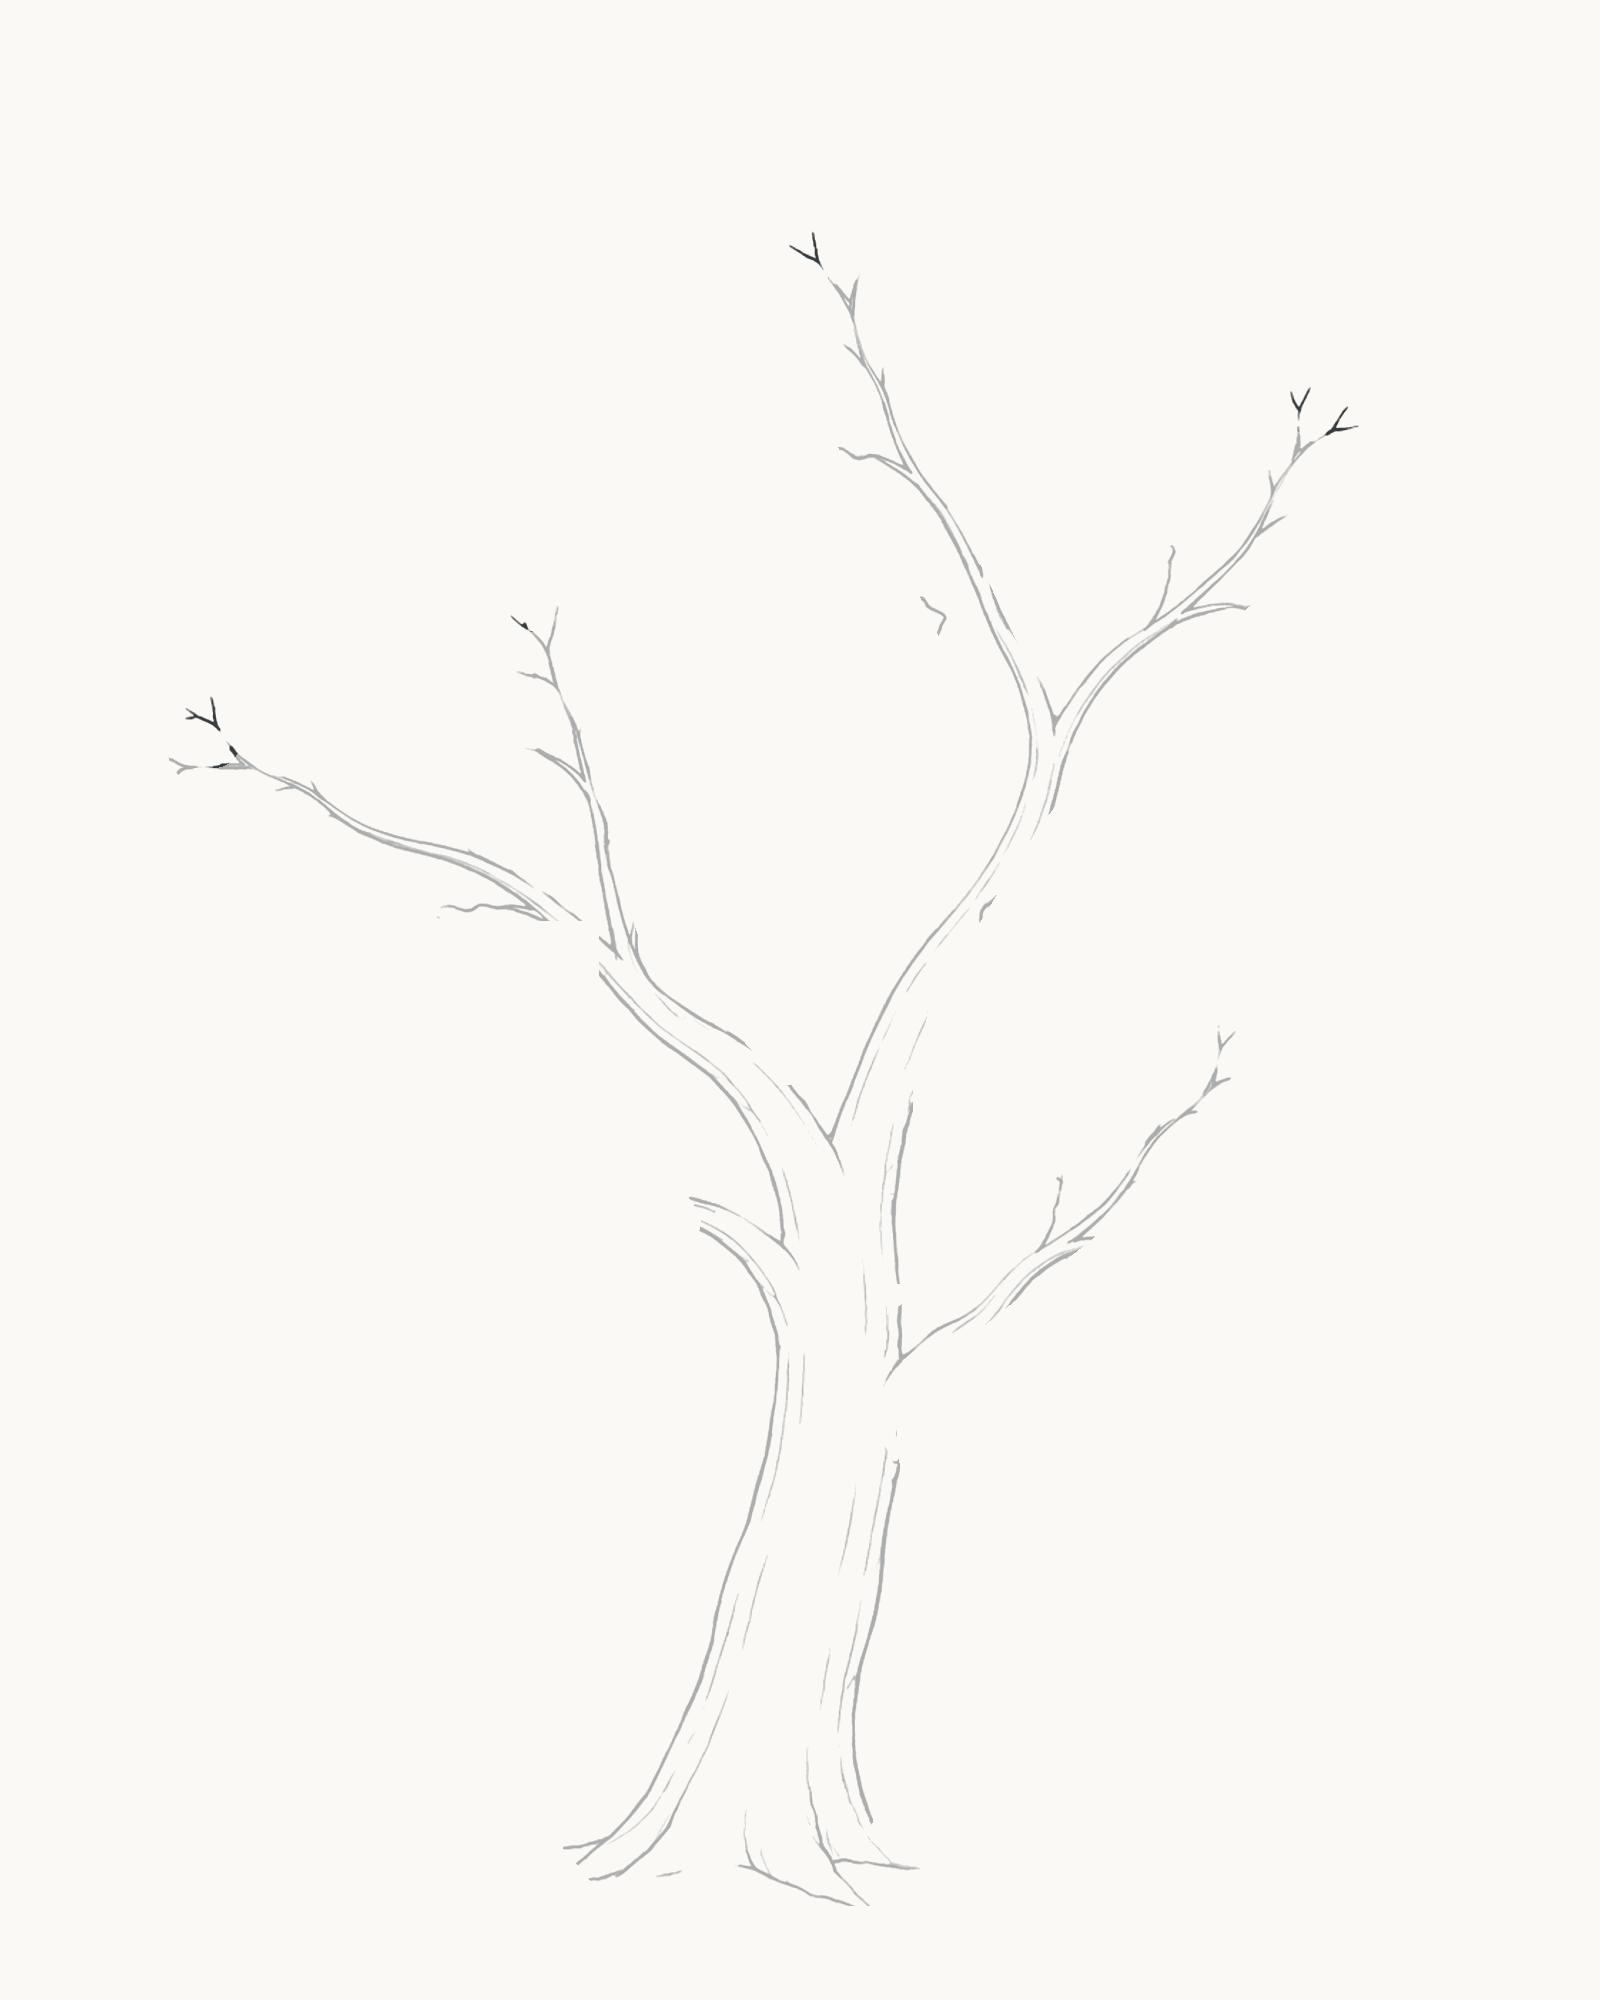
Stage 4 of 7. Fine uneven forks complete the branch skeleton without crowding it. Split selected endpoints into a small number of fine forks. Keep these twigs short, light and unevenly spaced. Some point upward; others turn into the open areas where the crown will sit. Stop before the centre becomes a dense fan.
The fine lines will remain visible through selected openings in the foliage. They do not need to fill every future group.
Look for this before moving on: The terminal tips vary in length and direction, taper to points, and do not repeat like the teeth of a comb.
If it goes wrong: Remove just one repeated or crossing tip and redirect it into nearby open space. Do not redraw the parent branch.
5. Build the outer foliage groups
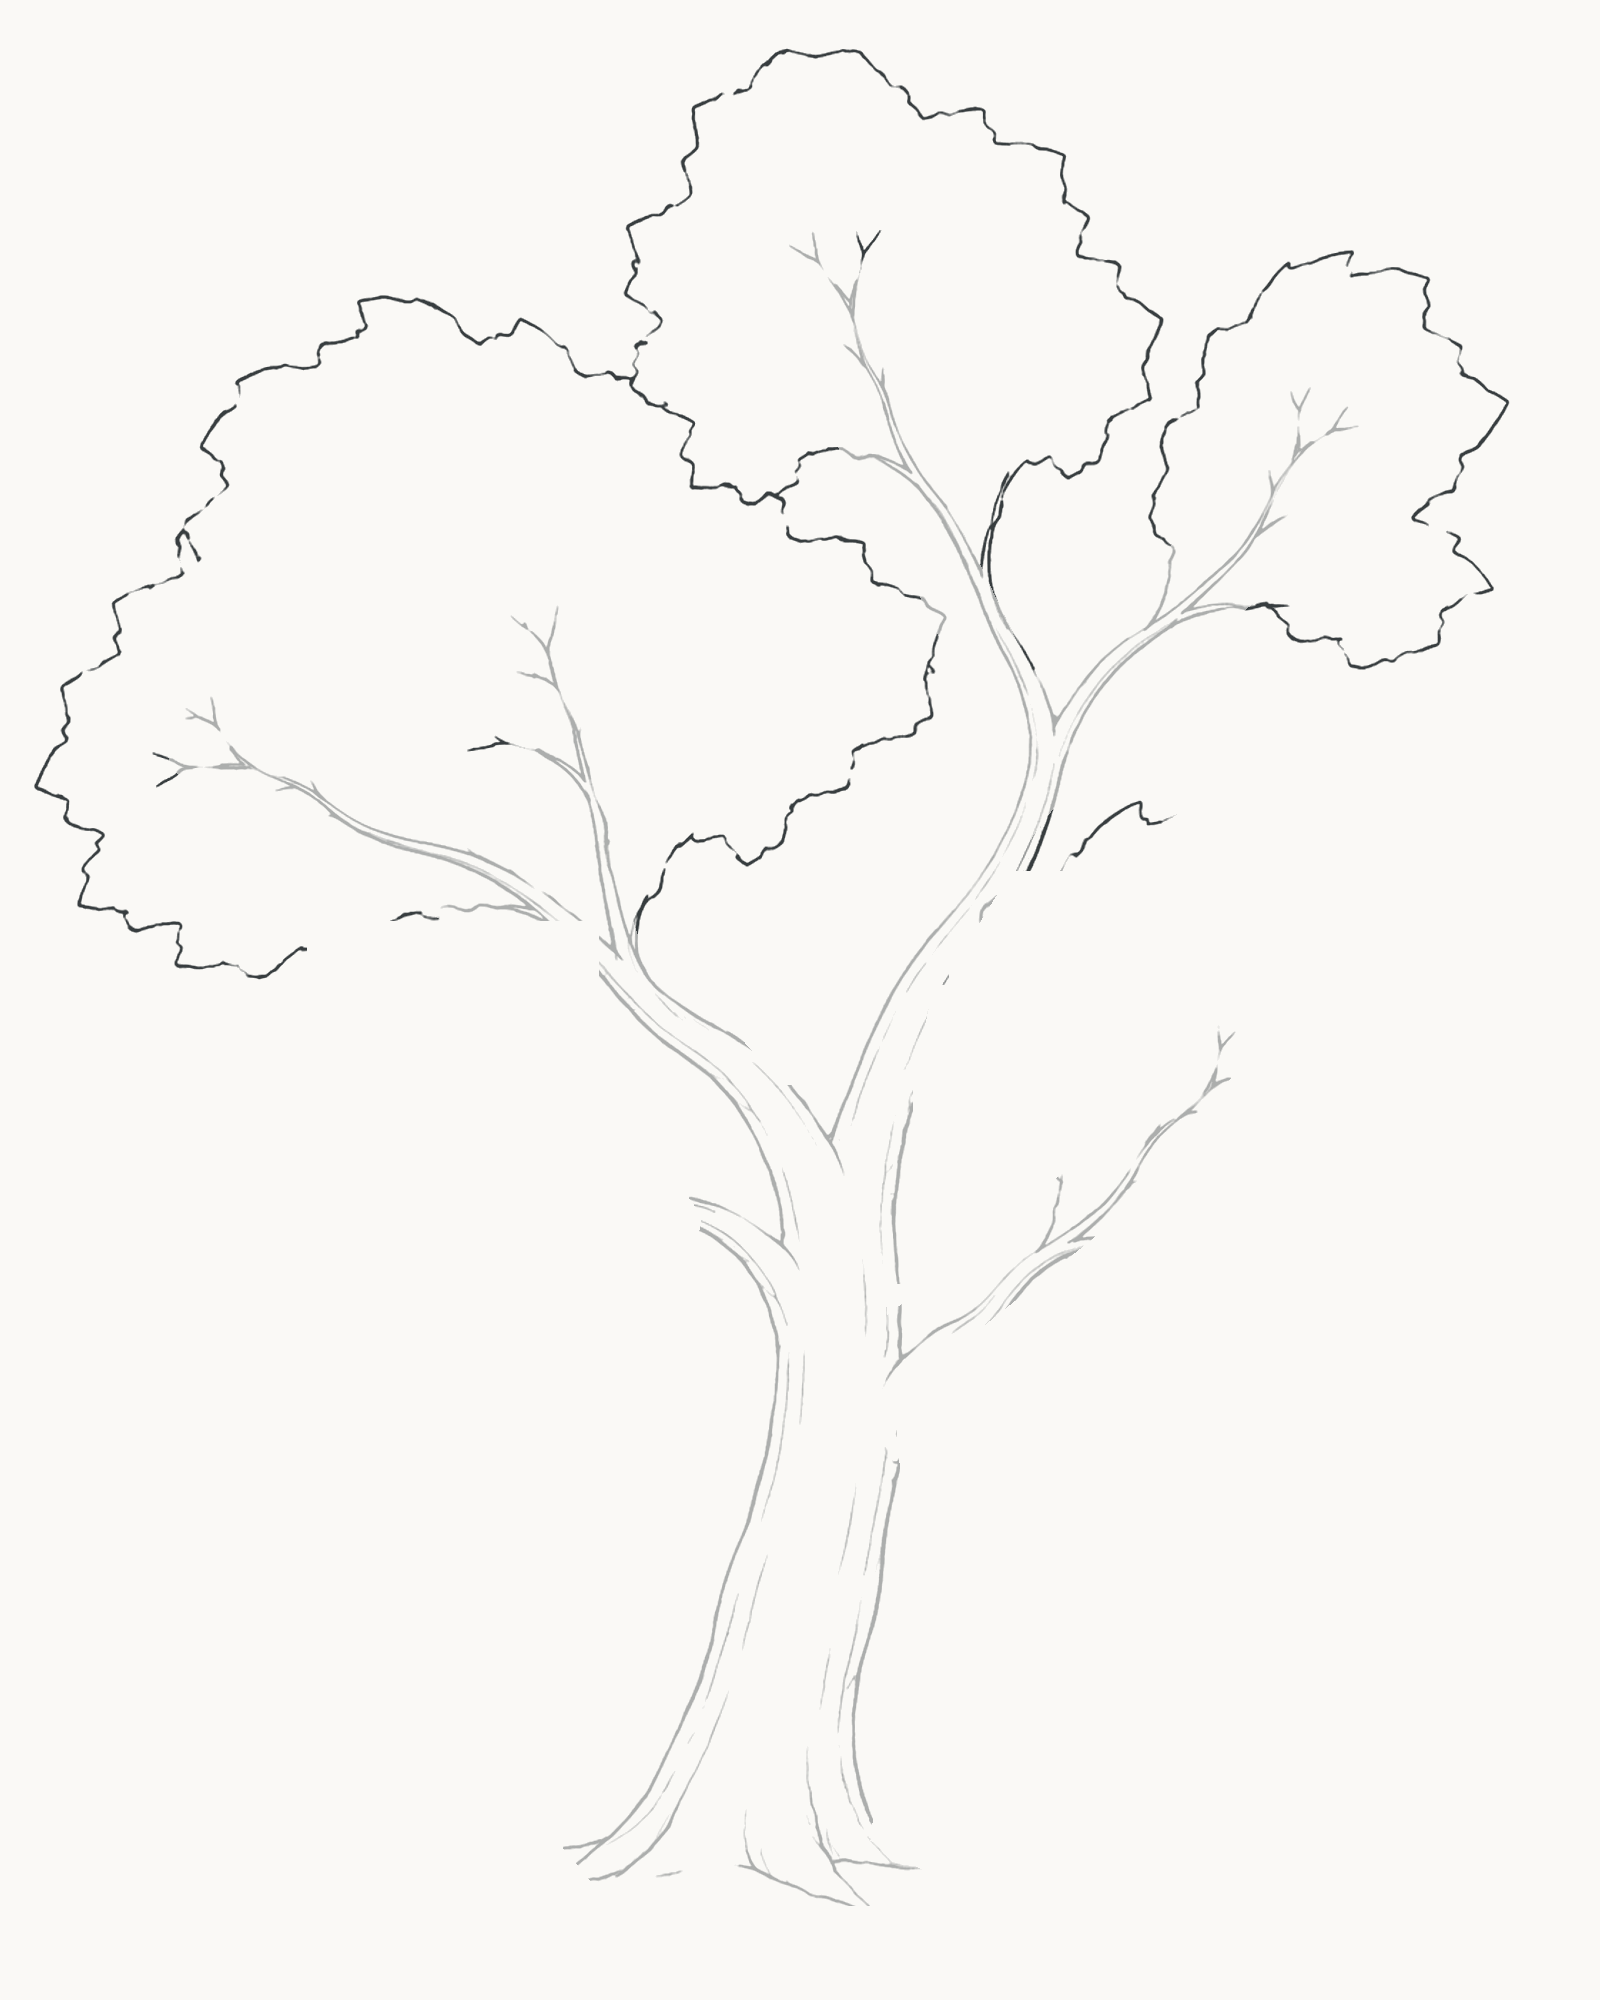
Stage 5 of 7. Three unequal upper groups establish the crown around the branches. Draw three irregular masses around the upper branch tips. Begin with the broad group on the left, add the highest group above the centre, then place the narrower group at the upper right. Use broad changes of direction and occasional sharper notches. Avoid a row of identical round scallops.
Let the three groups overlap visually while keeping the branch lines already on the page. The lower crown remains open for the next stage.
Look for this before moving on: Three unequal groups are easy to trace, the left side is broad, the centre reaches highest, and the upper-right group is narrower. Small branch windows remain visible.
If it goes wrong: Change only the most repetitive lobe. If a group seems to float, bring its nearest edge towards the branch that supports it rather than moving or erasing the branch.
6. Complete the lower crown
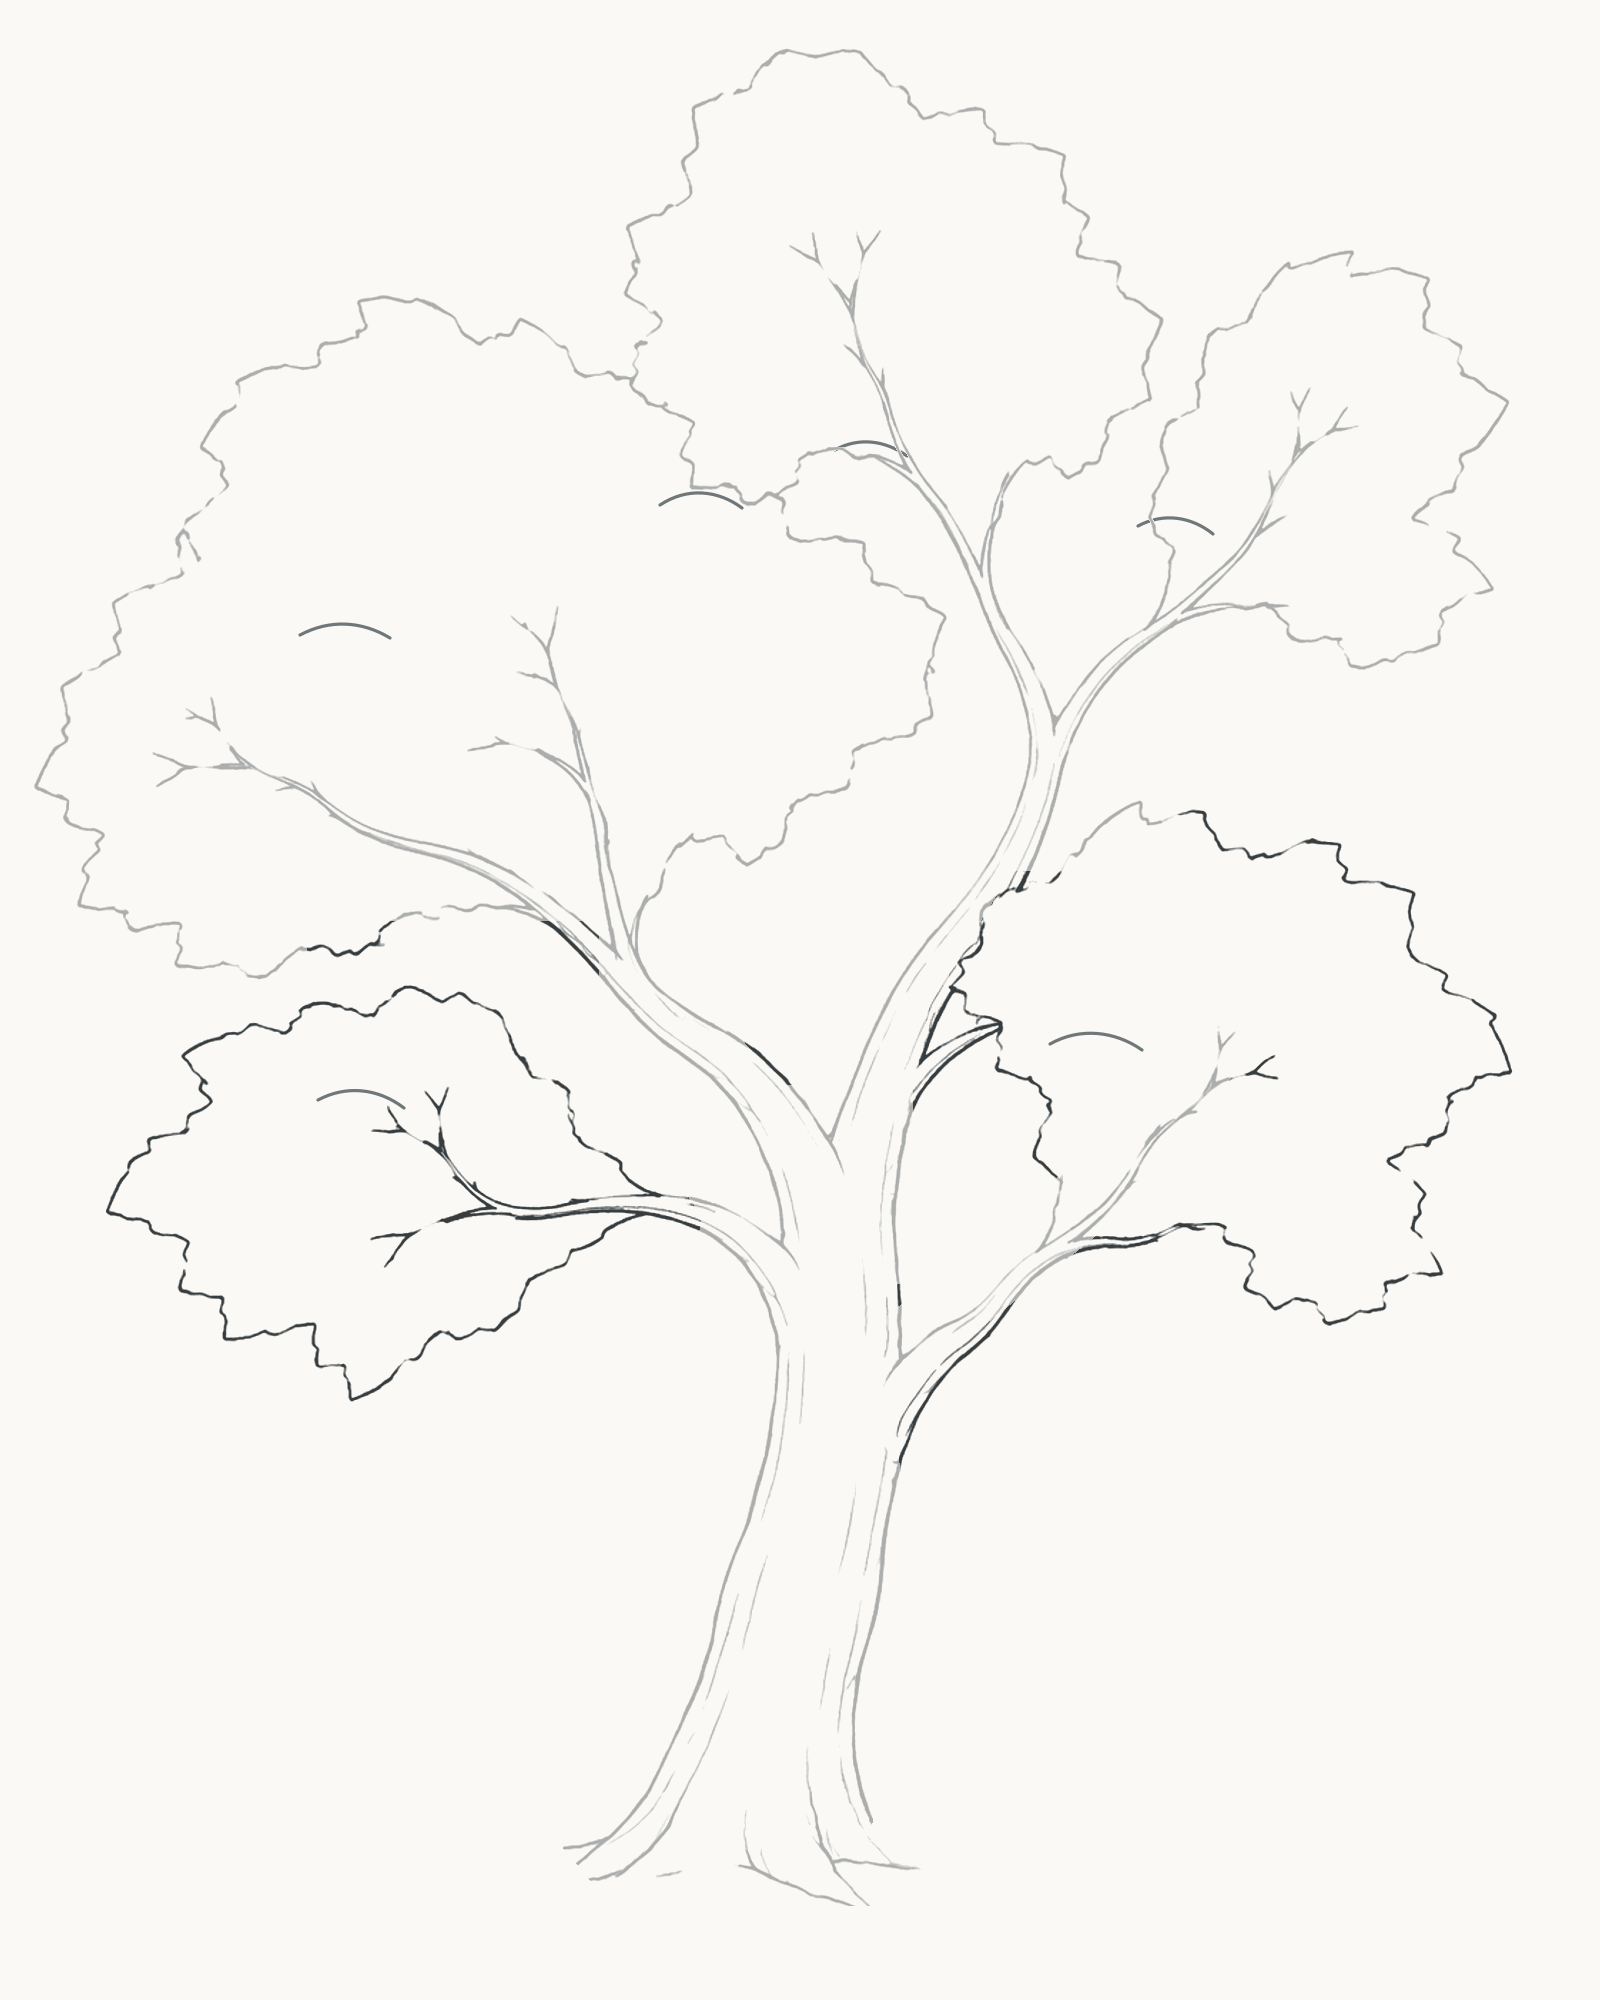
Stage 6 of 7. Two lower groups close the crown; six light fragments clarify its overlaps. Add the front-left foliage group around the low left branch, then the lower-right group around its branch. Their contours close the main crown without enclosing the whole tree in one cloud.
Finish with the six short, light contour fragments shown inside the groups. These suggest that one mass overlaps another; they are not individual leaves and should stay much shorter and lighter than the outer edges.
Look for this before moving on: Five unequal groups form one connected, asymmetric crown. The trunk and selected branches remain visible, and the internal fragments read as quiet overlaps rather than leaf symbols.
If it goes wrong: Close only the nearest unwanted gap with one broad contour change. If an inner fragment resembles a leaf or eyebrow, shorten or lighten that fragment alone.
7. Ground the tree
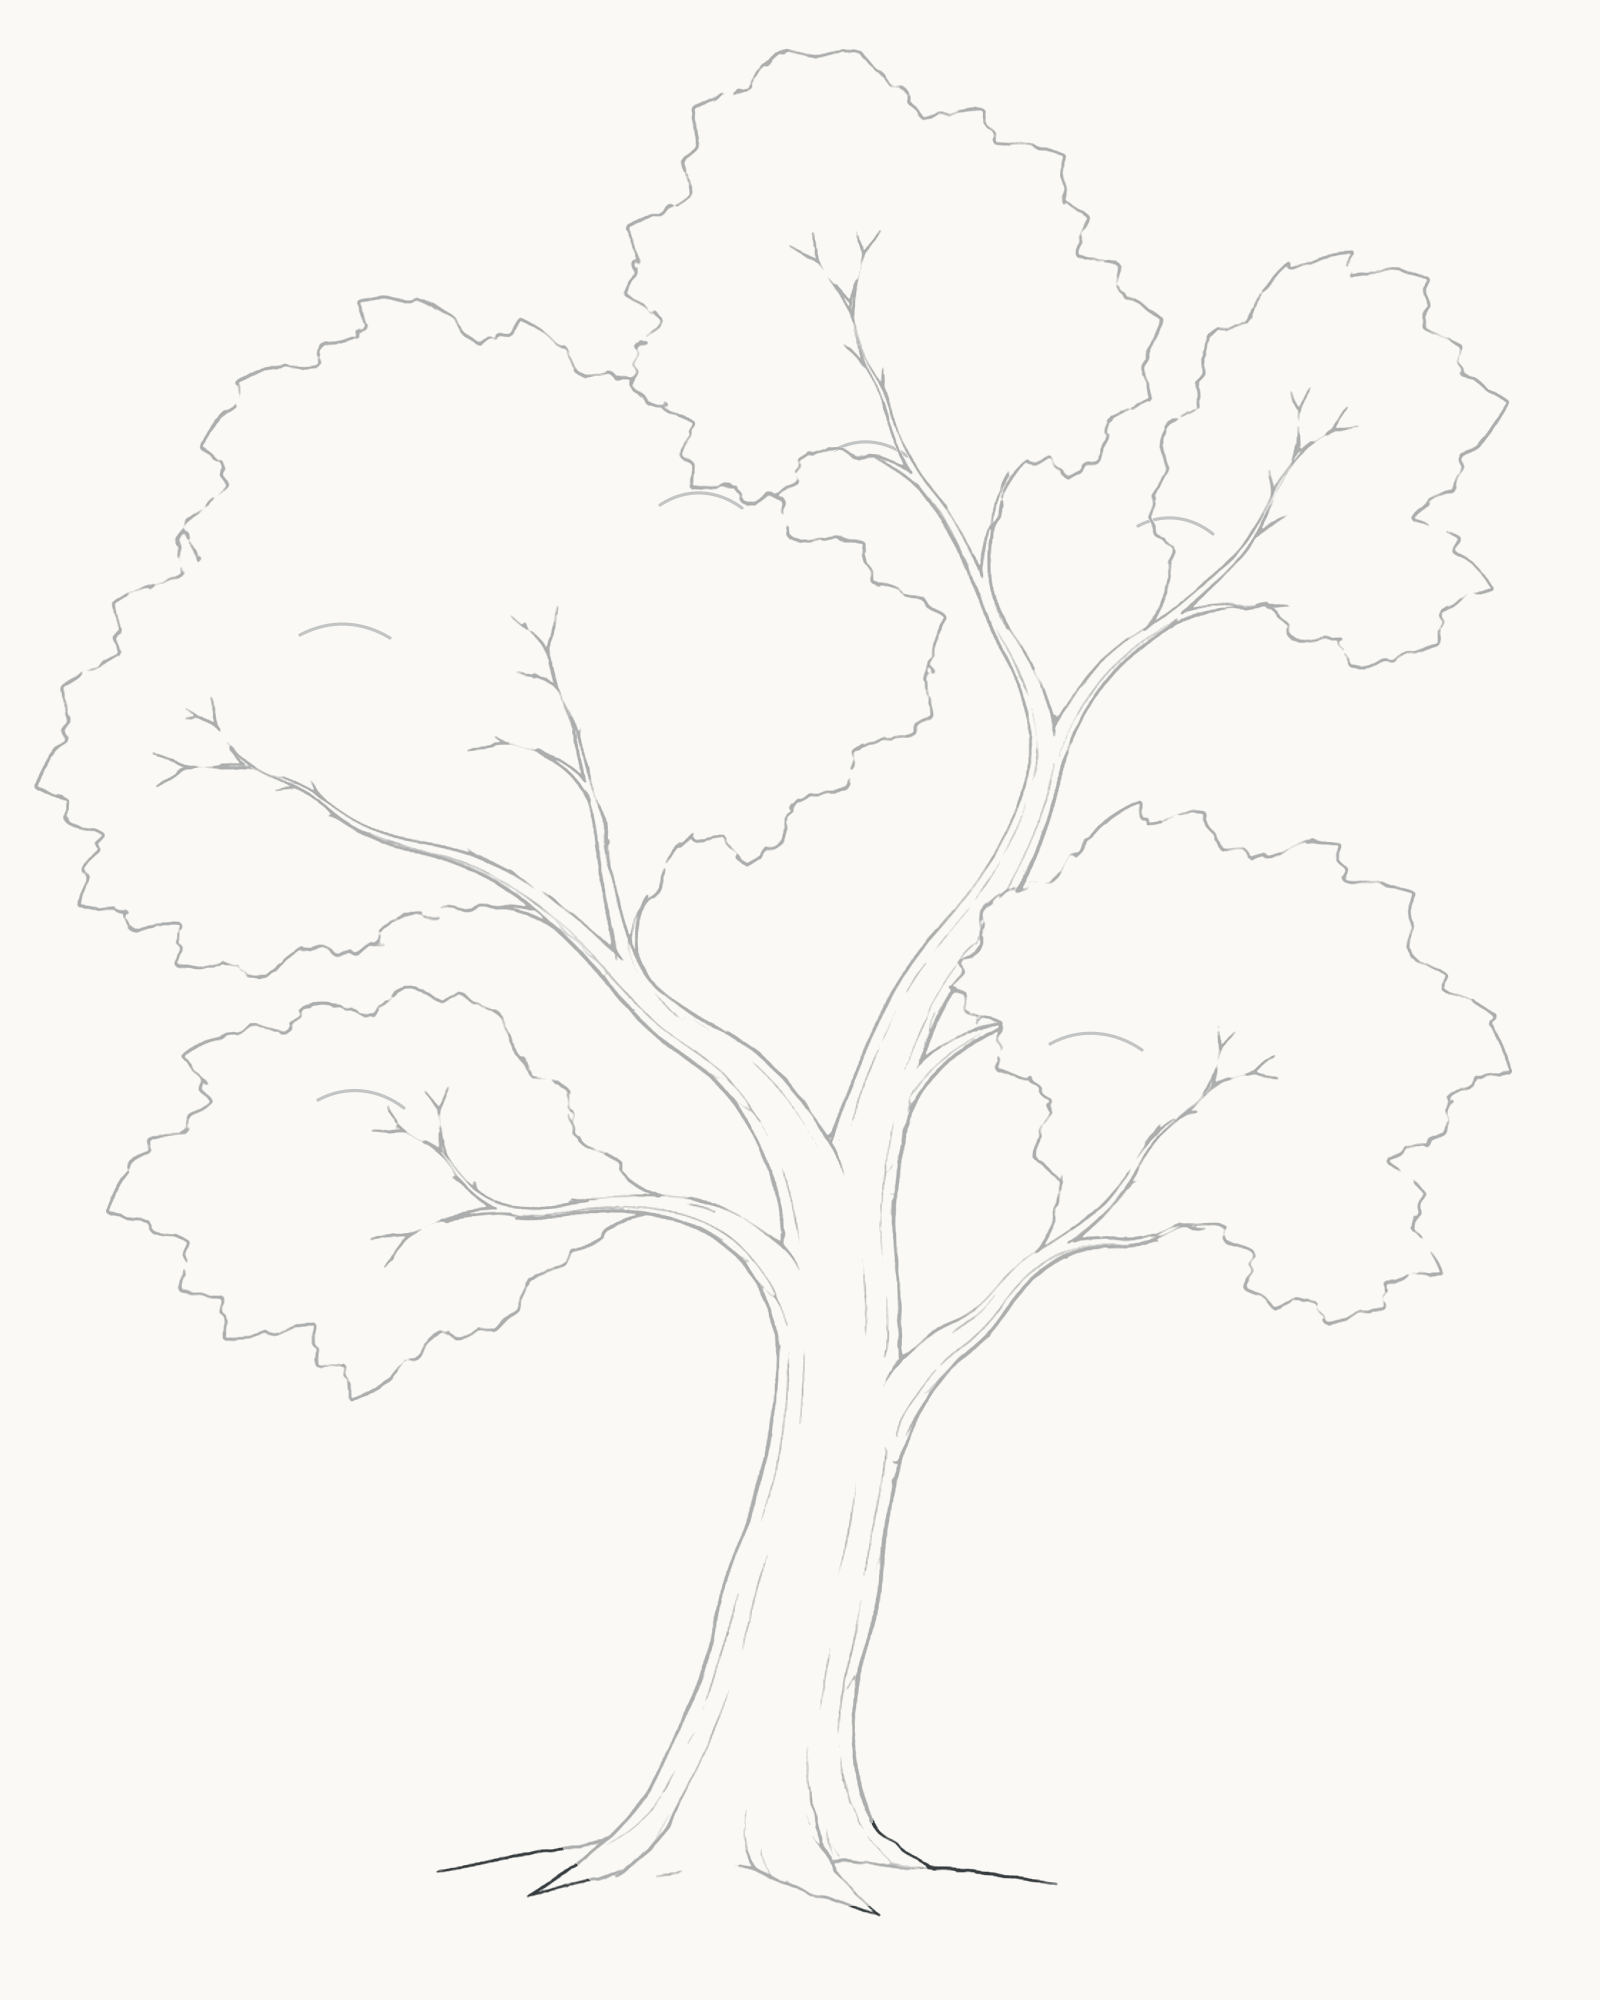
Stage 7 of 7. Two low ground strokes complete the line drawing without adding shading. Add one low line travelling outward from the left root edge and one from the right. Keep both below the root toes. These two strokes are enough to make the tree sit on the page; they are not a horizon, grass or shading.
Look for this before moving on: The two ground lines extend away from the root flare without crossing the trunk, and every part of the tree from Stage 6 is otherwise unchanged.
If it goes wrong: Erase only the section that rises above a root or crosses the base, then redraw that ground stroke outward from the root edge.


Common mistakes and small fixes
- The trunk looks like a tube. Adjust one side in a short section so the base is wider and the upper trunk narrower. Do not erase both contours.
- The branches look stiff or pasted on. Replace a blunt T with a narrow flowing wedge and keep the branch thinner than its parent.
- The crown looks like one cloud. Change one repeated round curve into a broader arc and another into a sharper notch; preserve the five-group arrangement.
- The tree has too many twigs. Keep the terminal forks that explain the main paths and lift only the crowded or repeated extras.
- The internal marks look like leaves. Shorten and lighten them. They separate masses rather than form a pattern.
Practise a different crown
Repeat the seven stages with the same trunk and branch logic, but change the five foliage groups: make the left side lower, the top group narrower and the lower-right group broader. Keep the group count and branch attachments. This practises asymmetry without asking you to learn a new construction method.
Frequently Asked Questions
What is the easiest way to start drawing a tree?
Begin with the tapered trunk and two main limbs before drawing the crown. The large structure gives every later branch and foliage group a clear place to attach.
Do I need to draw every leaf?
No. This lesson uses five foliage masses and a few short overlap fragments. Drawing every leaf would change the exercise into a much longer detailed study.
Why do my branches look stiff?
They may be too equal, too thick at the ends or attached with blunt T shapes. Vary each fork, taper child branches and let the join flow in the same direction as the parent.
How do I stop the canopy looking like a cloud?
Use several unequal overlapping groups, mix broad curves with sharper notches, and avoid repeating the same small scallop around the perimeter.
Do I need special pencils?
No. One HB or No. 2 pencil is enough for this line drawing. Use lighter pressure for small branches and internal crown fragments rather than changing pencil grade.
Should I add shading?
Not for this lesson. The intended finish is a complete line drawing. Practise the branch attachments and five-part crown clearly before treating tone as a separate exercise.
References
- How to draw trees: A step-by-step tutorial, Adobe — View source.
- How To Draw Trees, The Virtual Instructor — View source.
- Tree Drawings, The History of Art — View source.
More DRAWING Guides

How to Draw a Rose: A Step by Step Guide

How to Draw a Tree: A Step by Step Guide

How to Draw Eyes: A Step by Step Guide

How to Draw Leaves: A Step by Step Guide

How to Draw Autumn Leaves: A Step by Step Guide

How to Draw Flowers: A Step by Step Guide

How to Draw a Lily: A Step by Step Guide

How to Draw a Sunflower: A Step by Step Guide

How to Draw a Tulip: A Step by Step Guide

How to Draw a Hibiscus: A Step by Step Guide

How to Draw a Daisy: A Step by Step Guide
