




Draw one complete lotus flower and leaf in eight permanent line stages. Build a shallow receptacle, organise twelve petals into three overlapping tiers, support the bloom with three sepals and a long curved stalk, then add one round leaf on its own separate stalk. Every sound line stays in place; there is no guide-removal, outline-darkening or shading pass.
Difficulty: Beginner; the main challenge is making the petal tiers overlap without becoming a flat fan
Time: Allow about 30–45 minutes. This is an untested estimate, and the finished bloom at Stage 6 is a sensible stopping point.
Medium: HB or No. 2 pencil, line only
See the lotus as a bowl, not a wheel
The petals in this exercise are arranged by depth. Three broad forms make the near edge of the bowl, four rise at the sides and five stand behind the centre. That order matters more than making any one petal perfectly symmetrical. It gives every new curve somewhere definite to begin and end, while slight differences in width and lean keep the bloom from looking like an emblem.
The raised, top-shaped receptacle is a useful identifying feature of the sacred lotus, Nelumbo nucifera.[1][3] Its large round leaves are carried on their own stalks and lack the familiar notch of a water-lily leaf.[2][3] Those observations explain the two separate stalks and the unnotched leaf used here. This is a designed drawing exercise rather than a botanical plate or exact petal census.
Materials
- One pointed HB pencil. A No. 2 classroom pencil is a practical equivalent.
- A vertically oriented sheet of smooth white or warm-white paper. Printer paper or an unlined sketchbook page is fine for practice.
- A clean eraser for correcting only the newest faulty curve.
- Wooden pencils may need sharpening during the longer petal stages.
- Optional: keep a clear photograph of an open lotus viewed from a modestly raised angle nearby. Use it to notice uneven petal widths and the separate flower and leaf stalks; follow the supplied drawing for the exact lesson result.
You do not need a ruler, compass, ink, colour, blending stump, tracing paper, specialist surface or tablet. For uniform thin marks, you can replace the wooden pencil with a 0.5–0.7 mm mechanical one.
Before you draw
Imagine a portrait frame four units wide and five high. The small receptacle sits close to 52% of the page width and 24% of its height. Keep generous space around it: the petals will fill the upper half, the flower stalk will curve down the right side, and a separate leaf will occupy the lower-left area.
Use the separate Stage 1 placement panel to judge those proportions. Its envelope, percentage marker and stalk corridors are viewing aids, not lines to copy onto the paper. The optional page grid works the same way and starts switched off. Turn it on briefly if you want to compare a petal tip, leaf edge or stalk bend with a cell, then continue freehand.
Keep the main contours calm and clear. Seed cavities, stamens, fold lines and leaf veins can be lighter and finer. Upper-left is the notional light direction, but this version remains a pure line drawing: open spacing suggests clarity without any tonal fill.
1. Place the shallow receptacle

Stage 1 of 8. A shallow receptacle fixes the bloom centre and leaves room for both stalks. 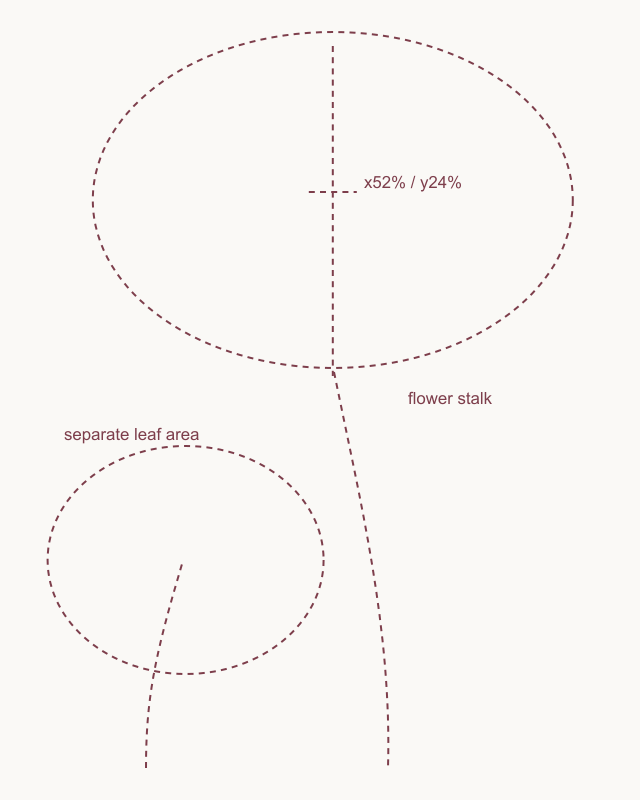
Placement cue: locate the receptacle around x52% and y24%. Reserve the broad bloom envelope, right flower-stalk corridor and separate lower-left leaf area, leaving every cue mark off the drawing. Near the x52%/y24% point, draw a low oval for the top. Let its right end sit a fraction higher than the left. From the two ends, bring short arcs inward and down, then join them with a gently rounded lower point. The result should resemble a small shallow cup seen from slightly above.
This shape is permanent. Keep it modest so the future petals can surround it without becoming cramped, and leave the long areas below and lower-left completely open.
Look for this before moving on: one small receptacle is wider than high, its top remains visible and there is ample room for a broad bloom, two separate stalks and a leaf.
If it goes wrong: keep the more useful half. Remove only the newest oversized, circular or sharply pinched arc, then reconnect it between the same stable ends without redrawing the whole cup.
2. Build the three-petal front bowl
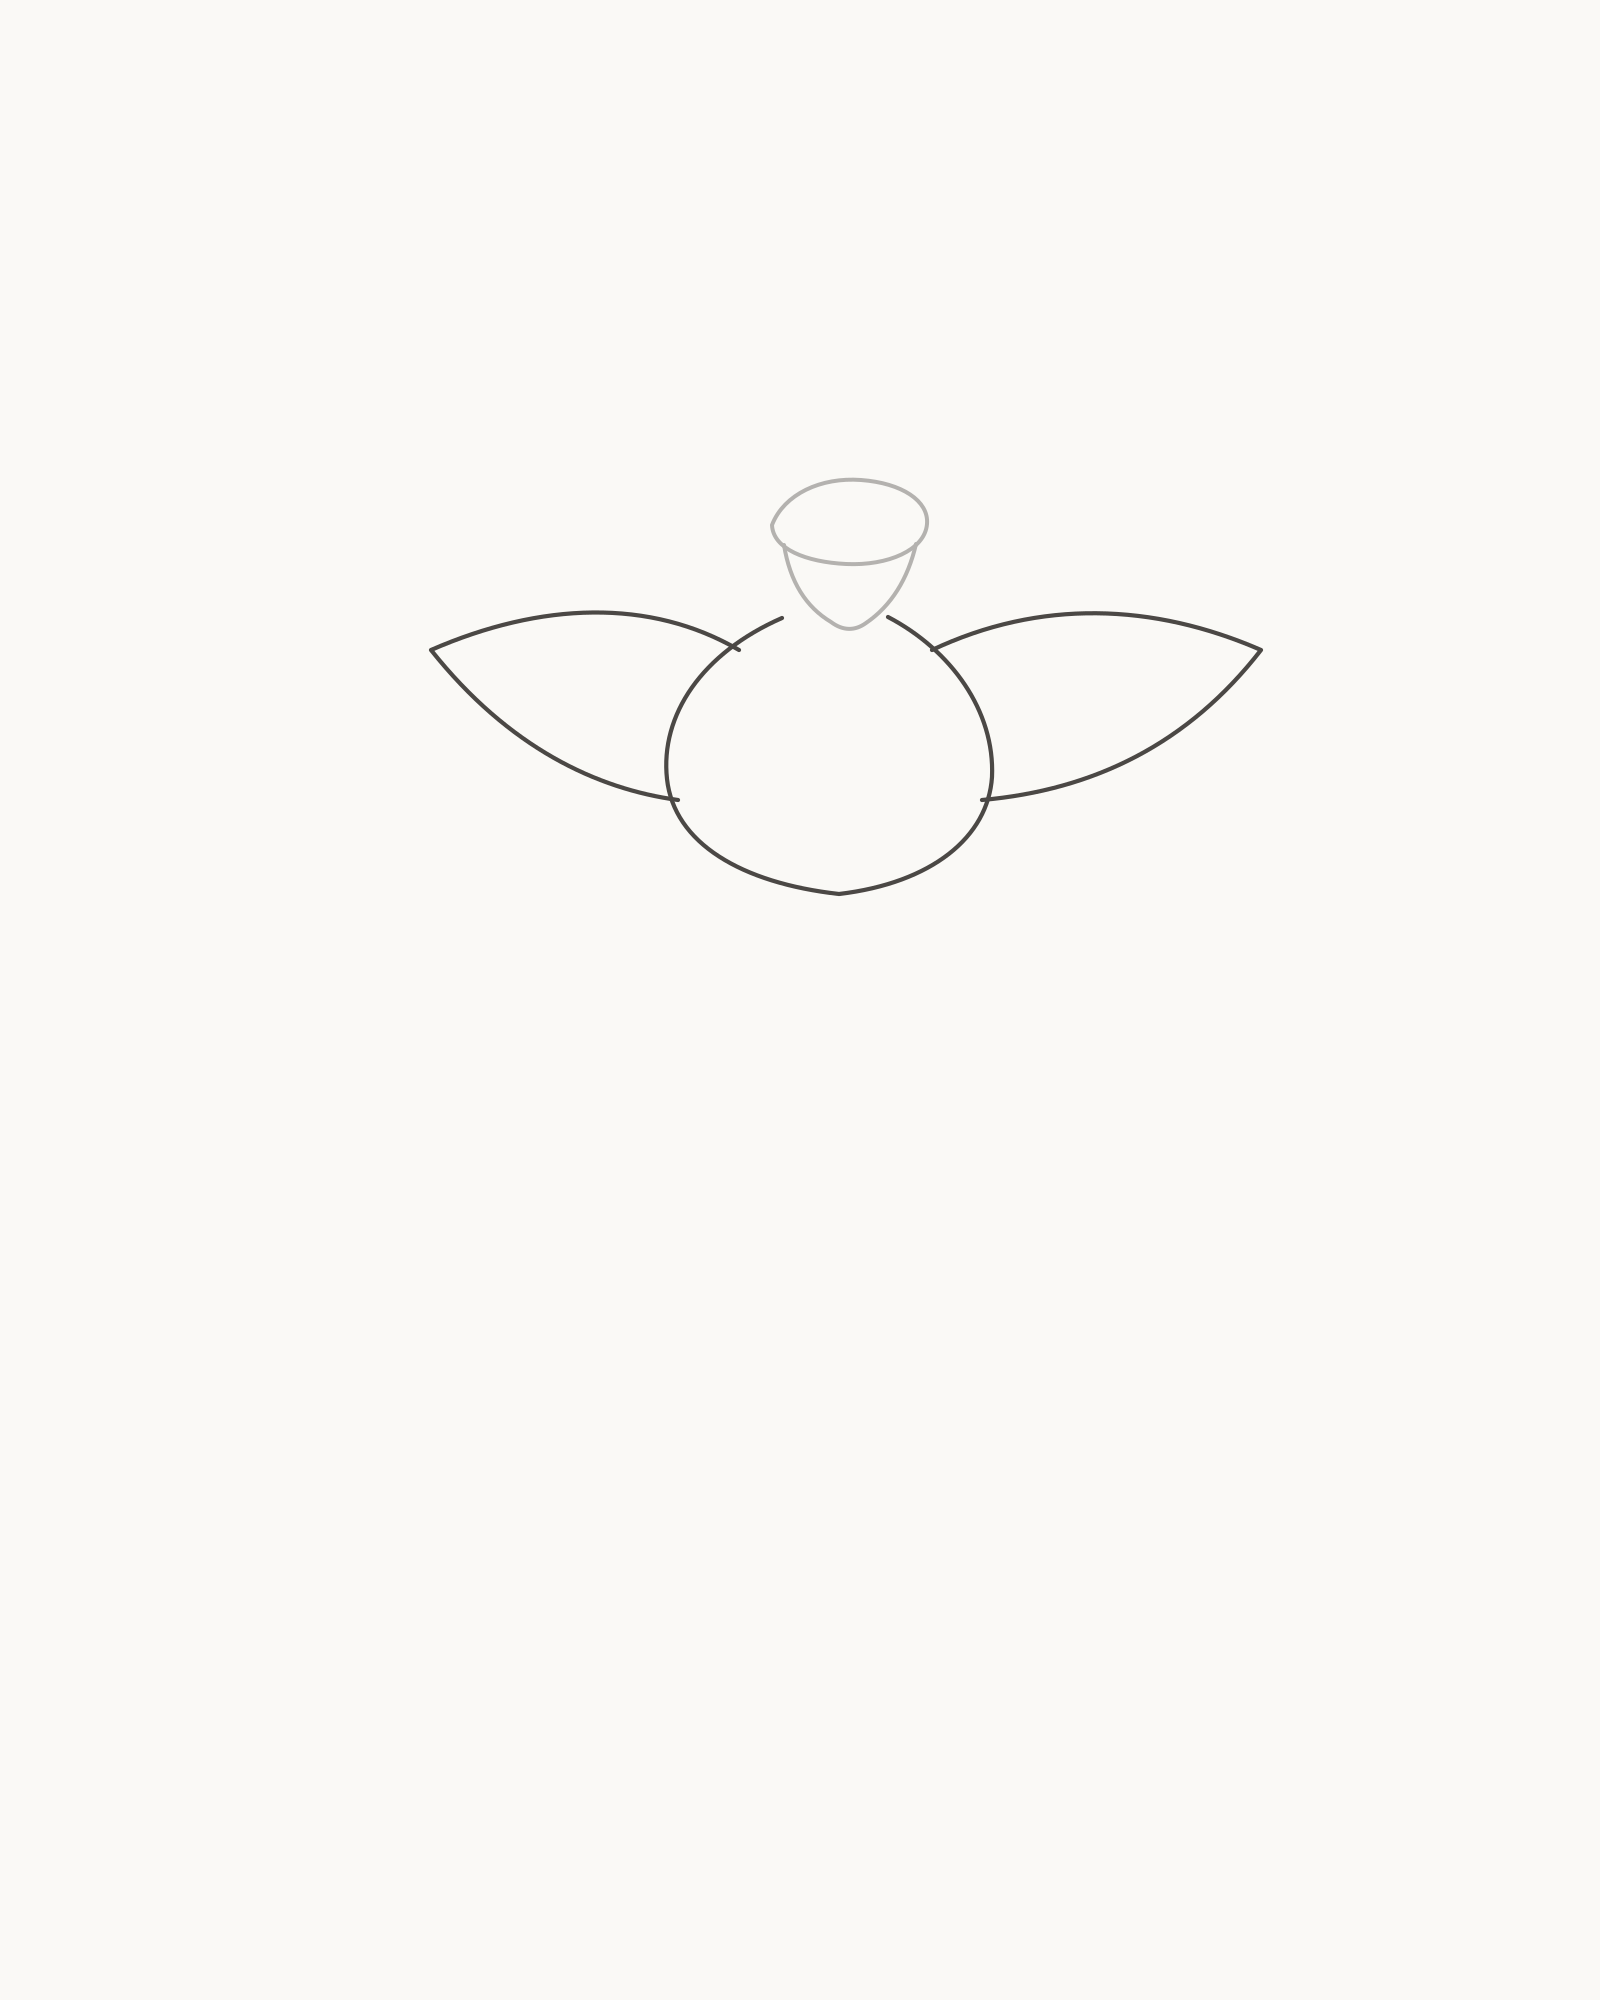
Stage 2 of 8. Three front petals establish the near edge of the cupped bloom. - Left-front petal
- Broad centre petal
- Right-front petal
Add the left-front petal first. Begin beside the lower-left of the receptacle, travel out to a broad left point and return towards the centre-front area. Its upper and lower edges should bow differently.
Next draw the broad centre petal. Start below the left side of the receptacle, curve down around the lowest part of the bloom and return below its right side. Keep the bottom rounded rather than turning it into a long hanging teardrop. Finish with the right-front petal, letting it reach a little differently from the left one before it returns to the centre form.
These are three separate shapes, not one scalloped ribbon. The centre petal sits nearest to the viewer, so the inner ends of the side pair stop where that front contour takes over.
Look for this before moving on: exactly three front petals form one shallow lower bowl; the centre petal reaches lowest, the side pair are unequal, and every visible end meets the receptacle area or the front contour.
If it goes wrong: preserve the cup and completed petal shapes. Lift only the newest flat, repeated or crossing contour back to its last secure contact, then change its bow before reconnecting it.
3. Add four side petals
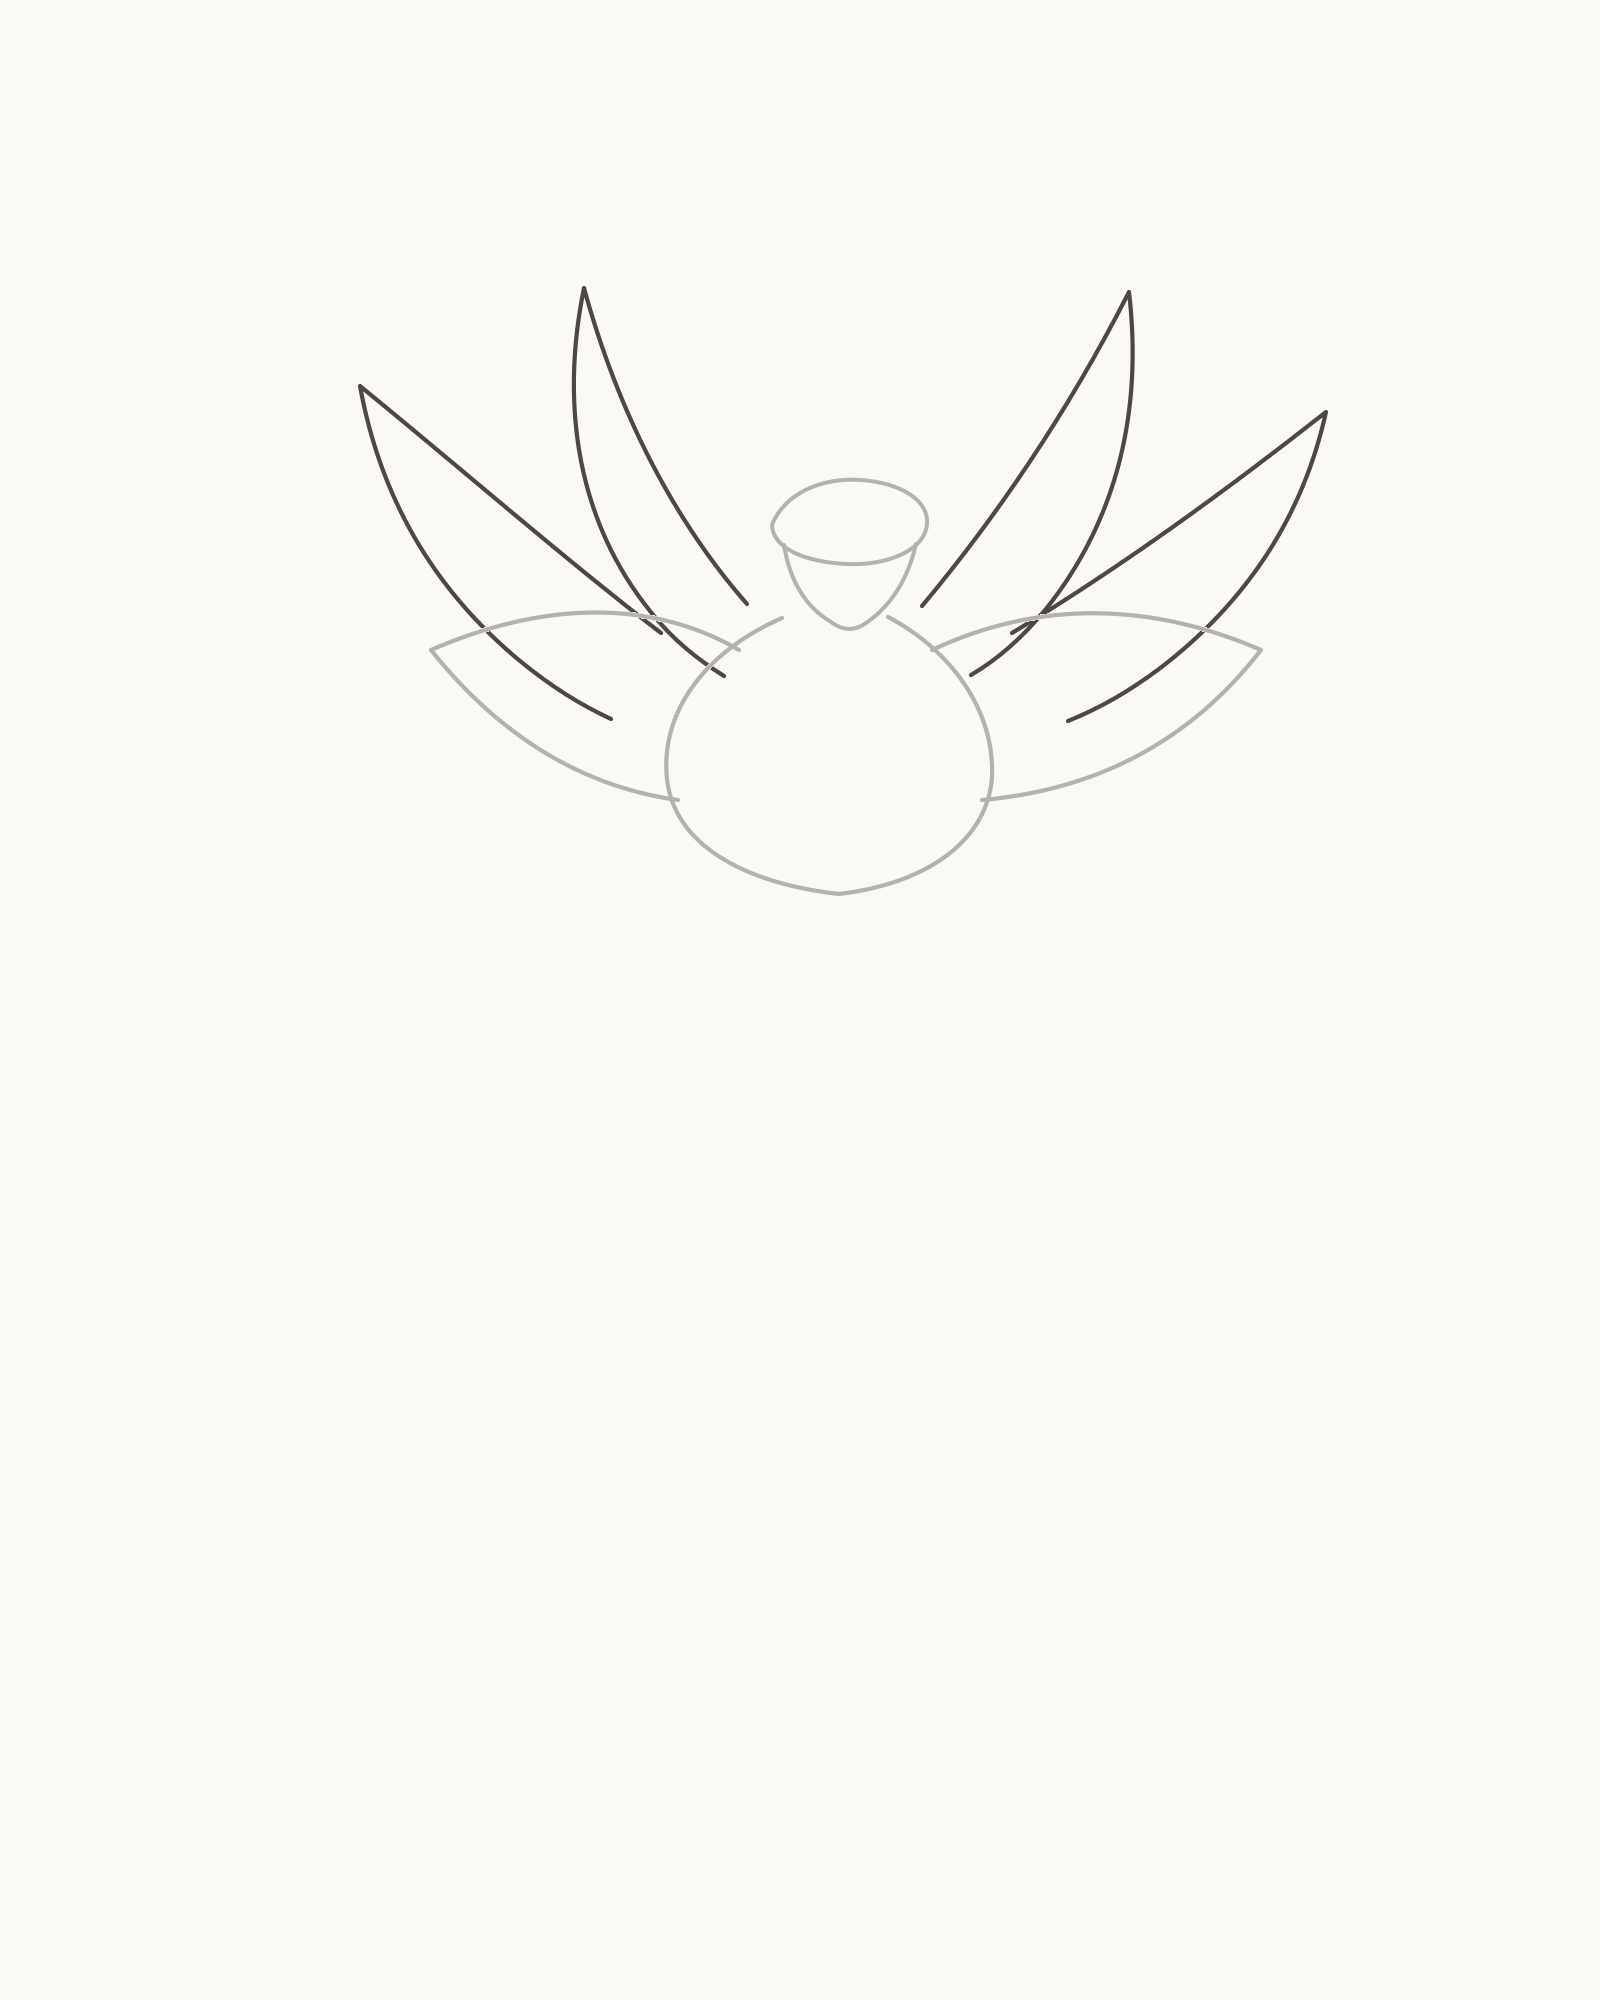
Stage 3 of 8. Four side petals widen the bowl with visible overlap stops. - Outer-left petal
- Inner-left petal
- Inner-right petal
- Outer-right petal
Work from the outside towards the centre on the left. Place one low diagonal petal, then one taller petal inside it. Repeat on the right in reverse: draw the taller inner petal, followed by the lower outer petal. This outer-left → inner-left → inner-right → outer-right order makes the four additions easy to count.
Each shape rises behind the front bowl. Where a return edge reaches a completed front petal, stop it there rather than drawing through. Let the left group open a little wider, while the right pair stands slightly more upright.
Look for this before moving on: seven petals are now countable, with two new forms on each side; the four new tips differ in height and lean, and no return line crosses the front tier.
If it goes wrong: leave all earlier contours untouched. Replace only the newest side-petal edge from its secure start to its intended stop; shortening a return is better than disguising a crossing with another petal.
4. Raise five petals at the back
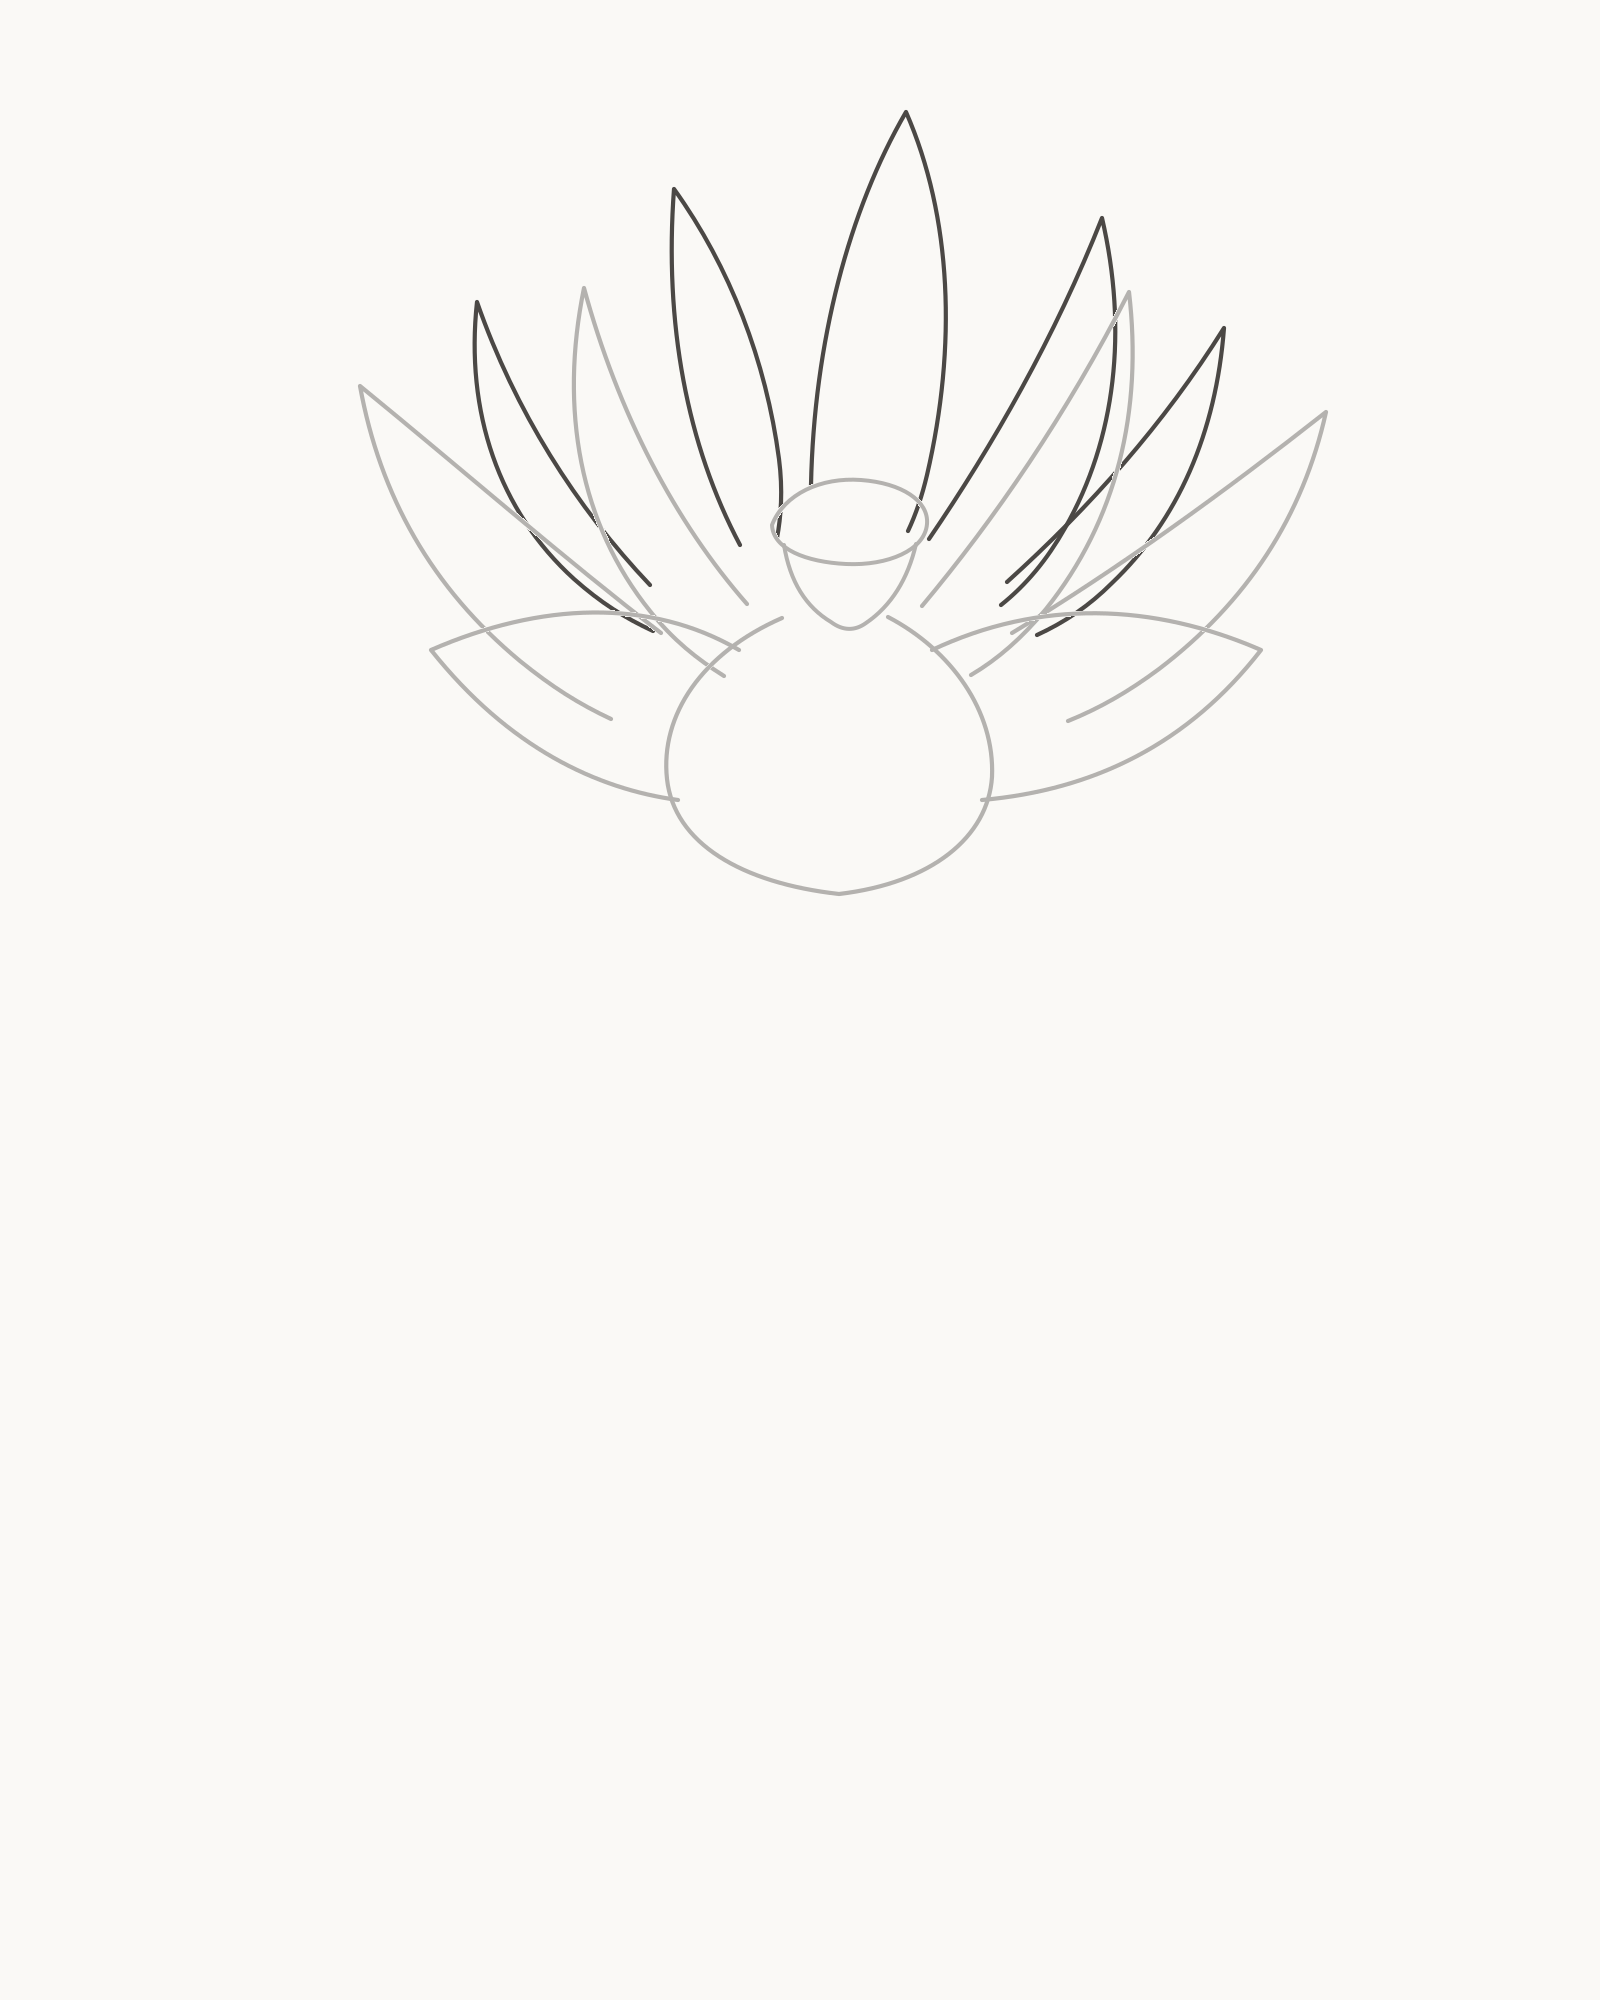
Stage 4 of 8. Five varied rear petals complete the twelve-petal flower. - Work left to right
- Vary height and lean
- Count twelve petals
Add the rear tier from left to right. Begin with a shorter left-leaning petal, then a taller neighbour. Place the tallest petal just right of the bloom's visual centre, followed by two descending forms on the right. Vary the shoulder width as well as the height so the five do not become a crown of repeated points.
The lower ends meet the receptacle area or disappear at an accepted middle-tier edge. Count the complete flower when the fifth rear petal is in place: three front, four side and five rear petals make twelve.
Look for this before moving on: exactly twelve petals form one cupped bloom, five new petals rise behind the centre, the tallest is not perfectly centred and every visible endpoint has a clear attachment or overlap.
If it goes wrong: keep the finished front and side tiers. Remove only the latest rear contour, then alter its lean or shoulder rather than squeezing a thirteenth petal into a narrow gap.
5. Describe the flower surface
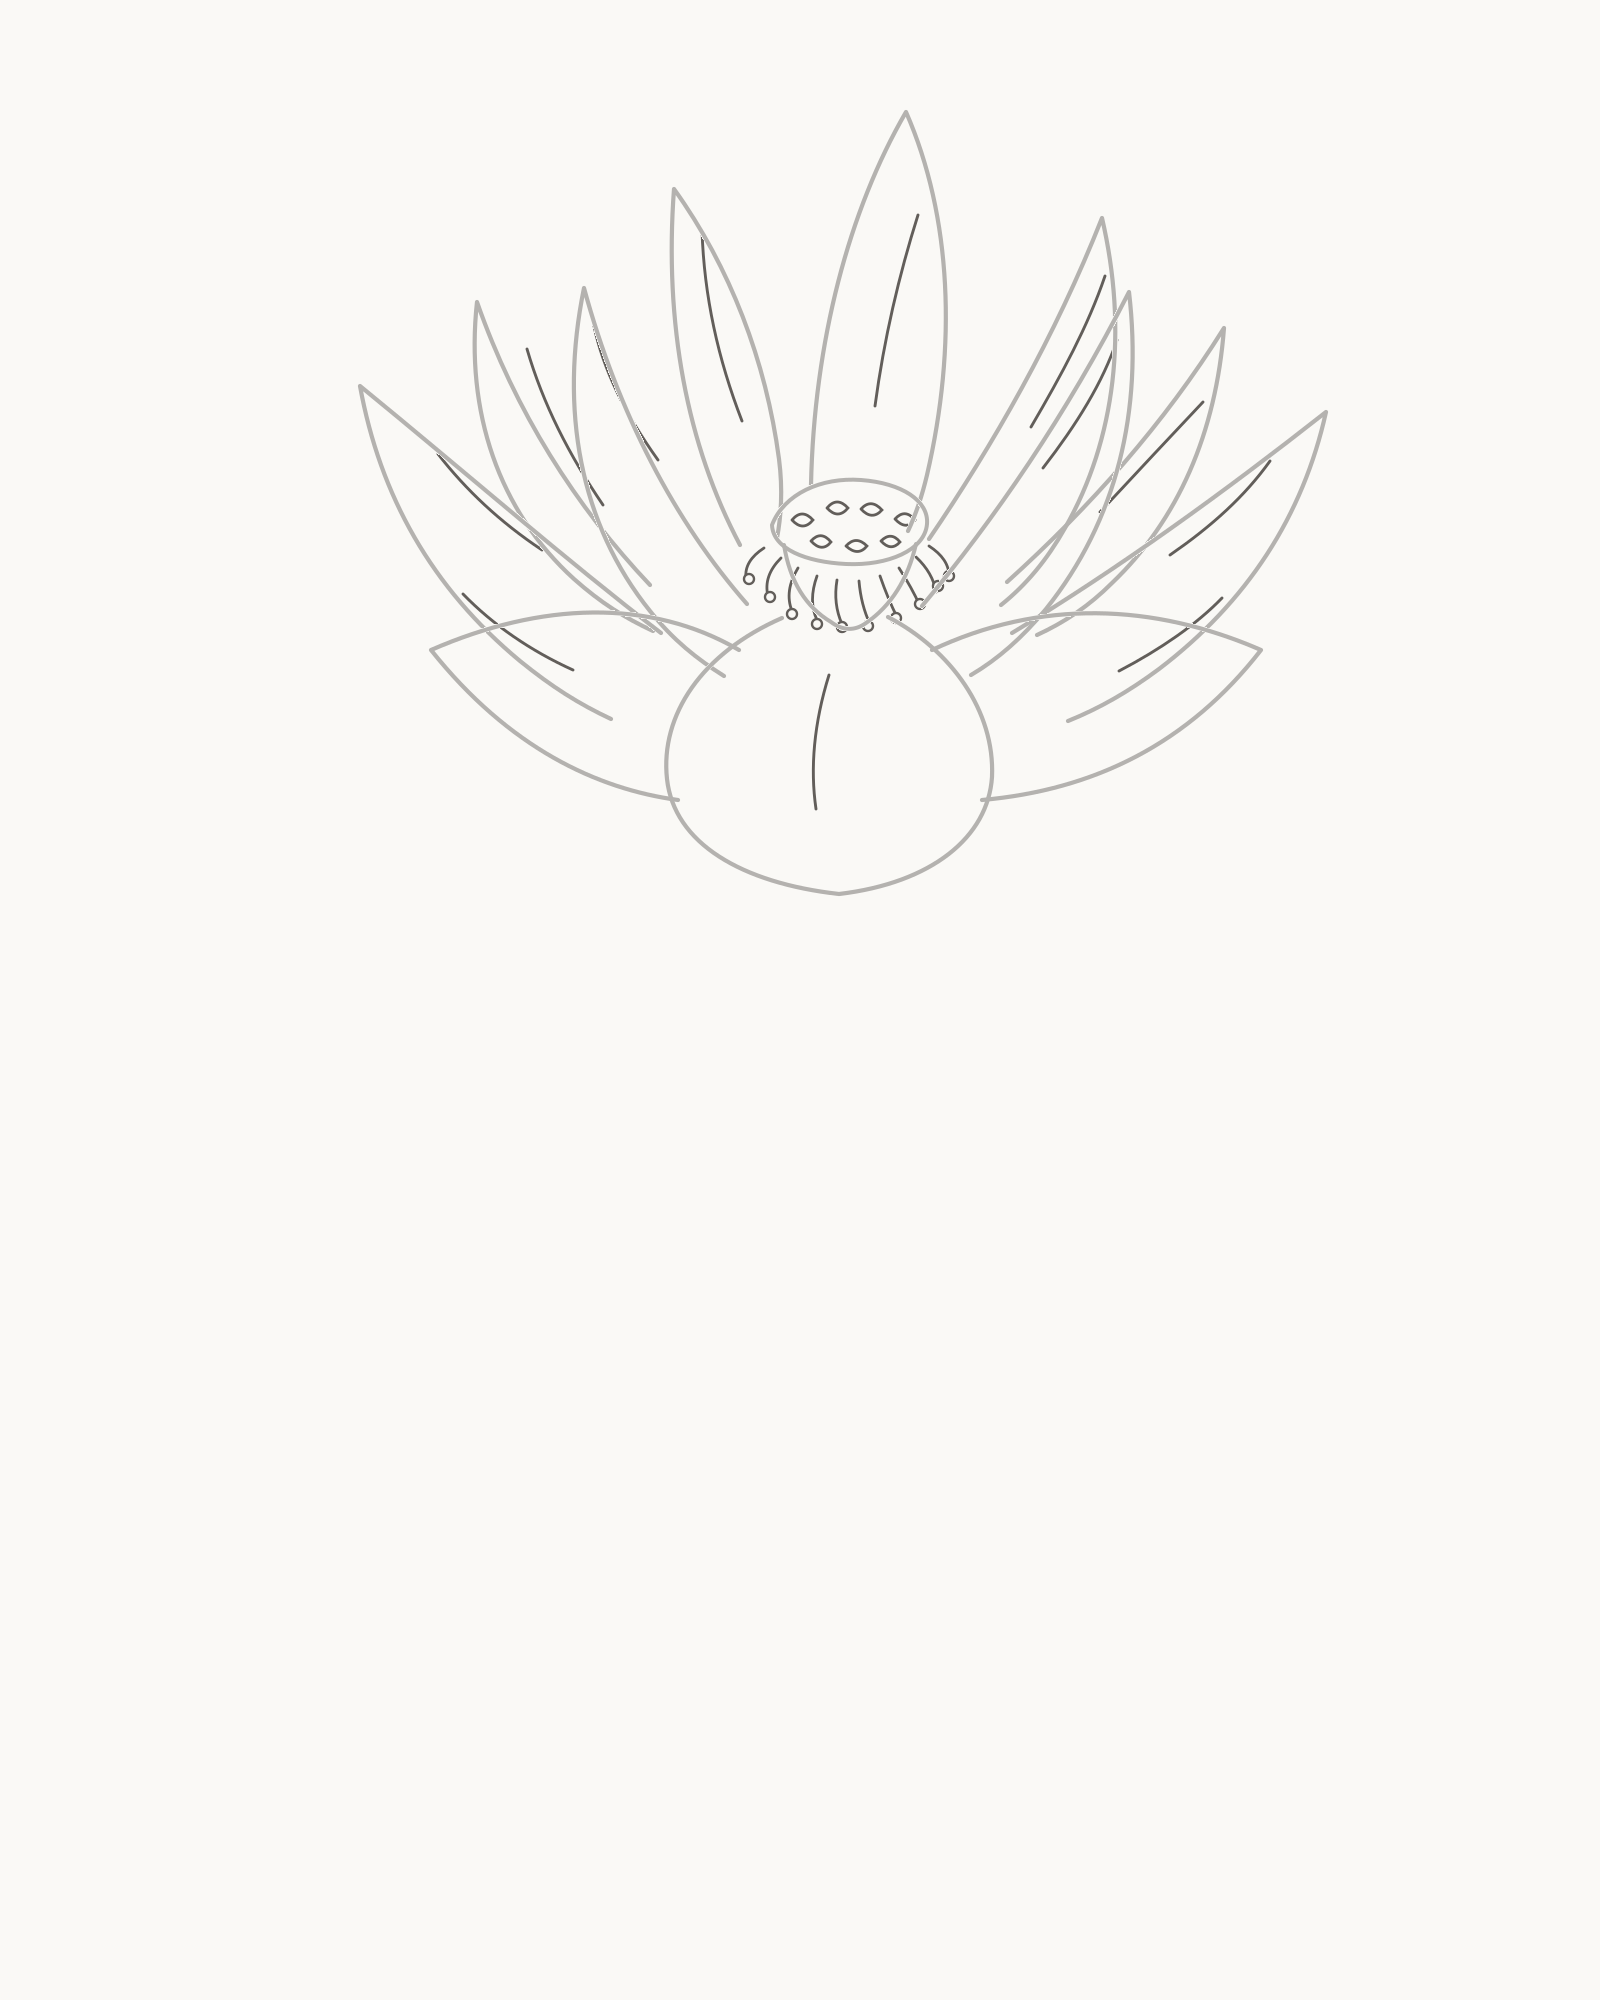
Stage 5 of 8. Open centre marks and short folds clarify the lotus without shading. - Seven open cavities
- Ten short stamens
- Twelve petal folds
Begin at the top of the receptacle and place seven small open seed cavities. Keep warm paper visible inside and between them. Around the lower sides, add ten short curved stamens with tiny open tips; they should frame the cup without turning into a dark necklace.
Finally add one short fold line inside each of the twelve petals. Aim every line in the direction its petal grows and stop well before the tip. These are permanent structural marks, not shading strokes.
Look for this before moving on: seven cavities, ten stamens and twelve short folds remain separately readable; no mark escapes its flower part and no area has become filled or dark.
If it goes wrong: keep every clear detail. Remove only the newest crowded cavity, wandering stamen or overlong fold, then replace that single mark with more open spacing.
6. Support the bloom with sepals and a stalk
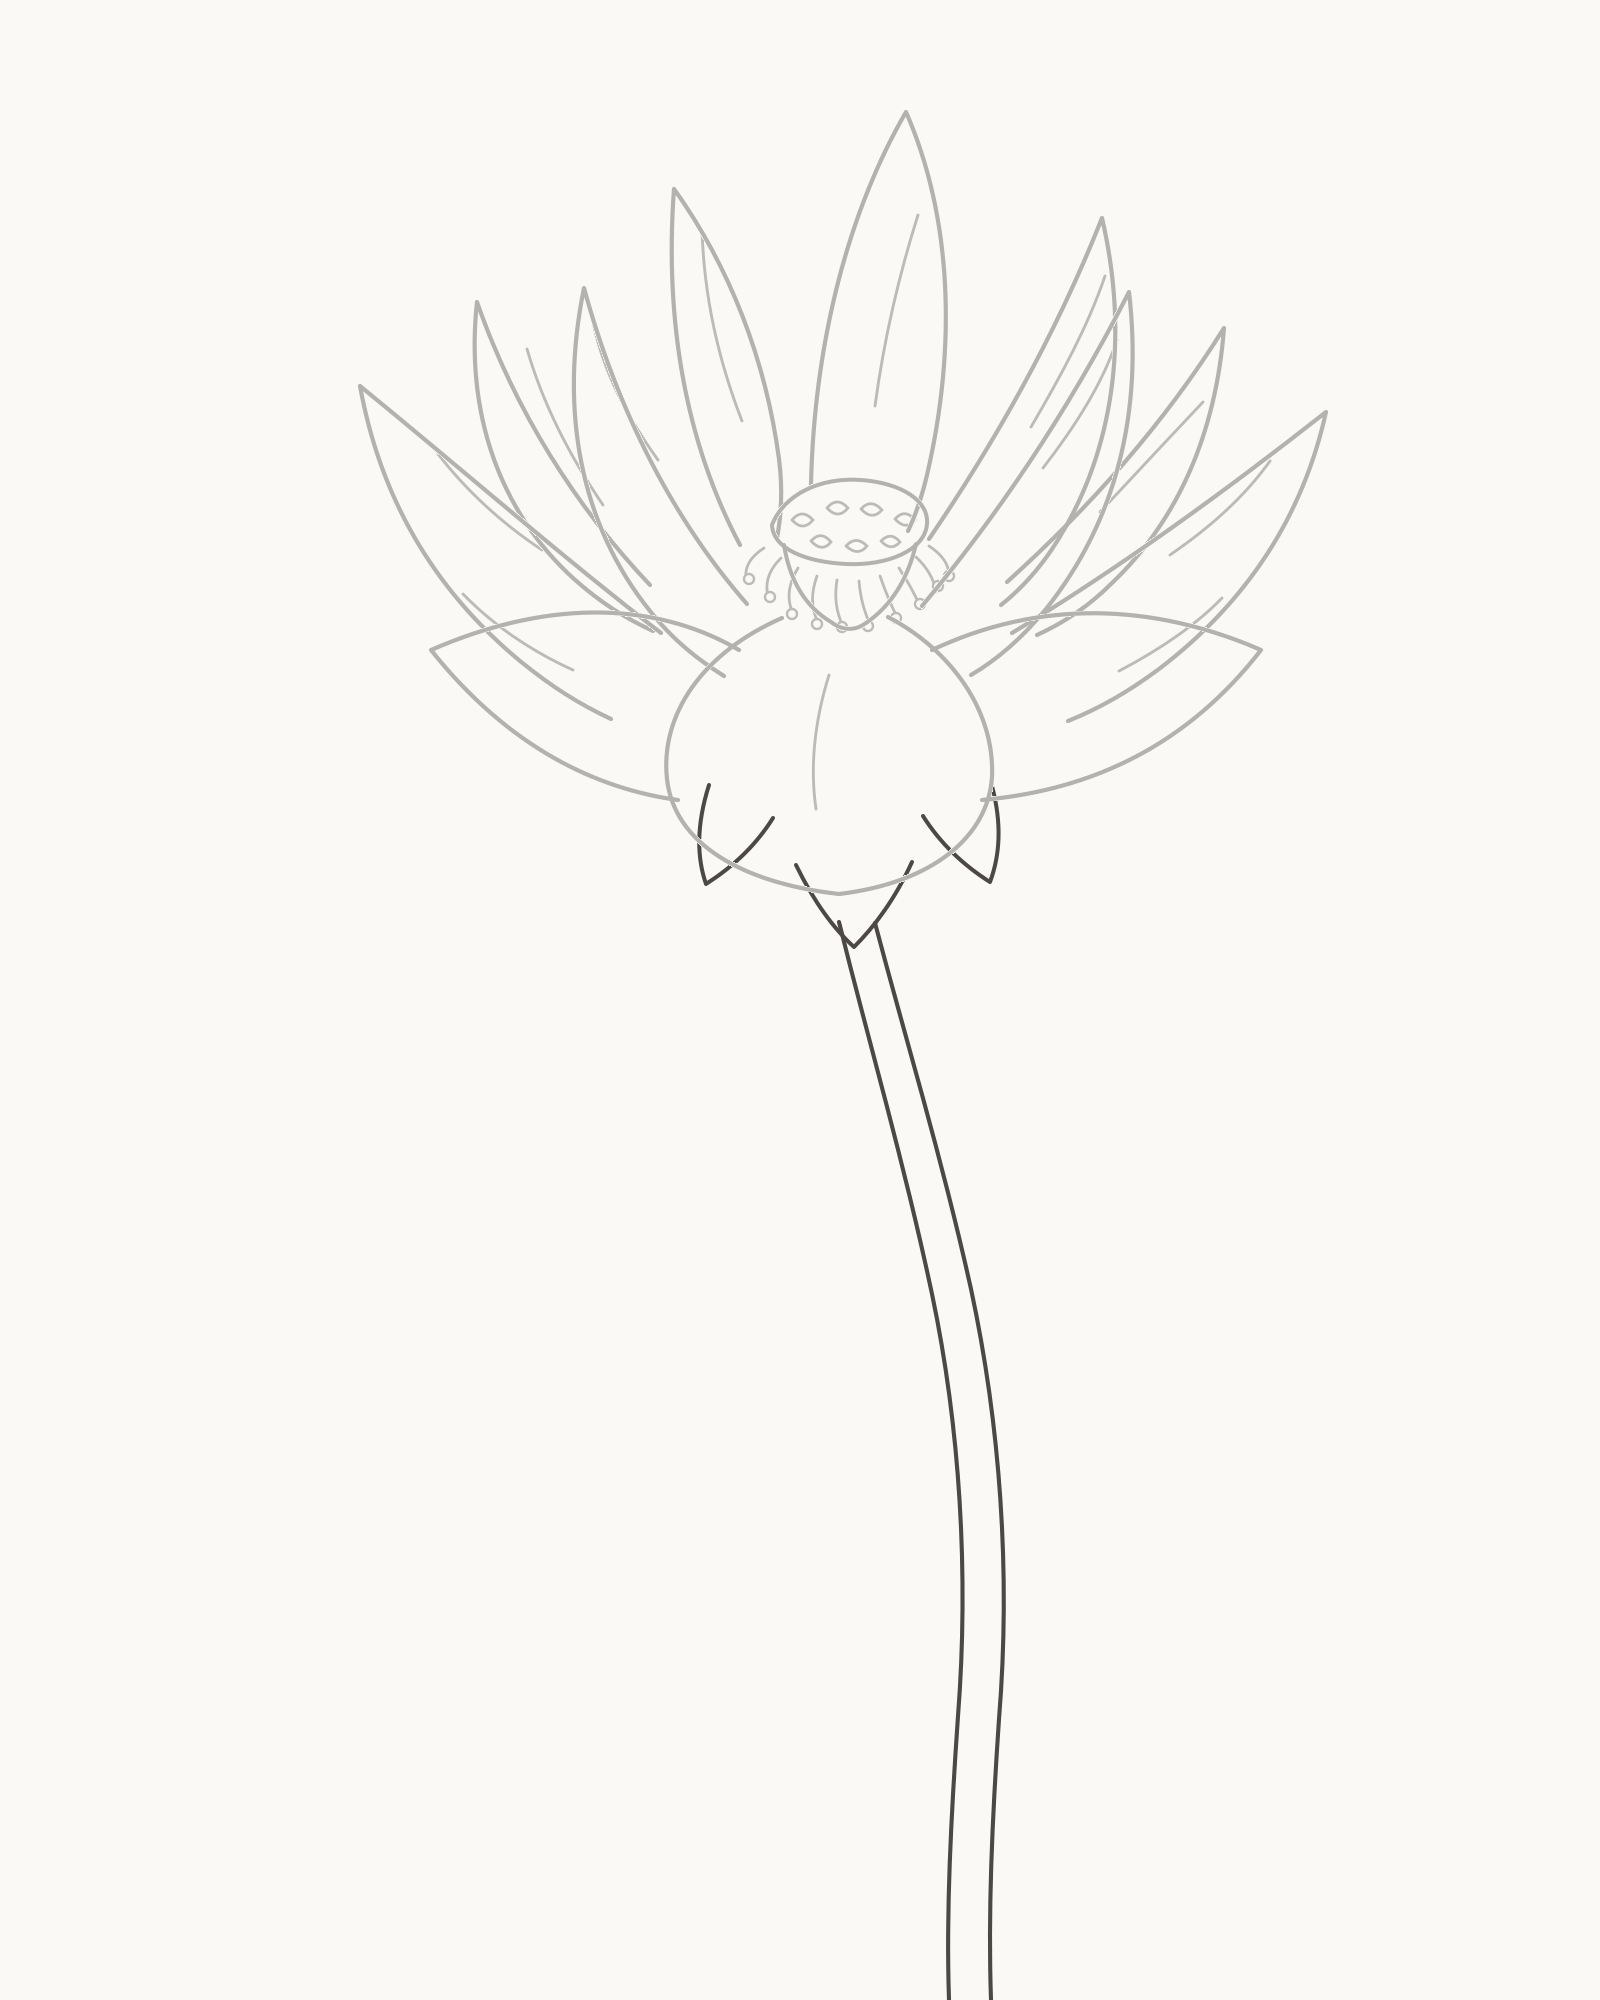
Stage 6 of 8. Three sepals and one slender curved stalk support the raised bloom. - Three unequal sepals
- First stalk edge
- Second stalk edge
Under the front bowl, add three compact unequal sepals: a small left point, a lower central point and a small right point. They sit behind the petals, so only their exposed sections are drawn.
From two separate contacts beneath that support, sweep the edges of the flower stalk towards the bottom of the page. Let both follow the same relaxed S movement while maintaining a narrow natural width. The second edge should answer the first without becoming ruler-parallel.
Look for this before moving on: three sepals are countable beneath the bloom, and two non-crossing stalk edges meet them before following one continuous S-curve to the lower crop.
If it goes wrong: retain the clearer sepals and the more natural stalk edge. Correct only the newest point or curve from its last attachment; do not thicken the junction or run a line through the front petal.
7. Place a separate lotus leaf
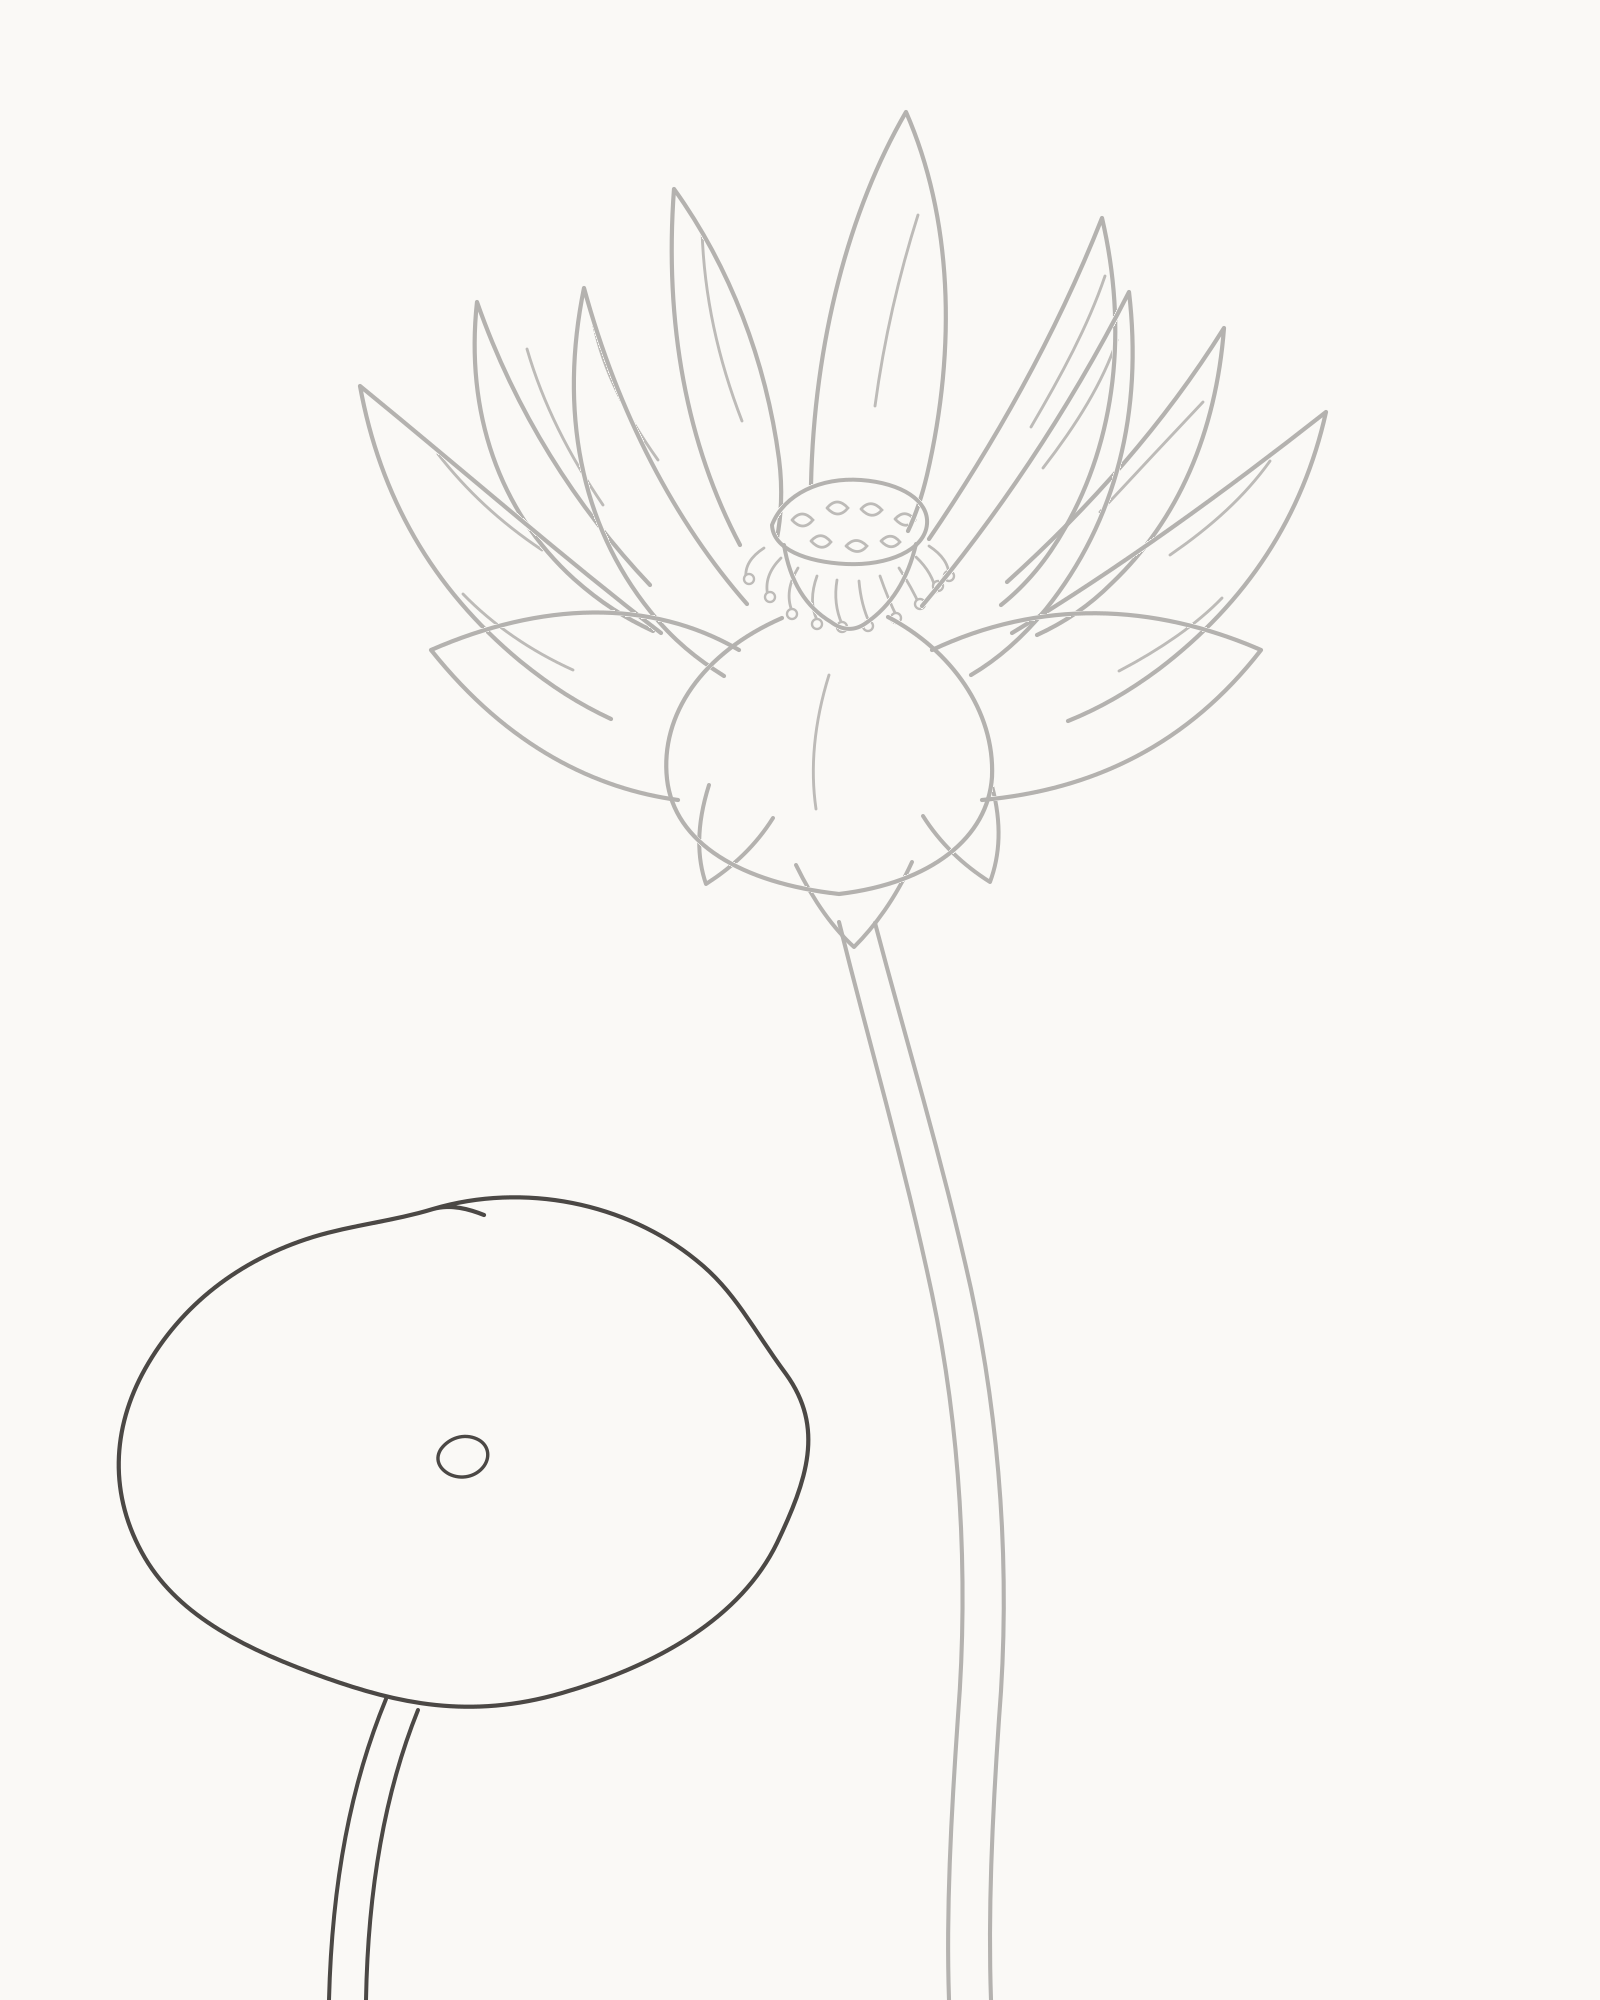
Stage 7 of 8. A separately stalked unnotched leaf balances the flower. - Separate stalk to blade edge
- Off-centre dimple
- Organic unnotched contour
Start near the lower-left crop with two narrow stalk edges. Aim them towards the future leaf centre, but stop both when they reach its lower perimeter—the stalk continues behind the blade, so no line crosses the leaf surface.
Place a small off-centre dimple above that hidden continuation. Build the unnotched leaf around it in one calm circuit: upper edge, rounded left side, lower edge and a slightly lifted right return. Change the curvature gently along the way so the blade feels organic rather than compass-drawn.
The leaf stalk and flower stalk must remain completely separate. The firmer paired stalk lines are attachment landmarks, not a change of shading.
Look for this before moving on: one independent two-edge stalk stops behind one continuous unnotched leaf; its off-centre dimple aligns above the hidden stalk, and neither stalk touches the other.
If it goes wrong: preserve the flower and the sound part of the new leaf. Replace only the latest circular, notched or clipped perimeter segment—or the newest stalk edge if it drifts towards the flower stem.
8. Add the leaf veins
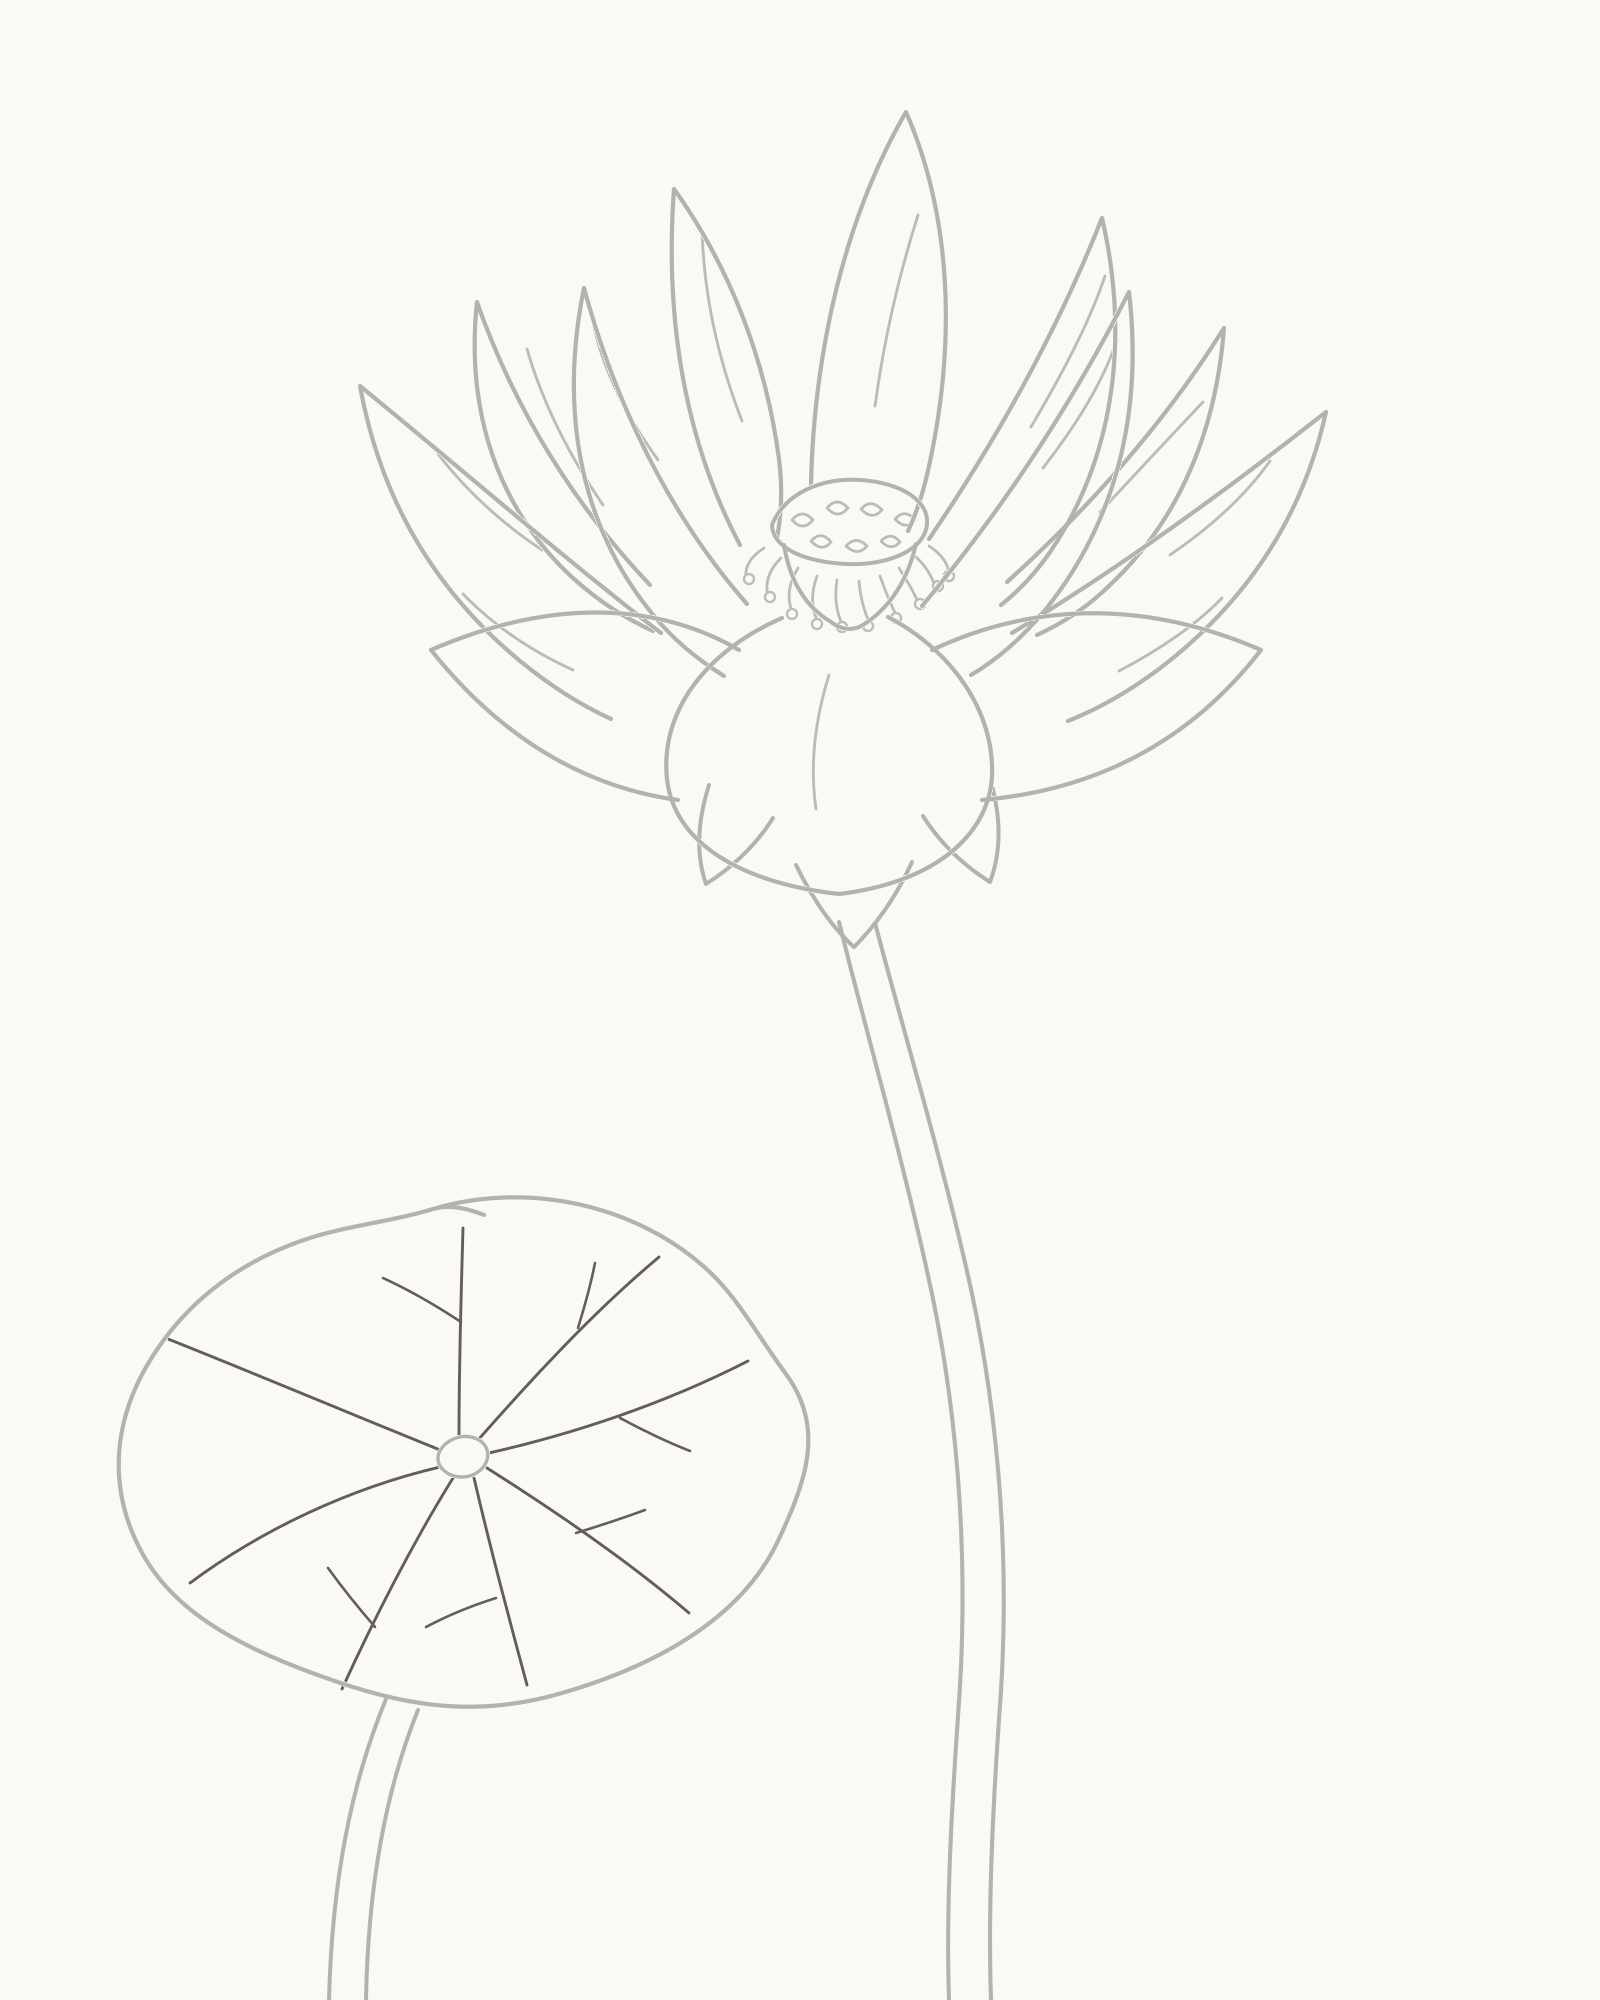
Stage 8 of 8. Sparse unequal veins complete the line drawing. - Eight primary veins
- Six short branches
- Keep every end inside
From the dimple, draw eight primary veins in a clockwise sequence. Give them different lengths and slight changes of curve, stopping each one before the outside contour. Add six short fork branches to selected veins, again ending well inside the blade.
Keep the pattern open. These marks describe how the leaf spreads from its attachment; they are not equal wheel spokes and should not merge into hatching. This completes the line drawing. There is no shading option or final outline-darkening pass.
Look for this before moving on: eight primary veins and six short branches remain traceable, all end inside the leaf, and the complete lotus still has open paper throughout its flower and foliage.
If it goes wrong: keep every vein that begins cleanly at the dimple. Shorten or replace only the newest straight, crowded or edge-touching line; never thicken the centre to hide a poor meeting.


Troubleshooting the finished lotus
The bloom looks like a flat fan. Compare the newest petal with the tier in front of it. Shorten only a crossing return edge, or make the newest rear petal more upright; do not add more petals.
The petals look stamped or mirrored. Change one property on the latest petal—its lean, shoulder width or tip height. Avoid putting identical bends into every contour.
The receptacle has become a dark knot. Keep the clear cavities and stamens. Remove only the newest crowded mark until warm paper separates the shapes again.
The sepals look like another flower. Check that only three compact points are visible and that the central one leads into the stalk. Repair the newest exposed edge rather than drawing a collar around the base.
The leaf looks like a lily pad. A lotus leaf in this exercise has no wedge-shaped notch.[2] Close only the newest accidental gap and keep its separate stalk aligned under the dimple.
The leaf looks like a wheel. Preserve the useful veins and vary only the latest line's curve or stopping point. Six short branches are enough; extra spokes will make the pattern mechanical.
Turn the bloom slightly farther
On a fresh area of paper, repeat Stages 1–6 with a flatter receptacle and a narrower rear tier. Let one side of the front bowl open farther than the other, while keeping the 3/4/5 petal count and three-sepal support. This changes the viewpoint through proportion and overlap without introducing shading or a new construction method.
For more practice with broad blades and internal structure, try How to Draw Leaves. The Lily guide offers a contrasting trumpet-shaped bloom, while How to Draw Flowers develops a small two-bloom arrangement. Return to How to Draw for the practical lesson index. Historical flower examples stay in the separate Flower drawings gallery; this page keeps to the construction exercise.
Frequently Asked Questions
What is the easiest way to start a lotus drawing?
Start with the small shallow receptacle, then build the petals in depth groups: three at the front, four at the sides and five at the rear. This avoids guessing twelve petals around a complete circle.
How many petals should I draw on the lotus?
This lesson uses twelve visible major petals because the 3/4/5 grouping is full enough to read clearly while remaining countable. Real sacred lotus flowers can have numerous petals, so twelve is a drawing decision rather than a botanical rule.[3]
How do I make a lotus flower look three-dimensional without shading?
Use overlap and proportion. Keep the centre shallow, make the front bowl broad, raise the middle and rear tiers, and stop hidden return edges at the contour in front of them.
What is the difference between a lotus leaf and a water-lily leaf?
For this drawing, the most useful distinction is the edge: the round lotus leaf has no familiar wedge-shaped water-lily notch. It also sits on its own stalk rather than branching from the flower stalk.[2][3]
Where should the flower stalk attach?
Place three compact sepals behind the lower front petal, then begin the two stalk edges from separate contacts beneath that support. No stalk line should travel through a petal.
Do I erase the first receptacle or the fold lines?
No. The receptacle and all twelve short fold lines remain visible in the final drawing. Use the eraser only to correct the newest faulty segment before accepting that stage.
Does this lotus lesson include shading?
No. It ends as a clean line drawing. The on-page comparison switch can make previous marks paler so the newest action is easier to see, but it does not alter the cumulative artwork.
Can I draw only the flower without the leaf?
Yes. Stop after Stage 6 for a complete flower and stalk. Stages 7–8 add the separate unnotched leaf as an identification and radial-line exercise.
References
- Kew Science, Nelumbo nucifera Gaertn. View source
- New York Botanical Garden, Water Lilies and Lotus. View source
- University of Oxford Herbaria, Nelumbo nucifera — Sacred lotus. View source
More DRAWING Guides

How to Draw a Rose: A Step by Step Guide

How to Draw a Tree: A Step by Step Guide

How to Draw Eyes: A Step by Step Guide

How to Draw Leaves: A Step by Step Guide

How to Draw Autumn Leaves: A Step by Step Guide

How to Draw Flowers: A Step by Step Guide

How to Draw a Lily: A Step by Step Guide

How to Draw a Sunflower: A Step by Step Guide

How to Draw a Tulip: A Step by Step Guide

How to Draw a Hibiscus: A Step by Step Guide

How to Draw a Daisy: A Step by Step Guide
