




Draw one complete hibiscus in eight permanent line stages. You will organise five broad petals around a small throat, attach the flower's long centre column, support it with three sepals and a curved stem, then add two unequal toothed leaves. Each stage keeps everything already drawn, so there is no hidden cleanup or shading pass.
Difficulty: Beginner; the main challenge is keeping the five petals distinct at their overlaps
Time: Allow about 35–50 minutes. This is an untested estimate, and it is fine to pause after the bloom or the stem.
Medium: HB or No. 2 pencil, line only
Read the flower as three layers
The useful starting fact is structural rather than decorative. Mallow-family flowers commonly have five separate, often overlapping petals, while the filaments gather around the style to form the conspicuous central column.[1] That gives you two simple things to count: five large petal forms and one anchored projection from the throat.
This exercise arranges the petals in three depth layers: one broad front petal, a side pair and a rear pair. The arrangement is designed for this slightly turned view, not as a universal diagram of every hibiscus. Real plants vary, so the uneven heights, waves and leaf angles should be copied as relationships rather than as a flower symbol.[1][2]
Materials
- One pointed HB pencil. A standard No. 2 classroom pencil is an equivalent everyday option.
- A vertically oriented page with a smooth white or warm-white surface. Try an unlined sketchbook page or printer paper for practice.
- A clean eraser, reserved for the newest misplaced segment only.
- A sharpener if you use a wooden pencil.
- Optional: one clear photograph of a single open hibiscus with its centre column visible. Use it to observe direction and asymmetry, while following the supplied drawing for the exact stage sequence.
You do not need a compass, ruler, marker, blending stump, coloured pencil set, specialist paper or drawing tablet. A 0.5–0.7 mm mechanical pencil is a useful substitute if you prefer a consistently narrow line.
Before you draw
Imagine a portrait frame that is four units wide and five high. The small flower throat sits at about 46% of the page width and 31% of its height. The full bloom spreads across most of the upper half, while the long lower corridor must remain clear for the sepals, stem and two leaves.
Use the separate Stage 1 placement panel to locate that throat and reserve the lower space. Its box, percentages and direction line are measuring aids, not marks to copy. The optional page grid works the same way: compare a petal edge or leaf tip with a cell, then leave the grid off your paper.
Keep the main contour calm and visible. The throat directions, anther marks and leaf veins can be a little finer. Nothing is scheduled for erasure, and no later stage asks you to darken every line. The notional light comes from the upper left for consistency with the series, but this version remains an unshaded line drawing.
1. Set the throat and five directions

Stage 1 of 8. The throat and five directions reserve the bloom. 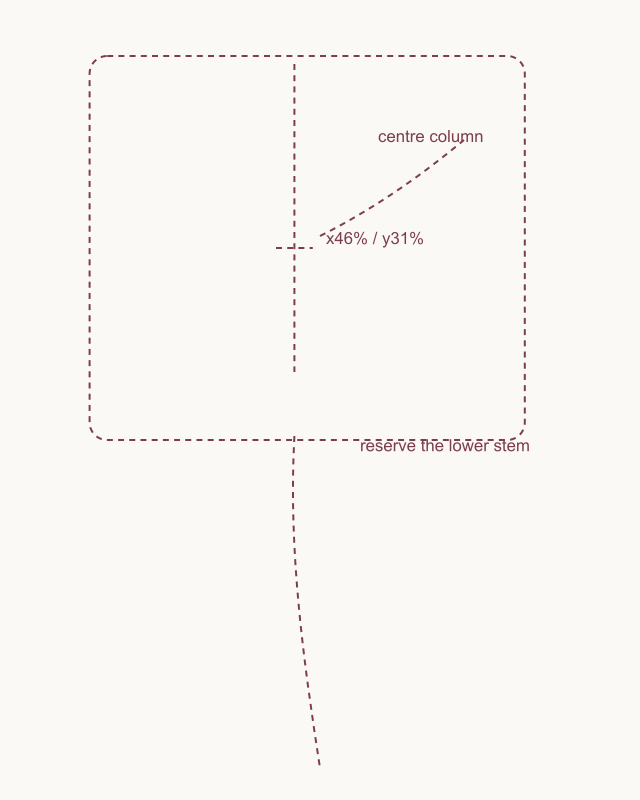
Placement cue: locate the throat around x46% and y31%. Reserve the upper-right column direction and lower stem corridor, leaving every cue mark off the drawing. Place a small, slightly uneven oval at the x46%/y31% position. From it, add five short lines in clockwise order: upper-left, upward, upper-right, lower-right and lower-left. Begin each line at or just beside the oval and let it stop quickly in open paper.
These are permanent fold roots, not disposable spokes. Keep the gaps between them unequal and resist making the oval perfectly round. Most of the page should still be empty when this stage is complete.
Look for this before moving on: one small irregular throat and exactly five short directions are countable, with room for a wide bloom around them and a long stem below.
If it goes wrong: keep the sound part of the oval and any correctly aimed directions. Remove only the newest oversized arc or extra line, then replace it between the same nearby points without enlarging the centre.
2. Shape the broad front petal

Stage 2 of 8. One broad petal establishes the nearest layer. - Start lower-left
- Round the lowest edge
- Return lower-right
Begin on the lower-left side of the throat. Carry one line outward and down, allowing a few soft changes of curvature as it rounds the lowest part of the bloom. Bring the same contour back up to the lower-right side of the throat.
Make this nearest petal broad rather than a narrow teardrop. Its left and right halves should not mirror one another, and the edge needs gentle variation rather than repeated scallops. Keep all five Stage 1 directions visible above and beside it.
Look for this before moving on: one broad lower petal meets opposite sides of the throat, reaches one clear lowest area and encloses no repeated row of bumps.
If it goes wrong: leave the secure throat contact and the more natural half of the petal untouched. Lift only the newest pinched, flat or mechanical section and reconnect it to the next stable point.
3. Add the unequal side petals
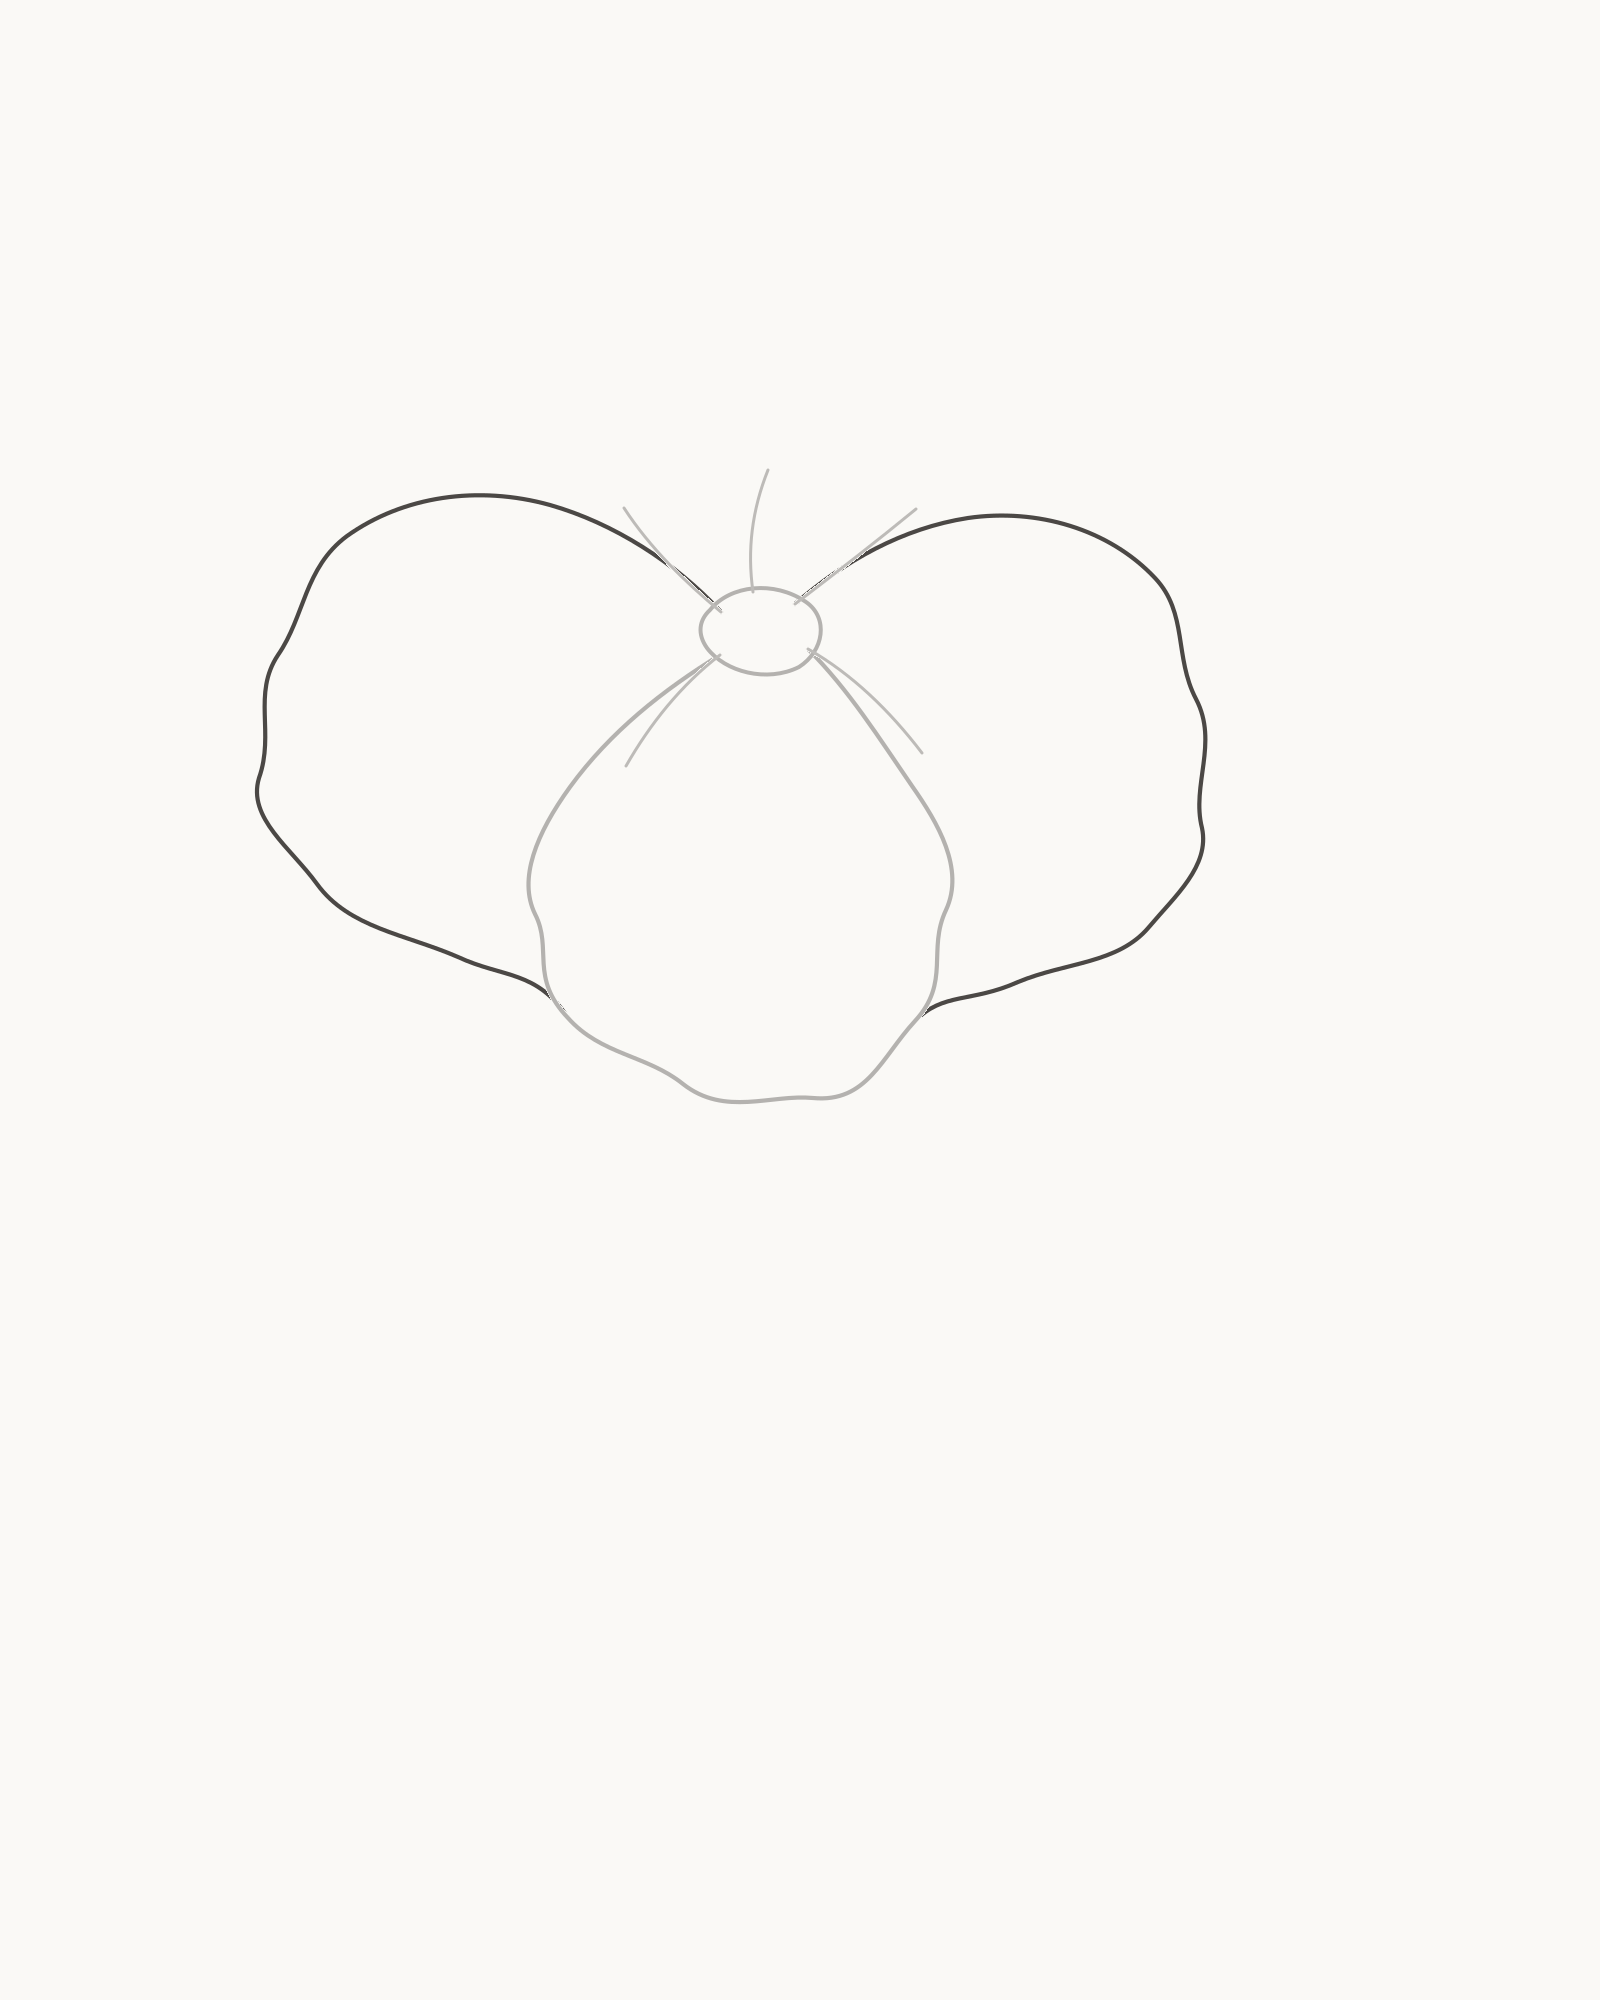
Stage 3 of 8. Two unequal side petals form the middle layer. - Left side petal
- Wider right petal
Draw the left side first. Start near the upper-left direction, swing through a wide outward shoulder and travel down until the contour disappears beneath the front petal. Next, build the right side from the upper-right area. Give it a different width and shoulder, then stop it deliberately at the front layer.
The two endpoints need not be joined: the front petal is hiding them. Keep the right form a little wider and avoid copying the left curve in reverse. The purpose of this stage is one structural pair, carried out in the clear order left then right.
Look for this before moving on: two side petals can each be traced from the throat region to one intentional concealed endpoint, and their width, lean and edge rhythm visibly differ.
If it goes wrong: preserve the first successful side and the front petal. Erase only the latest side contour back to its starting area, then change its widest point before returning to the same hidden stop.
4. Complete the five-petal bloom
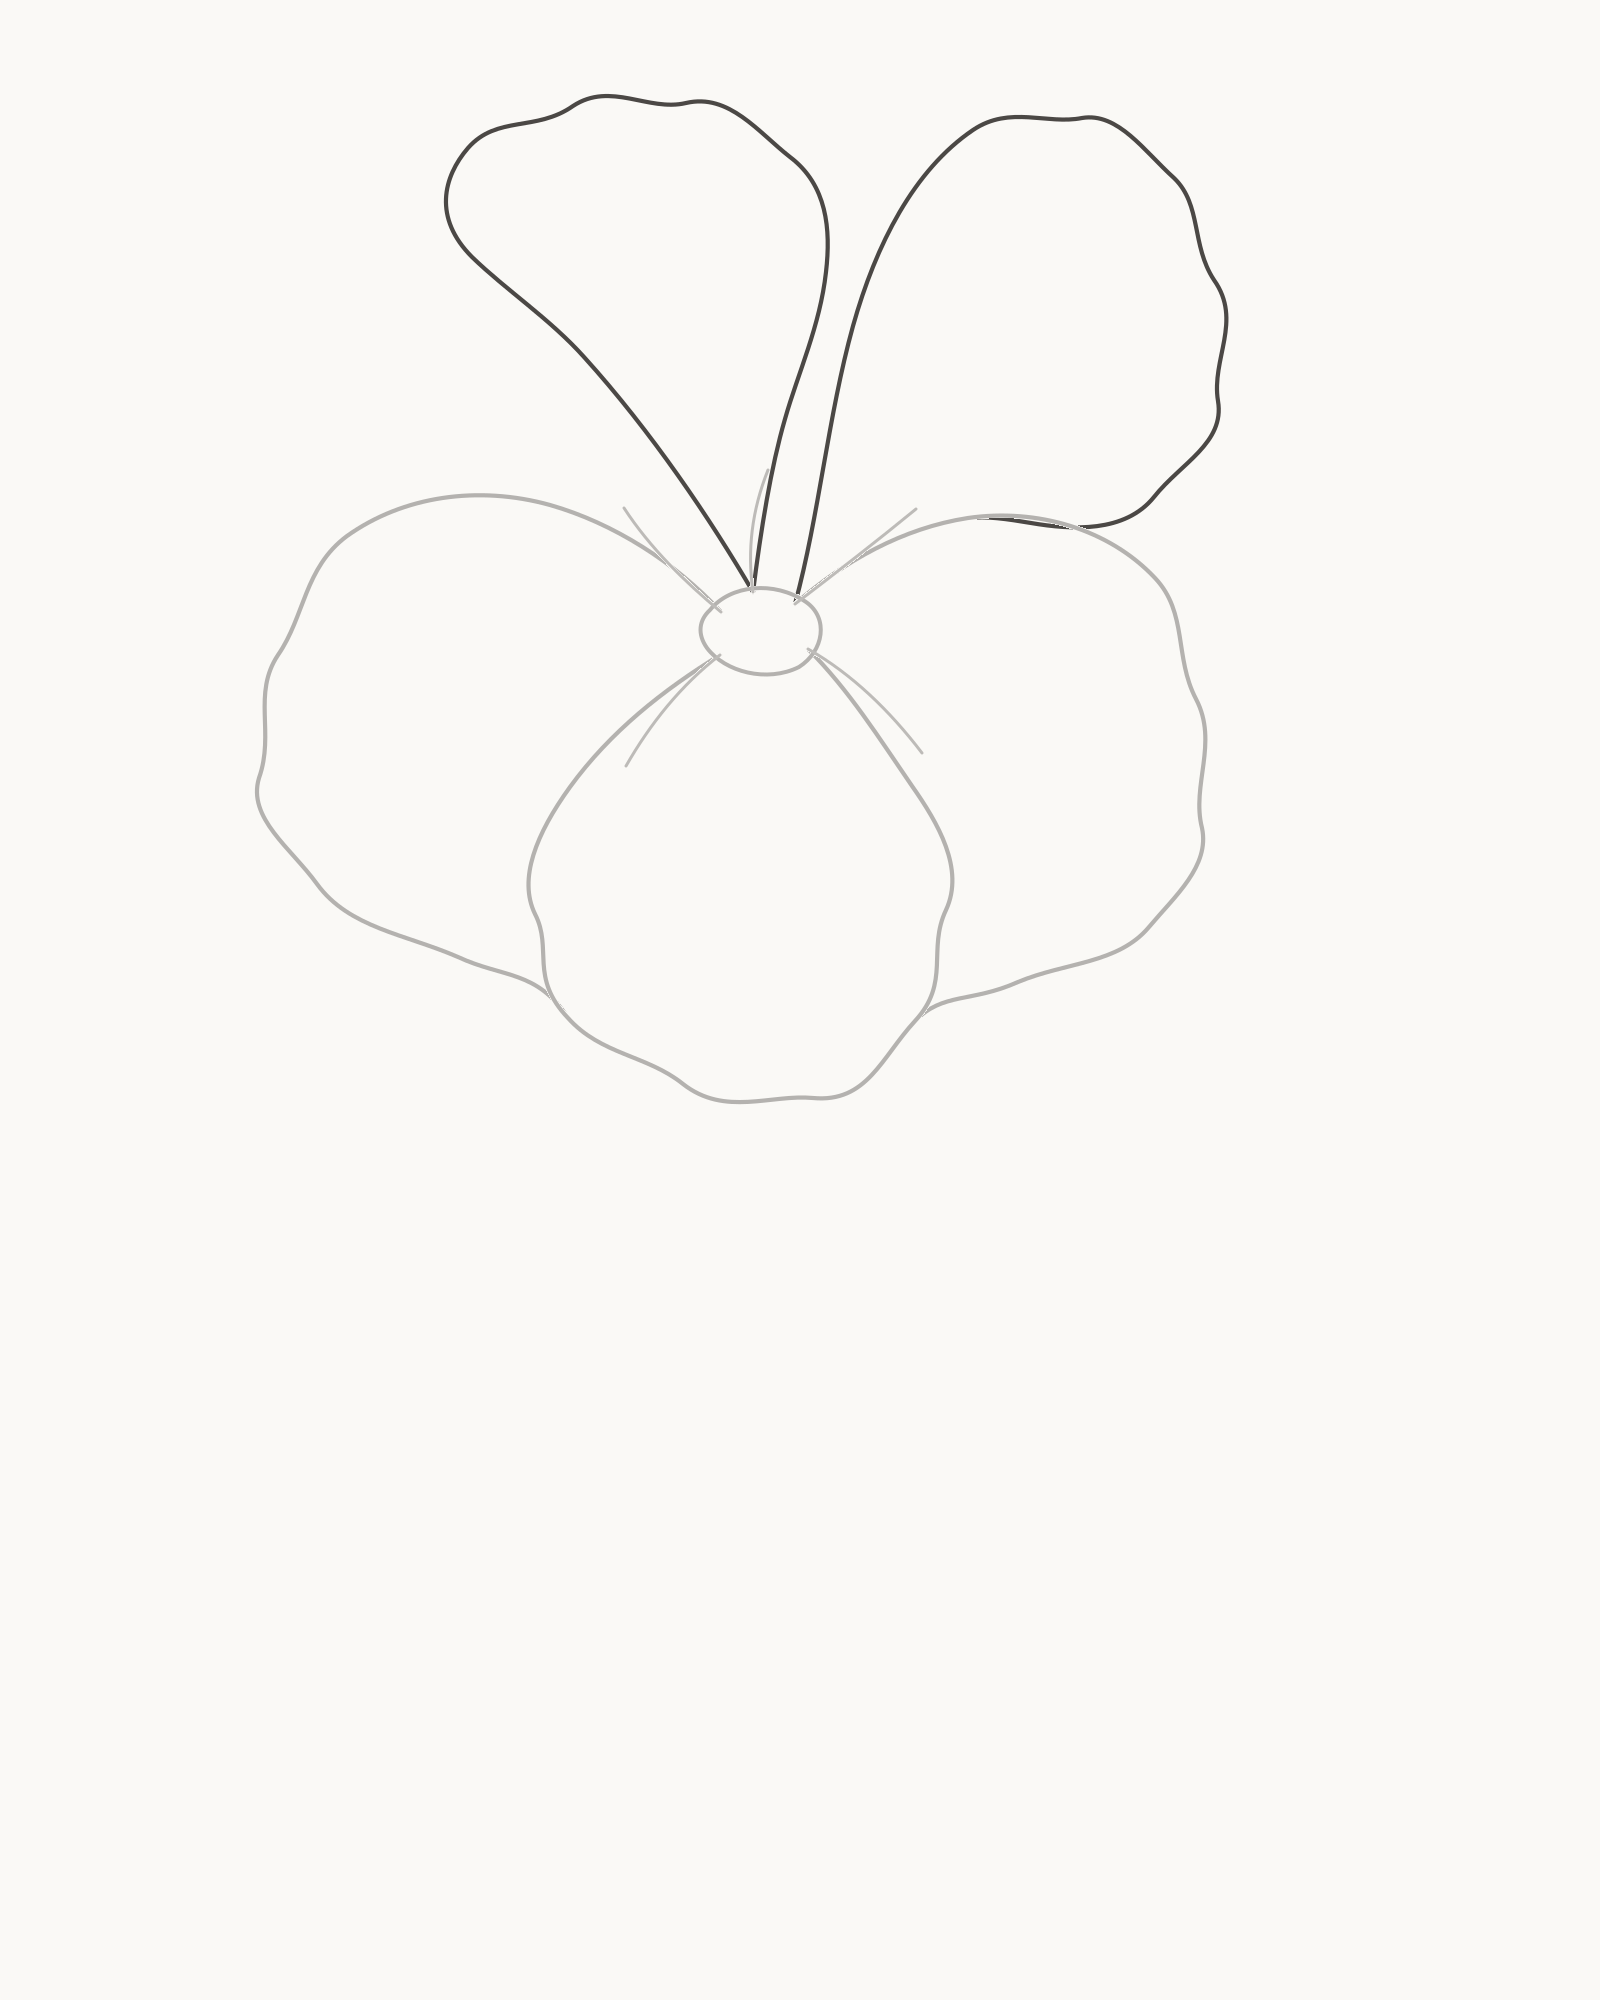
Stage 4 of 8. Two unequal rear petals complete the five-part bloom. - Shorter rear-left
- Taller rear-right
- Count five petals
Add the rear-left petal first. Let it climb higher than the side layer, with a broad top that bends back towards the throat. Then draw the rear-right petal taller and slightly more upright, returning it towards the centre behind the right side.
Count the large forms when both are in place: front, left side, right side, rear-left and rear-right. The two new petals should differ in height, width and top turn. Their unequal silhouette is what keeps the finished bloom from looking like a radial badge.
Look for this before moving on: exactly five major petals are readable in three layers, the rear-right rises higher than the rear-left, and no loose line creates a sixth petal.
If it goes wrong: keep the completed front and side layers. Replace only the newest rear contour between its centre contact and its last reliable section; do not hide a counting problem with another lobe.
5. Build the projecting centre column
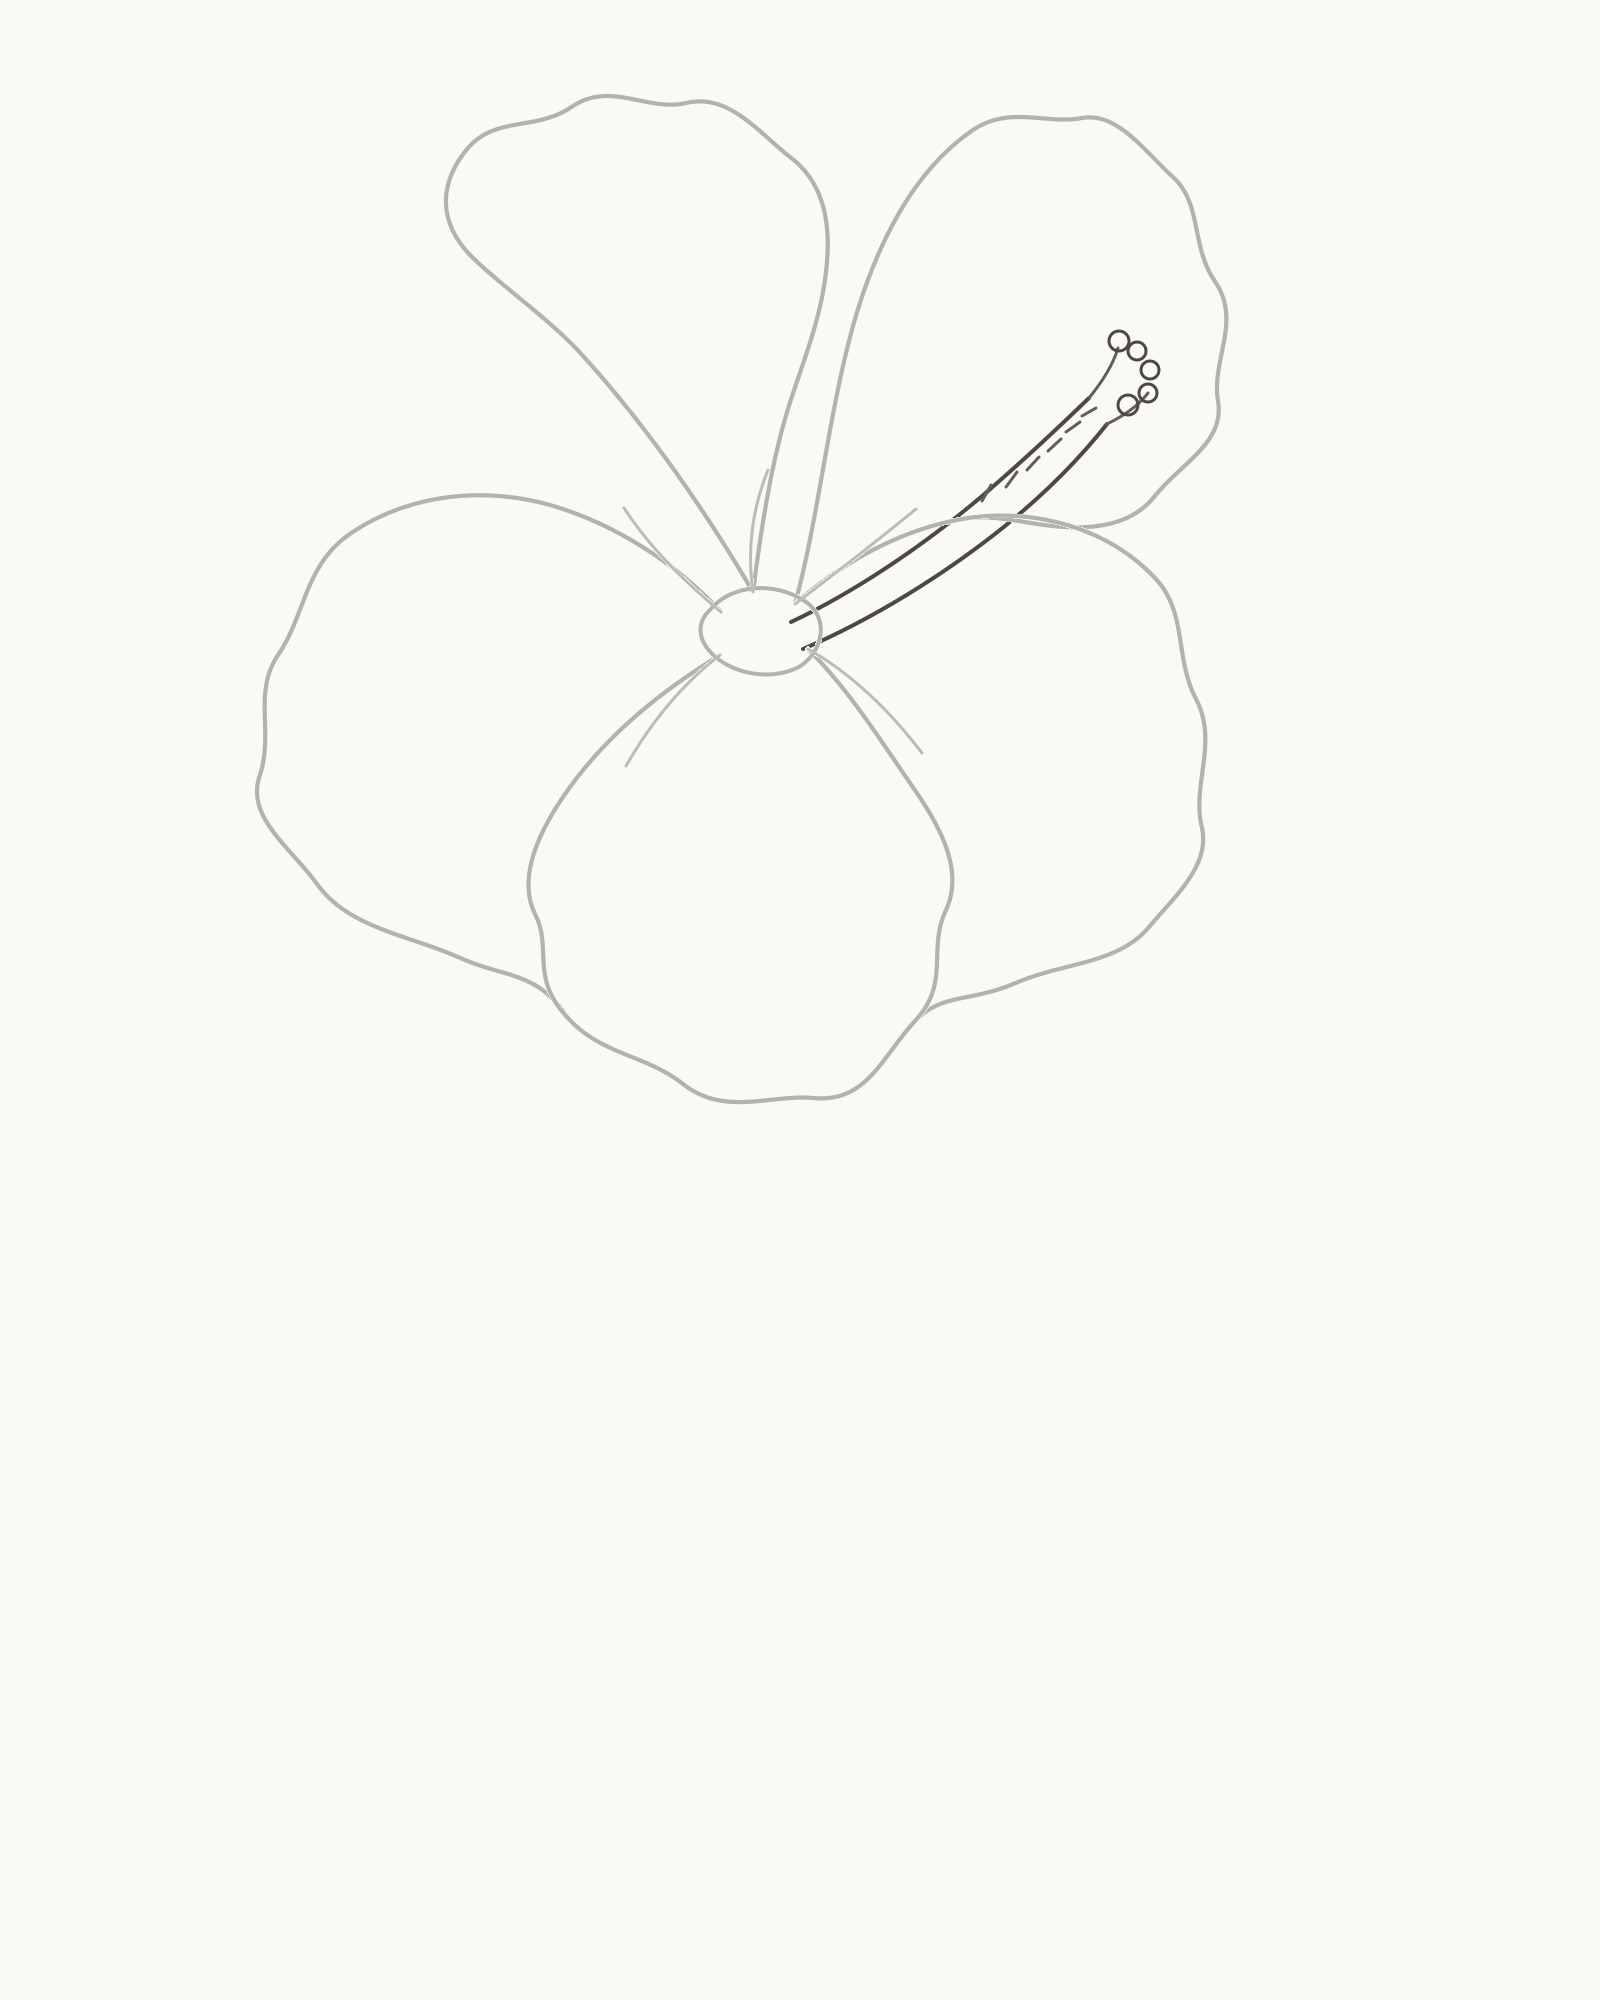
Stage 5 of 8. The anchored centre column makes the flower recognisable. - First long edge
- Nearby return edge
- Five tip lobes
- Six anther marks
Start at the throat and take one long, gently bending edge towards the upper right. Return with a nearby second edge so the column stays narrow but not rigidly parallel. Both edges must visibly grow from the throat and travel through open petal space without cutting an outer contour.
At the tip, add five small rounded stigma lobes. Along the outer half of the column, place six short anther marks, spaced rather than packed into a dark strip. Work base to tip: two edges, five lobes, six marks.
Look for this before moving on: both column edges begin at the throat, remain separate and finish together; five tip lobes and six smaller anther marks can be counted at a glance.
If it goes wrong: retain the sound edge and every correct terminal mark. Remove only the newest crossing edge, oversized lobe or crowded dash, then rebuild that local part from its nearest stable point.
6. Support the bloom with sepals and stem
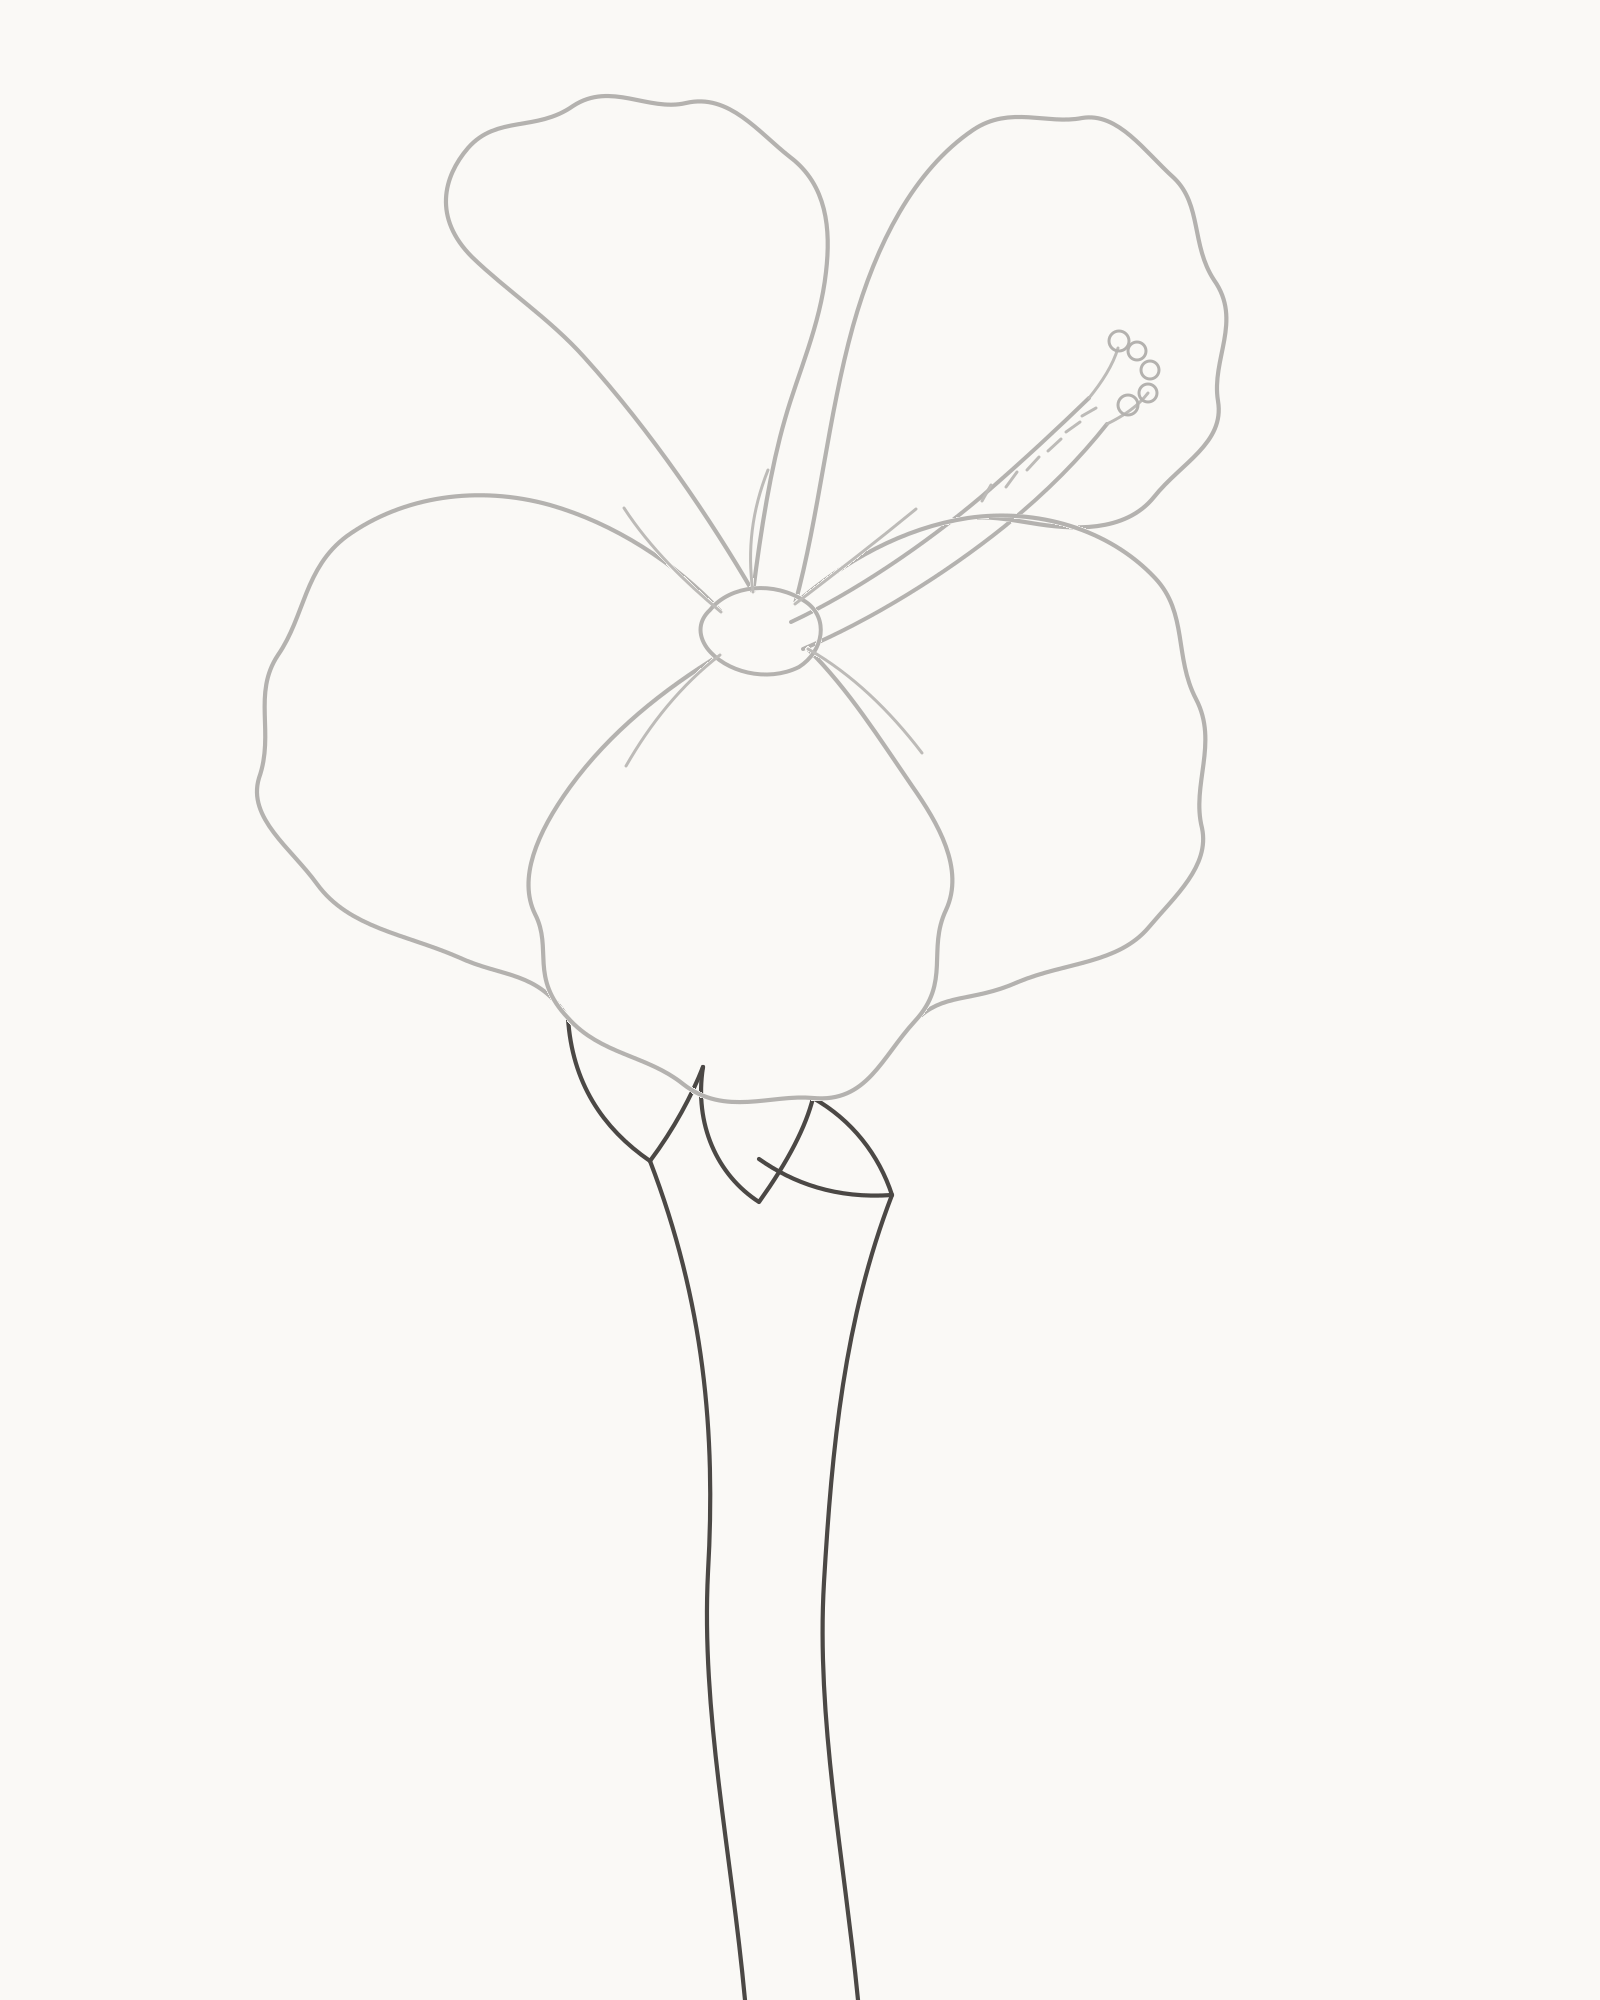
Stage 6 of 8. Three sepals and an S stem support the flower. - Three sepals
- Left stem edge
- Right stem edge
Under the lowest petal, draw three unequal sepals. Let the left one angle down-left, the middle one hang lower, and the right one turn across the base. They should overlap slightly as a support group rather than repeat as three identical spikes.
From separate points beneath that group, send two stem edges down the page in a gentle S. The space between them changes subtly; it should never pinch shut, cross or expand into a tube. Carry both edges to the lower crop.
Look for this before moving on: three sepals are individually readable, and two non-crossing stem edges meet them at separate contacts before following one continuous S to the page edge.
If it goes wrong: leave the better sepal or stem edge in place. Correct only the newest support curve from its last secure contact, using the surviving edge as a spacing guide without tracing over it.
7. Attach the large left leaf
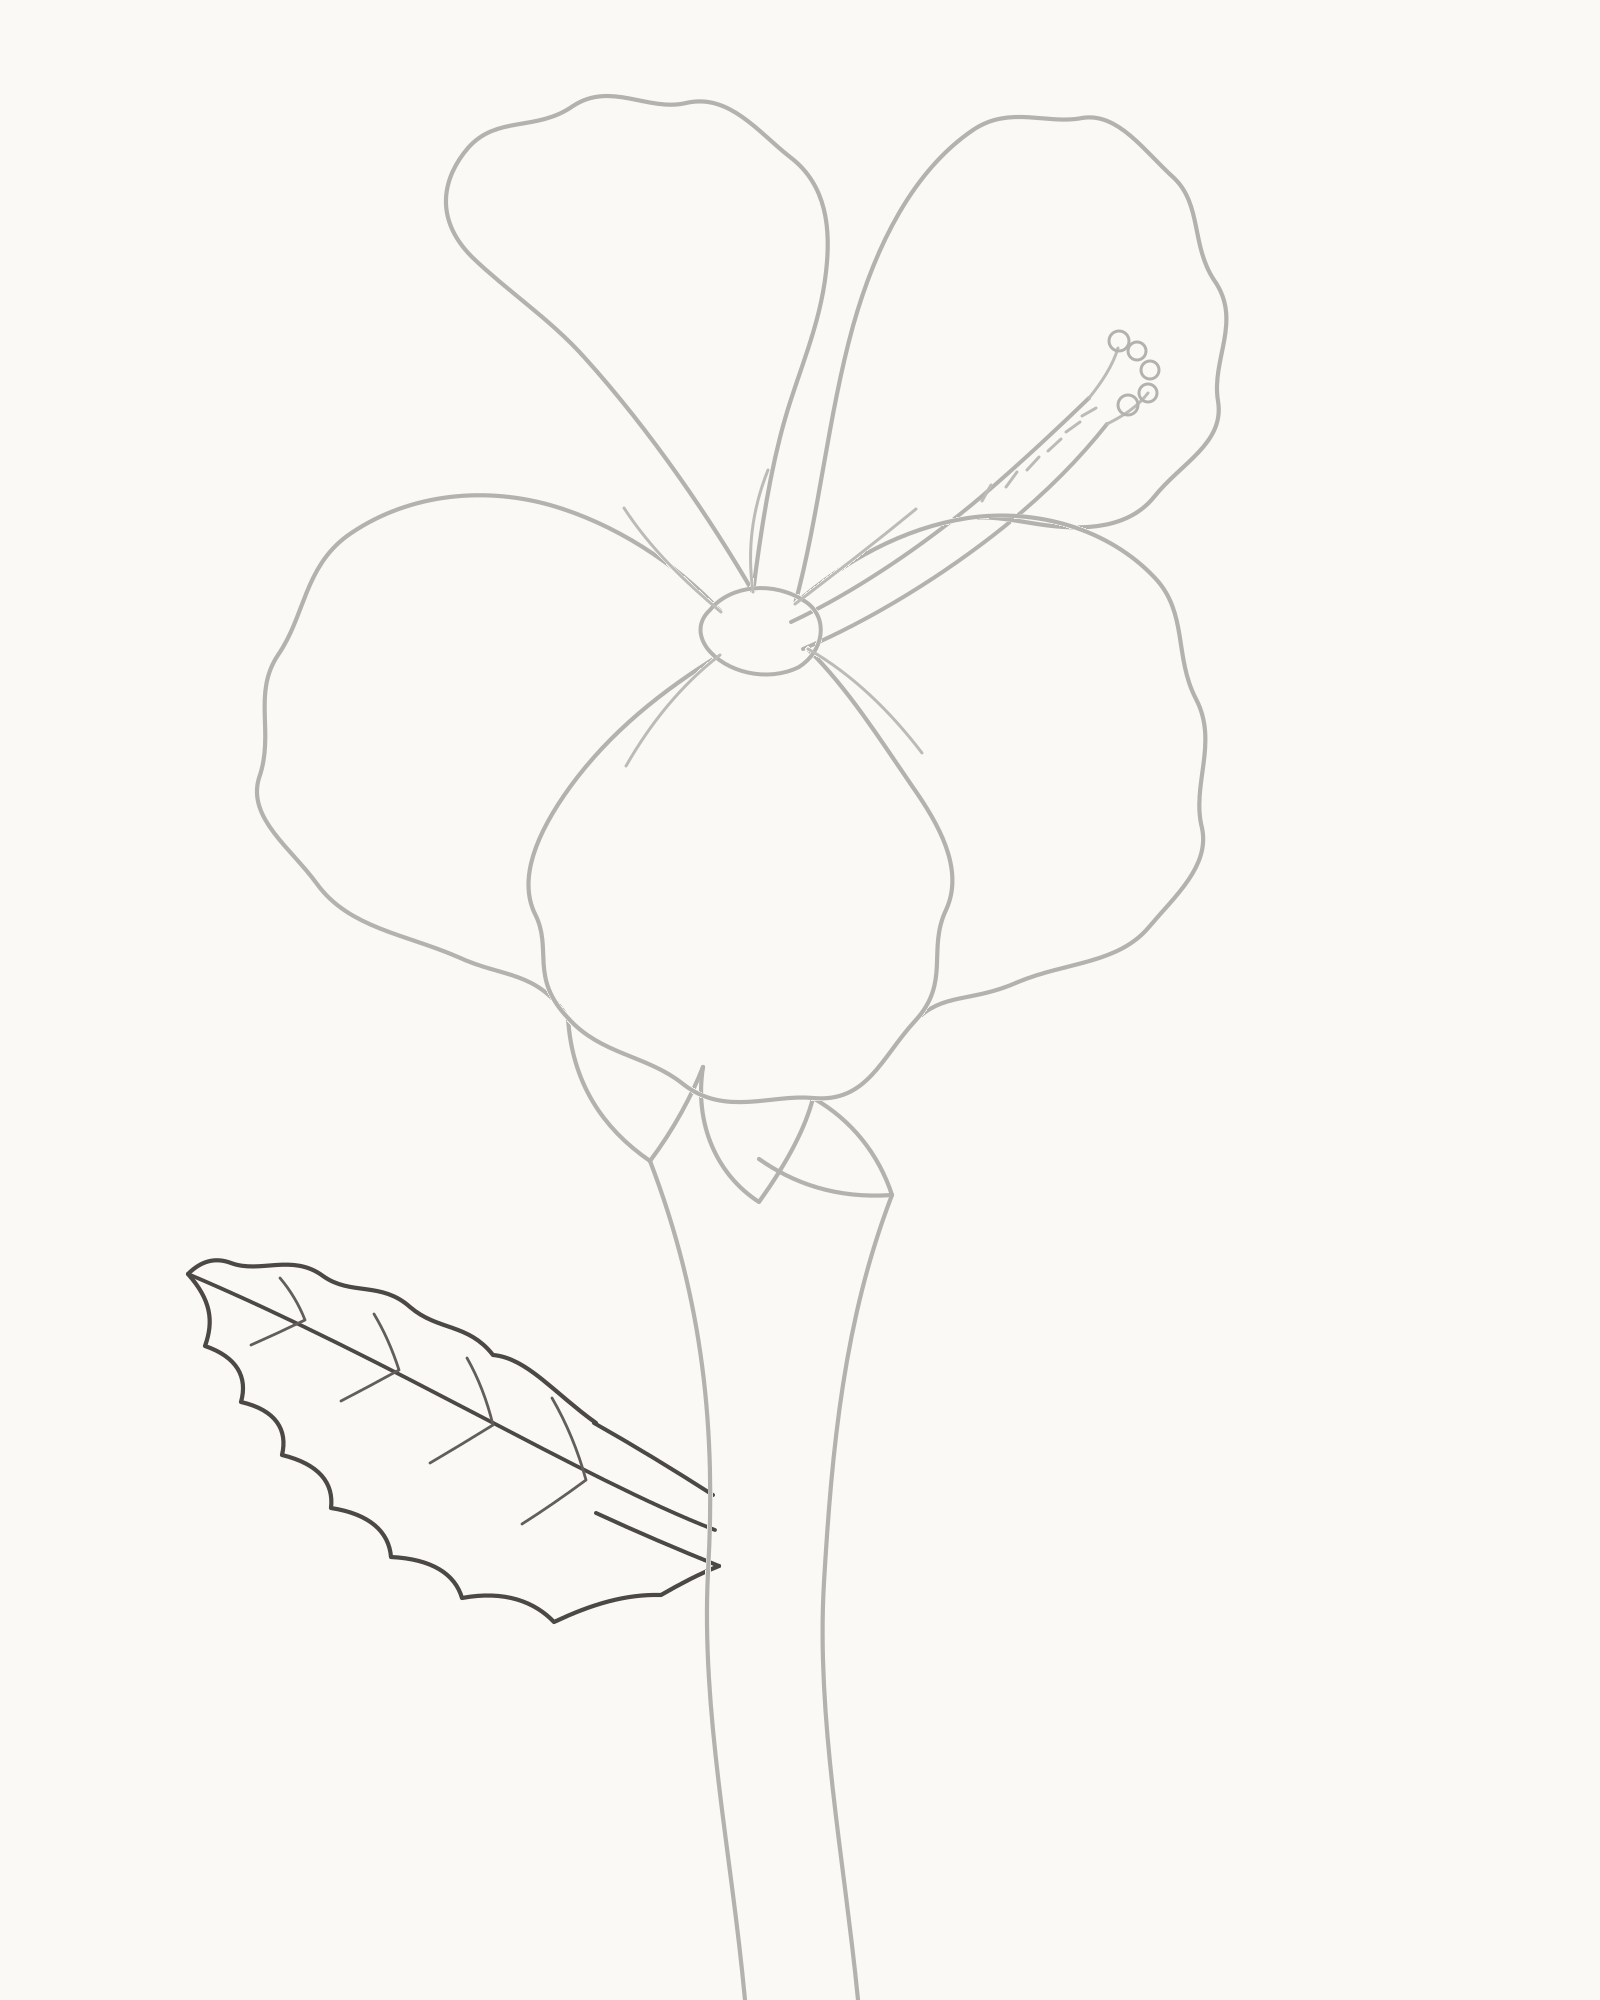
Stage 7 of 8. A large toothed leaf attaches at two stem contacts. - Two contacts
- Midrib and blade
- Four vein pairs
Choose two nearby contacts on the lower-left stem. Run the short stalk and midrib from that attachment towards one left-pointing tip. Around it, draw an uneven toothed blade: take one contour to the tip, then return along a differently curved edge to the second stem contact.
Add four short vein pairs from the midrib. Change their length and spacing, and stop every branch before it touches the blade edge. The two firmer lines at the stem are attachment landmarks, not shading.
Look for this before moving on: the leaf has two stem contacts, one traceable midrib, one pointed tip, restrained unequal teeth and four pairs of veins ending inside the blade.
If it goes wrong: keep the attachment and midrib. Replace only the newest awkward tooth or outer section between stable turns; shorten a vein locally if it reaches the edge.
8. Add the smaller right leaf
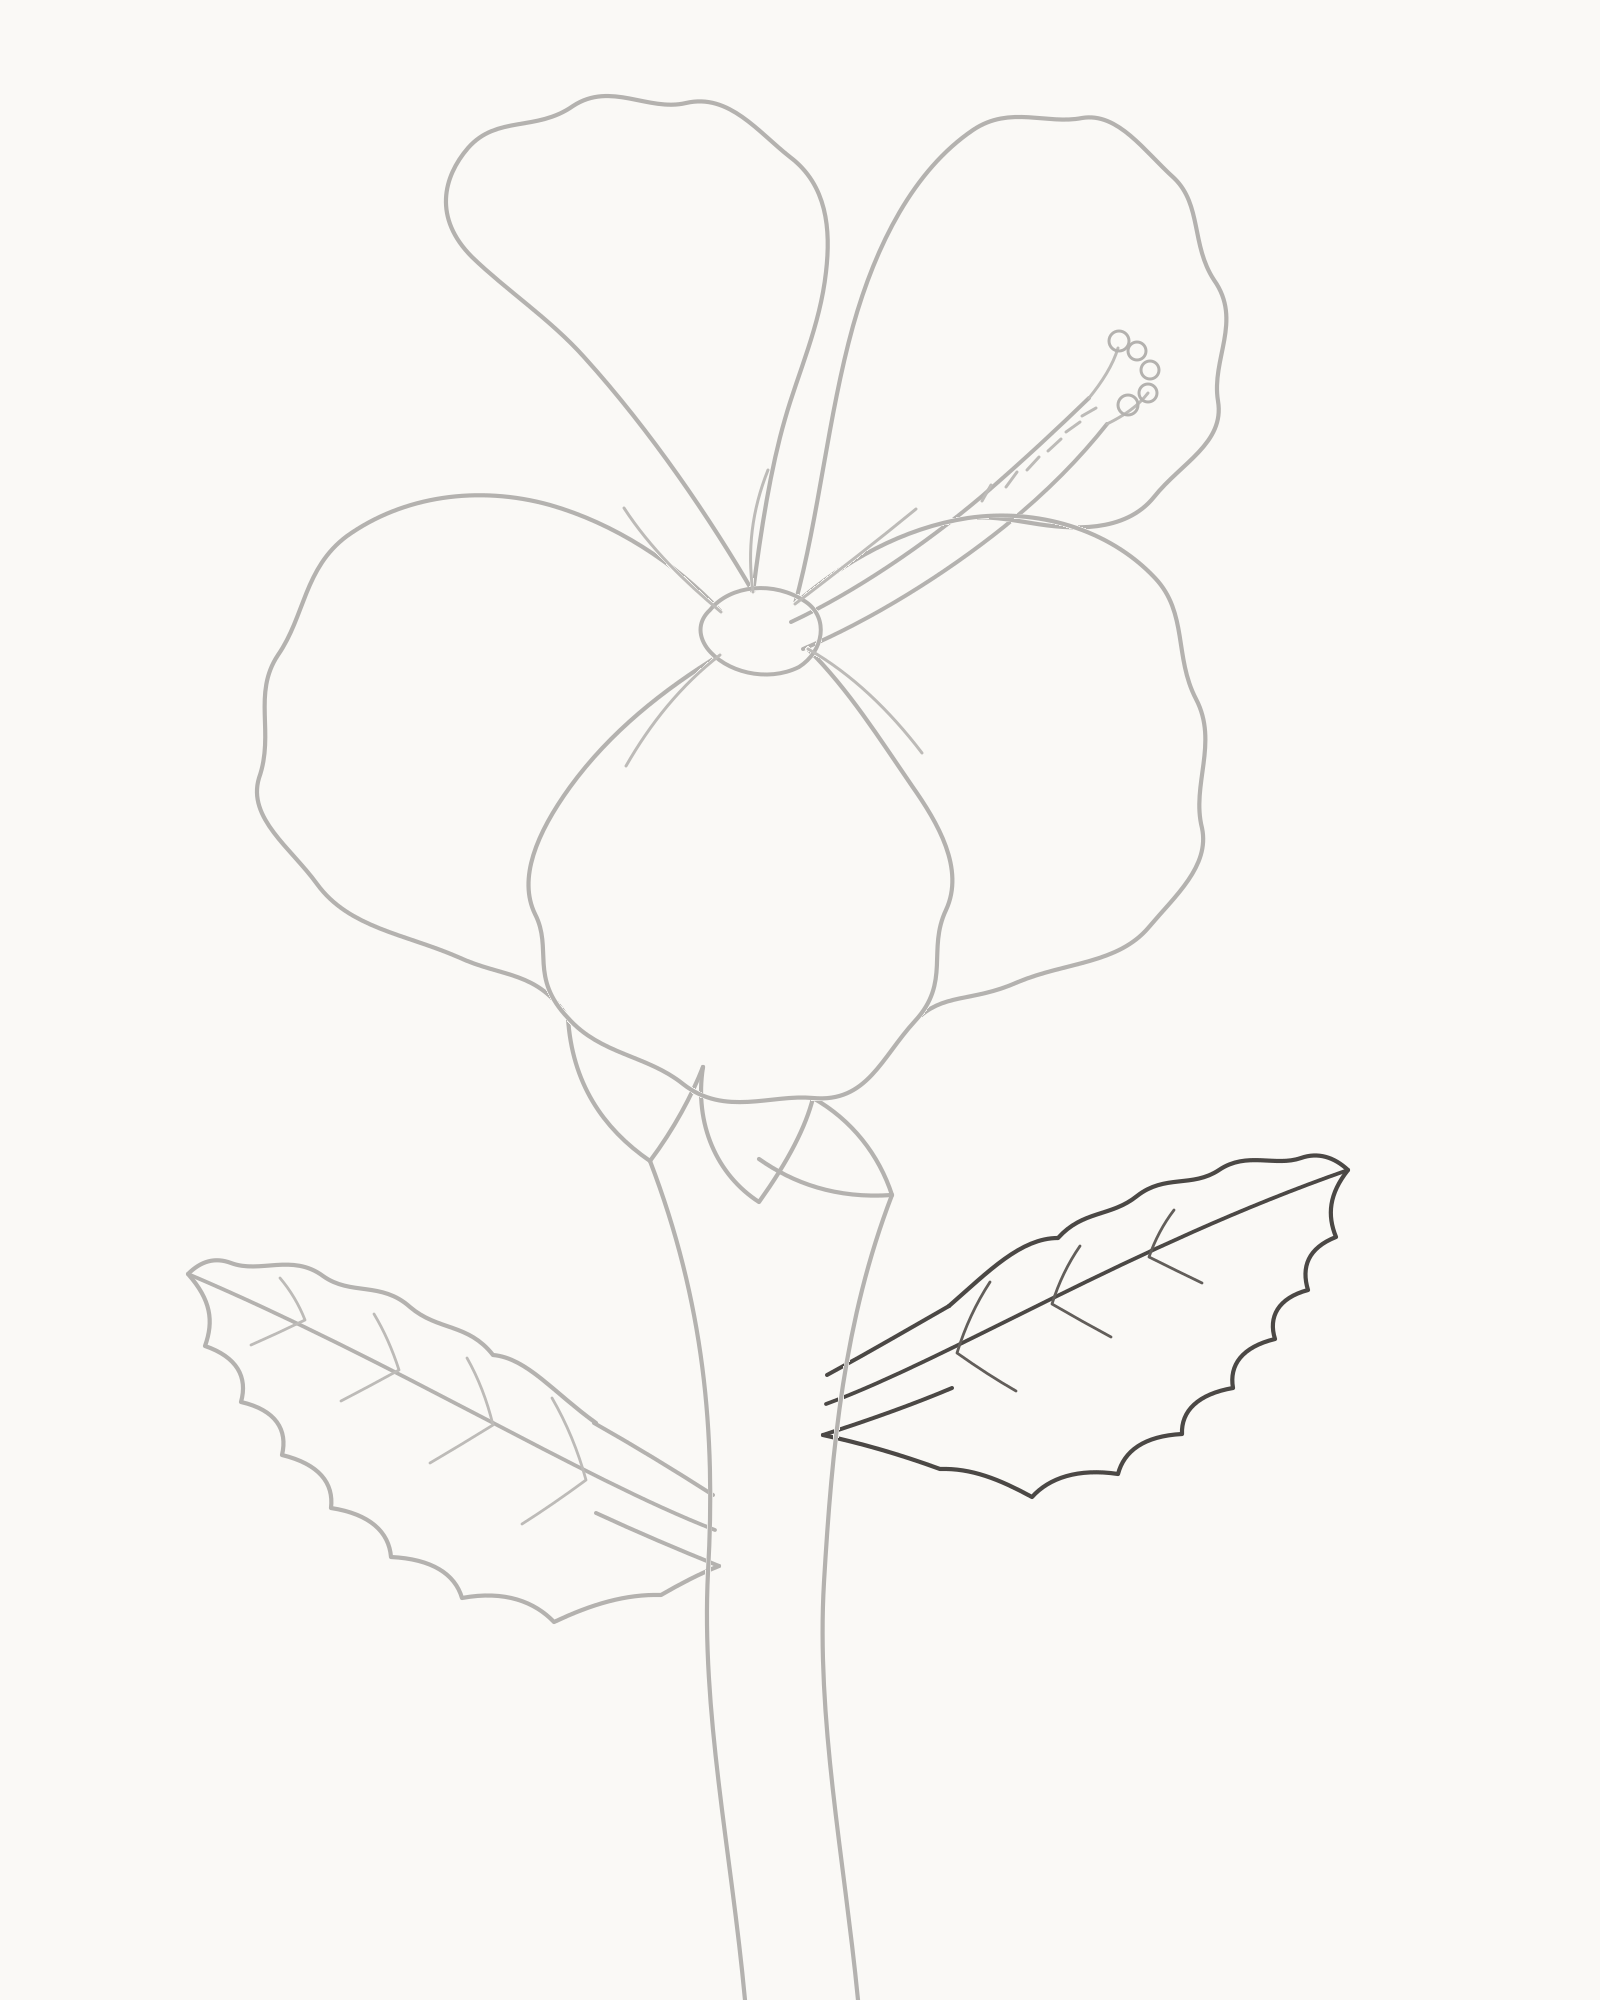
Stage 8 of 8. A smaller higher leaf completes the line drawing. - Higher contacts
- Midrib and blade
- Three vein pairs
Set the second attachment higher on the right stem edge. Aim its shorter midrib up and right, then close a narrower toothed blade around it. Change the lean, fullest point and tooth spacing so this leaf does not become a reflected copy of the first.
Finish with three short vein pairs. Those are the final marks: there is no shading option, general cleanup or outline-darkening stage. The original throat directions and every accepted contour remain visible in the completed drawing.
Look for this before moving on: the right leaf is smaller, higher and differently angled, with two clear stem contacts and exactly three vein pairs; the whole drawing remains line only.
If it goes wrong: preserve the stalk and midrib if they attach cleanly. Redraw only the newest blade section or vein, changing its bow or length without altering the large leaf or stem.


Common mistakes and local fixes
The flower looks like a five-point logo. Compare the petals in pairs. Adjust only the newest repeated outer arc by moving its widest point or changing its top turn; do not add decorative scallops.
Six petals seem to appear. Trace the front, side pair and rear pair with your eye. Remove the newest loose dividing contour that creates the extra form, leaving all five intended boundaries intact.
The centre resembles an antenna. Reconnect only its newest base edge to the throat and check that the column has two sides. Keep the five tip lobes compact and separate the six anther marks along its length.
The flower appears pasted onto the stem. Check the three sepals before redrawing anything else. Repair only the newest support contact so each stem edge begins beneath that group rather than inside a petal.
The leaves dominate the bloom. Preserve their attachments and midribs. Pull back only the newest outer section, shortening its reach while keeping a broad blade and one clear tip.
The two leaves form a matched pair. Keep the larger left leaf. Change only the newer right blade's tilt, width or tooth spacing while retaining its higher attachment.
Practise a more turned flower
On a fresh area of paper, repeat Stages 1–5 with the throat moved slightly left and the centre column aimed more steeply upward. Narrow the left side petal and let the right side open wider, but keep the same front, side-pair and rear-pair count. This is a useful way to practise viewpoint through proportion without introducing colour or a new shading method.
For more work on serrated blades and clear attachments, try How to Draw Leaves. To organise two simpler blooms on one branch, continue with How to Draw Flowers. The How to Draw page returns to the complete practical index. The separate Flower drawings gallery remains the home of historical examples rather than this procedural lesson.
Frequently Asked Questions
What is the easiest way to start a hibiscus drawing?
Place a small throat first and give it five short permanent directions. They divide the open space before you commit to any large petal, while leaving the lower half free for the stem.
How many petals should I draw?
This exercise uses five major petals: one front, two side and two rear. That count reflects a useful mallow-family observation, but the exact widths and overlaps belong to this designed view rather than every hibiscus species.[1]
How do I stop the petals looking identical?
Change where each petal is widest, how high it reaches and how its outer edge turns. Compare only the newest form with its neighbour; small structural differences work better than adding random wrinkles.
What is the long part in the centre?
It is shown here as one narrow column projecting from the throat, ending in five small stigma lobes with six restrained anther marks along its outer section. Treating it as an anchored two-edge form keeps it from floating like a decorative antenna.
How should the stem meet the flower?
Put three sepals beneath the bloom, then start the two stem edges from separate points under that support. Do not extend the stem through the petal or attach a single loose line to its base.
Do I erase the first five direction lines?
No. They remain as short inner folds in the final drawing. Use the eraser only on the newest faulty segment before you accept that stage.
Does the finished hibiscus include shading?
No. The promised result is line only. The switch beside each stage may fade older lines on screen to show what changed, but that display aid does not alter the cumulative drawing.
How can I make the leaves look natural?
Give them different heights, lengths, leans and tooth rhythms. Keep each midrib connected to the stem and stop the secondary veins inside the blade rather than running them into the outline.
References
- Brooklyn Botanic Garden, Heavenly Hibiscus. View source
- Kew Science, Hibiscus L.. View source
More DRAWING Guides

How to Draw a Rose: A Step by Step Guide

How to Draw a Tree: A Step by Step Guide

How to Draw Eyes: A Step by Step Guide

How to Draw Leaves: A Step by Step Guide

How to Draw Autumn Leaves: A Step by Step Guide

How to Draw Flowers: A Step by Step Guide

How to Draw a Lily: A Step by Step Guide

How to Draw a Sunflower: A Step by Step Guide

How to Draw a Tulip: A Step by Step Guide

How to Draw a Hibiscus: A Step by Step Guide

How to Draw a Daisy: A Step by Step Guide
