




Draw one open lily, its curved stem and two narrow leaves in eight permanent line stages. Build the small throat and centre first, close six broad petal-like forms, then add the stem and leaves without shading or temporary construction marks.
Difficulty: Beginner, with a detailed flower centre
Time: Allow about 35–50 minutes. This is an untested estimate, so pause after the centre or before the four-petal stage when needed.
Medium: HB or No. 2 pencil, line only
Read the flower from its centre
A true lily flower has six similar petal-like parts called tepals, arranged botanically in two groups of three. [1] In this drawing they are grouped by what you can see: two upright forms first, followed by four side and front forms. That is a drawing order, not a claim that the visible pair makes a botanical group. The familiar word “petal” is used in the stages because it is easier to follow while copying a curve.
The tall stalk in the middle is the pistil and ends in a small three-part stigma. Six thinner stamens spread around it, each with an anther at its tip. These few terms are useful because they tell you which line to add and which structure should sit highest; no detailed flower anatomy is needed.
This is a general open Lilium-type observation exercise rather than a species-identification plate. It does not add tiger-lily spots, a calla-lily trumpet or a water-lily arrangement. Every mark in the stage images belongs to the final line drawing.
Materials
- A sharpened HB pencil; an ordinary No. 2 school pencil is equivalent.
- Smooth white drawing paper, an upright sketchbook page or unlined printer paper for practice.
- A clean eraser for correcting only the newest misplaced section.
- A pencil sharpener.
- Optional: a clear photograph of one open true lily, or a flower you are allowed to observe, for comparing unequal petal curls.
You do not need a ruler, compass, ink pen, coloured pencil, blending stump, tracing paper or several graphite grades. A 0.5–0.7 mm mechanical pencil is also suitable if it makes the flower centre easier to see.
Before you draw
Imagine a tall 4:5 frame. The throat sits at about 49% of the width and 46% of the height. The flower spreads across most of the upper half, while the stem and two leaves use the lower half. Leave that lower space open from the beginning.
Use the separate Stage 1 placement cue to locate the throat and compare the flower's overall reach. The cue is not part of the artwork. If you turn on the optional grid, use it to compare position and proportion; do not copy the grid onto the paper.
Keep the throat and short direction marks light. Petal contours and the stem can be a little firmer, but there is no final darkening pass. The programme's upper-left light direction does not create visible tone here because the result is line only.
1. Place the throat and six directions

Stage 1 of 8. A small throat and six unequal directions fix the flower centre. 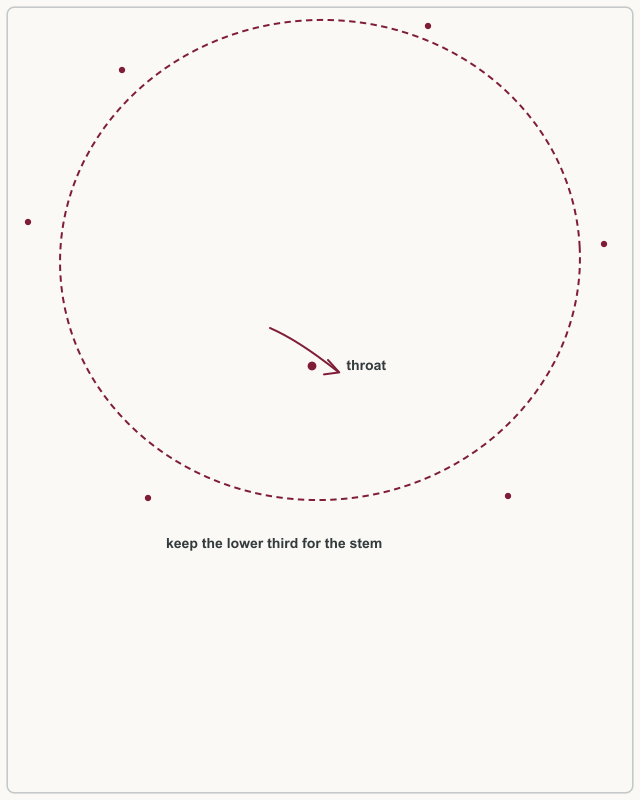
Placement cue: locate the throat around x49% and y46%. Keep the lower third for the stem, and leave every cue mark out of the drawing. Find the throat near 49% of the drawing area's width and 46% of its height. Draw the small shallow upward curve shown in the stage. It should feel open and slight rather than round like a button.
Add six short permanent directions from separate points around it. Work across the fan: upper-left, left, lower-left, upper-right, right, then lower-right. Let the angles and lengths differ. These strokes will remain as small folds or base directions inside the finished petals, so none should extend across the future flower.
Look for this before moving on: the throat is small and near the stated position, six short lines fan from separate contacts, and the lower third of the page remains empty.
If it goes wrong: replace only the newest throat segment or direction. Do not enlarge the throat to absorb a detached line; shorten that one stroke and reconnect it to a clear point.
2. Draw the pistil
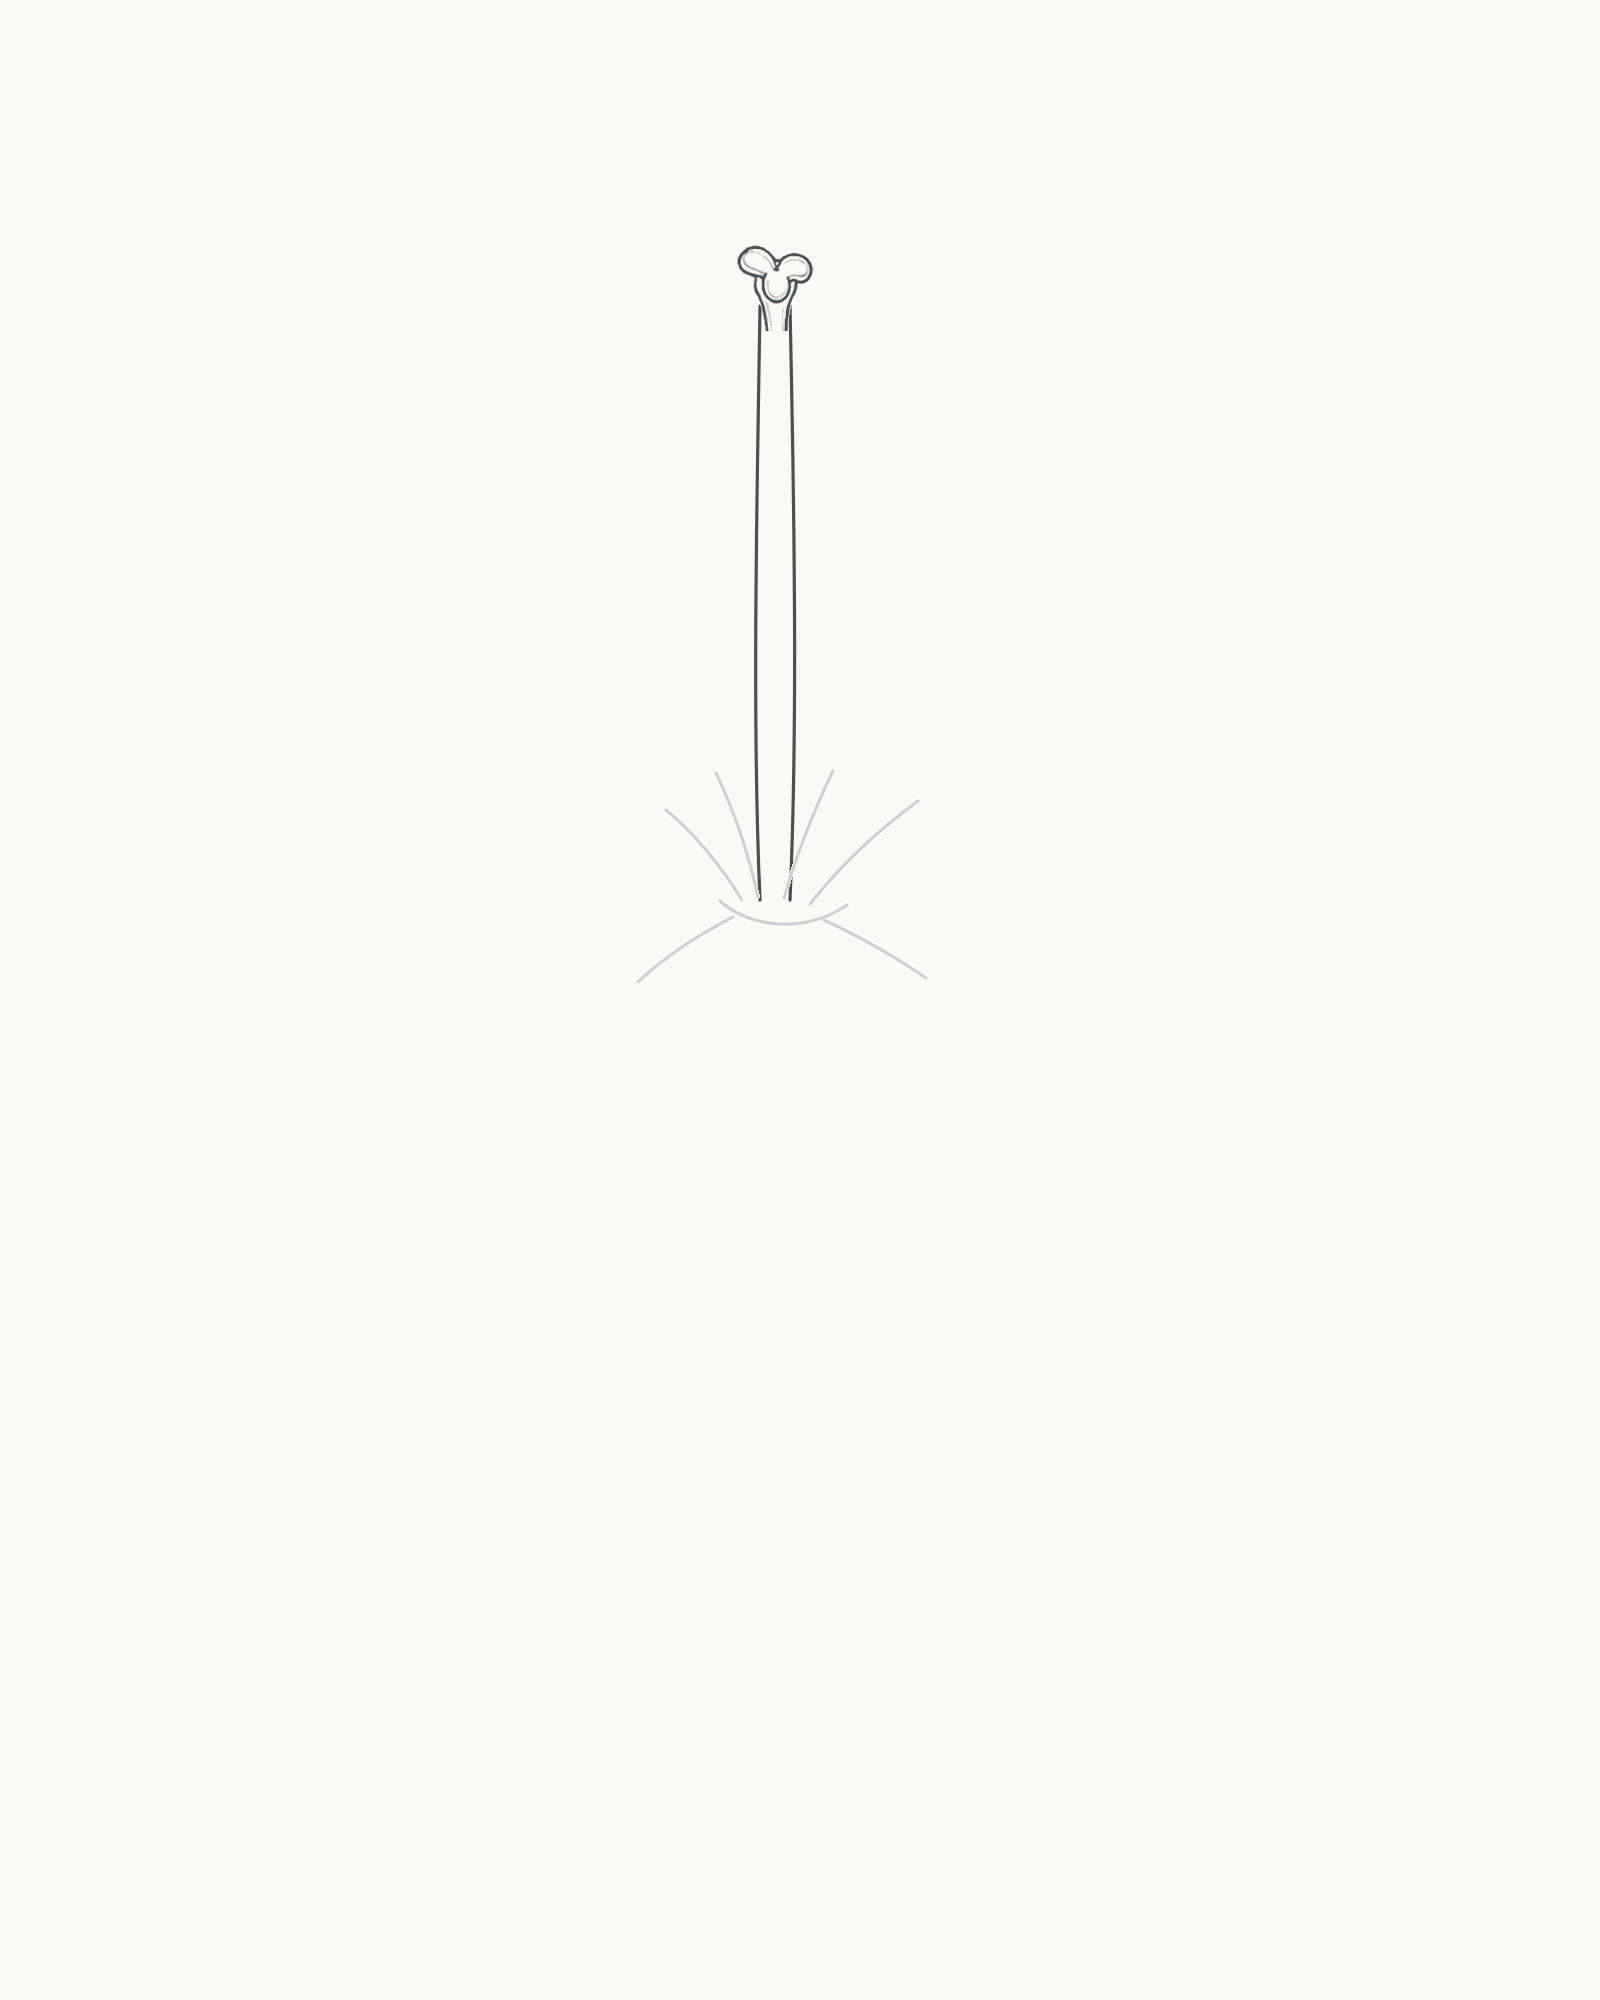
Stage 2 of 8. The tall pistil establishes the highest centre landmark. From the middle of the throat, take two long lines upwards. Keep them close together and give each a very slight bow, so the stalk is tall without looking ruled. Join both edges to the small three-lobed stigma at the top.
The pistil is the highest centre landmark. It does not need to be perfectly vertical, and its cap should remain much smaller than a petal tip.
Look for this before moving on: one narrow stalk rises from the throat, its two edges do not cross, and both meet one small readable three-part stigma.
If it goes wrong: preserve the throat and the better stalk edge. Remove only the newer edge or stigma lobe, then reconnect it between the same two landmarks with a gentler curve.
3. Add six stamens
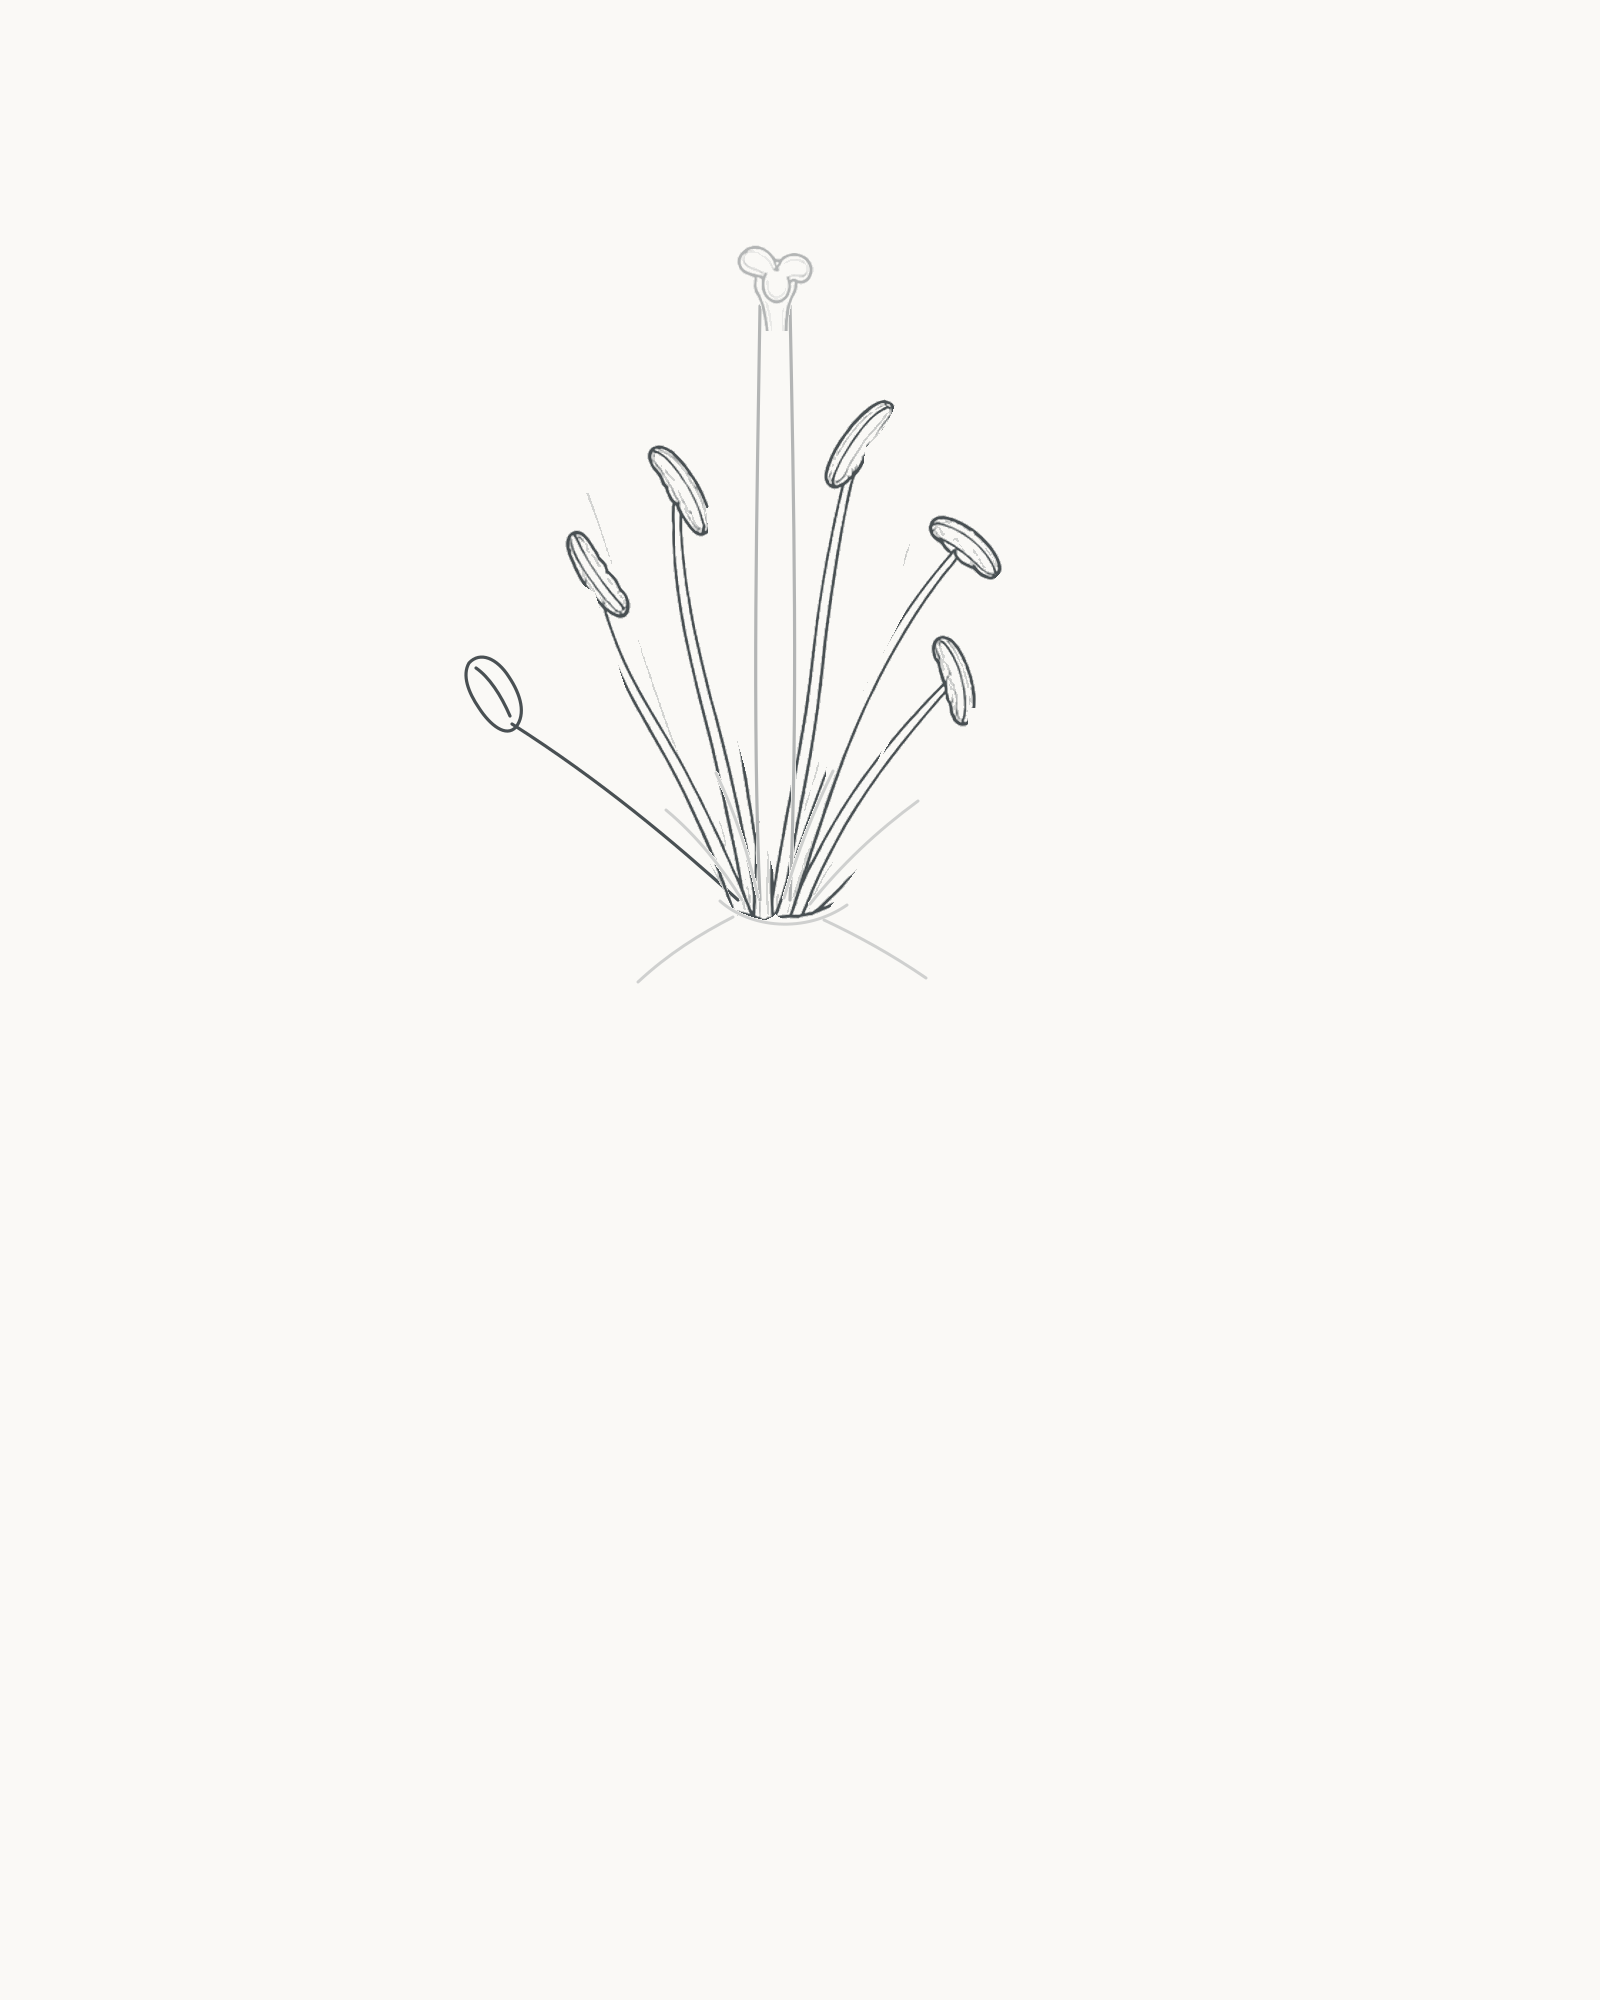
Stage 3 of 8. Six individually traceable stamens complete the flower centre. Add six thinner filaments around the pistil, one complete pair at a time. Start with the two on the far left, then add the pair just left of the pistil, the two on its right, and finish with the lower-right one. Each filament begins at its own throat contact and ends inside one tilted, unfilled anther.
Vary the reach and tilt rather than spacing the tips like points on a crown. Count the attached pairs before you continue: there should be six stamens plus the taller pistil.
Look for this before moving on: exactly six filament-and-anther pairs can be traced from the throat to their tips, their heights and angles differ, and none floats beside its filament.
If it goes wrong: leave the pistil and completed pairs untouched. Remove only the newest filament or anther, then redraw it from a free throat contact; do not darken the centre to hide a gap.
4. Close the two upright petals
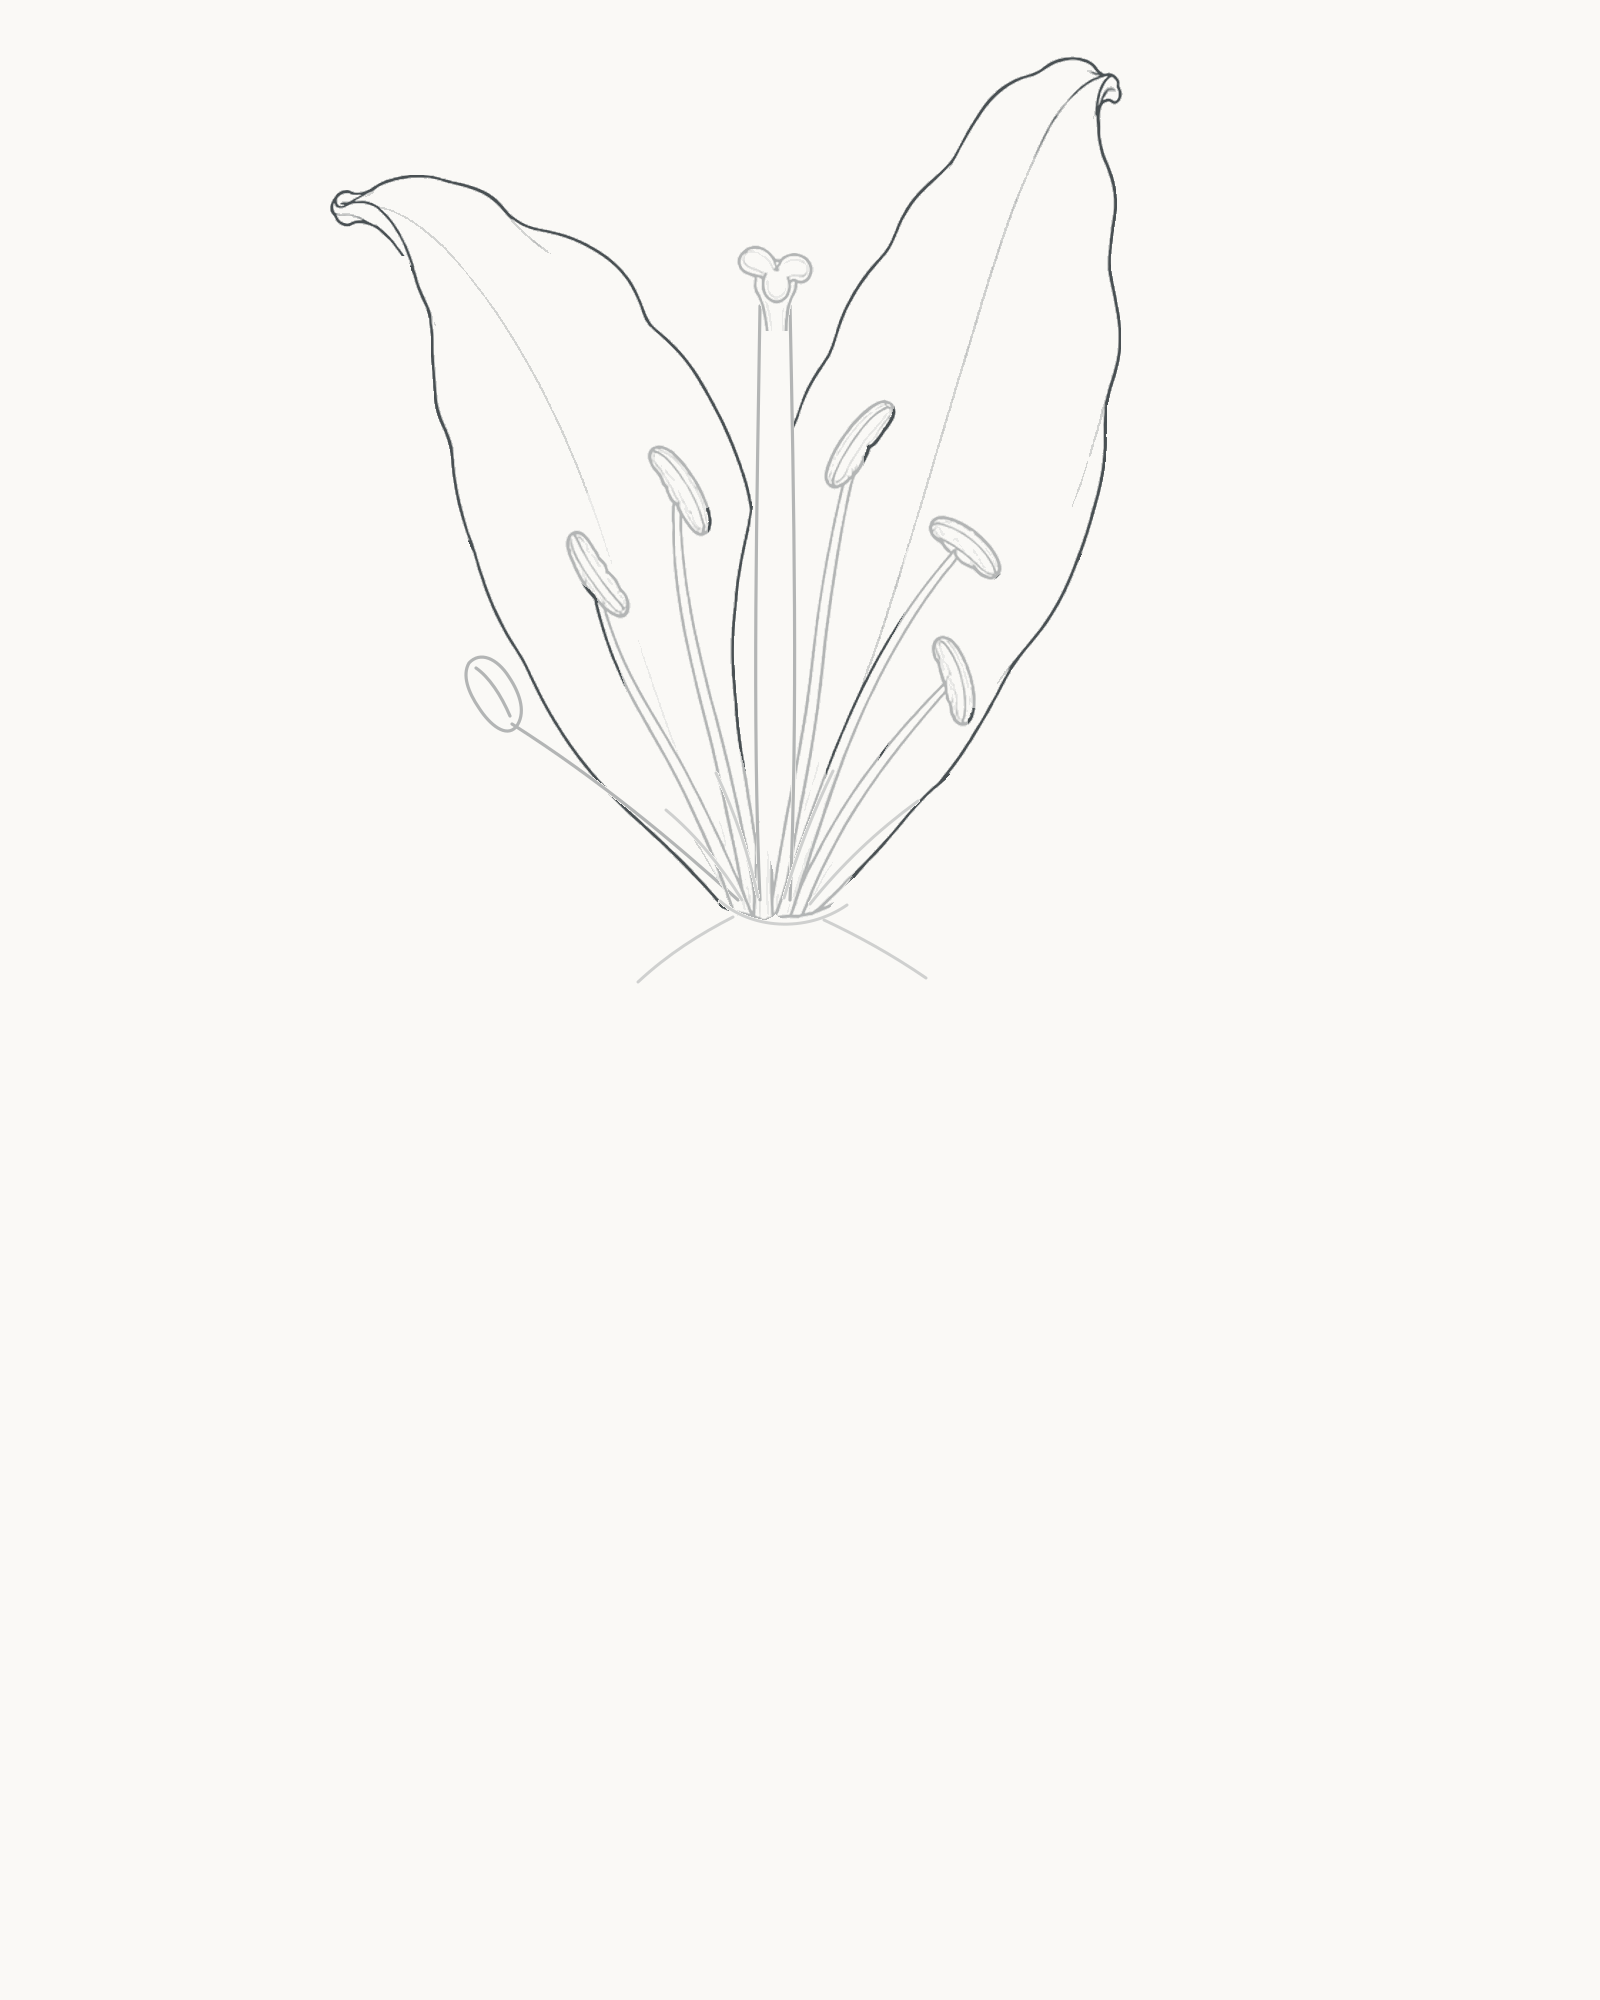
Stage 4 of 8. Two unequal upright petals frame the centre without crossing it. Draw the upper-left petal first. Begin at its short direction mark, take the contour upwards to the curled tip and return to a separate place at the throat. The two sides should not mirror each other.
Close the taller upper-right petal next. Let it rise higher and narrow differently on the way to its small tip turn. Both petals sit behind the centre structures, so stop their contours rather than drawing across a filament.
Look for this before moving on: two complete unequal petals stand behind the centre, both tips are visible, and each contour returns to the throat without cutting through a stamen.
If it goes wrong: keep the sound side and both centre contacts. Lift only the newest outer arc between those landmarks, then give its tip a clearer change of direction.
5. Complete the flower
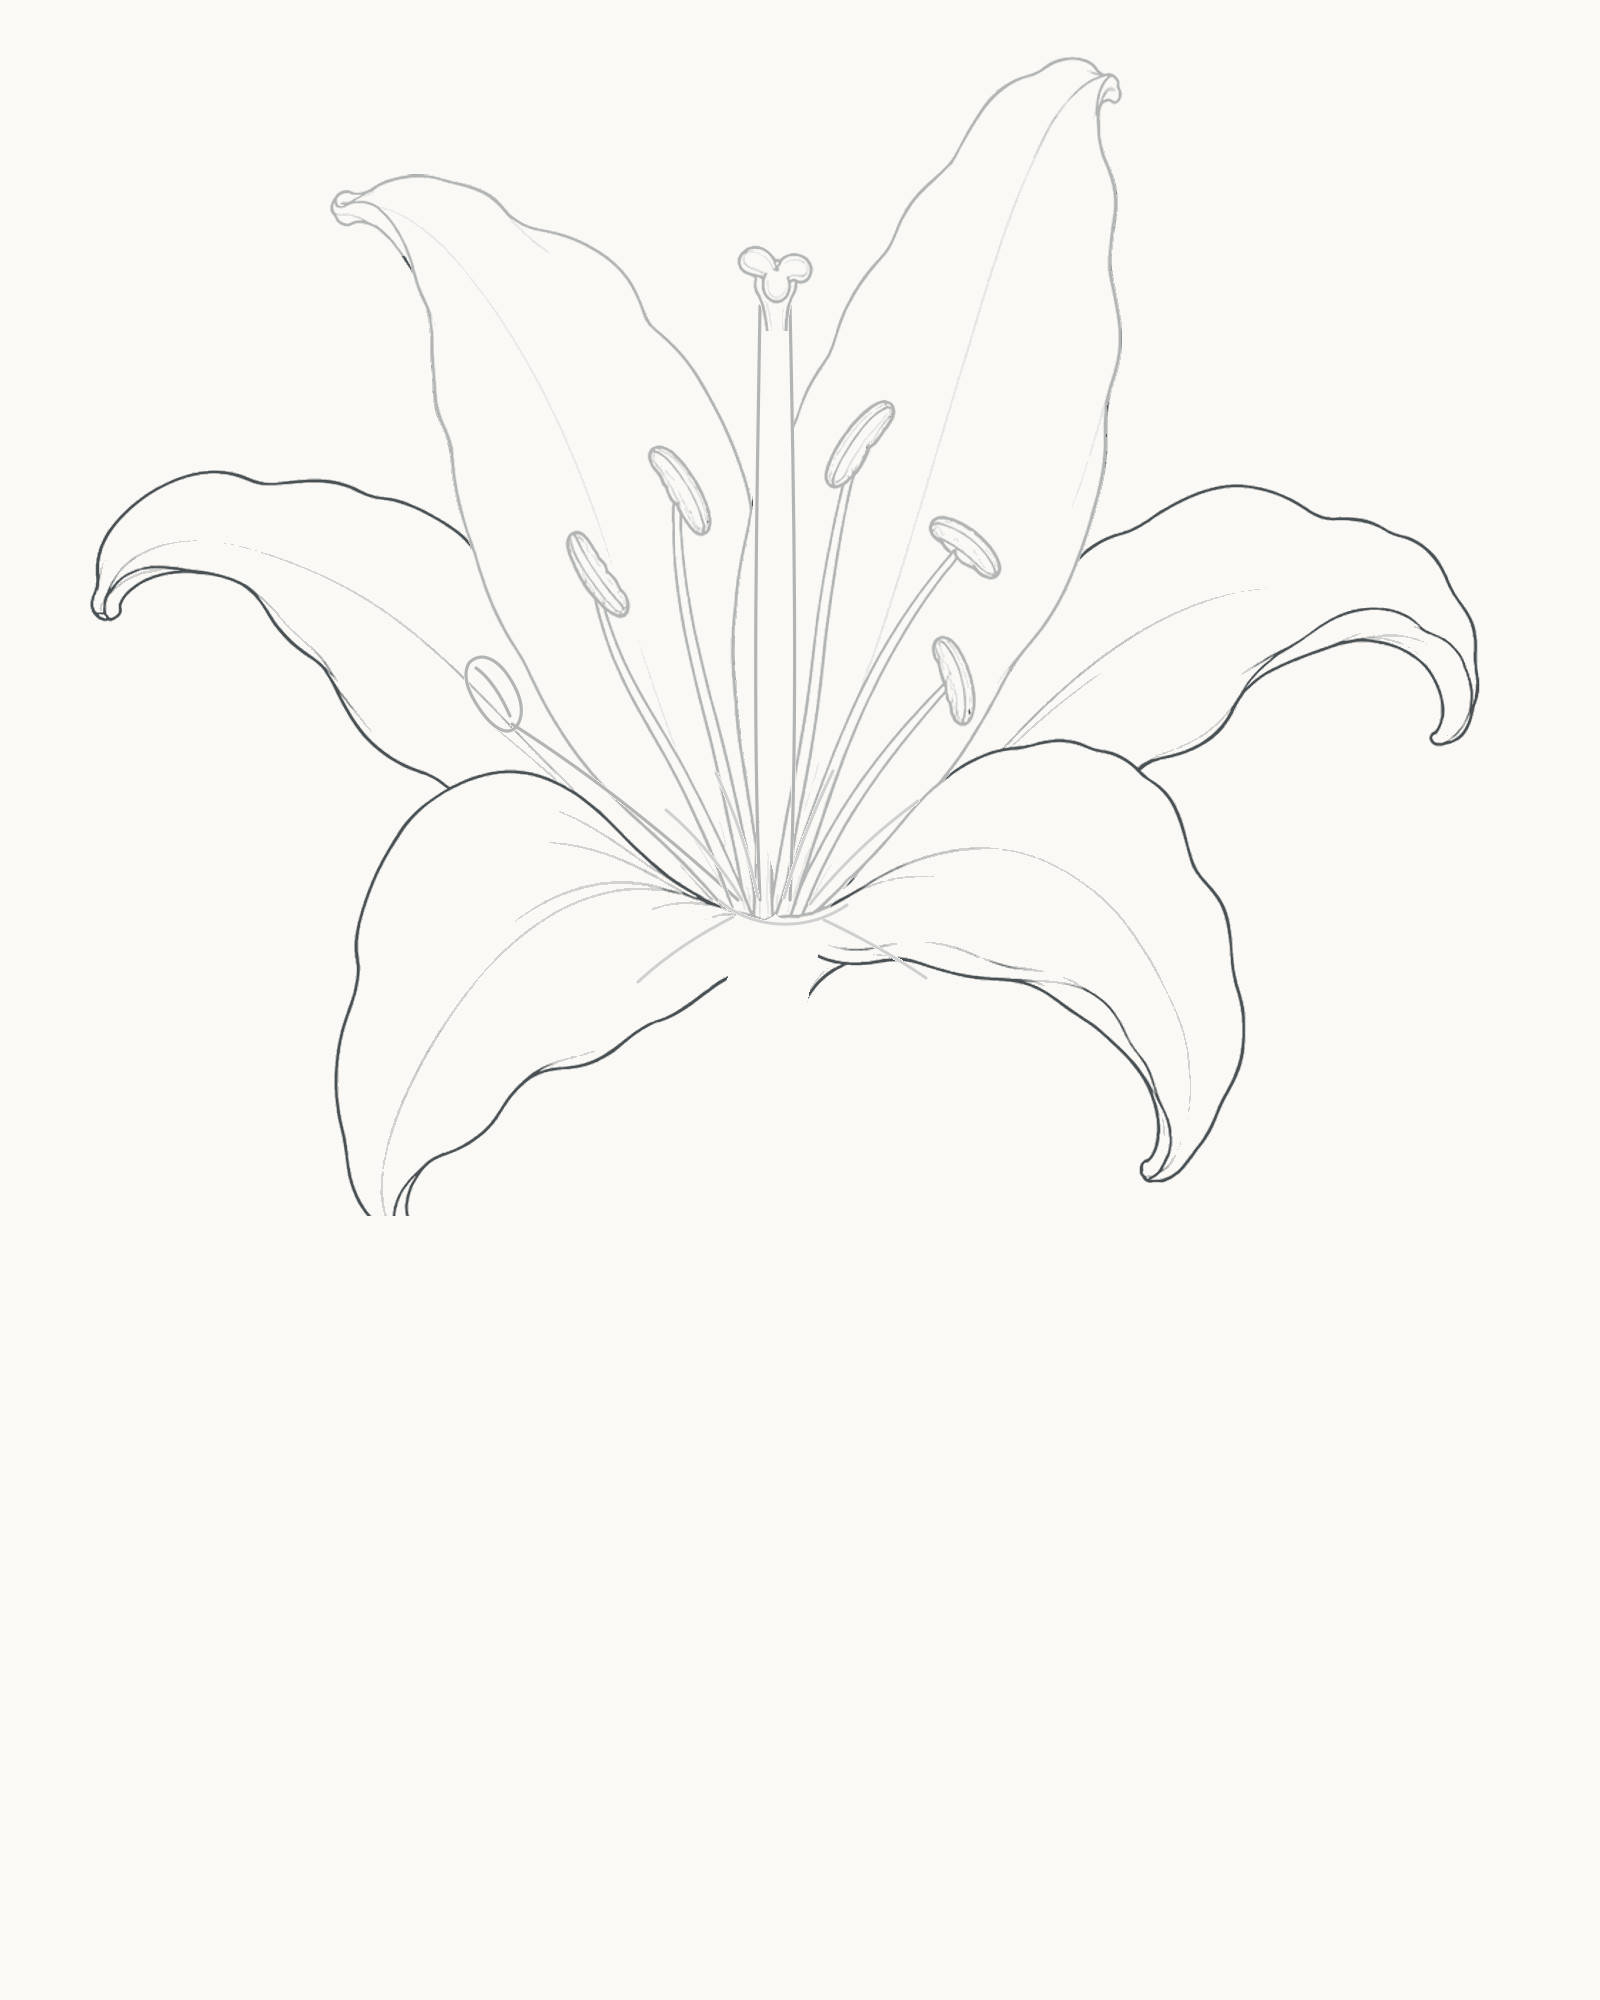
Stage 5 of 8. Four ordered contours complete the broad open lily. - Left side
- Right side
- Front-left
- Front-right
Add the four remaining petals in a fixed order so the larger change stays manageable.
- Close the left-side petal around its direction line, letting its tip curl outwards.
- Add the right-side petal with a different width and a longer outward turn.
- Draw the broad front-left petal from the throat, allowing it to sweep down and back.
- Finish with the front-right petal. Let it overlap near the throat without retracing the petal beside it.
Complete one contour before beginning the next. The six petals should share the same throat but keep different reaches, widths and edge rhythms.
Look for this before moving on: the two earlier petals plus four new ones form one open six-part bloom, the side curls differ, and the broad front pair overlaps cleanly without closing the throat.
If it goes wrong: keep the centre and every finished petal. Remove only the newest contour section between two sound contacts, then redraw that one curve; do not copy the opposite petal or add extra scallops.
6. Attach the stem
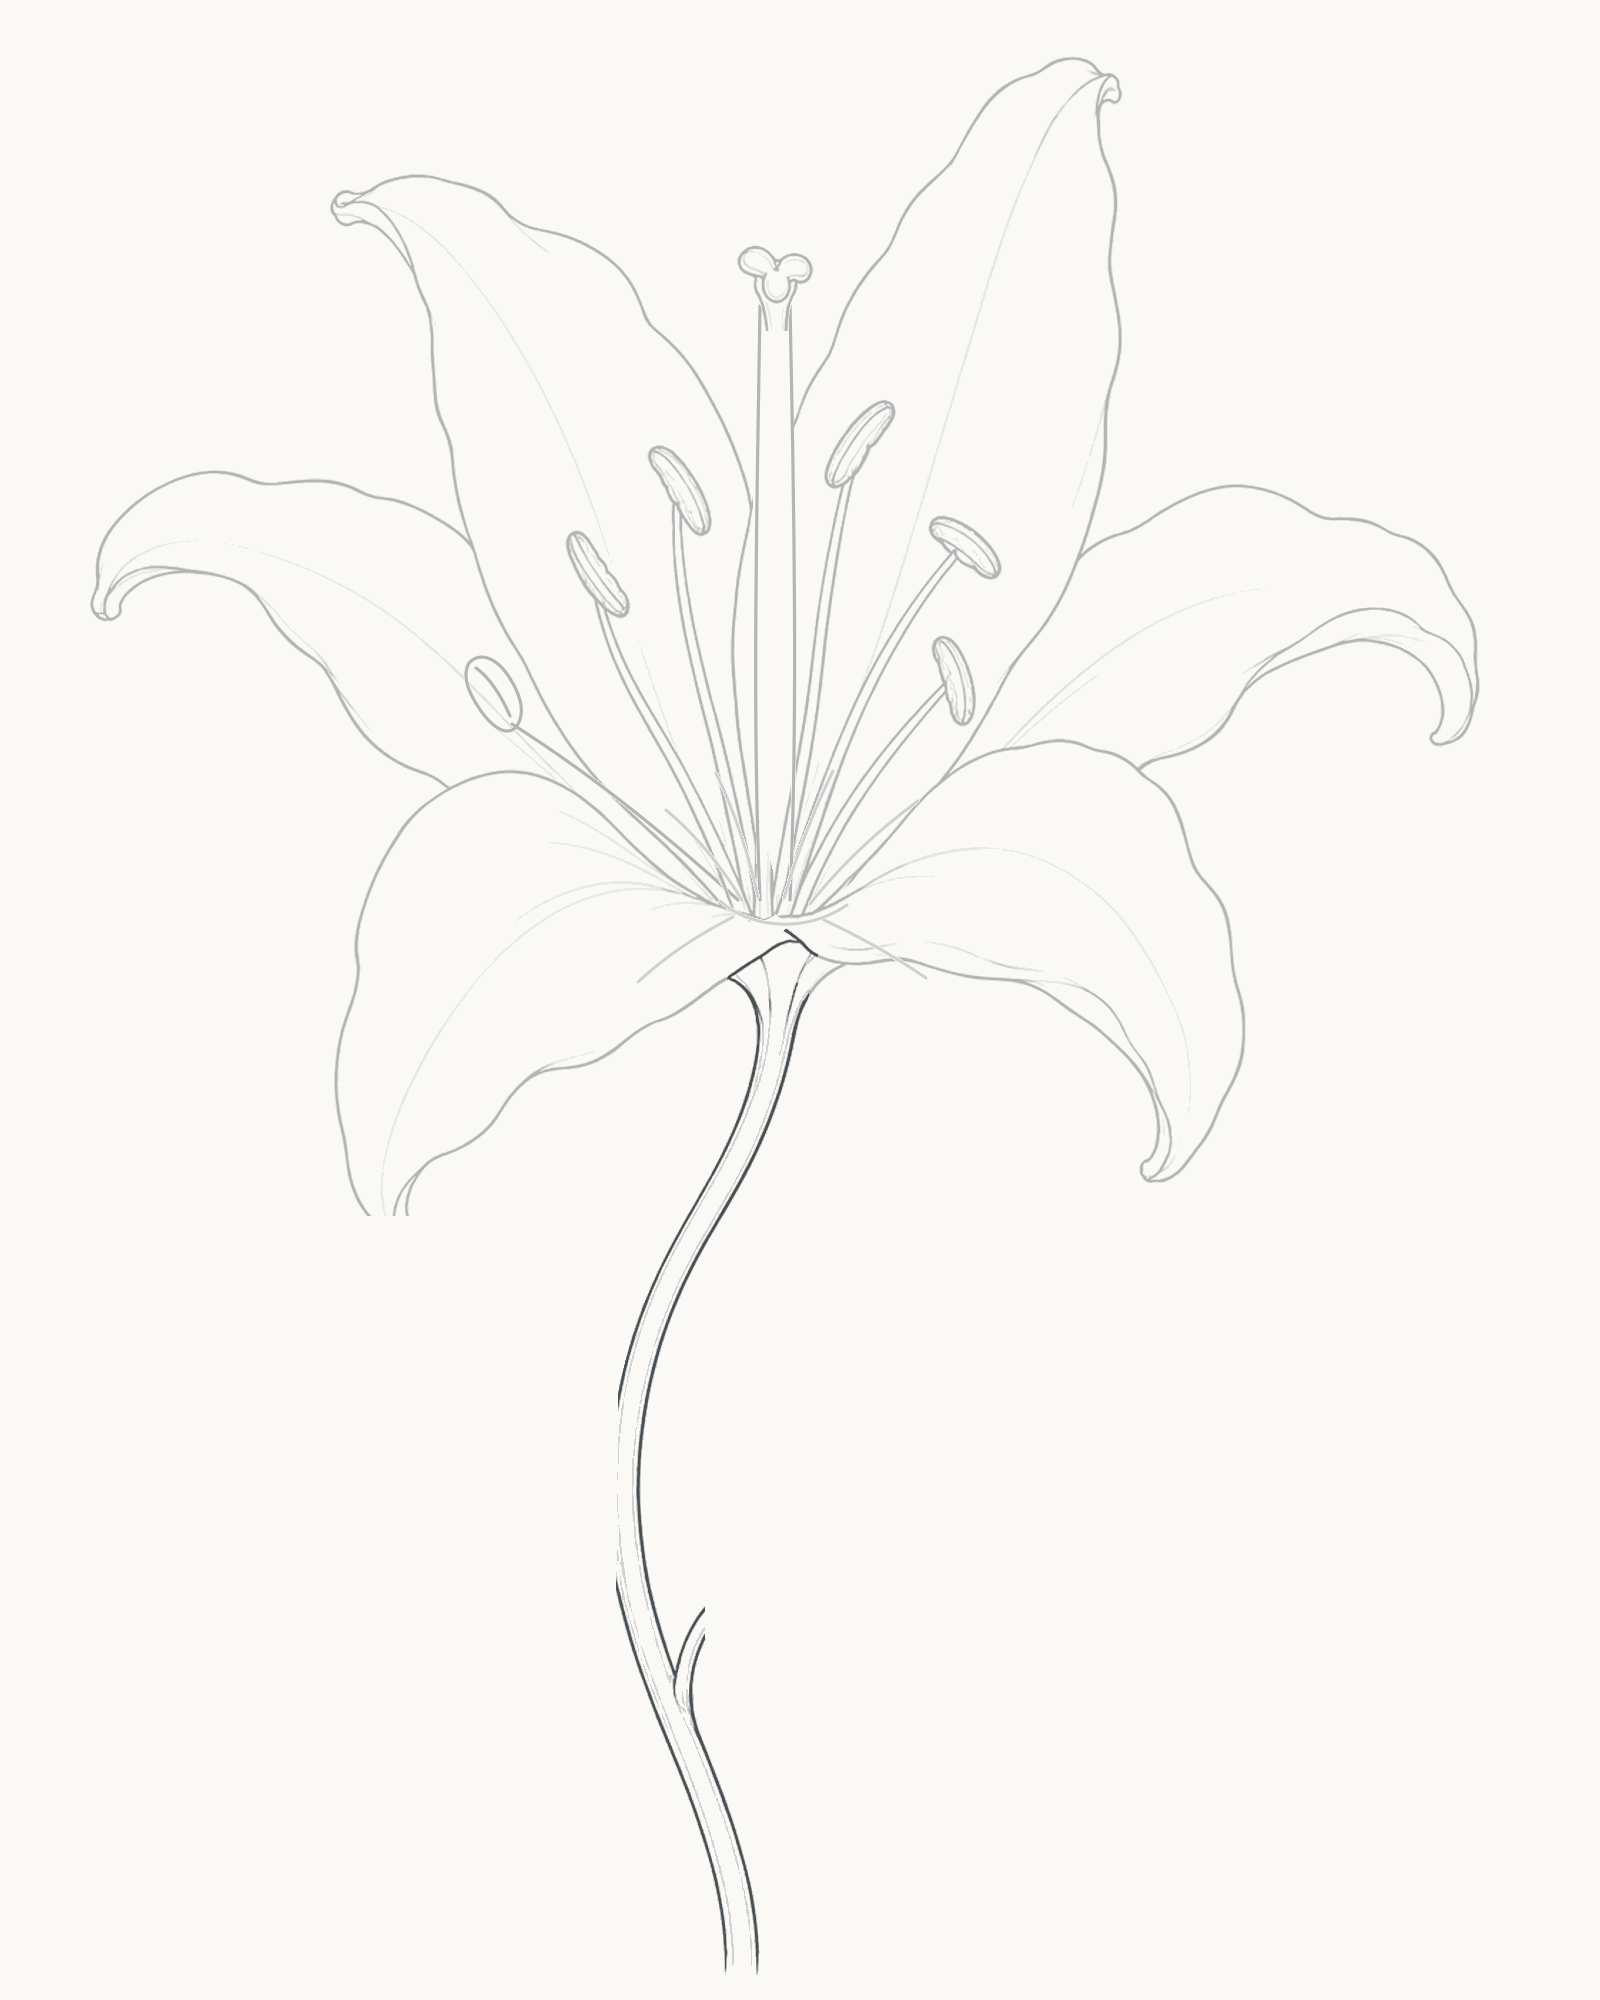
Stage 6 of 8. Two flowing edges attach the bloom to a slender S-curved stem. The front petals hide the underside of the flower, so no separate pointed calyx is added. Begin directly beneath that concealed base and draw one side of a gentle S-curve towards the bottom edge. Add the second edge close beside it, allowing the stem to narrow slightly as it approaches the bloom.
Both lines continue through the lower crop. They should flow together without crossing or becoming a stiff parallel tube.
Look for this before moving on: both stem edges touch the concealed flower base, follow the same S-shaped path and continue to the bottom edge with clear space between them.
If it goes wrong: keep the flower and the sound stem edge. Remove only the newest edge back to its flower contact, then redraw it with the first curve as a guide rather than attaching it to a petal tip.
7. Place the leaf midribs
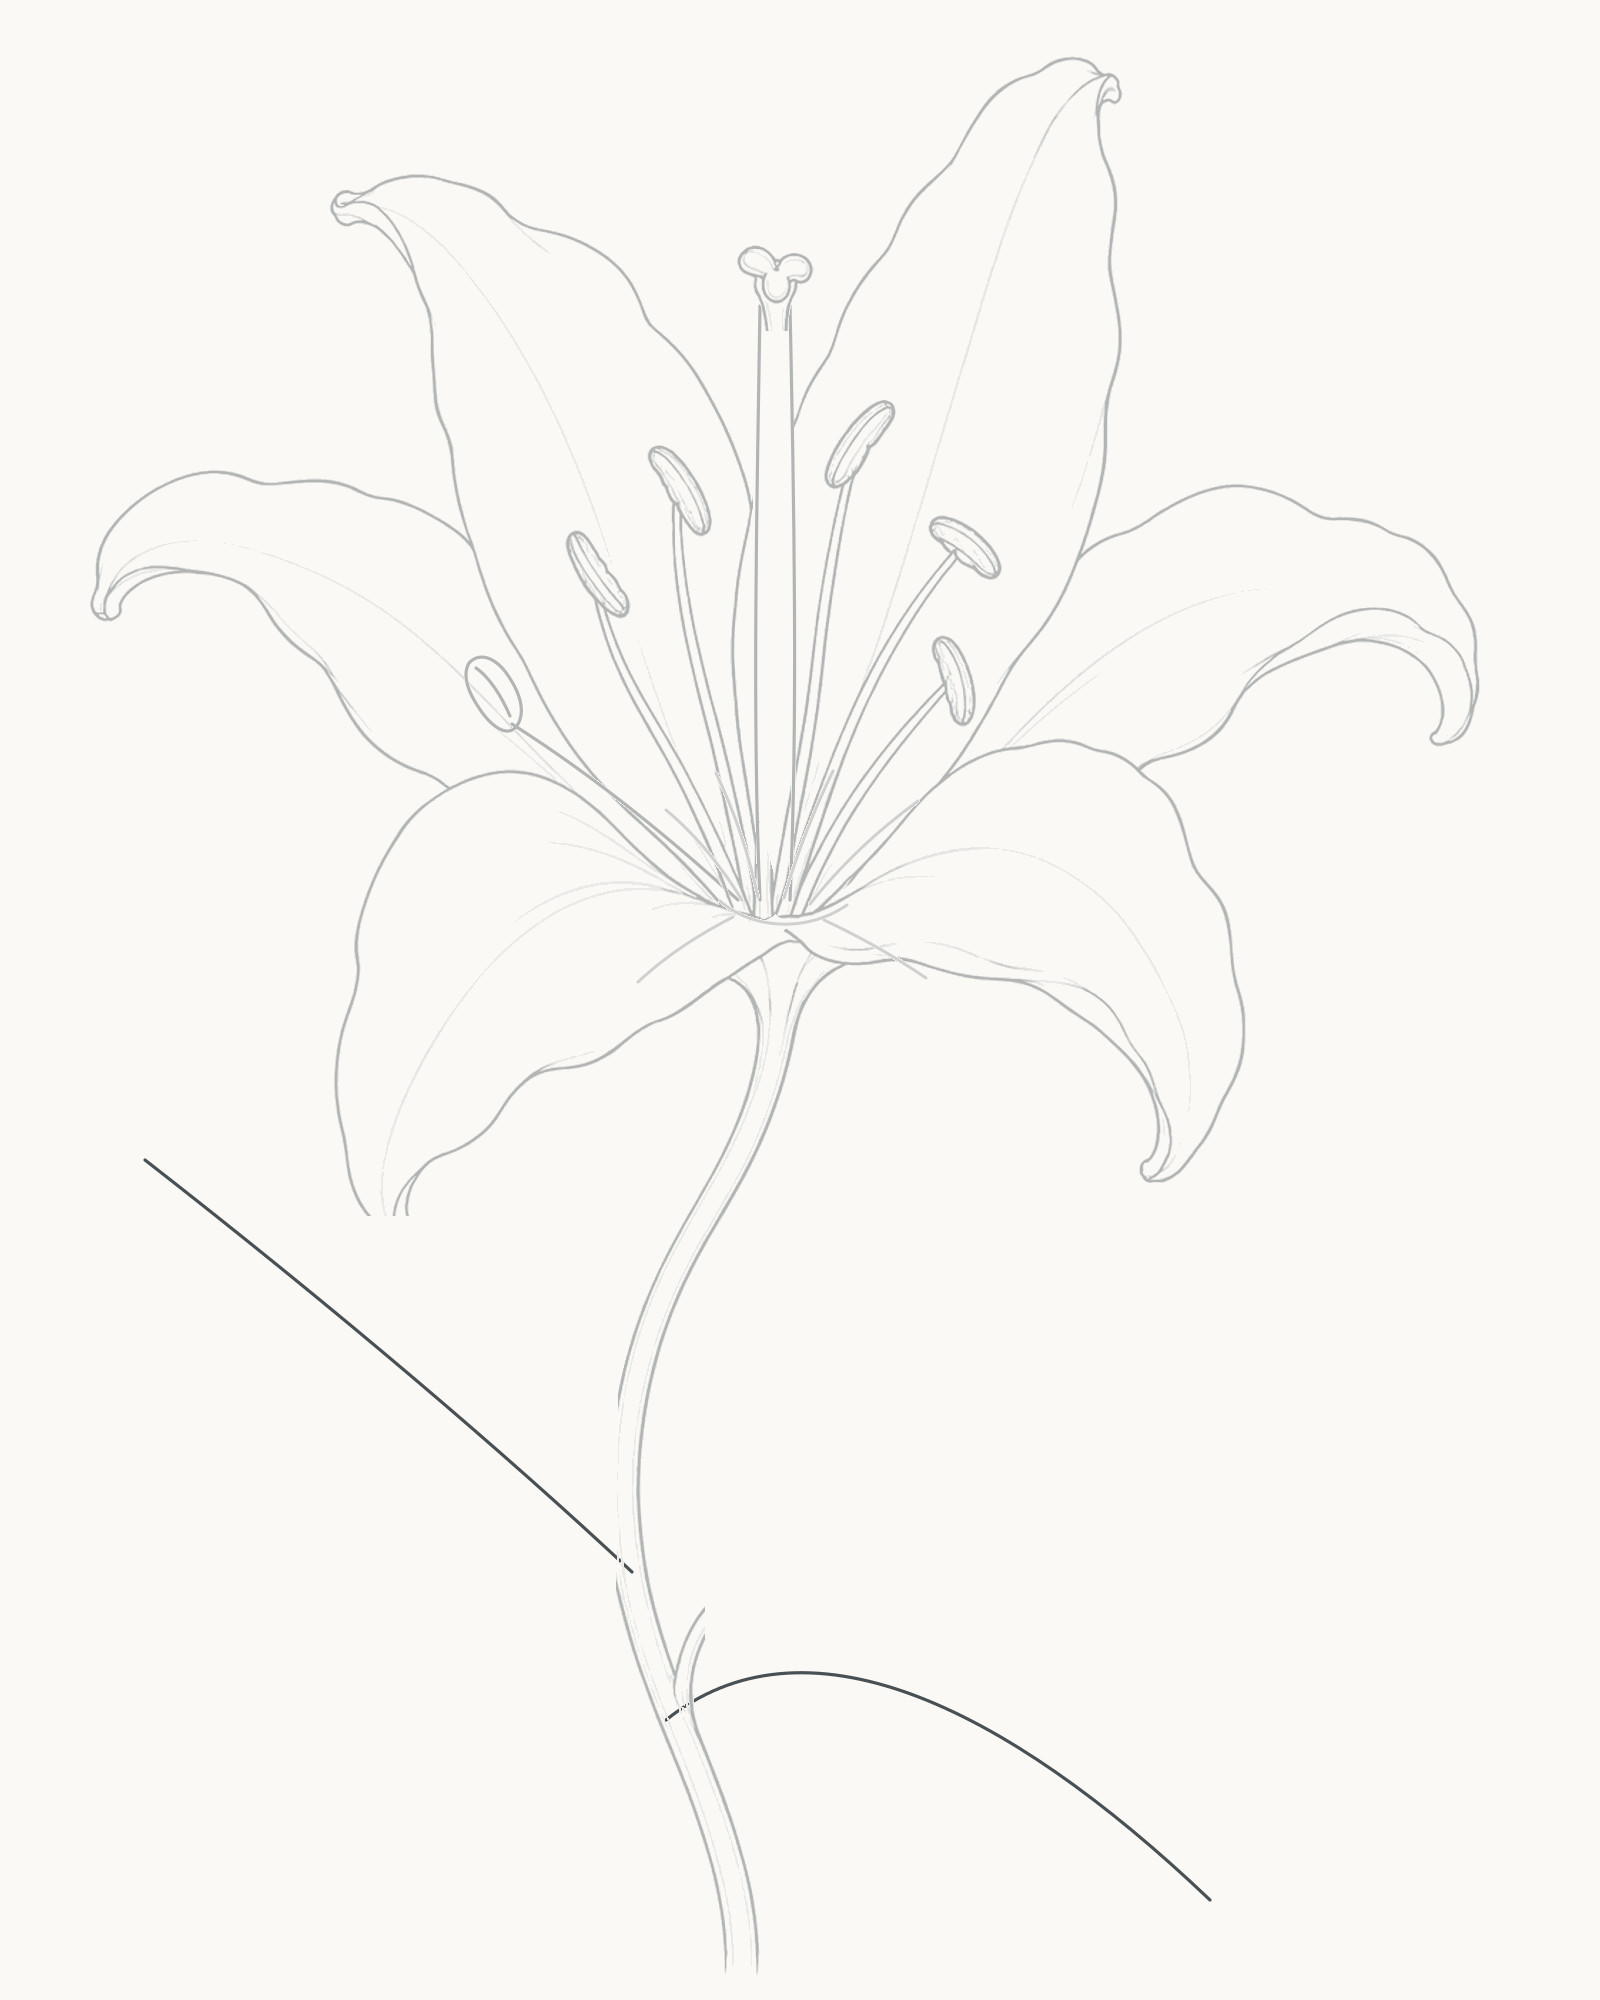
Stage 7 of 8. Two firm unequal attachment landmarks set the leaf directions. Add the longer left midrib first. Start directly on the stem and sweep it up-left towards its pointed tip. Then begin lower on the stem and take the second midrib down-right.
These two lines are deliberately firmer than the fine lines added inside the leaves at the next stage. They are permanent attachment landmarks, not shading. Do not try to balance them: the left line is longer and higher, and the right travels in a different direction.
Look for this before moving on: both lines physically meet the stem at different heights, the left one reaches farther, and there is enough open space around each for a narrow blade.
If it goes wrong: preserve the stem and the better midrib. Remove only the newest line from its attachment, then reset its direction before enclosing it with a contour.
8. Close the leaves
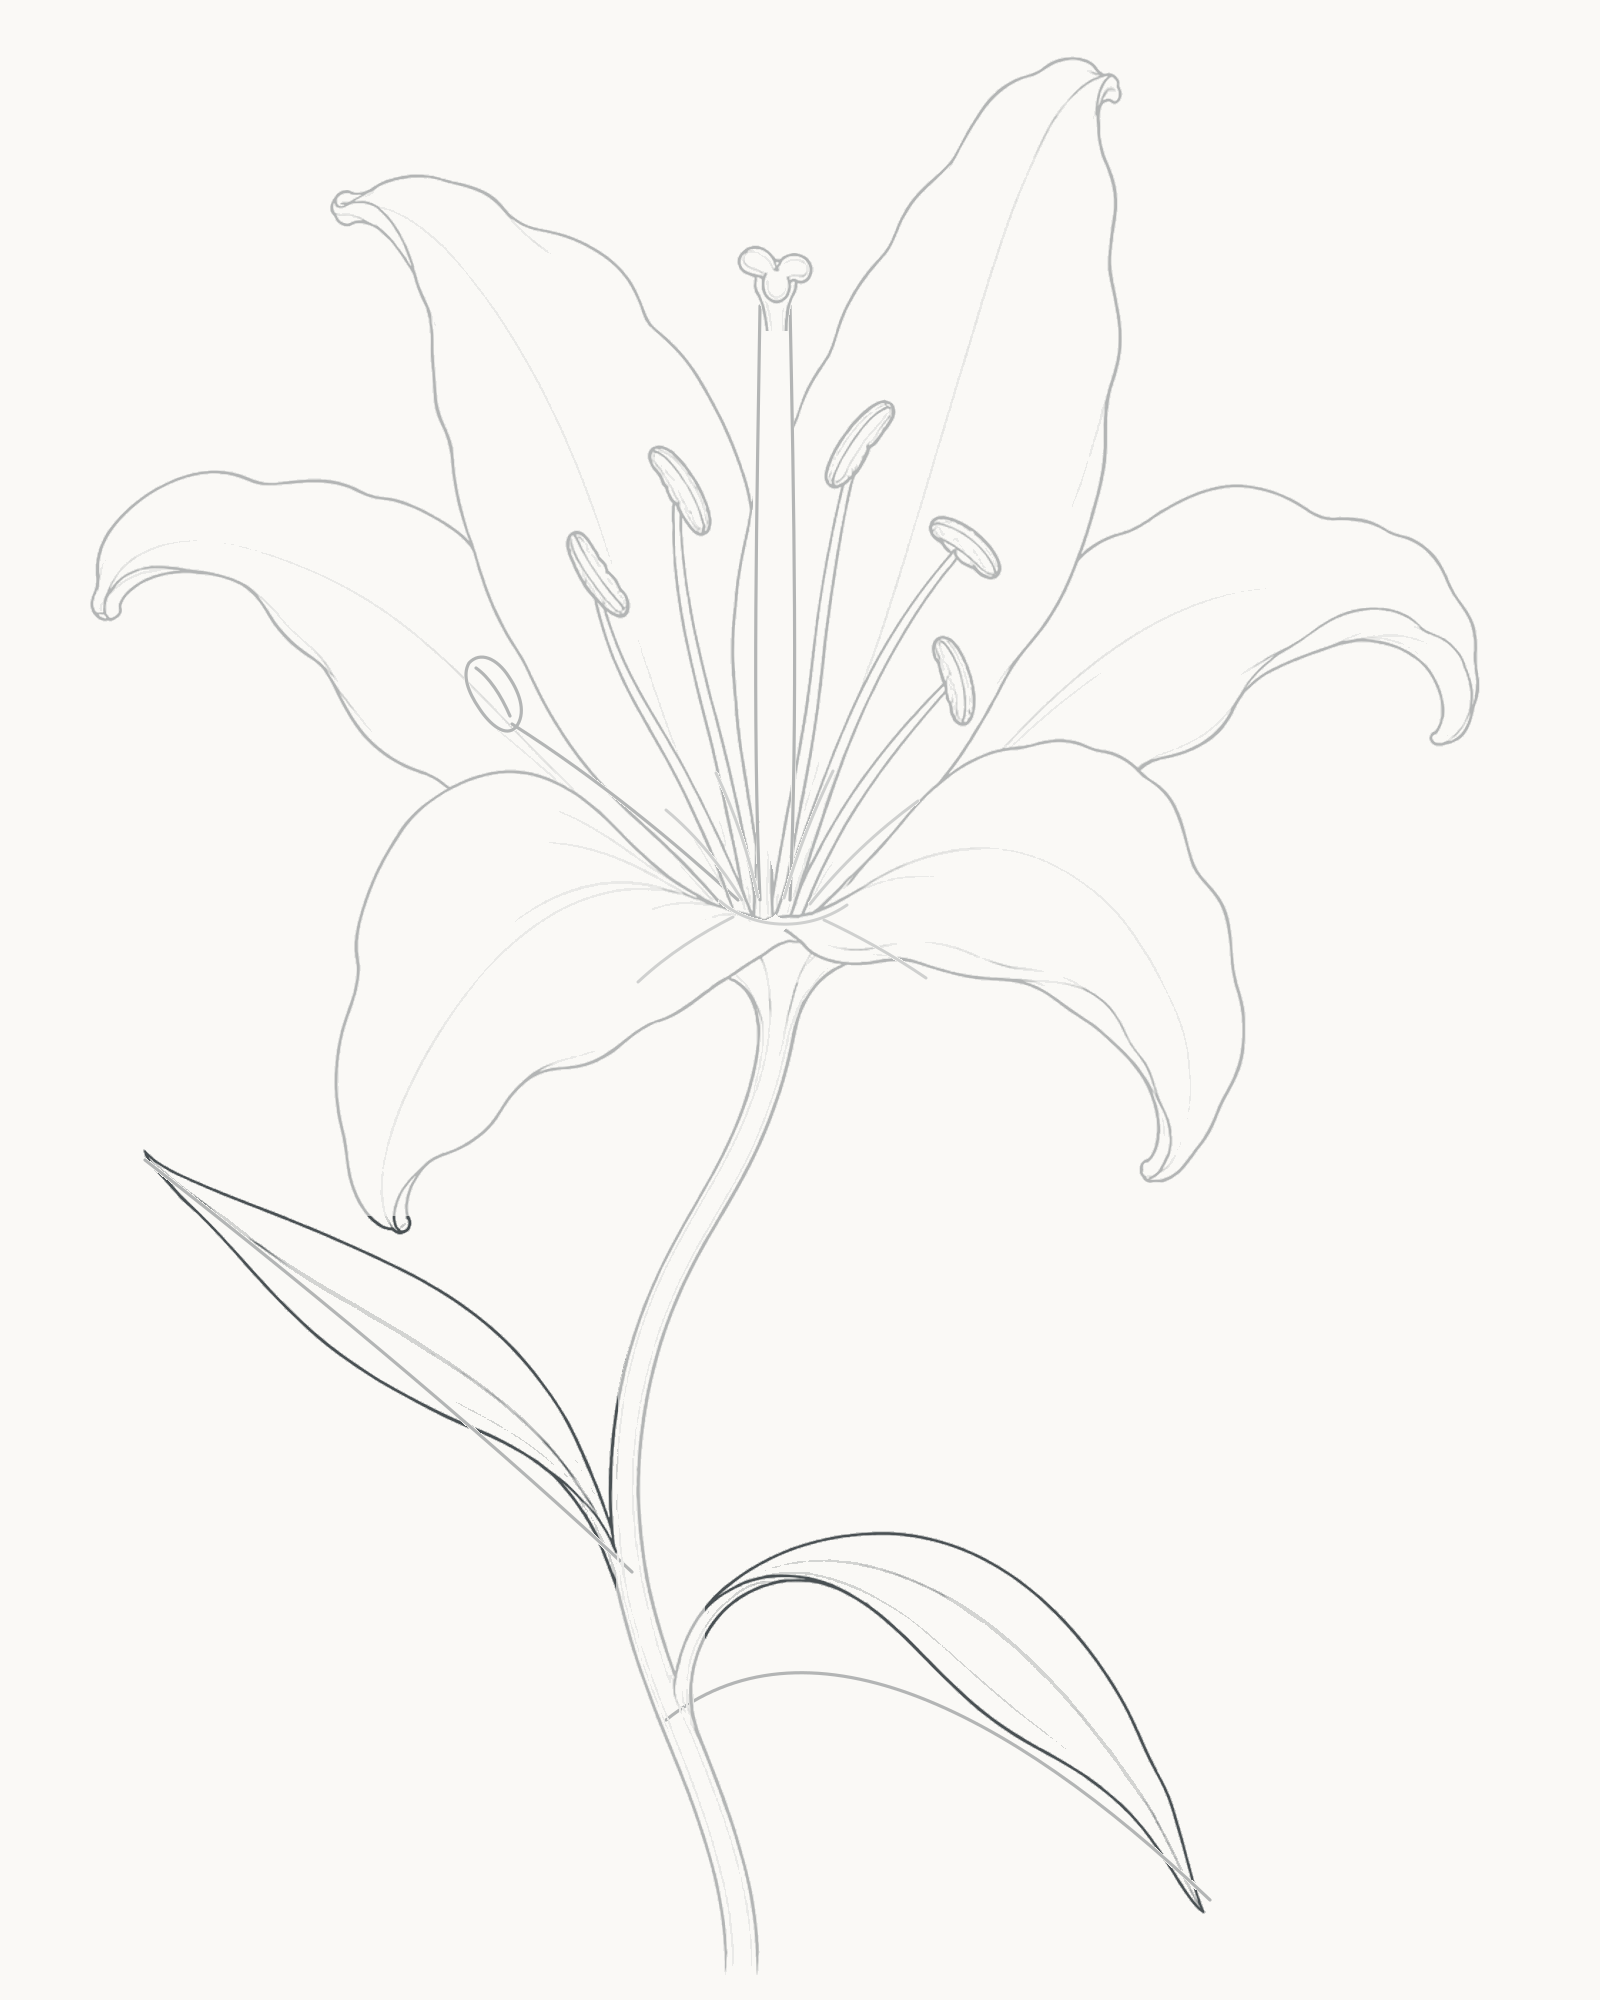
Stage 8 of 8. Two unequal attached leaves finish the line-only lily. Enclose the left midrib with two long unequal curves that meet at its tip and return to the same stem attachment. Close the lower right leaf in the same way, keeping it shorter and differently bent instead of reflecting the left shape.
Add one fine secondary lengthwise line inside each blade. Run it generally beside the midrib and stop before the leaf tip. These two lines describe the long direction of the leaves; they are not hatching, side veins or tone.
Look for this before moving on: both narrow leaves close at their own stem attachments, their sizes and bends differ, and each contains its retained midrib plus exactly one finer lengthwise line.
If it goes wrong: keep the midrib and the better outside edge. Replace only the newest leaf arc, or shorten the newest inner line if it touches the contour or tip; do not add more lines to cover the error.


Common mistakes and small fixes
The throat looks like a dark knot. Keep the short directions on separate contacts. On the next attempt, leave a little white paper between the bases instead of retracing them.
The centre looks like a regular crown. Compare the six anther heights and tilts. Correct the newest pair rather than moving the pistil or thickening every filament.
The flower looks like a pinwheel. Check where each petal becomes widest and how each tip turns. Change the newest contour's reach or edge rhythm instead of adding decorative lines.
A front petal looks pasted on. Return its newest edge to an existing throat contact and preserve the overlap. Do not draw a complete shape beneath the flower.
The stem seems to grow from a petal tip. Move only its newest upper contact to the concealed base beneath the front pair. A lily in this lesson needs no pointed rose-like calyx.
The leaves look mirrored. Keep both midribs and alter only the newest contour's width or fullest point. Their different heights and directions should remain obvious.
The leaf lines look like shading. Retain the midrib and one fine lengthwise companion in each blade. Remove any repeated parallel or fishbone marks.
Practise the flower at another angle
On a fresh part of the page, repeat only Stages 1–5 with the throat slightly narrower and the upright pair leaning to one side. Shorten one side petal and let the opposite one travel farther. Keep the same centre count and six-part bloom. This tests whether the directions and overlaps agree with the new turn without adding shading or a second species.
For another way to organise several petals, try How to Draw Flowers. To practise midribs and unequal outlines, use How to Draw Leaves. The How to Draw page returns to the complete practical guide index.
Frequently Asked Questions
Does a lily have six petals?
A true Lilium flower has six similar petal-like tepals rather than six petals in the strict botanical sense. “Petal” is used in the drawing steps as the simpler location word.
How many stamens should I draw?
Draw the six shown around the taller pistil. Count each filament and attached anther as one pair before closing the petals around them.
How do I stop the flower looking like a star?
Vary the petal widths, reaches and tip turns, and preserve the front overlaps. A shared throat should organise the flower without making six equal radial arms.
Should I draw the centre or petals first?
For this exact image, place the small throat, pistil and six stamens first. Their scale is controlled by the stated page position and separate placement cue, then the petals close around them.
Do I erase the first direction lines?
No. They remain as short folds or base directions in the final drawing. Use the eraser only on the newest misplaced section.
Does this lesson include shading?
No. The accepted result is a line drawing. Clear centre attachments, overlaps and unequal contours are the finish.
Is this the same shape as a calla lily or water lily?
No. This lesson uses one open true-lily form with six petal-like tepals around a tall centre. Those other flower names lead to different silhouettes and should be treated as separate drawing subjects.
References
- NC State Extension, Lilium. View source
More DRAWING Guides

How to Draw a Rose: A Step by Step Guide

How to Draw a Tree: A Step by Step Guide

How to Draw Eyes: A Step by Step Guide

How to Draw Leaves: A Step by Step Guide

How to Draw Autumn Leaves: A Step by Step Guide

How to Draw Flowers: A Step by Step Guide

How to Draw a Lily: A Step by Step Guide

How to Draw a Sunflower: A Step by Step Guide

How to Draw a Tulip: A Step by Step Guide

How to Draw a Hibiscus: A Step by Step Guide

How to Draw a Daisy: A Step by Step Guide
