




Draw one complete rose in seven stages: an open bloom, three visible sepals, a gently curved stem, a larger leaf on the left and a smaller leaf lower on the right. The construction is designed for a beginner using an ordinary pencil. Each stage keeps the lines already in place while adding one clear construction action.
The finished drawing is an illustrative rose rather than a botanical plate or a photorealistic study. Its depth comes from clear overlaps: petals at the front hide the lower ends of petals behind them, and the calyx visibly connects the bloom to the stem.
Difficulty: beginner—careful rather than instant
Time: allow about 35–50 minutes; this is an estimate, not a timed result
Medium: HB or No. 2 graphite pencil on plain paper
Outcome: Stage 7 is the complete line drawing
Materials
- A sharpened HB or ordinary No. 2 writing pencil.
- Plain, uncoated paper in a portrait format: A4, US Letter or a similar size is fine.
- A clean eraser for small corrections.
- A scrap of paper for checking pencil pressure and placing beneath your drawing hand.
A 0.5–0.7 mm mechanical pencil can replace the wooden pencil. A kneaded eraser can replace a vinyl or plastic one. You do not need a ruler, compass, blending stump, textured paper or tracing paper.
Before you draw
Keep the page upright. The bloom will occupy most of the upper half, while the stem will descend close to the bottom edge. The first mark is deliberately small, so locate it before drawing: use the separate placement cue at x52%, y25%—52% across and 25% down the page. In plain terms, that is just right of centre and one quarter of the way down. The cue is only a location aid; do not copy its frame, crosshair or ring onto your paper.
Read the flower as overlapping groups around a small cup, not as a spiral surrounded by repeated scallops. Detailed rose-drawing instruction also treats tucked petals as a useful observation anchor. [2][3] For this line drawing, use the overlap edges and gapless attachments to describe depth while keeping the paper white.
Make inner petal seams light. Give the outside contour, front overlap edges, stem and leaf edges a slightly firmer line when each first appears. There is no planned tracing-over or broad erasing later, so compare each new shape with the image before moving on.
Darker lines are new in the current stage. Earlier marks remain visible at reduced strength.
-
1. Place the small central cup

Stage 1 of 7. Use this first permanent cup to set the rose's scale and position. 
Placement cue: x52%, y25%. The frame and marker are guides only. At the location given by the 52%-across, 25%-down cue, draw the compact cup shown in the first image. It should span roughly one tenth of the page width. Let its opening tilt slightly clockwise rather than sitting level. Inside it, add the small hook that opens towards the upper left and the short inner fold beside it. Keep all three lines light; they are part of the finished rose, not temporary construction.
Look for this before moving on: The cup is small, slightly tilted and a little right of the page centre. The hook and fold sit inside it, and there is generous room above, to both sides and all the way to the bottom for the rest of the rose.
If it goes wrong: If the cup is large, low or circular like a target, erase only that small group of lines and place it again. Do not add a surrounding oval or grid to compensate.
-
2. Build the three-part middle cup
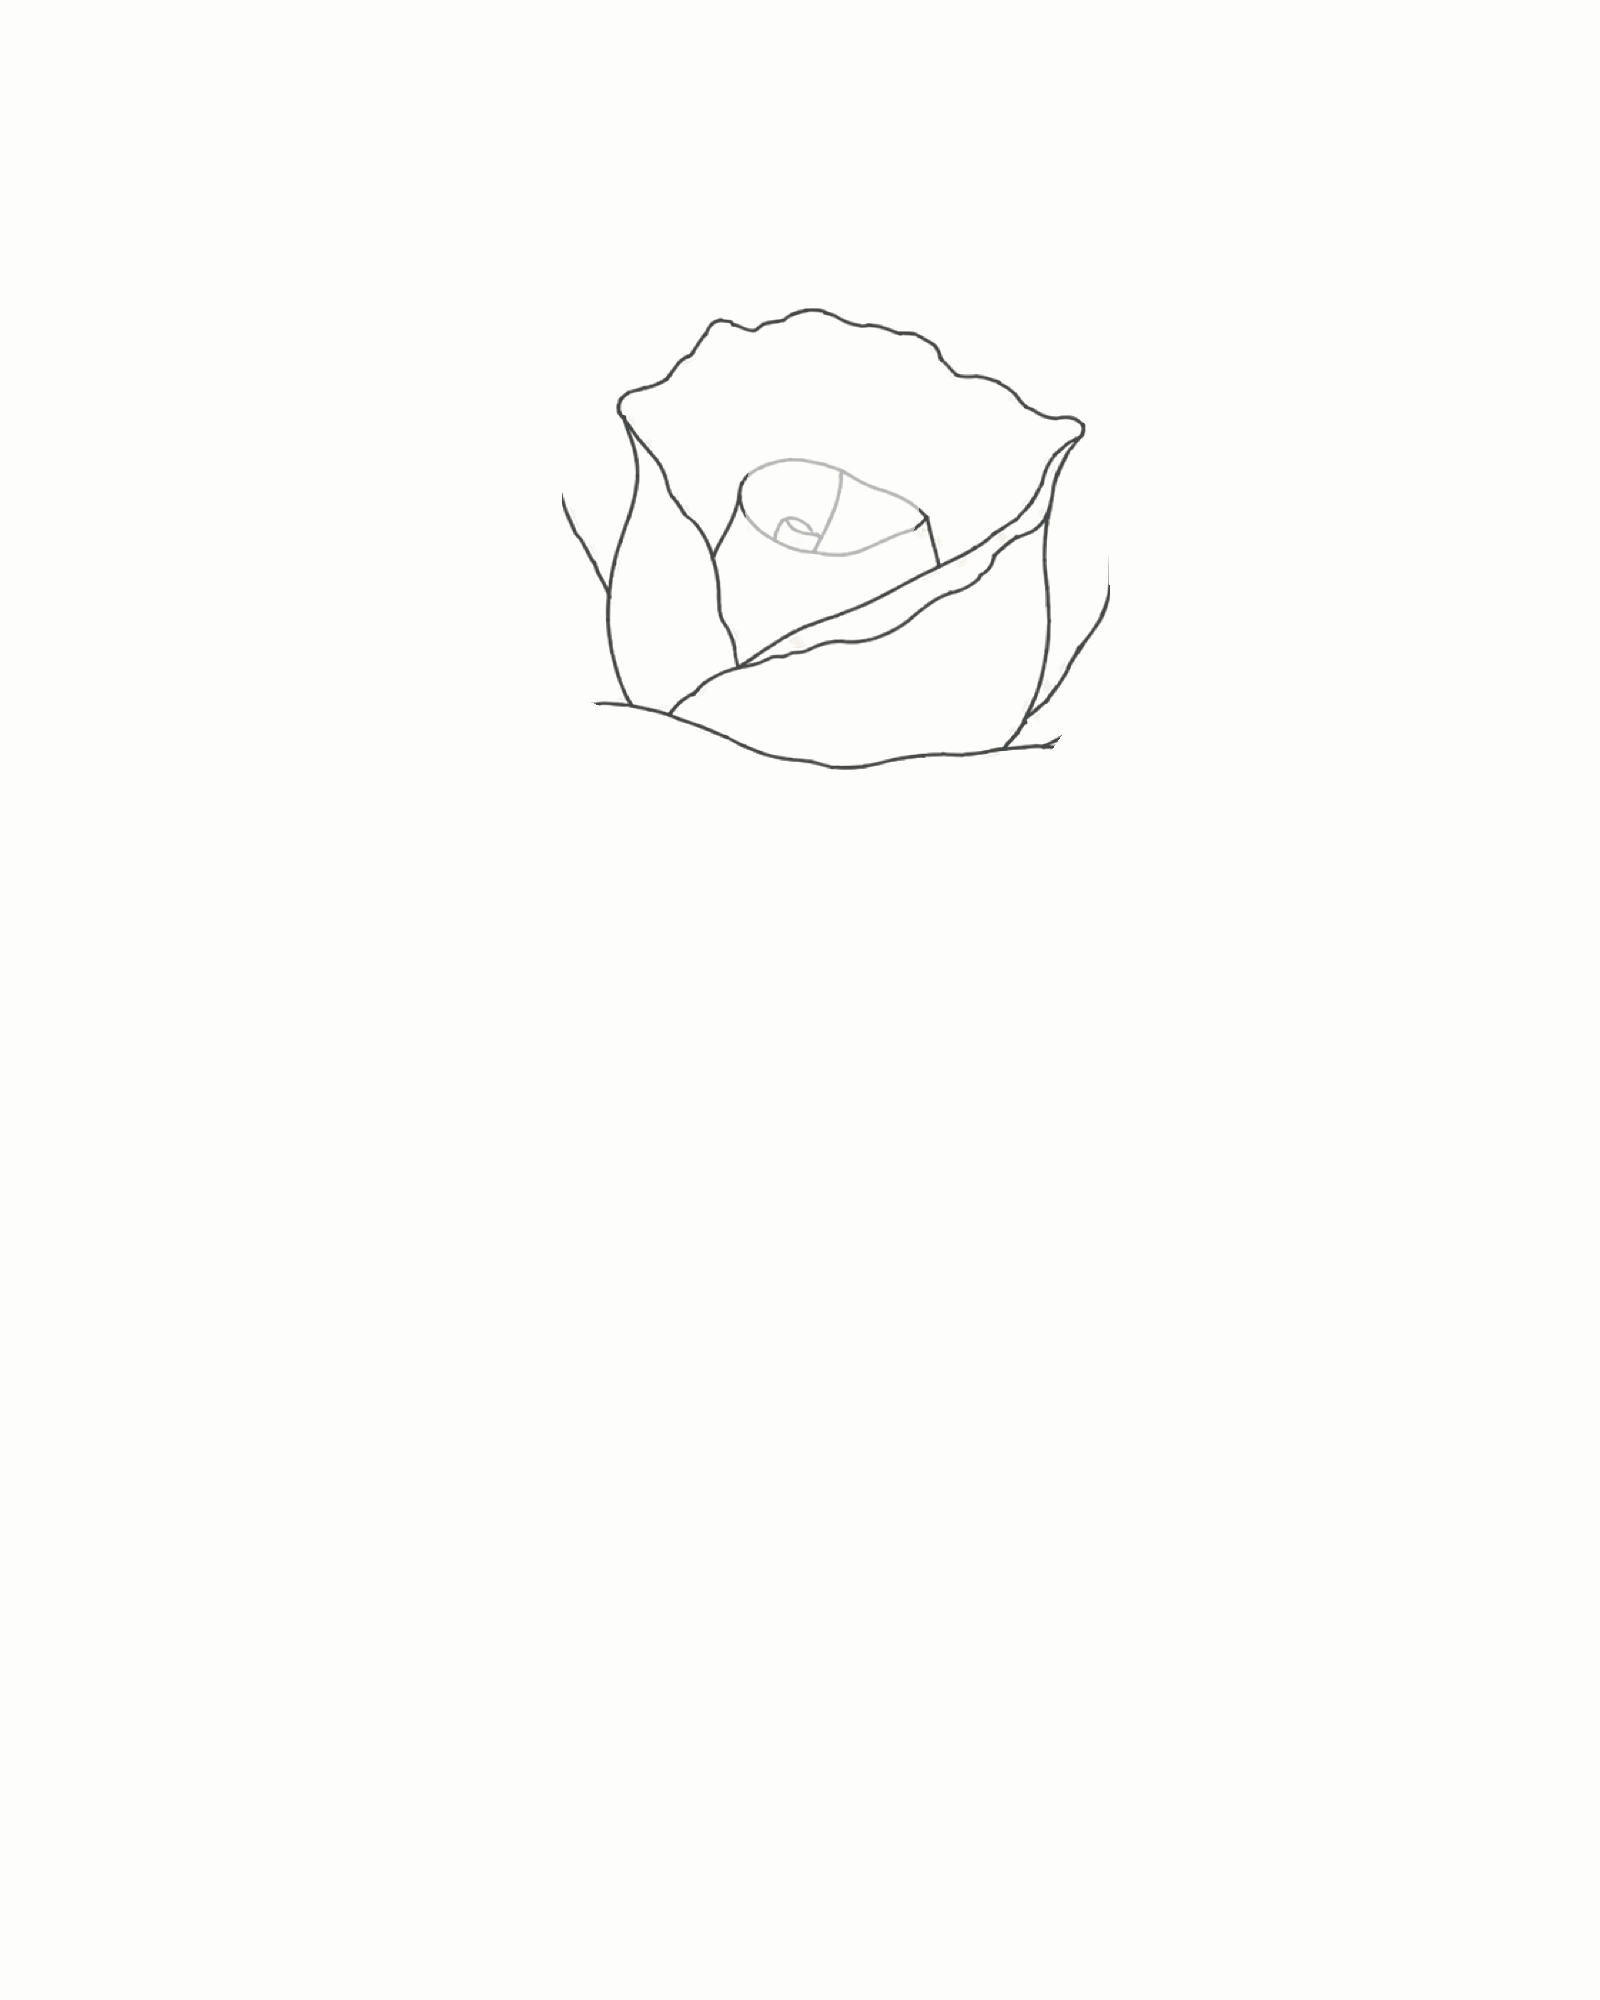
Stage 2 of 7. Add the left wall, taller right wall and front cradle in that order. - Left wall
- Right wall
- Front cradle
Keep the central cup and work around it in this order. First draw the left wall, curving out and returning towards the cup. Second add the right wall, allowing it to rise slightly higher so the two sides do not mirror one another. Third draw the shallow front cradle from left to right below the core. Its upper edge crosses the lower ends of both walls, which makes the cradle read as the petal in front. Complete all three before comparing your drawing with the second image.
Use light lines for the interior seams and a modestly firmer line for the cradle edge where it hides the two lower joins. Keep the surrounding paper clear.
Look for this before moving on: The original hook remains visible. The left wall, taller right wall and front cradle read together as one open cup, and neither wall has an exposed lower end beyond the cradle.
If it goes wrong: If the walls form a heart or a closed ring, shorten or tilt just one wall. If the cradle hides the core, erase only its upper edge and replace it lower down so it crosses the walls near their lower ends.
-
3. Add the three outer petals
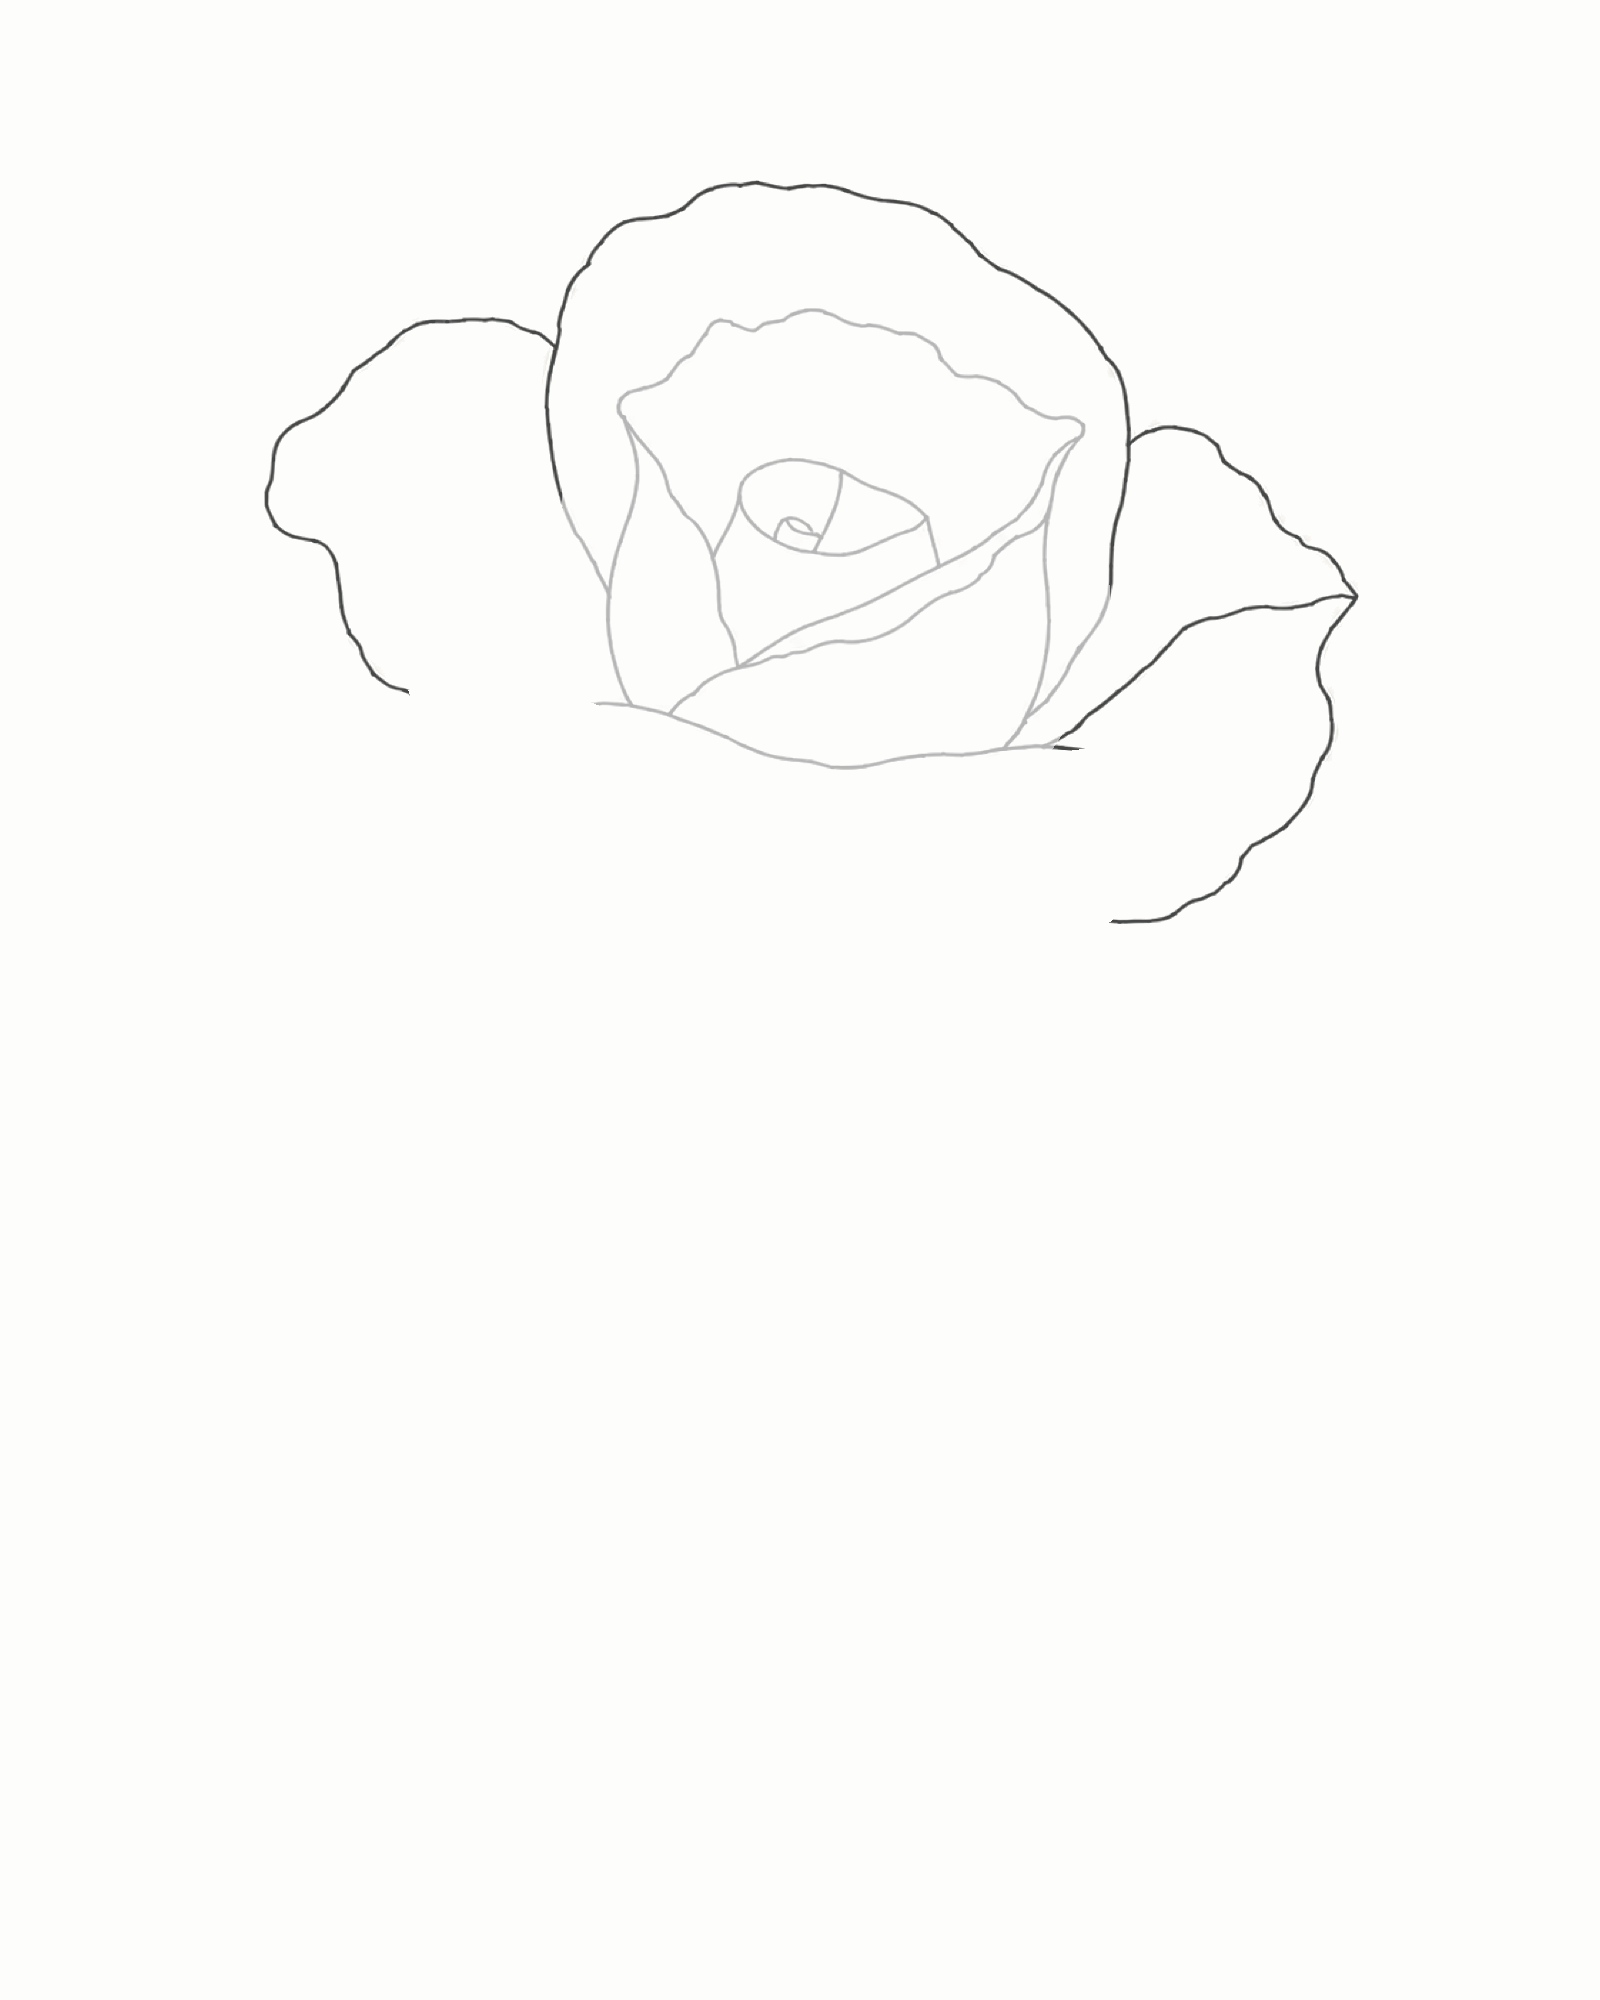
Stage 3 of 7. Add three unequal outer petals and leave their lower endpoints ready for one later overlap. Leave the middle cup untouched. Add one broad top-back petal rising behind it. Then draw the left outer petal, making it a little broader, followed by the right outer petal, which sits slightly lower. The three shapes should be individually readable rather than forming a symmetrical clover.
Finish the lower end of each new petal inside the space that the front petal will cover in Stage 4. For the moment those three short ends remain open; this is intentional. They should point into the lower central area of the bloom, not finish out in the empty background.
Look for this before moving on: You can trace one top-back, one left and one right outer petal. They sit behind the unchanged middle cup, the left and right sides are unequal, and all three open ends gather within the future front-petal area.
If it goes wrong: If one outer edge crosses an earlier petal or ends outside the lower central area, erase only that edge. Replace it behind the middle cup and stop its lower end nearer the other two; keep the correctly placed petals.
-
4. Close the bloom with the front petal
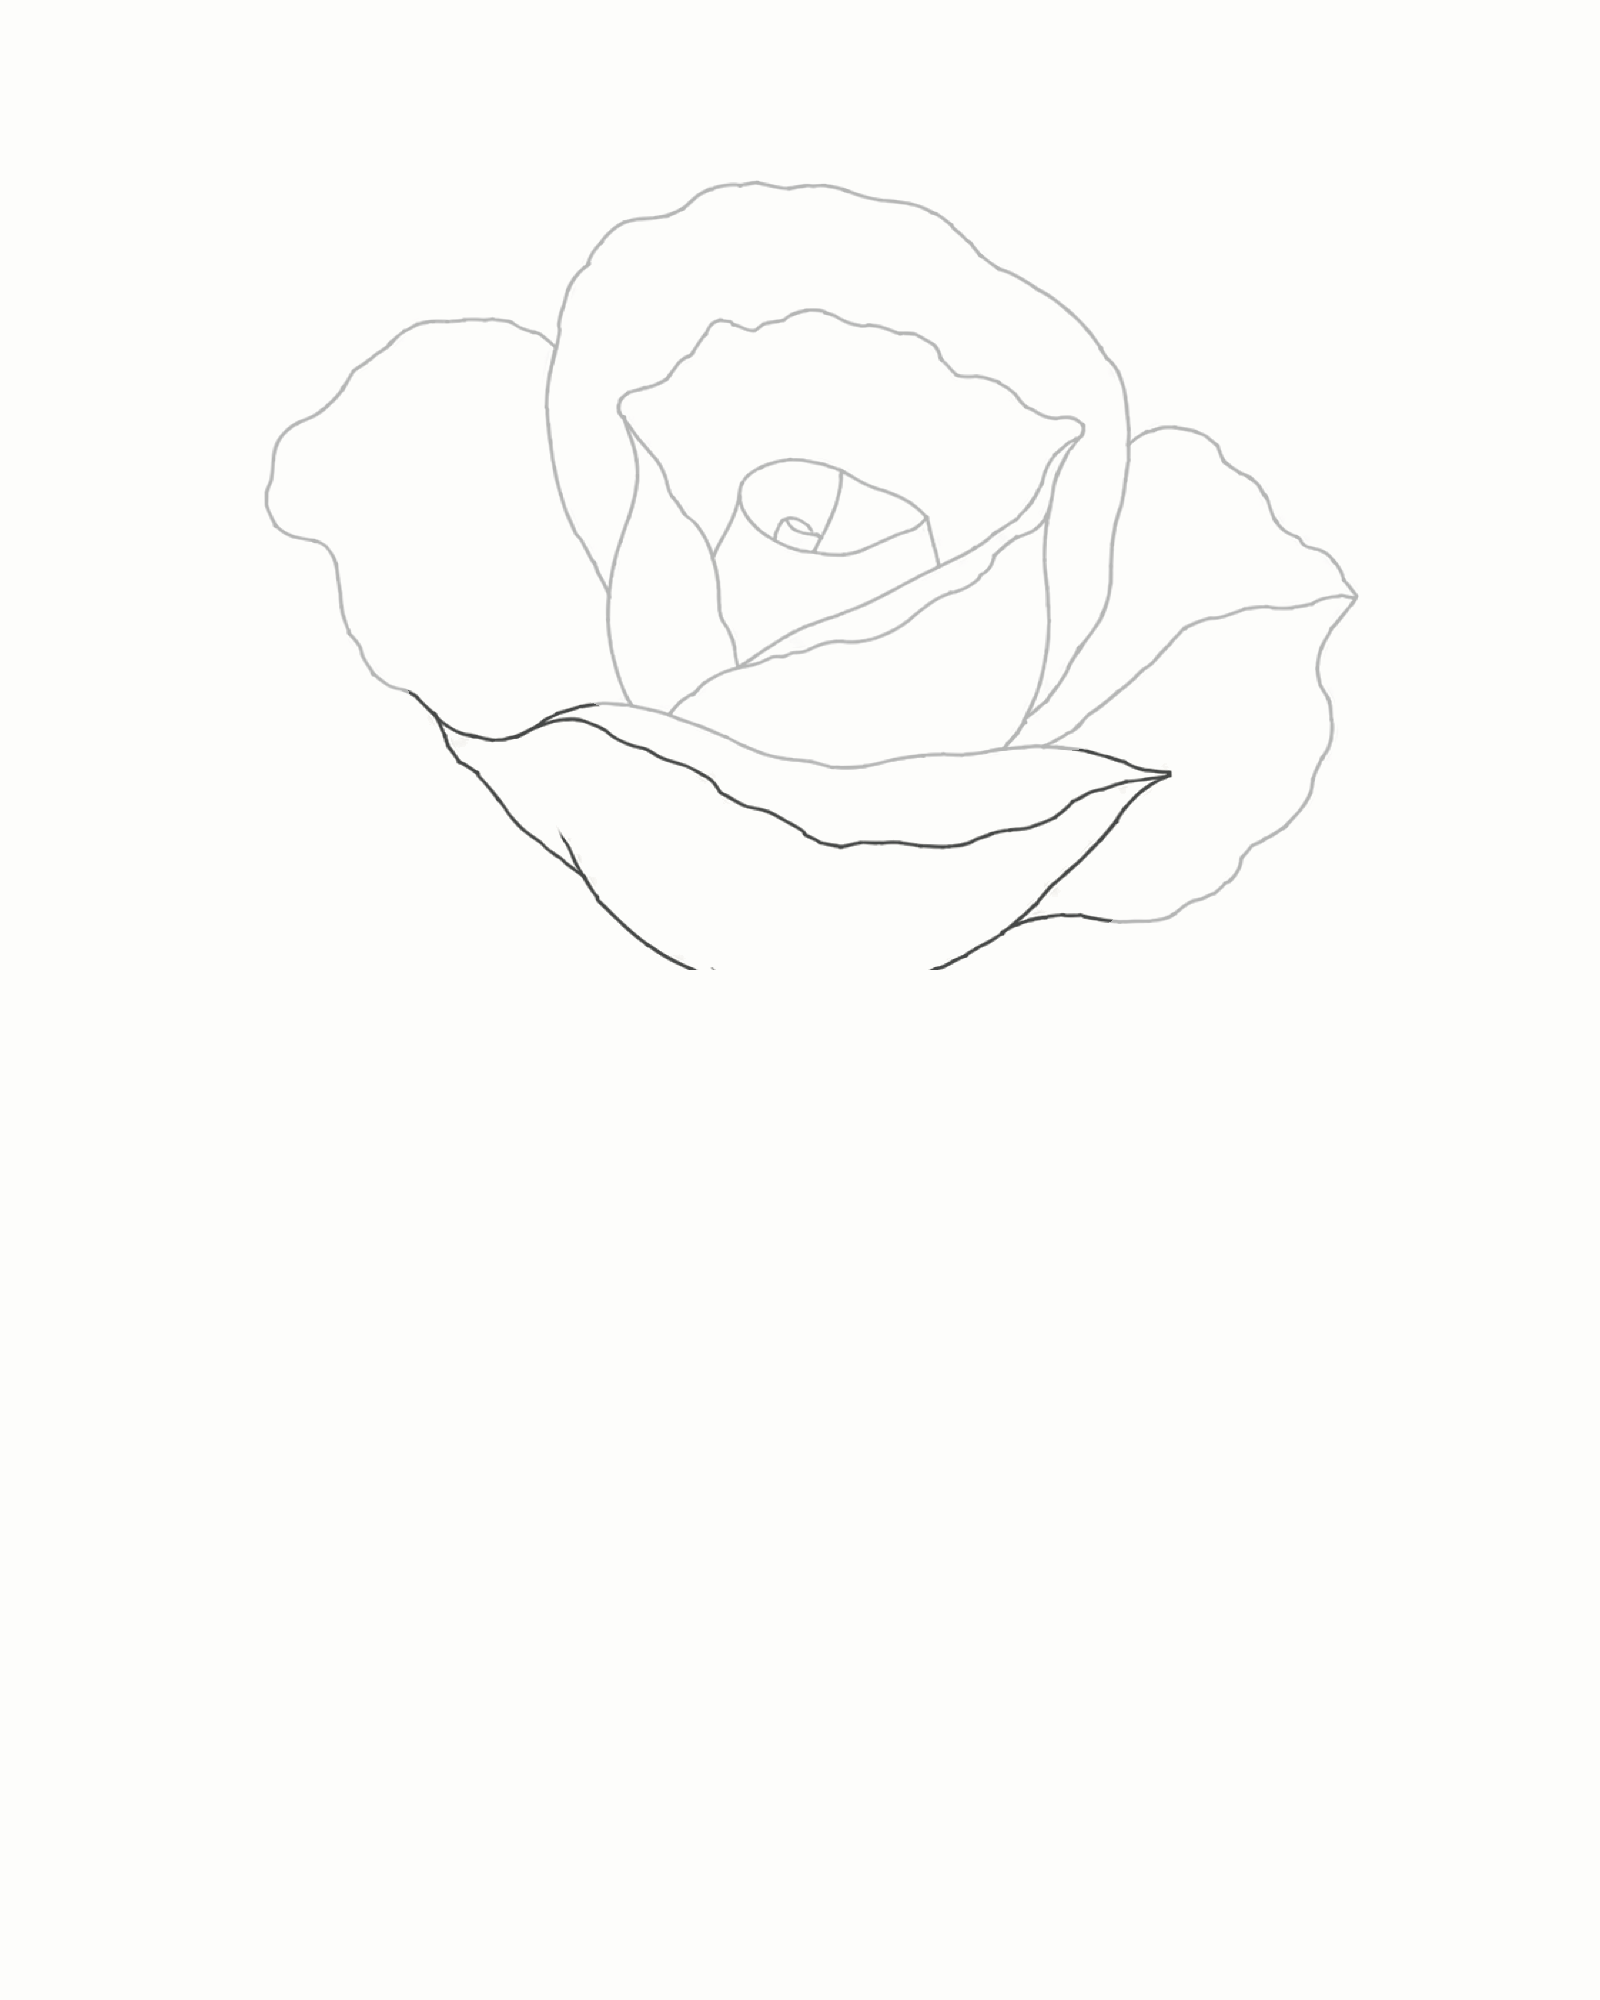
Stage 4 of 7. One broad front petal closes the bloom and covers all three planned endpoints. Draw one broad front basal petal across the lower third of the bloom. Begin near the lower-left overlap, follow the irregular upper rim from left to right, then bow the outside edge down around the base and return it towards the lower-right overlap. This petal sits in front of the three open ends from Stage 3 and explains where they disappear.
Keep the two shoulders unequal: one may sit slightly higher and one side may be flatter. Narrow the petal gently at the lower centre where the calyx will attach next. Avoid a perfect semicircle.
Look for this before moving on: The bloom now has a closed silhouette. Every previously open petal end is covered by the new front edge, while the earlier petals and central cup remain unchanged and easy to follow.
If it goes wrong: If an open end still shows, adjust only the nearest end of the front petal so it overlaps that line. If the petal looks pasted on or bowl-shaped, flatten one side or raise the opposite shoulder without altering the petals behind it.
-
5. Connect the calyx and S-curve stem
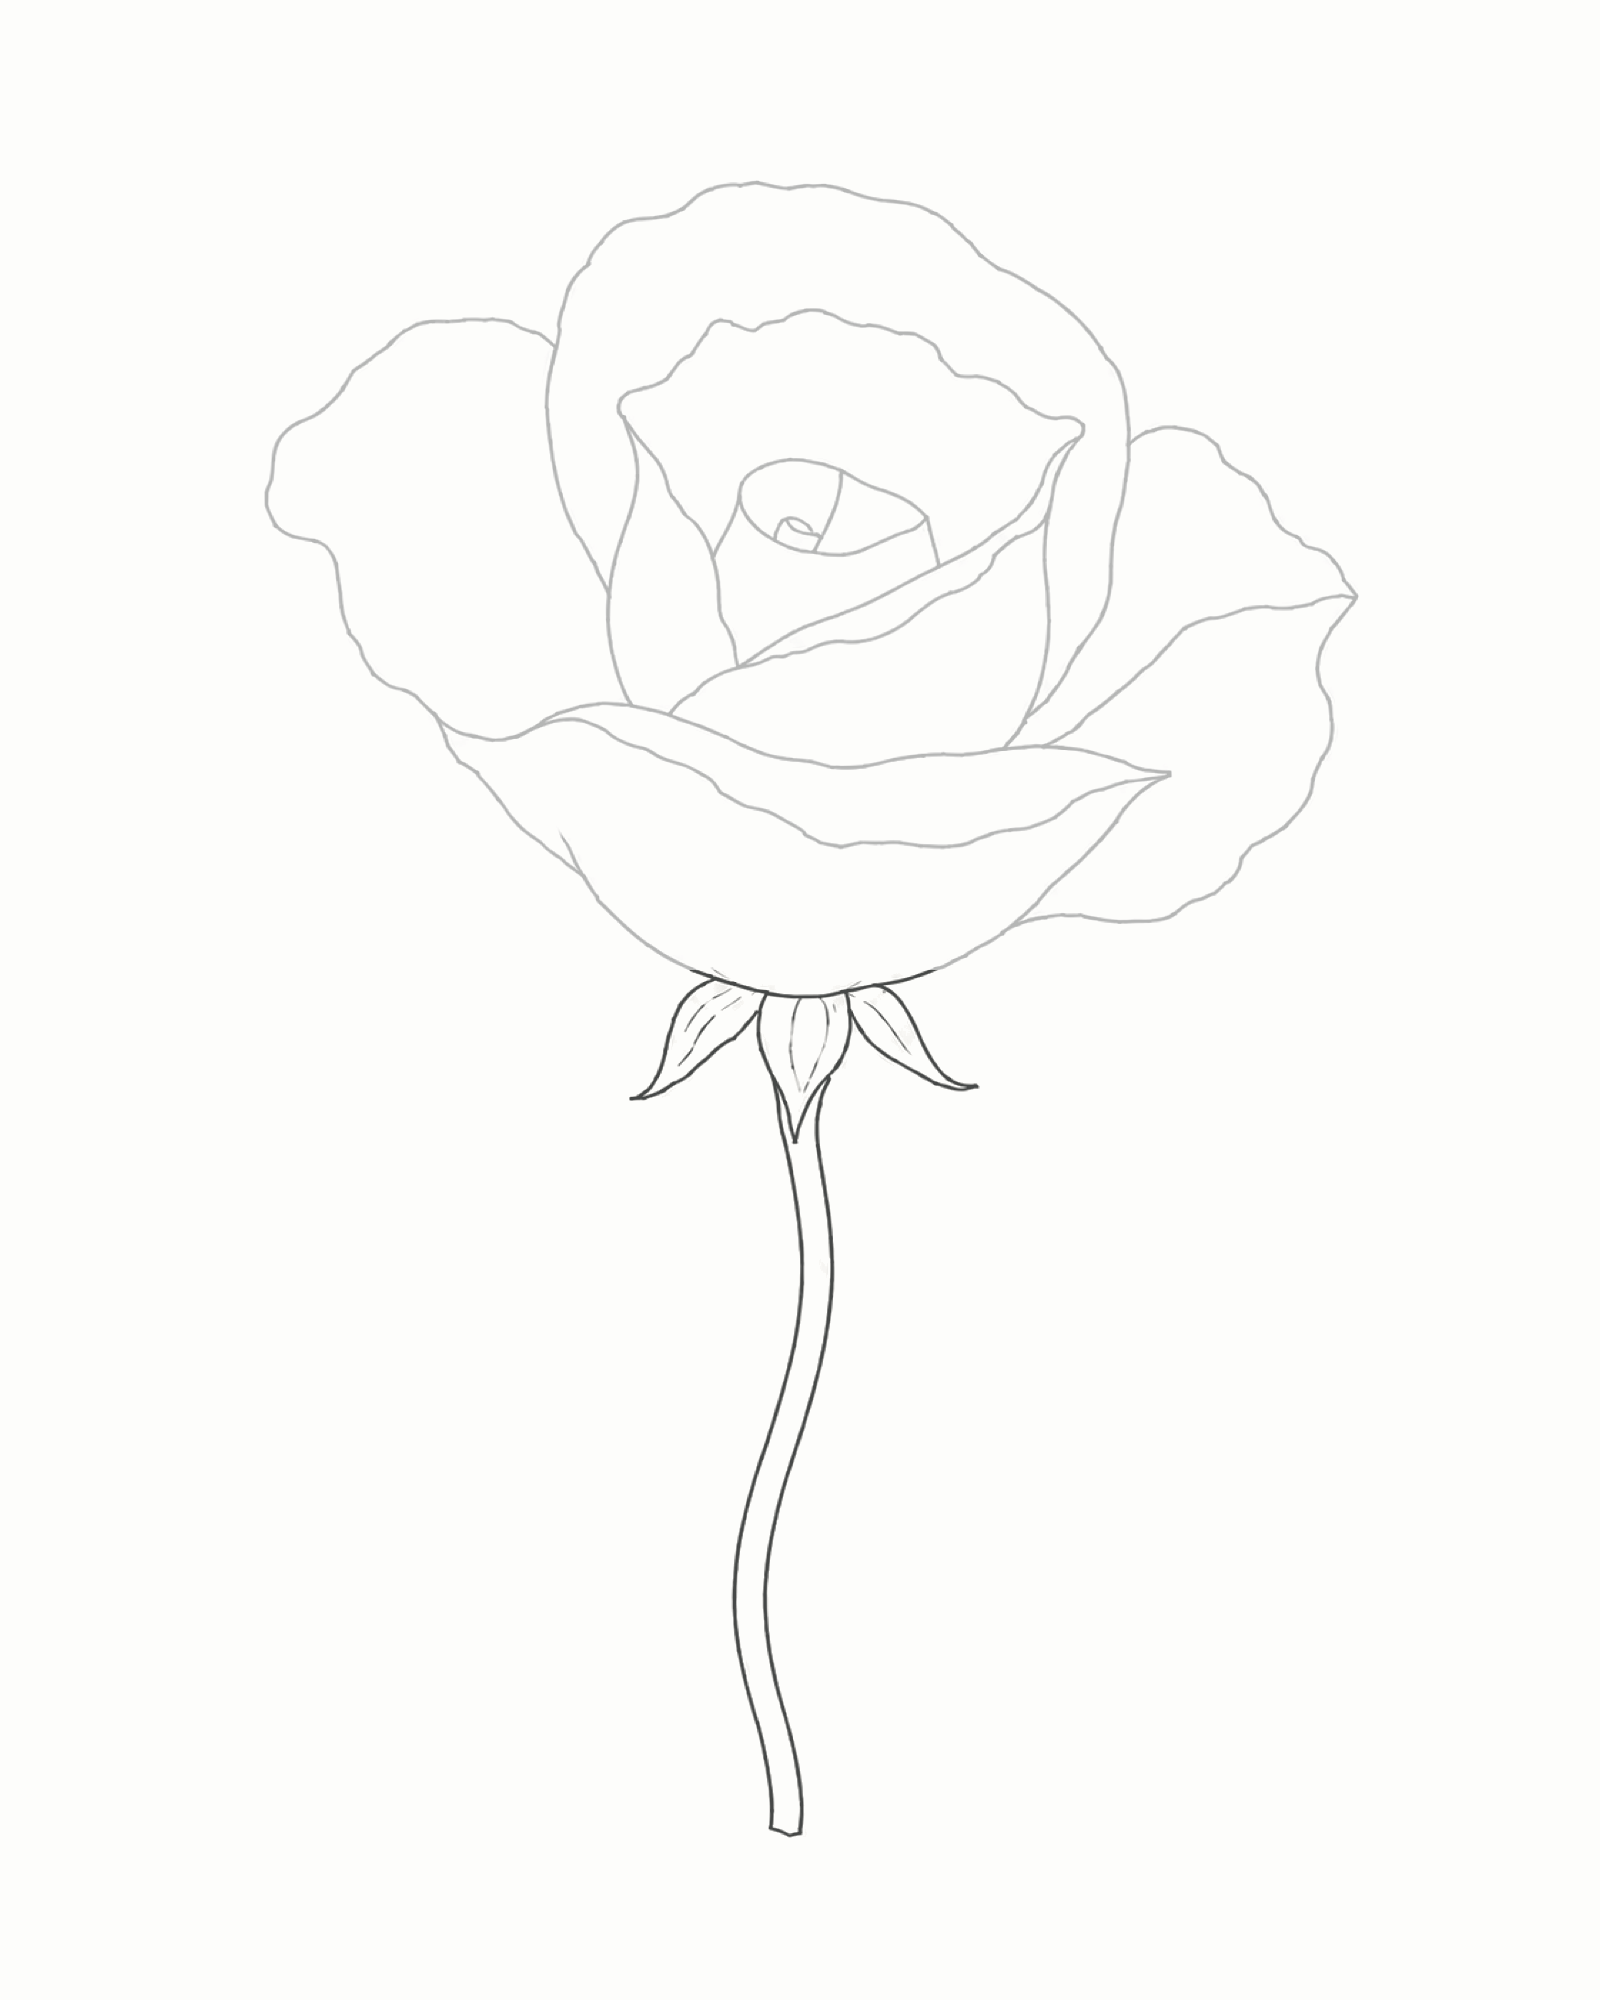
Stage 5 of 7. Three sepals connect the closed bloom to one continuous S-curve stem. Under the centre of the bloom, add the small receptacle and three visible sepals: one central sepal pointing down and two shorter sepals opening to the sides. They emerge from behind the front petal. Start the stem behind the central downward sepal, then carry its two edges towards the bottom of the page as one gentle S-curve. Let it taper slightly and stop inside the lower margin.
Draw the sepal lines lightly to medium and set the two stem edges at their final, slightly firmer weight. Do not add a centreline, leaves, thorns or surface detail.
Look for this before moving on: There are exactly three readable sepals. The bloom, receptacle, central sepal and stem form one gapless connection, and the stem bends gently rather than ending in a hook or leaving the page.
If it goes wrong: If the stem seems to sprout from the face of the front petal or the junction floats, erase only the first 5–10 mm of the faulty join. Reconnect it from behind the central sepal and preserve the good part of the stem below.
-
6. Attach the larger left leaf
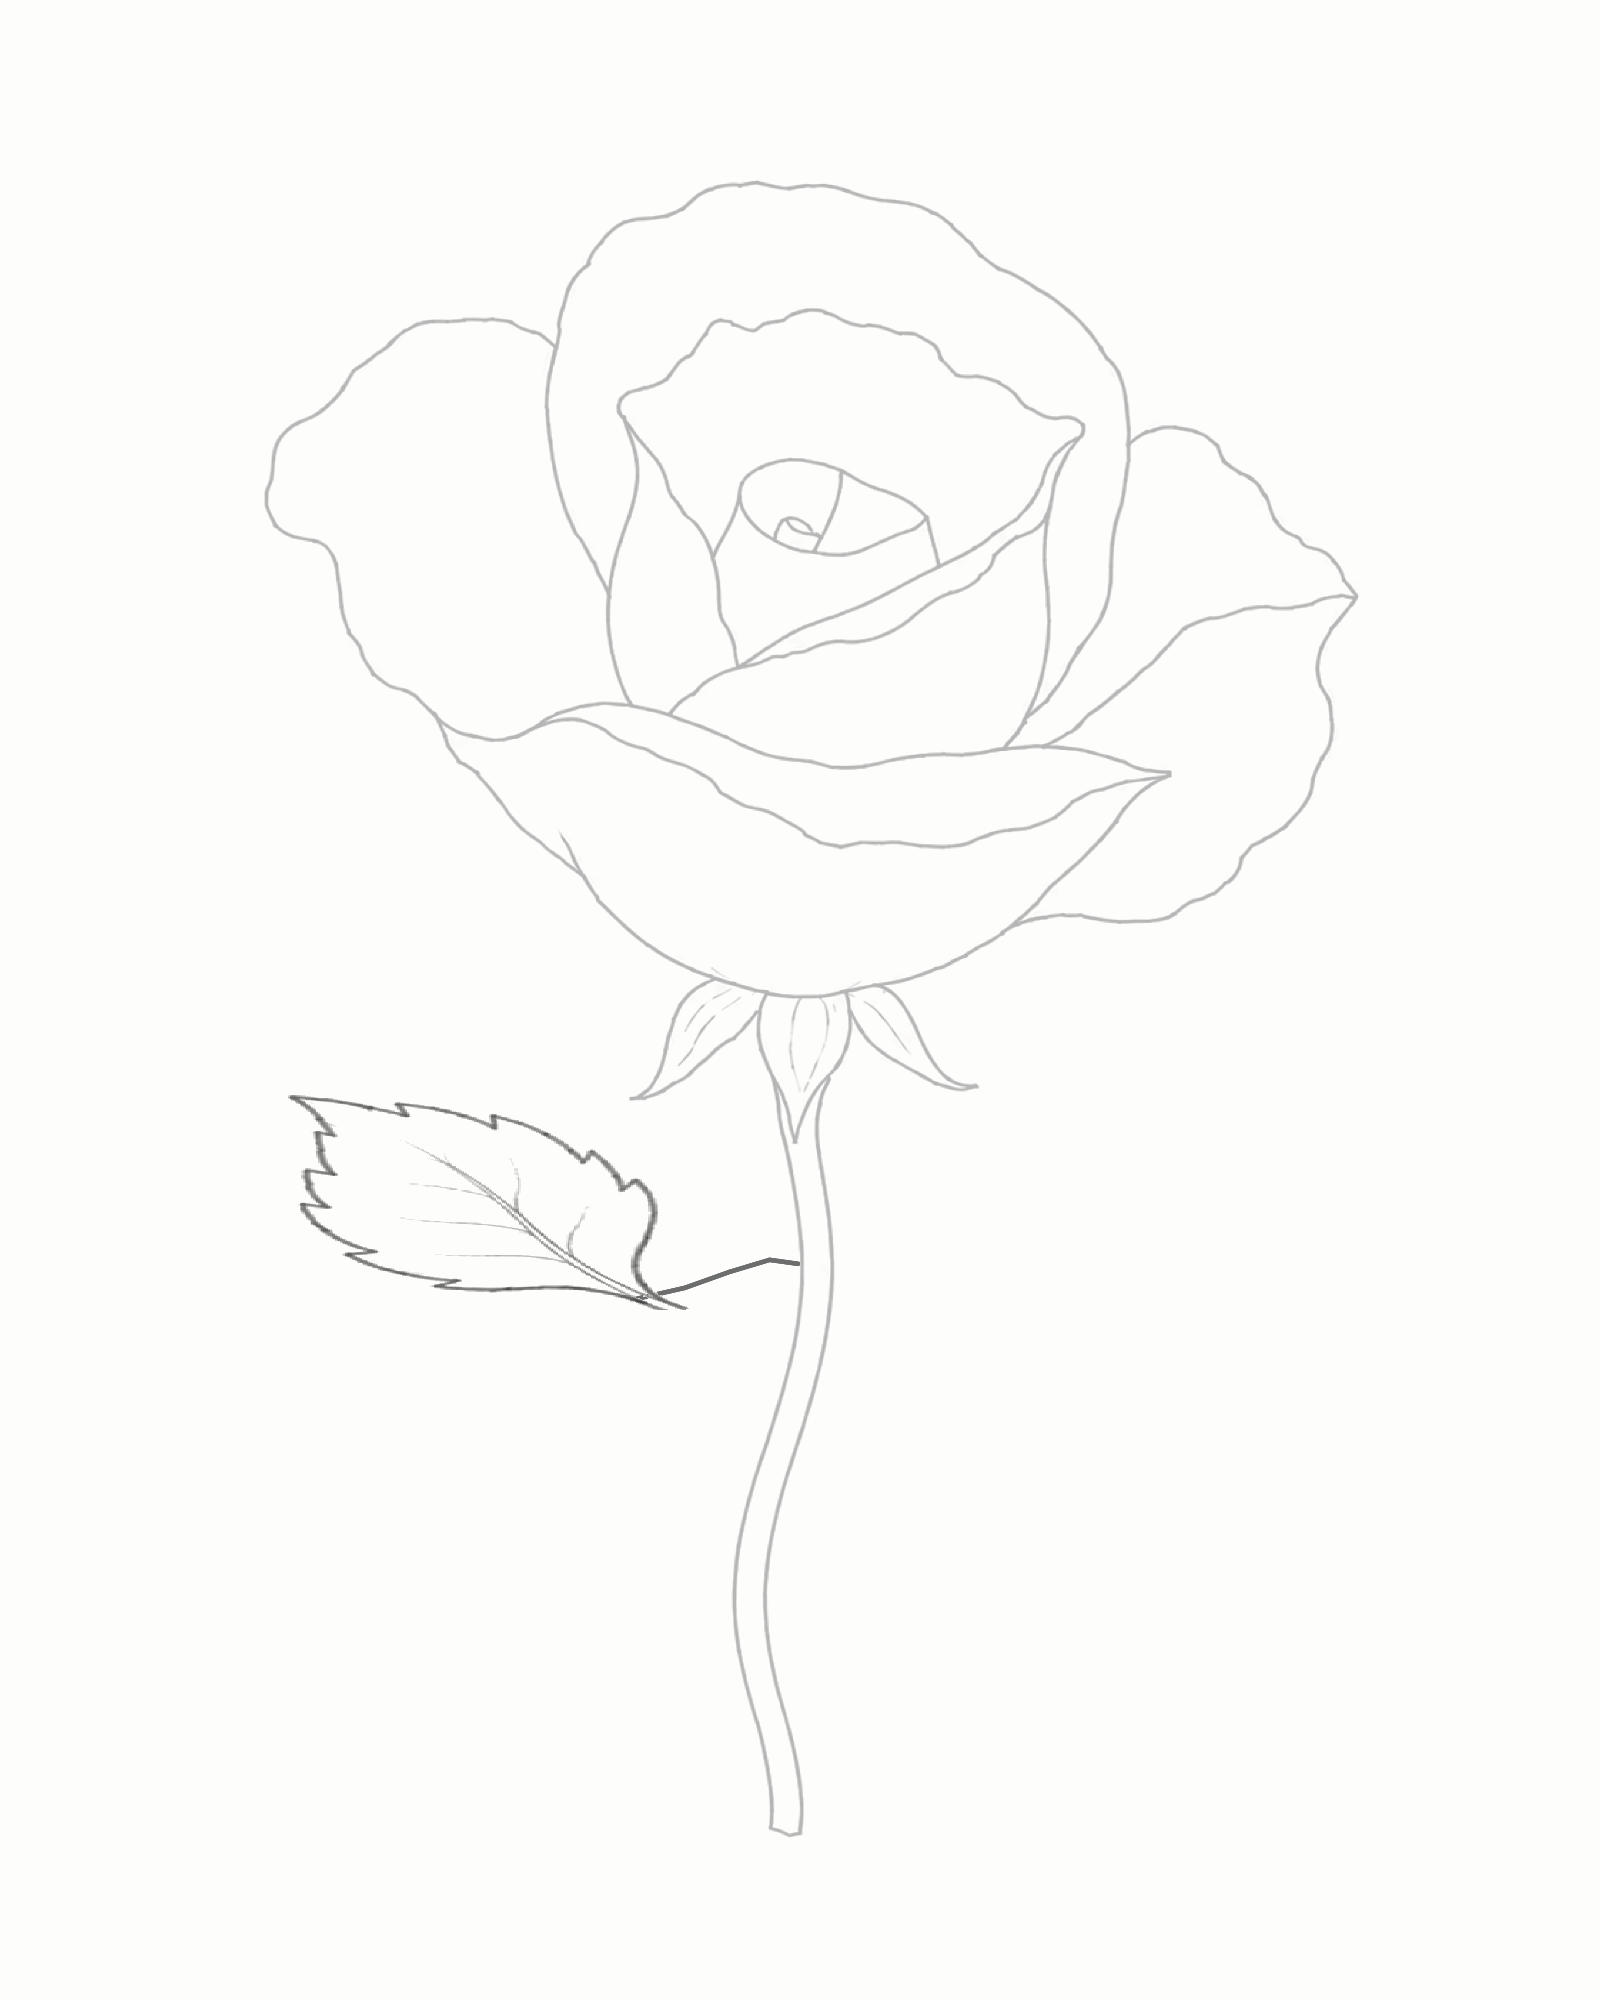
Stage 6 of 7. The larger left leaf grows from a narrow stem junction into its centre vein. About two thirds of the way down from the bloom, draw a short stalk angling up and left from the left edge of the stem. Join it as a narrow wedge, not a blunt T. Continue the stalk directly into the leaf’s centre vein, then build a long blade around it, pointing left and slightly upward. Give the edge restrained, uneven serrations and add four to six light side veins on each side; stop those veins before they touch the outline.
The stalk is slightly firmer than the veins because it is an attachment landmark rather than a tonal mark. Leave the paper beside it clear.
Look for this before moving on: The larger leaf is contained inside the page and visibly grows from the stem through one continuous stalk and centre vein. Its serrations vary rather than repeating like saw teeth.
If it goes wrong: If the stalk leaves a gap or meets the stem as a crossbar, erase only its last few millimetres and redraw the tapered wedge into the stem. Shorten any side vein that reaches the edge; keep the blade and stem intact.
-
7. Add the smaller lower-right leaf
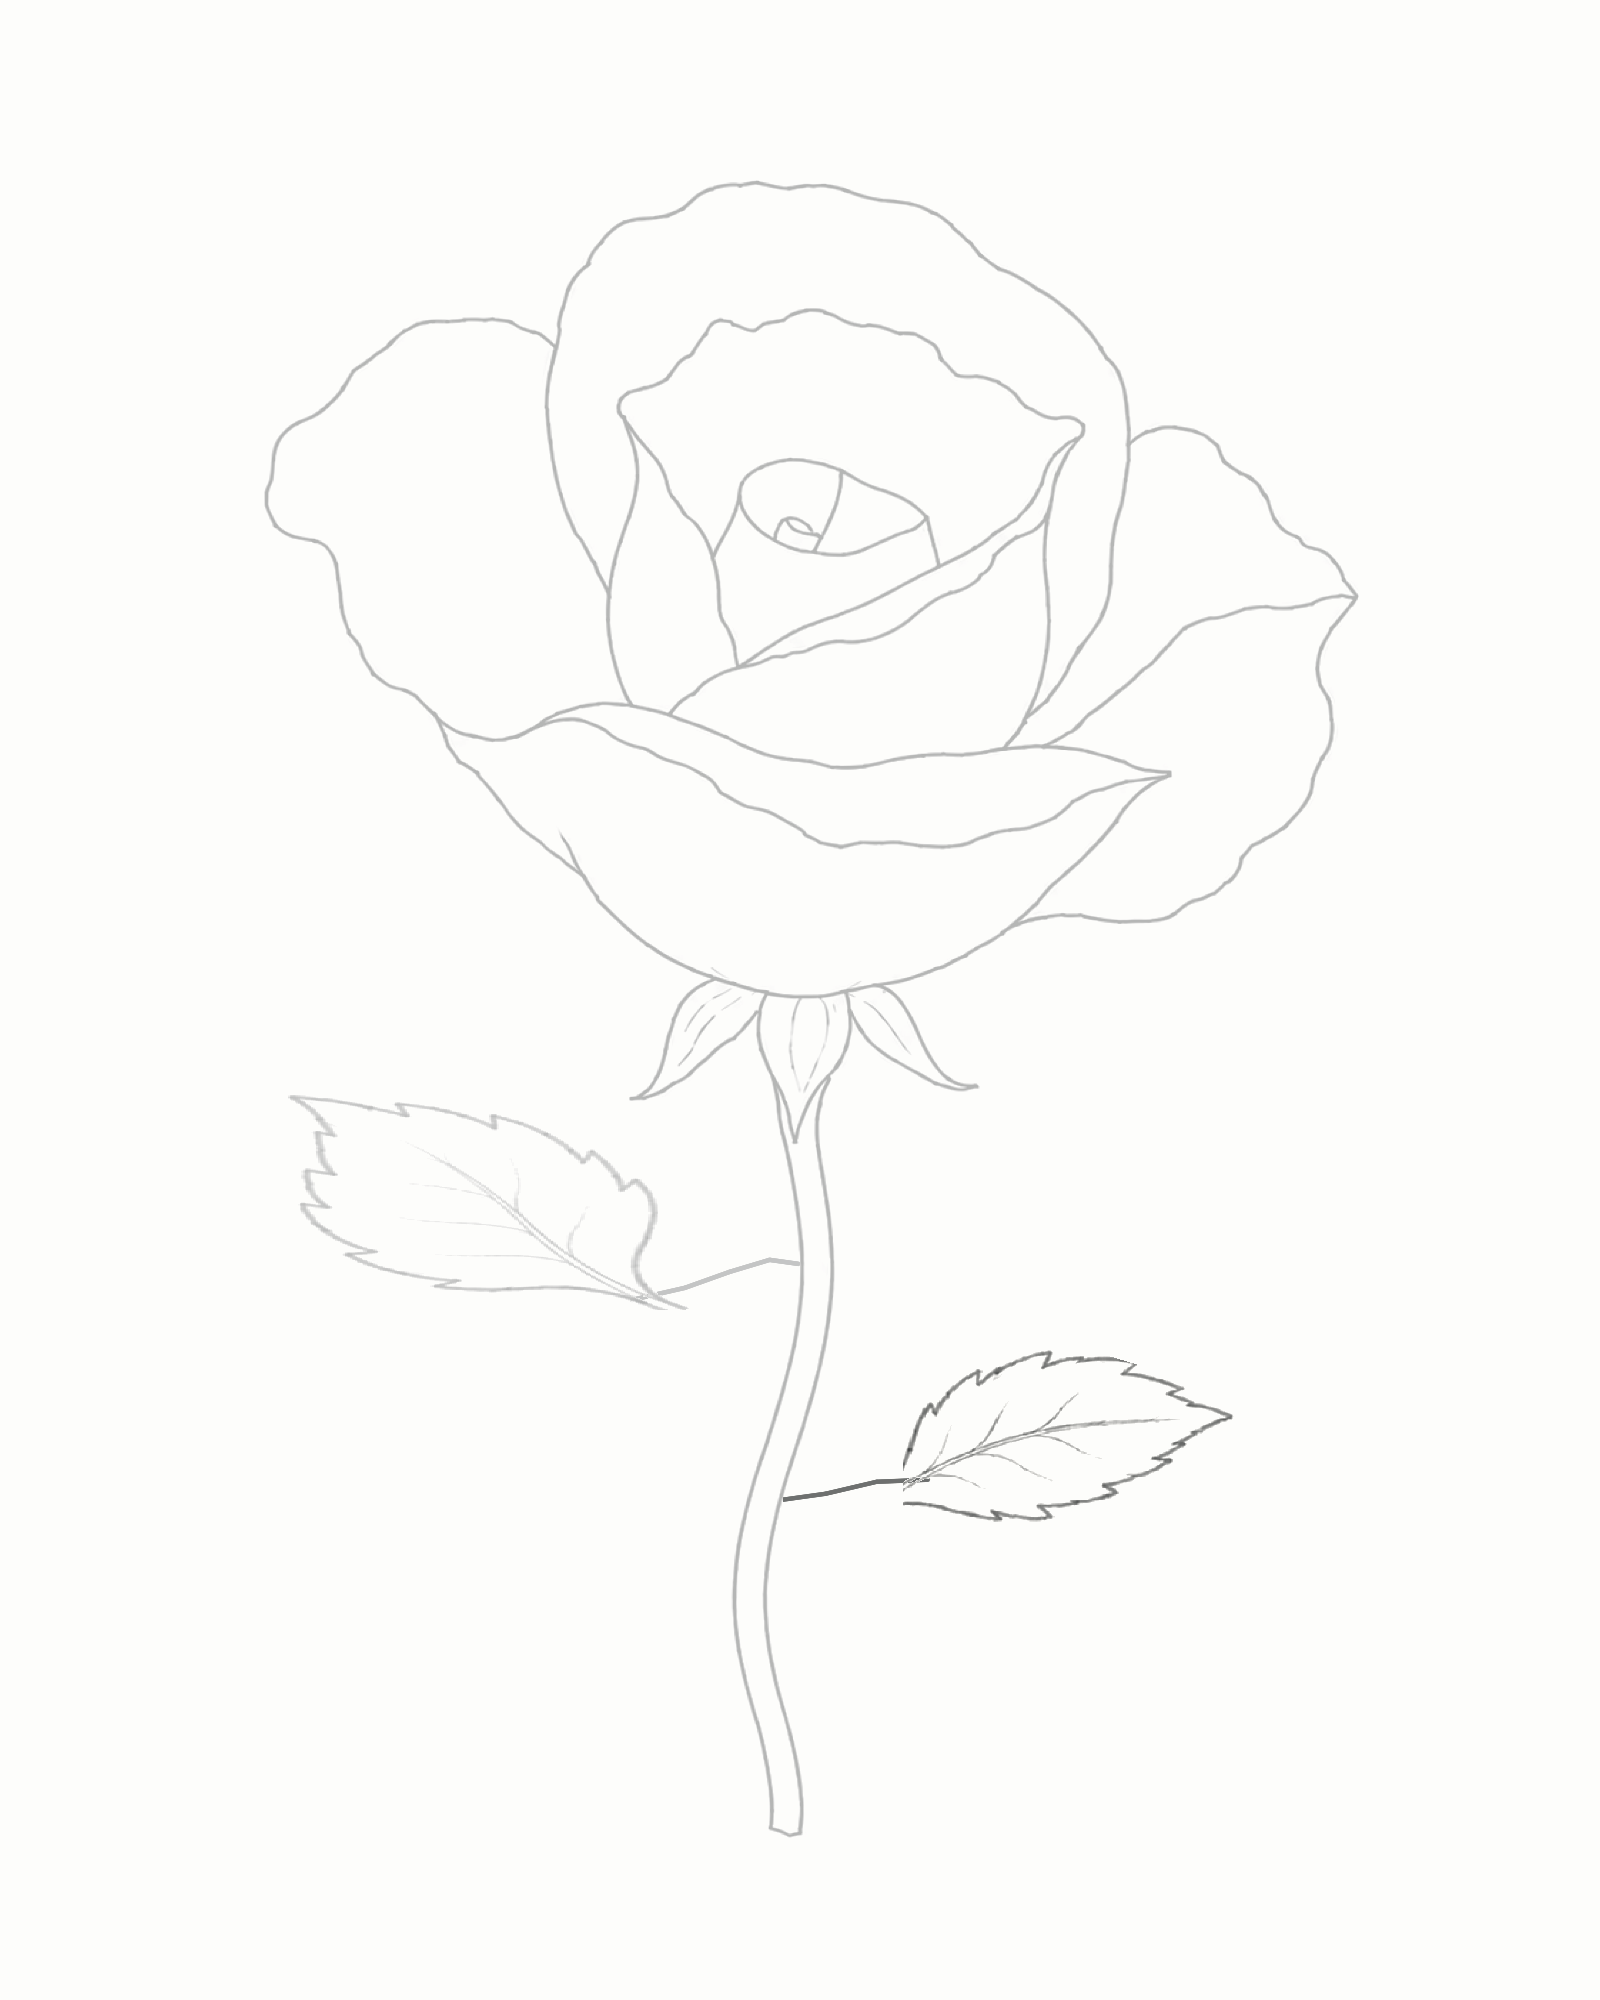
Stage 7 of 7. The smaller, lower right leaf completes the rose without mirroring the left leaf. Keep the left leaf and stem as they are. Lower down, attach a shorter stalk to the right edge of the stem and angle it up and right. Carry that stalk into a centre vein, then draw a smaller, lower leaf around it. Use a different angle and outline from the left leaf, with restrained irregular serrations and four or five light veins on each side.
As before, the firmer stalk is an attachment landmark rather than a band of shadow. The blade, not the stalk, supplies most of the visible leaf shape.
Look for this before moving on: Both leaves have gapless connections, but they do not mirror each other. The right leaf is smaller, lower and differently angled. The rose is now complete as a line drawing.
If it goes wrong: If the right leaf matches the left or crowds the page edge, shorten only its stalk and blade and lower the angle. If the junction is detached, rebuild just the last part of the stalk while preserving the stem and the completed left leaf.


Common mistakes and small fixes
- The centre looks like a target. Keep the hook tucked within a tilted cup; avoid adding rings around it.
- The bloom becomes too regular. Compare left and right widths and heights. Change one faulty outer edge rather than roughening every petal.
- A Stage 3 endpoint still dangles. Extend the nearest end of the Stage 4 front petal just enough to cover it.
- The stem looks pasted beneath the bloom. Check that it starts behind the central downward sepal and that no white gap cuts through the junction.
- A leaf looks pinned onto the stem. Rebuild only the short stalk as a tapered wedge, keeping its centre vein continuous into the blade.
A useful practice variation
On the scrap paper, repeat Stages 1–4 at half size with the cup tilted slightly the other way. Keep the same overlap logic—middle walls and cradle, three outer petals, then one front closing petal—but swap which side is broader and which sits lower. This isolates the main skill of the lesson without requiring another full stem-and-leaf drawing.
A short art-history connection
Before photography, botanical illustrations helped printed works record plant forms. Their useful lesson here is structural clarity: show how the bloom, sepals, stem and foliage connect before adding surface detail. The Rose Drawings gallery includes a botanical rose by Pierre-Joseph Redouté alongside other historical approaches to the subject. [1]
Frequently Asked Questions
What is the easiest way to start a rose drawing?
Start with a small tilted cup, not a large spiral or the outside of the bloom. Its position and size leave room for the outer petals and the full stem.
Do I need special drawing pencils?
No. An HB or No. 2 pencil can make every line in this lesson.
Should I draw guidelines and erase them later?
No global oval, axis or grid is needed for this sequence. The first cup is a final mark. Use the separate 52%-across, 25%-down cue for placement, and erase only a local mistake when necessary.
How many petals should I draw?
Follow the visible groups rather than chasing a botanical petal count: the central cup, the three-part middle cup, three outer petals and one broad front petal. Their overlap order matters more than the total.
How do I make the rose look less flat?
Keep front edges in front of the lines they cover, connect the calyx and leaves without gaps, and use slightly firmer lines only for the silhouette, front overlaps and attachment landmarks.
References
- Rose Drawings, The History of Art — View source.
- How to Draw a Rose, Draw Botanical — View source.
- How to Draw a Rose, Art Is Fun — View source.
More DRAWING Guides

How to Draw a Rose: A Step by Step Guide
How to Draw a Tree Step by Step
Coming soon
How to Draw Eyes: A Step by Step Guide

How to Draw Leaves: A Step by Step Guide

How to Draw Autumn Leaves: A Step by Step Guide

How to Draw Flowers: A Step by Step Guide

How to Draw a Lily: A Step by Step Guide

How to Draw a Sunflower: A Step by Step Guide

How to Draw a Tulip: A Step by Step Guide

How to Draw a Hibiscus: A Step by Step Guide

How to Draw a Daisy: A Step by Step Guide
