



Draw one complete perched bird
Draw a small garden bird perched securely on a slim branch in eight permanent line stages. You will build the head and body first, attach one folded wing and two unequal tail feathers, then give the bird a convincing grip before organising a few feather groups. The finished result is a natural, species-neutral pencil drawing with only eight light hatch marks.
Difficulty: Beginner; the feet meeting the branch need the closest attention
Time: Allow 30–45 minutes. This is an untested estimate, so pause whenever a junction needs comparing rather than treating it as a speed target.
Medium: Mainly HB pencil, with an optional 2B for the pupil and final eight hatches
This is a calm left-facing bird seen mostly from the side, with just enough of the breast visible to make the pose feel rounded. It is not meant to be a particular species. Keeping the markings neutral lets you concentrate on the relationships that make many small perched birds believable: a beak tied to the eye line, a smooth head-to-back connection, a folded wing anchored at the shoulder, a shared tail root and toes that curl around their support.
The near wing is the only wing shown. One leg and foot are more exposed, while the narrower far grip sits a little behind and to the right. The branch falls gently from left to right and finishes before the tail, so those forms never collide.
Every line you see in a stage remains in all the stages that follow. There are no pale construction circles to erase and no later pass that retraces an earlier outline. If the newest curve misses its target, repair that small interval while the reliable earlier drawing stays in place.
Materials
- One sharpened HB pencil or an ordinary No. 2 school pencil.
- A 2B pencil for the pupil and the final hatch marks. If you have only an HB, press a little more firmly for those small accents.
- Plain white printer paper, cartridge paper or an unlined sketchbook page.
- A putty eraser, or a clean corner of a standard eraser, for lifting only the latest misplaced line.
- A pencil sharpener.
- Optional scrap paper for rehearsing one toe curve before Stage 6.
A ruler, compass, blending stump, coloured pencil, marker and tracing paper are unnecessary. Smooth paper helps the sparse contours stay clean, but there is no need to buy specialist drawing paper for this exercise.
Before you draw
Turn the paper vertically and imagine a 4:5 frame. The head belongs high and left of centre, around 38% across the drawing area and 28% down. Leave a generous margin in front of the beak and much more room to the lower right for the body and tail. The separate placement cue beside Stage 1 marks this position; the optional grid is a page-viewing aid, not something to draw and erase.
Look at the final image before making a mark. Notice the continuous descent from crown through nape and back, the fuller breast beneath the head, and the white interval between the branch end and the tail. Observational bird-drawing guidance commonly recommends settling the large pose before feather detail, while feather directions tend to flow towards the tail.[1][2] This lesson follows that useful principle but limits the surface information to a few countable lines.
Use a light, clear touch for the contours. Keep internal feather divisions a little quieter. The imagined light arrives from the upper left; only the final eight hatches respond to it, and the drawing never develops a filled shadow or textured coat.
1. Place the head, beak and eye
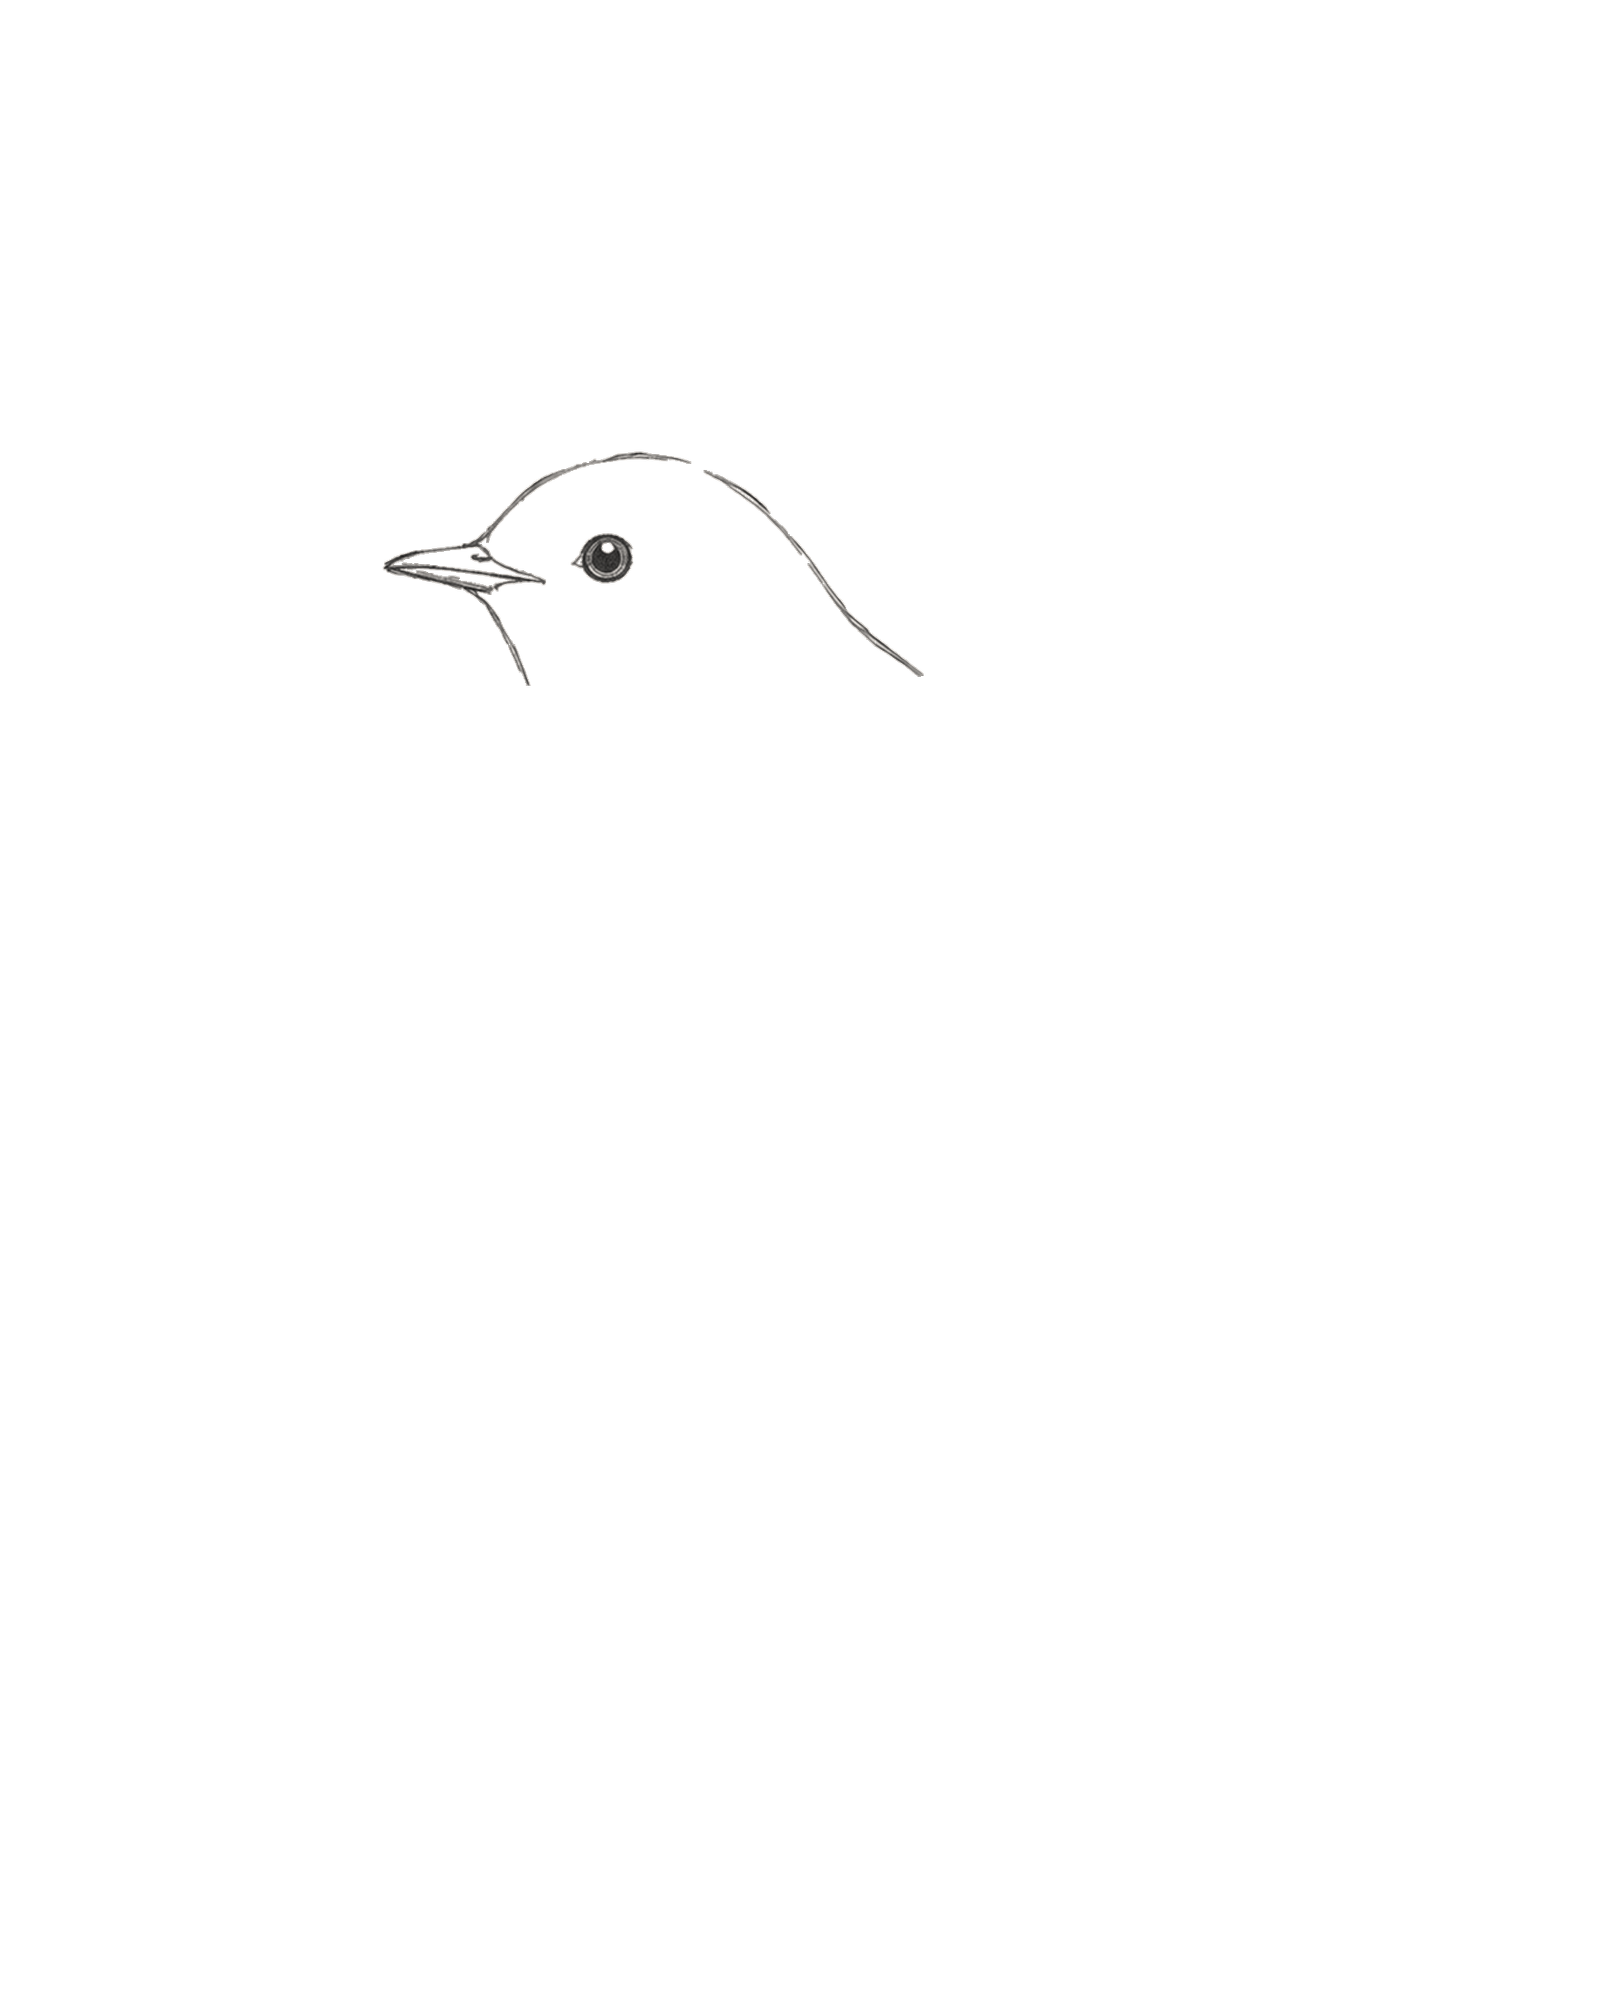
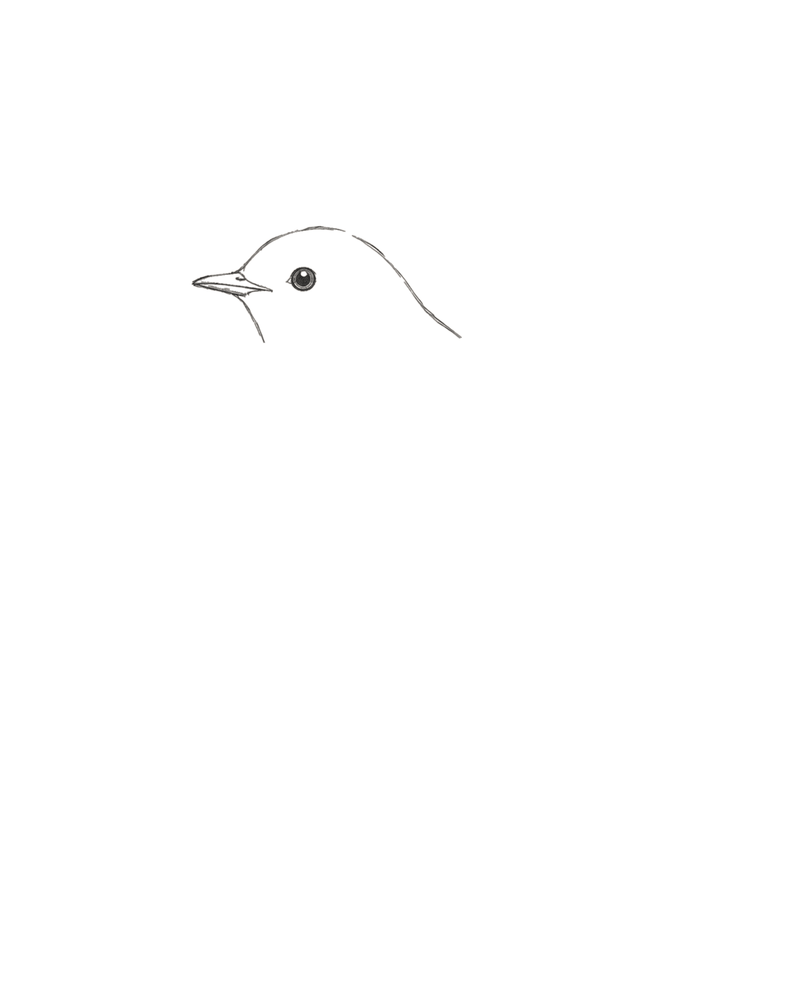
Stage 1 of 8. The head, beak and eye establish position and left-facing direction. 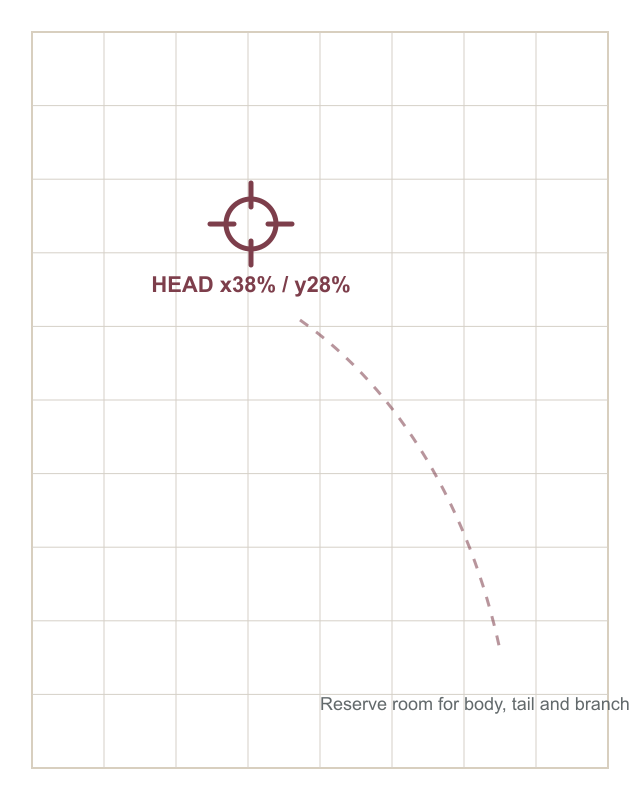
Placement cue: set the head near x38% and y28%. Leave the lower-right sheet open for the body, tail and support. Keep the cue off the drawing. - Asymmetric crown and cheek
- Two-part beak at eye height
- Small eye and white highlight
Use the separate x38% / y28% cue to place the head. Draw the crown as a mild, uneven arch rather than a perfect circle. Continue into the cheek, but leave the nape and throat ends open for the body that follows.
Attach the beak at eye height. Make its upper and lower edges meet at one narrow point facing left. Set the small eye just behind and a touch above the beak join. Darken the pupil with the 2B, leaving the tiny upper-left highlight as untouched paper.
Look for this before moving on: the head is high and left in the frame; the beak has two connected edges and one point; the eye sits behind the join; and two open contour ends are ready for the nape and throat.
If it goes wrong: retain the sound crown or cheek. Lift only the newest beak edge or eye mark, then replace it relative to the existing face instead of enlarging the whole head.
2. Connect the body contour
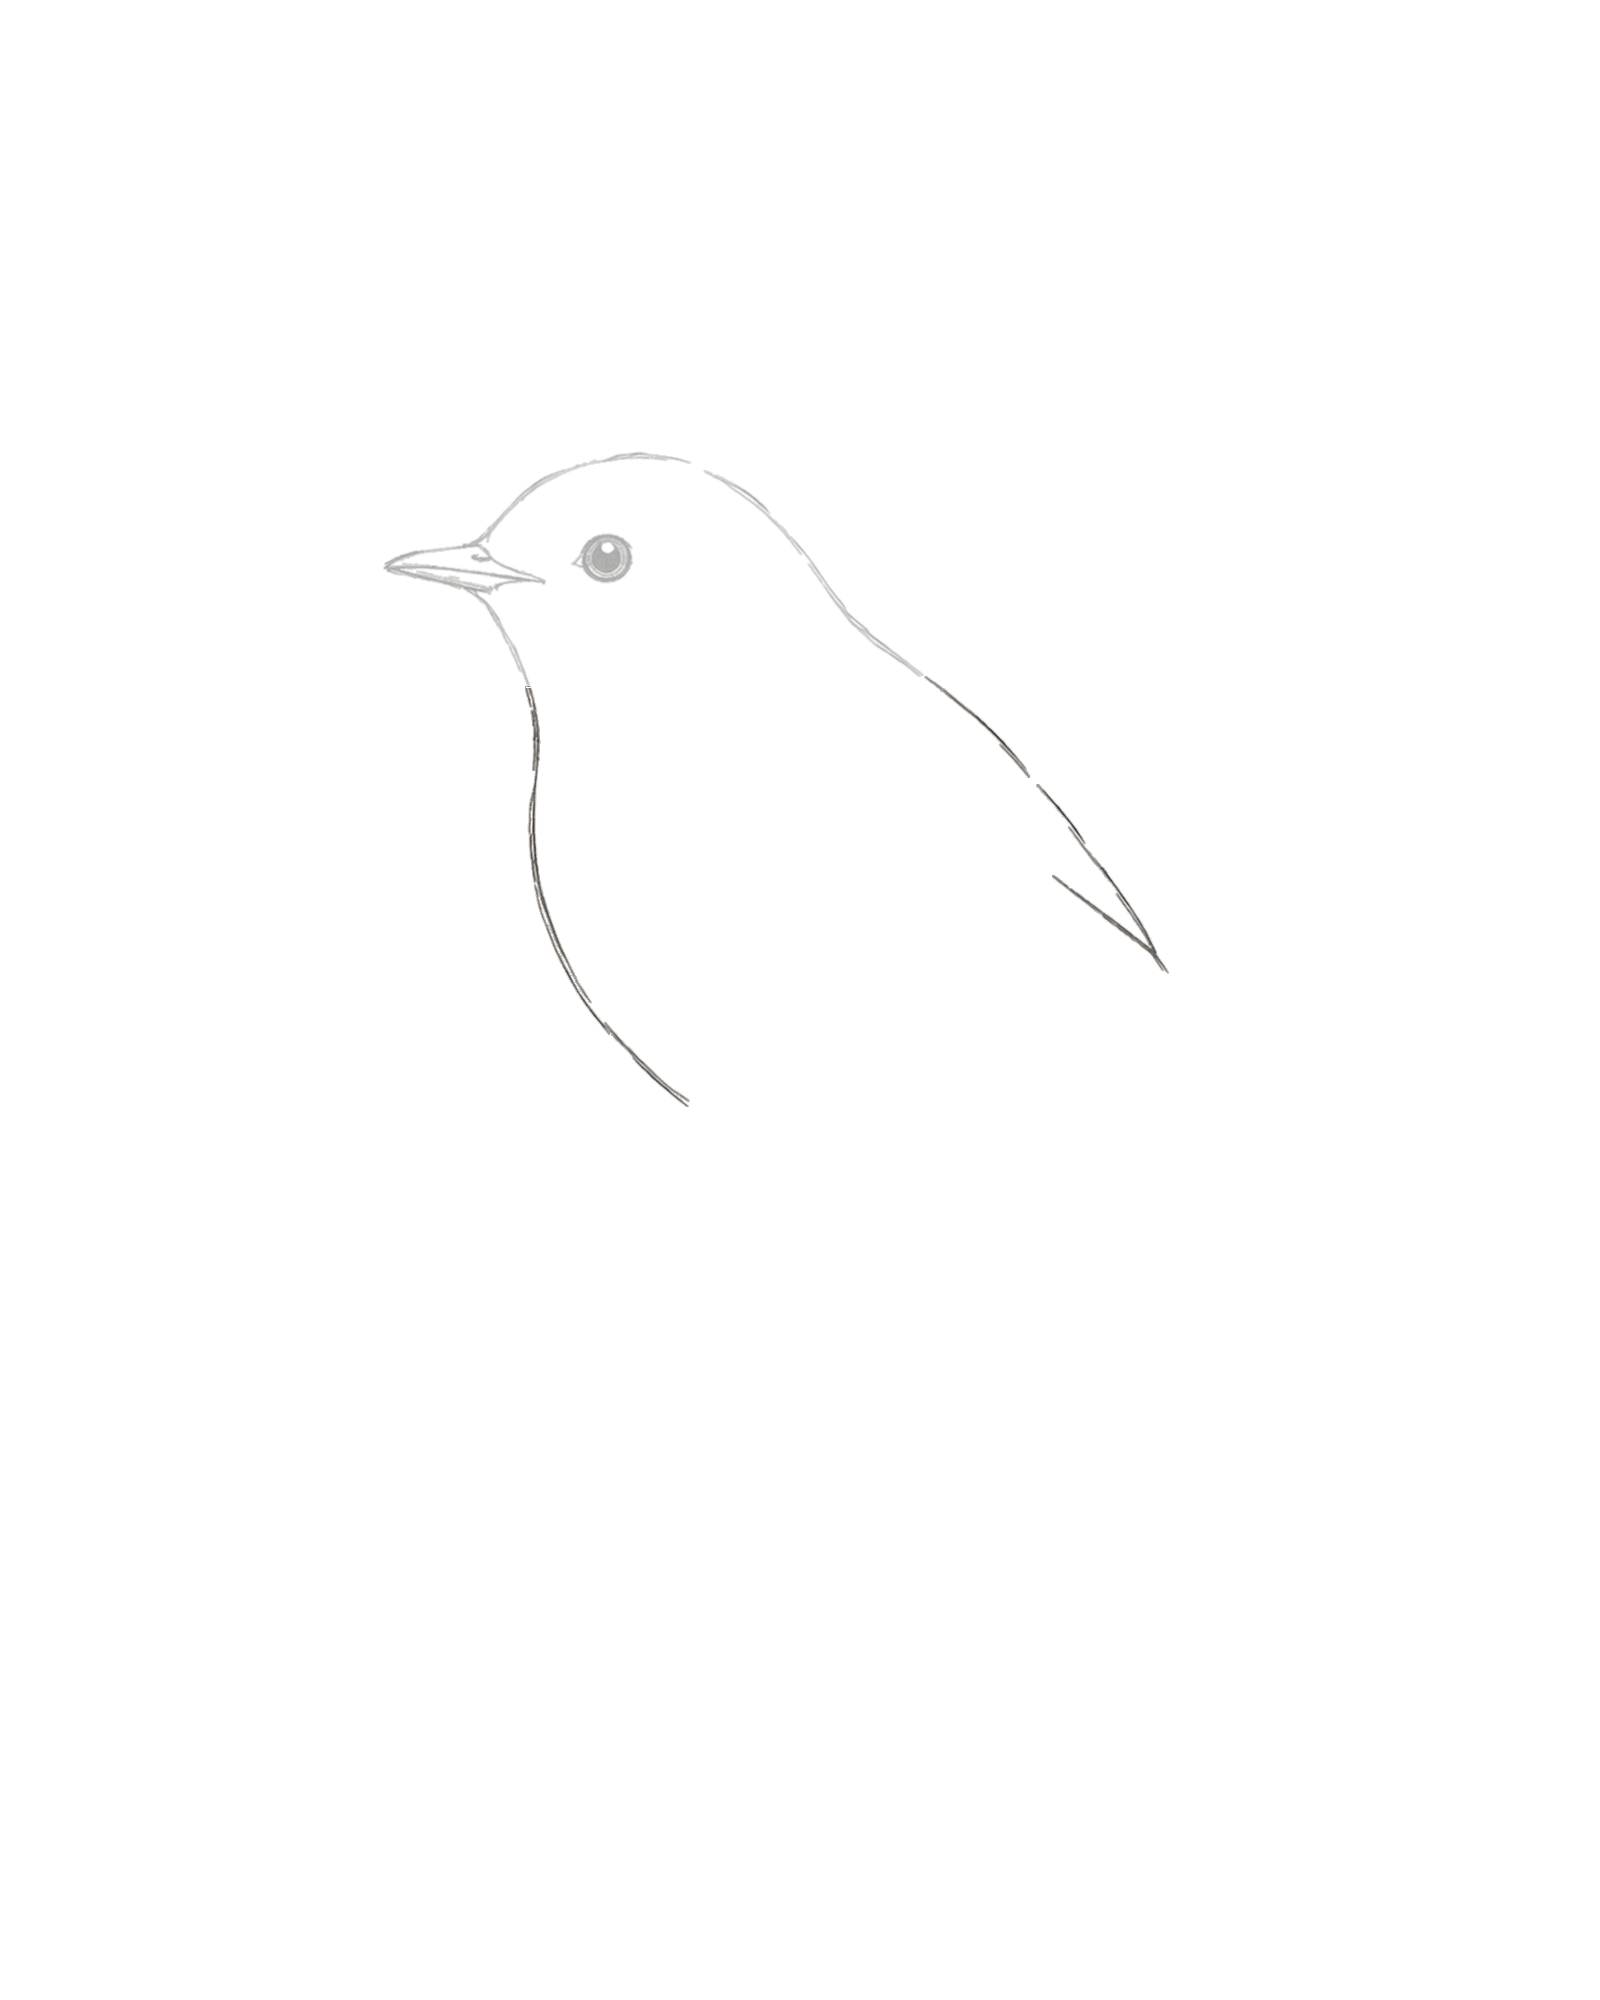
Stage 2 of 8. Connected back and breast curves turn the head into one tilted body. - Nape into back
- Throat into breast
- Leave leg and tail openings
Continue from the crown's open rear end into the nape, then sweep one restrained curve down and right along the back. Stop at the rear body opening shown in the image; this will accept the tail later.
Return to the cheek's lower end. Take the throat into a fuller breast curve, then around the underside of the body. Leave the small lower openings where the two legs will emerge. The body should tilt gently towards the head, not hang beneath it like a second round ball.
Look for this before moving on: head and body read as one joined silhouette, the back is shallower than the breast, and visible openings remain at the lower body and rump for later attachments.
If it goes wrong: leave Stage 1 untouched. Replace only the newest section of back or breast between its two nearest reliable points; a flatter local curve is better than a dark correction line.
3. Attach the folded near wing
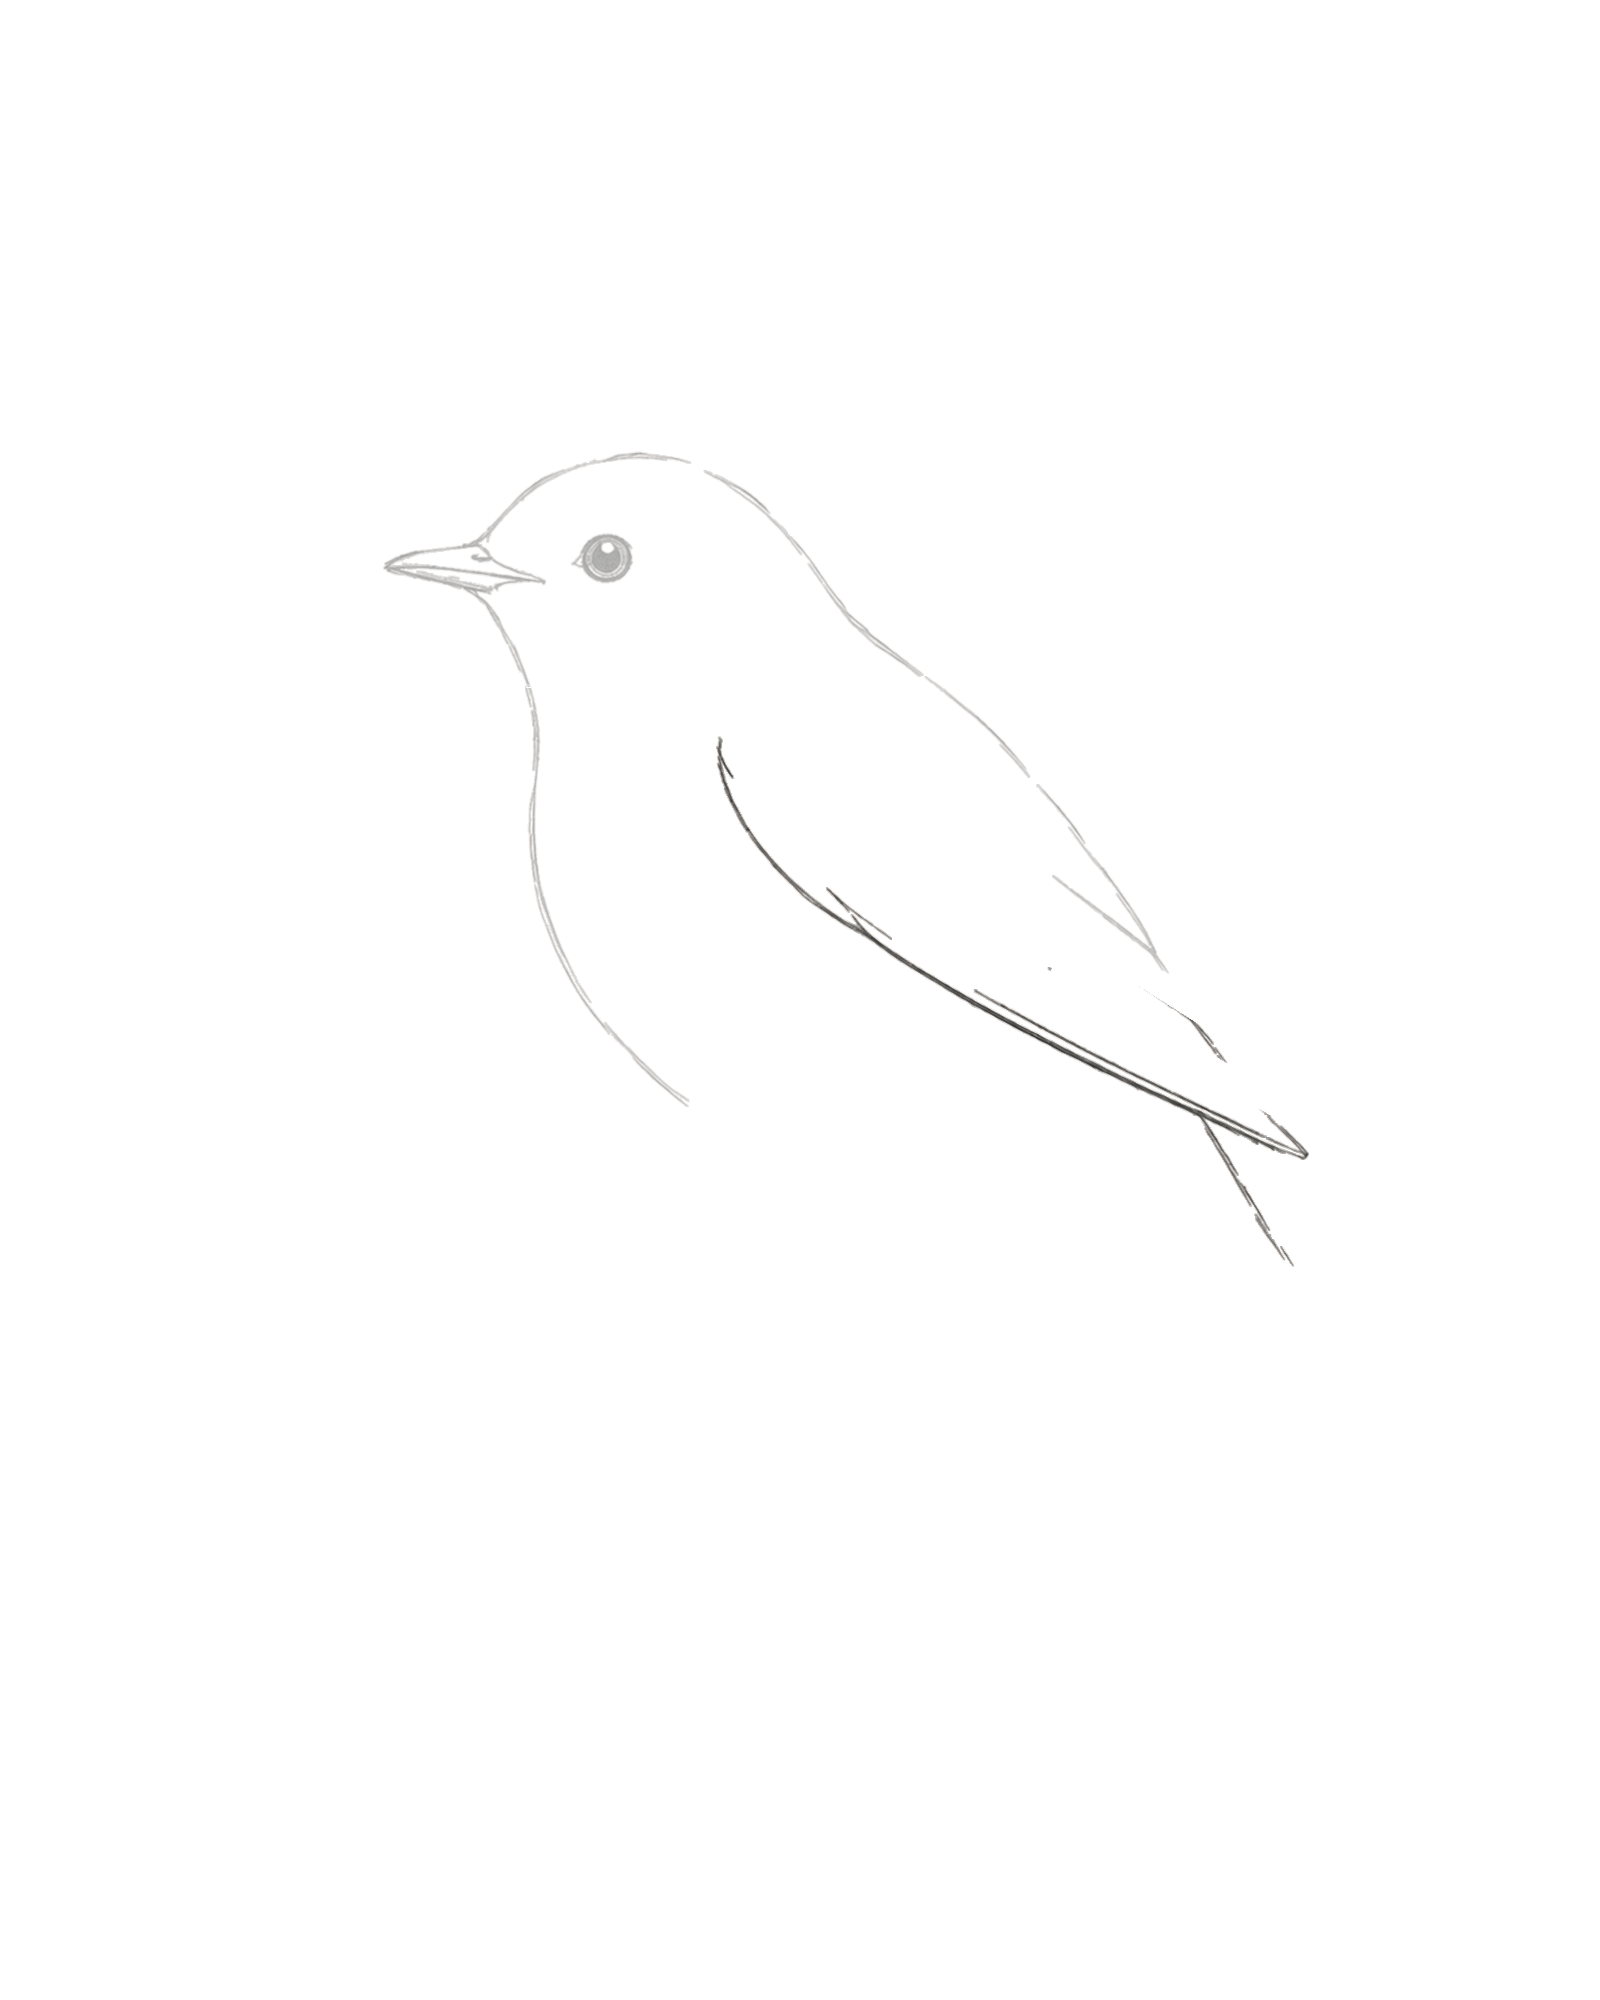
Stage 3 of 8. One tapered near wing attaches below the nape and stays inside the body. - Set the shoulder
- Follow the body tilt
- Taper before the tail root
Begin the wing just below and behind the nape. Round the shoulder gently, then let the wing travel along the body's tilt. Narrow it towards a lower-right tip that ends inside the flank, before the open tail root.
Close the wing as one simple near-side mass. Do not add the long feather divisions yet. A slim patch of unmarked body should remain beneath the wing, making it clear that the wing lies on the bird rather than repeating its outer contour.
Look for this before moving on: the shoulder visibly belongs to the body, the wing tapers towards the rump, its tip stops short of the tail opening, and the outer body line remains easy to trace.
If it goes wrong: preserve the bird outline. Adjust only the latest wing endpoint or the newest part of its return curve; do not expand the wing until it mirrors the belly.
4. Build the unequal tail
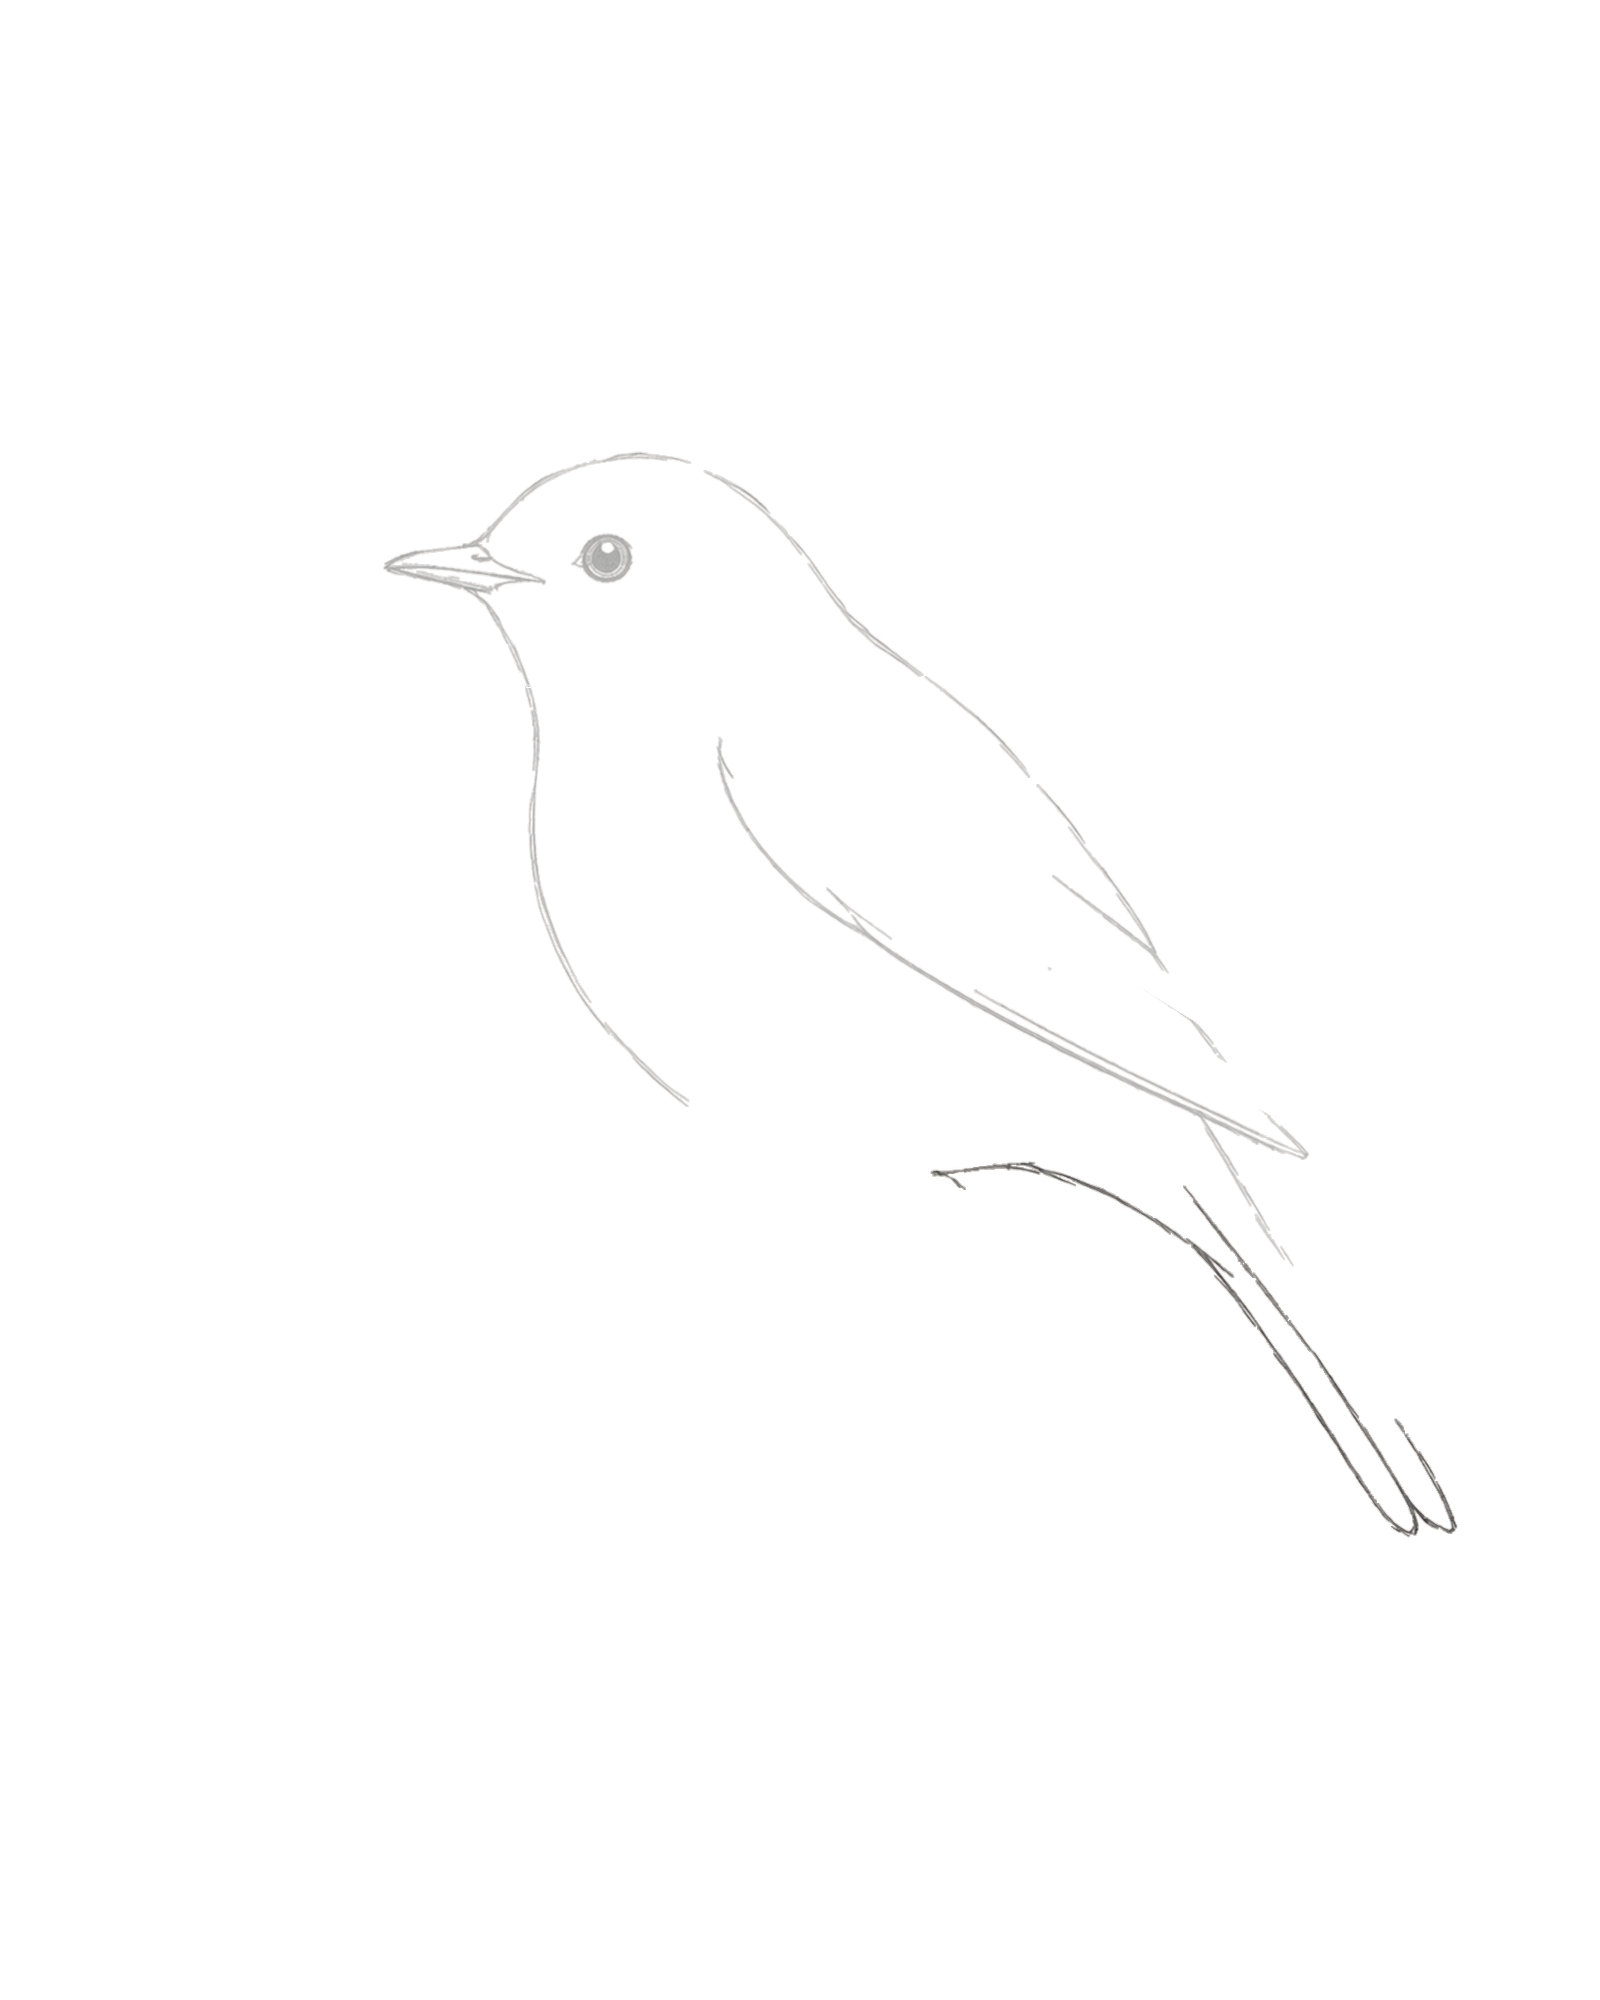
Stage 4 of 8. Two unequal feathers share one natural root and remain clear of the support. - Shorter upper feather
- Longer lower feather
- One separation from the root
Use the rear body opening as one shared tail root. Extend the shorter upper feather down and right first. Add the longer lower feather from the same attachment, allowing it to project farther before tapering to its own tip.
Place the single separation line from the shared root in the same general direction. The feather ends should differ in both length and spacing. Keep them clear of the blank area where the branch will finish.
Look for this before moving on: two tail feathers can be followed separately to unequal tips, both return to one rump junction, and neither appears pasted to the underside of the bird.
If it goes wrong: keep the body and wing exactly as they are. Shorten or redirect only the latest tail tip, or replace the newest separation from the existing shared root.
5. Set the branch and reserve the grip gaps
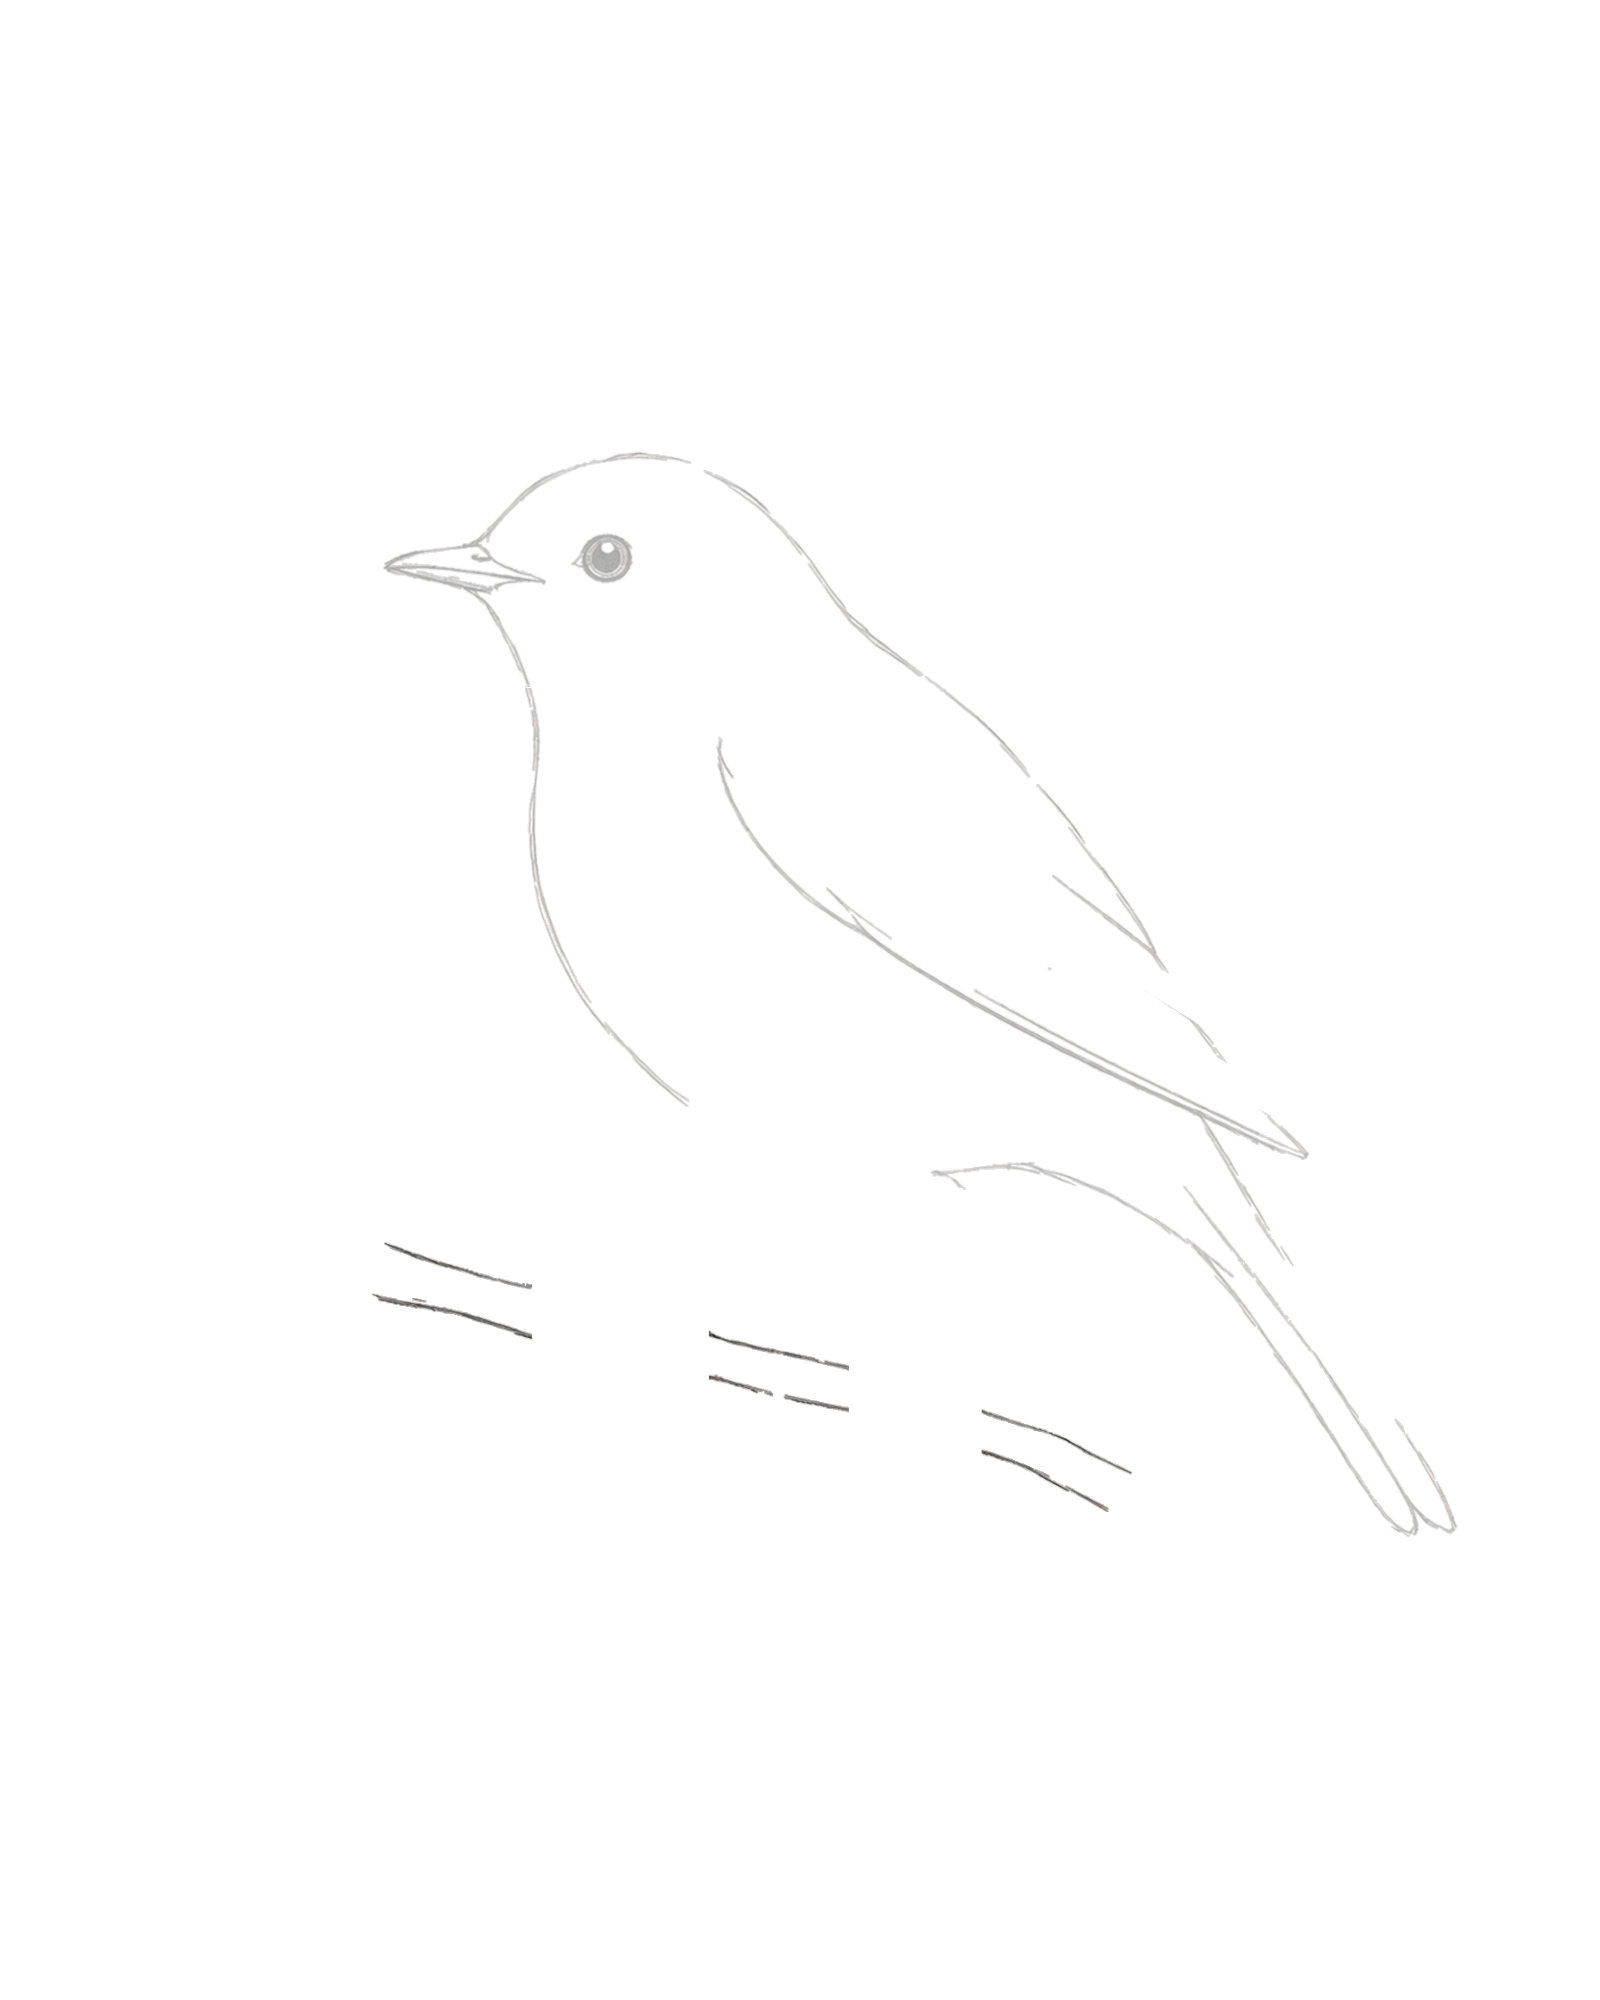
Stage 5 of 8. Three support sections reserve two precise destinations for the feet. - Left branch section
- First grip gap
- Middle section
- Second grip gap
- Tapered right section
Draw the branch as two shallow contours falling gently from left to right. Work in three aligned sections instead of one unbroken stroke. Leave the first small gap directly beneath the nearer leg opening and the second beneath the farther one.
Those two white breaks are deliberate destinations, not missing pieces. Stage 6 will put the feet across them and add only the short branch continuations hidden inside each grip. Finish the right end before it reaches the tail, keeping an unmistakable strip of white paper between the two.
Look for this before moving on: all three branch sections point along one gentle downward path, two small grip gaps line up under the body openings, and the branch end remains separate from the tail.
If it goes wrong: do not move the bird or tail. Replace only the newest branch-section endpoint until the sections share one direction and the two openings sit beneath the planned legs.
6. Complete both grip junctions
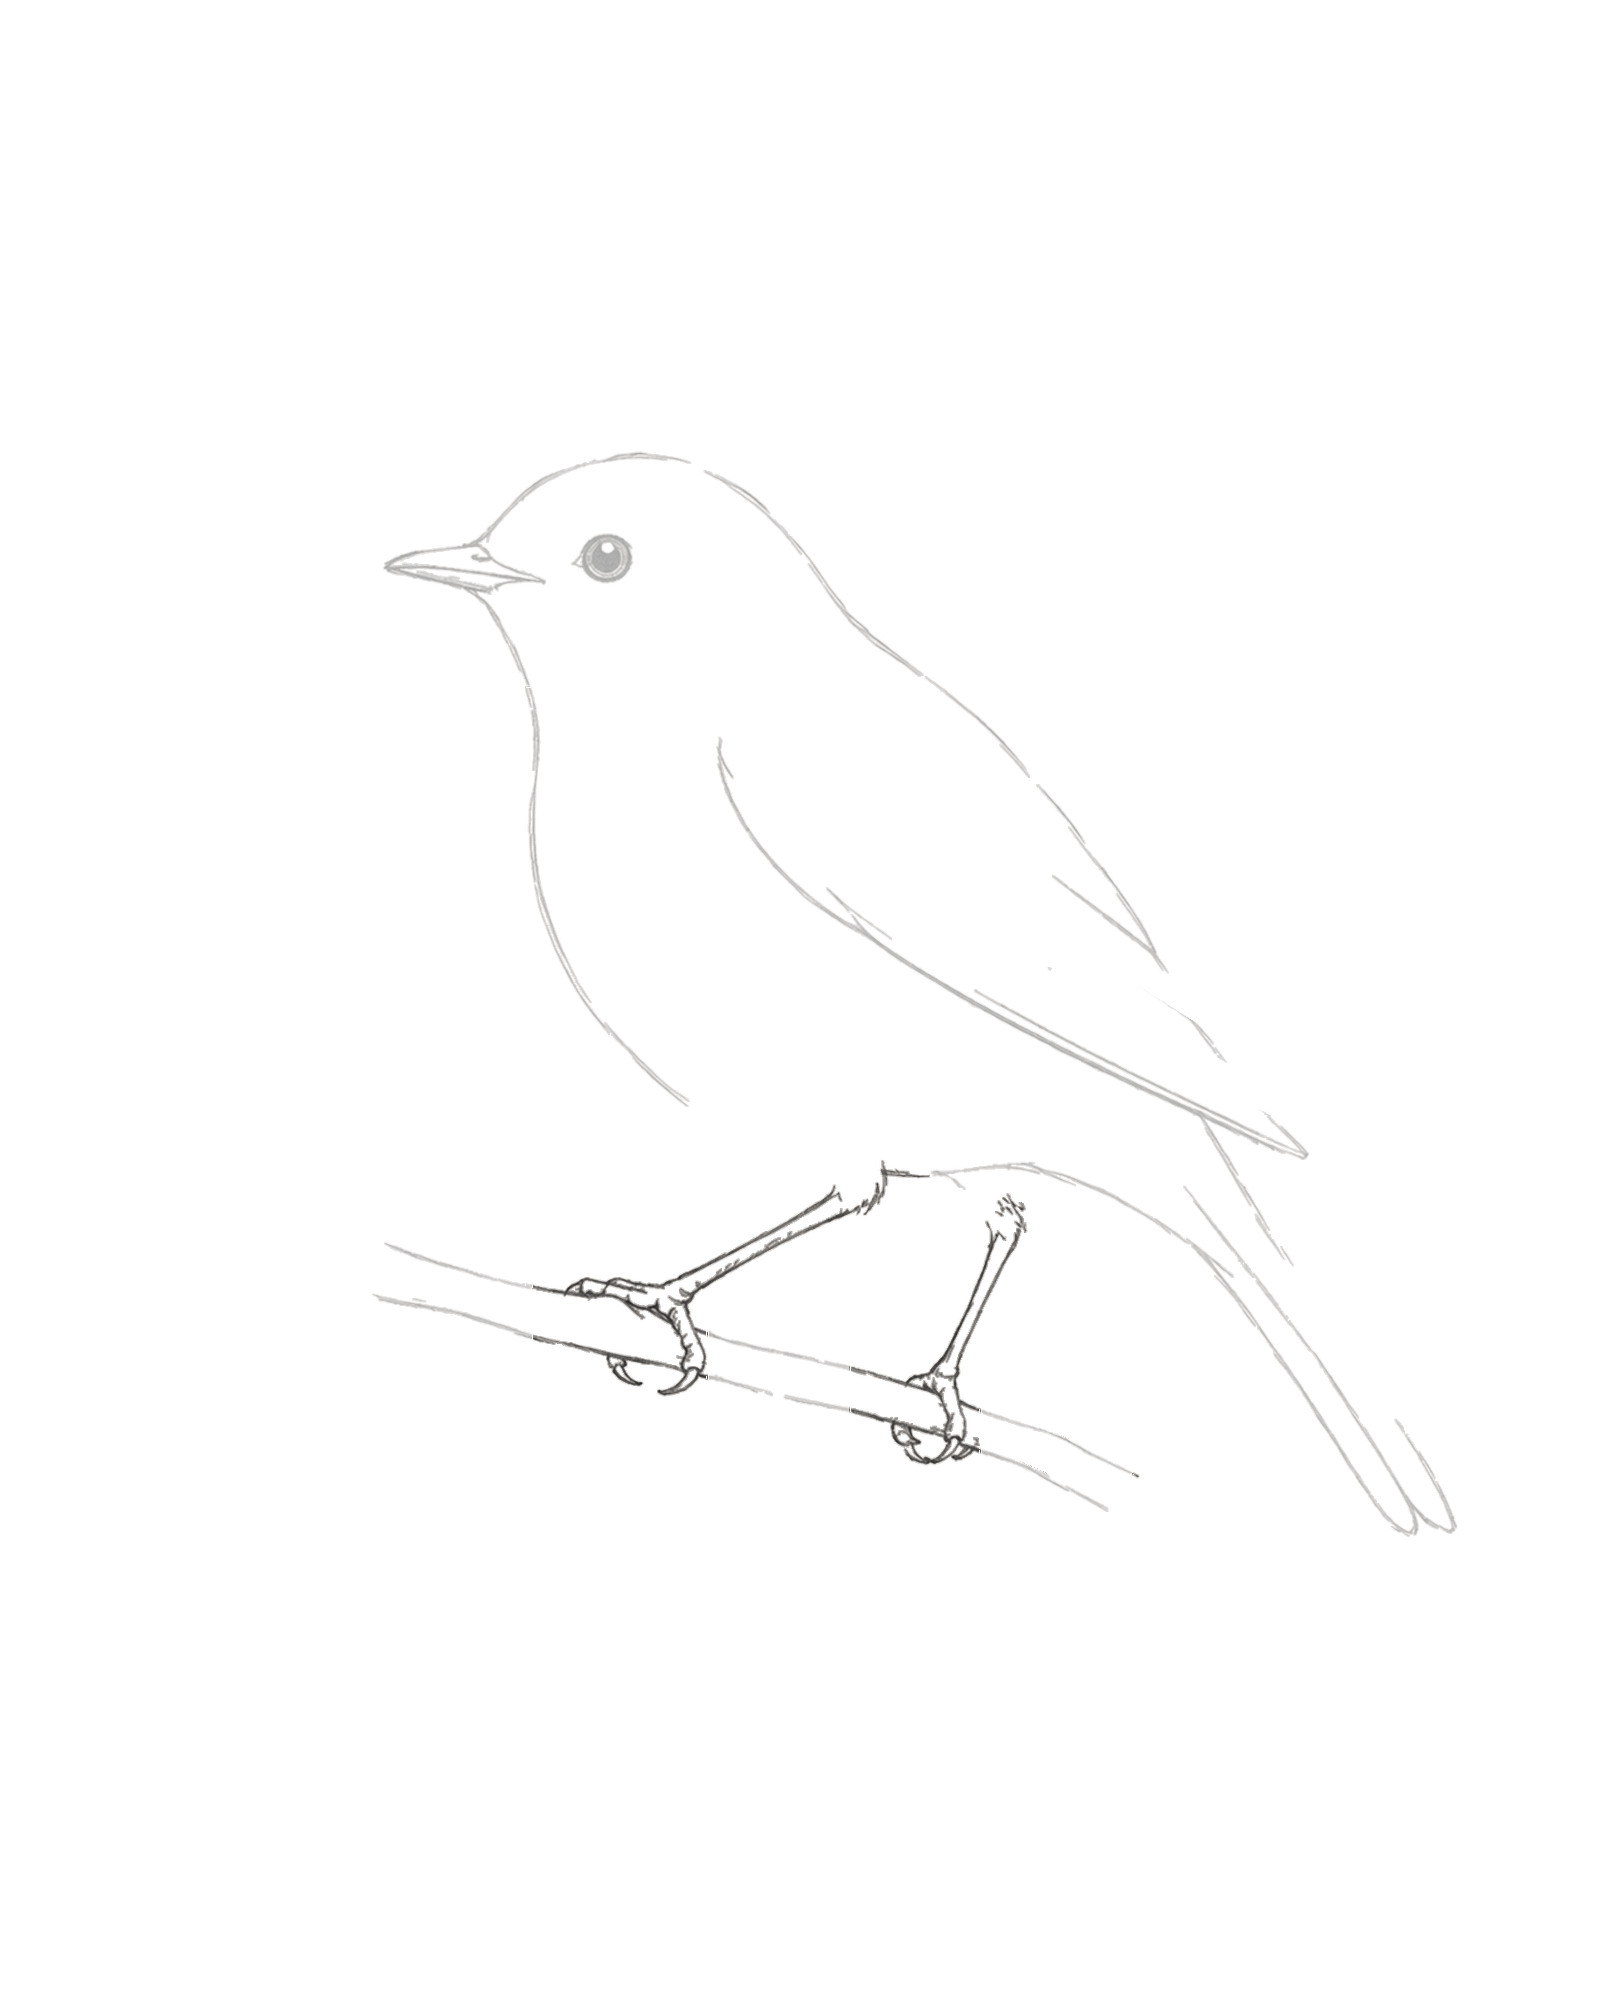
Stage 6 of 8. Unequal toes curl across and behind the branch to carry the bird’s weight. - Near leg and front toes
- Near rear toe and local support
- Narrower far leg and foot
- Close the second local support
Make the nearer grip first. Carry its leg down from the front lower-body opening. At the branch, curve two toes over the top and hook the shorter rear toe behind it. Complete only the small pieces of branch concealed within that reserved gap, so the foot and support read as one joined crossing.
Now add the narrower far leg from the opening slightly to the right. Keep part of its foot behind the nearer one and offset its toes rather than copying the first set. Close the second branch gap locally in the same way. The low bends shown are the bird's ankles; do not add projecting knees.
Look for this before moving on: both legs connect body to branch, the front toes visibly pass over the support, a rear toe hooks behind, the far foot is slimmer and offset, and neither planned gap remains unexplained.
If it goes wrong: keep every visible Stage 5 branch section. Lift only the newest leg or toe from its closest secure endpoint, then curve the replacement around the local support instead of laying it flat on top.
7. Map the feather groups
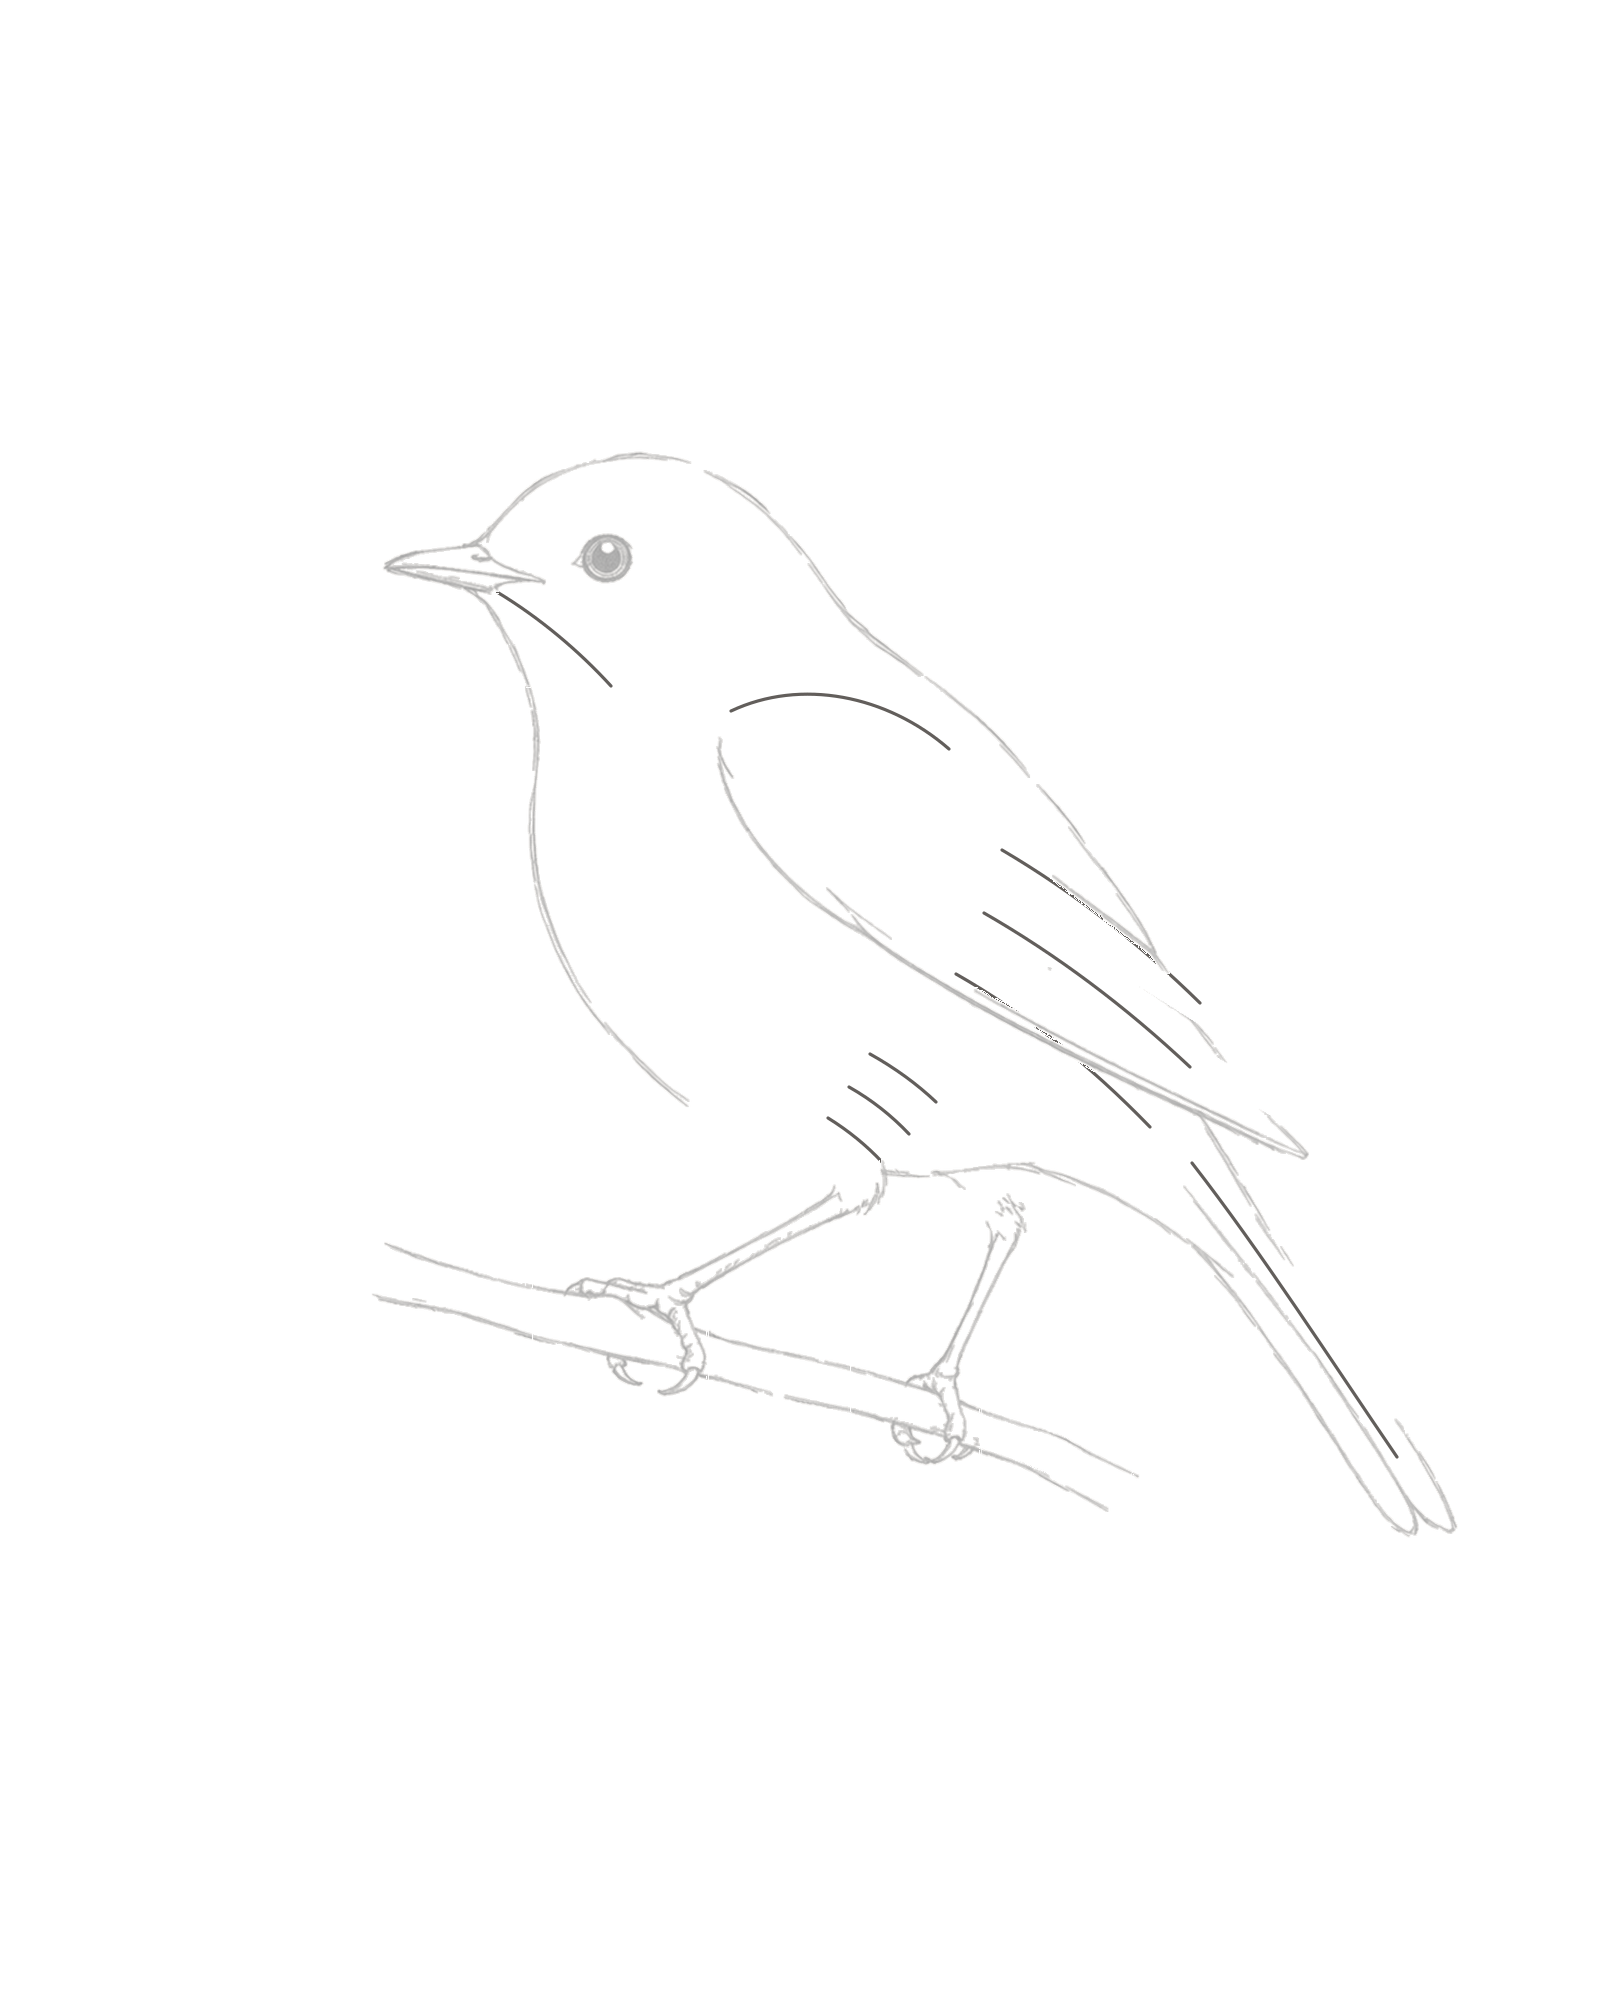
Stage 7 of 8. A few countable groups explain feather flow without covering the anatomy. - Face and throat
- Shoulder
- Three wing divisions
- Tail division
- Three flank curves
Add the internal structure in a fixed order: first the cheek-to-throat boundary, then the shoulder group. Inside the folded wing, place exactly three long divisions that follow its taper and stop before touching the edge.
Continue with one line along the tail's direction. Finish the stage with three short curves on the lower flank. These marks describe groups and flow, not individual feathers; drawing every feather would bury the body and attachment logic.[1][2]
Look for this before moving on: there is one throat division, one shoulder group, three long wing divisions, one tail line and three short flank curves, all contained by the forms they describe.
If it goes wrong: leave the outline and grip alone. Remove only the latest repeated or crossing internal mark, then use fewer, longer curves aimed towards the tail.
8. Add eight directional finish marks
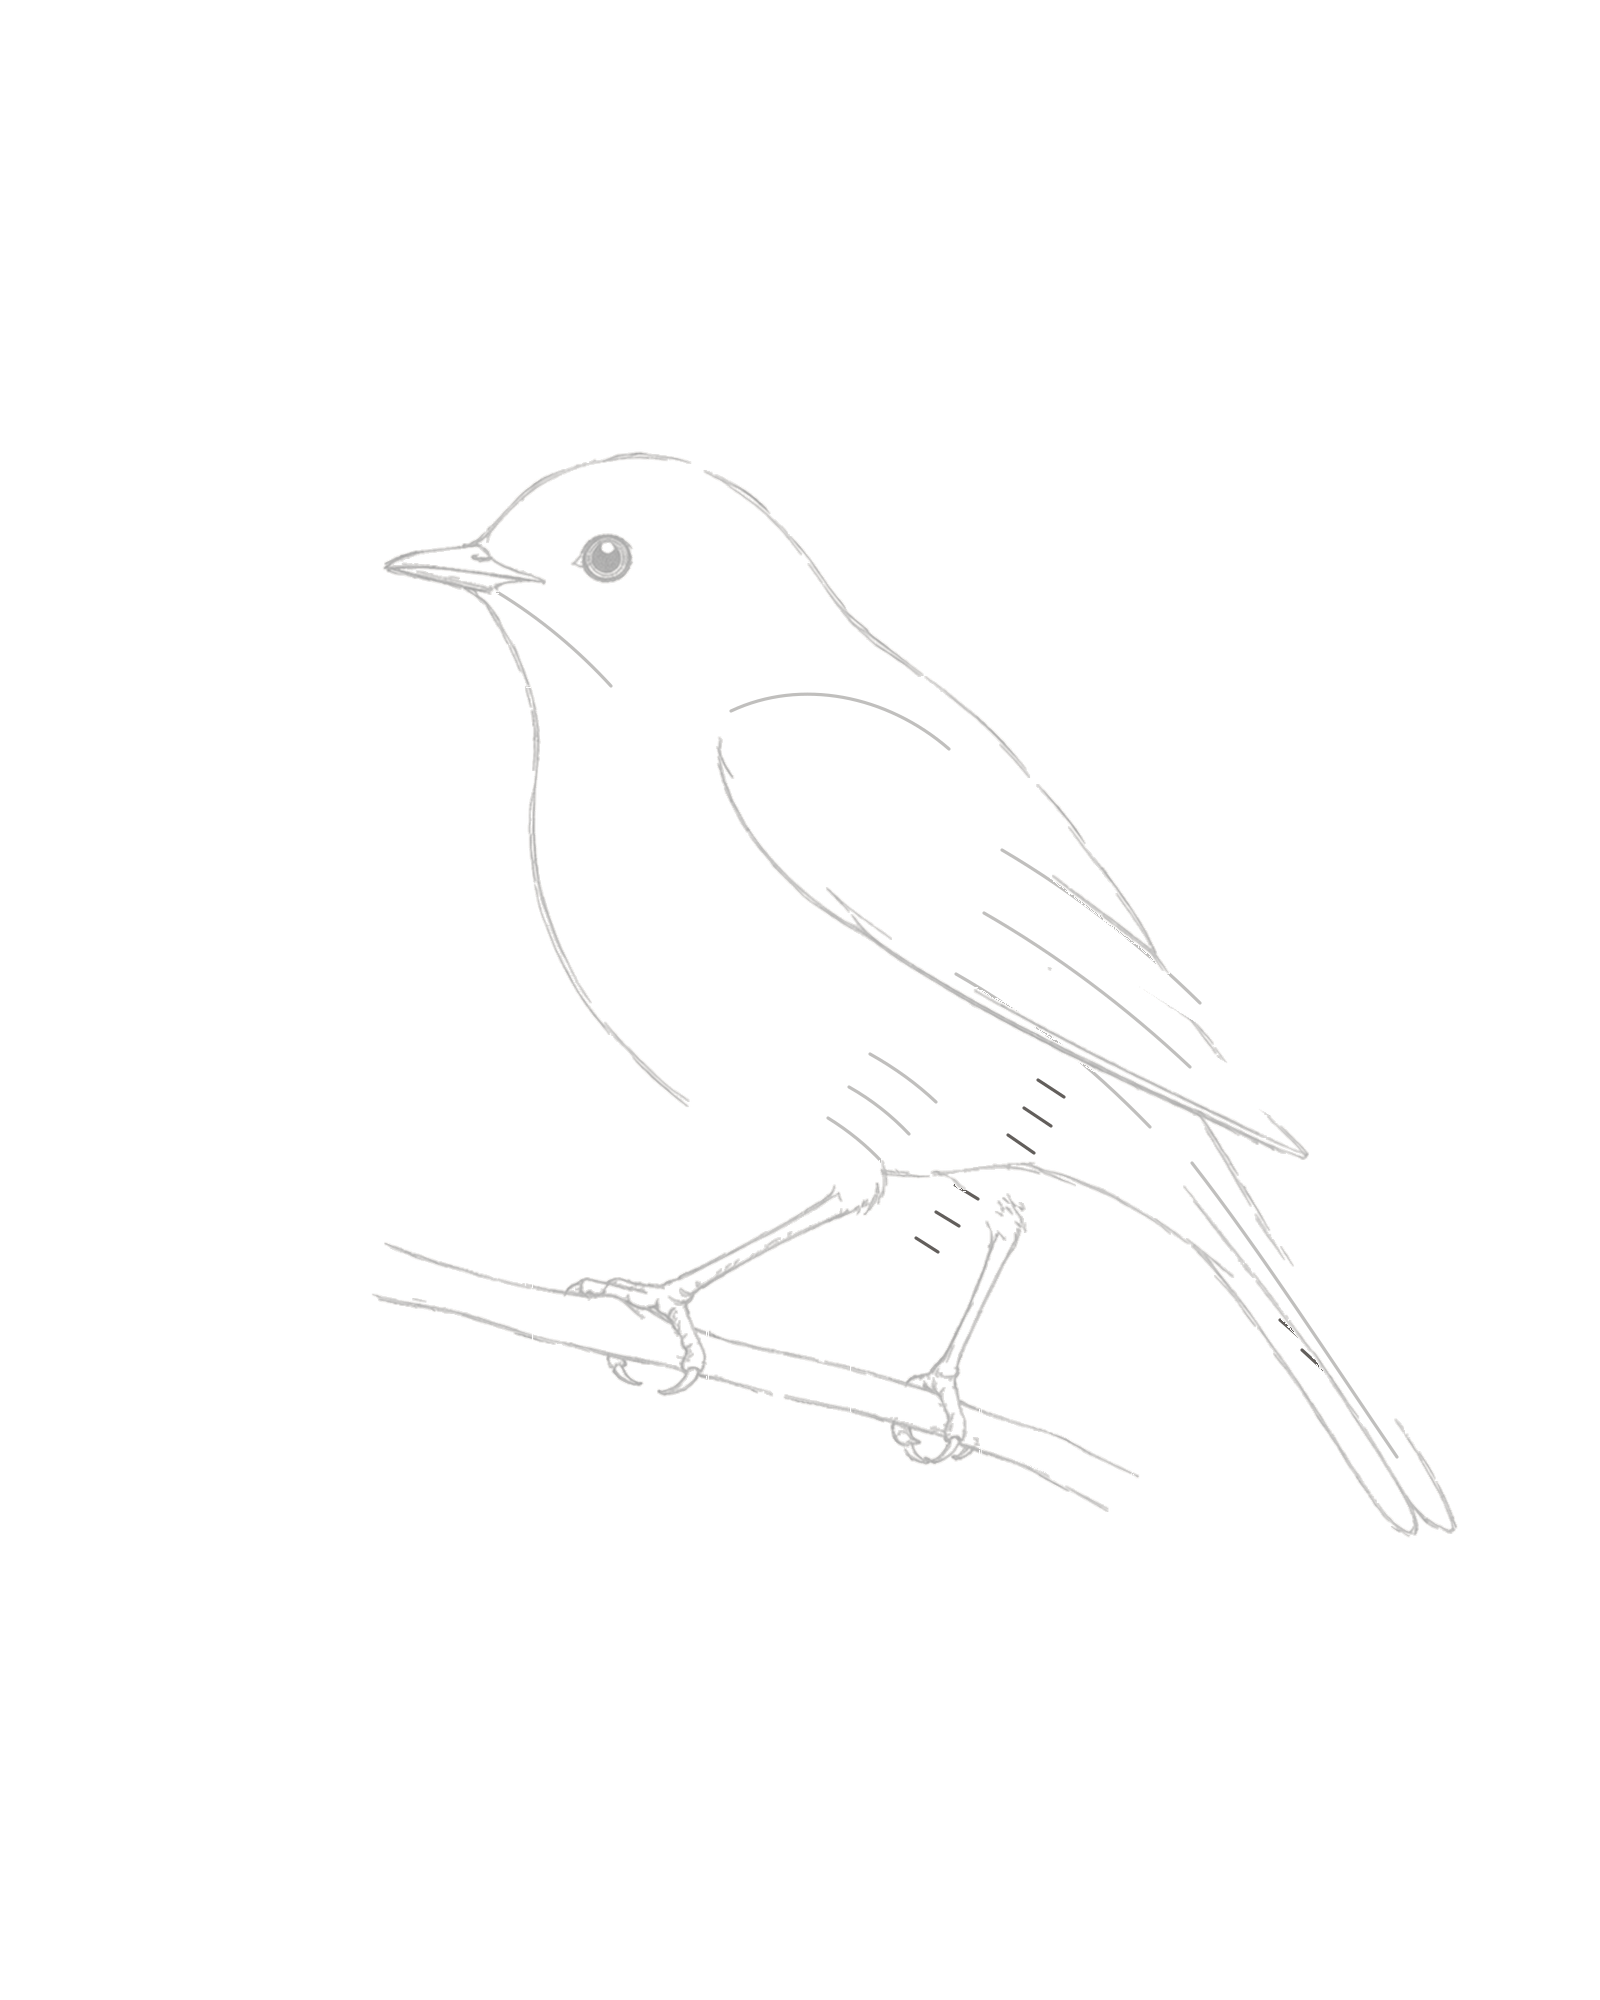
Stage 8 of 8. Eight sparse hatches complete the upper-left light logic without tonal shading. - Lower-right body marks
- Wing-direction marks
- Tail-direction marks
- Count exactly eight
Finish with exactly eight short hatches. Place them only on the lower-right planes shown in the image: a sparse set across the body, wing and tail. Angle each small stroke with its local feather direction while keeping the upper-left areas open.
Do not darken an existing contour, fill the body or scatter graphite between the hatches. The pupil remains the darkest compact accent, and its small upper-left highlight stays white. This is a line drawing with a light-direction hint, not a shaded version.
Look for this before moving on: all eight hatches are individually countable, none crosses an outline or joint, the drawing is still mostly white, and every piece of anatomy remains clear.
If it goes wrong: lift only the newest hatch and replace it within the same body, wing or tail plane. Never use extra hatching to hide an uncertain join.


Common mistakes and small fixes
The head looks circular or cartoon-like. Keep the eye small, let the crown and cheek differ slightly, and check that the head flows into two body contours. On another attempt, correct the dominant curve instead of adding facial detail.
The bird looks like two stacked ovals. Find the crown-to-nape and cheek-to-throat connections. Replace one newly drawn neck interval so the transition is smooth; do not outline a separate neck ring.
The wing appears pasted on. Its shoulder should begin below the nape and its tip should stop inside the flank. Repair one endpoint, leaving the outer body undisturbed.
The tail resembles two equal bars. Return both feathers to the same rump root, then vary the later feather's length or taper. Avoid changing both tips at once.
The branch seems broken in Stage 5. Check whether each break is beneath a lower-body opening. If so, leave it: those are the planned grip gaps. Only a gap that misses its leg destination needs a local branch-end repair.
The feet sit on the branch rather than holding it. Make the near toes cross the upper edge and let the rear toe hook behind. Correct the newest toe curve; do not thicken the branch to meet a floating foot.
The feathers become a pattern. Count the contracted groups and stop. Three wing divisions and three flank curves are enough to explain direction without covering the form.
The last stage looks shaded. Count eight short marks and preserve broad white areas. Remove the latest extra hatch rather than lightening an earlier outline.
Practise a change of posture
On a fresh area of paper, repeat Stages 1 and 2 with the back angled a little more horizontally and the breast slightly narrower. Keep the beak tied to the eye line and preserve the same two body openings. This small change tests whether you can organise a new posture without adding species markings or copying every feather.
The How to Draw page has the complete practical lesson index. To compare how artists have used birds as subjects, rather than follow another construction sequence, visit the separate Bird Drawings gallery.
Frequently Asked Questions
What is the easiest bird to draw for a beginner?
A small perched bird in a side view is a manageable first subject because the body, folded wing, tail and support remain visible. Keep it species-neutral until those attachments make sense.
How should I start a simple bird drawing?
Place the head and beak high enough to leave room for the body and tail. Connect the body before adding wing or feather details, then pause to check the overall tilt.
What basic shapes make a bird?
You can think of a compact head, a fuller tilted body, a tapered folded wing and two tail wedges. This lesson draws their permanent contours directly rather than using circles that must later disappear.
How do I draw bird feet on a branch?
Establish the support first and leave small openings where the grips belong. Bring each leg down to its gap, pass the front toes over the branch, hook a rear toe behind and close only the concealed local support line.
How do I draw feathers without drawing every feather?
Show a few structural groups. One shoulder indication, three long wing divisions, one tail division and three short flank curves can explain the feather direction while preserving the larger anatomy.
Can I use a photograph as a bird reference?
Yes, when you have permission to use it. Treat a clear side-lit photograph as observation help for posture, folded-wing direction and grip; do not assume that finding an image online grants permission to reproduce its composition.[1]
Do I need to erase the first shapes?
No. Every line shown here belongs to the final bird. Use an eraser only to replace the newest misplaced curve before continuing.
How do I draw a flying bird?
Treat flight as a separate exercise. Spread wings introduce angle, foreshortening and negative-space problems that are intentionally absent from this first perched-bird lesson.
References
- John Muir Laws, How to Draw Birds. View source
- Audubon, Learn to Draw Birds with David Sibley. View source
- EasyDrawingTips, How to Draw a Bird Step by Step — Side View. View source
More DRAWING Guides

How to Draw a Rose: A Step by Step Guide

How to Draw a Tree: A Step by Step Guide

How to Draw Eyes: A Step by Step Guide

How to Draw Leaves: A Step by Step Guide

How to Draw Autumn Leaves: A Step by Step Guide

How to Draw Flowers: A Step by Step Guide

How to Draw a Lily: A Step by Step Guide

How to Draw a Sunflower: A Step by Step Guide

How to Draw a Tulip: A Step by Step Guide

How to Draw a Hibiscus: A Step by Step Guide

How to Draw a Daisy: A Step by Step Guide
