



Draw one complete seated dog
This lesson shows you how to draw a complete seated dog in nine stages. The result is a calm, medium-built mixed-breed dog seen from a slight three-quarter angle, with one folded ear, one upright ear, four grounded paws and a low curved tail. The drawing stays open and line-led, so the important work is proportion, attachment and balance rather than dense fur or shading.
This is a beginner lesson, although a whole animal needs more comparison than a single flower or object. Allow about 45–60 minutes, but regard that as an untested estimate rather than a deadline. Every visible line in the stage images belongs to the finished result. There are no disposable circles to remove later, so pause after each addition and correct only the newest part if needed.
What you will need
- An HB graphite pencil sharpened to a fine point. An ordinary No. 2 or a mechanical pencil between 0.5 and 0.7 mm will also do the job.
- Smooth white or warm-white paper in portrait orientation. Ordinary printer paper is suitable for a first attempt.
- A clean eraser for replacing the most recent faulty curve. No full-drawing cleanup is planned.
- A sharpener if you use a wooden pencil.
- Optional scrap paper for rehearsing one paw, a folded ear or the upward turn of the tail.
You do not need charcoal, blending tools, coloured pencils, tracing paper or specialist drawing paper. Use light-to-moderate pressure and keep the point sharp enough for the eyes, paw divisions and final hatches. A ruler may help you understand the separate placement cue, but do not draw its grid over the dog.
Before you start
Turn the paper vertically. The separate placement cue puts the centre of the first head outline at about x38% and y24%. This leaves most of the lower page for the chest and legs, with a broad open corridor on the right for the seated hindquarter and tail. The upright ear reaches higher than the folded ear, so keep clear paper above both.
Use the final image as a proportion reference while following the stages. Compare the head with the chest before thinking about coat detail. The head without its ears is roughly two-thirds of the chest width. The shoulder is fuller and a little higher than the rump, the nearer front leg gives the clearest vertical support, and the farther limbs are narrower or partly hidden. Drawing guides from Wacom and Clip Studio also place body structure, joint direction and pose before surface detail; that priority is especially useful when checking a seated animal.[1][2]
The dog looks slightly towards the viewer's left. This turn makes the visible eye and muzzle sides unequal. Keep those differences: copying one side onto the other would flatten the head. Imagine light arriving from the upper-left, although tonal marks do not appear until the last stage.
1. Place the permanent head outline
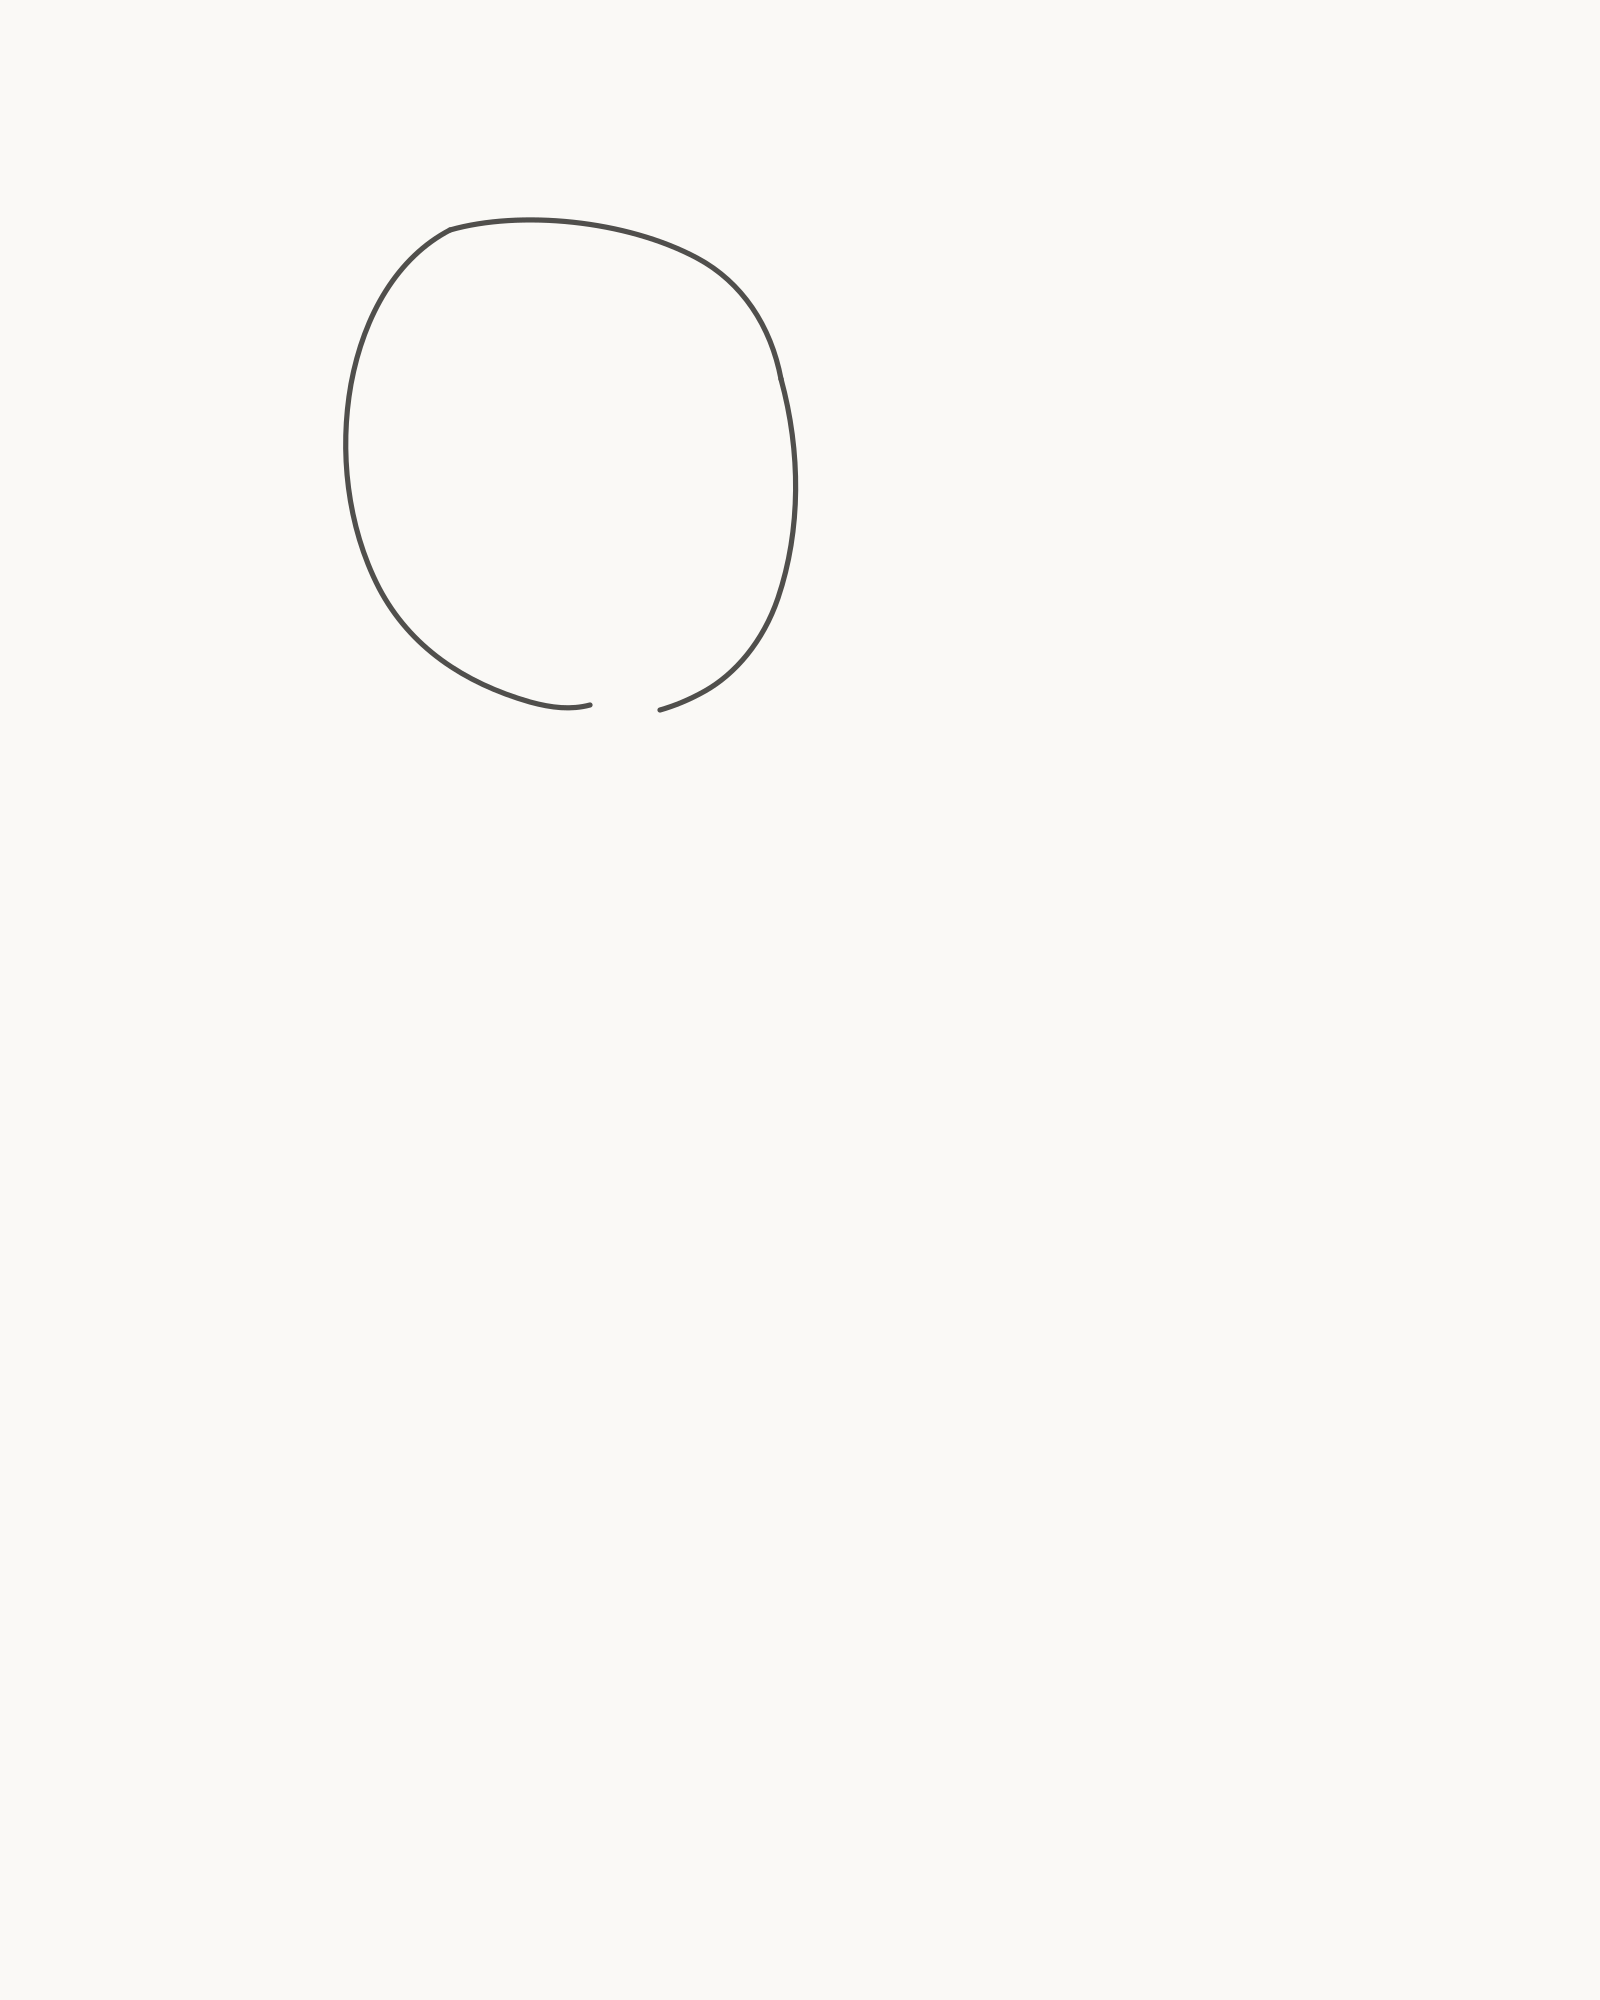
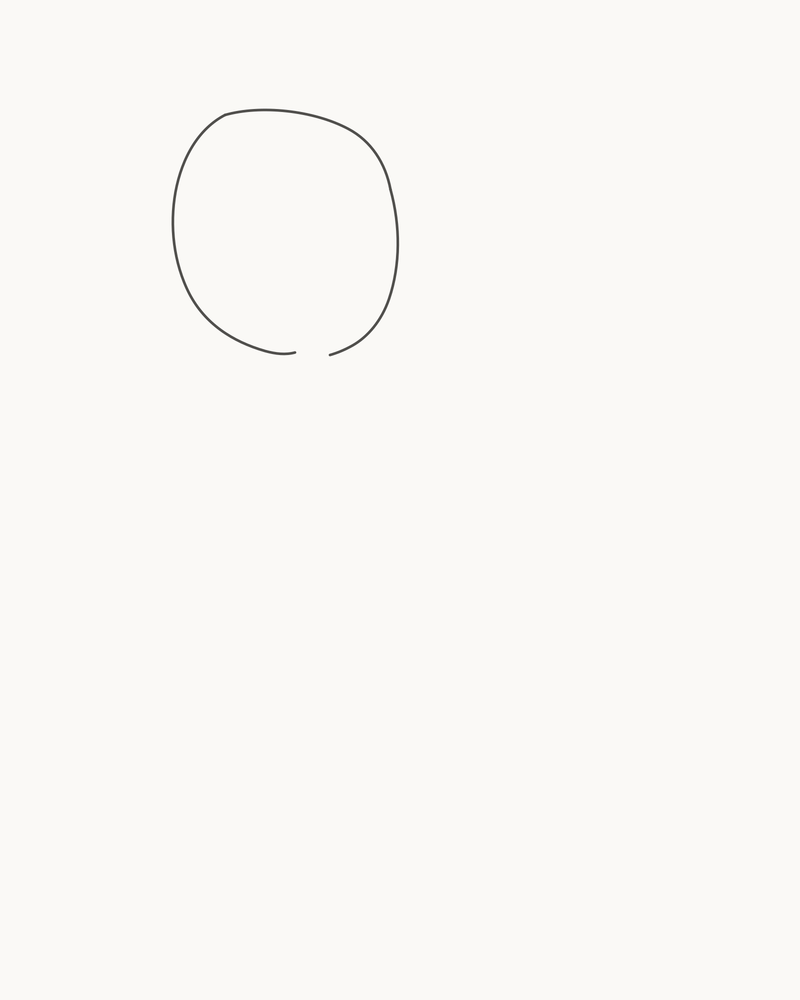
Stage 1 of 9. A permanent open outline fixes the head size and position. 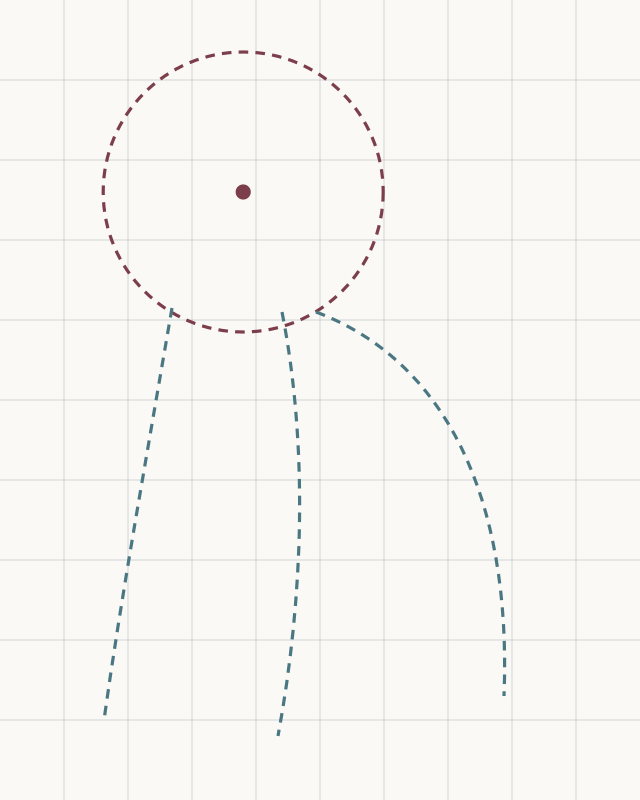
Placement cue: locate the head centre near x38% and y24%. Reserve the lower sheet for the body and the right side for the hindquarter and tail. Leave every cue mark off the drawing. Begin at the point shown by the separate placement cue, around x38% and y24% of the page. Draw one quiet outline for the head. Start near the top, curve around the crown and cheeks, then narrow slightly as you descend. Stop with two separate lower ends instead of closing the shape under the chin.
This outline remains in the final drawing. It is not an oval that will disappear, and it does not need to look like a complete dog face yet. The muzzle and facial turn will be placed inside it in Stage 3. Keep the crown broad and the lower opening clear enough to receive the neck later.
Look for this before moving on: the head sits in the upper-left half of the sheet, has open paper around it and ends in two separate lower points. It is neither an oversized puppy circle nor a pointed fox-like shape.
If it goes wrong: erase only the newest outside curve between the two lower endpoints. Flatten a pointed cheek or reduce an over-round side without closing the neck opening or starting again.
2. Attach the two unequal ears
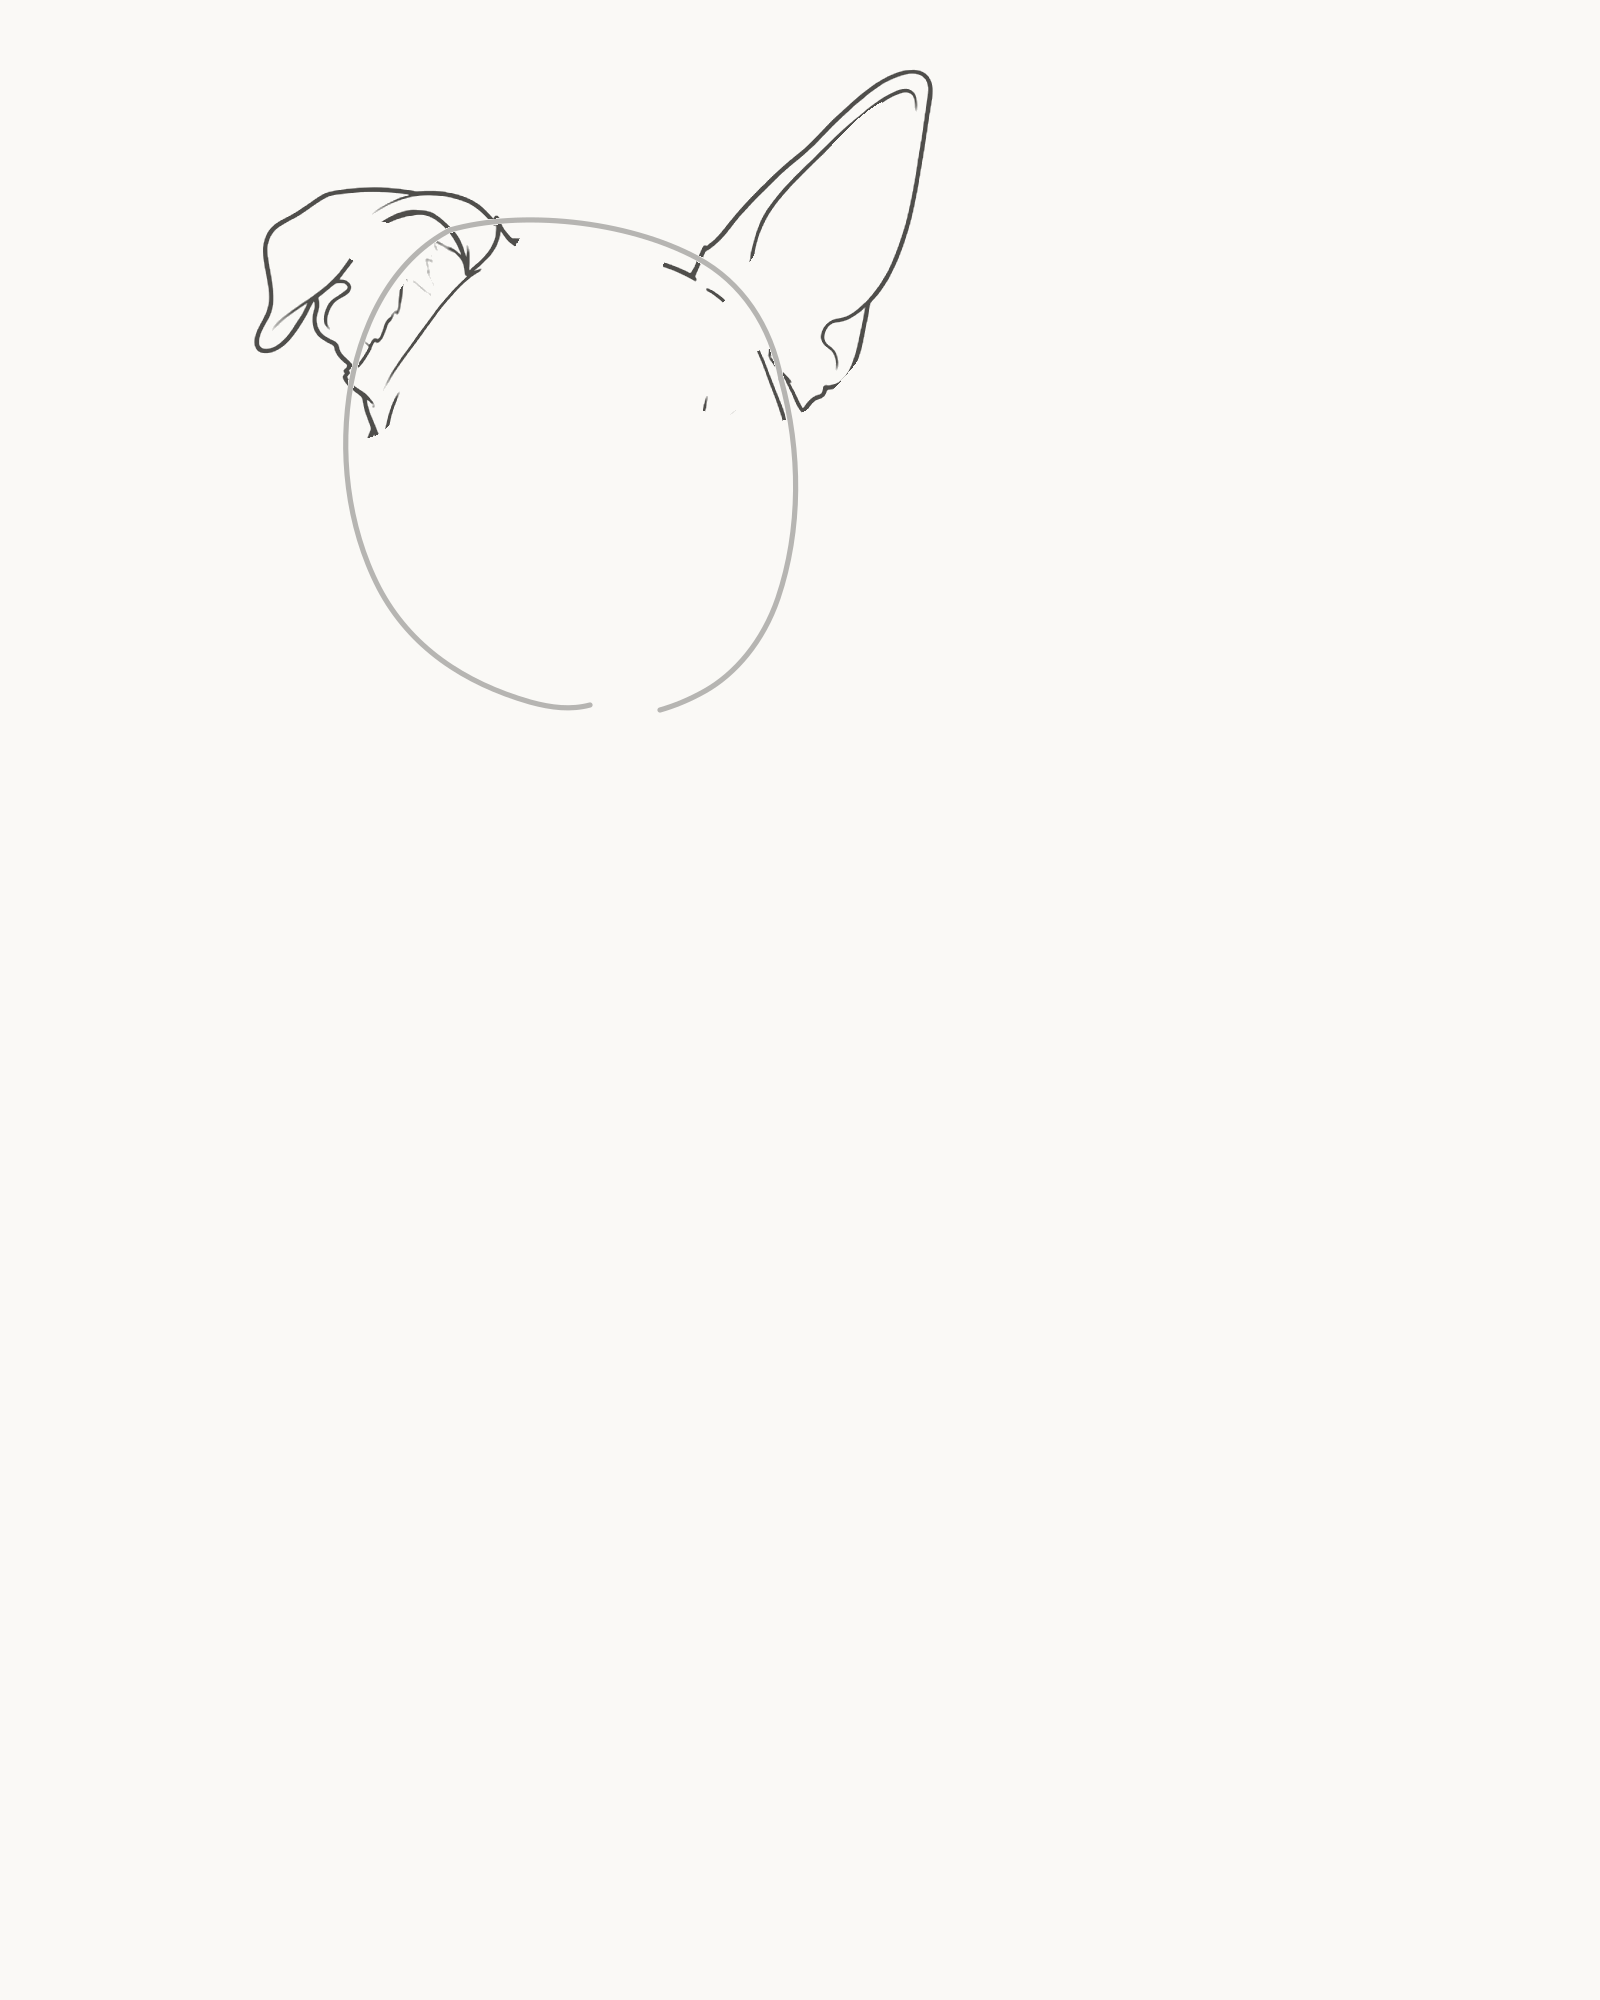
Stage 2 of 9. A folded ear and upright ear establish asymmetry. - Upright far ear
- Folded near ear
- Short inner folds
- Check both roots
Add the upright ear on the viewer's right first. Let its root slip behind the crown, rise to a narrow rounded point and return to the head with a gentle inward curve. Keep it tall but leave a margin above its tip.
Now build the folded ear on the viewer's left. Its root also sits behind the crown, but its outer edge drops sideways rather than rising. Add the short internal folds shown in the image to explain how the ear turns over. These lines describe the attachment; they are not tufts of fur.
Look for this before moving on: one ear rises and one folds down, yet both clearly join behind the crown. Their angles, widths and internal shapes differ, and neither appears pasted onto a cheek.
If it goes wrong: replace only one new ear edge or root arc. If the pair looks mirrored, lower the folded ear's outer tip or narrow the upright ear; preserve the Stage 1 head.
3. Add the face and muzzle landmarks
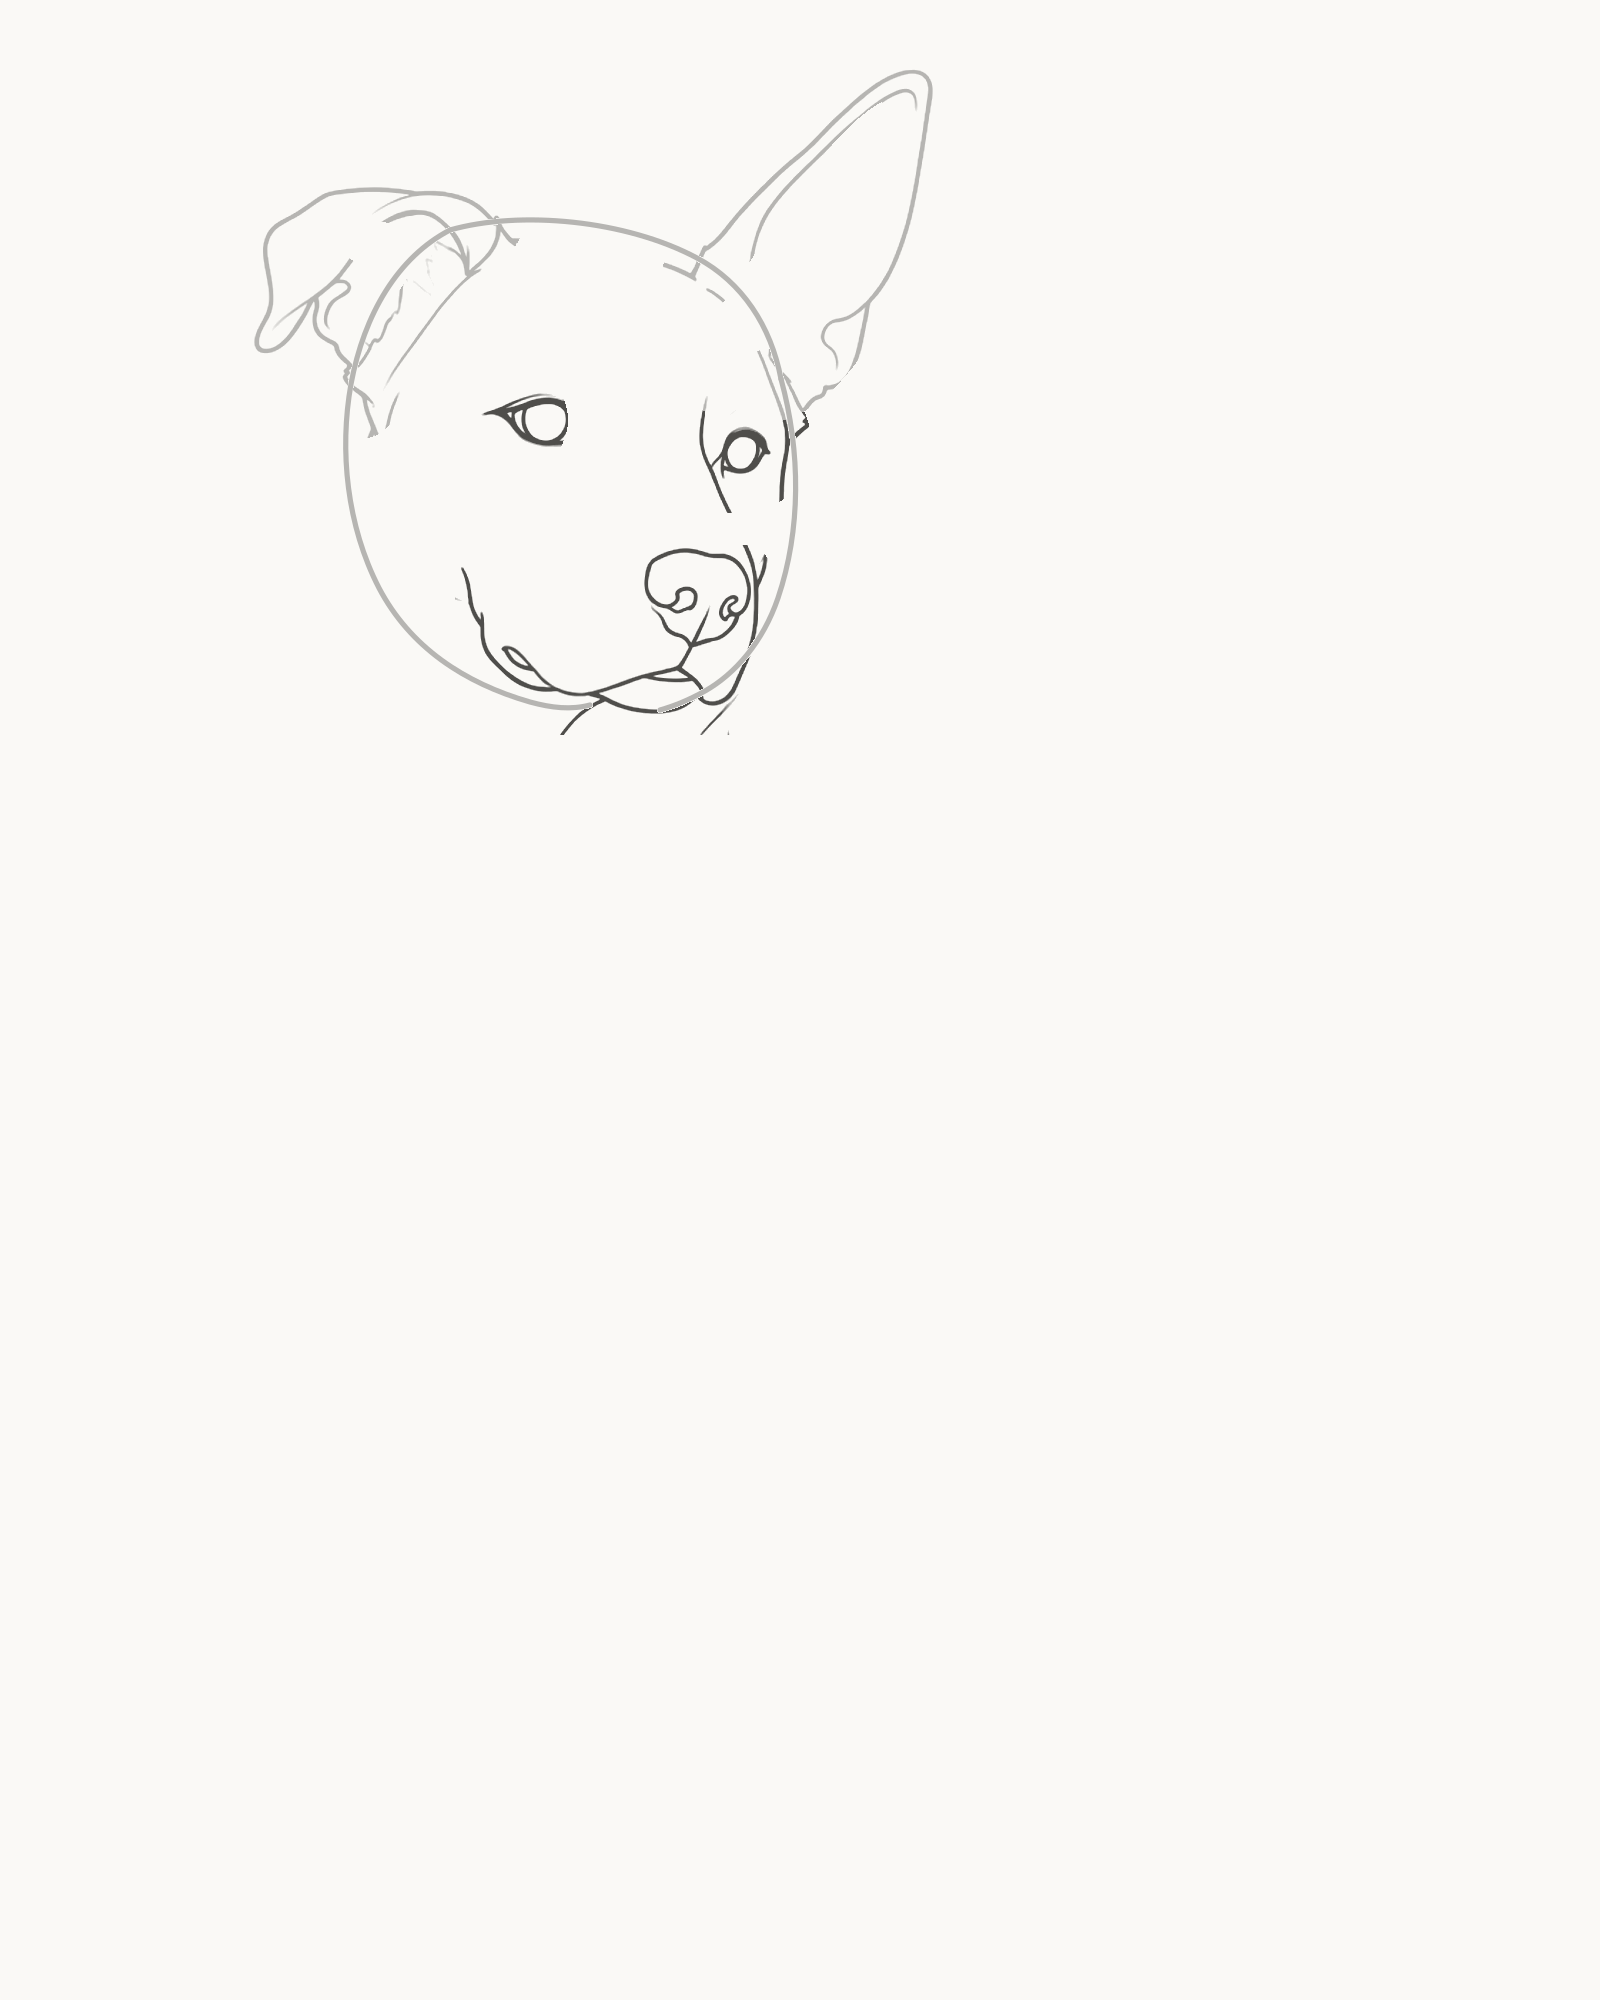
Stage 3 of 9. Unequal features turn the muzzle gently viewer-left. - Bridge and eyes
- Open nose
- Muzzle edges
- Mouth and lip
Work from top to bottom. First place the short bridge and the two open eyes. The eye nearer the viewer's left is slightly larger and sits a touch lower; the farther eye stays closer to the bridge. Keep both shapes open and restrained rather than filling them as dark buttons.
Next place the broad nose in the lower-right part of the head outline. Leave paper showing inside it. Connect the nose to the short muzzle edges, then add the small mouth division and lower lip. The muzzle occupies the existing head shape: do not attach a new oval outside it. This ordered sequence—bridge and eyes, nose, then mouth—helps all the features agree on the same turn.
Look for this before moving on: both eyes and the open nose point towards the viewer's left, the mouth connects beneath the muzzle, and the two sides remain deliberately unequal. The expression reads as calm rather than cartoon-like.
If it goes wrong: lift only the newest eye, nose edge or mouth line. Re-place it against the bridge before adding another feature; do not darken the nose or enlarge both eyes to disguise a spacing error.
4. Connect the neck, chest, back and rump
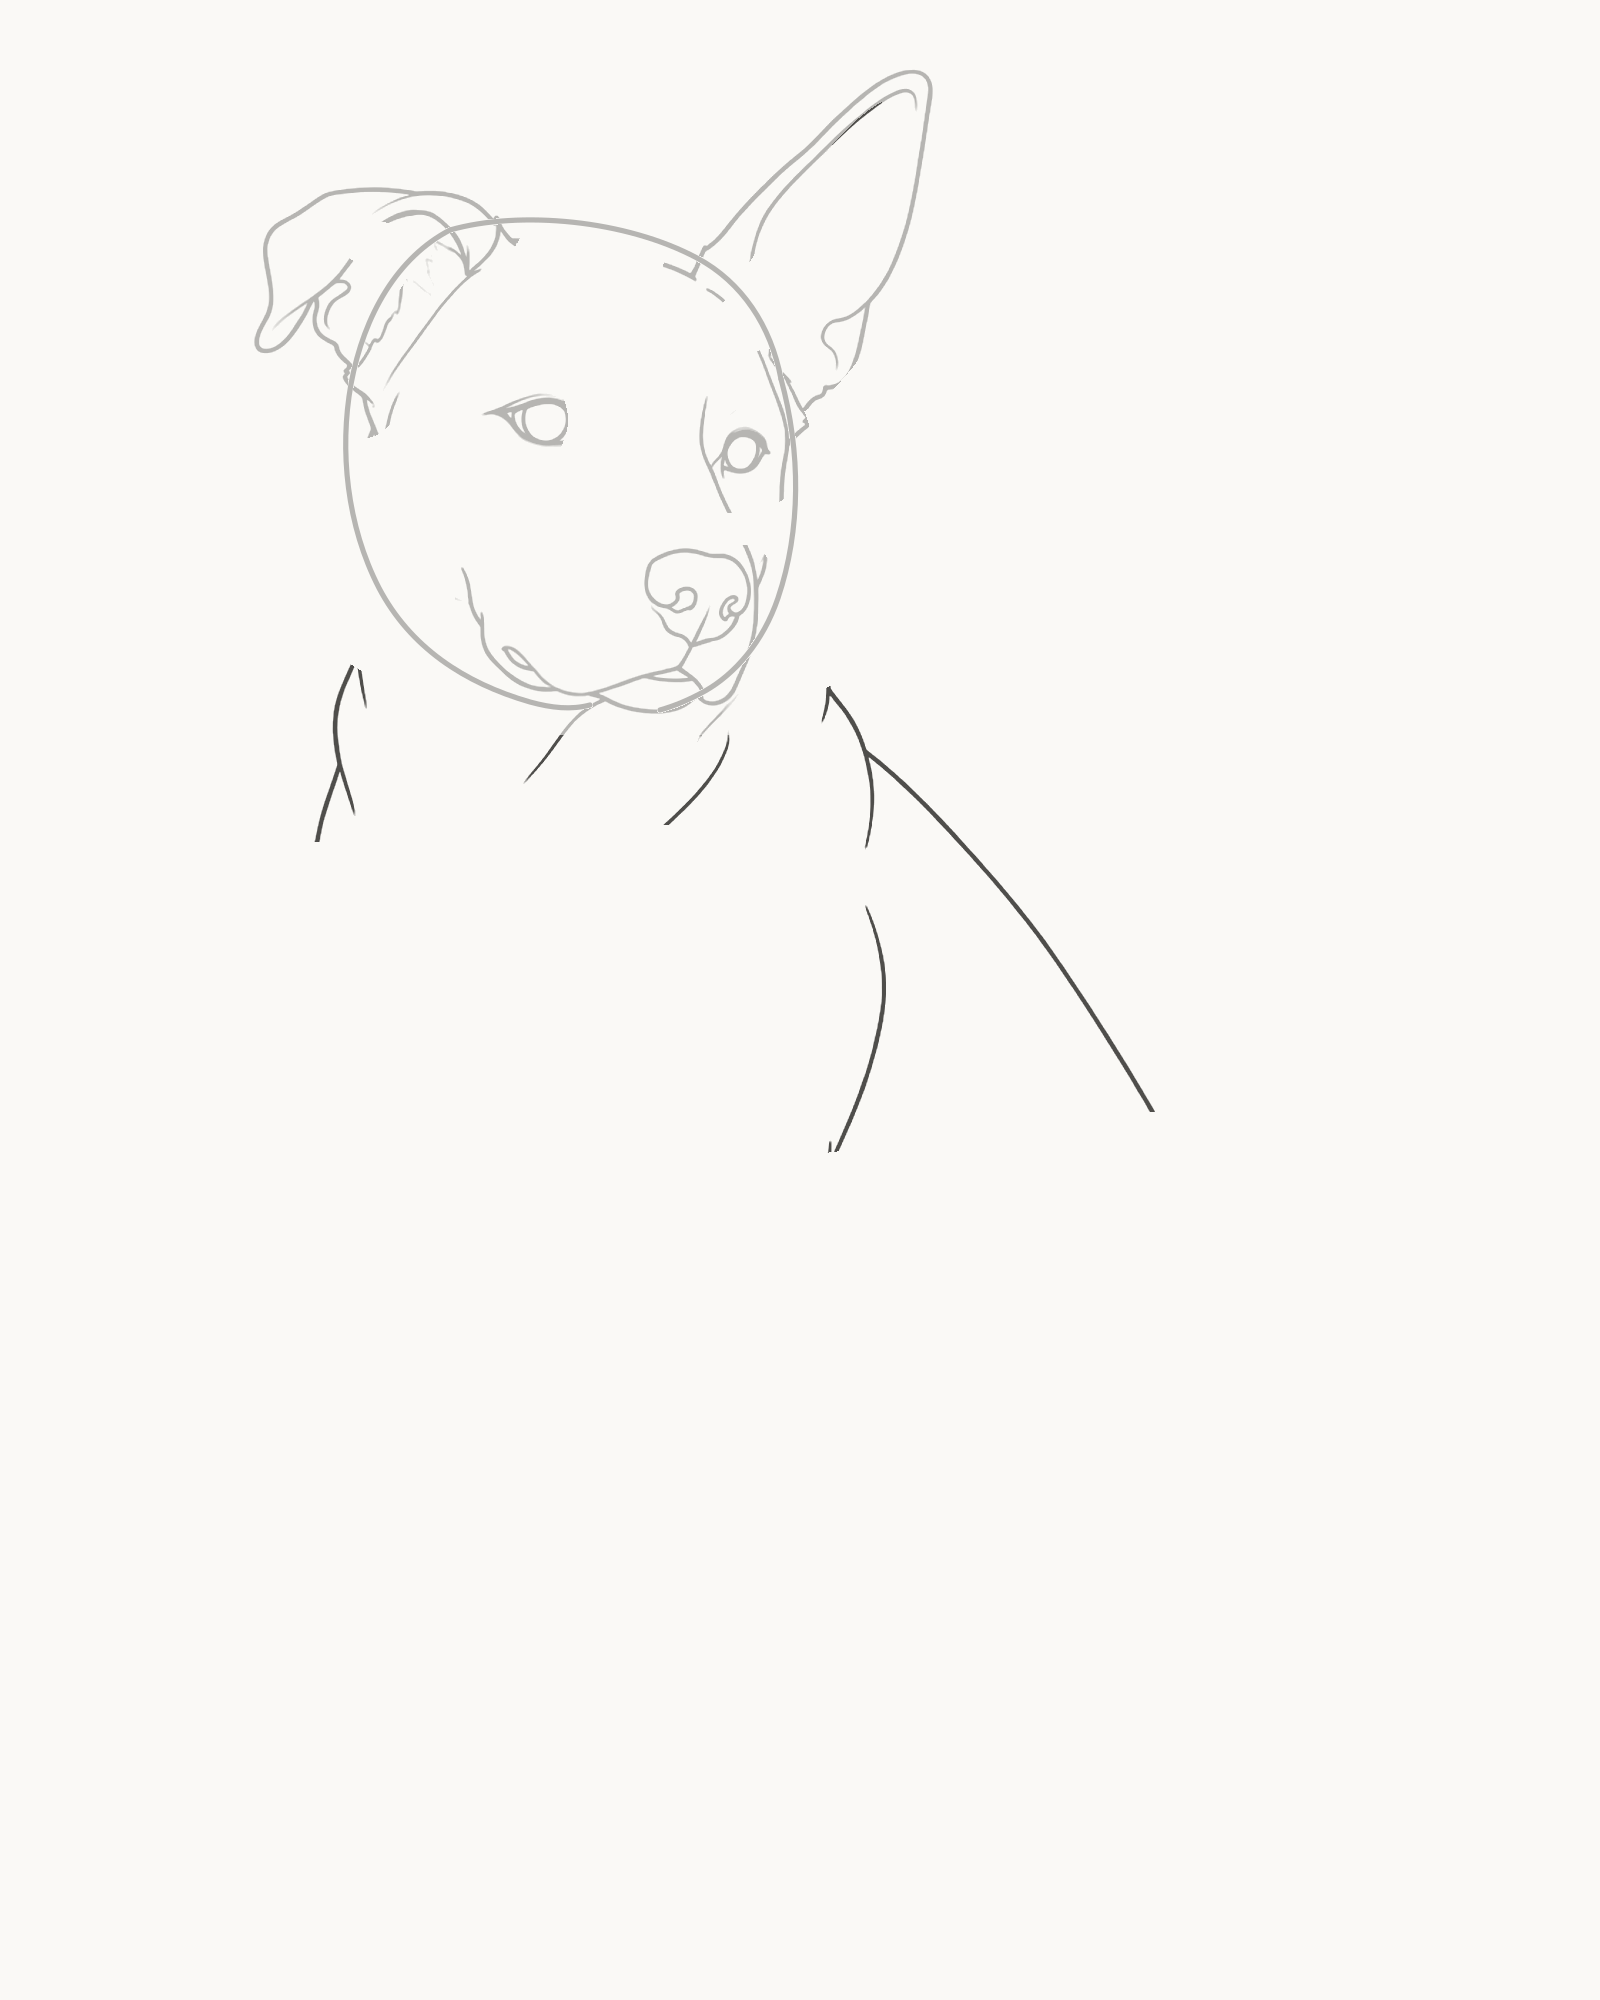
Stage 4 of 9. The torso supports the head and reserves every limb opening. - Near neck and chest
- Far neck return
- Back curve
- Rounded rump
Start beneath the near side of the jaw. Draw the short neck return into the outer chest, letting the chest swell before stopping at the planned opening for the nearer front leg. Add the farther neck return under the opposite side of the jaw, then the inner chest edge shown in the image.
From behind the upright ear and shoulder, take one long, easy curve down the back towards the viewer's right. Round it into the upper rump and stop before the future tail and hind leg. These separate stopping points are intentional: later limbs close the body without crossing or erasing the torso.
Look for this before moving on: the head is supported by a tapered neck and broad chest. The back slopes into a lower, wider rump, while clean openings remain for both front legs and the rear construction.
If it goes wrong: replace the most recent neck or torso section between its existing endpoints. If the body is too small, adjust only the back/rump curve; do not move the accepted head or turn the neck into a dark collar.
5. Build the nearer front leg and paw
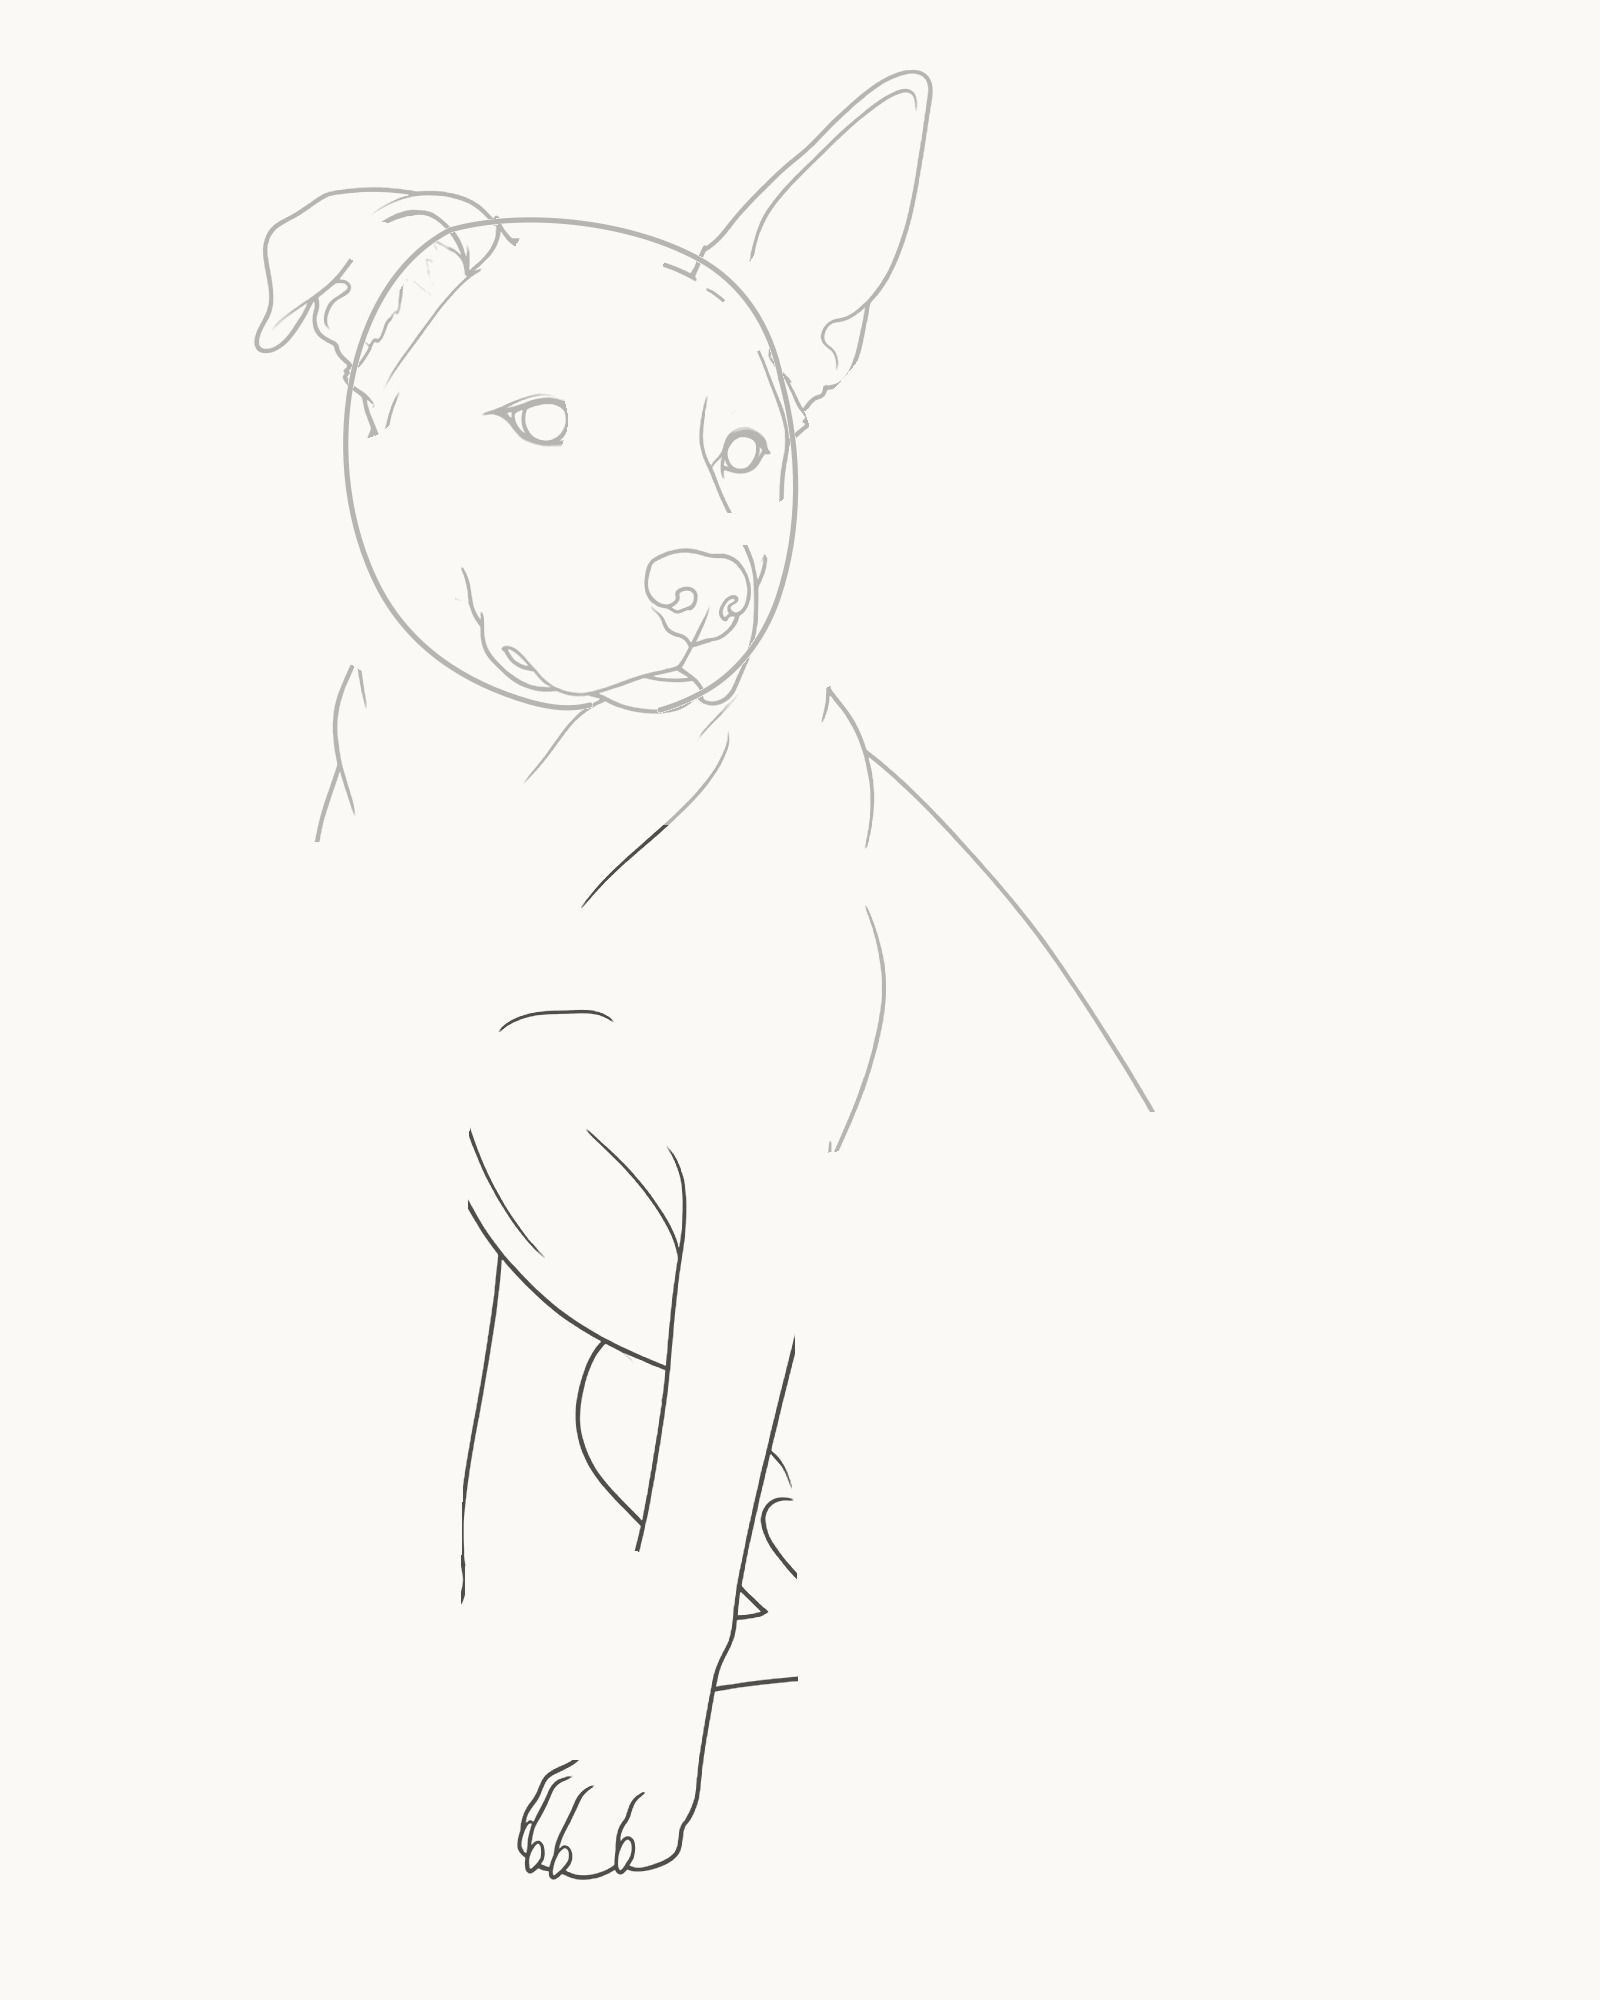
Stage 5 of 9. The nearer front leg supplies the strongest vertical support. - Inside leg edge
- Outside leg edge
- Paw closure
- Wrist and toes
The nearer front leg is the stronger, more central support. Begin where the chest stopped and draw its inside edge downwards. Let it change direction slightly at the wrist before opening into the paw. Return up the outside edge with a gentle taper so the leg is narrower near the wrist than at the chest.
Close the paw against the implied ground band. Follow the small toe shapes shown in the image rather than drawing one smooth slipper. Add the short wrist fold and the fine toe divisions last. Keep these inner marks lighter than the outside leg.
Look for this before moving on: the leg descends convincingly from the chest, tapers instead of forming a tube and ends in a flat, readable paw. The wrist fold changes direction without becoming a black knot.
If it goes wrong: repair one new leg edge, wrist fold or paw section. A floating paw can be lowered by replacing only its bottom curve; a thick leg can be narrowed from one side while the chest remains untouched.
6. Add the farther front leg and paw
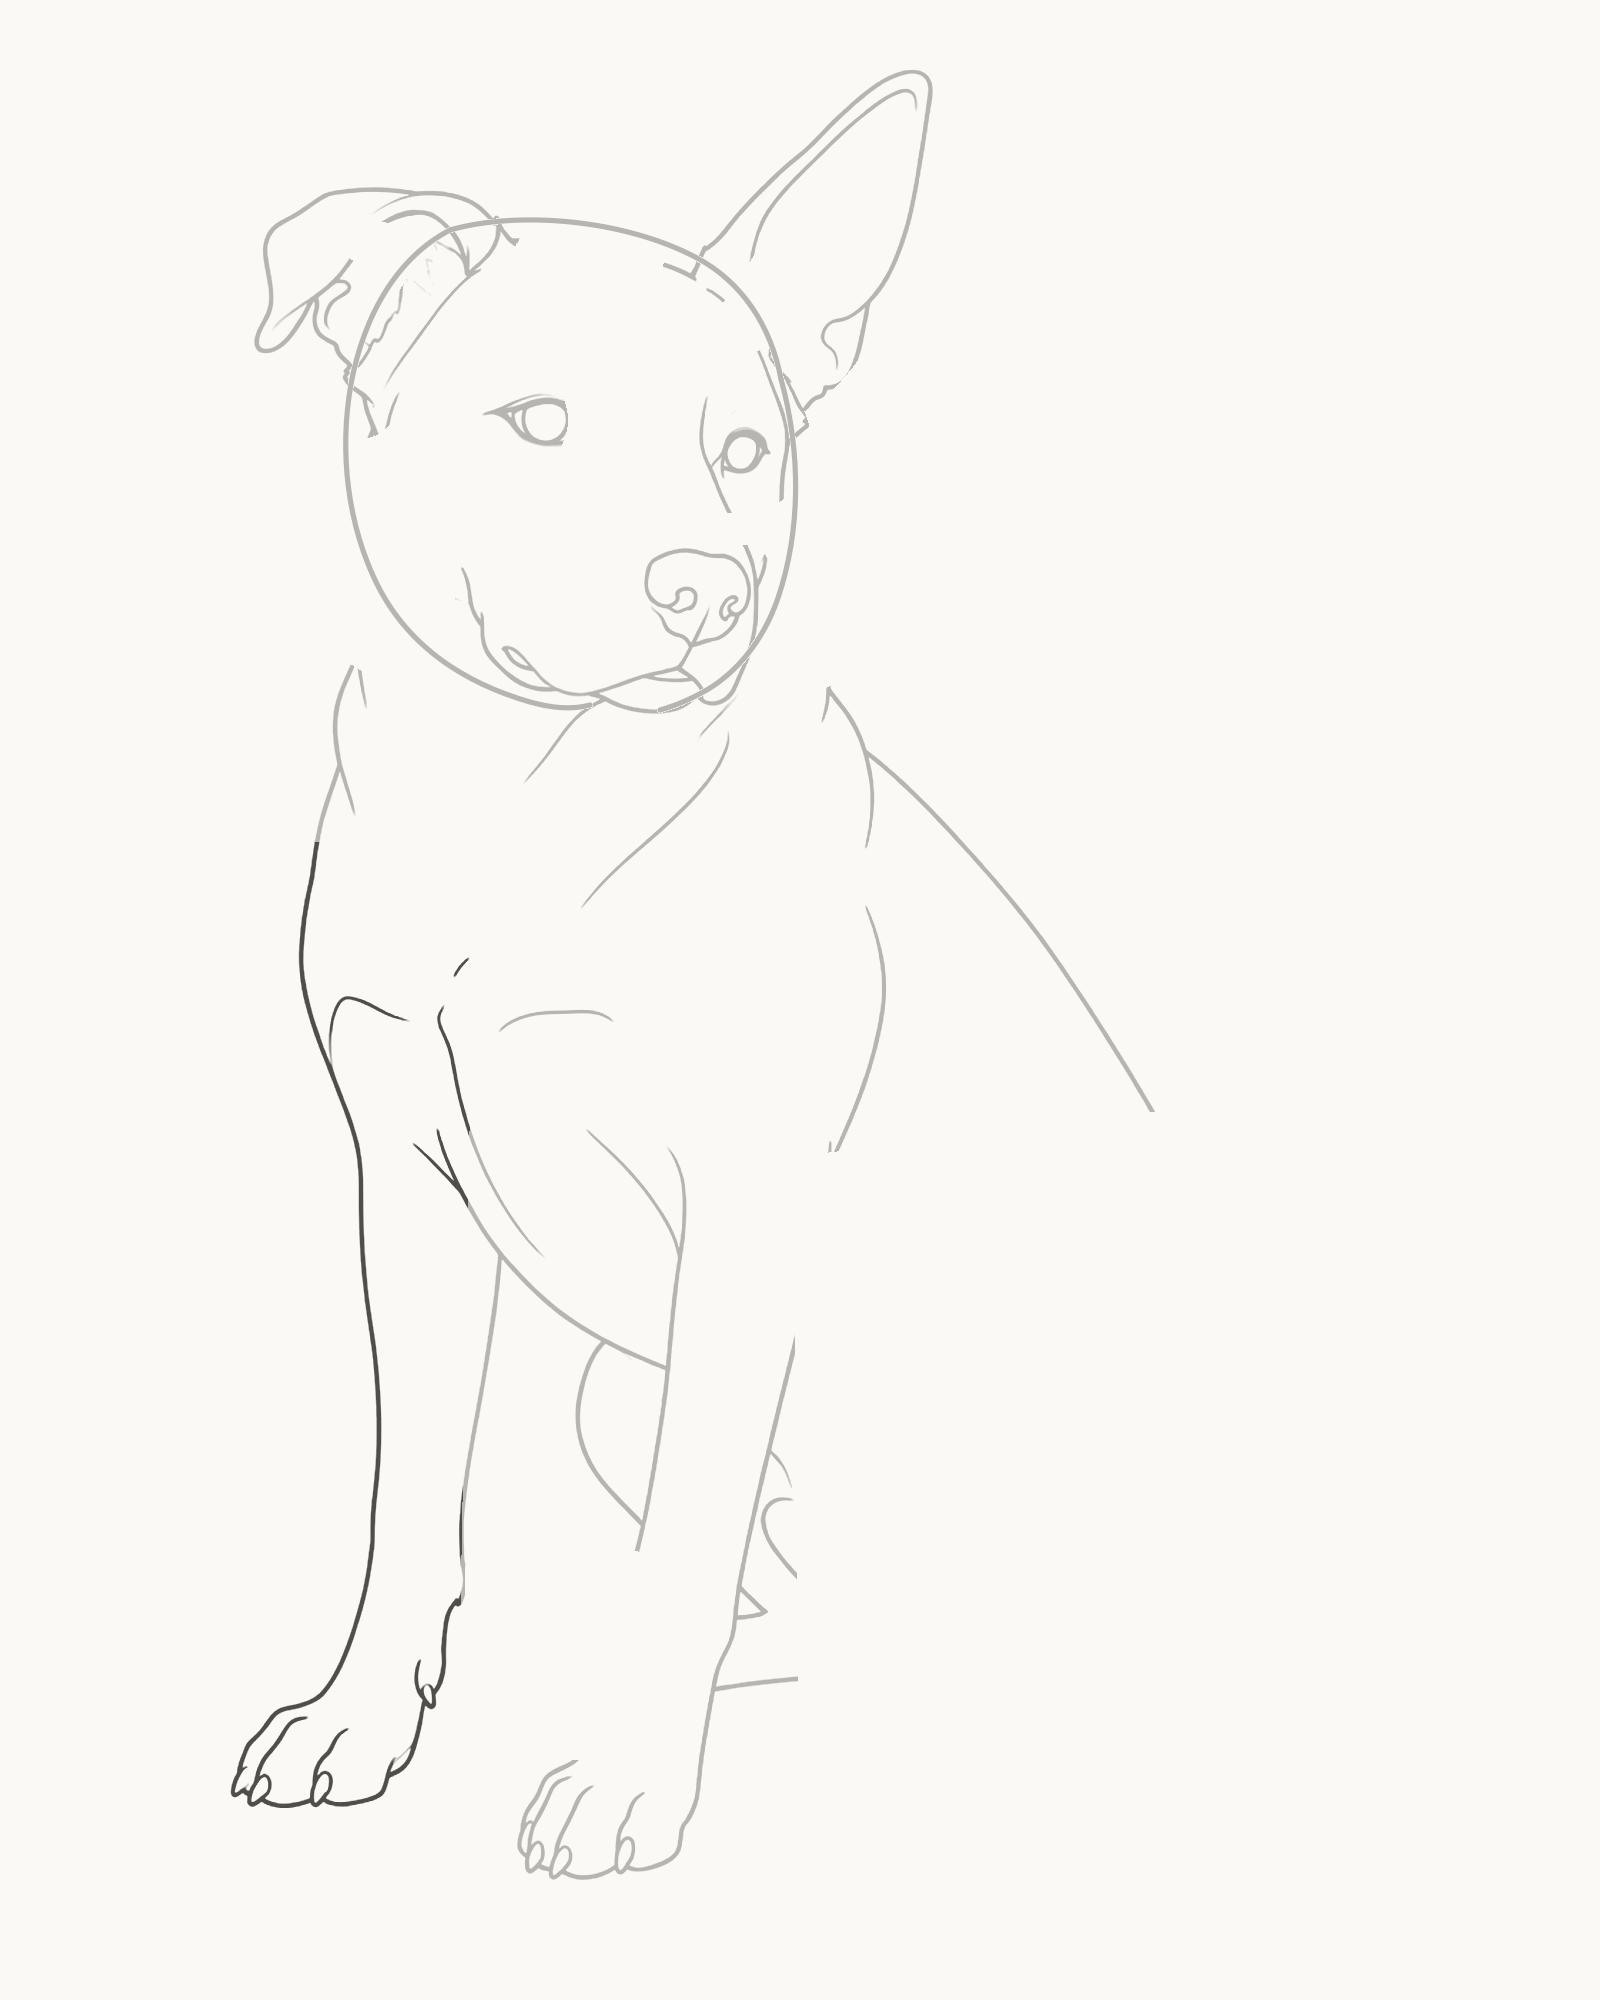
Stage 6 of 9. The narrower far leg establishes clear front-to-back depth. - Visible upper interval
- Lower leg return
- Smaller paw
- Wrist and toes
Build the second front leg behind and to the viewer's left of the first. Draw only the intervals that remain visible around the nearer leg. Its upper part begins beneath the farther side of the chest, and its lower edge reaches a slightly smaller paw on the same overall ground band.
Keep this leg narrower. Add its modest wrist change and short toe divisions after the outline is secure. The two paws should not be identical: the farther one sits a little higher in the image and carries less visual weight, while remaining clearly in contact with the ground.
Look for this before moving on: two separate front legs can be counted. The farther leg is partly hidden, its paw is smaller, and neither limb reads as a doubled parallel cylinder.
If it goes wrong: erase only the latest visible interval, fold or paw edge. If the far leg has come forward, narrow its outside edge and reduce its paw instead of altering the nearer support.
7. Close the sitting body and rear paws
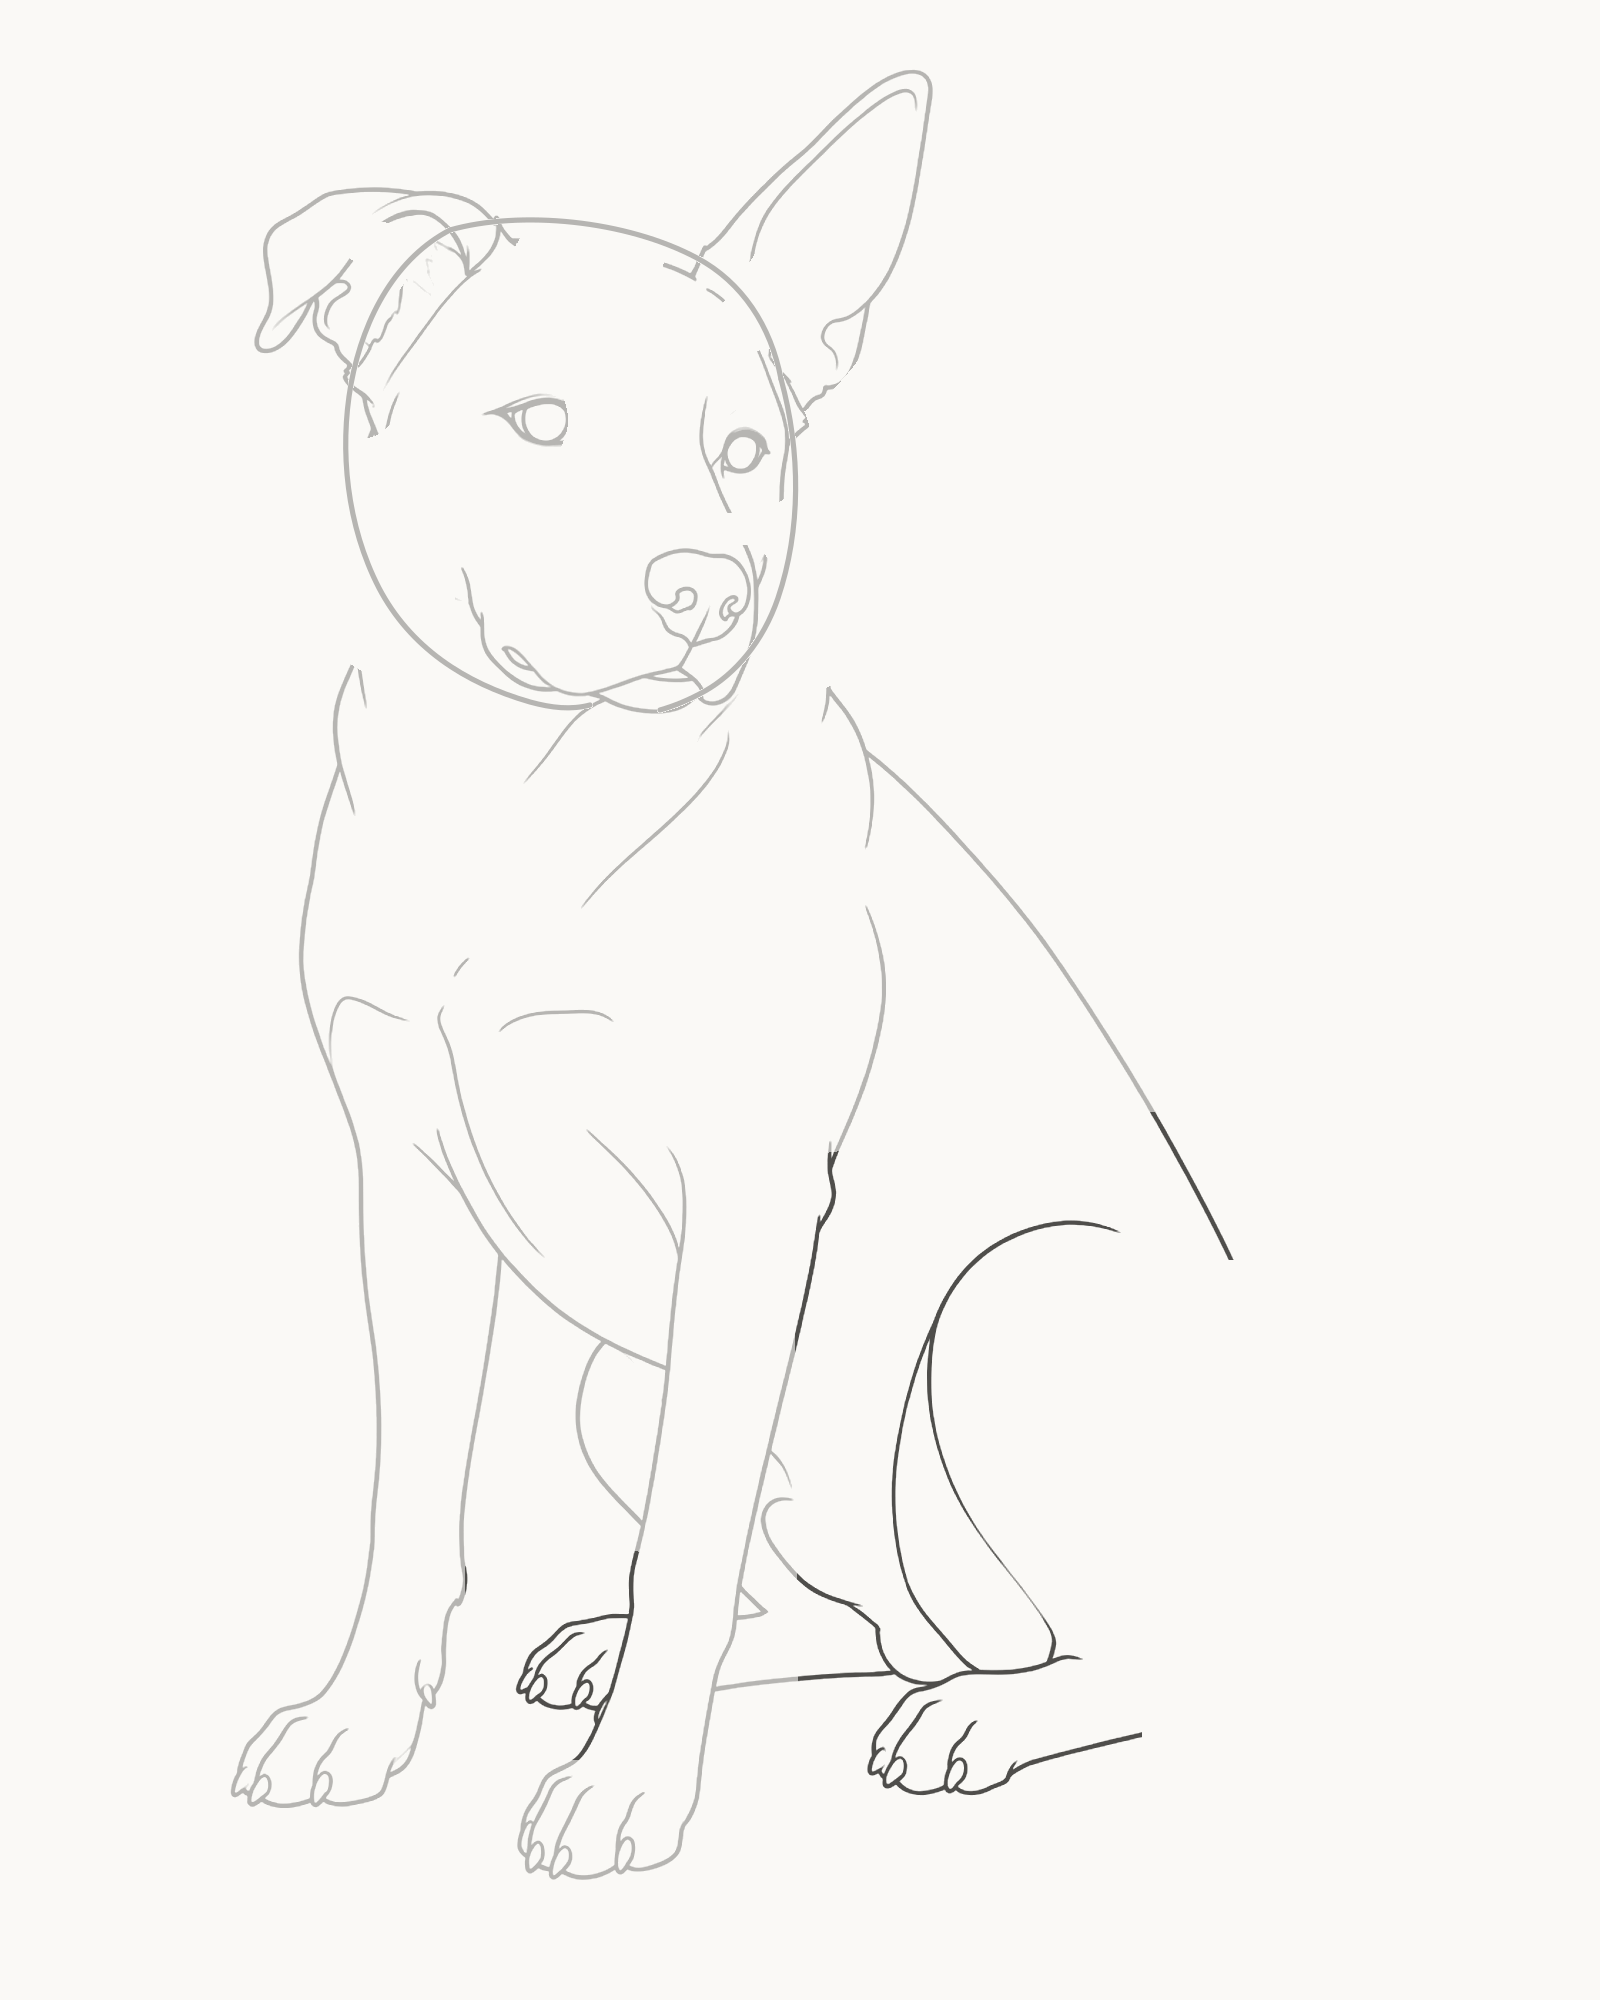
Stage 7 of 9. The hindquarter closes a stable seated support triangle. - Belly return
- Broad near thigh
- Near rear paw
- Small far rear paw
Add the belly return behind the front legs first. Stop it before it crosses the future thigh. From the retained rump, draw the large near-thigh curve down and forwards. Continue into the broad rear paw on the viewer's right, then lead the lower contour back towards the belly so the hindquarter feels like one folded mass rather than a separate oval.
Add the small far rear paw in the gap behind the front legs. Only part of it is visible, so keep it subordinate. Finish with the short hock fold and the toe divisions shown in the stage. The main supports now form a stable triangle between the two front paws and the nearer rear paw.
Look for this before moving on: the rump, thigh and near rear paw connect in one continuous sitting shape. The belly stops cleanly behind it, and the far rear paw is present without matching the size or prominence of the near one.
If it goes wrong: replace the newest belly, thigh, hock or paw curve between stable endpoints. If the thigh resembles a pasted circle, open its upper connection into the rump rather than covering the join with extra lines.
8. Attach the low, tapered tail
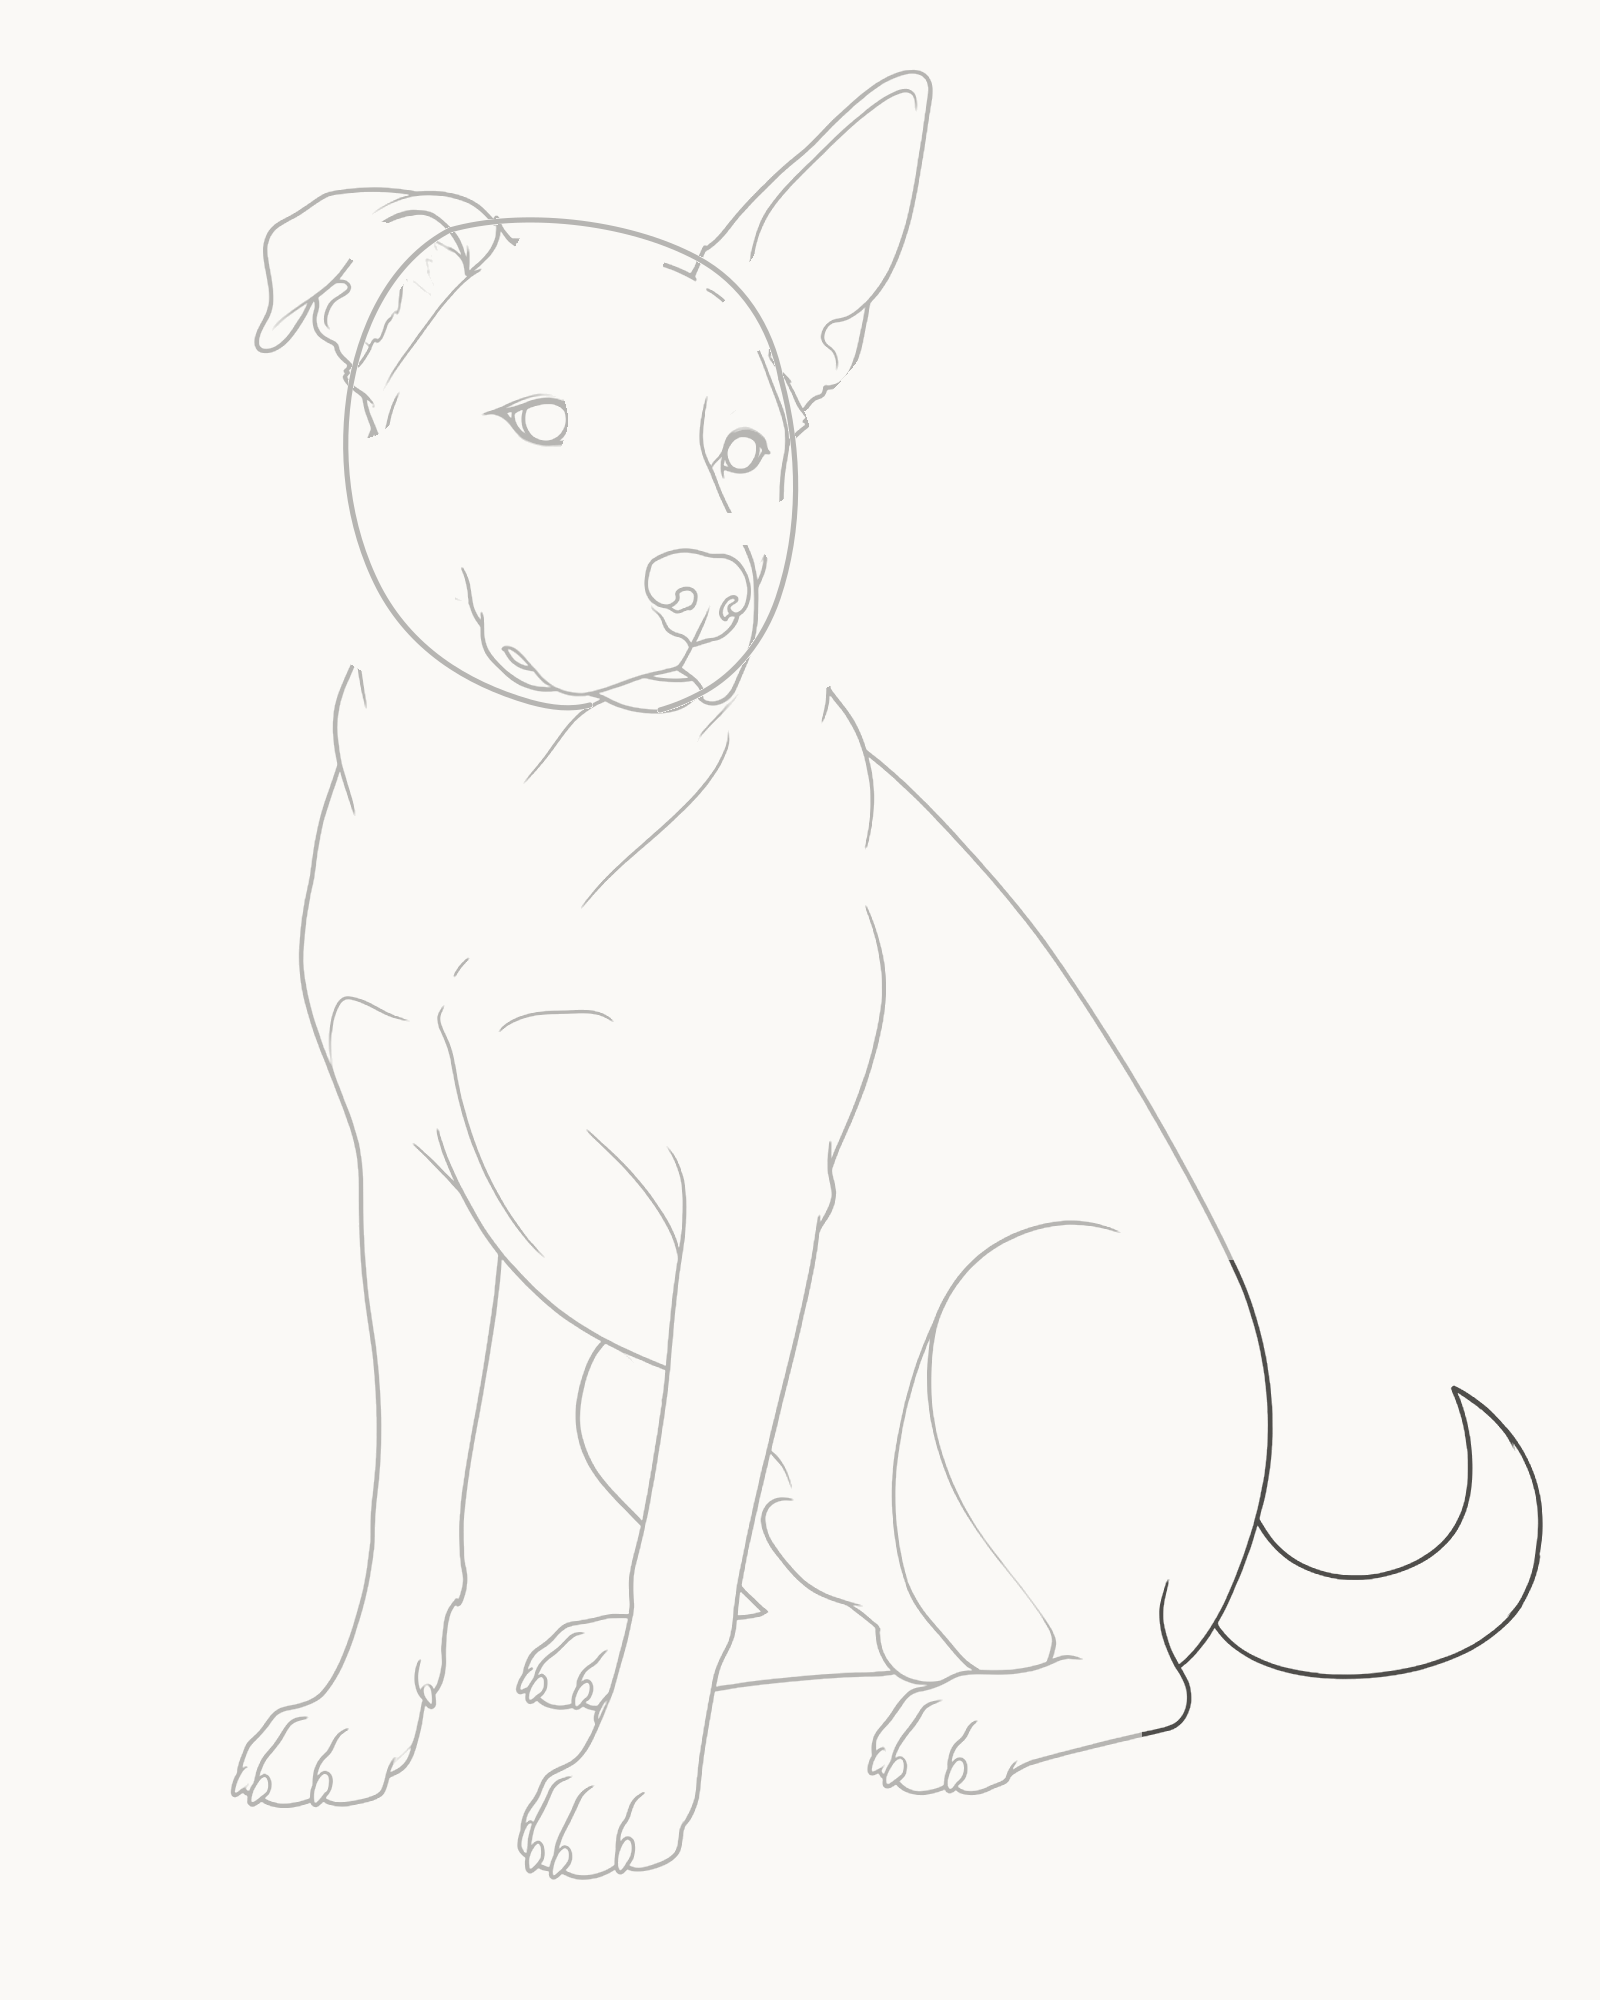
Stage 8 of 9. A hidden root and converging edges make the tail attach naturally. - Lower edge
- Ground turn
- Upward curve
- Tapered return
Begin behind the rump, allowing the actual root to remain hidden by the nearer body. Draw the lower tail edge out towards the viewer's right. Let it rest briefly near the ground, then turn it upwards in a broad curve.
Bring the second edge back towards the concealed root, steadily narrowing the distance between the two sides. The tail passes behind the seated body and does not cross the rear paw. Its taper and hidden attachment matter more than a decorative curl.
Look for this before moving on: the tail emerges believably from behind the rump, touches the low ground area, turns upwards and becomes narrower towards the tip. No limb or torso line has changed.
If it goes wrong: remove only the newest tail edge. Reconnect it from the hidden-root area or tighten its taper; never thicken the rump or redraw the rear paw to make space.
9. Add sparse light and ground marks
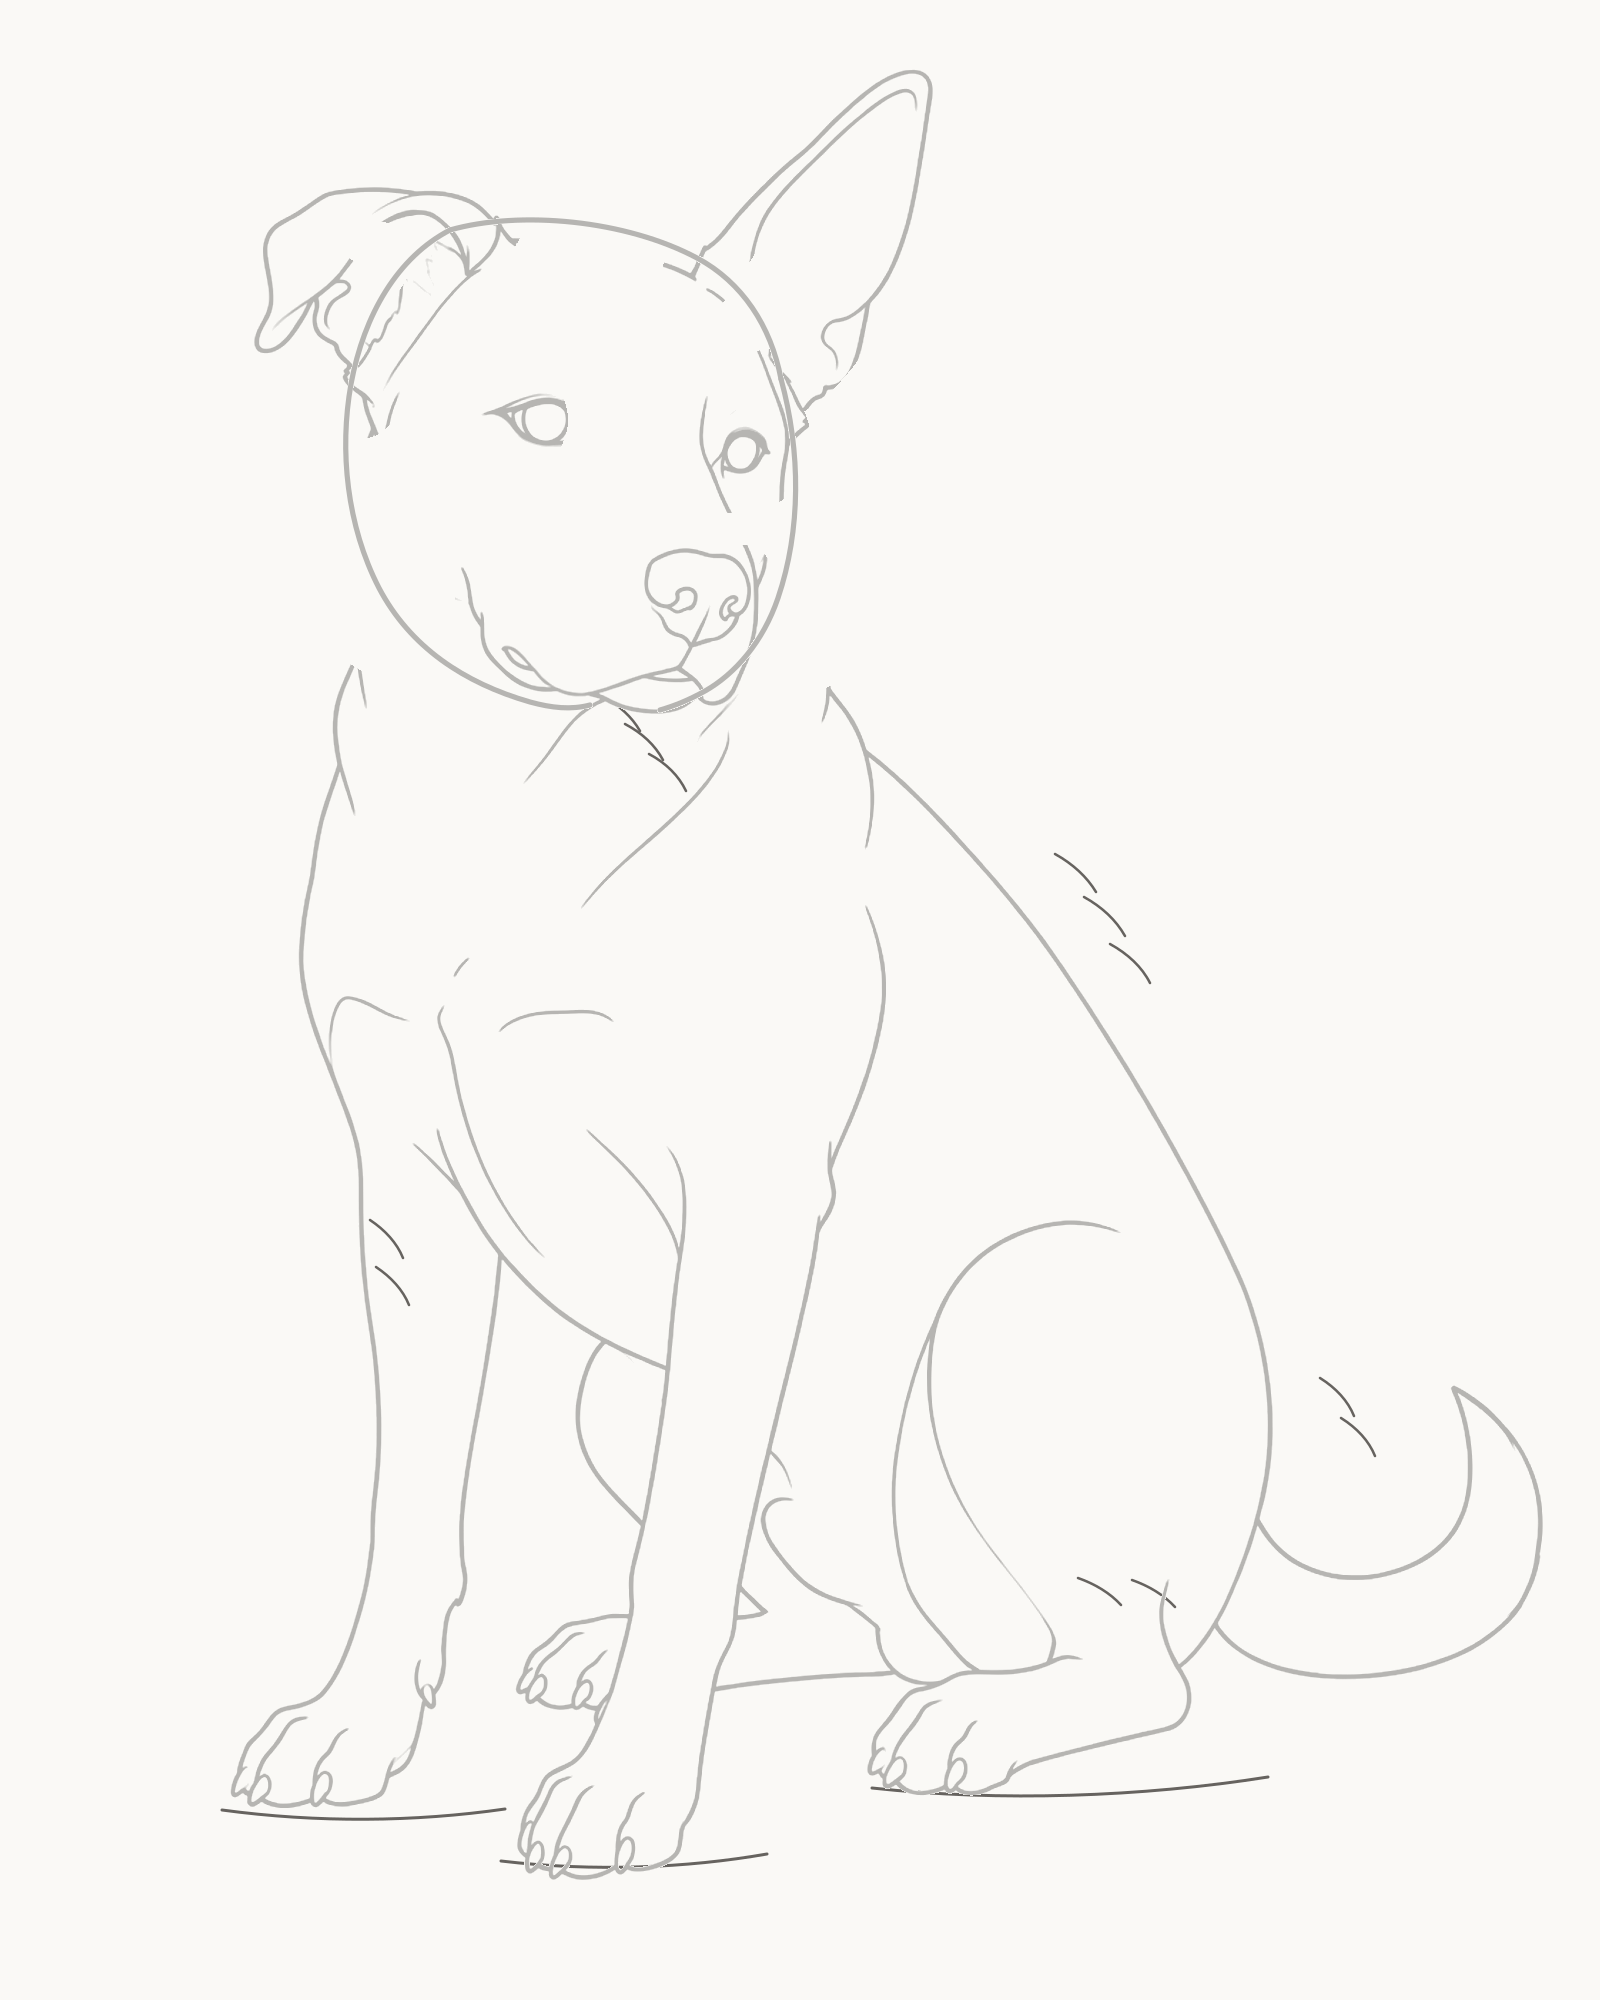
Stage 9 of 9. Sparse accents confirm upper-left light and grounded weight. - Three neck marks
- Nine body marks
- Three contacts
- Leave open paper
Keep the upper-left light direction in mind. Add twelve short, separated hatches to lower-right-facing areas: three beneath the jaw and neck, three across the lower-right torso and thigh, two on the farther leg, two beneath the tail's turn and two near the rear paw. Finish with three short ground contacts beneath the paws and tail area.
These are directional accents, not a coat texture or full shading pass. Leave generous gaps between them and do not retrace an outline. The open paper should still dominate the finished drawing.
Look for this before moving on: twelve hatches and three ground marks are countable. They support one upper-left light direction, make the seated weight clearer and leave every joint and attachment readable.
If it goes wrong: erase only the latest hatch or contact. Shorten a mark that competes with a contour, and remove a stroke on the light side instead of adding more lines to balance it.


Common mistakes and focused fixes
The head looks like a puppy symbol
Check the head against the chest rather than adding details. Keep the eyes small and unequal, preserve the broad short muzzle and let the body carry more area than the head. Do not enlarge the nose or round both ears to create instant character.
The ears seem attached to the cheeks
Follow each root back towards the crown. A short overlap at the top of the head should make the crown appear in front. Replace one root arc rather than thickening the whole junction.
The front legs look like matching tubes
Keep the nearer leg wider and more continuous. Break the farther leg into the visible intervals around it, reduce the far paw and retain the small changes of direction at both wrists.
The dog appears to float
Compare the bottoms of the two front paws and the near rear paw. They should occupy one narrow ground band. Correct only the newest paw base, then let the final three contacts confirm the surface without drawing a horizon.
The hindquarter looks pasted on
Trace the connection from back to rump, thigh, rear paw and belly with your eye. If there is a pinch or isolated oval, replace the newest curve at that junction. Fur strokes will not repair the structure.
The finish becomes scratchy fur
Count the final marks by group. Stop at twelve hatches and three ground contacts. Their job is to describe light and weight, not breed, coat length or colour.
A useful next exercise
Repeat the same dog at a smaller size but reverse the ear arrangement: fold the viewer-right ear and lift the viewer-left one. Keep the seated weight, head-to-chest ratio and near/far paw differences. This isolates asymmetry and attachment without asking you to invent a new pose all at once.
For closer practice with small facial placement, try How to Draw Eyes. The historical Dog drawings gallery is a separate place to study how artists have represented dogs rather than a second version of this practical lesson. You can also return to the How to Draw guides to search or filter the completed lessons.
Frequently Asked Questions
What is the easiest way to draw a complete dog?
Choose one clear pose and settle the largest relationships before adding coat detail. This lesson fixes the head, body, supporting legs, hindquarter and tail in that order, with one local check after each addition.
Do I have to begin with circles?
No. This sequence uses permanent outlines rather than temporary circles. The first head shape stays visible, and later marks attach to it without a cleanup stage.
How can I draw my own dog from a photo?
Choose a clear photograph with visible paws and little lens distortion. First compare head size, shoulder height, back angle and ground contacts. Then adapt ear, muzzle and tail proportions while keeping the structural order. Do not force a standing or lying photograph into this seated pose.
Will a school pencil work for this lesson?
It will. The familiar No. 2 grade behaves much like HB graphite and is suitable on printer paper. Sharpen it well, then ease the pressure for facial details, toe divisions and hatches.
Why are the two front paws different sizes?
The dog is turned slightly, so the farther front leg is partly hidden and its paw has less visual prominence. Making the paws identical would flatten the pose.
How do I make the dog look realistic without drawing fur?
Concentrate on proportions, joint direction, overlap and ground contact. Samantha Bell's full-body drawing lesson likewise highlights where lines connect, a useful reminder that attachment carries more structure than decorative texture.[3]
Should I erase the first head outline later?
No. It is part of the final contour. If its newest curve is wrong, repair it during Stage 1; do not schedule its removal after the face or body is attached.
Why is the far rear paw so small?
Most of it is hidden behind the body and front legs. The visible piece confirms the seated pose, but enlarging it to match the near rear paw would reverse the depth.
Is Stage 9 a shading stage?
It is a restrained line finish, not full tonal shading. The twelve hatches indicate lower-right-facing surfaces, while three short contacts help the paws and tail sit on the ground.
References
- Wacom, “How to Draw a Dog.” View source
- Clip Studio Paint, “How to Draw Dogs.” View source
- Samantha Bell, “Dog Drawing Step by Step.” View source
More DRAWING Guides

How to Draw a Rose: A Step by Step Guide

How to Draw a Tree: A Step by Step Guide

How to Draw Eyes: A Step by Step Guide

How to Draw Leaves: A Step by Step Guide

How to Draw Autumn Leaves: A Step by Step Guide

How to Draw Flowers: A Step by Step Guide

How to Draw a Lily: A Step by Step Guide

How to Draw a Sunflower: A Step by Step Guide

How to Draw a Tulip: A Step by Step Guide

How to Draw a Hibiscus: A Step by Step Guide

How to Draw a Daisy: A Step by Step Guide
