



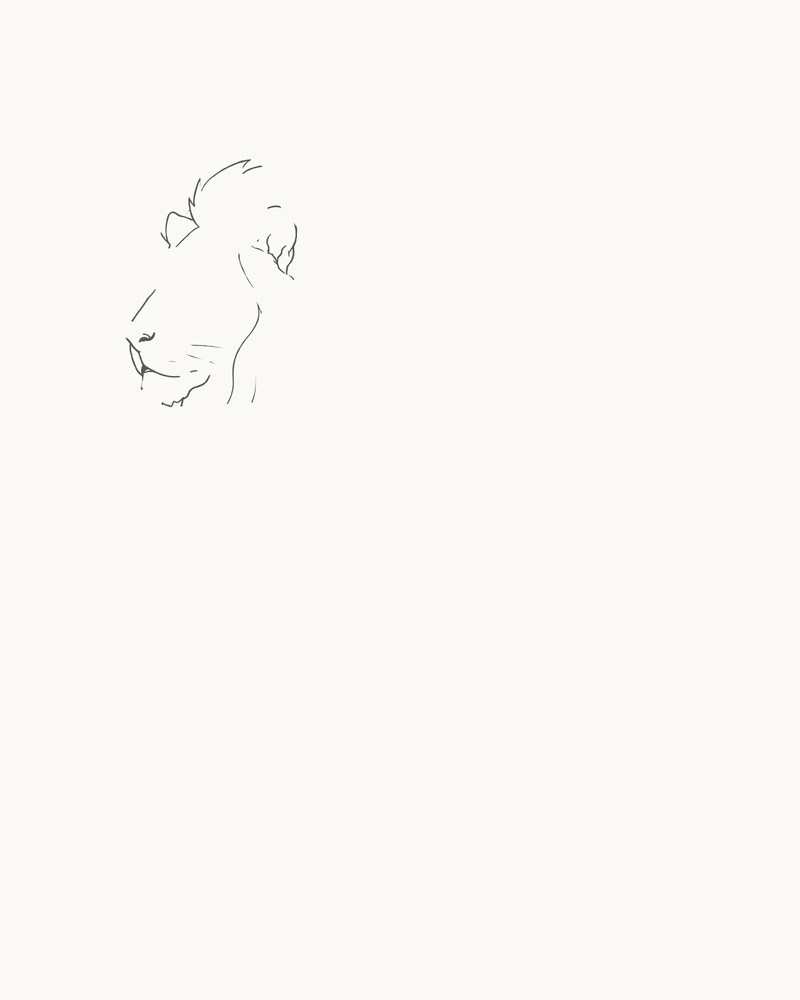
Draw one complete standing lion
Draw a complete adult male lion standing calmly and facing left in nine permanent line stages. You will fix the head and face first, attach an uneven mane, reserve the body openings and add four weight-bearing legs before finishing with a tapered tail. The result is a clean pencil outline with a readable full-body pose—not a face-only study, a cub, a cartoon mascot or a shaded fur drawing.
Difficulty: Beginner, with extra care needed where the mane meets the body and where each leg meets the underside
Time: Allow about 50–70 minutes. This is an untested estimate; use the completion checks rather than drawing to a timer.
Medium: HB or No. 2 pencil, line only
The head is shown in near-side profile, while the body turns just enough for all four legs to remain visible. The nearer foreleg and hindquarter have more visual weight. Their farther partners are narrower and partly hidden, so the pose has depth without shading.
Treat the mane as an attachment system, not a circle around the face. It begins behind the ear and crown, passes around the rear neck and shoulder, then returns beneath the jaw. One exit leads into the back and another into the front chest. Keeping those exits separate prevents a dark collar or a floating head.
Every line shown during the lesson stays in the final drawing. There is no hidden stick figure, body oval, tracing layer or end-of-lesson cleanup. If a fresh curve misses its target, replace that small section before adding the next component and leave sound earlier marks alone.
Materials
- A pointed HB or No. 2 pencil. A 0.5–0.7 mm mechanical pencil is a suitable substitute.
- Smooth unlined paper in portrait orientation. Printer paper is sufficient for a first attempt.
- A soft, clean eraser reserved for lifting the latest misplaced segment.
- A sharpener to keep the point narrow enough for the face and paws.
- Optional: scrap paper for rehearsing one paw or tail curve.
- Optional: a clear side-view or mild three-quarter photograph of an adult male lion, used only to compare the broad muzzle, mane-to-shoulder join and leg positions.
You do not need specialist graphite grades, charcoal, blending tools, tracing paper, coloured pencils, a tablet or a downloadable worksheet.
Before you draw
Imagine a 4:5 portrait frame. Place the head around 29% of the frame width and 27% of its height—high and left enough to leave a long open area for the torso, four paws and curled tail. The nose needs clear paper on the left; the tail tuft needs clear paper on the right; every paw needs room below it.
The separate Stage 1 placement cue and the optional 8×10 page grid show this area. They are viewing aids, not lines to copy onto the paper. If you use the grid, switch it off once the head position makes sense.
Keep the outer silhouette clear but restrained. Facial marks, whiskers, mane divisions, toe lines and the farther legs can be finer. The notional light comes from the upper left, but no visible shading is added. The final stage is still a line drawing.
1. Place the permanent head profile
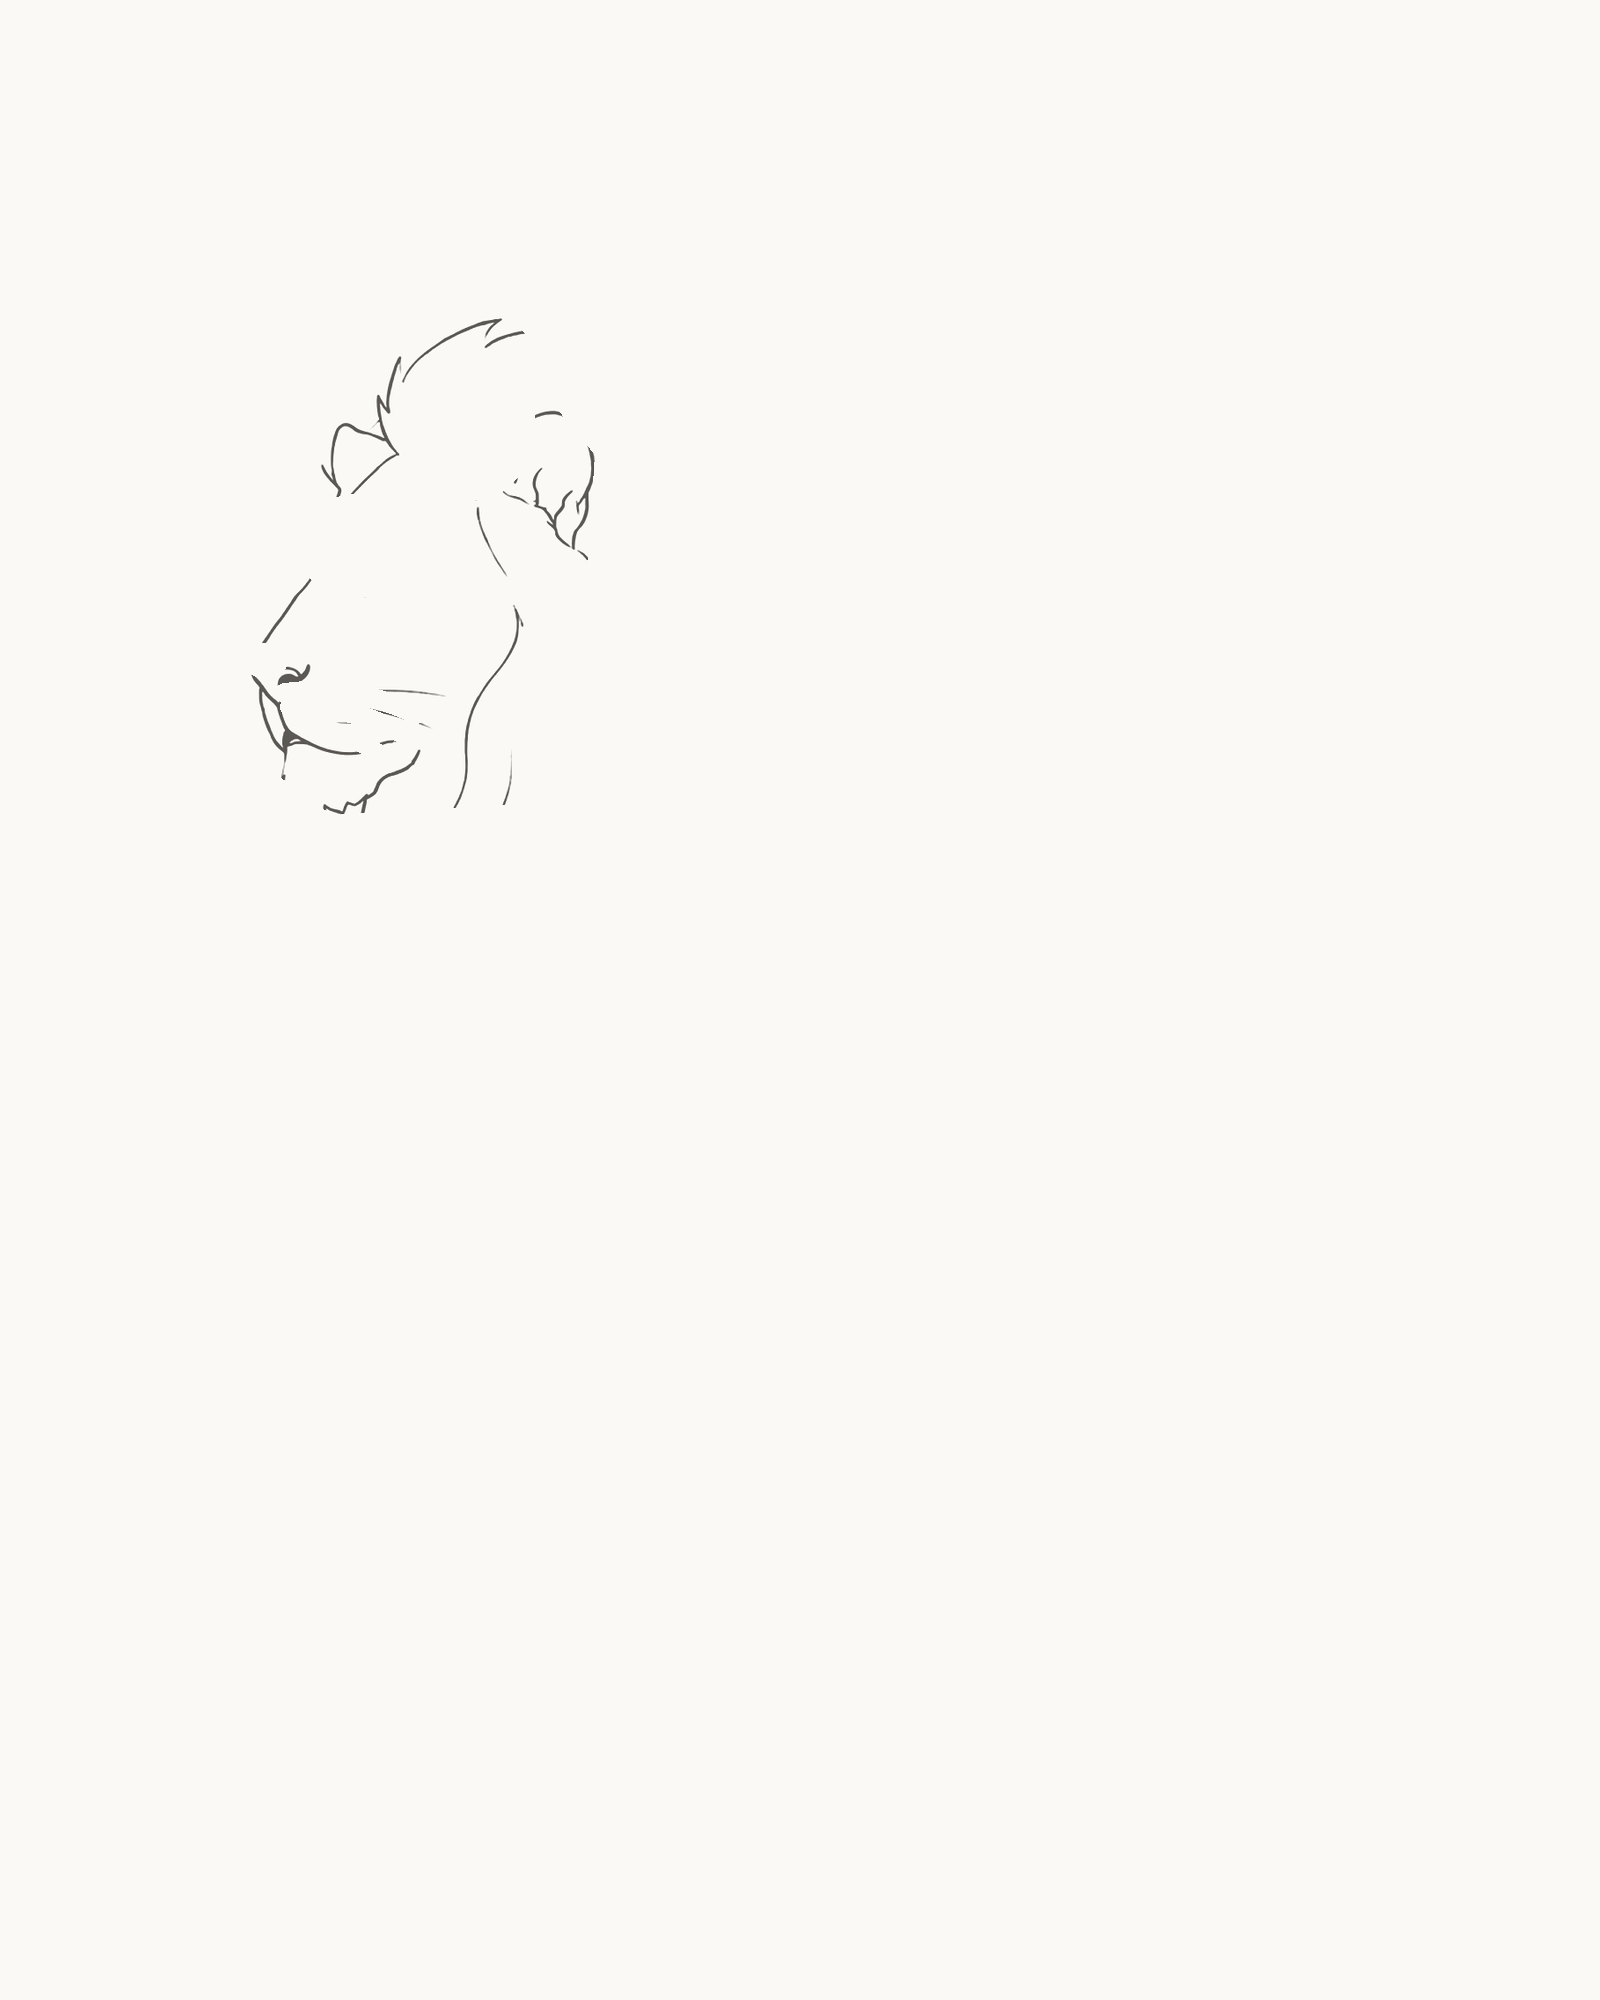
Stage 1 of 9. The permanent profile fixes the unequal ears, broad muzzle and future mane attachments. 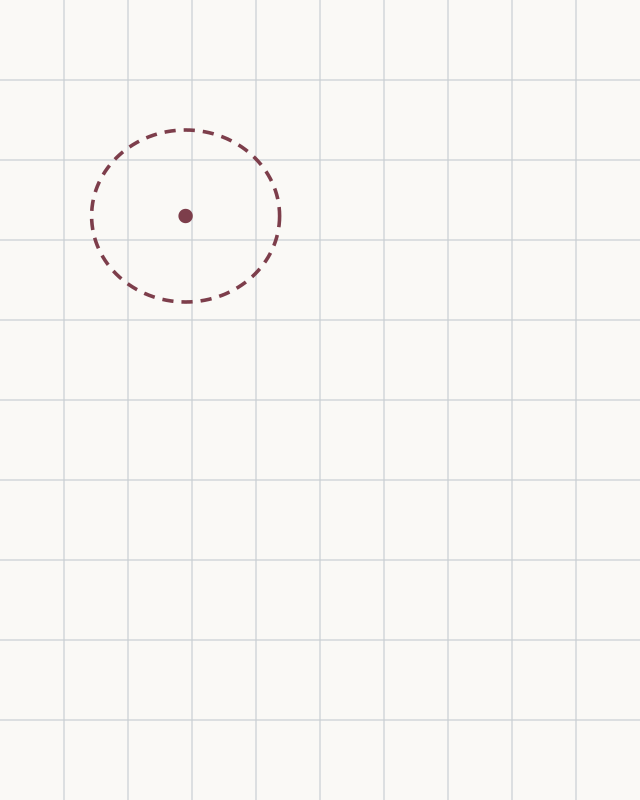
Placement cue: set the head around x29% and y27%. Leave the left edge open for the muzzle, the lower sheet for four paws and the right side for the tail. Keep the cue off the drawing. - Unequal ears and crown
- Nose bridge and open nose edge
- Broad muzzle and mouth
- Chin and cheek return
Use the placement cue to start around x29%/y27%. Draw the nearer ear first, then place the smaller far-ear arc behind it. Continue across the uneven crown and low brow towards the nose bridge.
Shape the open-paper nose edge and broad upper muzzle before adding the mouth, chin and short cheek return. Follow the visible stops and starts in the contour instead of closing the back of the head. Those open endpoints are intentional: the mane attaches to them later.
Look for this before moving on: the ears differ in size and angle, the muzzle points left without becoming canine-sharp, the crown and chin belong to one calm profile, and open space remains behind and below the head for the mane.
If it goes wrong: preserve the stronger ear, muzzle or chin. Replace only the newest profile section between two sound endpoints; do not enlarge the whole head around one misplaced line.
2. Add the facial landmarks
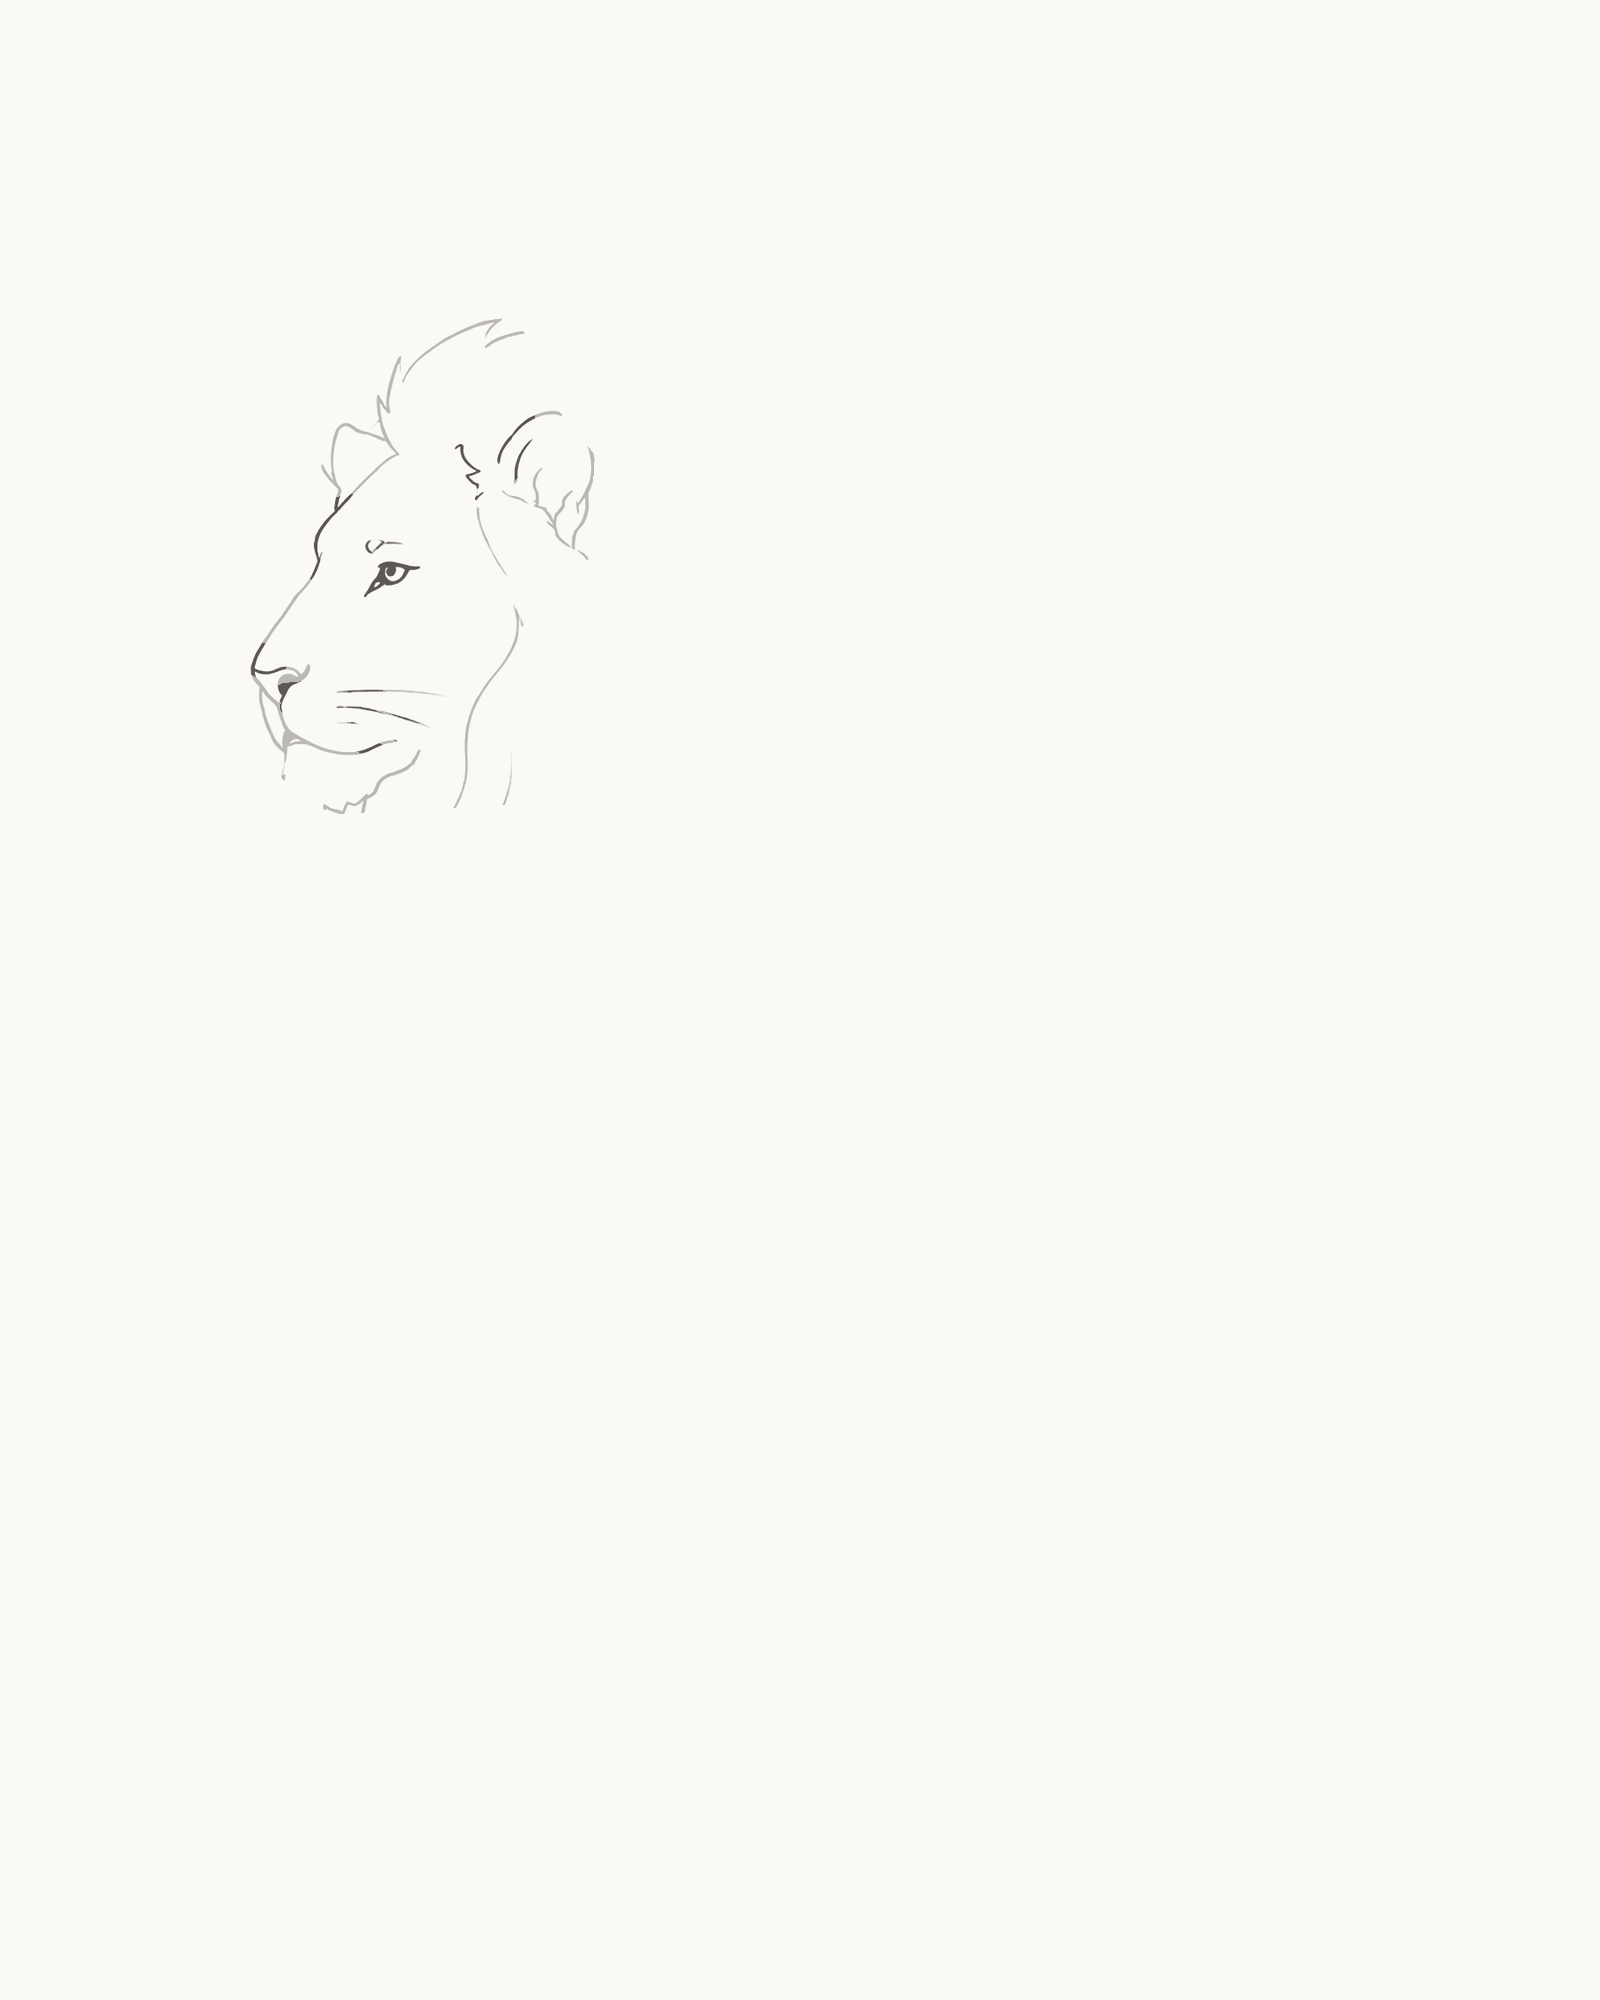
Stage 2 of 9. Small facial landmarks remain subordinate to the fixed broad profile. - Eye and brow fold
- Nostril and mouth split
- Two muzzle-pad arcs
- Three whiskers and inner-ear fold
Place the near eye behind and slightly above the nose, keeping its small highlight open. Add the short brow fold and inner-ear fold, then mark the nostril and mouth split inside the fixed profile.
Draw the two restrained muzzle-pad arcs before the whiskers. Finish with exactly three tapered whiskers from the near muzzle pad, varying their length and angle. They should start beside the mouth area, not at the nose tip.
Look for this before moving on: eye, brow, nostril and mouth all follow the left-facing profile; the eye and nose retain open paper; two muzzle-pad arcs remain distinct; and three whiskers can be traced separately from root to tip.
If it goes wrong: keep the Stage 1 contour untouched. Replace only the newest eye, fold, nostril, mouth line, muzzle arc or whisker relative to the fixed nose bridge and jaw.
3. Build the attached mane
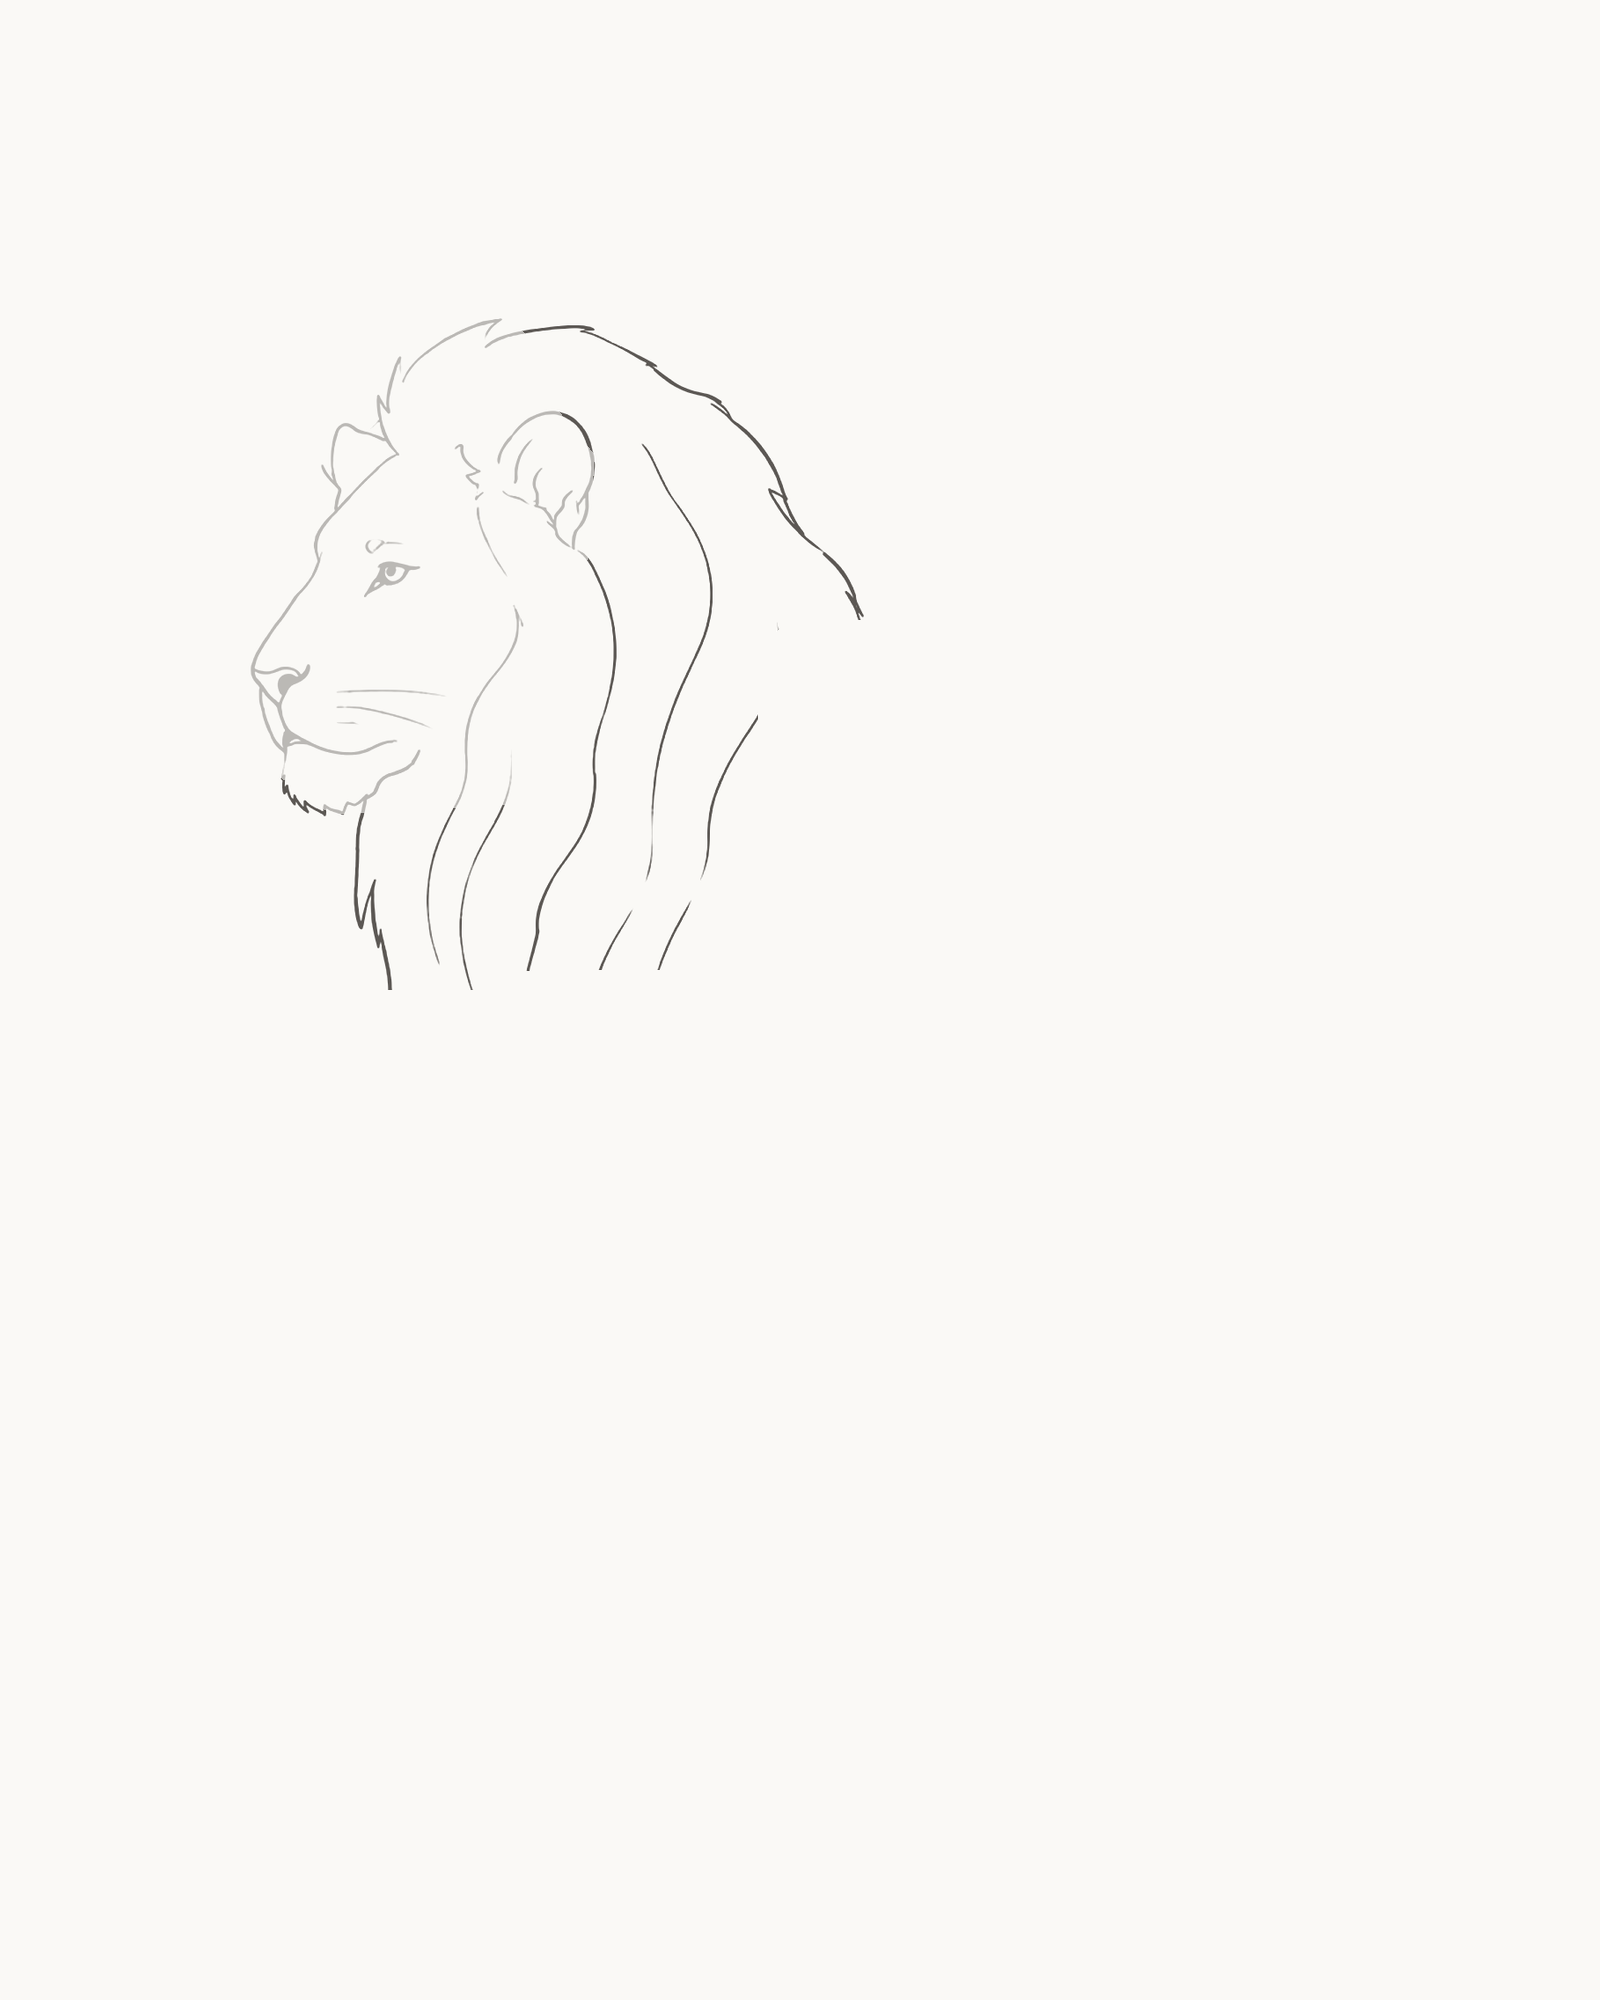
Stage 3 of 9. One asymmetric mane wraps behind the face and hands off separately to chest and back. - Outer mane around head and shoulder
- Keep chest and back exits separate
- Add five unequal flow divisions
Draw the outer mane before its internal lines. Begin behind the ears, take an uneven contour around the rear head and shoulder, and bring the lower edge forward beneath the jaw. Make the mass fuller below and behind the face than above the crown. Leave one clear rear exit for the back and a different lower exit for the chest.
Now add five long, unequal flow divisions inside the mane. Let them follow the fall of the outer mass, but stop each line before it reaches the face or the outer edge. Avoid short repeated spikes: the divisions describe large locks rather than individual hairs.
Look for this before moving on: the face remains in front, the mane reads as one attached asymmetric mass, five long divisions are individually visible, and the chest and back exits do not meet as a dark collar.
If it goes wrong: retain the face and the sound part of the mane. Replace only the newest outer section or one flow division; do not fill, darken or scallop the junction to disguise a mismatch.
4. Set the torso and attachment openings
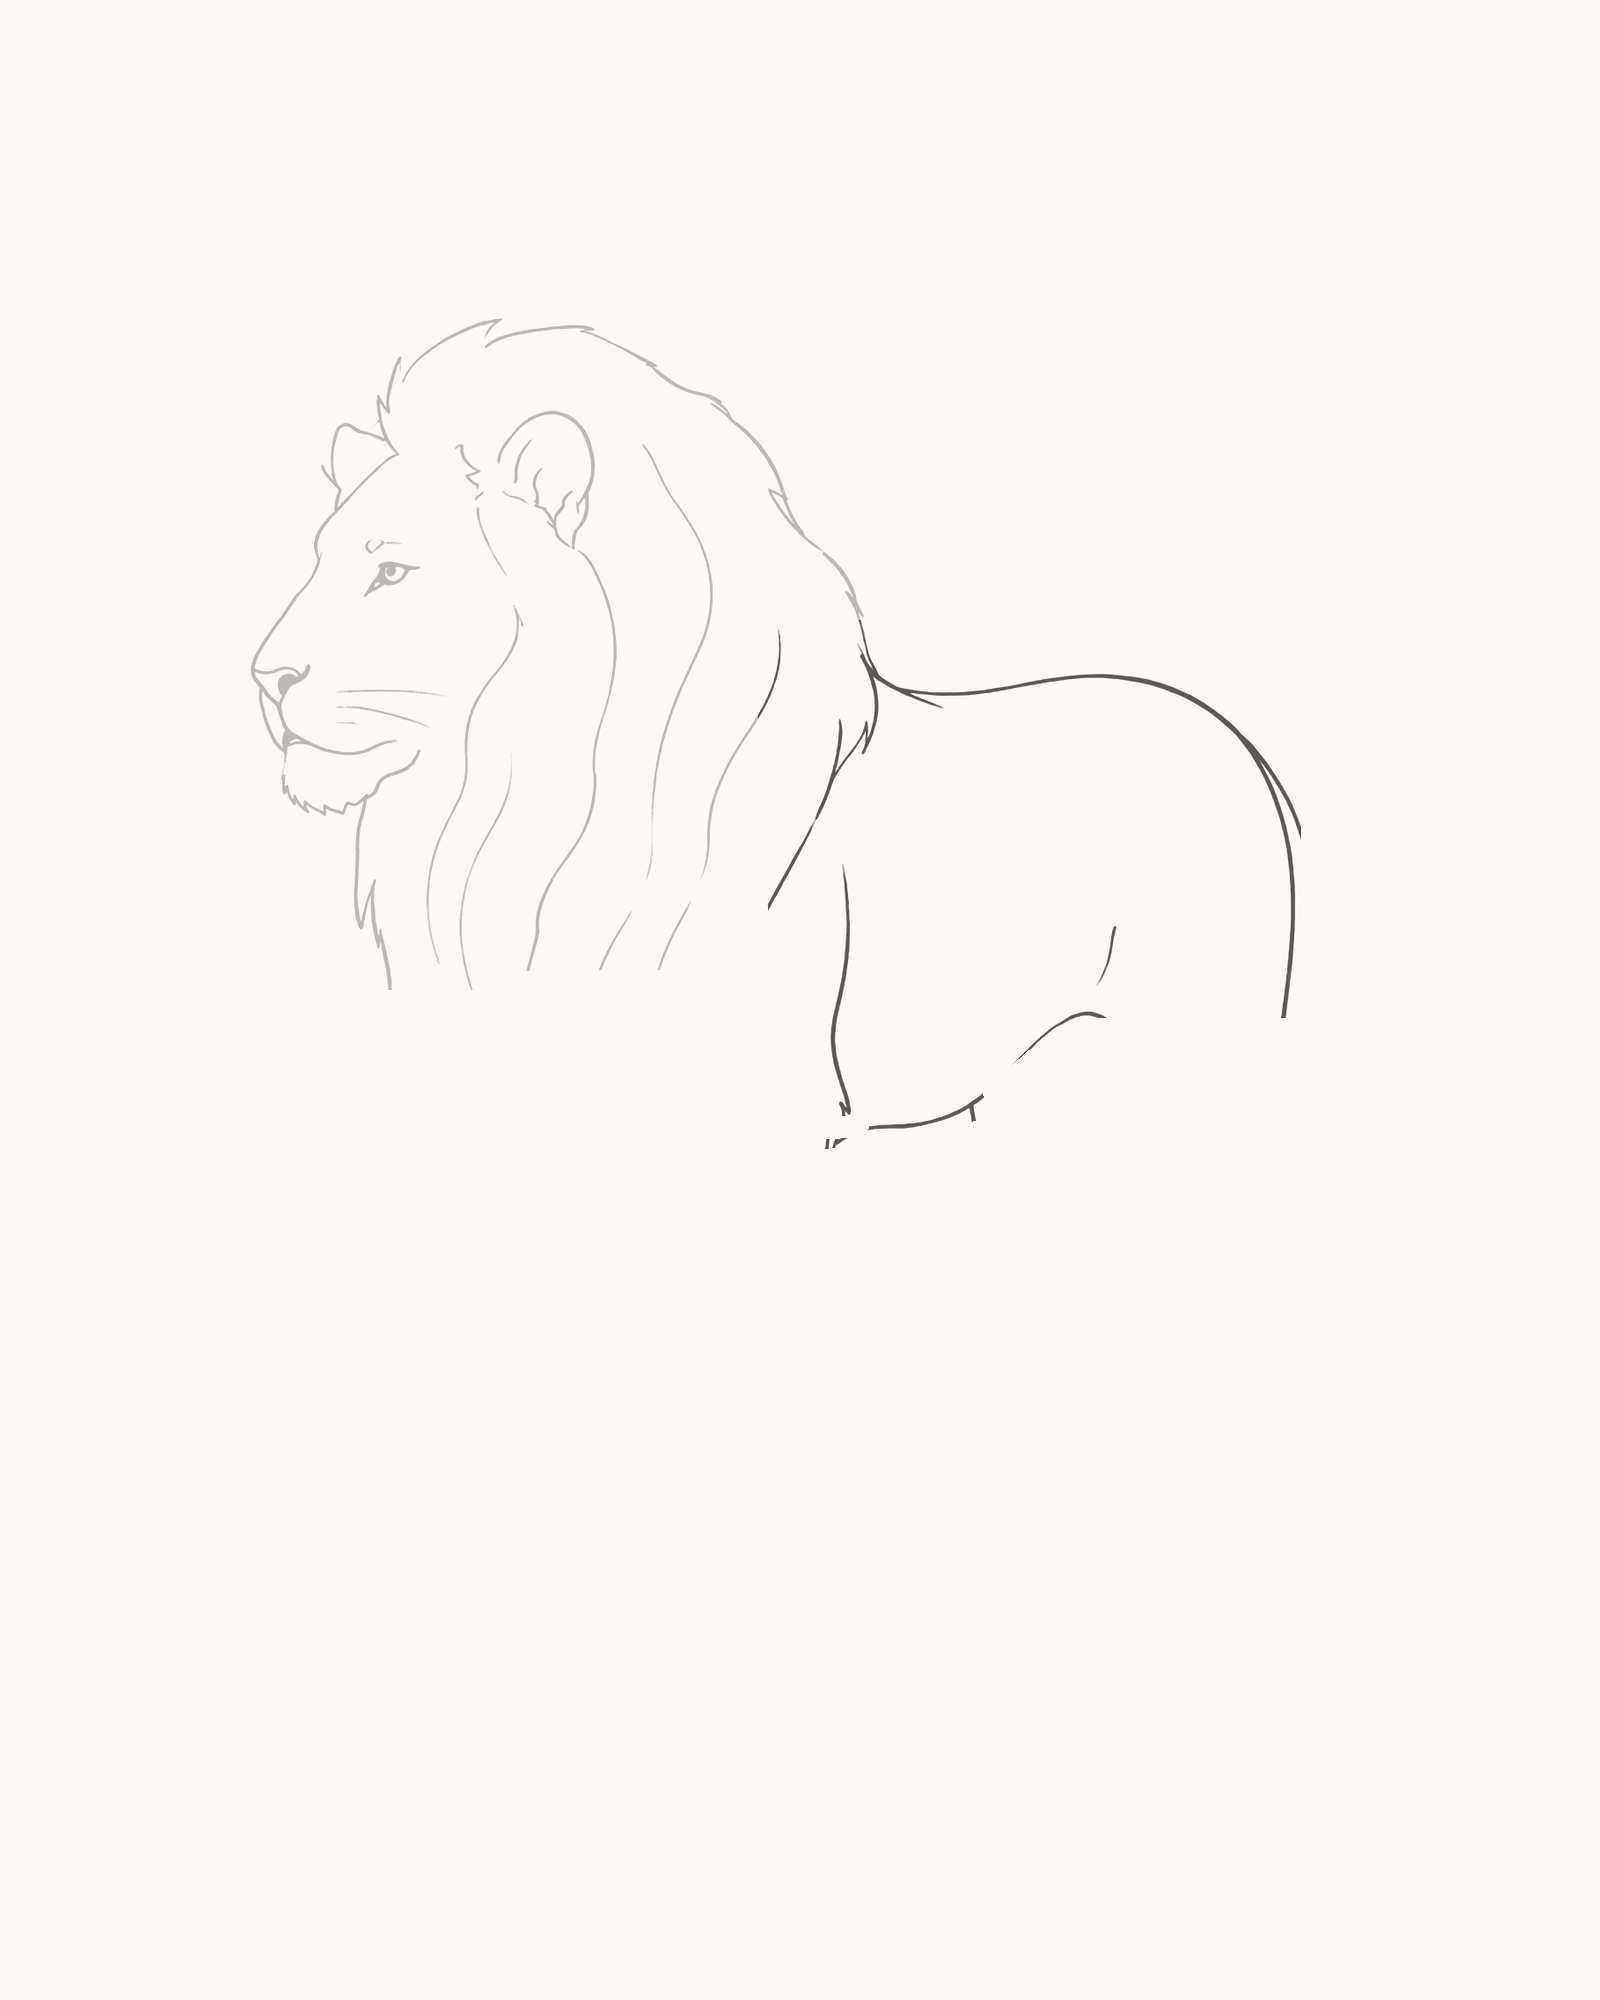
Stage 4 of 9. The torso fixes the body length while deliberate openings reserve every leg attachment. - Back into rounded rump
- Front underside interval
- Middle belly interval
- Rear underside interval
Start at the rear mane exit and carry the back gently down towards a rounded rump. Compare the visible length: from the mane to the rump, the torso is a little under two visible head lengths, about 1.8. Keep the shoulder a little higher than the rump.
Add the three small separated underside intervals shown in the image: the front chest return, the middle belly section and the rear underside section. Do not connect them into one continuous belly. The blank spaces between them reserve exact roots for the two forelegs and two hind legs; the tail root also remains hidden behind the upper rump.
Look for this before moving on: the back flows out of the mane, the rump is broad rather than pinched, the body is long without looking tubular, and distinct openings remain for every leg.
If it goes wrong: keep the mane and the more convincing body interval. Replace only the newest back, rump or underside curve between retained endpoints; never stretch the body by rejoining the mane.
5. Build the near foreleg and paw
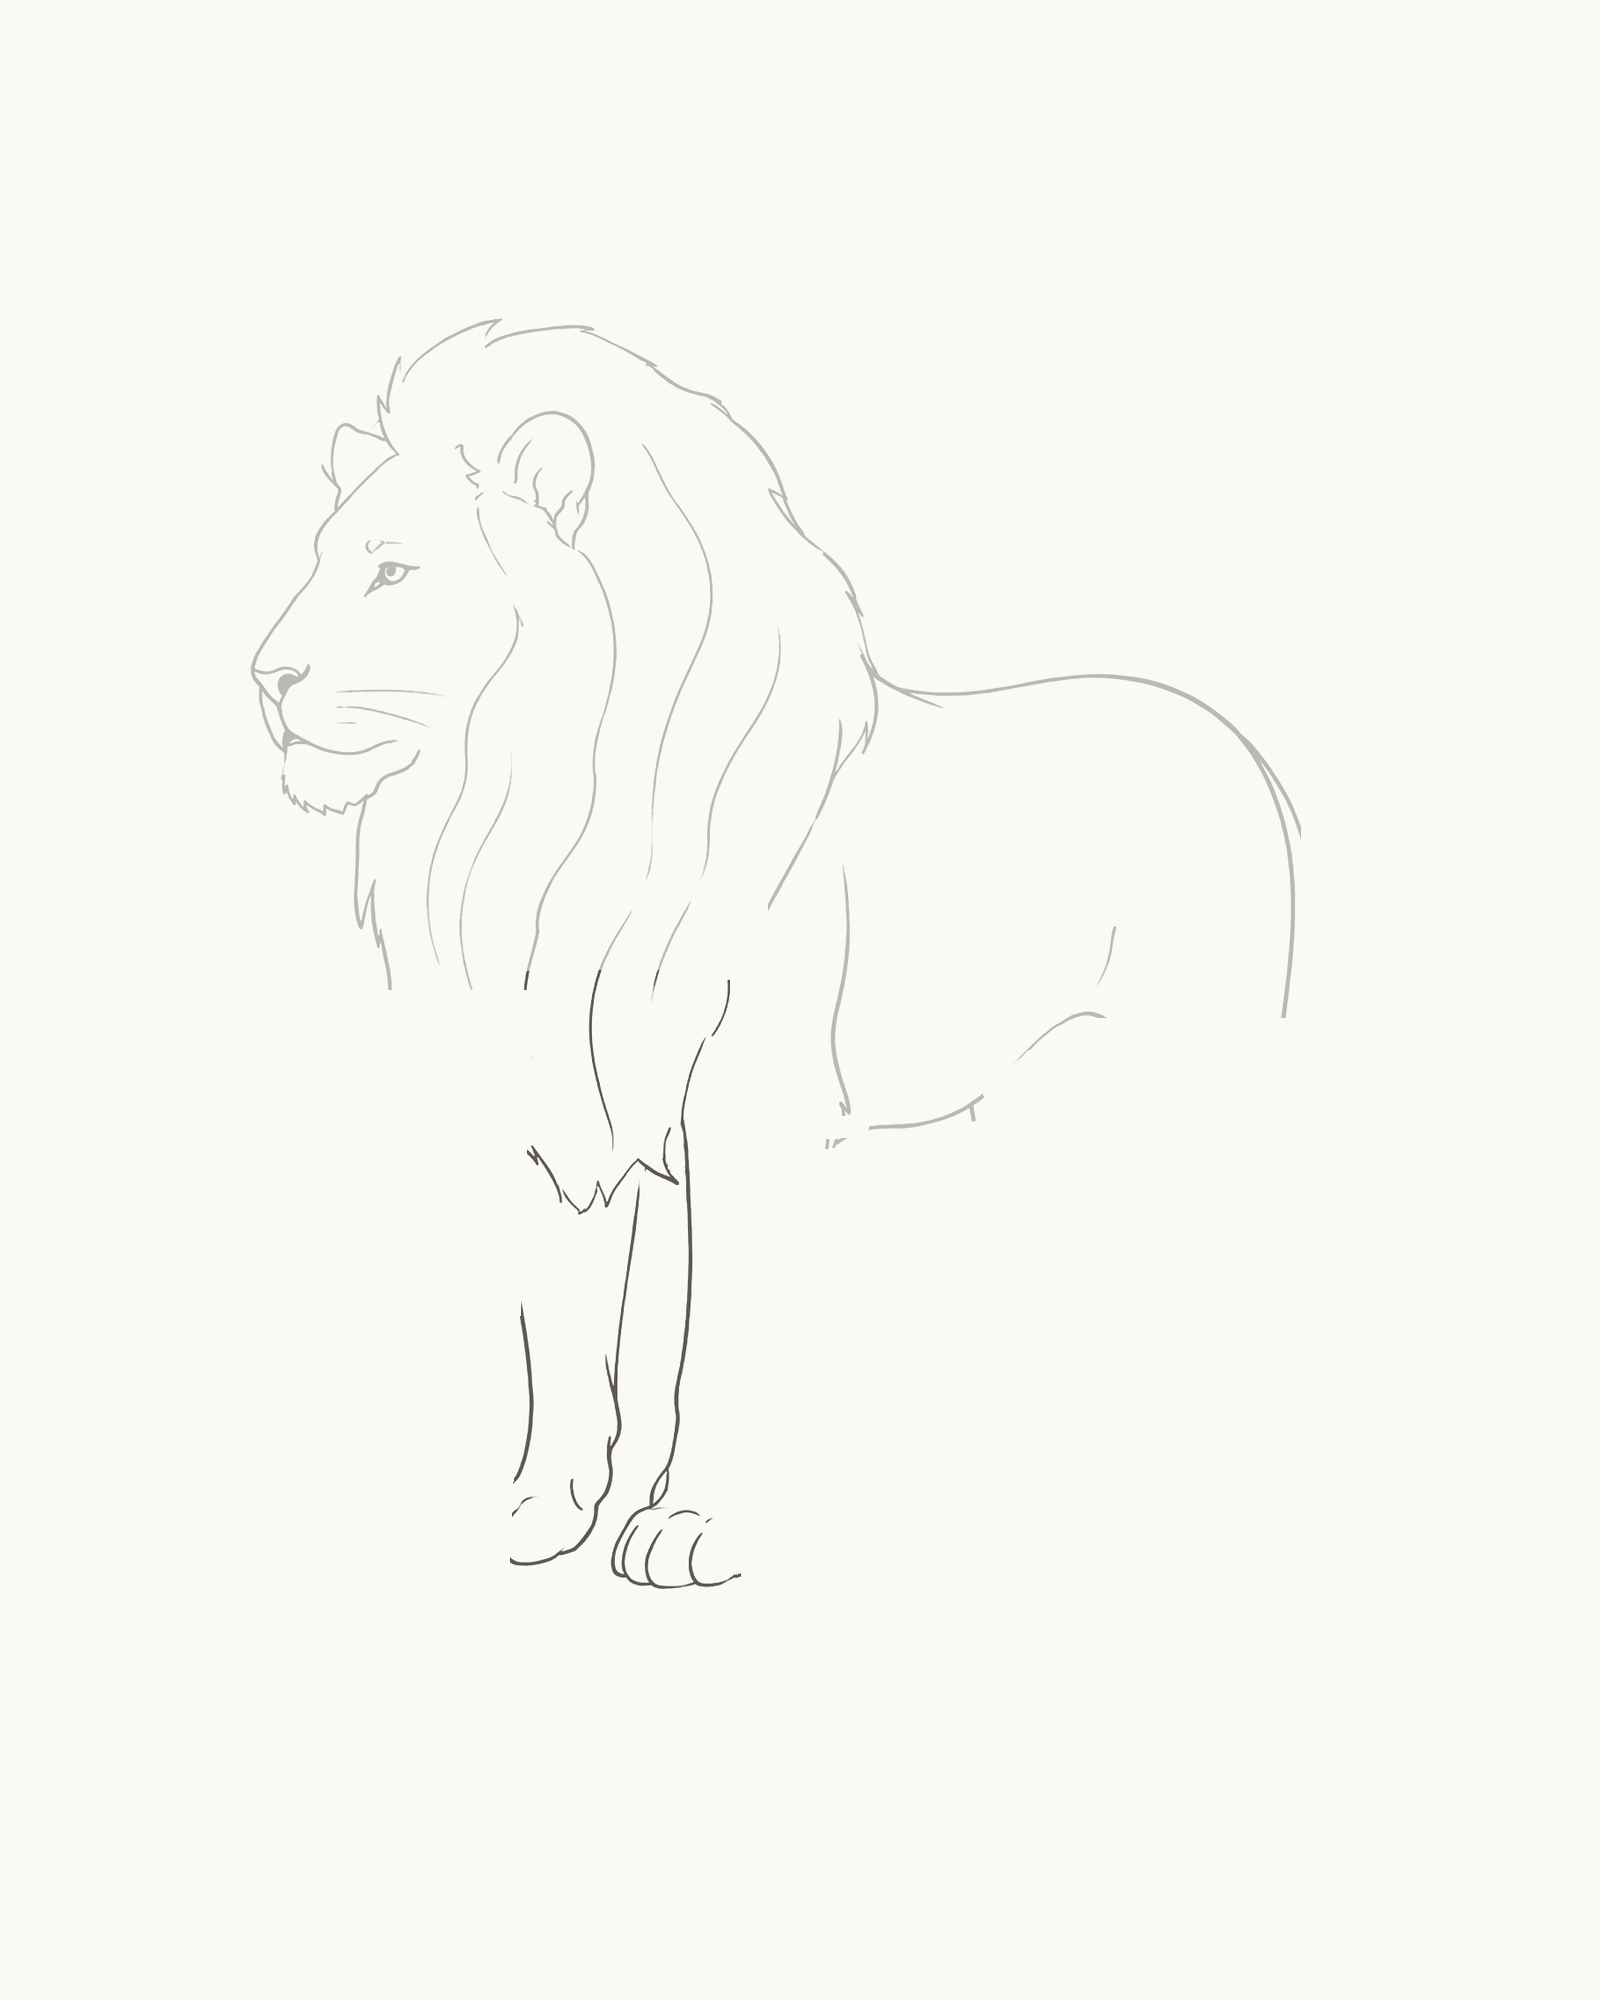
Stage 5 of 9. The first load-bearing foreleg grows directly from the waiting chest opening. - Chest-side edge
- Outer edge and wrist
- Broad paw closure
- Three toe divisions
Use the lower-chest opening for the nearer foreleg. Draw its chest-side edge down first, then the outer edge, letting the leg narrow gently towards a small wrist change. Avoid parallel sides.
Close one broad paw on the shared ground band and add three restrained toe divisions. The paw grows directly from the leg; it is not a separate shape placed underneath it.
Look for this before moving on: the leg forms a clean chest-to-ground support, the wrist changes direction without a sharp joint, the paw sits flat, and its toe marks stop inside the paw.
If it goes wrong: preserve the chest endpoint and the sound leg edge. Replace only the newest edge, wrist turn, paw lobe or toe division; do not thicken the mane or chest to hide the join.
6. Add the far foreleg and paw
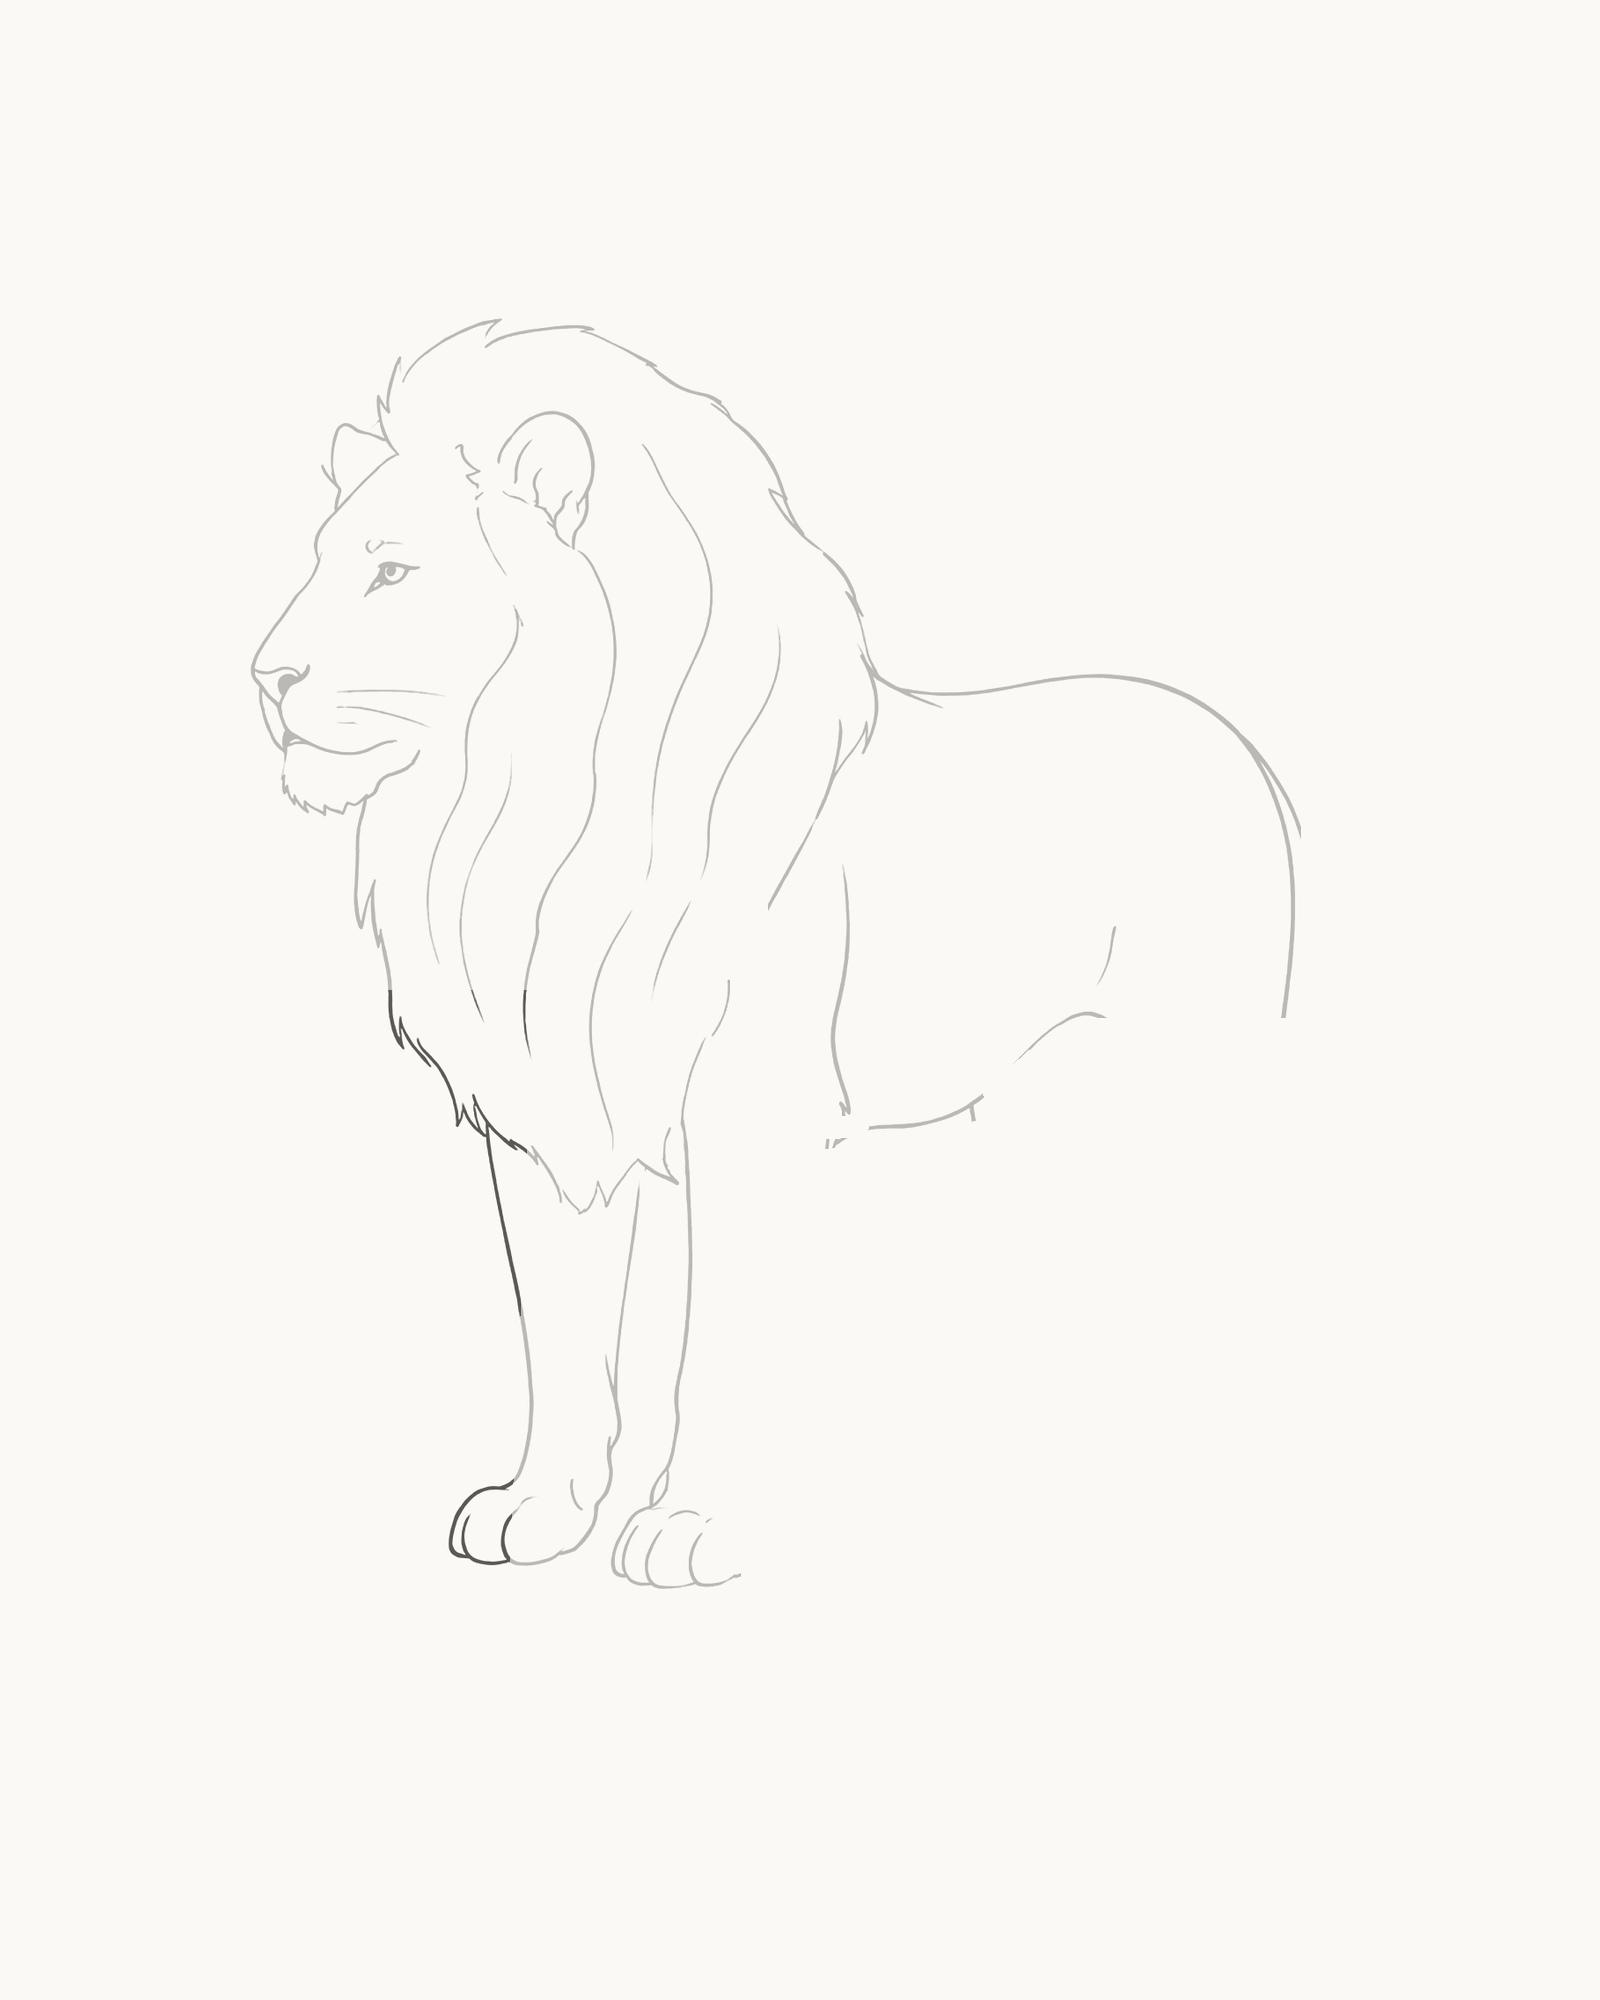
Stage 6 of 9. A narrower offset support makes the two front legs countable without mirroring them. - Visible upper interval
- Narrower lower return
- Smaller paw
- Two toe divisions
Attach the farther foreleg behind the first. Keep it narrower, with separate visible upper and lower intervals, so the nearer leg still overlaps it. Let its smaller paw meet the same ground direction a fraction higher.
Add two visible toe divisions to the far paw. The gap between the two legs should change gently from chest to ground rather than forming two matching columns.
Look for this before moving on: two front legs are easy to count, the far leg stays narrower and partly behind, both paws carry weight, and their contours do not merge.
If it goes wrong: leave the completed near foreleg alone. Replace only the newest far-leg interval, paw edge or toe line; do not widen it until the pair becomes symmetrical.
7. Build the near hindquarter and paw
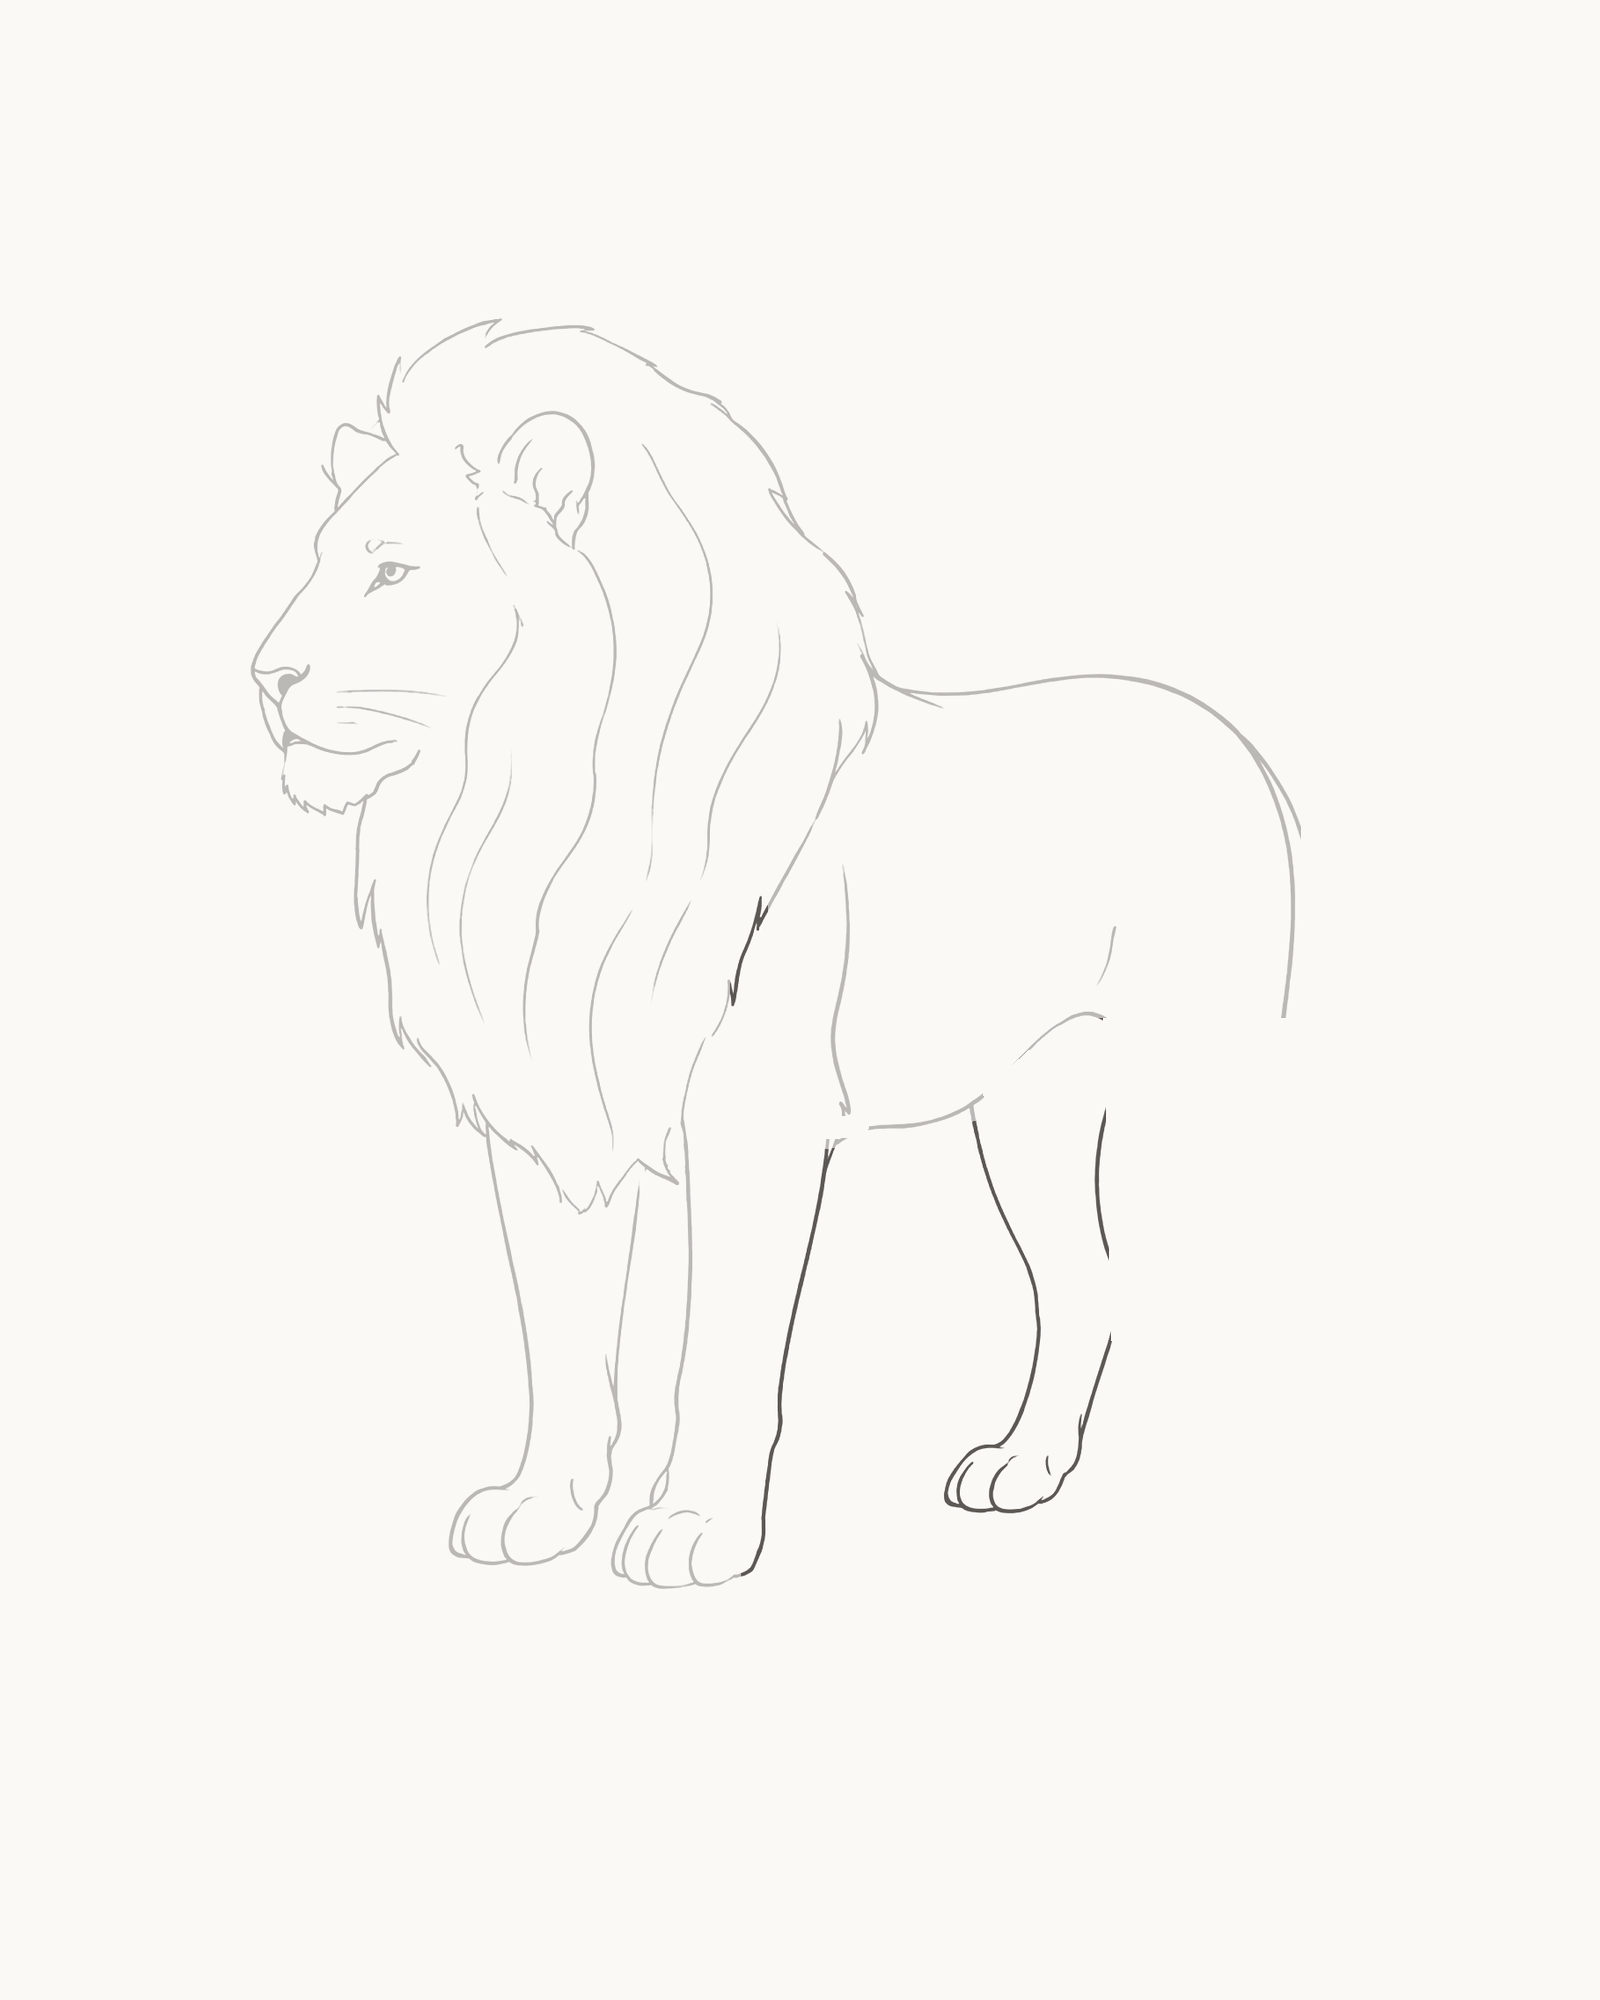
Stage 7 of 9. The broad thigh, hock and paw form one continuous rear support chain. - Outer thigh from rump
- Front thigh return
- Hock and lower leg
- Paw and three toes
Begin at the rump opening with the broad near thigh. Let its front return meet the waiting belly endpoint, then narrow the form through the rear-facing hock into the lower leg.
Close the rear paw on the same implied ground direction and add three toe divisions. The rump, thigh, hock and paw should read as one continuous support chain rather than an oval thigh with a foot added beneath it.
Look for this before moving on: the thigh is the largest leg mass, its front and back edges lead naturally into the hock, the paw reaches the ground band, and the body no longer appears unsupported at the rear.
If it goes wrong: keep the rump and fixed belly endpoint. Replace only the newest thigh, hock, lower-leg, paw or toe section; do not draw a second oval over the joint.
8. Add the far hind leg and close the underside
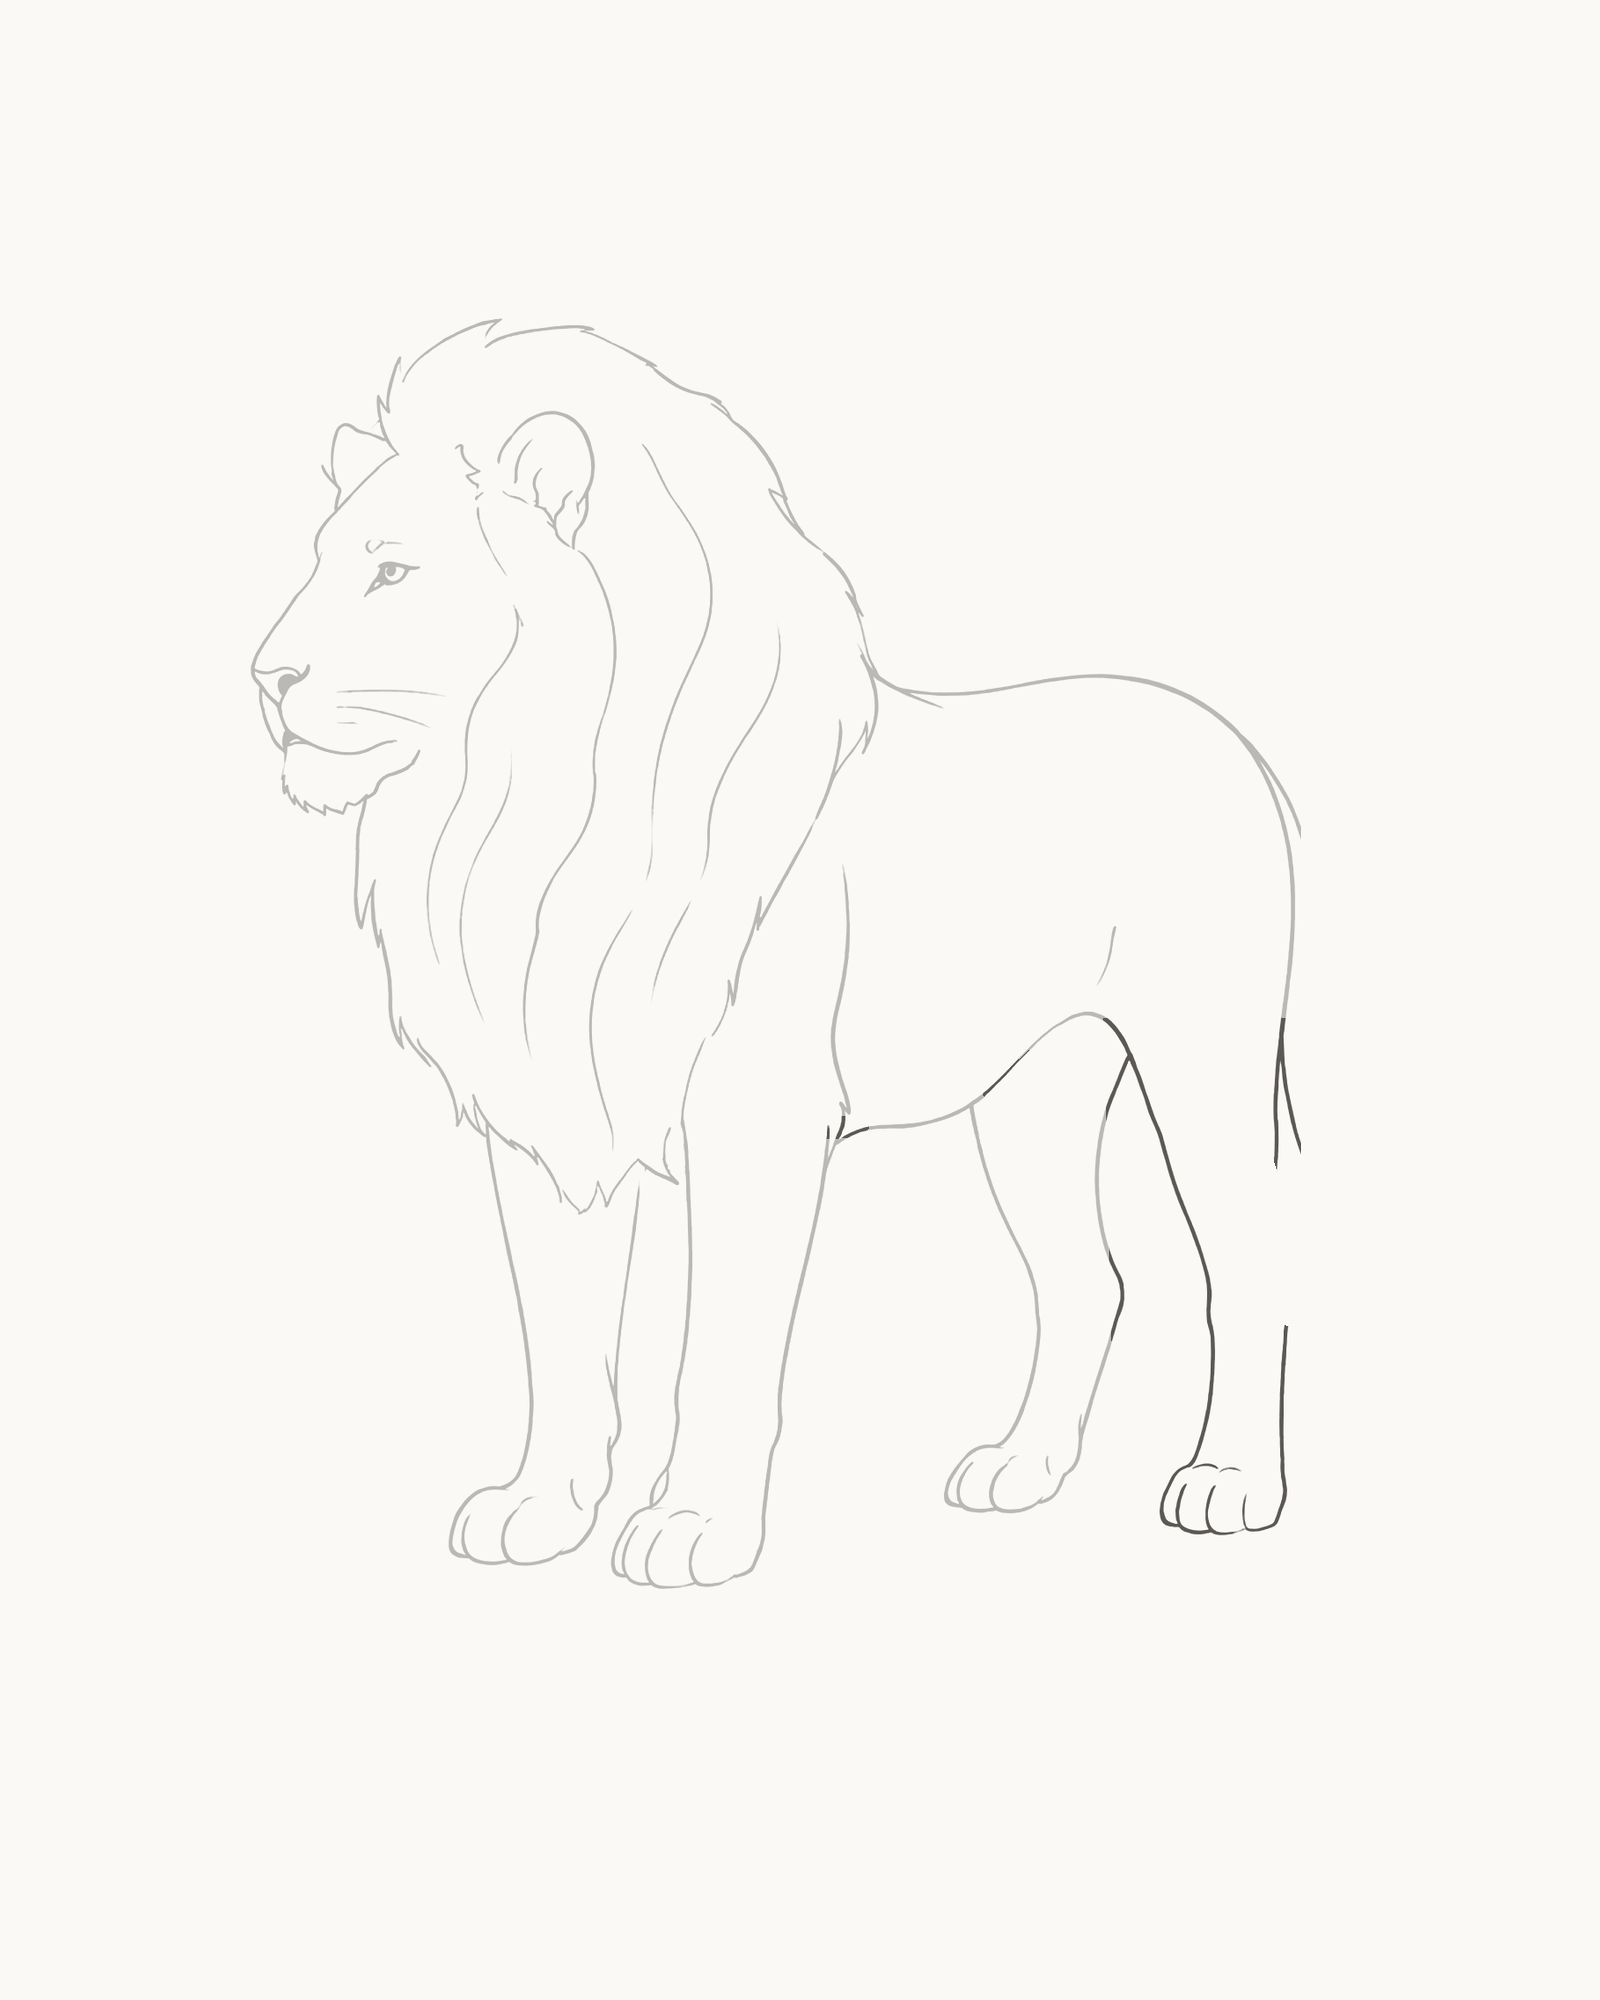
Stage 8 of 9. The far hind support comes first; two short local connectors then close the underside. - Far thigh and lower leg
- Smaller paw and two toes
- First belly closure
- Second belly closure
Build the farther hind leg before closing the belly. Start with the partly hidden upper interval behind the near thigh, continue into the narrower lower leg and add the smaller far paw with two visible toe divisions.
Only after that leg is readable, close the two short remaining underside gaps between the fixed leg roots. These are local connectors, not a new belly line. Stop each one as soon as it meets a leg.
Look for this before moving on: four different legs remain countable, the far hind leg stays behind the near thigh, its paw shares the ground direction, and exactly two short closures finish the underside without crossing a limb.
If it goes wrong: preserve the complete near hindquarter. Replace only the newest far-leg, paw, toe or short belly section between its existing endpoints; never run a long line through either hind leg.
9. Attach the tapered tail and tuft
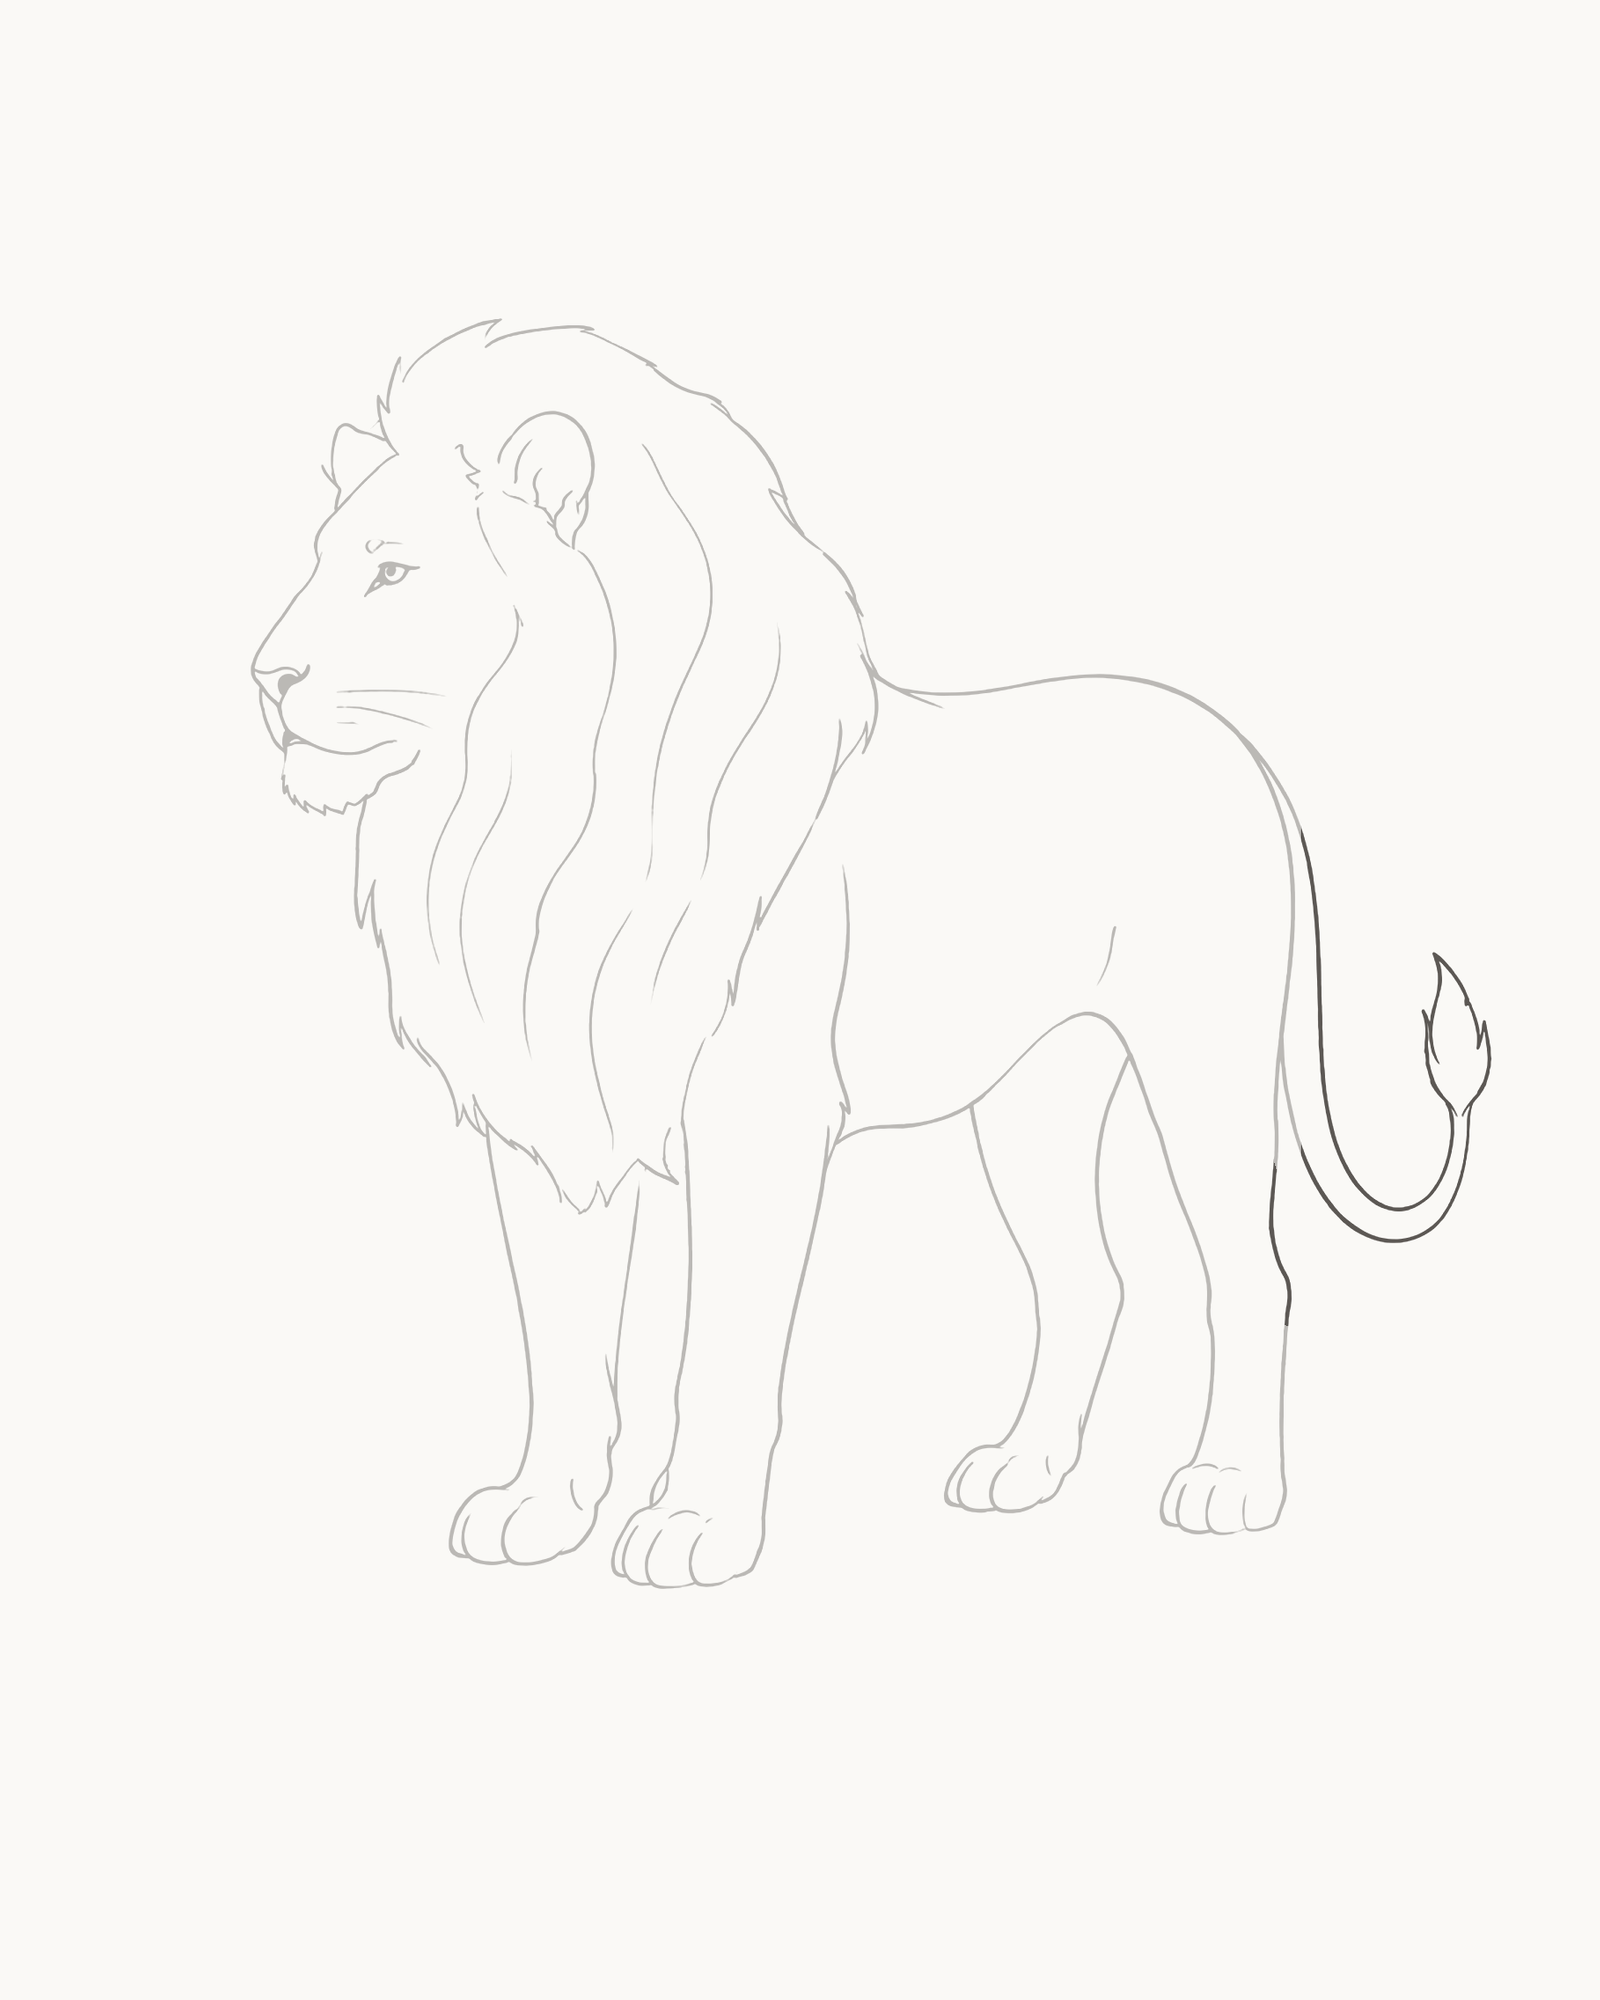
Stage 9 of 9. A narrowing tail with an uneven five-point tuft completes the silhouette without shading. - Outer edge from hidden root
- Inner tapered return
- Narrowing stalk
- Five unequal tuft points
The tail begins behind the upper rump, so its root is hidden. Draw the outer edge down from that concealed attachment, curve it outward and then up. Return with the second edge, steadily narrowing the gap to form a tapered stalk.
Open the tip into one small uneven tuft with five non-repeating outer points. Keep the tuft clear of the crop and the hind paw. No other contour, facial mark or leg changes in this stage.
Look for this before moving on: the root feels connected behind the rump, both edges converge through the curve, five unequal tuft points are traceable, and the complete tail clears the leg and page edge.
If it goes wrong: keep the rump and hind legs untouched. Replace only the newest tail edge or tuft point from the nearest stable point; do not widen the whole tail or reshape the rump to force the attachment.


Common mistakes and small fixes
The face looks like a dog or cub. Compare the broad muzzle with the smaller eye and low brow. Correct the newest feature that sharpens or enlarges the face rather than expanding the whole profile.
The mane looks like a sunburst. Keep the outside mass irregular and the five interior divisions long. Remove only the newest repeated spike or short radial line.
The head seems detached from the body. Check that the mane returns beneath the jaw and hands off at two different body exits. Repair one local exit instead of darkening the whole neck.
The torso looks like a tube. Keep the back gently sloped, the rump rounded and the belly higher than the paws. Replace the newest body interval rather than adding another outline over it.
The legs merge. Compare near and far widths, offsets and paw sizes. Correct only the newer leg and preserve the leg that already carries convincing weight.
A paw floats. Use the bases of the other paws as an implied ground direction. Replace the latest paw edge or wrist turn; do not add a cast shadow to conceal the gap.
The tail looks pasted on. Hide the root behind the rump and make both edges narrow towards the stalk. Reset the newest edge from the concealed root instead of drawing a dark connector.
Practise the support structure
On a separate sheet, draw only the Stage 4 torso and the four supports from Stages 5–8 at a smaller scale. Keep the near foreleg and near thigh broader, offset the two farther paws slightly, and stop the belly at each leg root. Leaving out the head and mane makes it easier to compare attachment order and ground contact without adding another finished animal.
For another complete animal lesson that separates near and far supports, try How to Draw a Dog. The How to Draw page returns to the full practical guide directory. For lion drawings as artworks and historical examples rather than a construction tutorial, visit the separate Lion Drawings gallery.
Frequently Asked Questions
What is the easiest way to start drawing a lion?
Choose the pose and reserve the full-body space before adding detail. This lesson places the permanent head high and left, fixes the face and mane, then uses visible openings in the torso for each leg.
What simple shapes make up a lion drawing?
You can think in broad masses—a wedge-like profile, an uneven mane, a long torso, tapered supports and a narrowing tail—but you do not have to draw disposable circles or ovals. Here, every visible curve remains part of the result.
How do I draw a lion's face for beginners?
Fix the broad outer profile first. Place the small eye behind the nose, keep the muzzle broad, add the mouth divisions inside that profile and finish with three near-side whiskers. Do not enlarge the features to make them easier to see.
How should the mane connect to the lion?
Begin behind the ear and crown, wrap the outer mass around the rear neck and shoulder, and return beneath the jaw. Keep separate exits for the back and chest so the mane does not become a floating circle.
How do I make a full-body lion look more realistic?
Prioritise weight and overlap before fur. Make all four paws share one ground direction, keep far legs narrower and partly hidden, attach the thigh to the rump and conceal the tail root behind the body.
Can I draw this lion with an ordinary pencil?
Yes. An HB or No. 2 pencil and smooth unlined paper are enough. Keep the main outline clear and use lighter pressure for facial marks, whiskers, mane divisions and farther-leg contours.
Do I erase the early lines or add shading at the end?
No. Every stage adds permanent final lines, and Stage 9 adds only the tail and tuft. Use the eraser only to replace the newest local mistake; no shading or cleanup stage is required.
Is this the same method for drawing a lion cub?
No. This lesson is designed around an adult mane and full standing body. A cub would need a different starting profile and body relationship, so the two outcomes are not mixed here.
References
- Studio Wildlife, How to Draw a Realistic Lion Like an Artist. View source
- Creative Bloq, How to Draw a Lion. View source
- Dessindigo, How to Draw a Lion. View source
More DRAWING Guides

How to Draw a Rose: A Step by Step Guide

How to Draw a Tree: A Step by Step Guide

How to Draw Eyes: A Step by Step Guide

How to Draw Leaves: A Step by Step Guide

How to Draw Autumn Leaves: A Step by Step Guide

How to Draw Flowers: A Step by Step Guide

How to Draw a Lily: A Step by Step Guide

How to Draw a Sunflower: A Step by Step Guide

How to Draw a Tulip: A Step by Step Guide

How to Draw a Hibiscus: A Step by Step Guide

How to Draw a Daisy: A Step by Step Guide
