



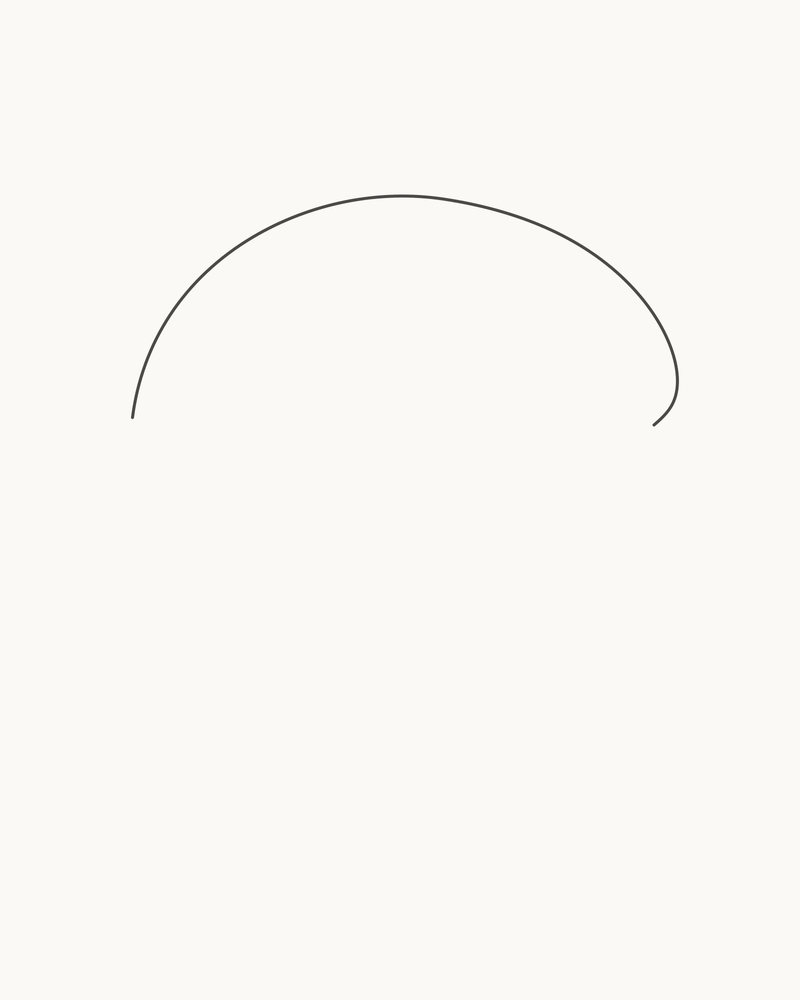
Draw one complete gilled mushroom in seven permanent line stages. Shape an unequal cap, leave a deliberate opening for the stalk, show a shallow underside, organise long and short gills, then add only enough ground and hatching to make the form feel settled. Every sound line remains in the finished drawing. There is no colour pass, blending stage or shading selector.
Difficulty: Beginner; the main challenges are joining the cap to the stalk and spacing the gills without making a wheel
Time: Allow about 30–45 minutes. This is an untested estimate.
Medium: HB or No. 2 pencil, clean line with sparse hatching
See the underside before adding detail
The drawing shows one familiar gilled mushroom from a slightly low side angle. That viewpoint reveals a narrow strip beneath the cap, so the stalk can disappear behind it and the gills can fan out towards the rim. A straight-on side view would hide those relationships; a view from directly below would make the gills the whole subject. Kew's practical observation guidance also points to changing angle when the underside is the useful feature.[3]
National Park Service descriptions distinguish the cap, the supporting stalk and the line-like or plate-like gills beneath a familiar gilled form.[1][2] They also note that not every mushroom has gills; some have pores instead.[1] The distinction matters here because the lesson is about one chosen structure, not a universal mushroom diagram or an identification guide.
Keep the cap unequal. Its highest point sits a little left of centre, the left rise is fuller and the right side falls more steeply. The stalk bends and changes width gently rather than forming a straight rectangle. Those differences make the result easier to believe without adding spots, colour or surface noise.
Materials
- A sharpened HB pencil. An ordinary No. 2 school pencil gives a comparable line. If a wooden pencil loses its point, sharpen it before the fine gills; a mechanical pencil between 0.5 and 0.7 mm is another comfortable choice.
- One smooth white or warm-white sheet in portrait orientation. A sketchbook page or clean printer paper is enough for a first attempt.
- A clean eraser for correcting only the curve you have just added. There is no planned cleanup stage.
- Optional: a clear photograph of one gilled mushroom from a low side angle, or a familiar shop-bought mushroom turned so that part of the underside is visible. Use it only to notice cap variation and attachment; follow the supplied drawing for this exact result.
- Optional: a scrap of paper for trying three long and three short gill lines before Stage 4.
Do not handle or eat an unknown wild mushroom for this exercise. A photograph or shop-bought example is sufficient, and this page is not an identification guide. Ink, colour, blending tools, tracing paper, rulers and compasses are unnecessary.
Before you draw
Imagine a portrait frame four units wide and five high. The cap's high point sits near 47% of the page width and 20% of its height. Reserve the broad upper-middle area for the cap and keep a clear vertical corridor below its centre for the stalk. The finished form needs more paper beneath the cap than above it.
Use the separate Stage 1 placement panel to compare the cap envelope and the reserved stalk corridor. Its dotted box and percentage label are viewing aids, not marks to copy onto the paper. The optional page grid starts hidden. Turn it on briefly if you need to compare the high point, rim height or stalk width cell by cell, then turn it off and continue with the visible curves.
Keep the cap and stalk outline calm and clear. Make the gills and final hatch strokes a little finer. The notional light comes from upper-left, but most of the depth comes from overlap and spacing. Only Stage 7 adds sparse marks on lower-right-facing surfaces.
1. Draw the cap silhouette
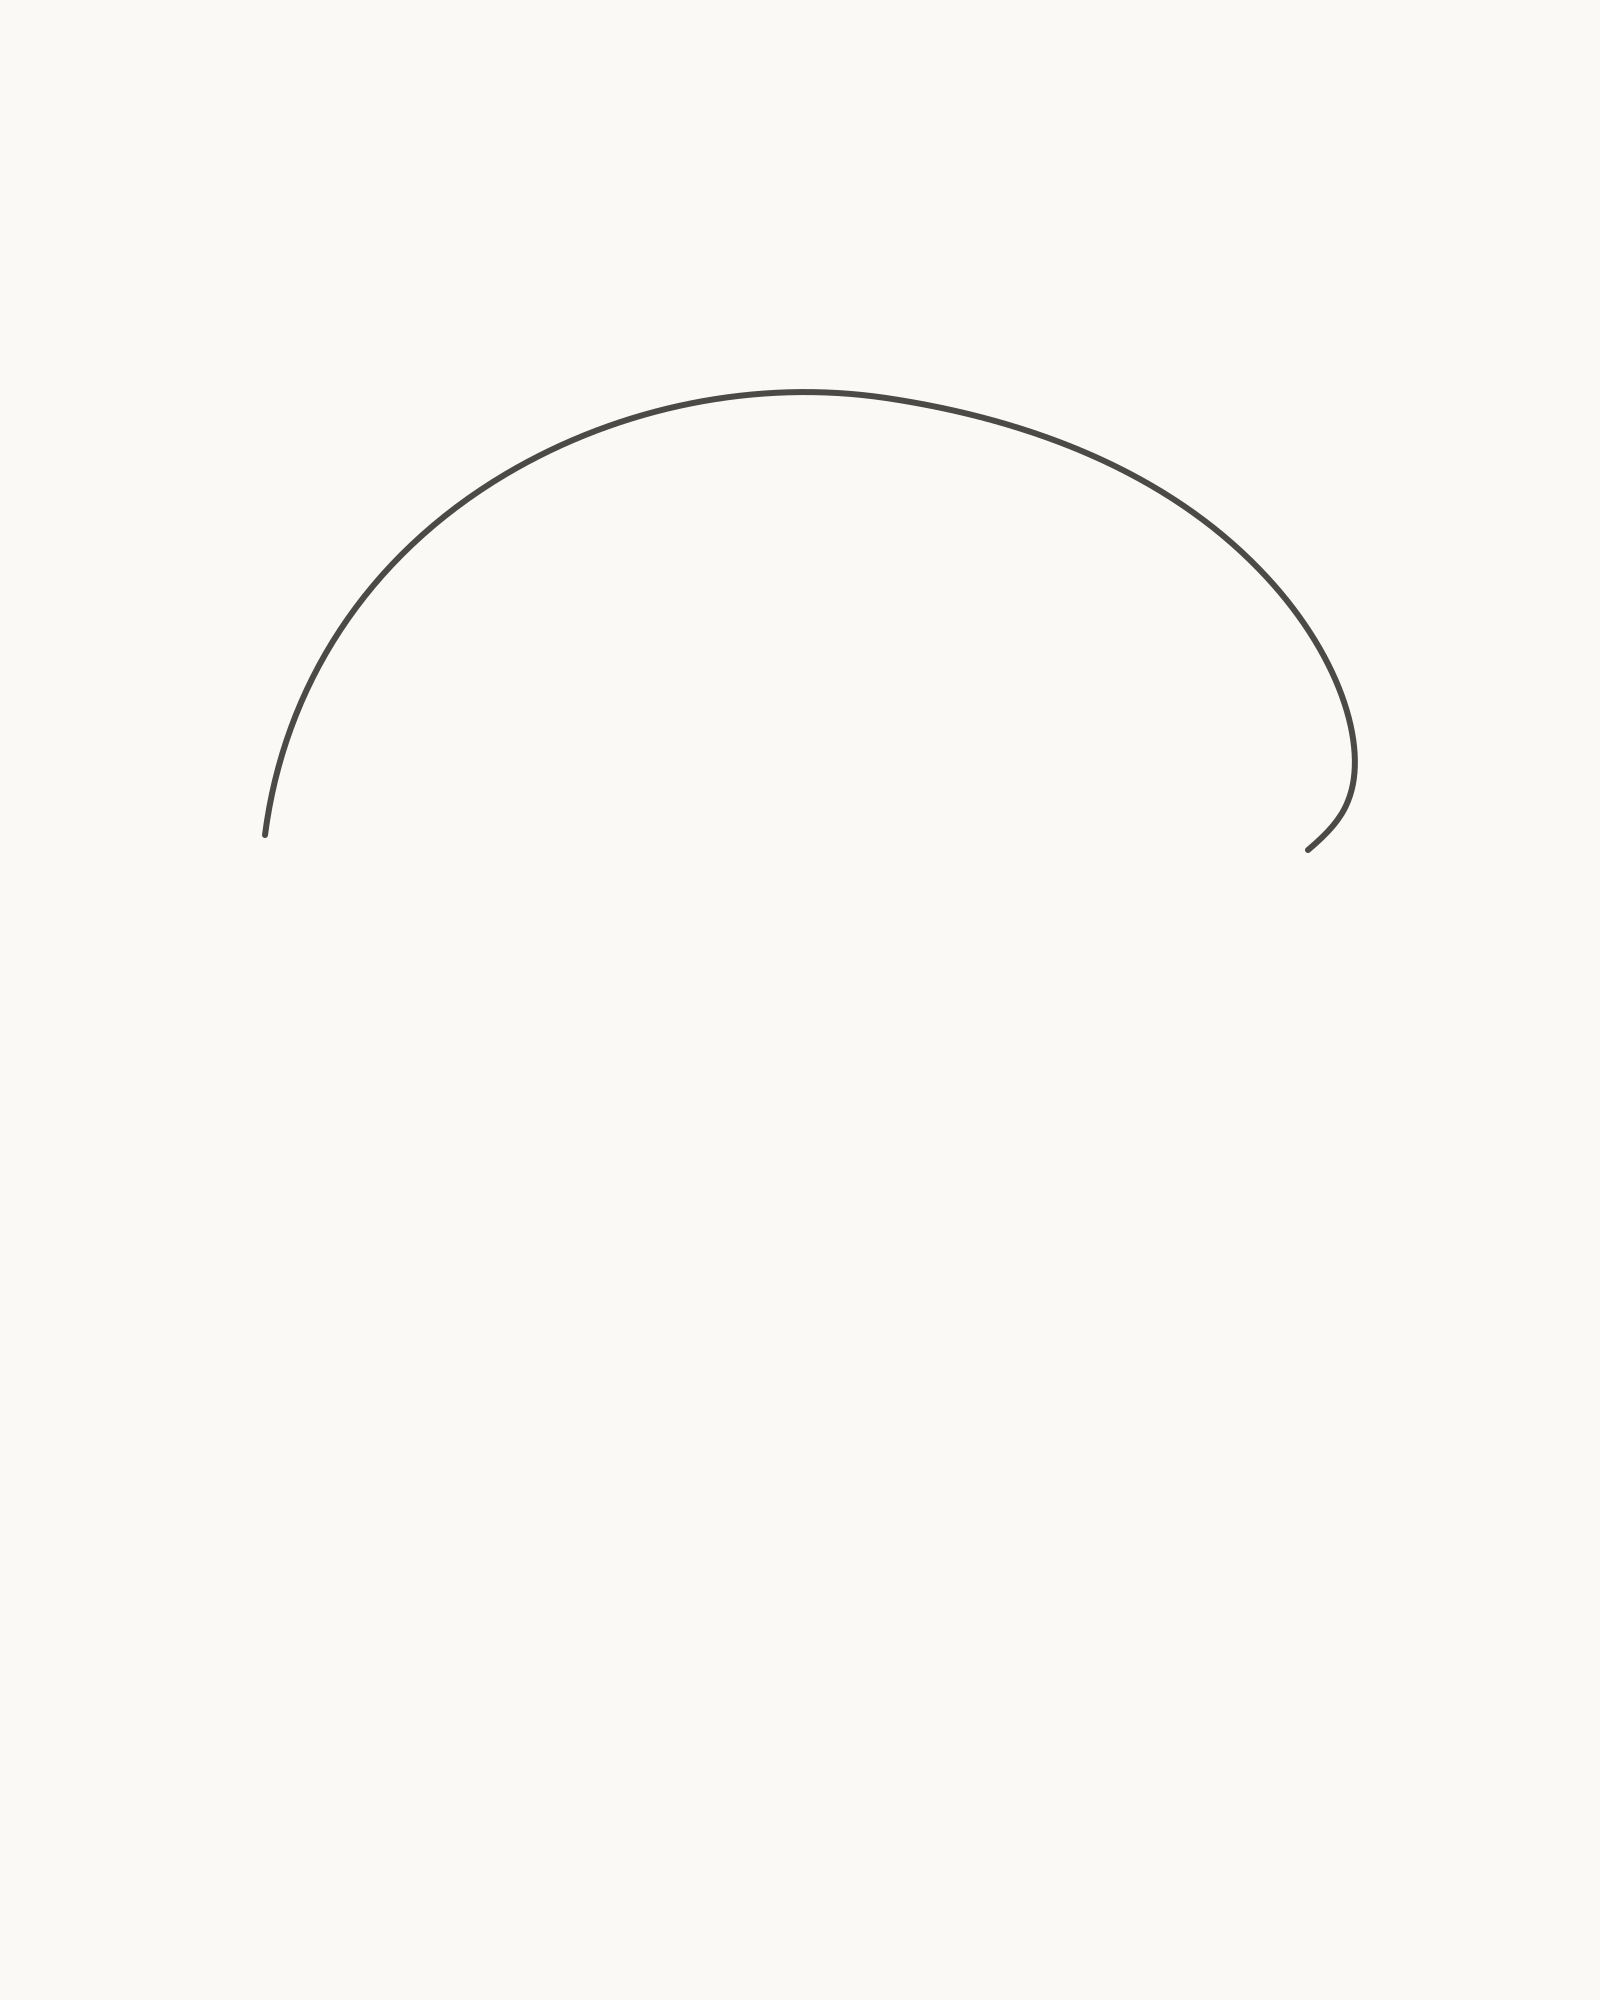
Stage 1 of 7. One unequal dome establishes the cap while leaving the underside open. 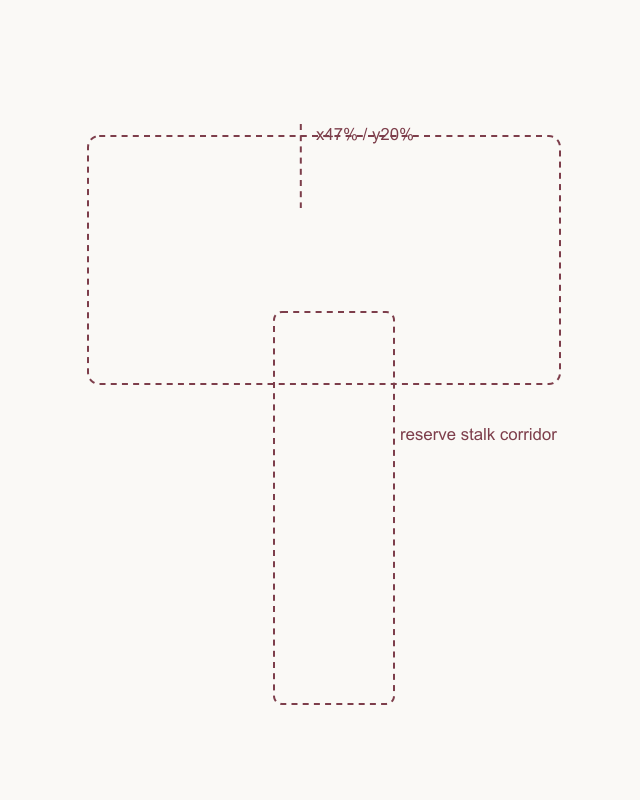
Placement cue: locate the cap high point around x47% and y20%. Use the dotted cap envelope and stalk corridor only for comparison; leave every cue mark off the drawing. Start at the lower-left rim. Curve upward through a full left shoulder, then flatten the turn slightly as you pass the high point just left of centre. Let the right half descend more steeply and finish at a lower-right rim point. Both ends should turn down gently, but do not join them underneath.
Draw the action as one broad sweep, pausing as needed without adding short corrective hairs. The top should feel organic and controlled rather than perfectly domed. Leave the entire underside open; the next two stages have been designed to fit that space.
Look for this before moving on: one broad cap occupies the upper field, its high point is left of centre, the two sides are unequal, and the two downturned rim ends remain unconnected.
If it goes wrong: preserve the stronger half and the clear high point. Remove only the newest flat, mirrored or abrupt section, then reconnect that short section between the same stable points. Do not close the underside to make the cap look finished.
2. Show the underside
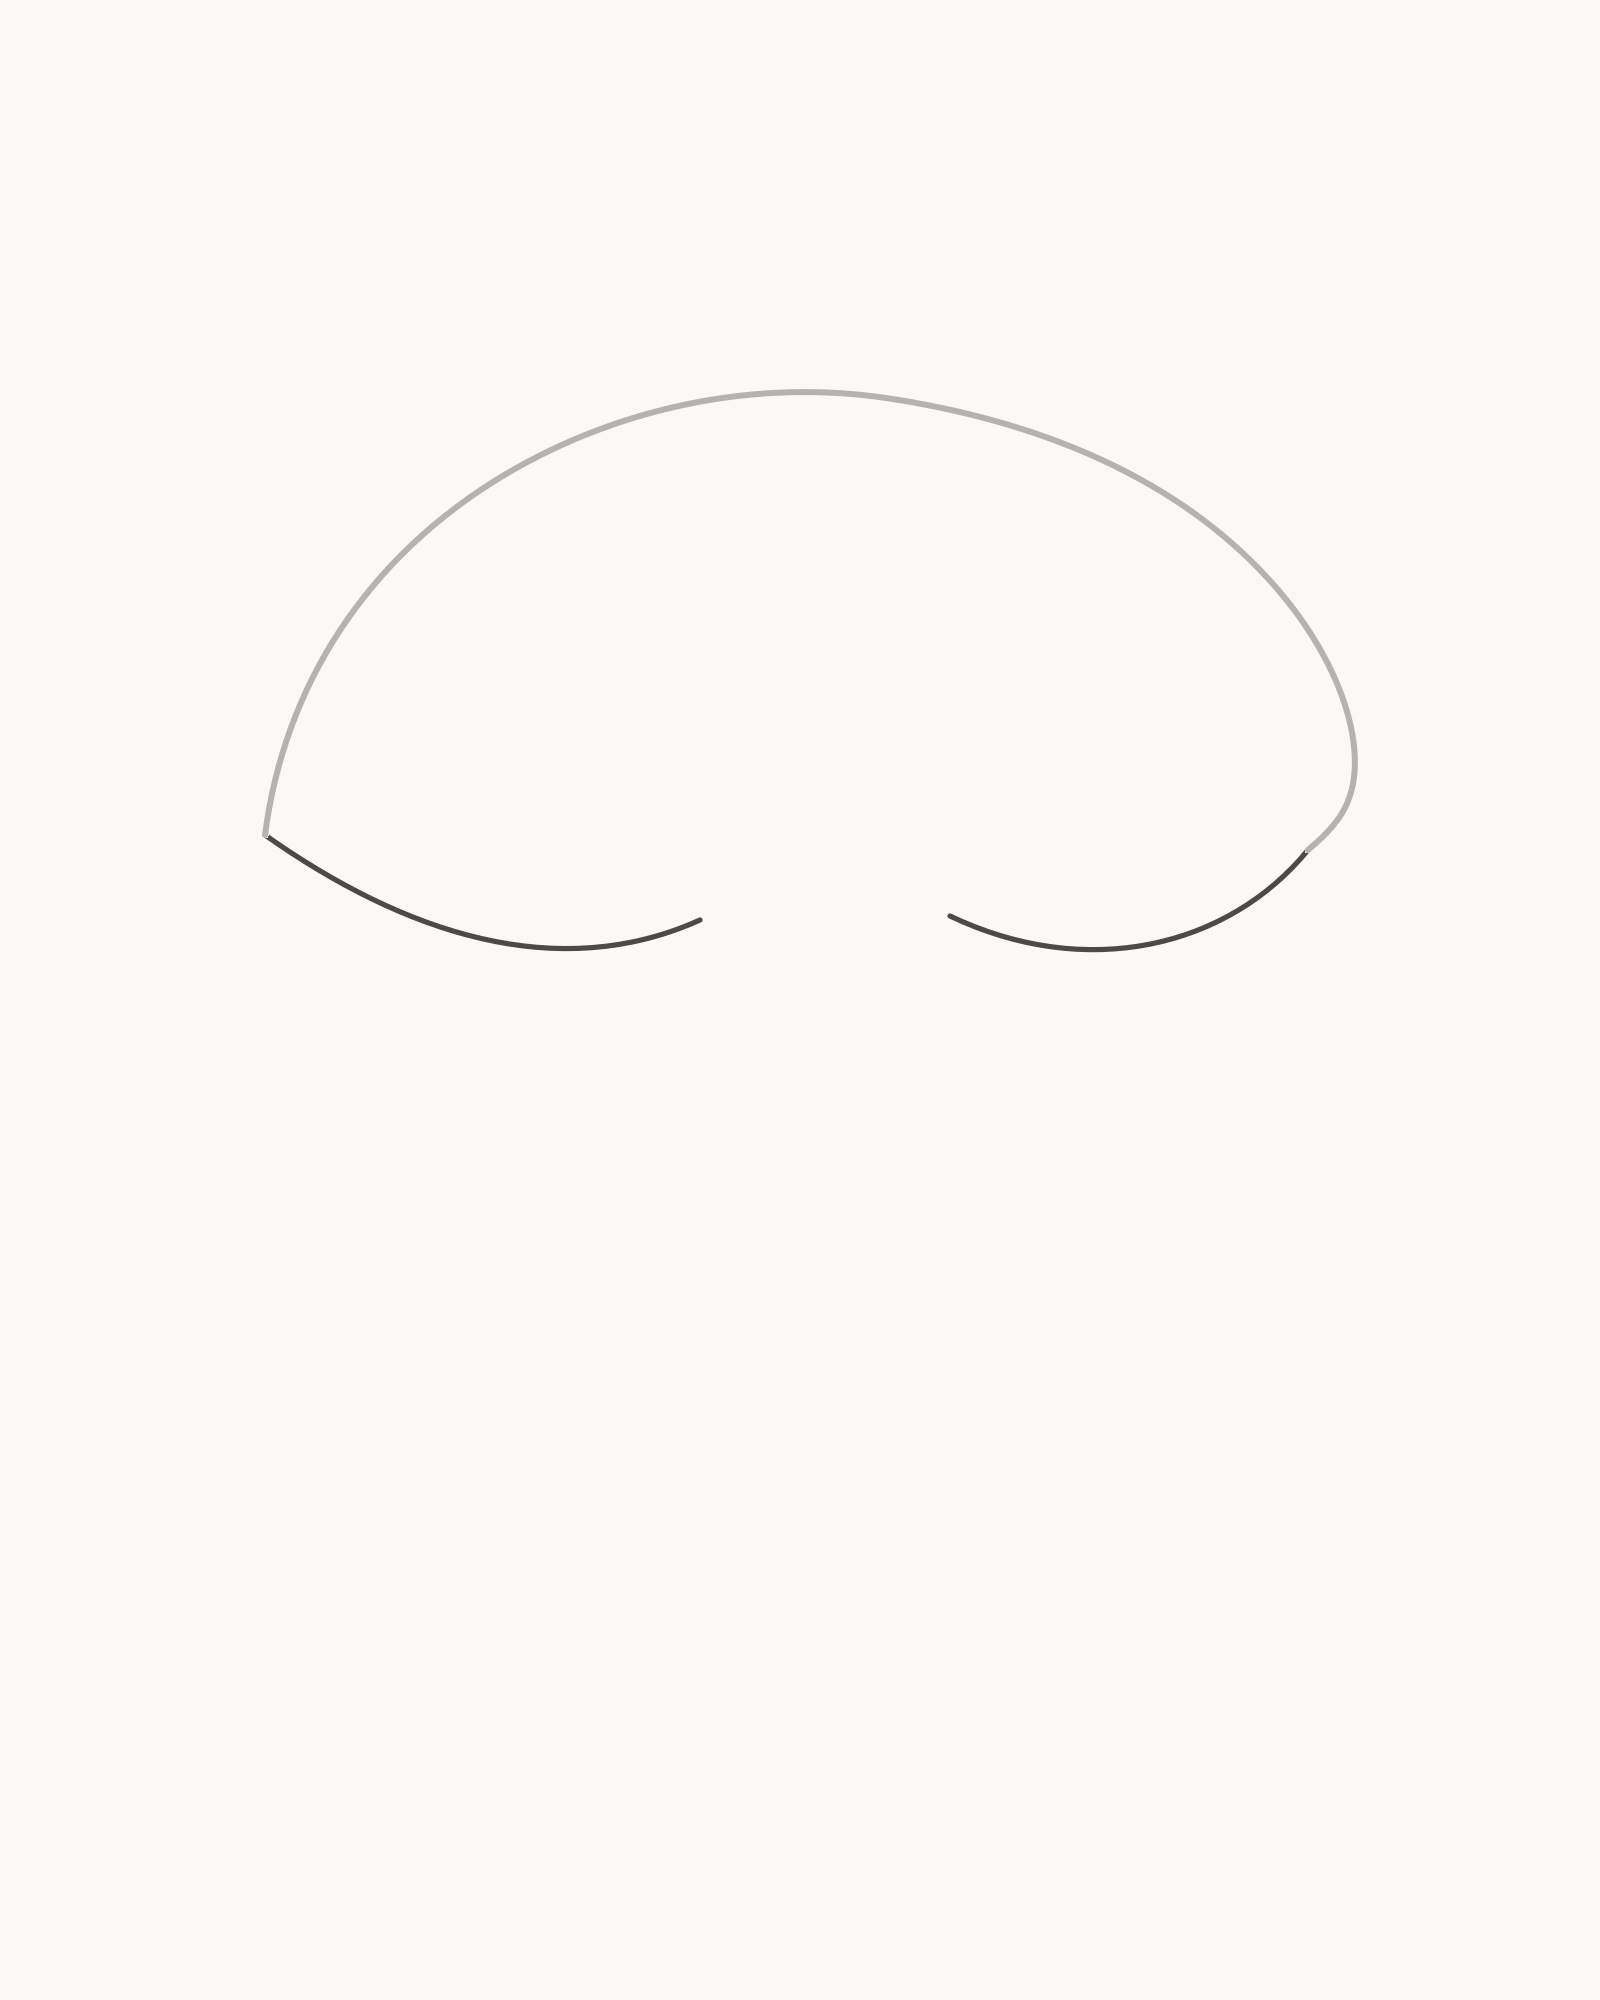
Stage 2 of 7. Two shallow arcs reveal the underside and reserve the stalk corridor. - Left underside arc
- Right underside arc
- Keep the centre open
From the left rim, draw a shallow curve inward and slightly down, stopping well before the centre. Repeat from the right rim, allowing that curve to rise through the opposite tilt before it stops. Leave a clean opening between the two inner ends.
Think of the pair as one shallow underside interrupted by the future stalk. They should not meet as a complete oval, and neither side should sag into a deep bowl. Draw the left arc first, then the right, so each has its own visible start and stop.
Look for this before moving on: two shallow underside arcs share one believable tilt, meet the accepted rim ends and preserve a generous central opening for the stalk.
If it goes wrong: keep the cap and the clearer underside arc. Lift only the newest deep, mismatched or overlong curve, then redraw it from the same rim point while stopping before the reserved centre.
3. Attach the curved stalk
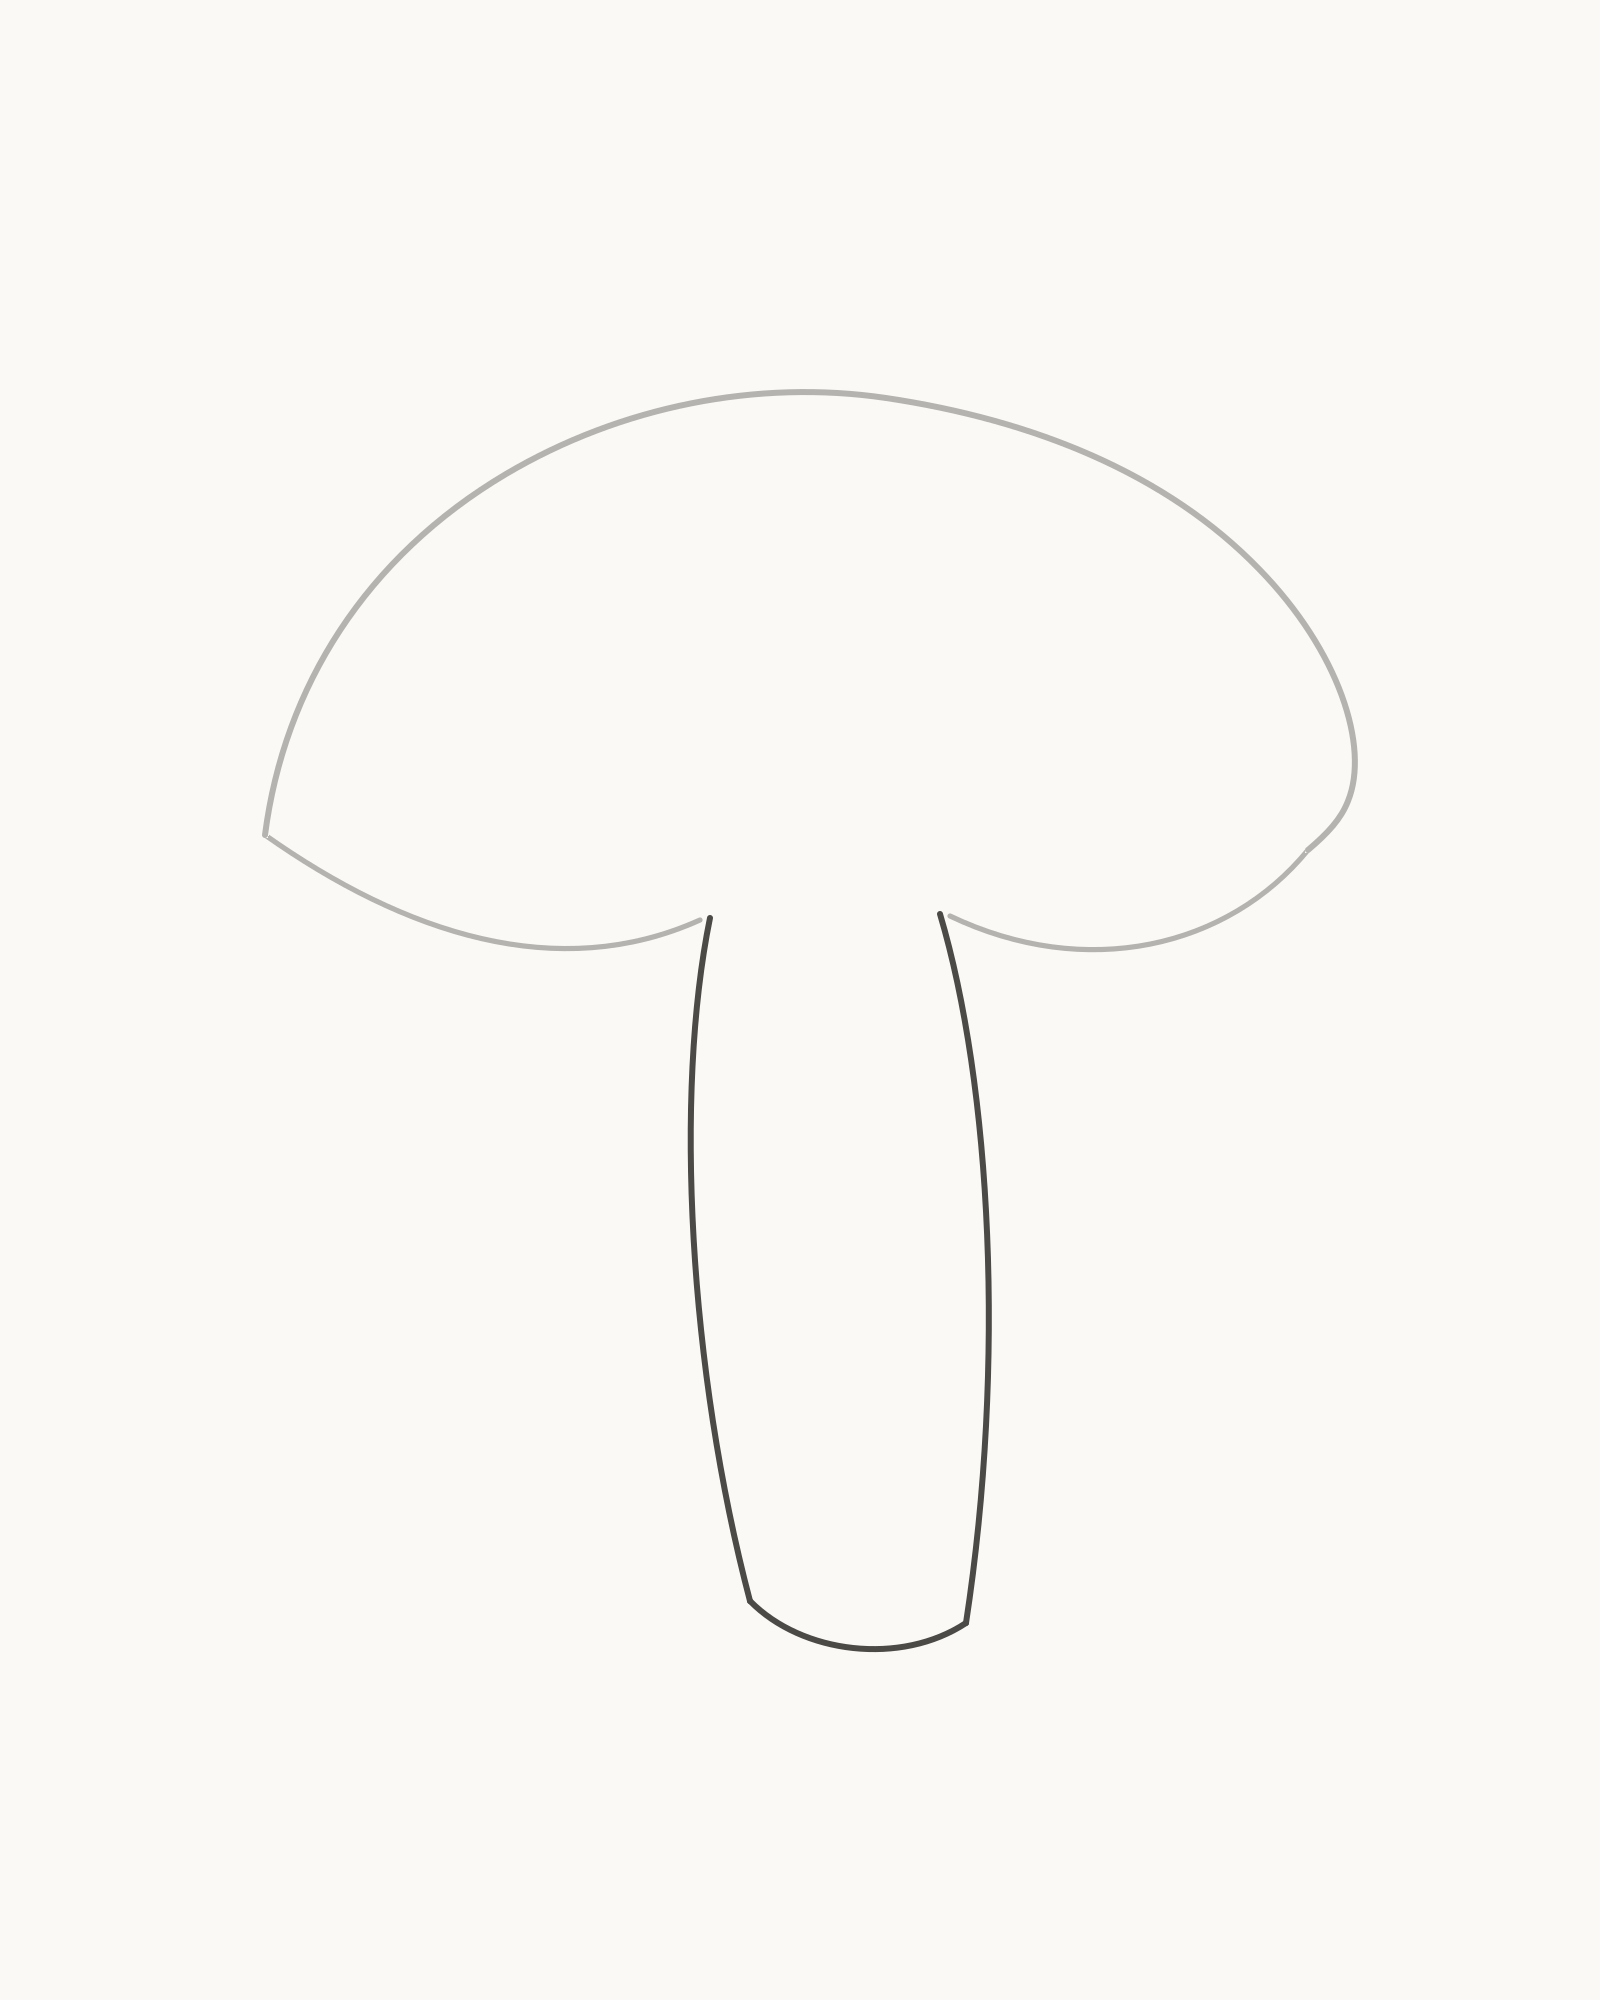
Stage 3 of 7. The curved stalk disappears behind the split underside. - Left stalk edge
- Right stalk edge
- Soft base curve
Begin the left stalk edge just inside the left end of the central opening. Carry it down with a slow rightward bend, letting the lower third turn outward slightly. Start the right edge from the other side of the opening. Give it a different curve and a modest change of width before joining both edges with one softly uneven base.
The two top ends disappear behind the underside rather than crossing it. Avoid a narrow pinched neck, but do not flare the stalk into a trumpet shape. The unequal edges should feel related to the same solid form.
Look for this before moving on: two non-crossing stalk edges begin behind the open underside, curve gently through the page and meet one soft base without forming a rigid tube.
If it goes wrong: leave the cap and underside untouched. Replace only the newest rigid, pinched or over-flared stalk edge—or the base segment if it leans against one side—using the same hidden top contact.
4. Place seven primary gills
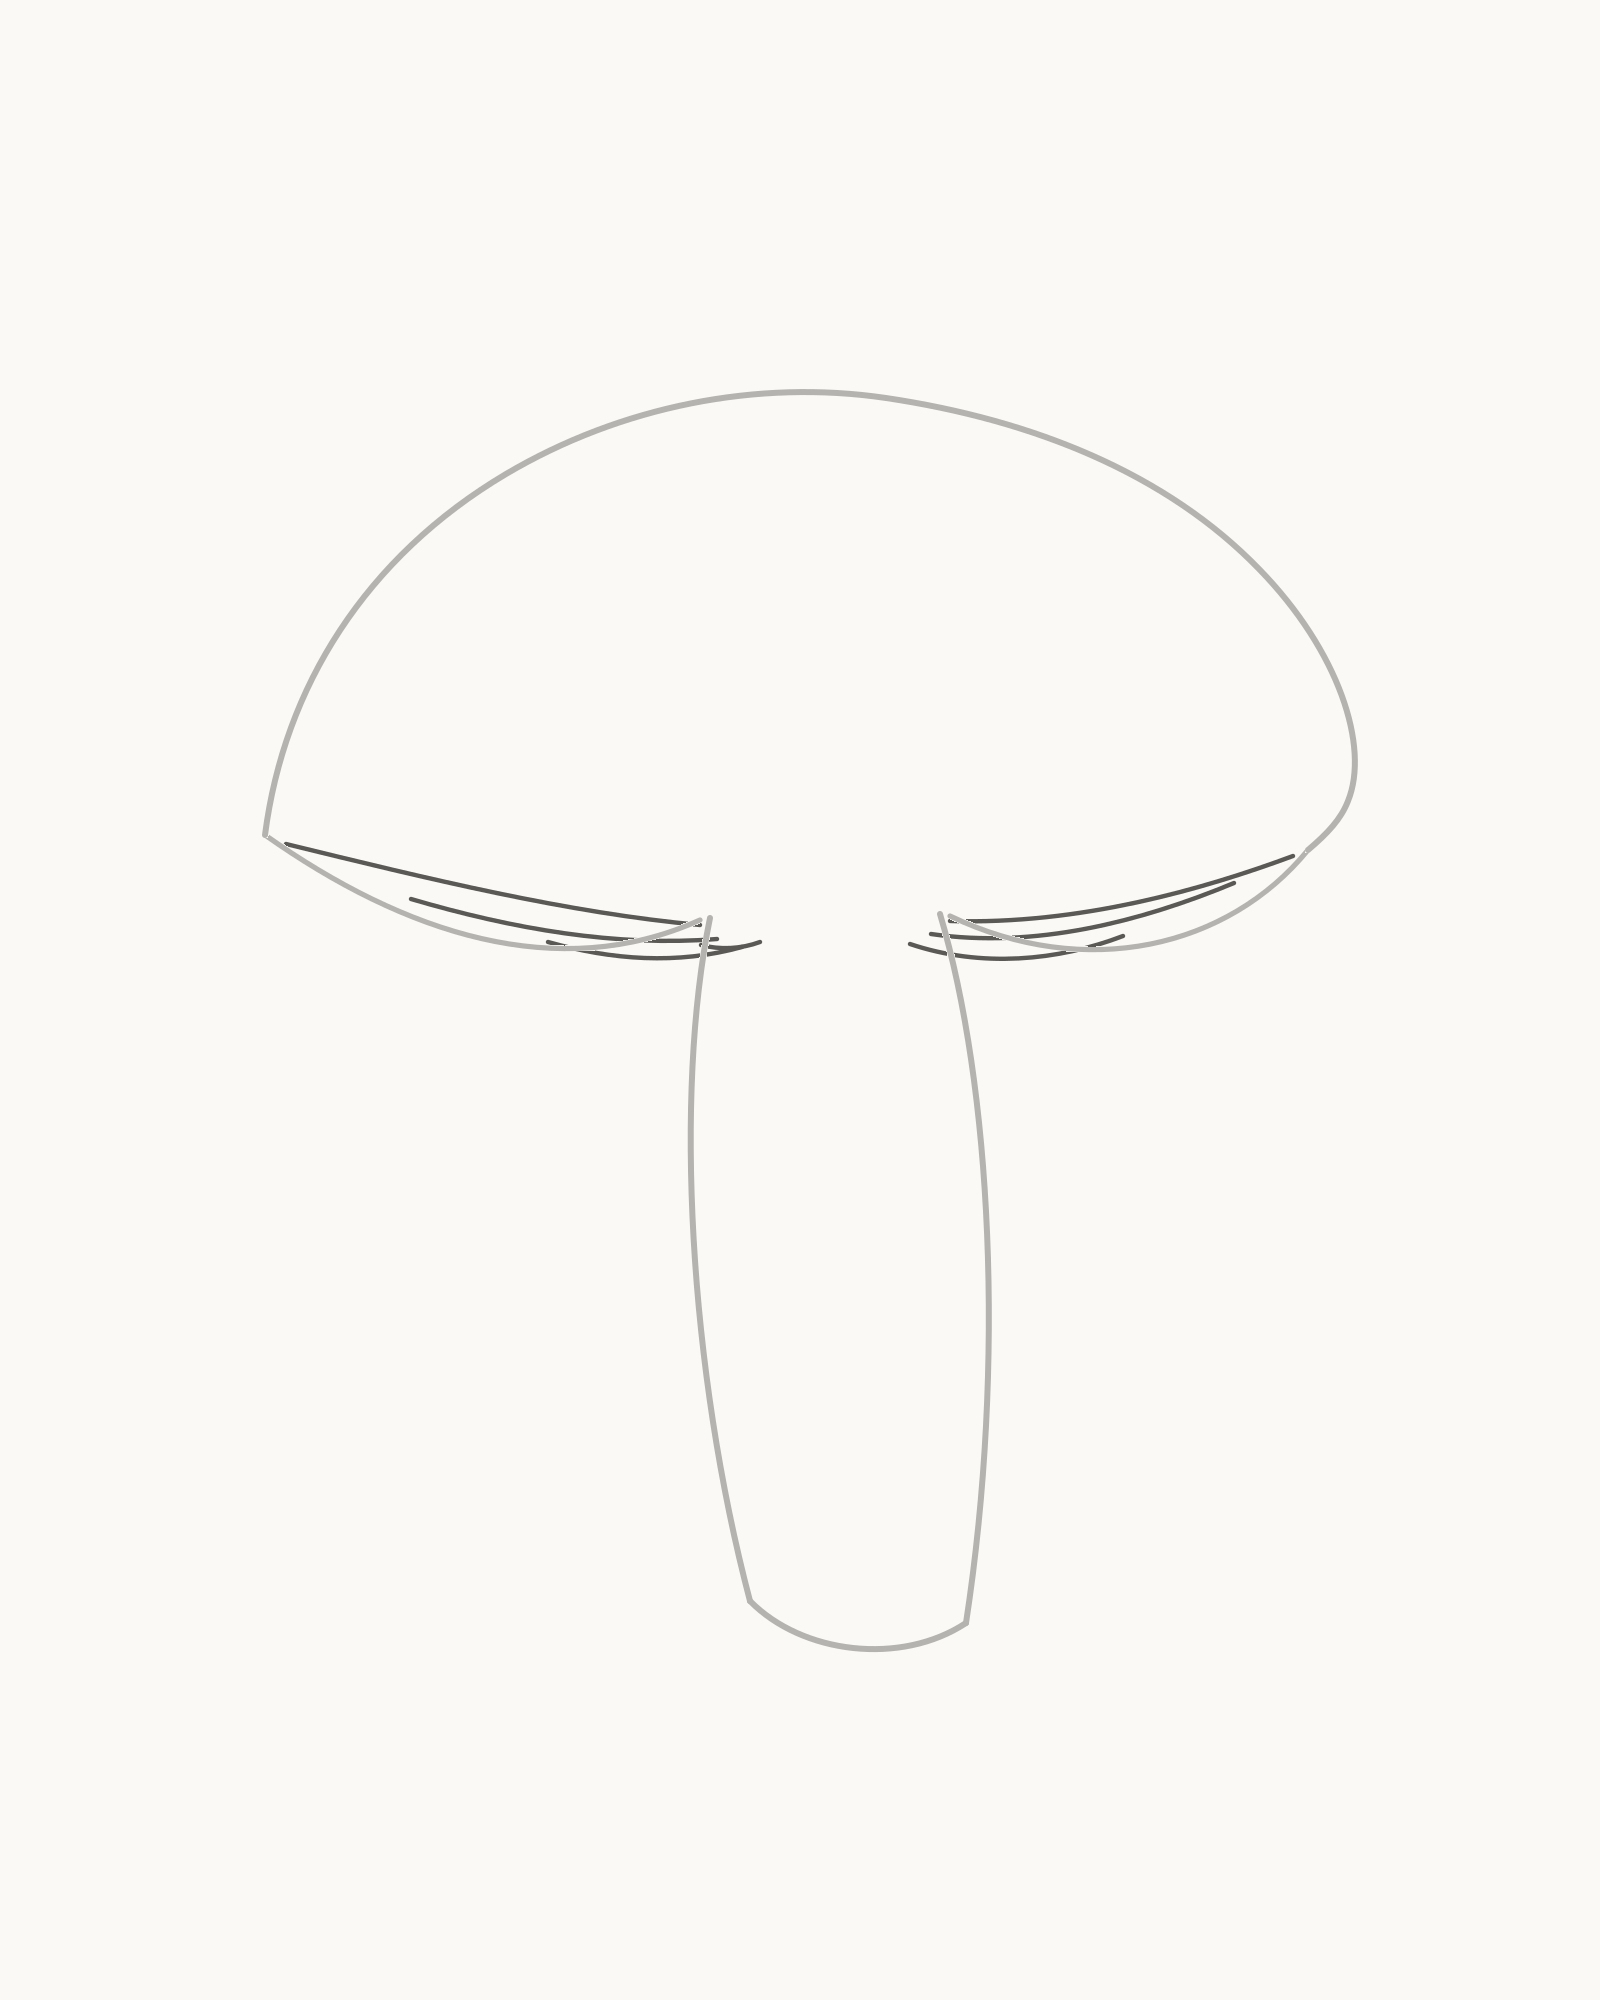
Stage 4 of 7. Seven primary gills establish the main underside fan. - Work left to right
- Vary each angle
- Stop at seven
Add seven longer gill lines from left to right. On the left, let three broad curves travel from near the hidden top of the stalk towards separate parts of the rim. Add one shorter inner-left curve beside the opening. On the right, place three long curves whose spacing and length differ from the left group.
The gills belong to the underside plane, so they should follow its shallow fan. Do not force them through one visible central dot. Their inner ends gather around the hidden attachment area while their outer ends spread along distinct rim points.
Look for this before moving on: exactly seven primary gills are countable, every line has its own angle and endpoint, and the group fans around the stalk opening without becoming bicycle spokes.
If it goes wrong: retain the underside and the clear gills. Remove only the newest line if it crosses the stalk, repeats a neighbour or aims for the same endpoint, then give that one curve a different start or spread.
5. Add eight shorter gills
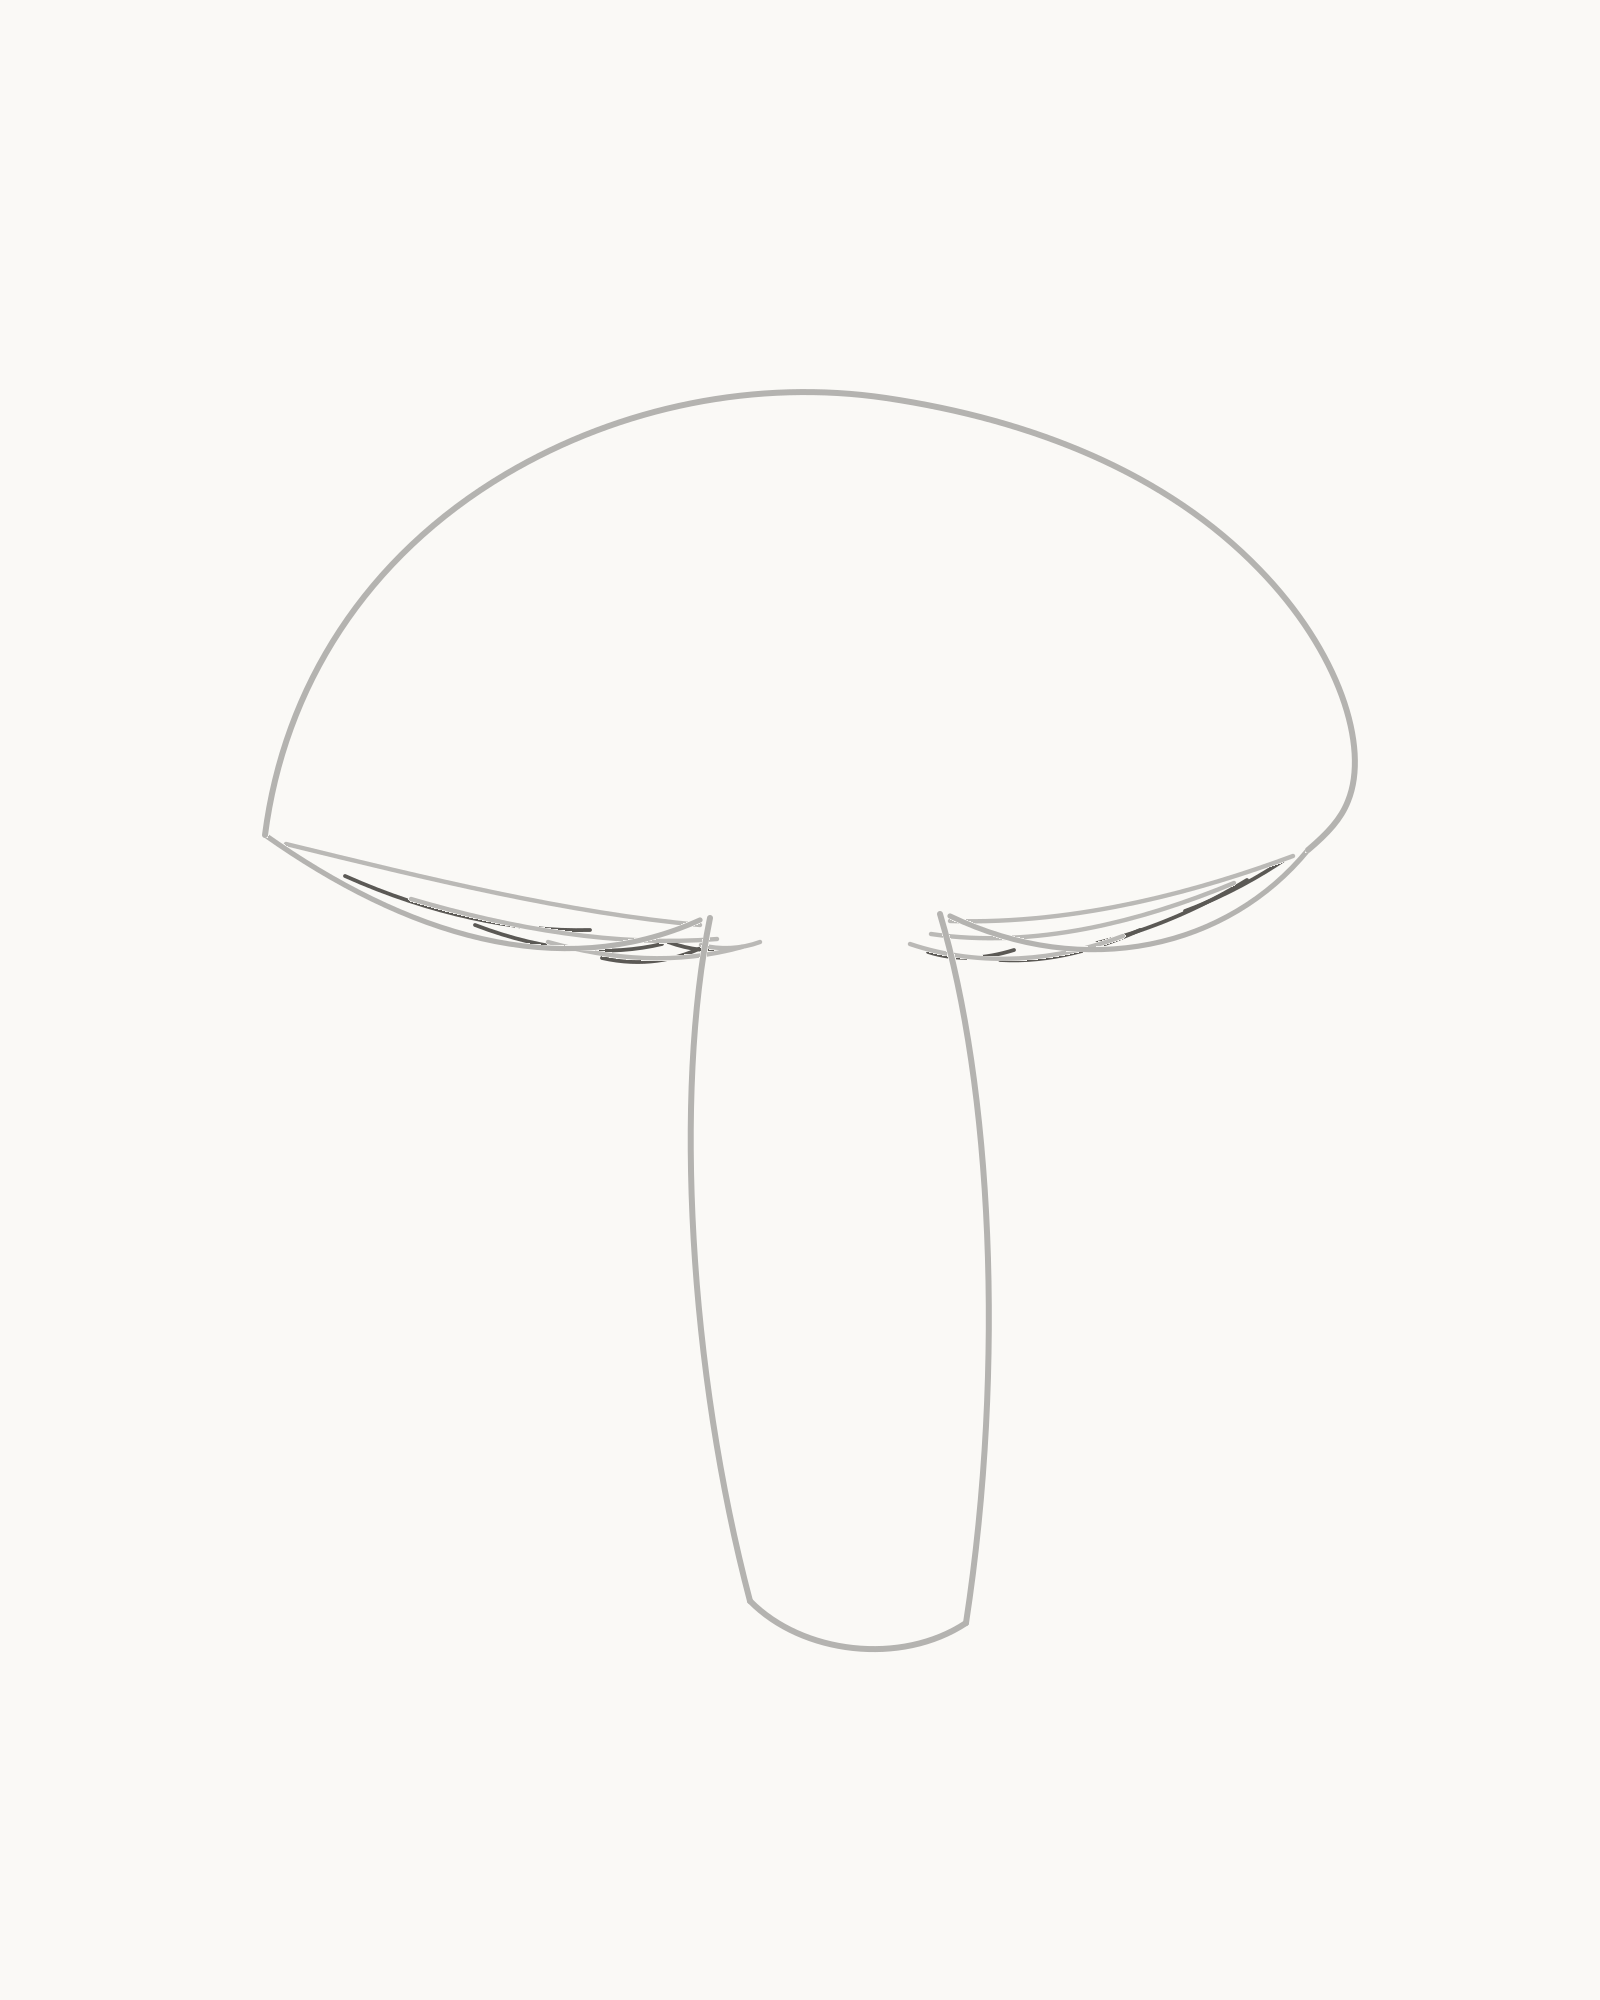
Stage 5 of 7. Eight shorter gills fill selected gaps without making a wheel. - Fill only wide gaps
- Stop before the centre
- Count fifteen total
Look for the widest gaps between the seven primary lines. Add eight shorter gills inside those spaces, working from the left rim towards the centre and then from the right rim back towards it. Every new line begins near the visible underside or rim and stops before reaching the hidden stalk area.
Vary the length according to the gap. The shortest additions sit close to the inner ends; slightly longer ones can occupy the broad outer spaces. Keep a slim band of warm paper between neighbours so the underside stays light and readable.
Look for this before moving on: fifteen gills are now visible—seven long and eight shorter—and the newer lines fill selected gaps without making a dense comb or regular wheel.
If it goes wrong: keep the primary fan and every useful filler. Remove only the newest overlong, crowded or scratch-like gill, then shorten or shift that line within the same open space. Stop at fifteen rather than adding marks to balance the sides.
6. Anchor the stalk
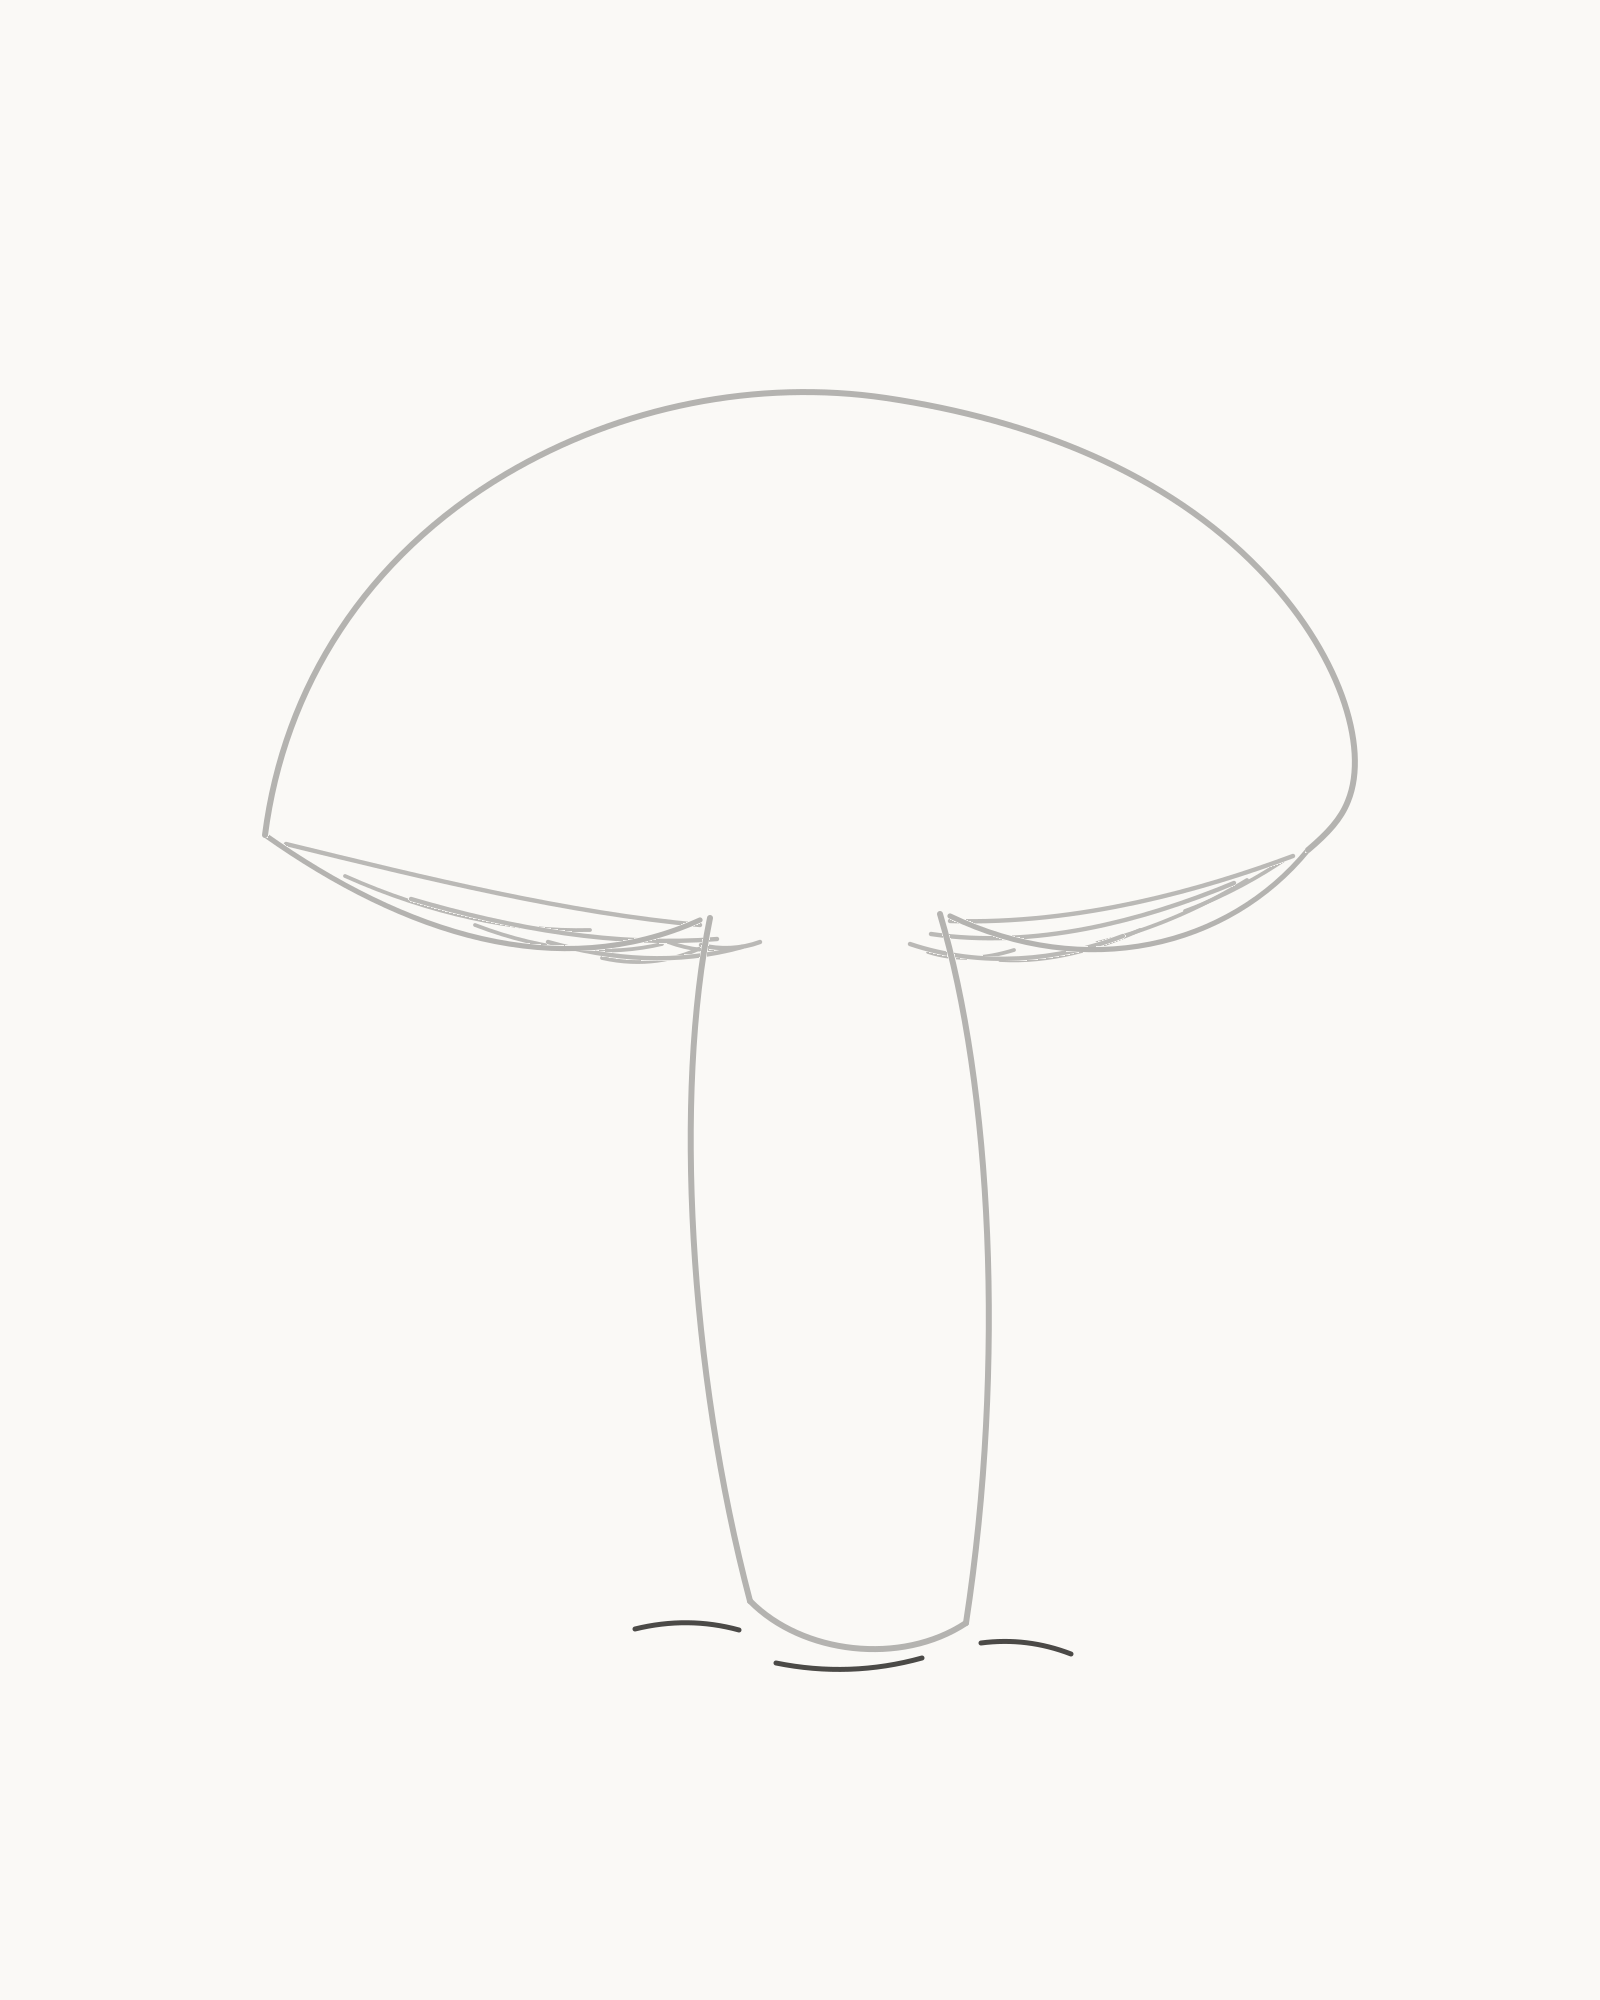
Stage 6 of 7. Three restrained base marks settle the stalk without adding scenery. - Short left mark
- Shallow centre mark
- Short right mark
Place three short strokes around the base: one just to the left, one shallow curve beneath the middle and one to the right. Keep them separate enough for the soft base edge to remain completely visible.
These marks indicate contact with a surface; they are not a cast shadow, grass or soil texture. The centre stroke may follow the base curve loosely, while the side strokes stay quieter and shorter.
Look for this before moving on: exactly three restrained marks settle the stalk on the page, with open paper between them and no dark patch beneath the base.
If it goes wrong: preserve the stalk and the clearest contact marks. Remove only the newest long, grassy or heavy stroke, then replace it with one shorter curve that does not obscure the base.
7. Add sparse hatching
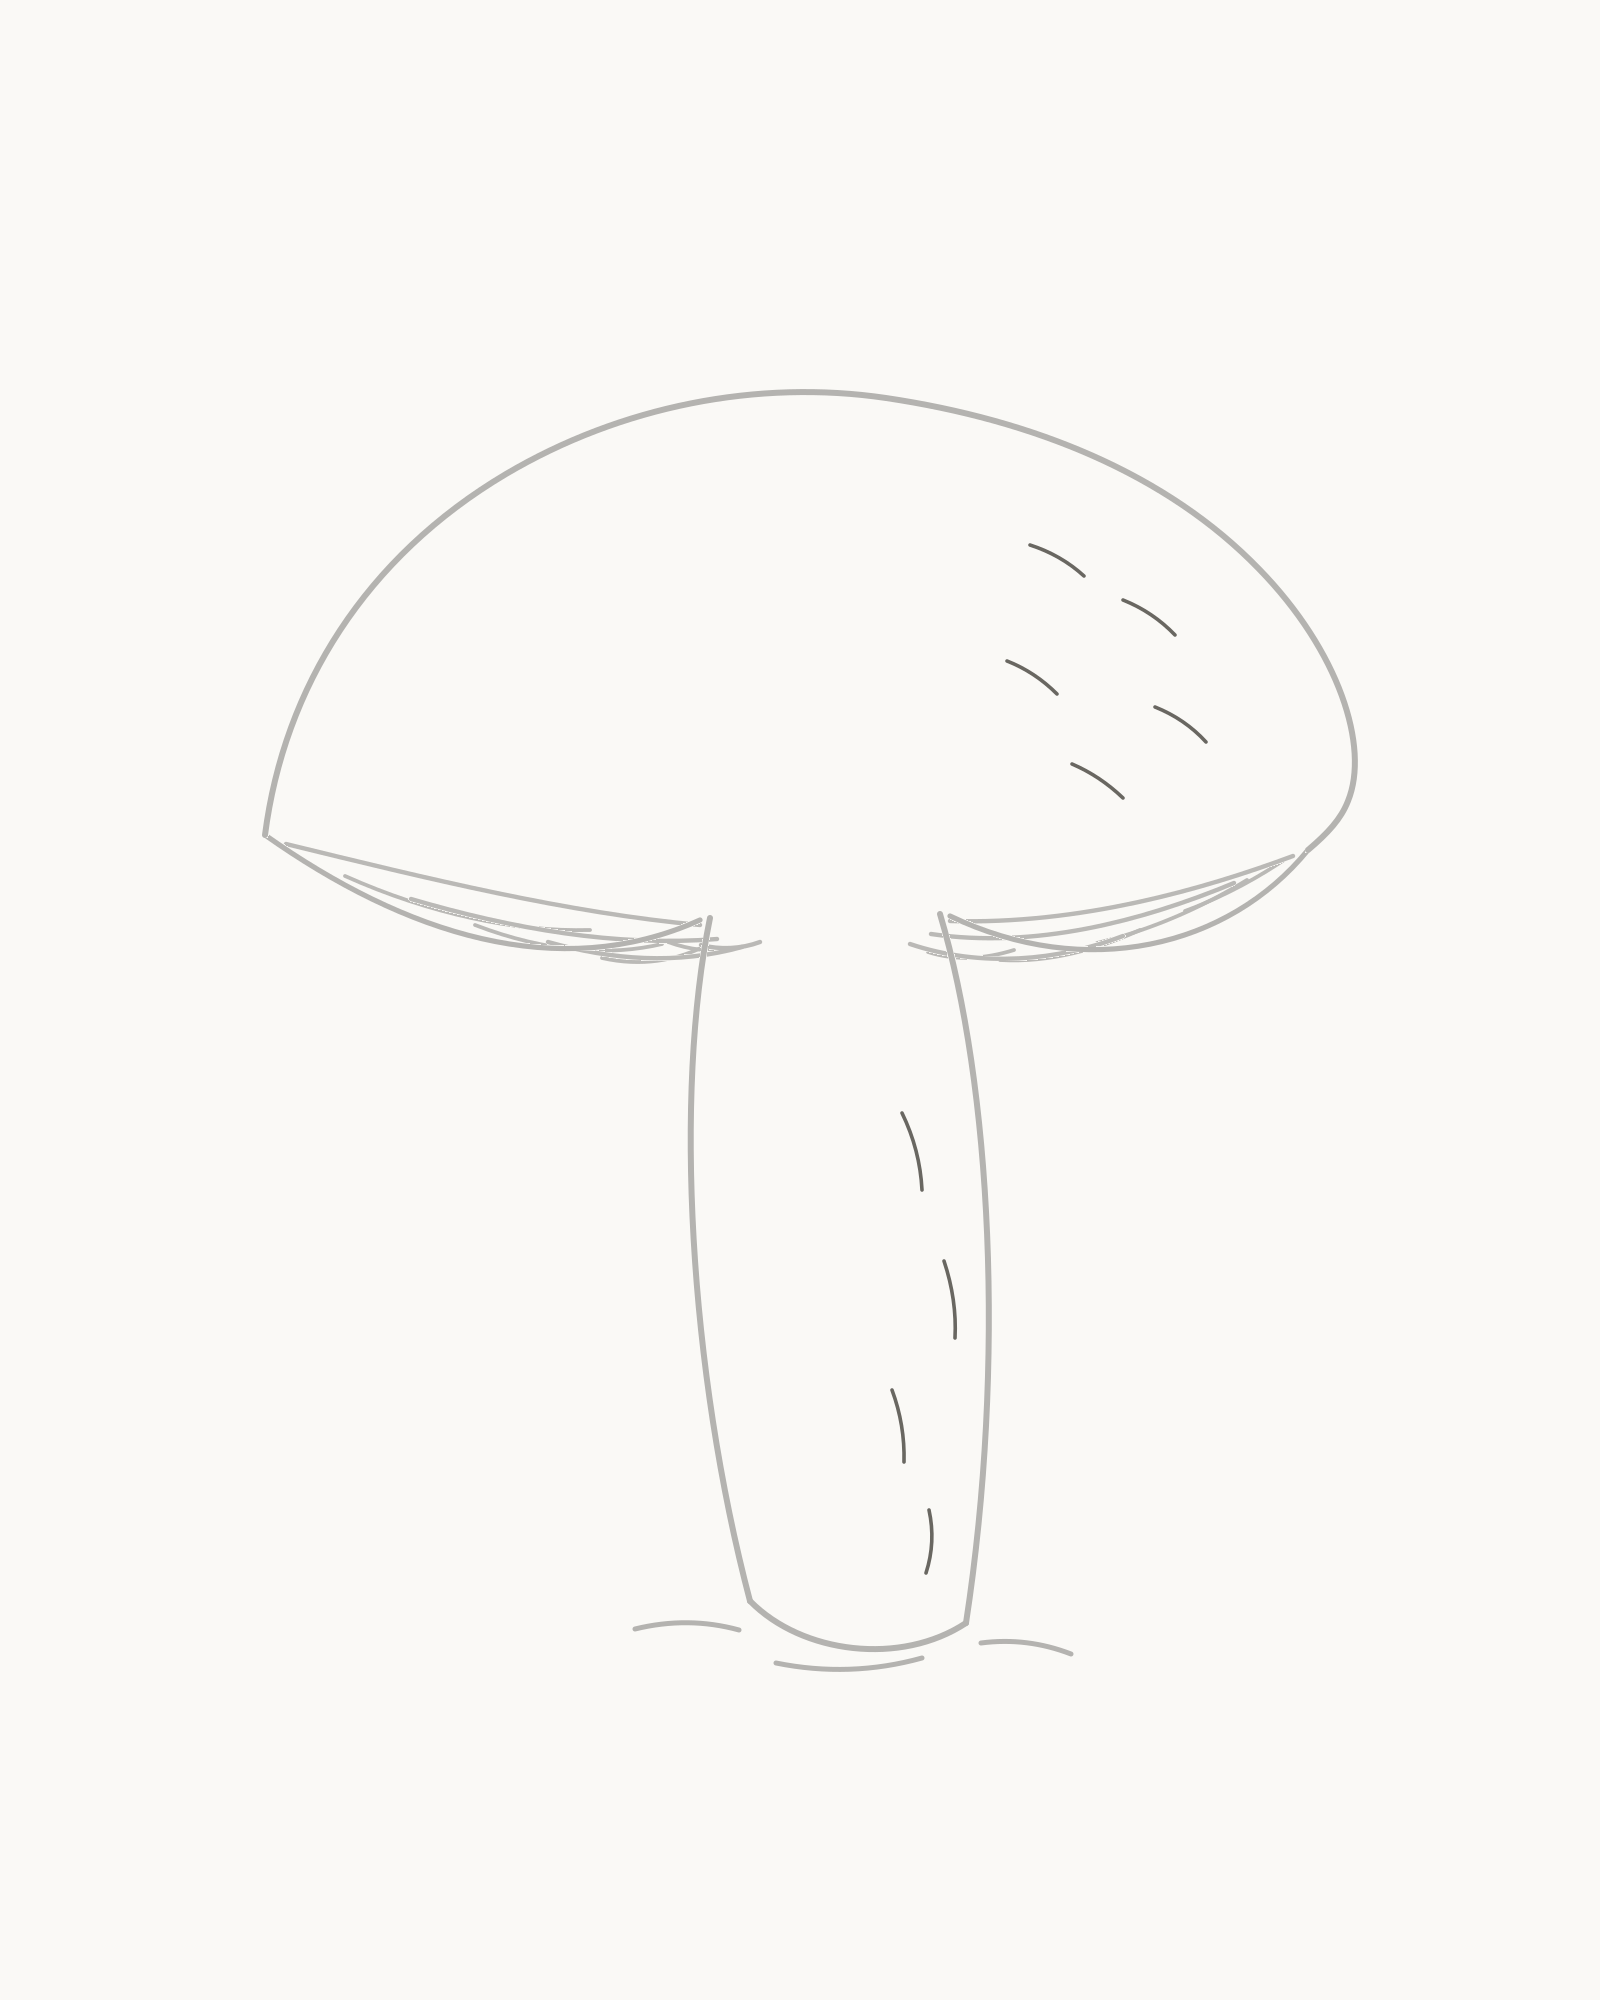
Stage 7 of 7. Nine sparse hatch strokes complete one upper-left light direction. - Five cap hatches
- Four stalk hatches
- Leave clean paper
Finish with nine light hatch strokes. Put five small curved marks across the lower-right half of the cap, spacing them rather than joining them into a seam. Add four short, gently vertical marks on the right-facing side of the stalk. Let every stroke follow the form beneath it.
The marks express one upper-left light direction. They should never become a shaded block, and they are not a way to fix a cap or stalk contour. When the ninth stroke is in place, leave the outer lines alone; the drawing is complete without retracing.
Look for this before moving on: five cap hatches and four stalk hatches remain separate, the upper-left side stays open, and the cap–stalk junction and every gill are still easy to read.
If it goes wrong: retain all clear structure and the useful hatch marks. Remove only the newest dark, joined or wrong-way stroke, then replace it more lightly along the local curve. Do not add more hatching to hide an outline fault.


Troubleshooting the finished mushroom
The cap looks like a perfect umbrella. Check the newest altered section. Keep the high point a little left of centre, let the left rise remain fuller and make the right descent slightly steeper. Avoid adding random wobble; one controlled difference is enough.
The underside looks like a broken oval. Compare the tilt of its two arcs and the width of the central opening. Repair only the newest mismatched segment. The gap is intentional because the stalk passes behind the cap there.
The stalk looks pasted onto the cap. Its two edges should begin inside the opening and disappear behind the underside. Shorten only the newest visible top segment if it crosses a gill or touches the rim at one isolated tangent.
The gills look like bicycle spokes. Keep the most convincing long curves. Change only the latest repeated angle, and remember that the eight shorter gills stop before the centre instead of sharing one hub.
The gills look like random scratches. Separate long primary curves from short fillers. Remove the newest mark that lacks a clear relationship to the underside edge, then place it inside a genuine open gap.
The mushroom appears to float. Check the three base marks rather than drawing a dark shadow. One short curve to either side and one beneath the base are enough to show contact.
The final drawing looks overworked. Count the hatches: five on the cap and four on the stalk. Remove only the newest extra or joined mark. Clean paper is part of the value pattern.
Change the cap lean
On a fresh area of paper, repeat the same seven actions but move the cap's high point farther left. Let the right rim drop slightly and curve the stalk a little more strongly in the opposite direction. Keep the same seven long and eight short gills, adjusting only their angles to the new underside. This practises attachment and perspective without introducing another mushroom or a background.
For a related exercise in curved surface spacing, try How to Draw a Strawberry. How to Draw Leaves offers a different way to organise repeated lines, and How to Draw holds the practical lesson index. Historical and artistic examples remain in the separate Mushroom drawings gallery; this page owns only the step-by-step construction.
Frequently Asked Questions
What is the easiest way to draw a mushroom?
Draw one unequal cap first, add the underside as two shallow curves with a central gap, then attach the stalk inside that gap. Add a few long gills before placing shorter ones. This order keeps the main structure visible before detail begins.
How do I make the stalk look attached to the cap?
Reserve an opening in the underside instead of drawing a complete oval. Start the two stalk edges inside that opening and let their top ends disappear behind the cap. Do not draw either edge through the underside line.
How many gills should I draw?
This exercise uses fifteen visible teaching lines: seven long primary gills and eight shorter fillers. It is a simplified spacing pattern, not an anatomical total. Stop while clear paper remains between the lines.
Do all mushrooms have gills?
No. The National Park Service notes that some mushrooms have pores rather than gills.[1] This lesson deliberately chooses one familiar gilled form so the underside can be studied clearly.
How can I stop the gills looking like a wheel?
Vary the long lines' angles and endpoints, then add shorter lines only inside the largest gaps. Do not make every line reach one visible central dot, and do not mirror the left and right groups.
Should a beginner draw spots on the cap?
Not for this outcome. Spots are associated with particular mushroom appearances and would turn a structural lesson into a species-like symbol. The cap here is kept clear so its unequal curve and light direction remain visible.
Is this a guide to identifying edible mushrooms?
No. It is a drawing lesson, not an identification or safety guide. Use the supplied image, a clear photograph or a familiar shop-bought mushroom for observation, and do not handle or eat an unknown wild specimen.
Does the finished mushroom need shading?
No tonal shading is required. The final stage uses only nine separate hatch strokes—five on the cap and four on the stalk—to suggest an upper-left light. The structure should already read before those marks are added.
References
- National Park Service, Mushrooms — Katahdin Woods and Waters National Monument. View source
- National Park Service, Mushrooms — Sitka National Historical Park. View source
- Kew Grow Wild, How to Take Great Photos of Fungi. View source
More DRAWING Guides

How to Draw a Rose: A Step by Step Guide

How to Draw a Tree: A Step by Step Guide

How to Draw Eyes: A Step by Step Guide

How to Draw Leaves: A Step by Step Guide

How to Draw Autumn Leaves: A Step by Step Guide

How to Draw Flowers: A Step by Step Guide

How to Draw a Lily: A Step by Step Guide

How to Draw a Sunflower: A Step by Step Guide

How to Draw a Tulip: A Step by Step Guide

How to Draw a Hibiscus: A Step by Step Guide

How to Draw a Daisy: A Step by Step Guide
