



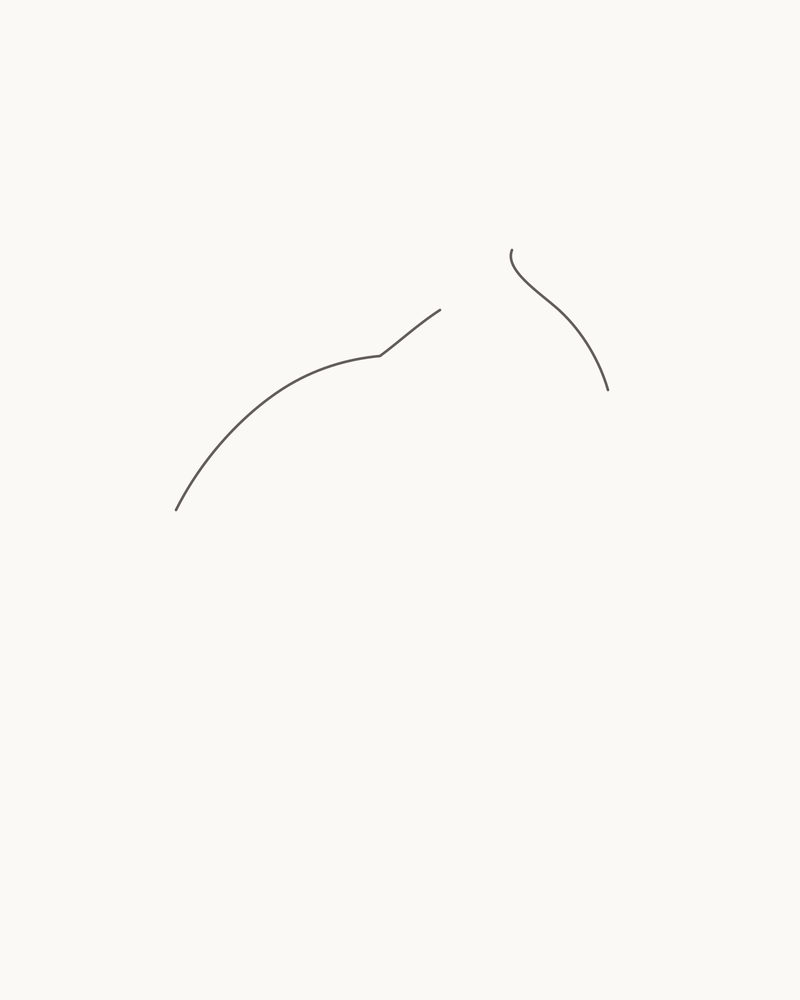
Draw one complete adult rabbit
Draw a complete adult rabbit sitting calmly and facing right. Eight stages build the permanent upper silhouette, lower body, unequal ears, four distinct paws, attached tail, quiet face and a handful of directional fur marks. The result is a clean line drawing: there is no colour or shading stage, and nothing added at the end is used to hide the construction.
Difficulty: Beginner to intermediate
Time: Allow about 40–55 minutes. This is an explicitly untested editorial estimate, not a timed drawing session.
Medium: A pointed HB or No. 2 graphite pencil on smooth, unlined paper.
The ear roots, overlapping forepaws and folded hind leg deserve the closest attention. Every line that appears in one stage remains in all the stages that follow. You will not erase a body oval, trace a darker replacement outline or cover a doubtful attachment with fur.
A few relationships do most of the work. The National Park Service describes the eastern cottontail as chunky, with large hind feet, long ears, large eyes and a short tail. Animal Diversity Web likewise records a compact body, large side-set eyes and a short tail. Those observations support the broad proportions used here, without making this invented rabbit a portrait of one species.
Posture matters too. The RSPCA distinguishes relaxed upright or slightly angled ears from tense, flattened positions. In this drawing, the unequal erect ears, deep hindquarter and grounded paws belong to one calm pose. Keep those large shapes coherent before spending time on the eye or whiskers.
Materials
- Choose a sharpened HB or No. 2 pencil. If you work with a mechanical pencil, an everyday 0.5 or 0.7 mm lead also gives enough control.
- Use unruled white or warm-white paper with a fairly smooth surface, held vertically. A spare sheet of ordinary office paper is enough for a first attempt.
- Keep a clean eraser for correcting only the most recent faulty curve. There is no general cleanup or guide-removal stage.
- A pencil sharpener.
- Optional scrap paper for rehearsing one tapered ear, the long hind-foot return or a whisker curve.
- An optional ruler for comparing the separate percentage or grid cue with the page edges. Do not use it to draw the rabbit.
No compass, tracing paper, marker, specialist graphite set, blending tool, colour, paint, tablet, printable, download or video is needed. Use light-to-moderate pressure: the lines should be easy to control but still readable without a heavy colouring-book border.
Before you draw
Place the paper in portrait orientation. The rabbit occupies the central area, with its face on the right and the rounded hindquarter on the left. Leave open paper above both ears, below every paw, behind the tail and in front of the whiskers.
The optional grid defaults off and is only a placement aid. For the first stage, locate the nose around x76% / y39%, the front root of the near ear around x64% / y25%, the highest part of the back around x44% / y36%, and the upper tail root around x22% / y51%. Treat each percentage as an approximate comparison with the whole page. No grid line, dot, coordinate or label becomes part of the rabbit.
The head is almost in profile, while the body turns just enough to reveal a farther forepaw and a small part of the farther hind foot. “Near” means the side visually closest to you; “far” identifies the partly hidden side. Both are drawn with the same line strength. Depth comes from attachment and overlap, not from fading a limb.
All four paws will settle on one invisible floor between roughly four-fifths and five-sixths of the page height. Do not draw a ground line. The completed image has no tonal model, so the reserved upper-left light direction does not require any shadow or hatching.
1. Set the permanent upper silhouette
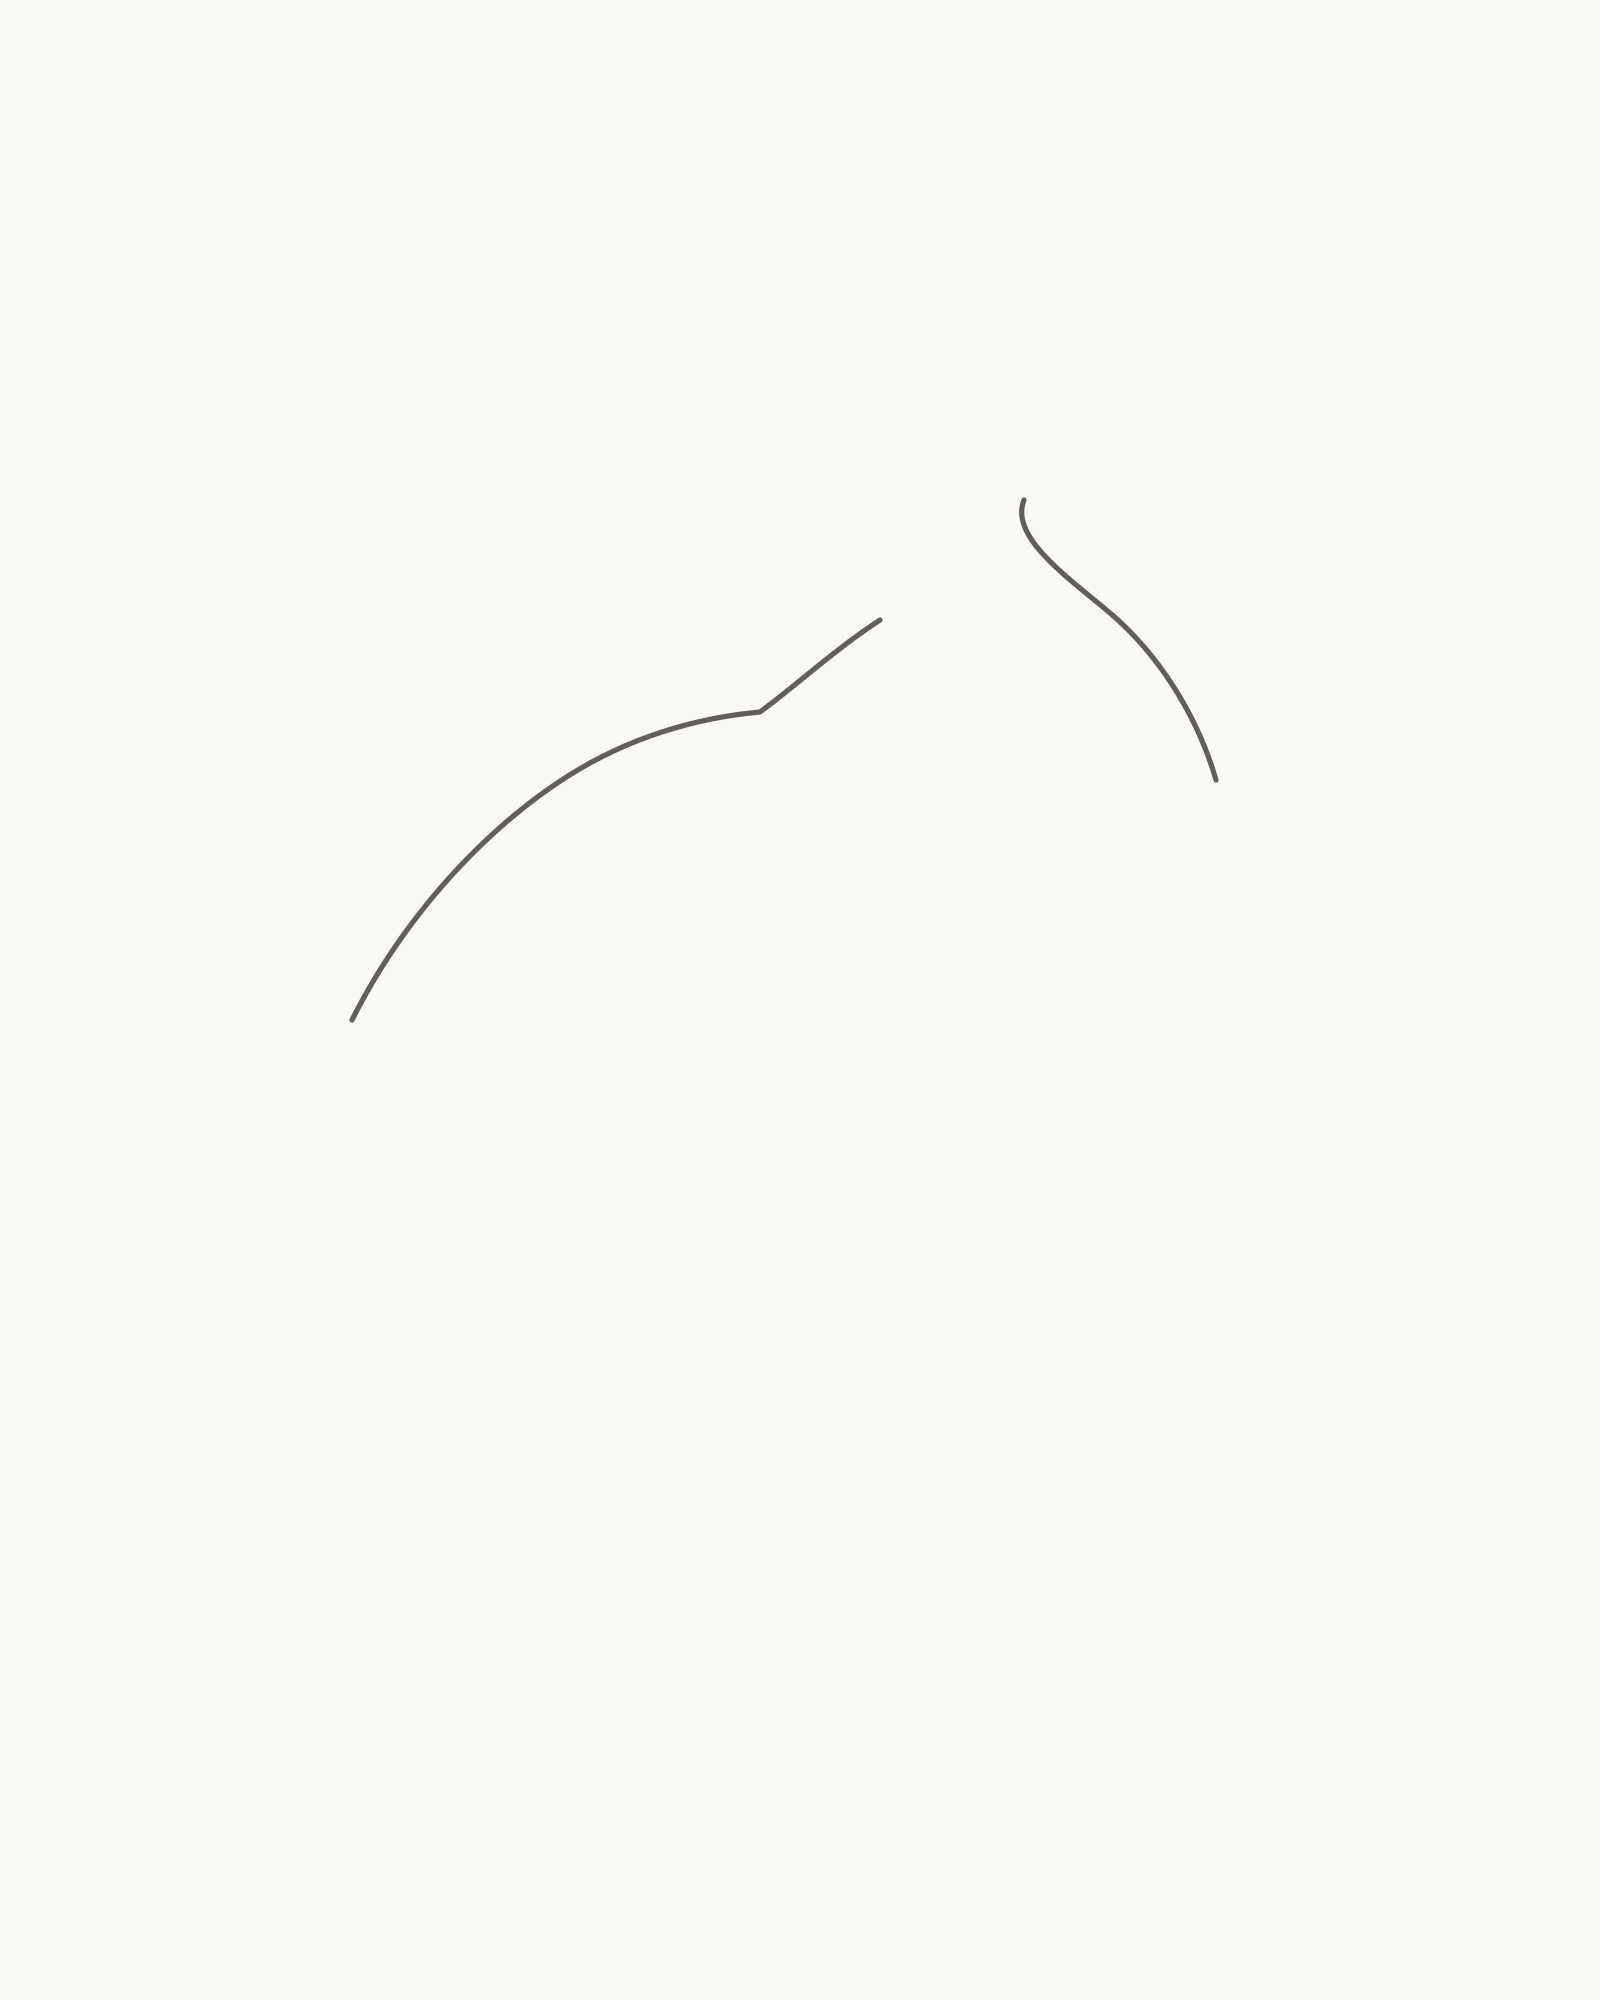
Stage 1 of 8. Two permanent intervals establish the modest head, tall ear space, sloping back and rounded adult rump. 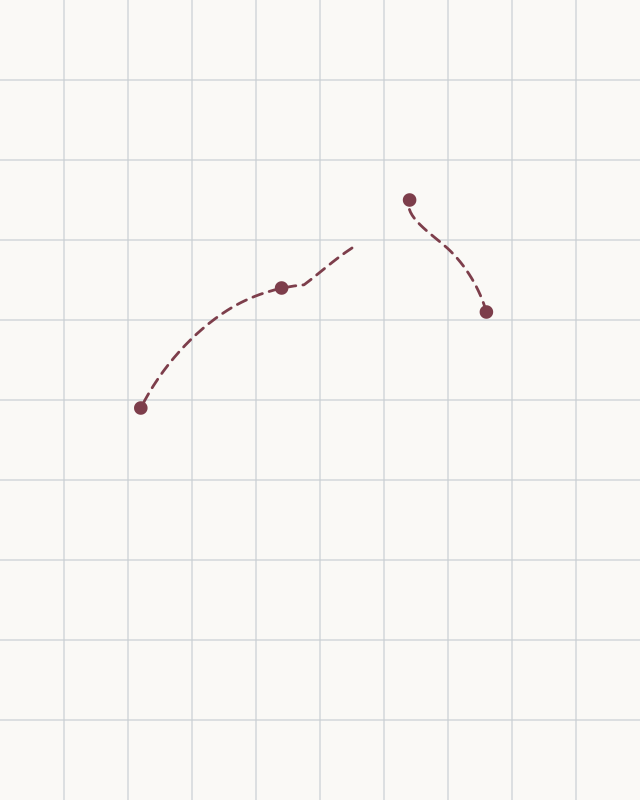
Placement cue: place the nose near x76% / y39%, the front near-ear root near x64% / y25%, the back high point near x44% / y36% and the upper tail root near x22% / y51%. Keep the cue off the drawing. - Nose and forehead
- Front near-ear root
- Nape and shoulder
- Back, rump and upper tail root
Start at the nose near x76% / y39%. Draw back over the forehead and stop at the front root of the near ear near x64% / y25%. Keep the forehead gently convex and the muzzle modest; a circular head would make the animal look younger and more toy-like than the finished rabbit.
Begin the second interval at the rear ear and nape anchor. Carry it down into the shoulder, then across a gently sloping back and around the fuller rump. End at the upper tail root near x22% / y51%. This back should change direction gradually rather than forming a perfect dome.
Both curves are final boundaries. The open crown between them is reserved for the ears, while the underside stays open for the body and legs.
Look for this before moving on: the head faces right, the nose and future whiskers have clear space, the ear area is tall enough, the back feels longer than the head, the rump is rounded without becoming a ball, and all four placement points sit close to the cue.
If it goes wrong: keep whichever interval already has the right scale and direction. Remove only the newest baby-round forehead, cat-like muzzle, stiff back section or misplaced tail-root end, then redraw that short part between two stable points. Do not replace both contours to fix one local bend.
2. Return along the lower body and keep three openings
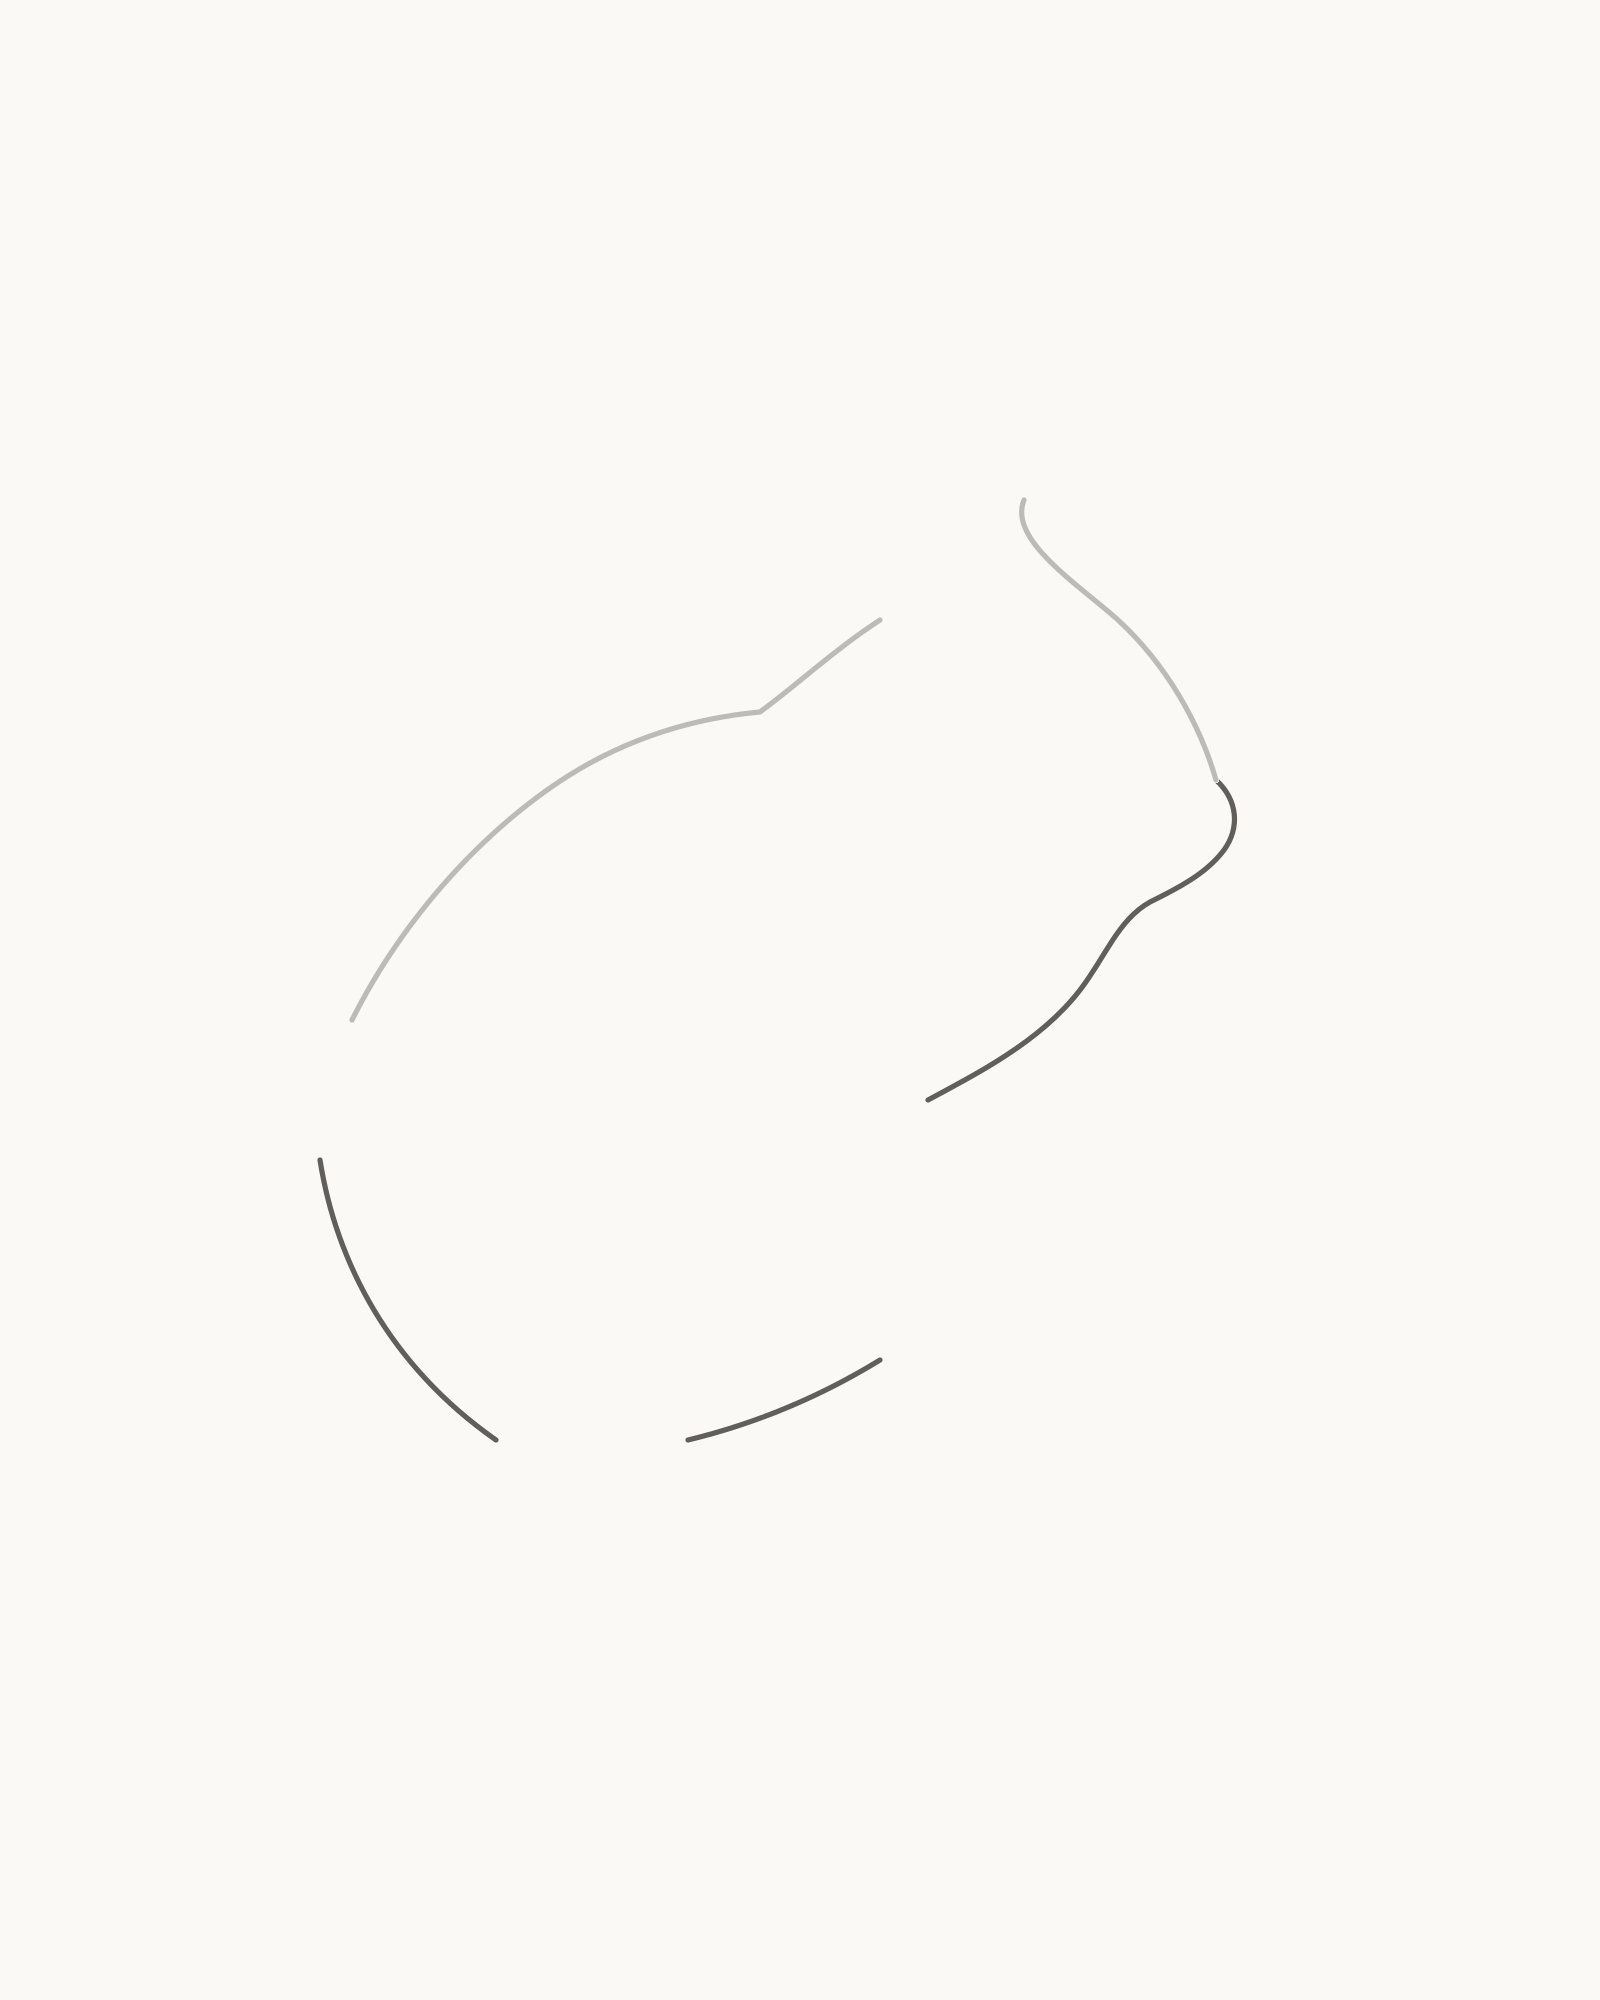
Stage 2 of 8. Three lower intervals are added in a fixed order while the foreleg, hind-foot and tail spaces stay deliberately open. - Nose → jaw → chest → foreleg opening
- Lower foreleg opening → belly → hind-foot opening
- Lower tail root → rump → hind-foot opening
Return to the exact Stage 1 nose. Draw the first permanent interval in this order: nose → muzzle and jaw → chest → foreleg opening. Let the small muzzle turn into the jaw, then allow the jaw to flow into the chest. Stop at the upper end of the waiting foreleg space.
Begin again at the lower end of that foreleg space. Draw lower foreleg opening → belly → hind-foot opening. The belly is shorter and quieter than the back because the folded hindquarter supplies most of the seated weight.
For the third interval, start at the lower tail root and draw lower tail root → lower rump → hind-foot opening. It curves down the rear of the animal and stops at the other side of the space reserved for the long near hind foot.
You should now see three deliberate openings: one for the forelegs, one for the folded hind foot and one between the two tail roots. They are planned endpoint pairs, not missing or temporary lines. Later stages bridge them; nothing will be cut open, erased or retraced.
Look for this before moving on: the two face contours meet at one nose, the jaw flows into a narrower chest, the hindquarter is deeper than the forequarters, and the foreleg, hind-foot and tail openings can each be identified without guessing. No lower interval should close into a body oval.
If it goes wrong: preserve Stage 1 and every successful lower interval. Replace only the newest muzzle, jaw, belly or rump section. If you accidentally close an opening, correct that just-drawn interval now; do not plan to slice through an older boundary when the limb or tail arrives.
3. Attach two unequal ears
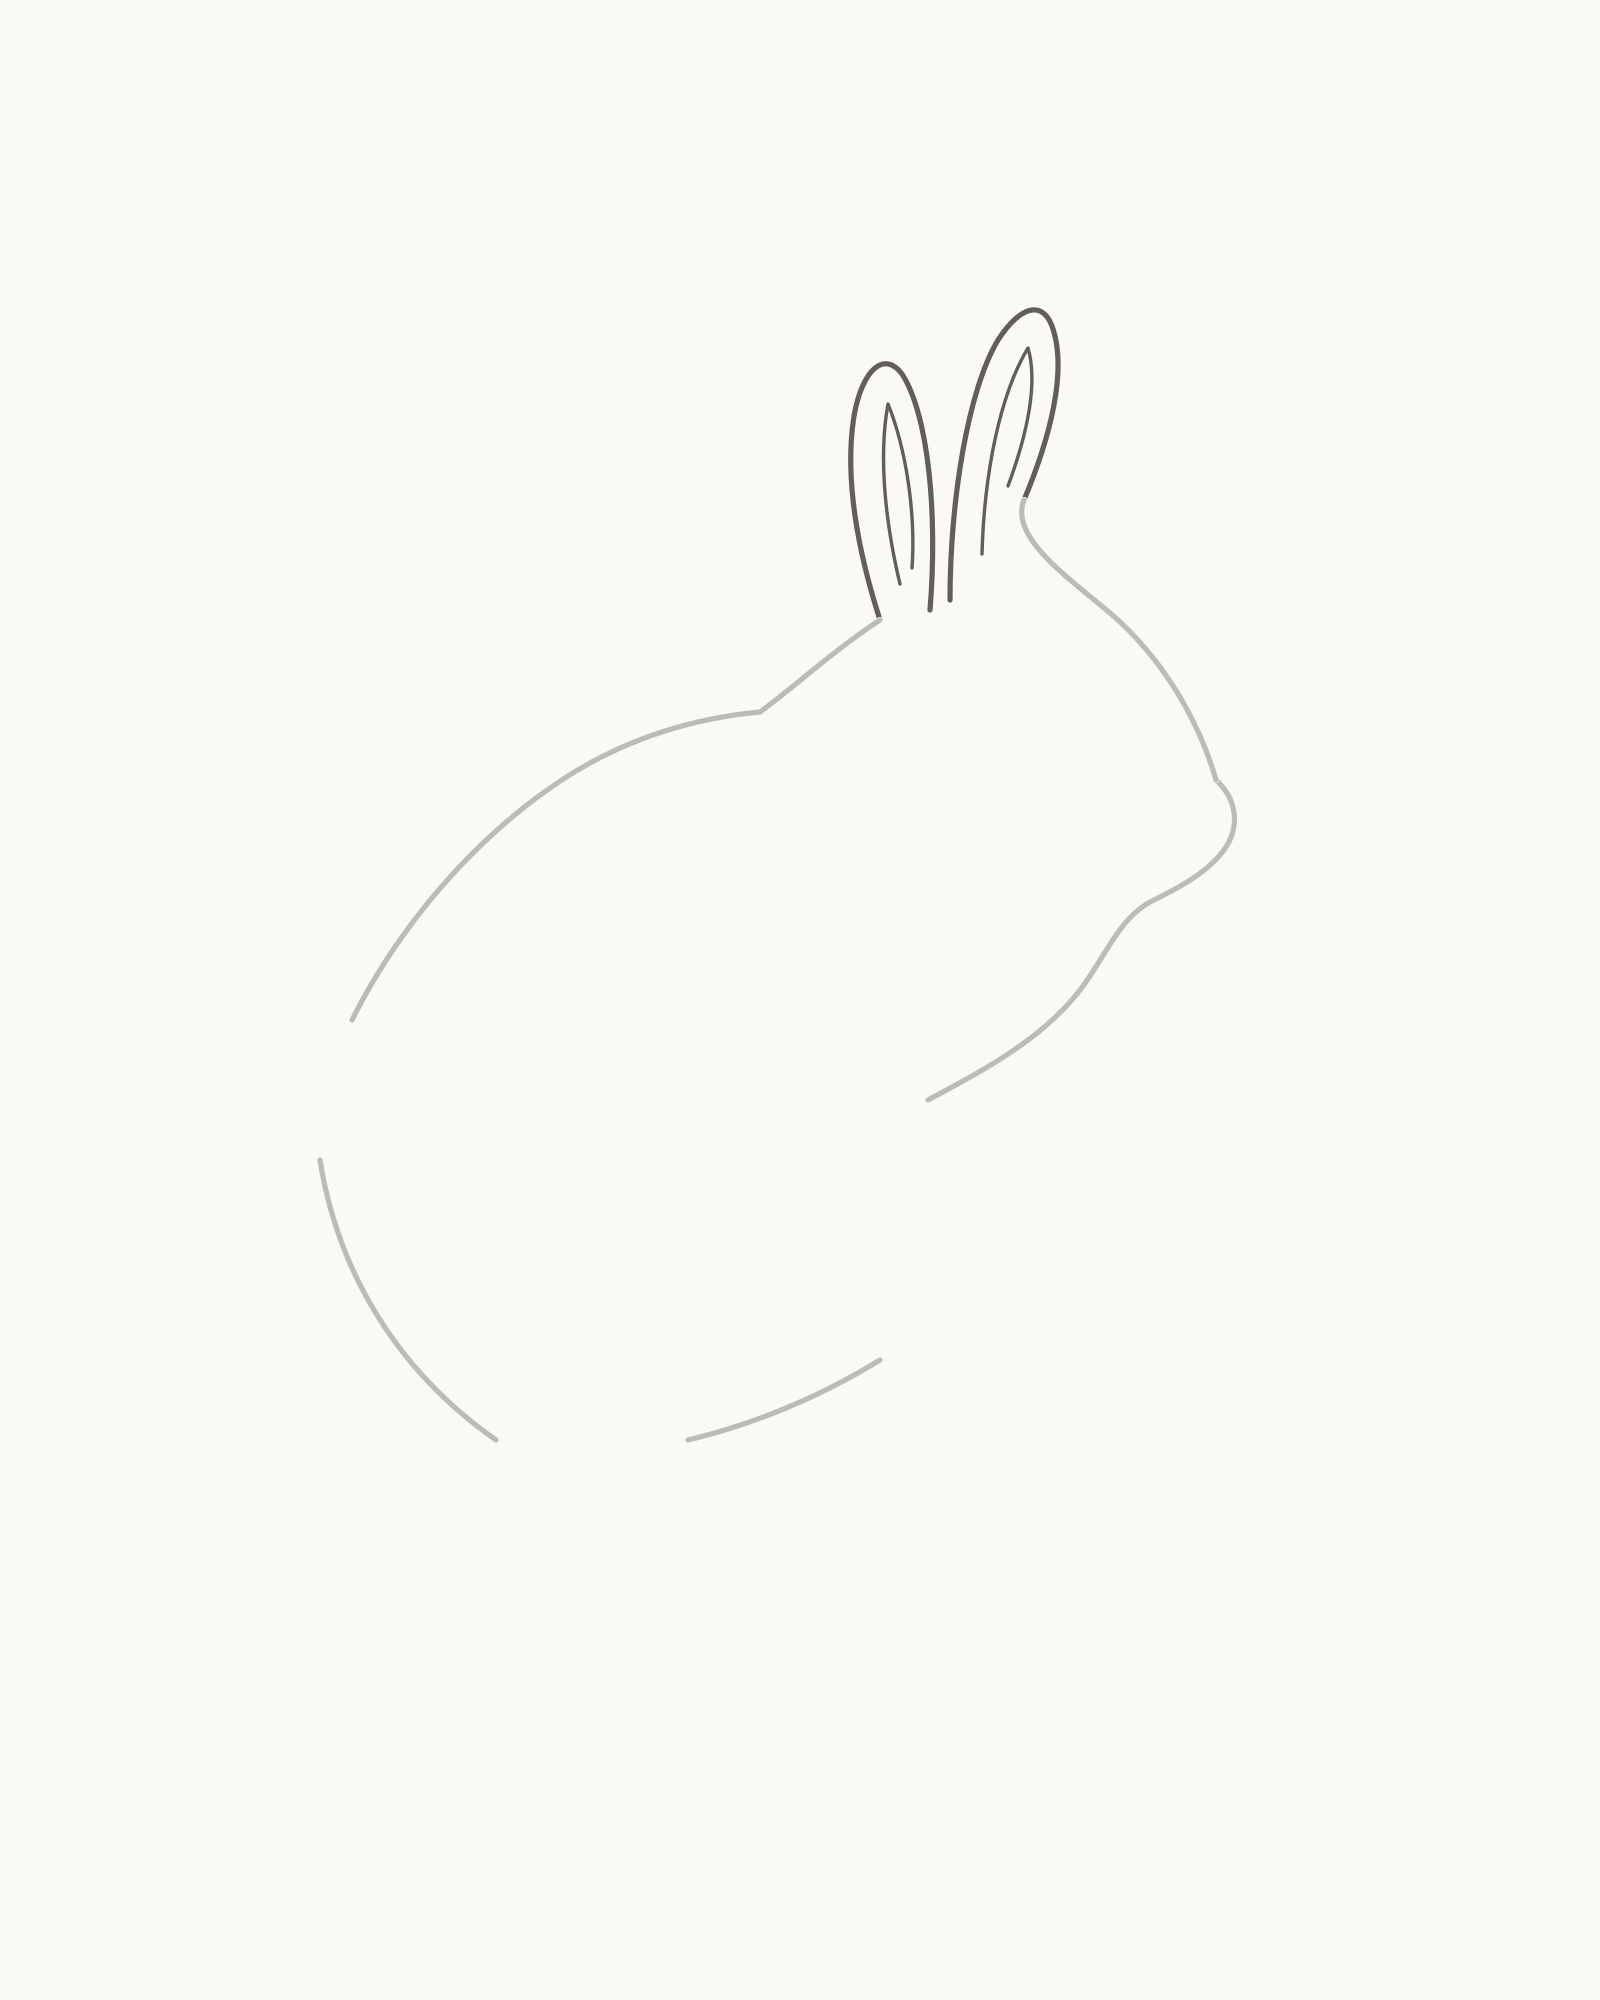
Stage 3 of 8. Two differently angled ears attach at separate crown points instead of forming a copied pair. - Near-ear outer contour
- Near-ear inner curve
- Shorter far-ear outer contour
- Far-ear inner curve
Draw the near ear first. Leave its front root from Stage 1, rise towards a rounded tip near x65% / y15%, and return to a separate crown point. The outer contour leans slightly forward. Add one inner curve that follows the taper while stopping short of both ends.
Place the far ear behind it. This ear rises from the nape side, stands a little more upright and finishes roughly 8–12% shorter. Its inner curve is also shorter. The two tips, widths and bends should differ; they are a near-and-far pair, not copied leaves.
The returning ear lines may finish inside the crown area because one form passes behind the other. What matters is that each root can be followed into the head without a floating gap or a tangled knot.
Look for this before moving on: the near ear leans forward, the far ear is shorter and partly hidden, all four ear contours are traceable, the bases attach at separate points, and neither ear is mirrored, folded or perfectly parallel to the other.
If it goes wrong: keep the accepted head, back and better ear. Replace only the newest floating root, pointed tip, parallel edge or copied inner curve. Rejoin it to the same crown or nape area instead of moving the Stage 1 silhouette to make room.
4. Add two separate forelegs and forepaws
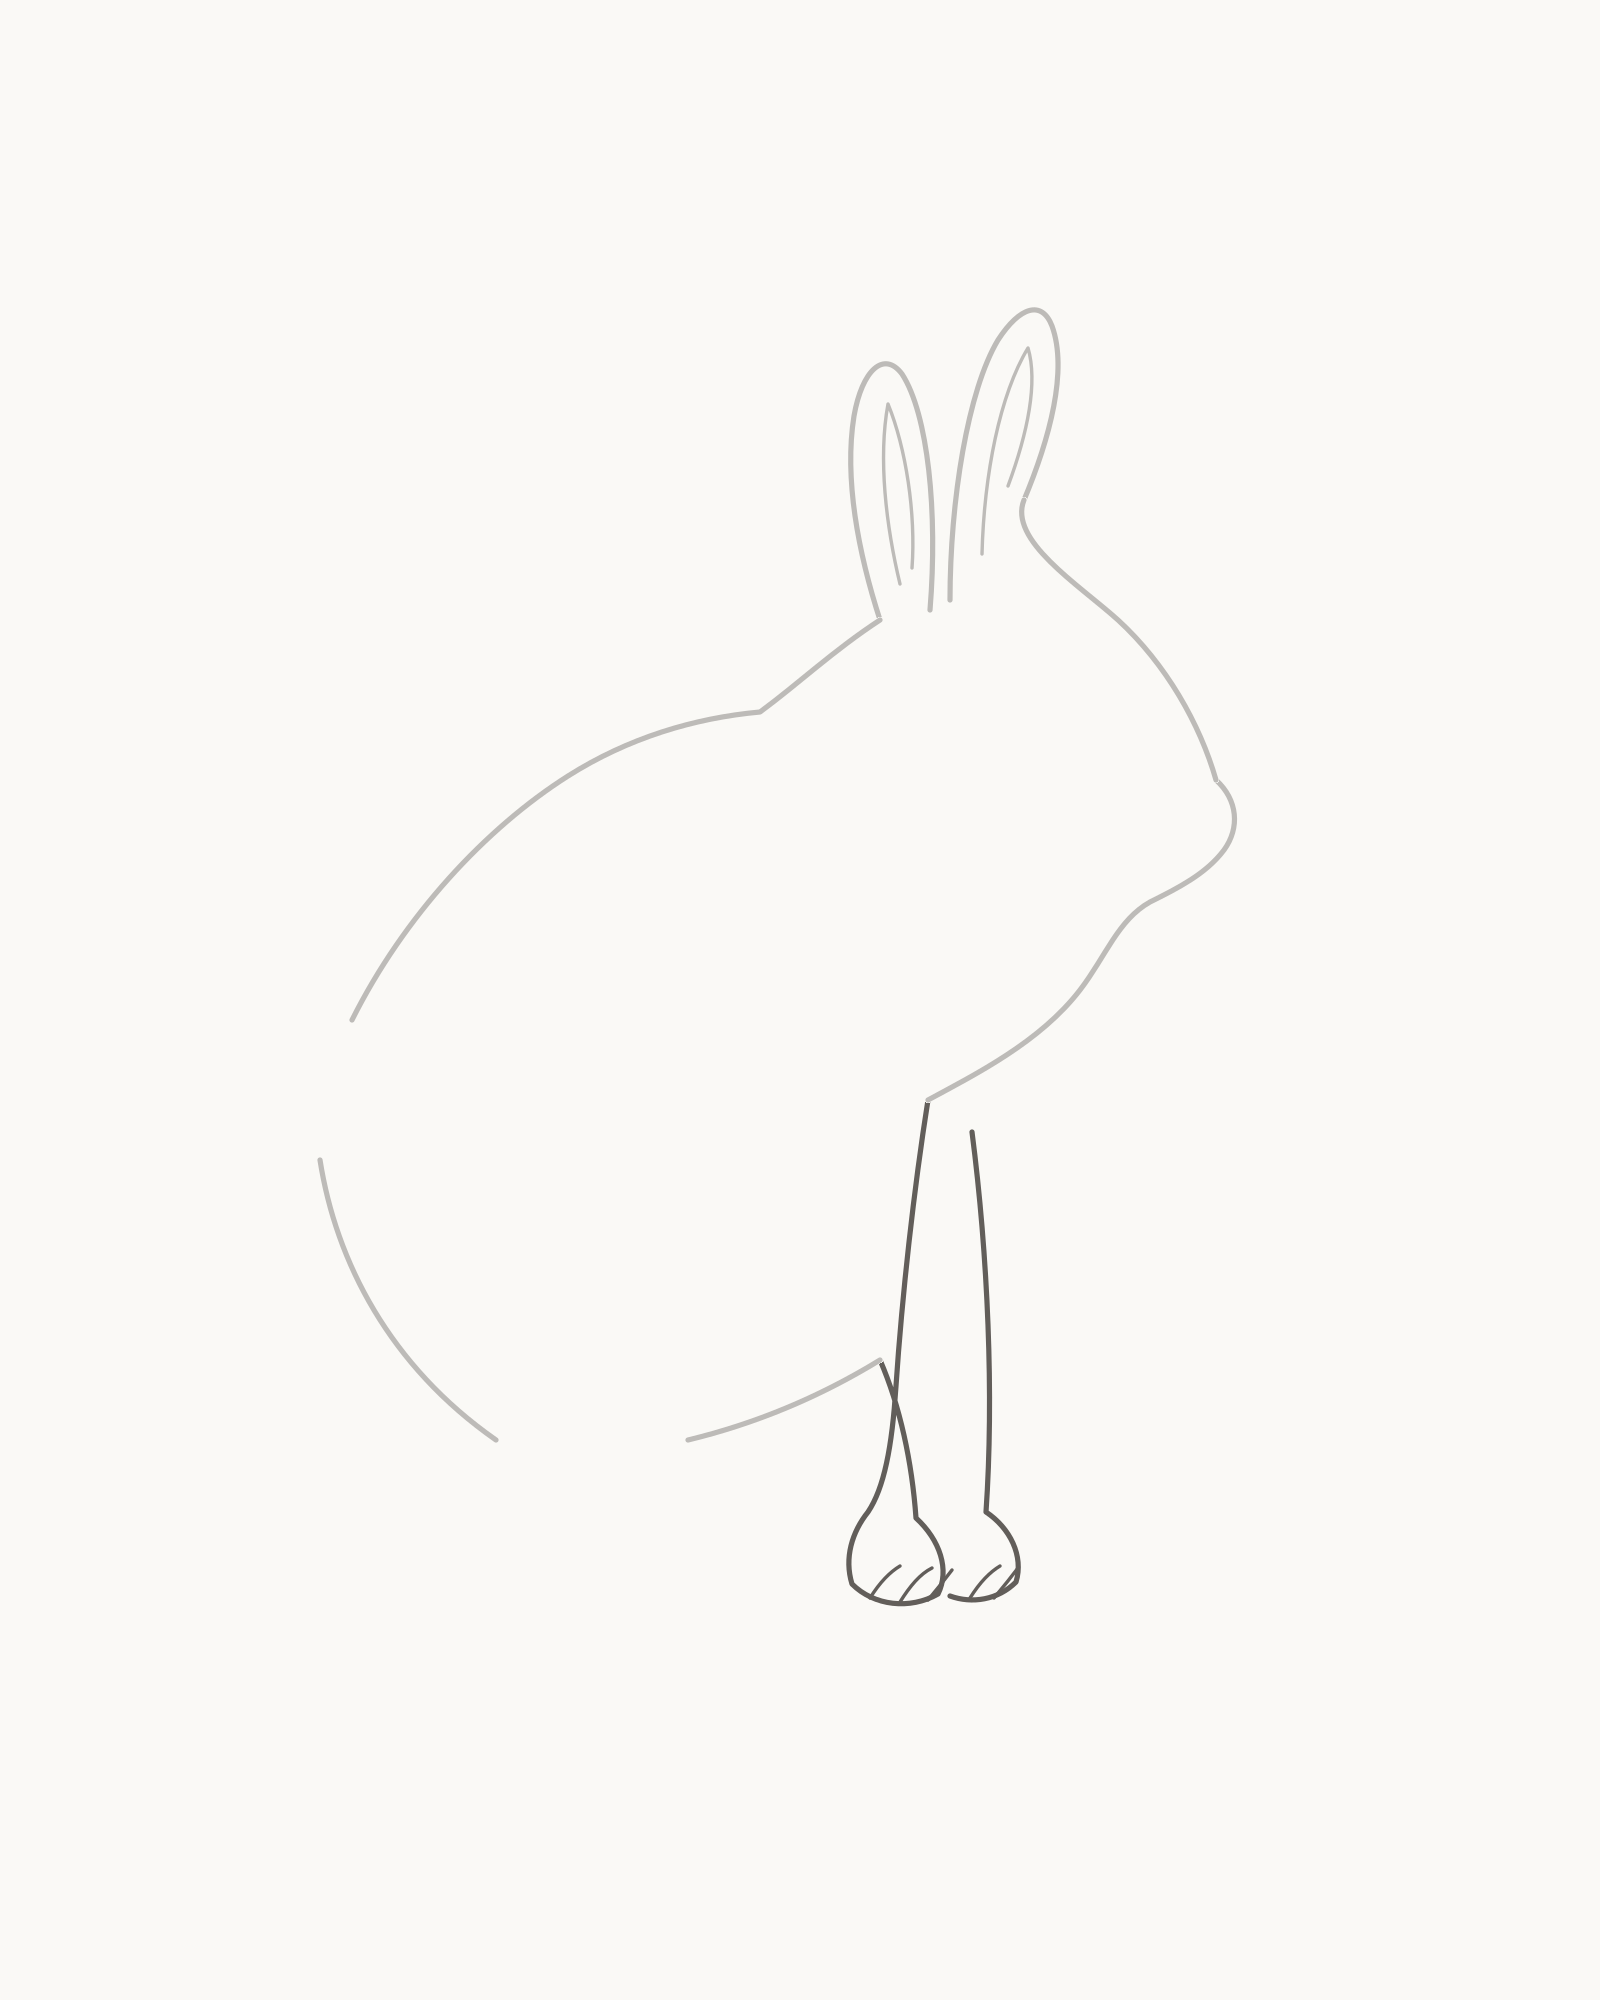
Stage 4 of 8. Two close but separate forelegs connect chest to their own paws, with three near and two far toe arcs. - Near foreleg outline
- Near paw and 3 toes
- Far foreleg attachment
- Far paw and 2 toes
The waiting chest gap now belongs to the near foreleg. From its upper endpoint, take the outside edge down with a slight backward taper, round a compact paw on the invisible floor, then return the inner edge to the lower endpoint of the opening. Add three short, unequal toe arcs inside this paw.
Now add the far foreleg behind it. Start inside the chest rather than on the belly, descend a little to the right and form a second, slightly offset paw. Part of this farther leg is hidden by the near one, but its visible line must still connect chest to paw. Add two toe arcs inside it.
The paws sit close together, yet each keeps its own outline. Do not join them into one mitten or allow a toe arc to cross from one paw into the other.
Look for this before moving on: the near leg bridges both chest endpoints, the far leg has a visible upper attachment behind it, two paw bottoms share one level, the outlines remain distinct at their closest point, and exactly five toe arcs are present—three near and two far.
If it goes wrong: trace each leg from chest to its own paw to locate the newest collision. Replace only that new edge, paw turn or toe arc. Preserve the other foreleg and all body contours; separating the paws should never require widening or redrawing the chest.
5. Build the folded hind leg and smaller far foot
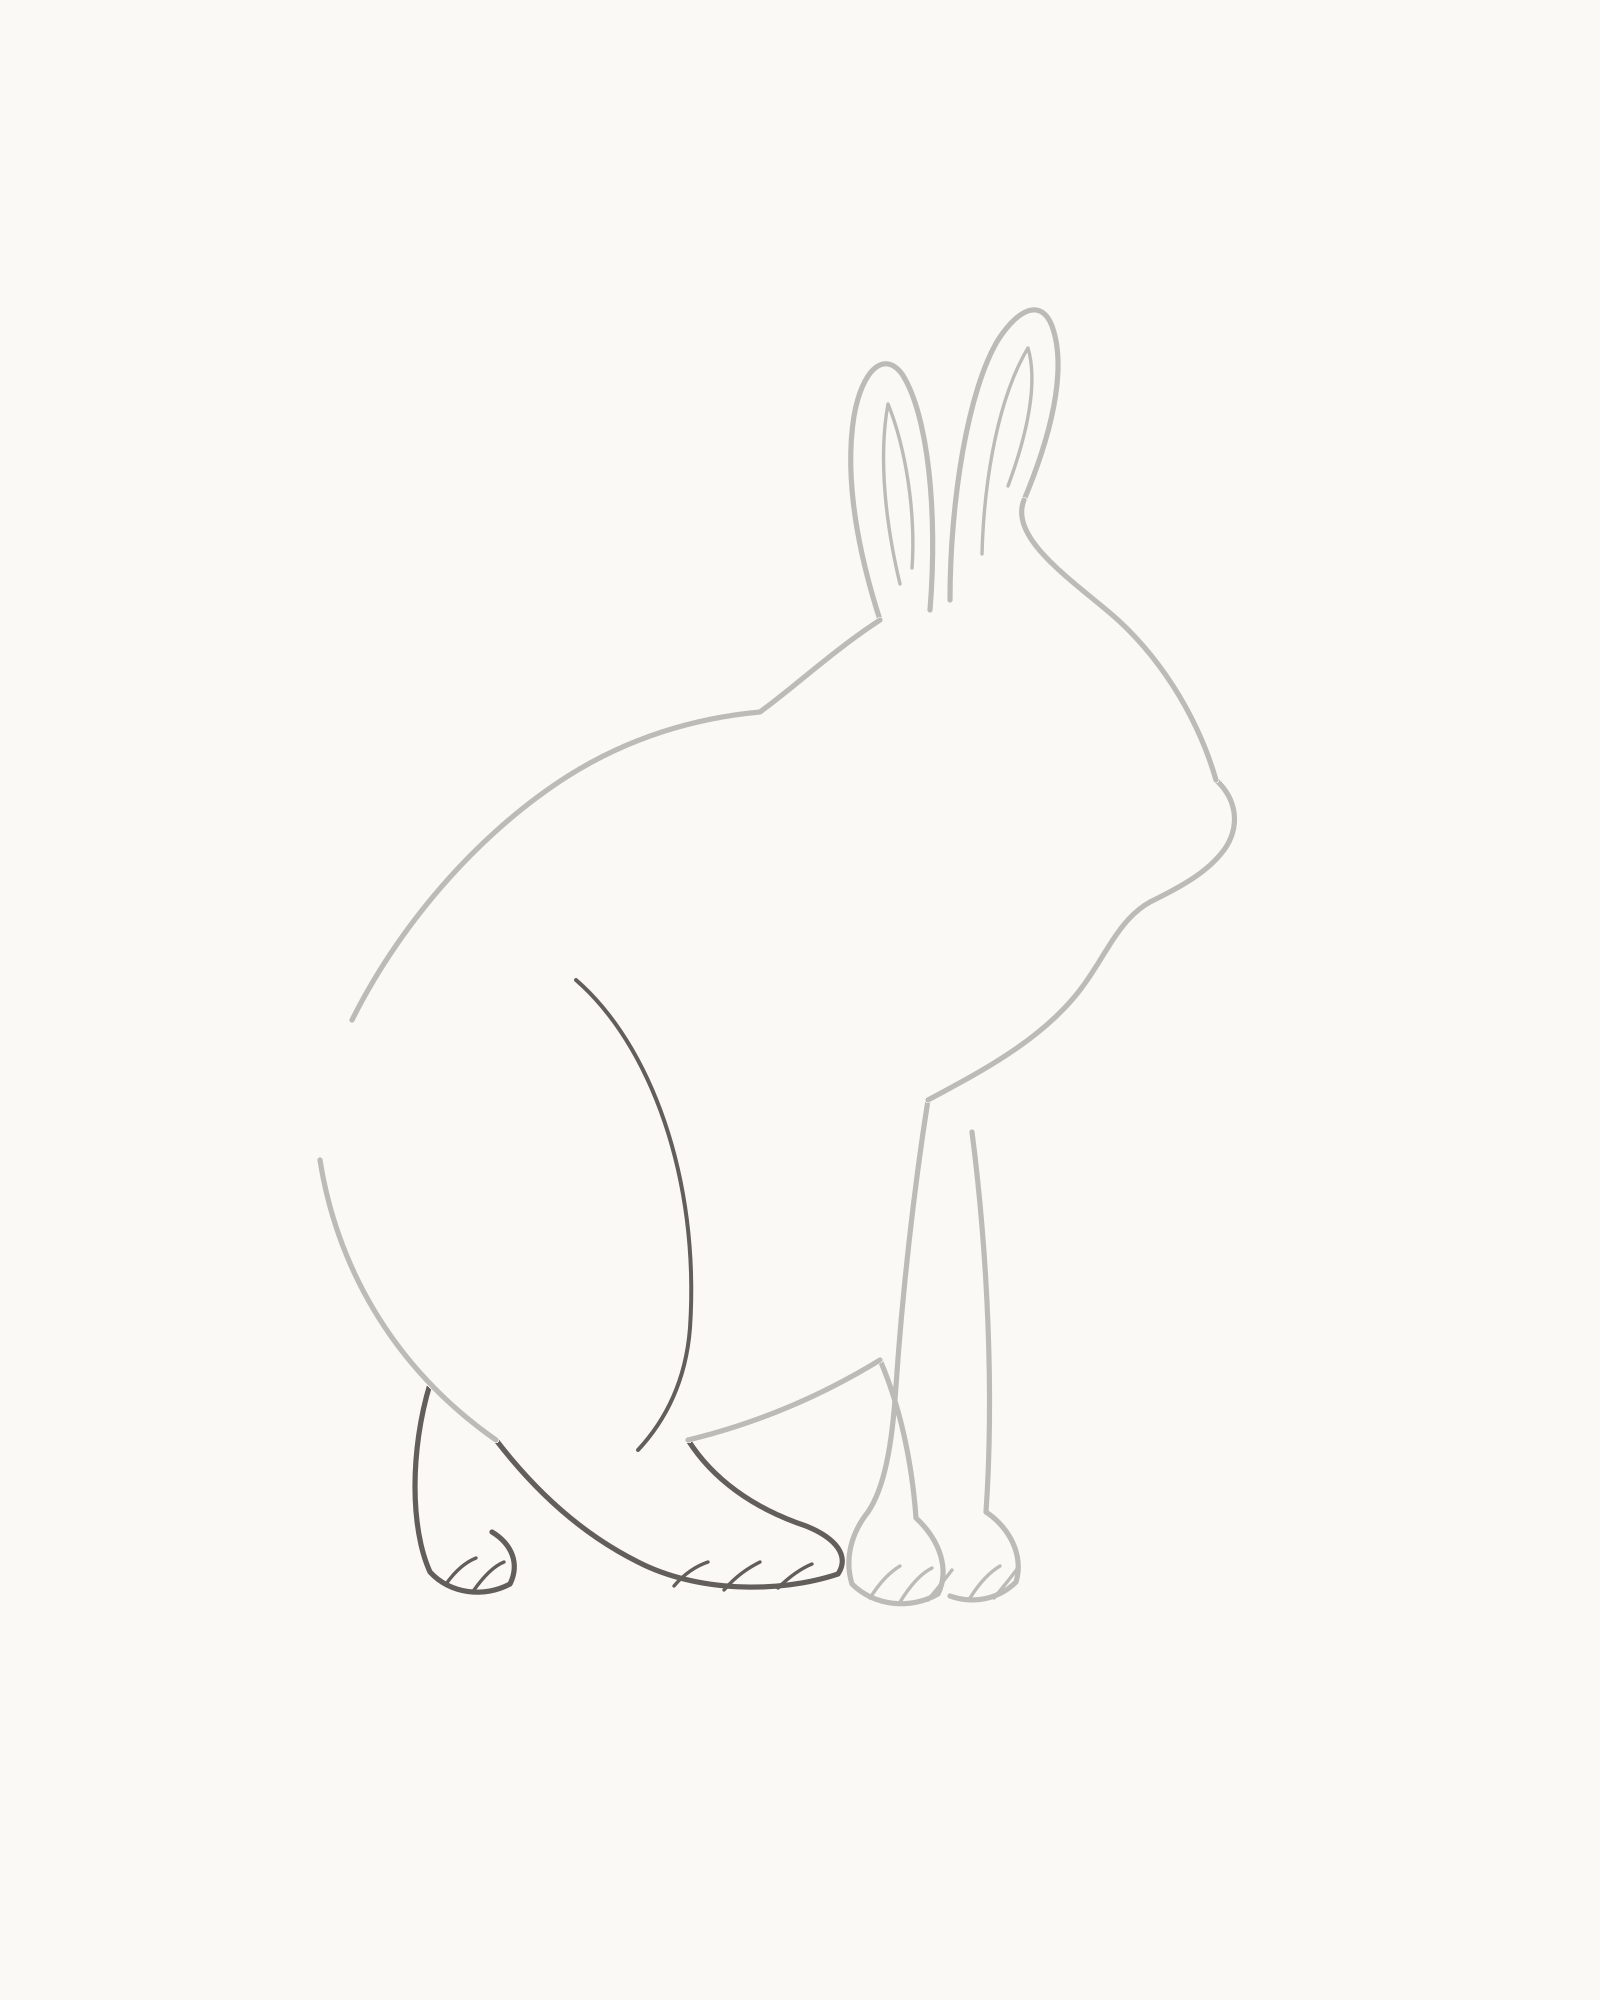
Stage 5 of 8. The large folded near leg carries the seated weight while a smaller traceable far foot completes the four-paw pose. - Near thigh curve
- Long near foot and 3 toes
- Far hind-foot attachment
- Small far foot and 2 toes
Begin with the internal curve of the near thigh. Start on the flank around x36% / y49%, bow down and forward, and turn towards the heel. This curve shows the large hind leg folded beneath the seated torso; it is not a decorative oval inside the body.
Bridge the rear body opening with the long near foot. Leave the lower rump endpoint, travel down and forward along the foot, round its front edge near the forepaws, then return smoothly to the belly-side endpoint. Add three small toe arcs near the front. This near foot is the longest of the four and carries much of the seated weight.
Add the far hind foot behind it. Only a small outer portion and short attachment are visible on the left of the near foot. Keep this farther foot smaller, but make its path readable from the body to its own floor contact. Finish with two toe arcs. It should read as the fourth paw, not as a loose oval or an extra fifth limb.
Look for this before moving on: the thigh curve belongs to the flank, the long near foot closes the rear opening without a pointed join, the far hind foot remains partly hidden but traceable, every visible foot meets the same floor, and ten toe arcs are now present in total.
If it goes wrong: keep the torso, forelegs and successful hind component. Replace only the newest thigh curve, foot return or toe arc. If the far foot resembles an extra limb, shorten and tuck that new contour behind the near foot while keeping a small visible attachment; never move or fade the established near leg.
6. Join the short tail to the rump
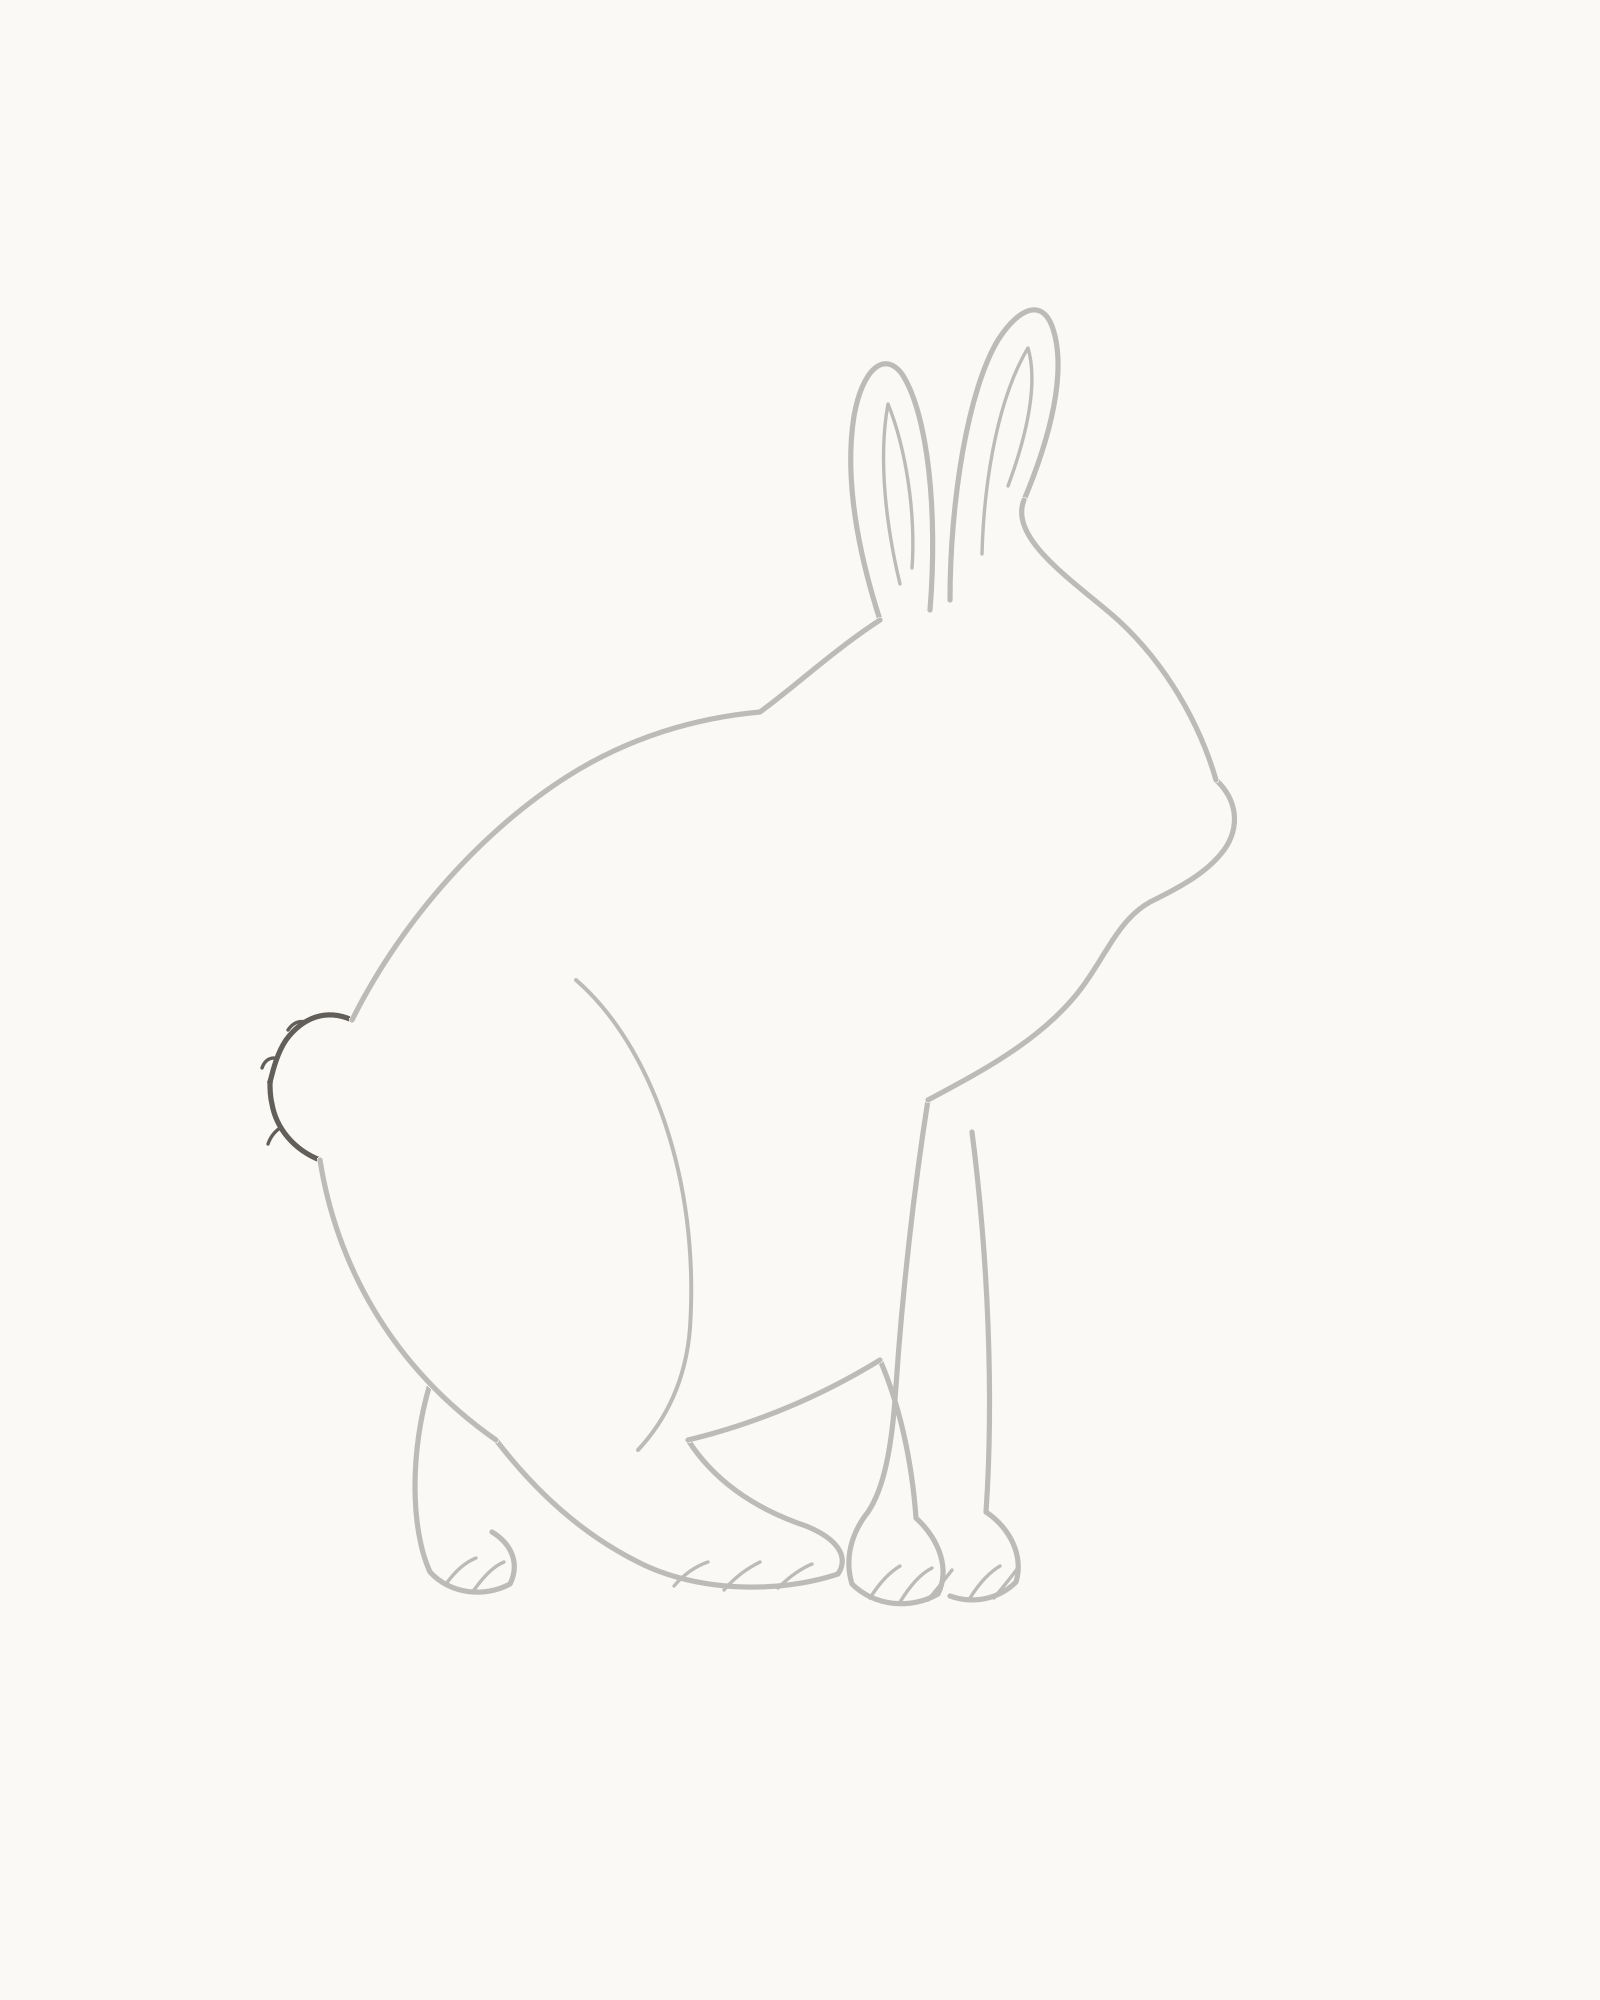
Stage 6 of 8. Two unequal curves join the fixed rump roots, with only three small notches breaking the outside edge. - Upper tail root
- Compact outer curve
- Three restrained notches
- Return to lower tail root
Find the upper of the two fixed tail-root endpoints, then sweep a compact curve left and slightly down. Return to the fixed lower root with a different curve so the tail swells gently rather than becoming a perfect circle.
Add exactly three tiny unequal notches along the outer edge. They are restrained edge breaks, not a row of scallops and not a request to fill the tail with texture. The tail stays behind the rounded hindquarter and well clear of the far hind foot.
Look for this before moving on: both tail contours meet their original rump endpoints, the small asymmetrical swell reaches only about x17% of the page, the tail does not touch a foot or page edge, and the three notches remain individually visible without turning the outline into a fluffy symbol.
If it goes wrong: leave both fixed roots and the better tail edge untouched. Replace only the newest circular, collared or oversized curve, or correct one crowded notch. Do not move the rump, thicken the join or add more marks to make the tail seem attached.
7. Place the face and five whiskers
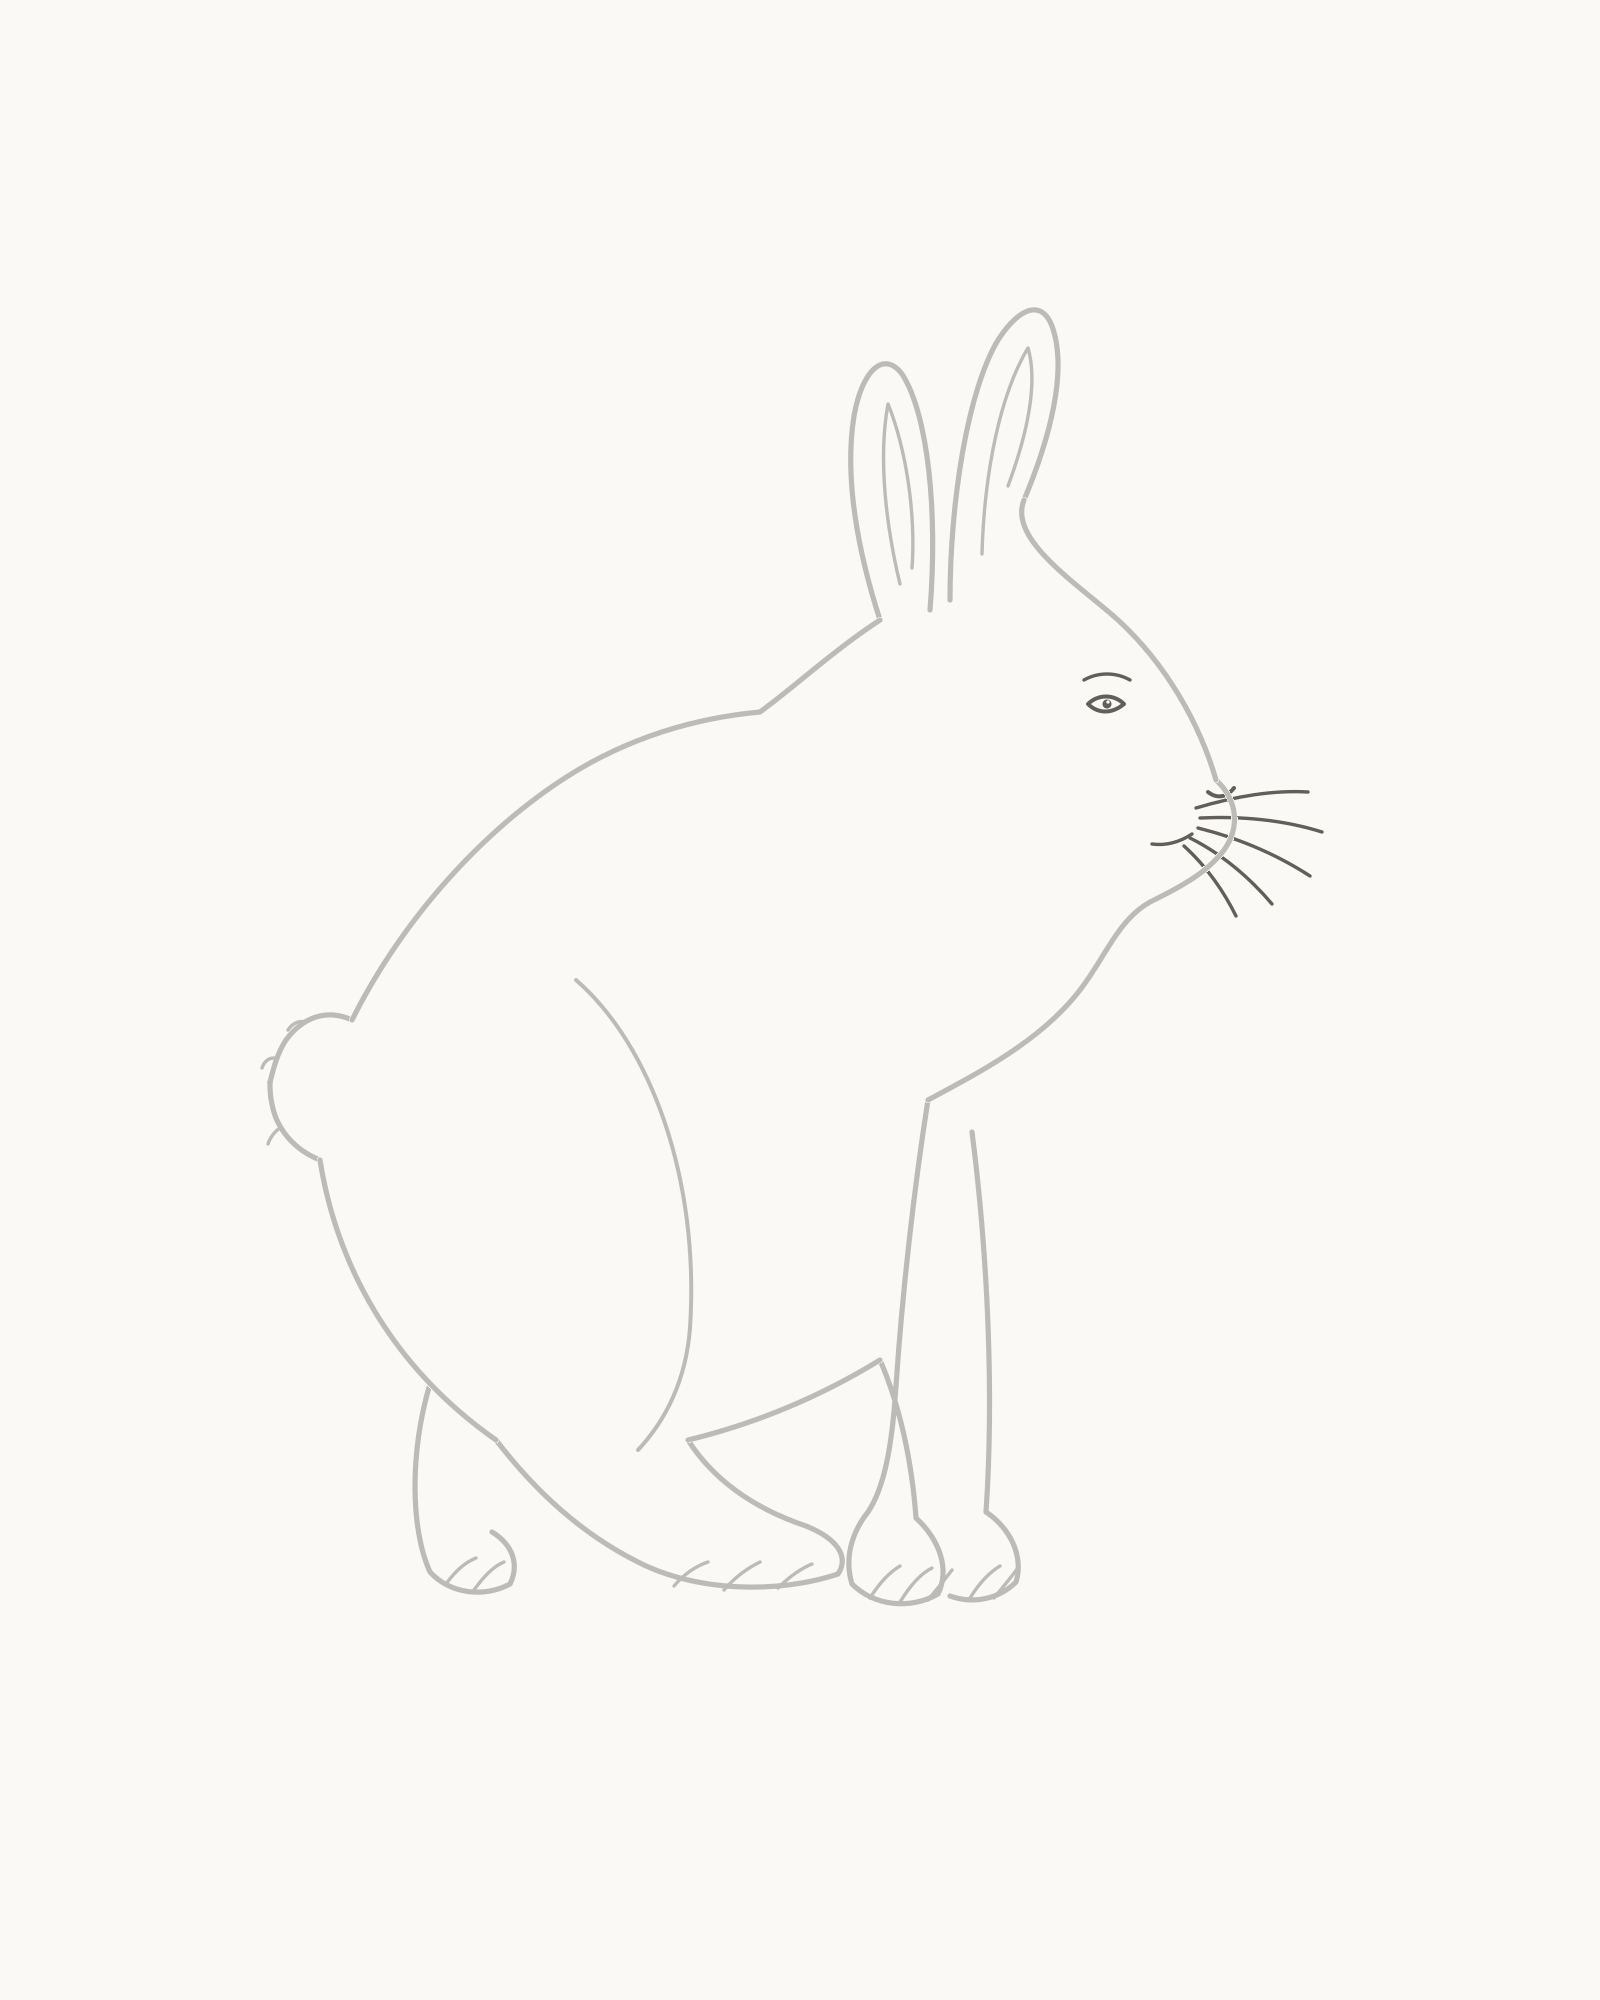
Stage 7 of 8. A quiet face and five separately rooted whiskers clarify direction without overpowering the head. - Eye with pupil reserve
- Brow and nose
- Closed mouth
- 5 separately rooted whiskers
Set one small near eye around x69% / y35%. Draw the narrow almond shape, add its tiny pupil and leave a minute unfilled point within it. Place the short brow above. There is no second visible eye in this near-profile head.
At the muzzle, add the small nose or nostril mark, then one short closed mouth seam. Keep both understated: a large button nose, smile, lashes or buck teeth would shift the expression towards a mascot.
Finish the stage with exactly five whiskers. Space their roots over a small area of the near muzzle instead of making every line spring from one dot. Let the curves fan at different angles and lengths, clearing one another and leaving open paper before the right edge.
Look for this before moving on: one small eye directs the gaze right, the pupil reserve is still visible, the mouth is closed, the five whiskers have separately readable roots, none begins at the eye or jaw, and every tip stays comfortably inside the crop.
If it goes wrong: keep the fixed head and any successful face mark. Replace only the newest oversized eye, filled pupil, smiling mouth or crossing whisker. Move a faulty new whisker root slightly along the muzzle and change its angle; do not enlarge the face or retrace older contours for balance.
8. Add ten sparse fur-direction marks
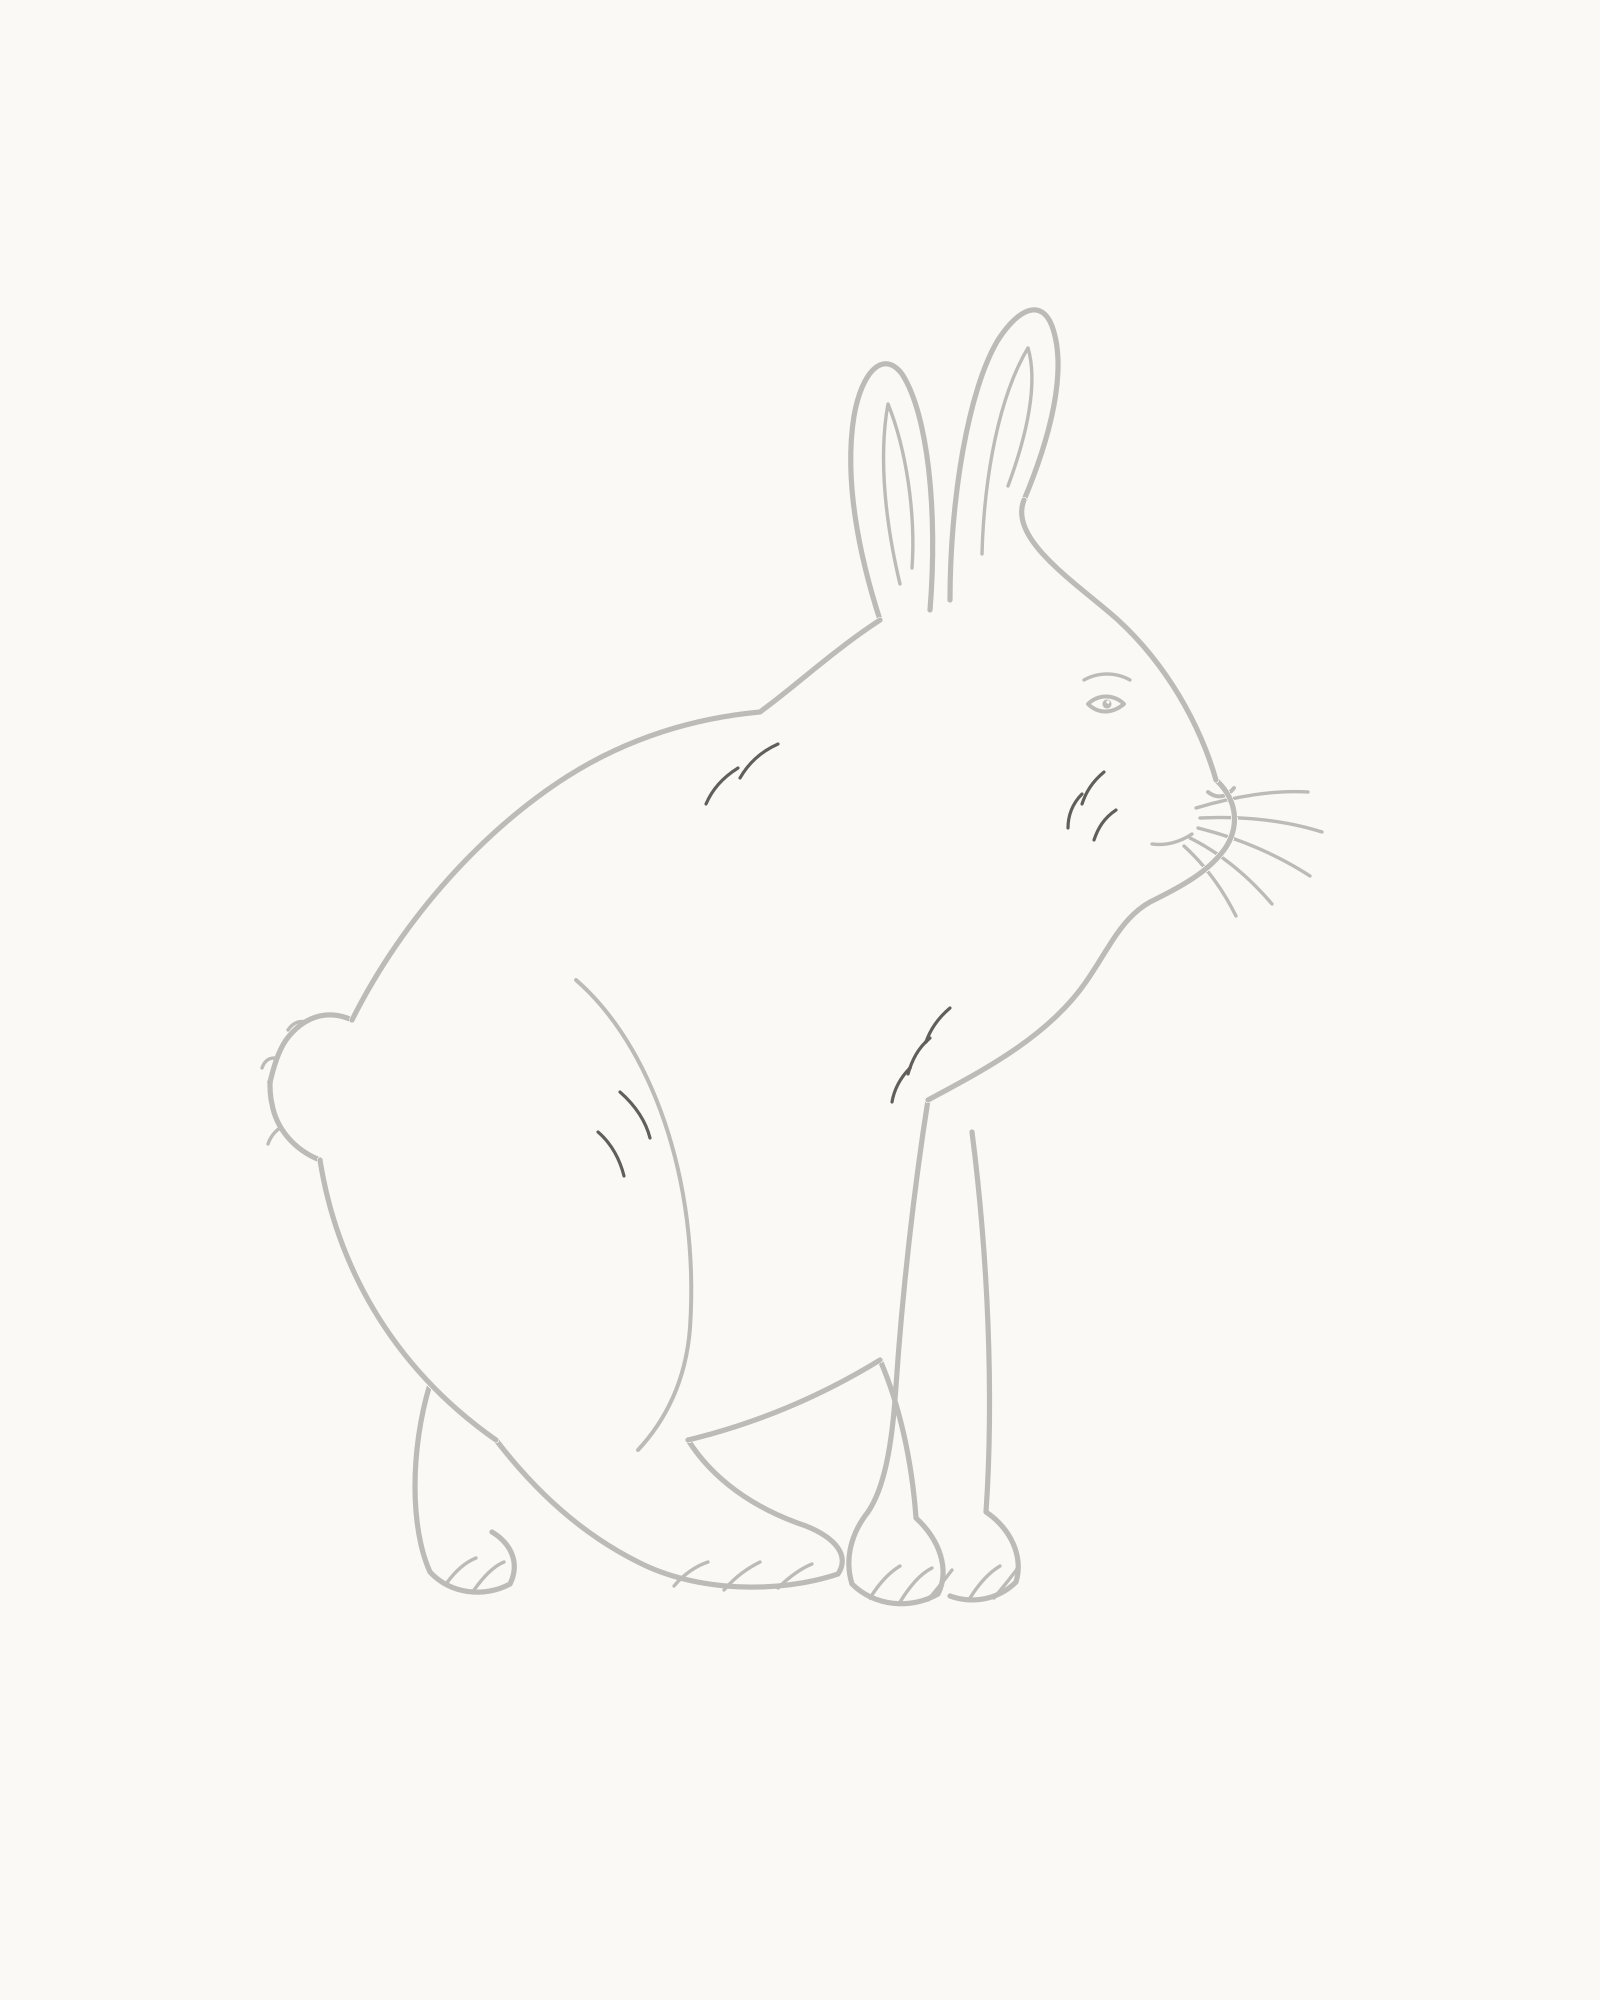
Stage 8 of 8. Ten separated open curves suggest fur direction while leaving the construction and attachments clear. - 3 cheek marks
- 3 chest marks
- 2 shoulder and back marks
- 2 hind-thigh marks
Add exactly ten short, open curves: 3 cheek + 3 chest + 2 shoulder/back + 2 near hind thigh. Vary their lengths, spacing and direction so each group follows the local turn of the form.
The cheek marks turn gently down and back. The chest group follows the descent towards the foreleg. Two shoulder/back curves describe the transition into the torso, while two thigh marks echo the rounded hindquarter. Leave open paper around every stroke.
These marks suggest direction only. They are not shading, hatching, random fuzz or a simulated material texture. None should cross the eye, mouth, whiskers, limb attachment, tail root or outer silhouette, and none may conceal a join that still looks uncertain.
Look for this before moving on: all ten marks can be counted in the 3 + 3 + 2 + 2 arrangement, the curves differ without becoming spikes, no grey patch forms, and the ears, paws, tail and clean body boundaries remain easier to read than the surface detail.
If it goes wrong: preserve every earlier contour and the successful new marks. Remove only the latest repeated, touching or overly long accent, then replace it with a shorter curve that follows that area. If an attachment is weak, leave it visible and practise the joint separately rather than covering it with more fur.


Fix small construction problems
The rabbit looks like a baby character. Compare the compact head with the deeper, longer torso. Keep the eye small, the muzzle modest and the paws controlled. Correct only the newest overly circular interval or enlarged feature.
The lower body looks unfinished. Identify the three planned opening pairs before changing anything. The foreleg gap is bridged in Stage 4, the hind-foot gap in Stage 5 and the tail gap in Stage 6. An open endpoint before its assigned stage is intentional.
An ear floats or the pair looks copied. Trace each outer contour into its own crown or nape root. Rebuild only the newest unattached base or matching curve. The near ear leans forward; the shorter far ear stands more upright behind it.
The forepaws merge. Follow the near leg and far leg separately from the chest. Adjust the newest paw edge at their closest point, retaining two complete outlines and the three-near/two-far toe count.
The far hind foot looks like another leg. Keep it smaller and partly hidden behind the long near foot. A short visible attachment and two toe arcs are enough. Replace only its newest outer turn instead of adding another thigh.
The long hind foot ends in a point. Smooth the newest return into the belly-side endpoint and keep the front edge rounded. Do not move the rump opening or push the foot through a forepaw.
The tail looks like a pom-pom. Compare the two unequal curves and their fixed roots. Replace the newest circular section, retaining only three restrained edge notches and plenty of open space around the join.
The eye or whiskers dominate the head. Reduce only the newest feature. The eye needs a minute pupil reserve, while five whiskers should leave separate roots and fan quietly rather than forming a dark knot.
The last marks look like shading. Return to the 3 + 3 + 2 + 2 count and remove the newest crowded stroke. Ten separated curves are enough; extra lines would obscure the construction rather than improve it.
Practise a different ear position
On another sheet, repeat the upper silhouette and body at half size. Keep the same adult head, deep hindquarter, four-paw ownership and attached tail, but angle the near ear slightly farther forward. Change its tip and inner curve together while leaving the shorter far ear upright. This small variation tests whether the ear still connects convincingly without rebuilding the whole rabbit.
For another lesson in a compact seated animal, try How to Draw a Cat. How to Draw a Horse offers a different problem in grounded limb ownership, and the complete practical directory is at How to Draw.
Frequently Asked Questions
What is the easiest way to start drawing a rabbit?
Place the whole upper silhouette before the eye or toes. Fix the nose, front ear root, high point of the back and upper tail root against the page, then connect them with the two Stage 1 intervals. This gives the later details a stable scale and crop.
Can I draw the rabbit without circles and construction lines?
Yes. This lesson uses permanent outer contours and planned openings. The first two stages establish the head, back, muzzle, chest, belly and rump; later stages bridge the reserved spaces with ears, limbs and tail.
How do I keep rabbit ears from looking like leaves?
Give each ear two believable head attachments, then vary its height, lean, width and inner curve. Here the near ear leans forward while the shorter far ear stands behind it. Avoid identical pointed loops.
How can I show all four rabbit paws clearly?
Build the near forepaw and long near hind foot as the main supports. Add the far forepaw and far hind foot from visible attachments behind them, keeping the farther shapes smaller or offset. Trace each limb to its own paw before adding toe arcs.
Why is the rabbit's far hind foot so small?
Most of it is hidden by the large folded near leg and long foot. The short visible attachment, small outer contour and two toe arcs are enough to establish the farther side without inventing a second full thigh.
Does a rabbit drawing need detailed fur or shading?
No. The silhouette, ear roots, folded hindquarter, paws and tail carry the identity. This result finishes with ten isolated direction marks and no tonal shading.
Is the placement grid required?
No. It is an optional way to compare four early locations with the page. Leave it switched off if you prefer to judge those positions directly from the paper edges; it never becomes part of the drawing.
Should I erase guides or darken the outline at the end?
Neither is part of this sequence. Every displayed contour is permanent. Correct only the newest local mistake before continuing, and keep the established lines at their original strength instead of tracing over the whole rabbit.
References
- National Park Service, Mammals of Scotts Bluff National Monument. View source
- Animal Diversity Web, Sylvilagus floridanus. View source
- RSPCA, Understanding your rabbit's behaviour. View source
More DRAWING Guides

How to Draw a Rose: A Step by Step Guide

How to Draw a Tree: A Step by Step Guide

How to Draw Eyes: A Step by Step Guide

How to Draw Leaves: A Step by Step Guide

How to Draw Autumn Leaves: A Step by Step Guide

How to Draw Flowers: A Step by Step Guide

How to Draw a Lily: A Step by Step Guide

How to Draw a Sunflower: A Step by Step Guide

How to Draw a Tulip: A Step by Step Guide

How to Draw a Hibiscus: A Step by Step Guide

How to Draw a Daisy: A Step by Step Guide
