



Draw one complete adult male mallard
Draw a complete adult male mallard standing in strict side view and facing right. Eight permanent stages establish the long upper silhouette, return around the underside, attach a short three-point tail and one visible folded wing, place two separately owned webbed feet, set the face, and finish with five restrained adult-mallard landmarks. The completed result is a clean line drawing without colour, feather fill or shading.
Difficulty: Beginner to intermediate
Time: Allow about 45–60 minutes. This is an explicitly untested editorial estimate, not a measured drawing session.
Medium: A pointed HB or No. 2 graphite pencil on smooth, unlined paper.
Compare the bill-to-face join, open wing roots and smaller far foot especially carefully. Marks accepted at one stage carry unchanged into all later stages. There is no temporary body oval to remove, no final outline traced over earlier contours and no texture added to conceal an uncertain attachment.
Mallards have a long, substantial body, a rounded head and a broad, fairly flat bill. Cornell Lab's identification guide describes the bird as hefty and long-bodied, while the RSPB also draws attention to its heavy-looking body and long, broad bill. Those observations are useful here because they prevent a compact adult profile from drifting into a round duckling or a toy-like rubber duck.
Age and sex should not be mixed casually. Cornell Lab, the RSPB and Audubon distinguish adult males, females and young birds in their identification material. This lesson therefore keeps one adult-male treatment from beginning to end. Because it is a line-only exercise, the identity comes from proportion, the standing posture and five sparse interior landmarks rather than the familiar green, white, brown and blue colour pattern.
The view is a strict right-facing profile. Only the near eye and near folded wing can be seen; the far wing is fully hidden by the body. Both legs and feet remain visible below the belly, with the farther support drawn slightly smaller. This combination exposes the attachments that a swimming pose would hide and keeps the construction problem focused on the duck itself rather than water or scenery.
Materials
- A sharpened HB or No. 2 pencil. If preferred, use a mechanical pencil with a standard 0.5 or 0.7 mm lead.
- One vertical sheet of smooth white or warm-white, unruled paper. Inexpensive office paper is enough for practising this sequence.
- A clean eraser, used only when the most recently drawn segment needs replacing. It is not needed for scheduled guide removal.
- A pencil sharpener.
- A spare scrap of paper for rehearsing a shallow bill, one three-point tail fan or a webbed foot.
- An optional ruler to help judge the percentage cue or separate grid against the paper edges. Never use it to rule through the duck.
No compass, tracing paper, marker, blending tool, specialist graphite set, coloured pencil, paint, printable or video is required. Use light-to-moderate pressure so each contour stays controllable and easy to compare. Avoid a thick cartoon outline: later marks should remain fine enough for the small eye, nostril, mouth seam and adult landmarks to stay distinct.
Before you draw
Use the paper vertically. The bill points towards the right edge, the short tail projects left, and the two webbed feet settle low on one invisible floor. Leave open paper above the crown, in front of the bill, behind the tail and beneath the toes.
The placement grid is optional and begins switched off. For Stage 1, compare four positions with the full page: the bill tip near x91% / y27%, the crown near x72% / y14%, the shoulder near x61% / y31%, and the upper tail root near x20% / y45%. Treat these as approximate relationships, not points that must be transferred mechanically.
“Near” means the visible side facing you. “Far” means the partly hidden side. The folded near wing sits on the torso and has two traceable roots. The far wing is occluded completely in this exact profile, so adding a matching second wing would invent anatomy the image does not show. Under the body, the front opening belongs to the near leg and the rear opening belongs to the smaller far leg.
The accepted sequence uses permanent marks. If the newest short interval is wrong, replace that interval before continuing while leaving every settled mark alone. Do not plan to close the whole body and cut it open later. The reserved upper-left light direction does not create hatch, cast shadow or tonal modelling in this line-only drawing.
1. Set the permanent upper silhouette
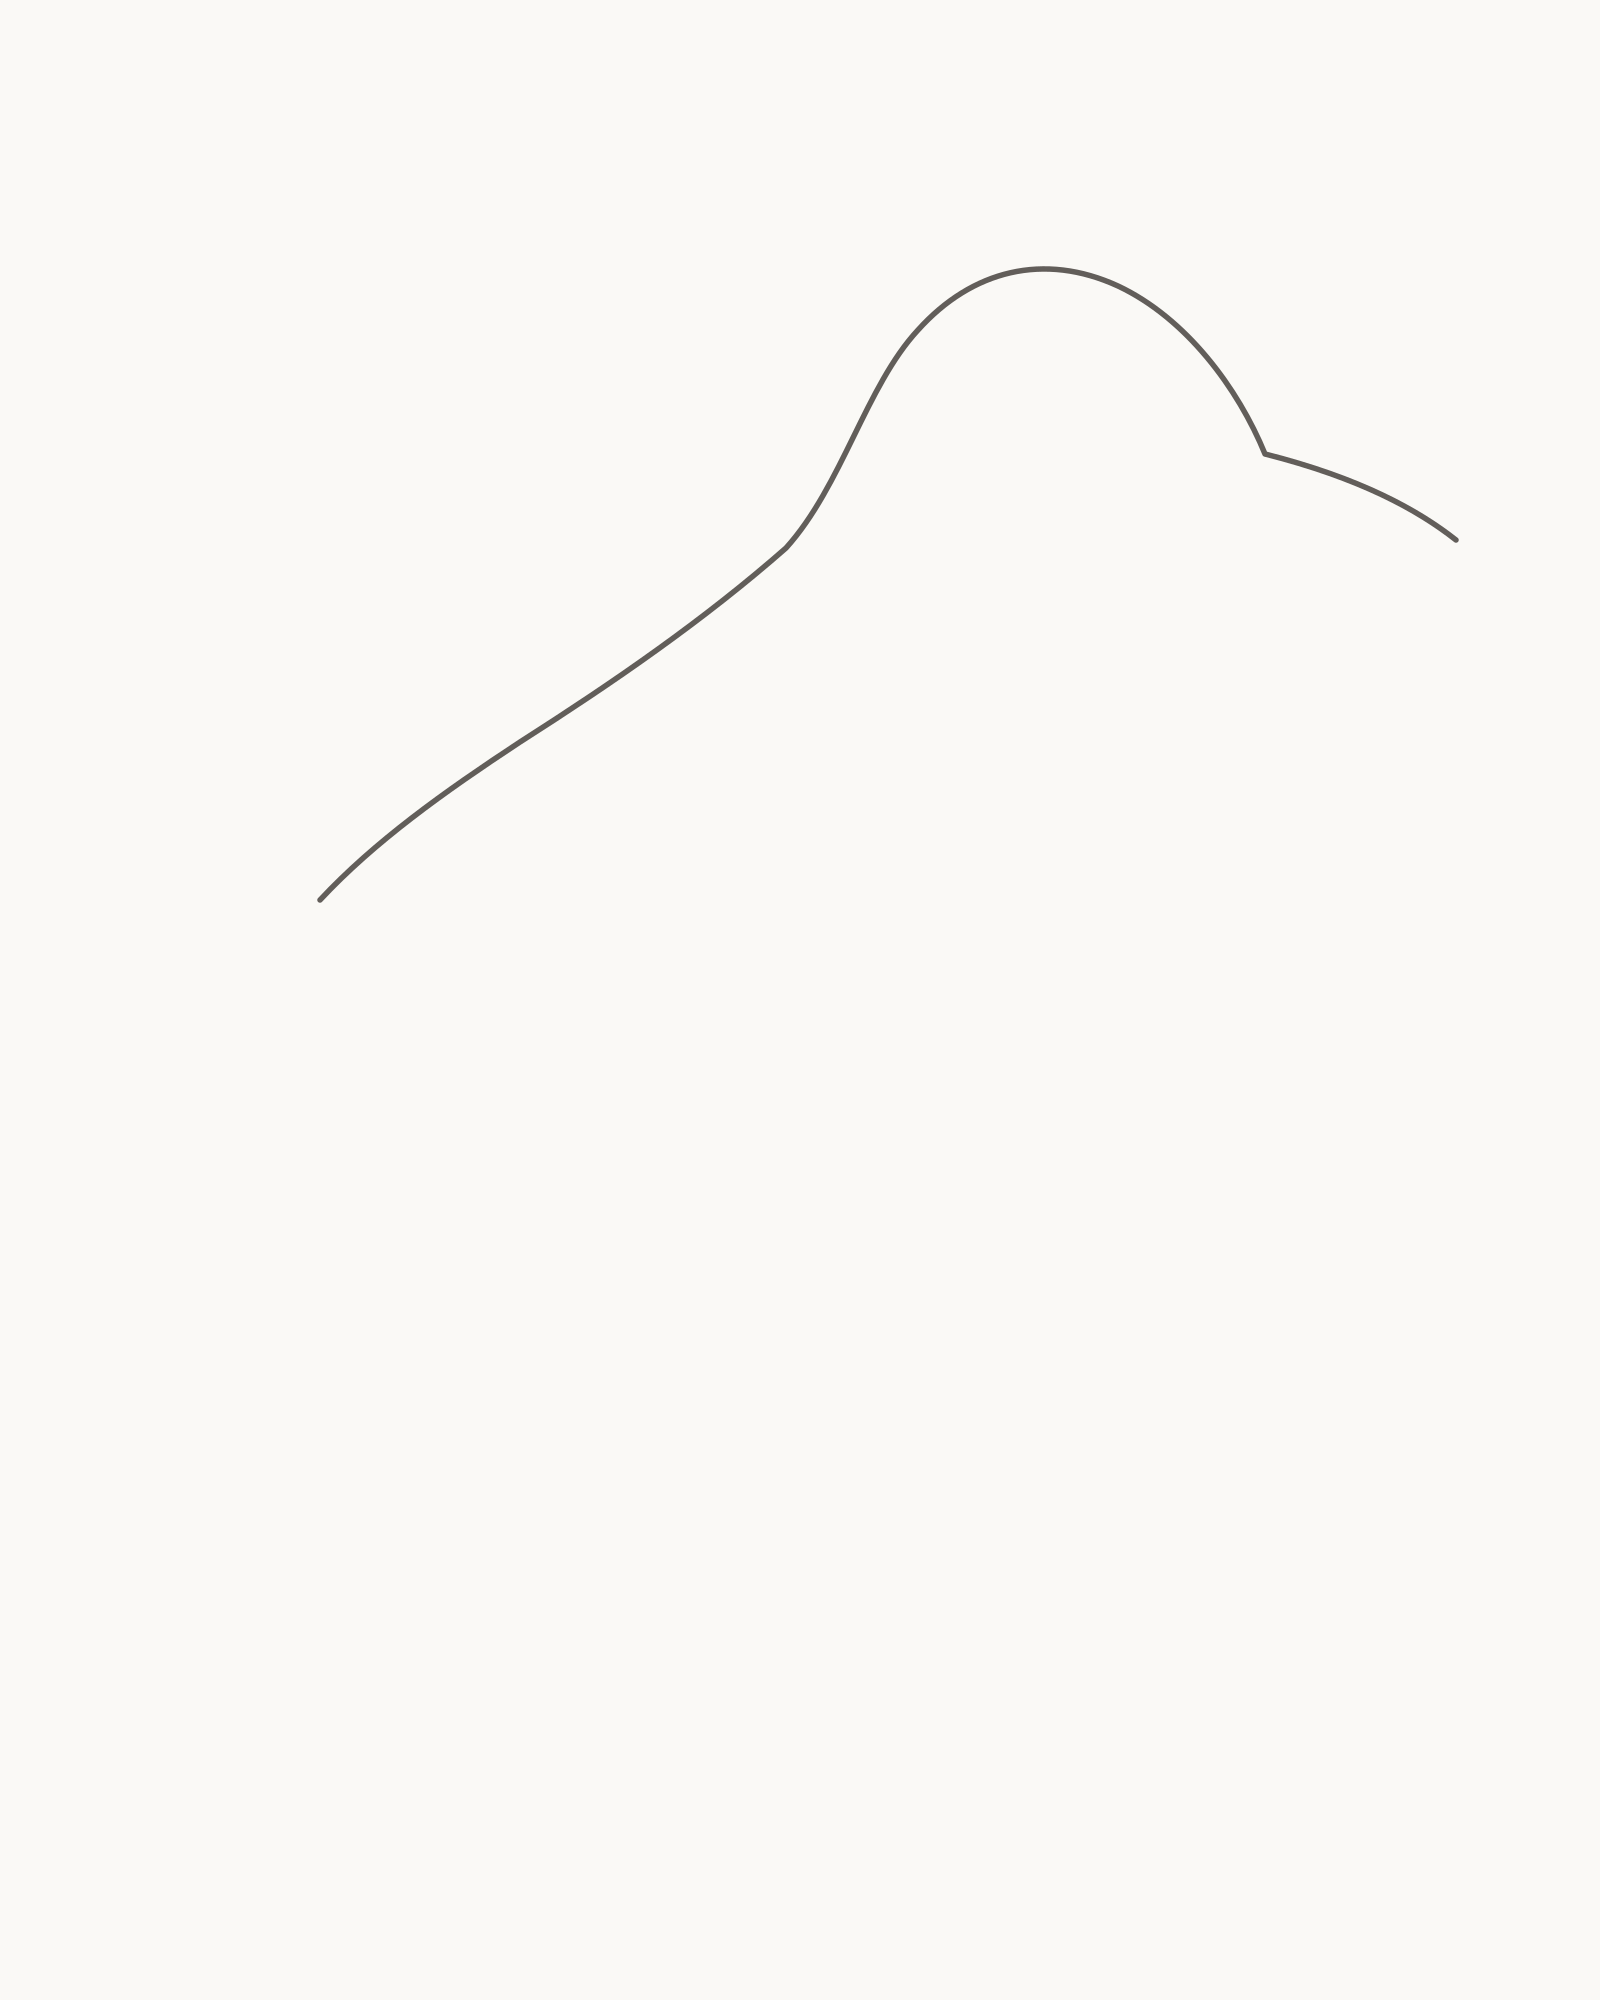
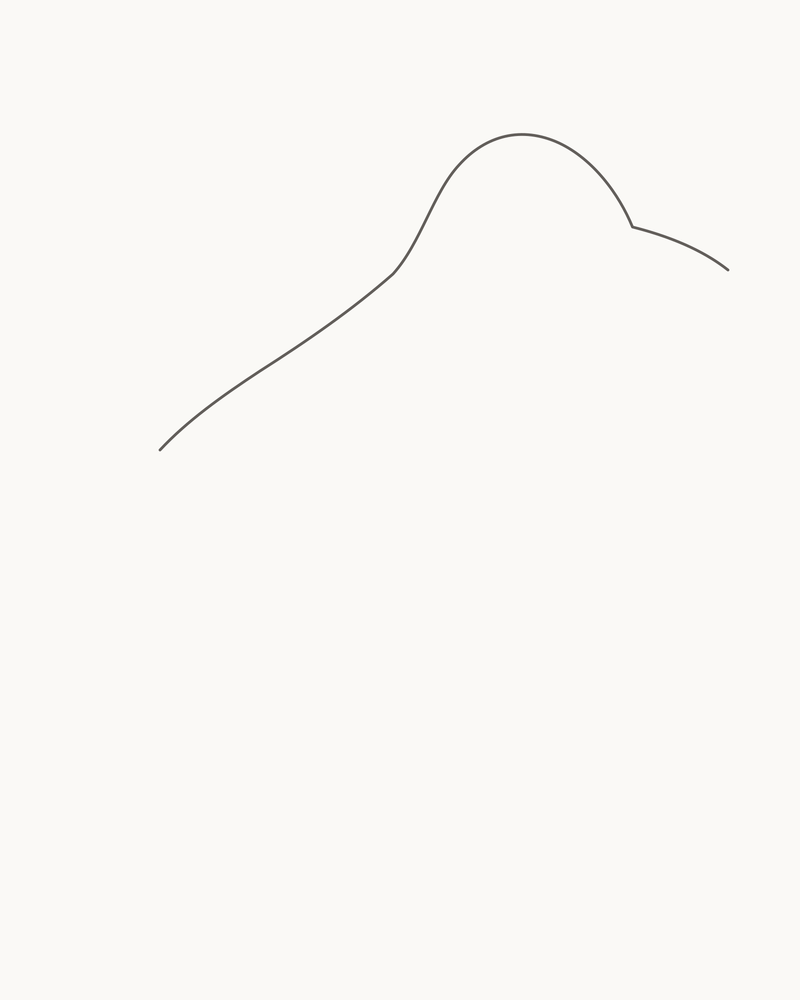
Stage 1 of 8. One permanent sweep establishes the broad bill, compact adult head, low back and upper tail root. 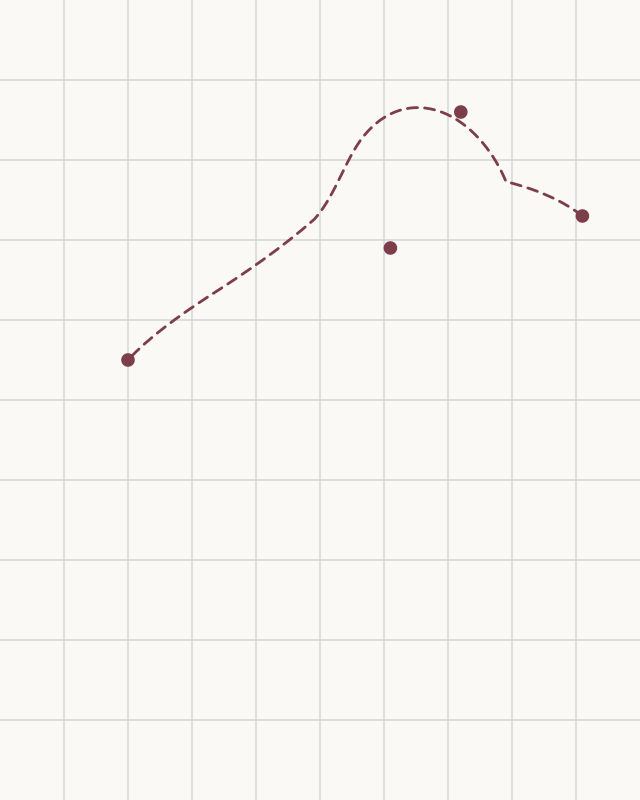
Placement cue: place the bill tip near x91% / y27%, crown near x72% / y14%, shoulder near x61% / y31%, and upper tail root near x20% / y45%. Keep the cue off the drawing. - Bill tip and upper bill
- Forehead and crown
- Nape and shoulder
- Back, rump and upper tail root
Begin at the bill tip near x91% / y27%. Travel left along the upper bill, ease into the forehead, and round the crown near x72% / y14%. Continue through the nape and shoulder around x61% / y31%, then carry one changing curve along the back and rump to the upper tail root near x20% / y45%.
This is one permanent contour, not the top half of a construction oval. Keep the bill shallow and broad rather than triangular. The head should be compact beside the long, low body, and the back should change direction naturally instead of forming a perfect ellipse. That extended sweep distinguishes the adult profile from a ball-headed duckling or upright novelty character.
Look for this before moving on: the duck faces right, the bill has room before the page edge, the crown is softly rounded, the nape flows into a long asymmetric back, and the upper tail root stops with generous space behind it.
If it goes wrong: keep the strongest parts of the contour. Replace only the newest spear-like bill edge, over-round crown, stiff shoulder turn or ballooned back interval between two stable points. Do not redraw the entire silhouette because one bend needs attention.
2. Return along the lower bill and body with planned openings
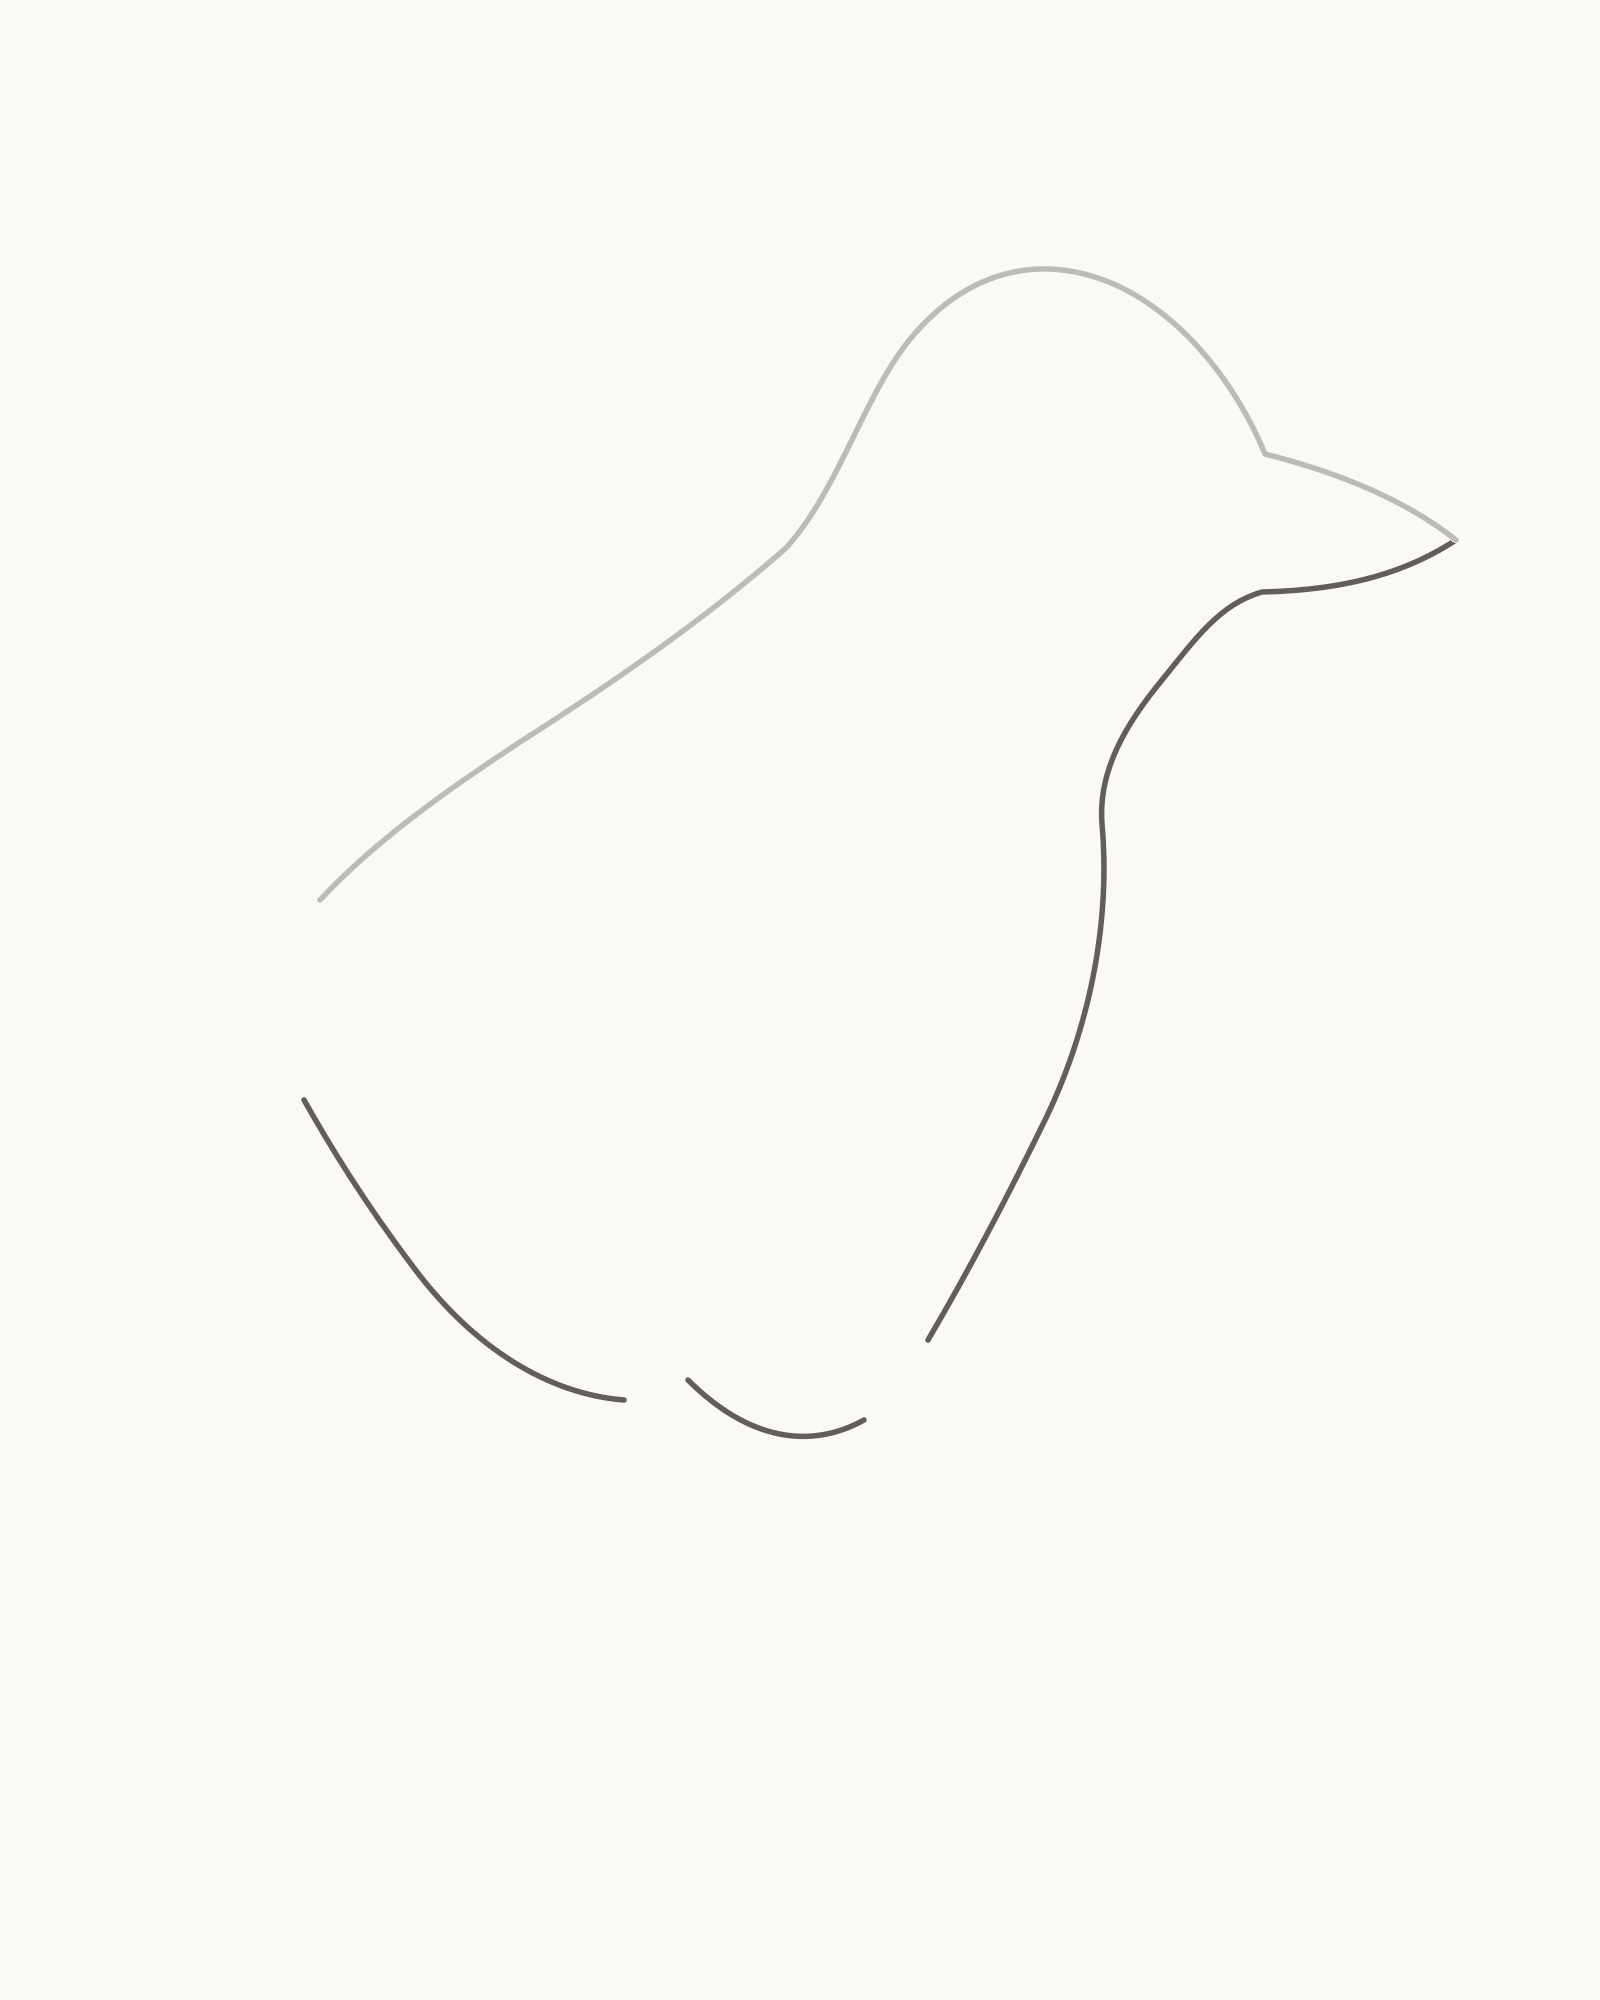
Stage 2 of 8. Three ordered lower intervals complete the adult body mass while two leg gaps and the tail space remain open. - Bill tip → throat/chest → belly → near-leg opening
- Near opening → underside → far-leg opening
- Far opening → rear underside → lower tail root
Begin again at the fixed Stage 1 bill tip. Draw the first lower interval in this order: bill tip → lower bill → throat and chest → belly → near-leg opening. Let the upper and lower bill edges meet once at the tip. The throat should flow into the chest without creating a separate collar, while the underside lengthens beneath the already established back.
Start again at the rear end of the near-leg opening. Add a short underside interval and stop at the front end of the far-leg opening. Begin once more beyond that second gap, continue around the rear underside, and finish at the lower tail root. The lower tail root remains separate from the upper root until Stage 3.
Stage 2 is deliberately open in three places: the near-leg opening, the far-leg opening and the tail opening. These are planned permanent endpoints, not missing pieces or temporary gaps. Later stages bridge their assigned pairs; no contour will be cut, rubbed out or retraced. The folded wing is an interior form, so it does not need another break in the body outline.
Look for this before moving on: both bill edges meet at one point, the throat enters the chest smoothly, the body reads about one and two-thirds times as long as it is high, and the two leg gaps plus the tail gap can each be identified without guessing.
If it goes wrong: preserve Stage 1 and every successful lower interval. Replace only the newest doubled bill tip, pinched throat, overly round belly or wrongly closed endpoint. Correct a new gap now rather than planning to reopen an older contour after a leg or the tail arrives.
3. Attach the three-point tail fan
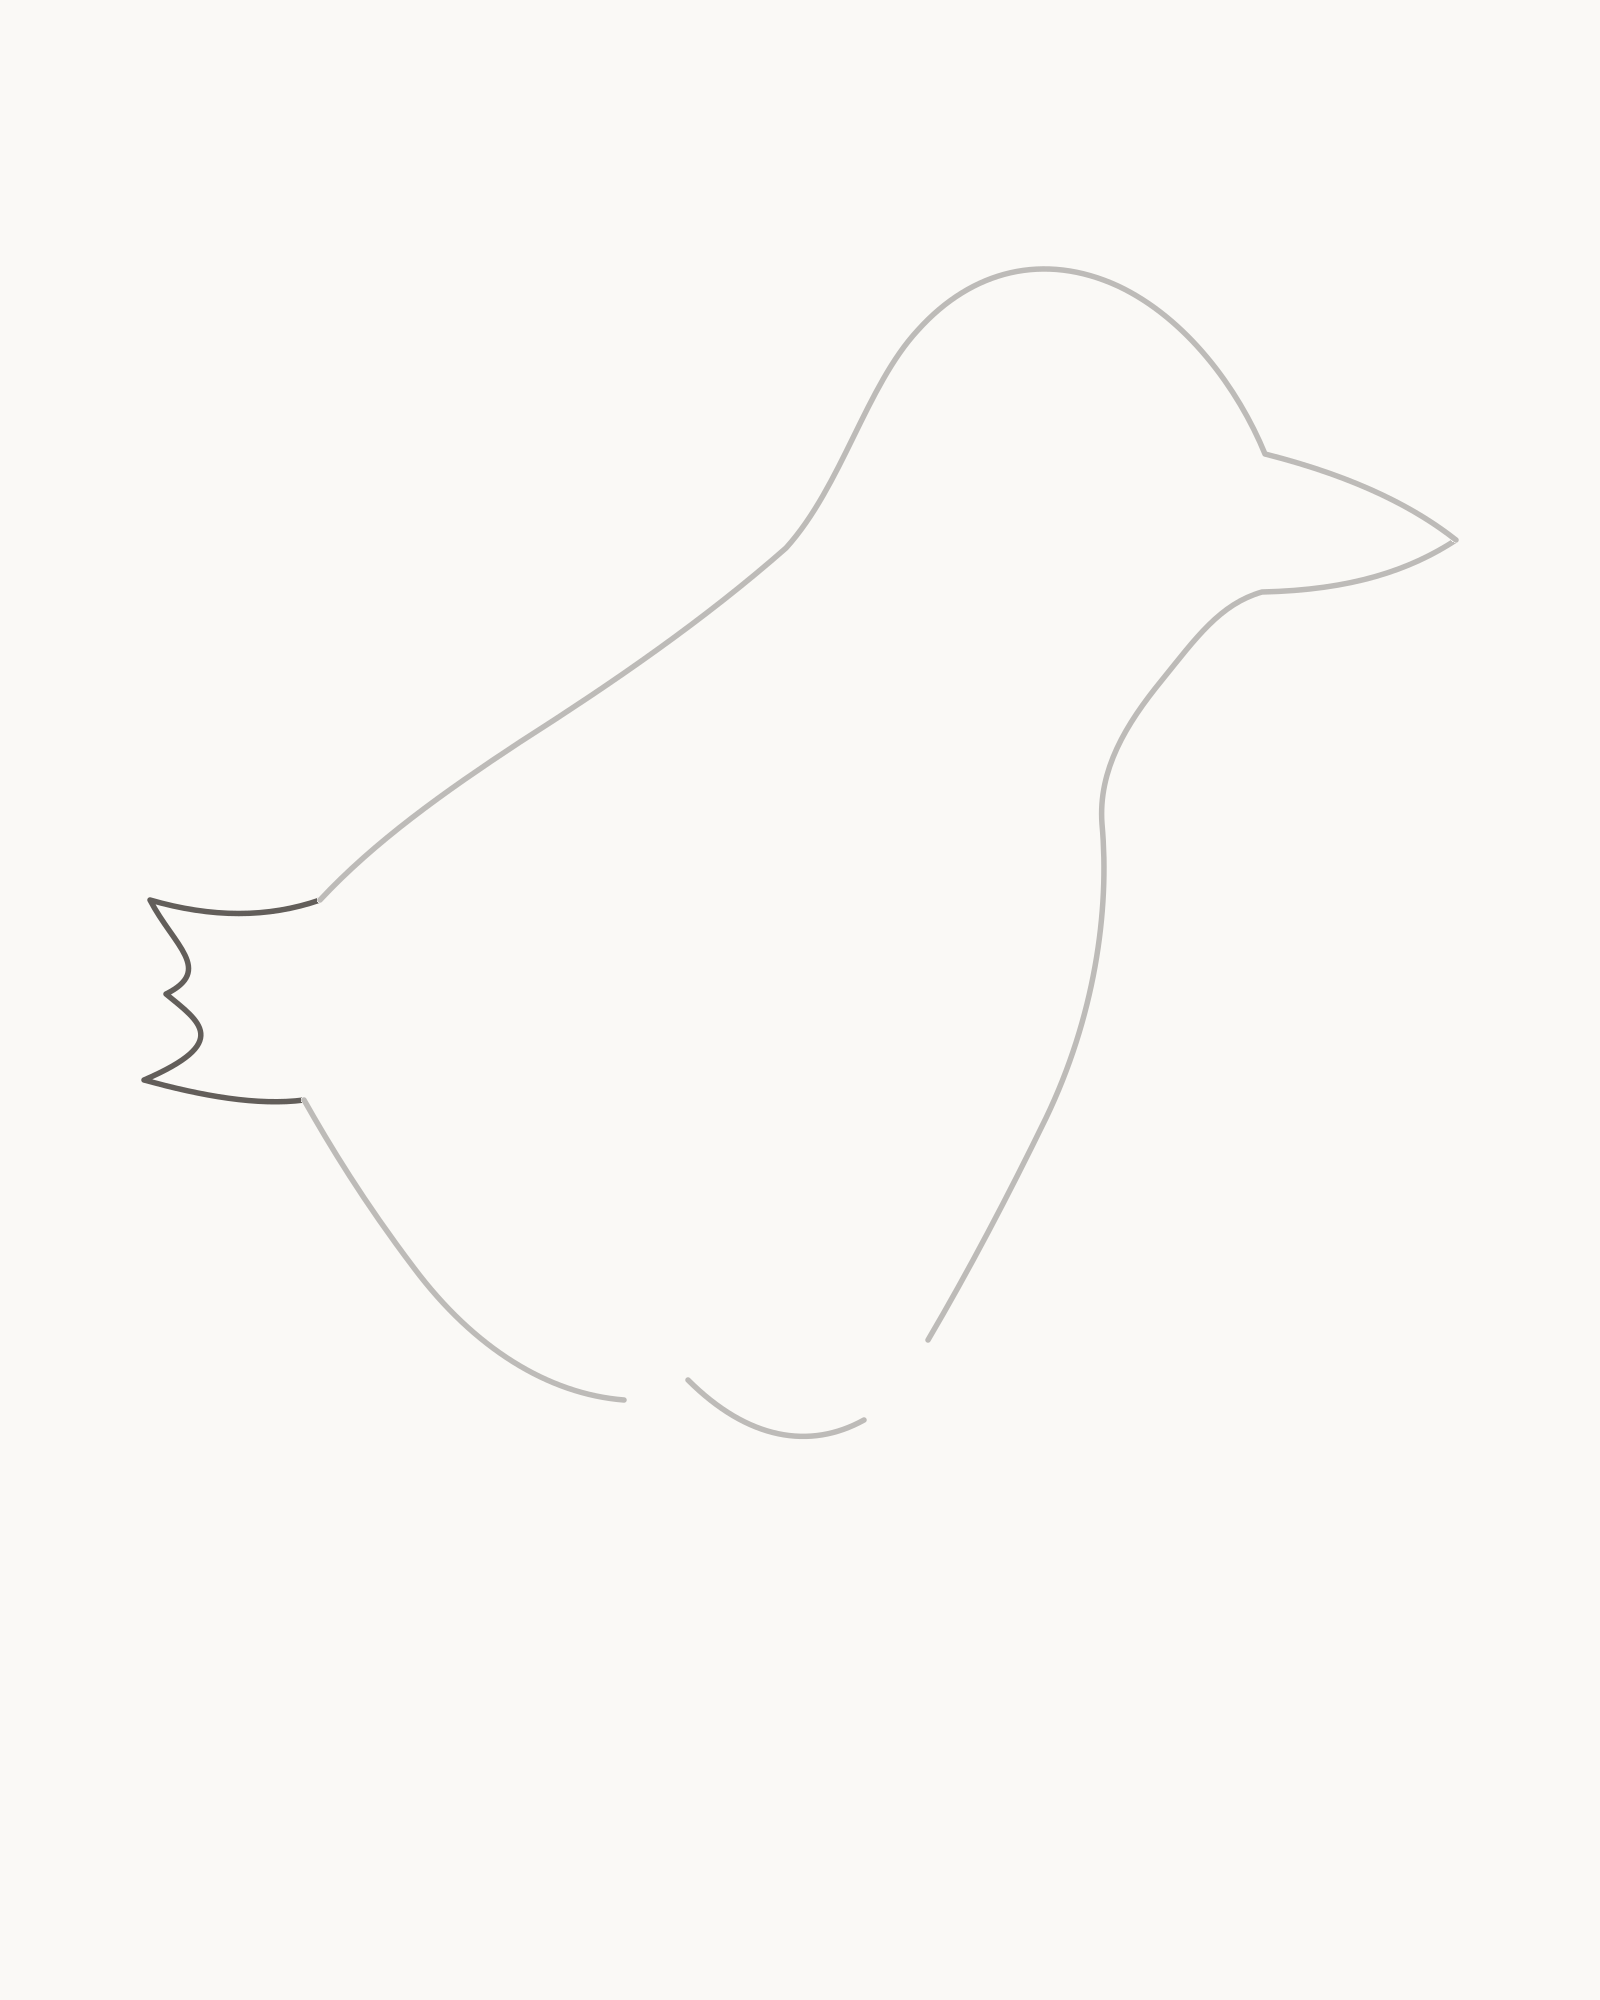
Stage 3 of 8. One compact fan bridges the two fixed rump roots with three unequal, separately readable points. - Upper tail root
- First and middle points
- Third unequal point
- Return to lower tail root
Join the two fixed rump endpoints with one short fan. From the upper tail root, move left into the first feather point, change direction for the middle point, then form a third unequal point before returning to the lower root. Keep the three tips distinct but restrained.
Every point belongs to the same attached tail. Avoid three identical spikes, a detached crown shape or a large triangle pasted onto the rump. The fan should project left within the open space already reserved for it and remain much shorter than the body.
Look for this before moving on: both tail ends meet their original roots exactly, the count is three unequal points, the fan reads as one compact attachment, and none of its tips approaches the page edge.
If it goes wrong: leave the body and one successful tail edge unchanged. Replace only the newest floating point, repeated spike or misplaced return between the fixed roots. Do not extend the back, alter the belly or add another feather to disguise a weak join.
4. Place the folded near wing
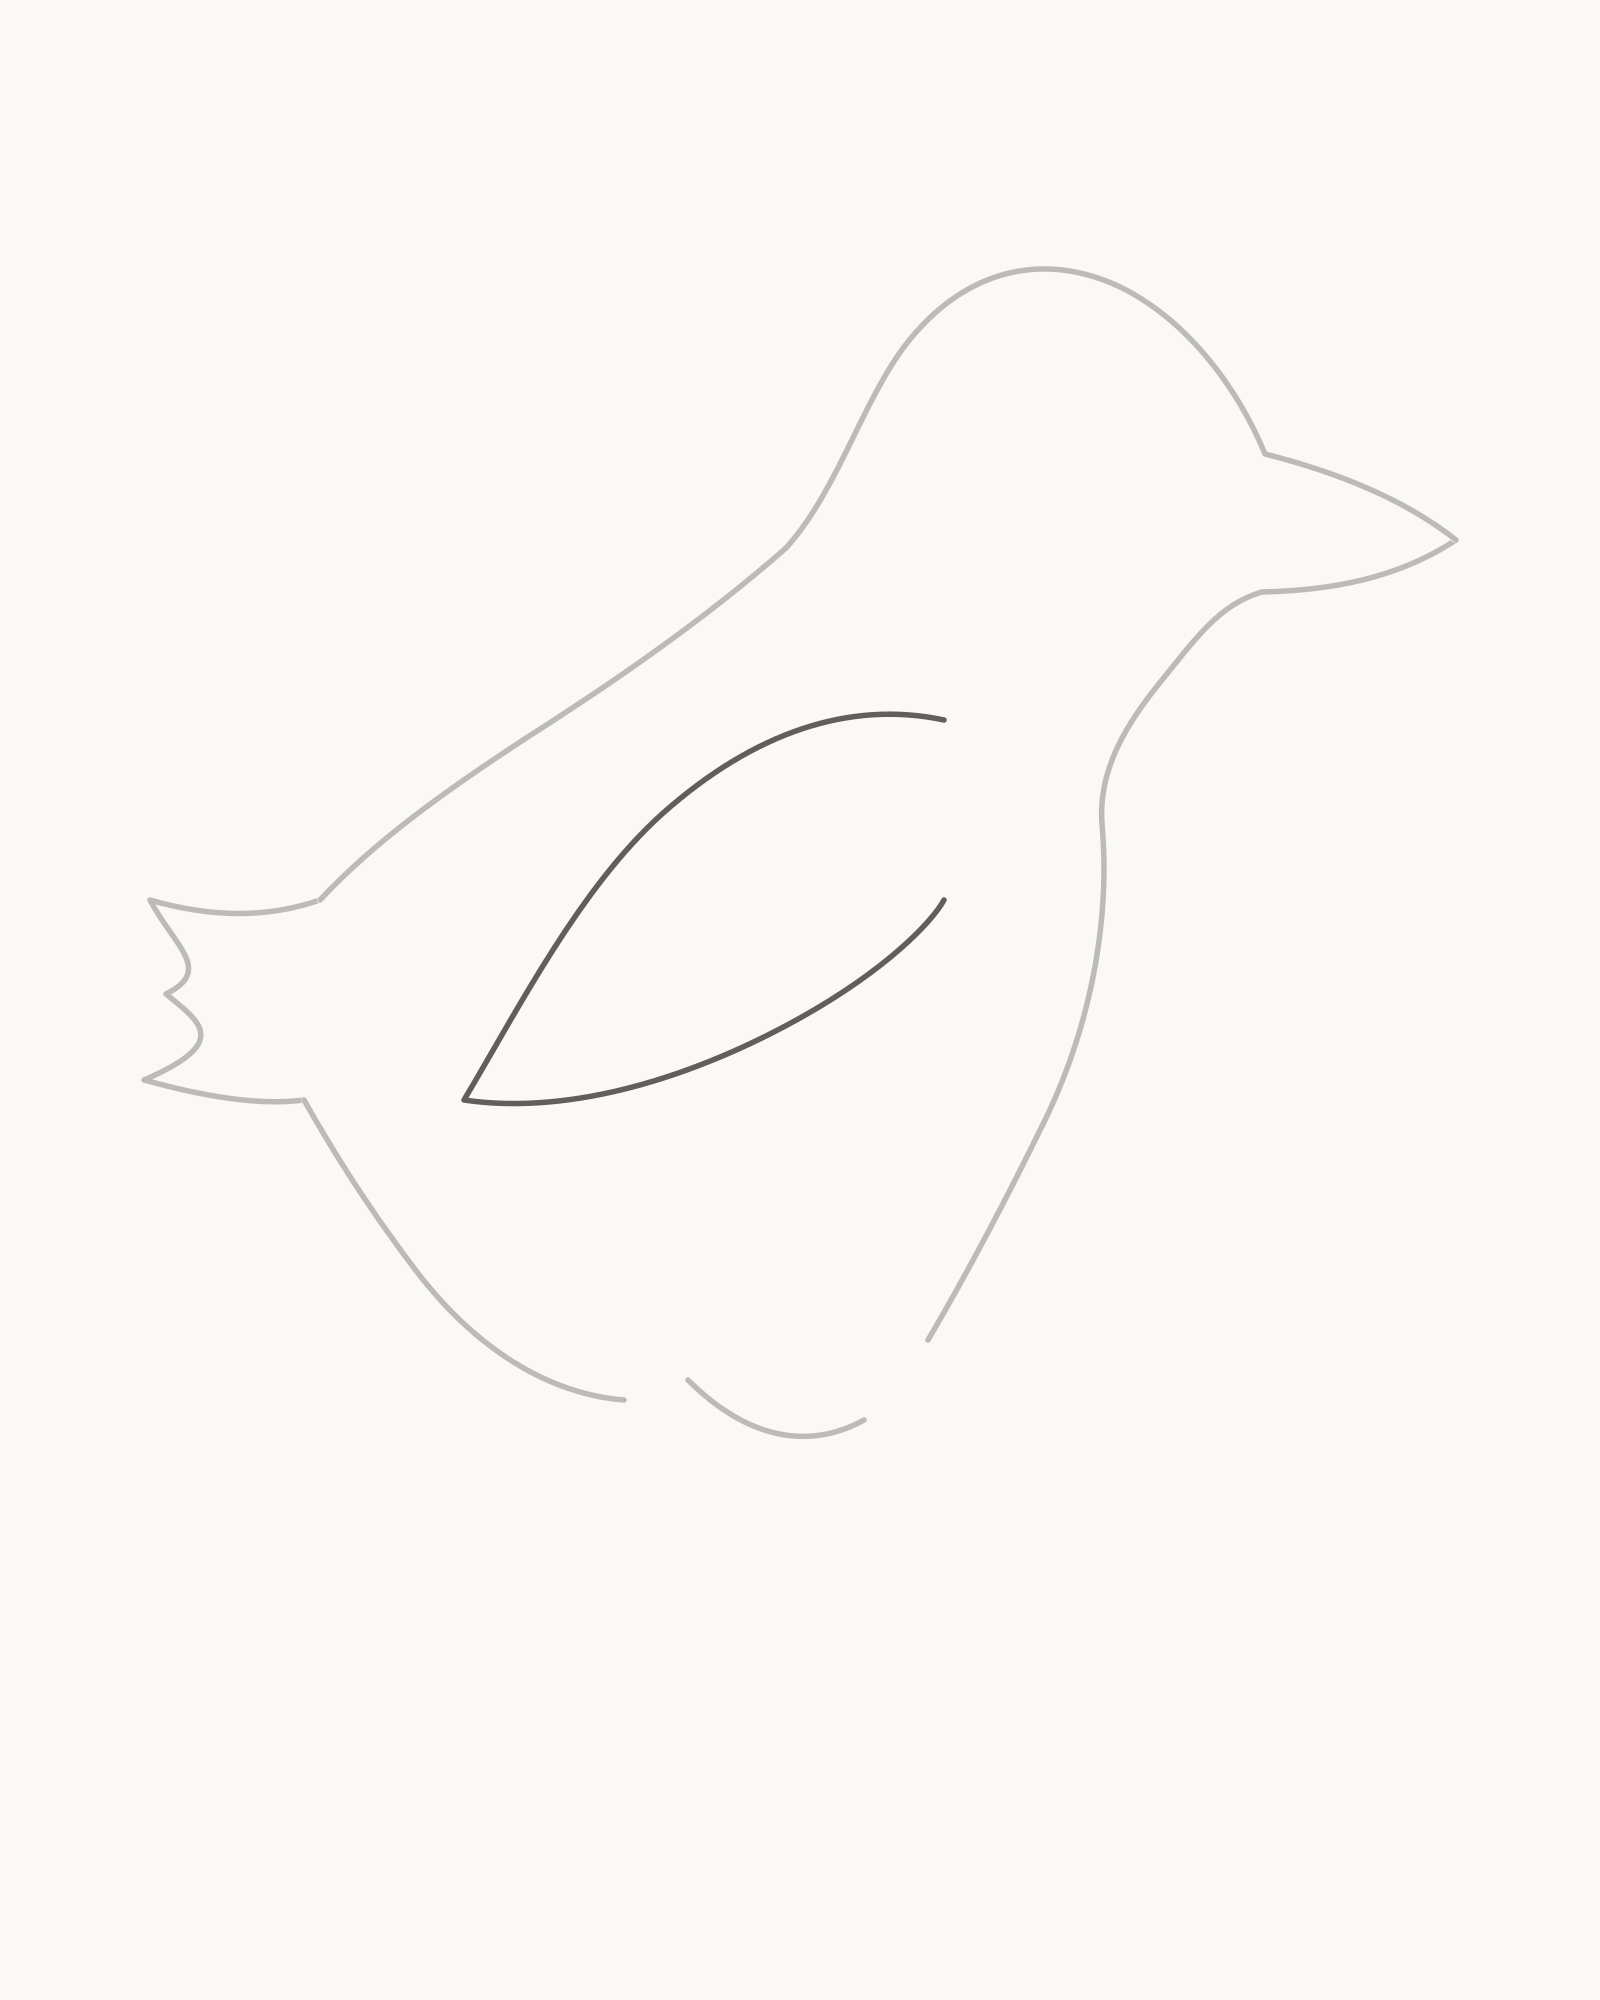
Stage 4 of 8. One tapered near wing rests on the torso; the far wing stays completely occluded. - Forward shoulder root
- Longer upper wing curve
- Restrained rear point
- Shallower return to lower root
Draw the visible folded wing on the side of the torso. Start at the forward shoulder root near x59% / y36%, follow a longer upper curve back and down to a restrained point near x29% / y55%, then return on a shallower lower curve to the second root near x59% / y45%.
The two curves are deliberately unequal. Their roots tie the wing to the shoulder mass, while the rear point follows the length of the body without touching the belly, either leg opening or the tail. Only this near wing appears. The far wing is fully occluded in the strict profile and should not be represented by a mirrored loop, an unexplained sliver or a second internal line.
Look for this before moving on: the wing can be traced from one shoulder root to the rear point and back to the second root, its upper and lower edges have different rhythms, and clear paper separates it from the belly gaps and tail fan.
If it goes wrong: preserve the body, tail and whichever wing interval is sound. Replace only the newest floating root, leaf-like curve or oversized rear point. Do not thicken the join to hide a gap, and do not add a far wing to balance the composition.
5. Add the near leg and webbed foot
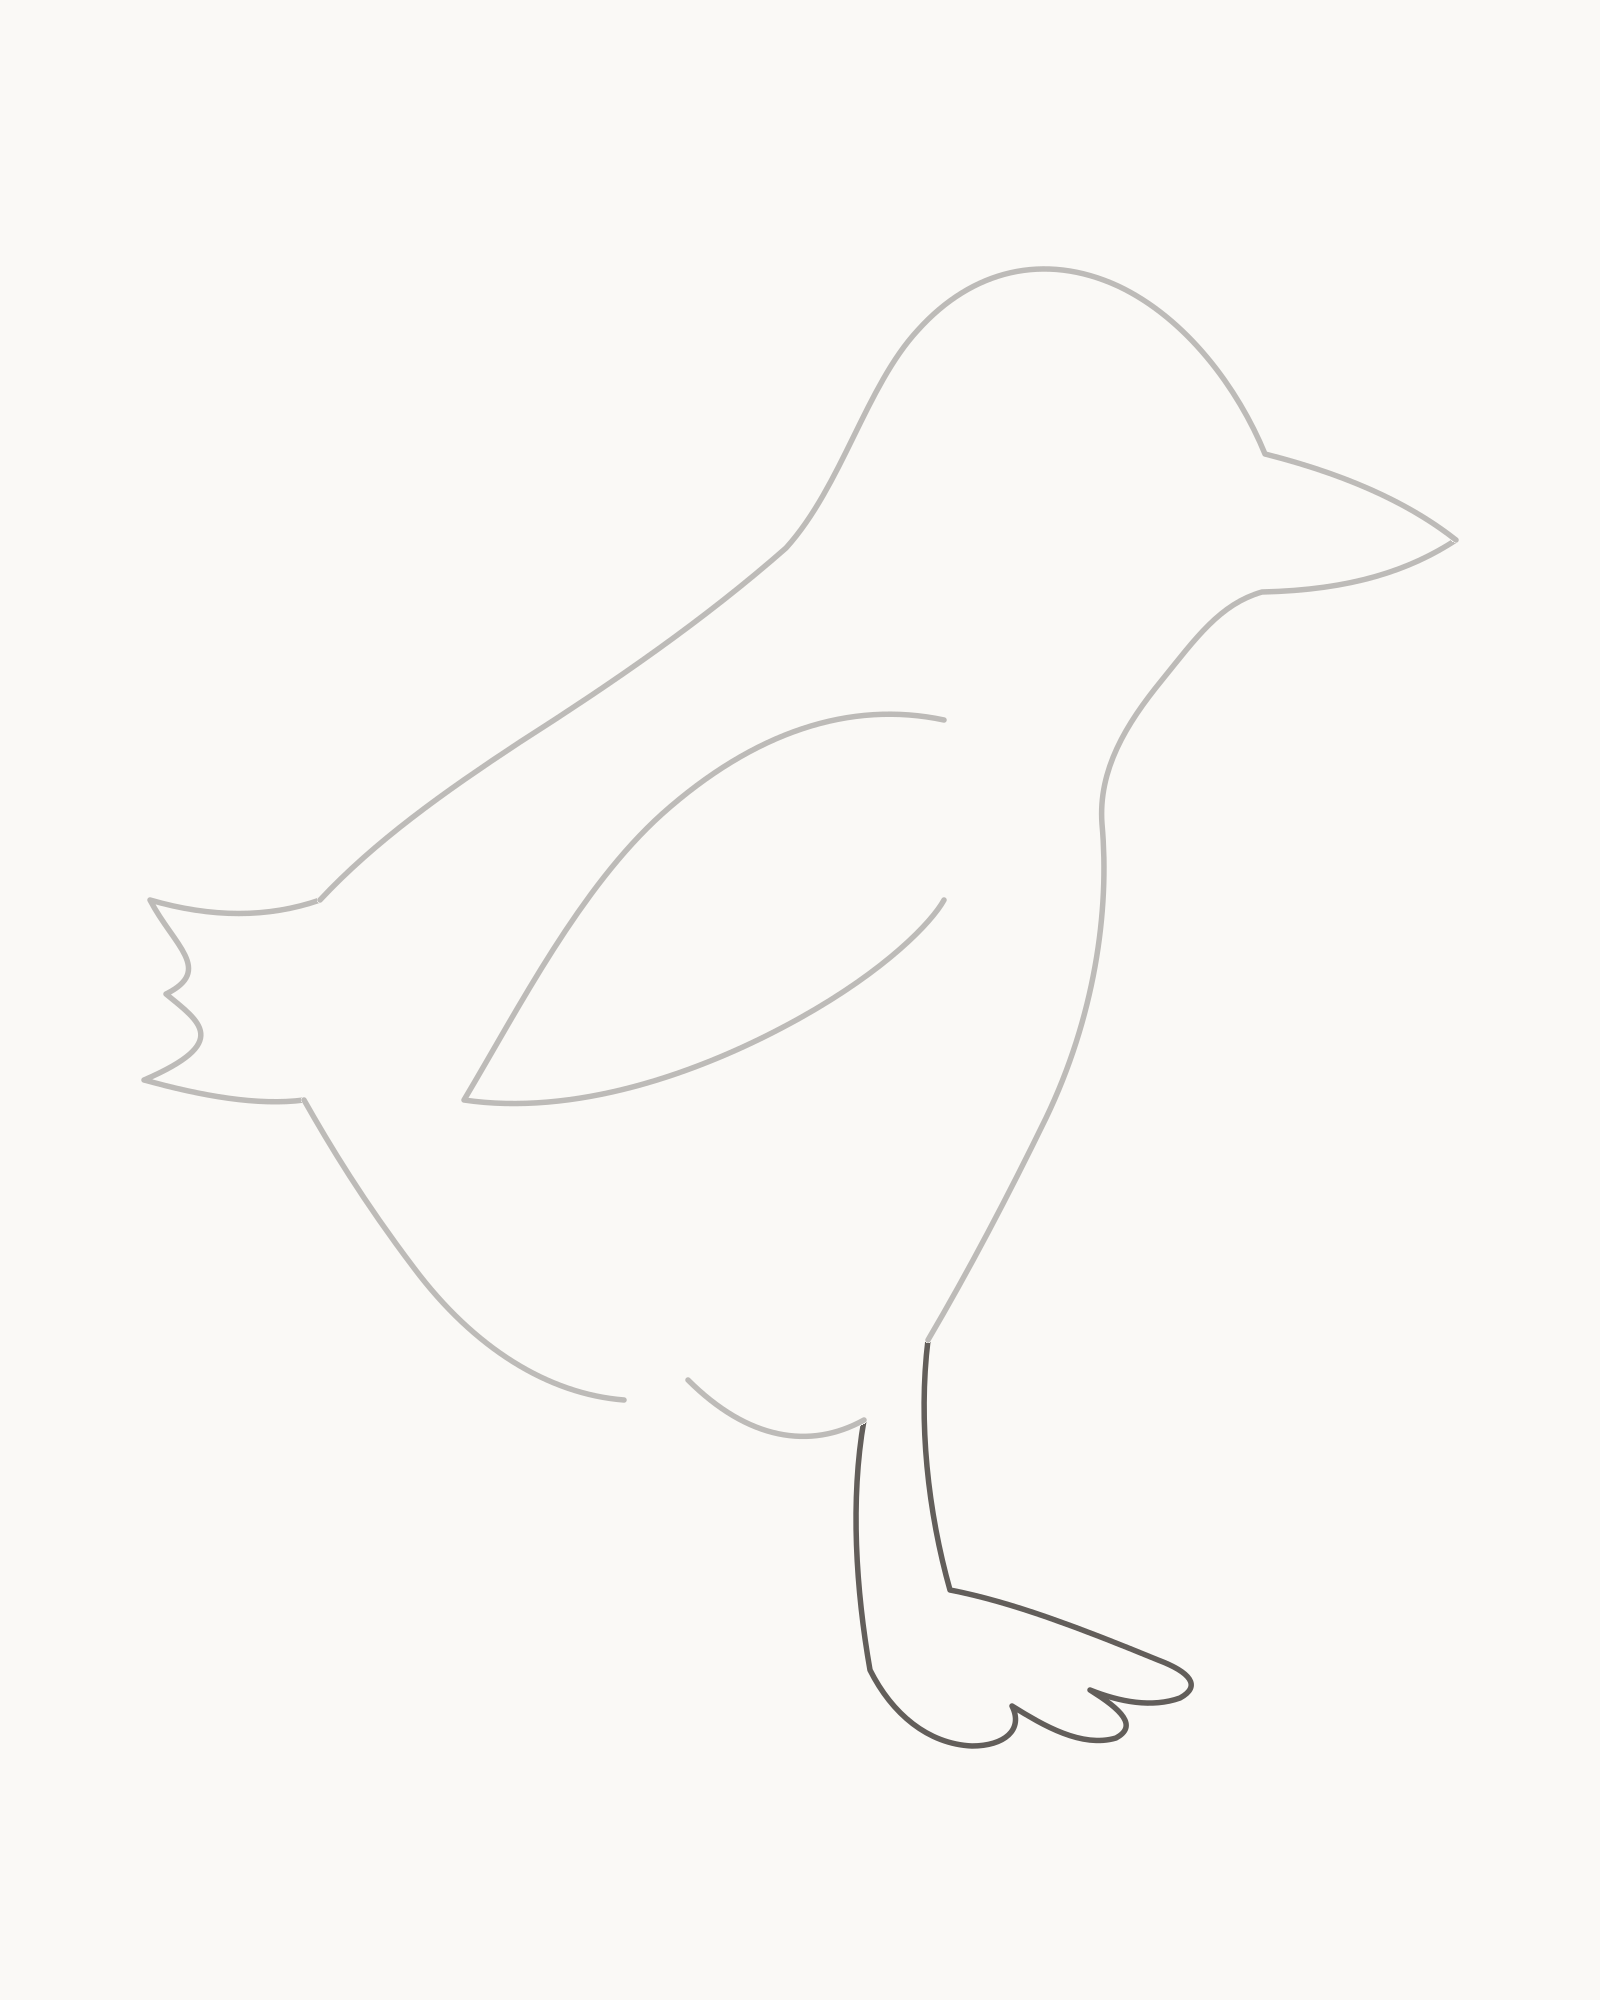
Stage 5 of 8. The front body gap receives one continuous near support with three distinct toe points. - Near leg from front gap
- Low foot extending right
- 3 unequal toe points
- Return through inner leg edge
The front underside opening belongs to the near support. Bridge it with a short leg: descend from the forward endpoint, turn into a low foot that extends right, shape exactly three unequal forward toe points with two shallow web valleys, and return through the inner leg edge to the other endpoint.
Keep the foot continuous with the leg and low against the invisible floor. The three toe points are parts of one webbed outline, not three detached claws. Make their lengths and turns slightly different so they do not resemble a mechanical comb or a human shoe.
Look for this before moving on: both leg edges meet the front body gap, the foot rests flat without a ground line, exactly three forward toe points and two valleys are visible, and the full support remains clear of the future far foot.
If it goes wrong: retain all earlier stages and any successful part of the new support. Replace only the latest ankle edge, floating foot turn, backward point or crowded web valley. Never widen the body opening or redraw the belly to accommodate the foot.
6. Add the smaller far leg and foot
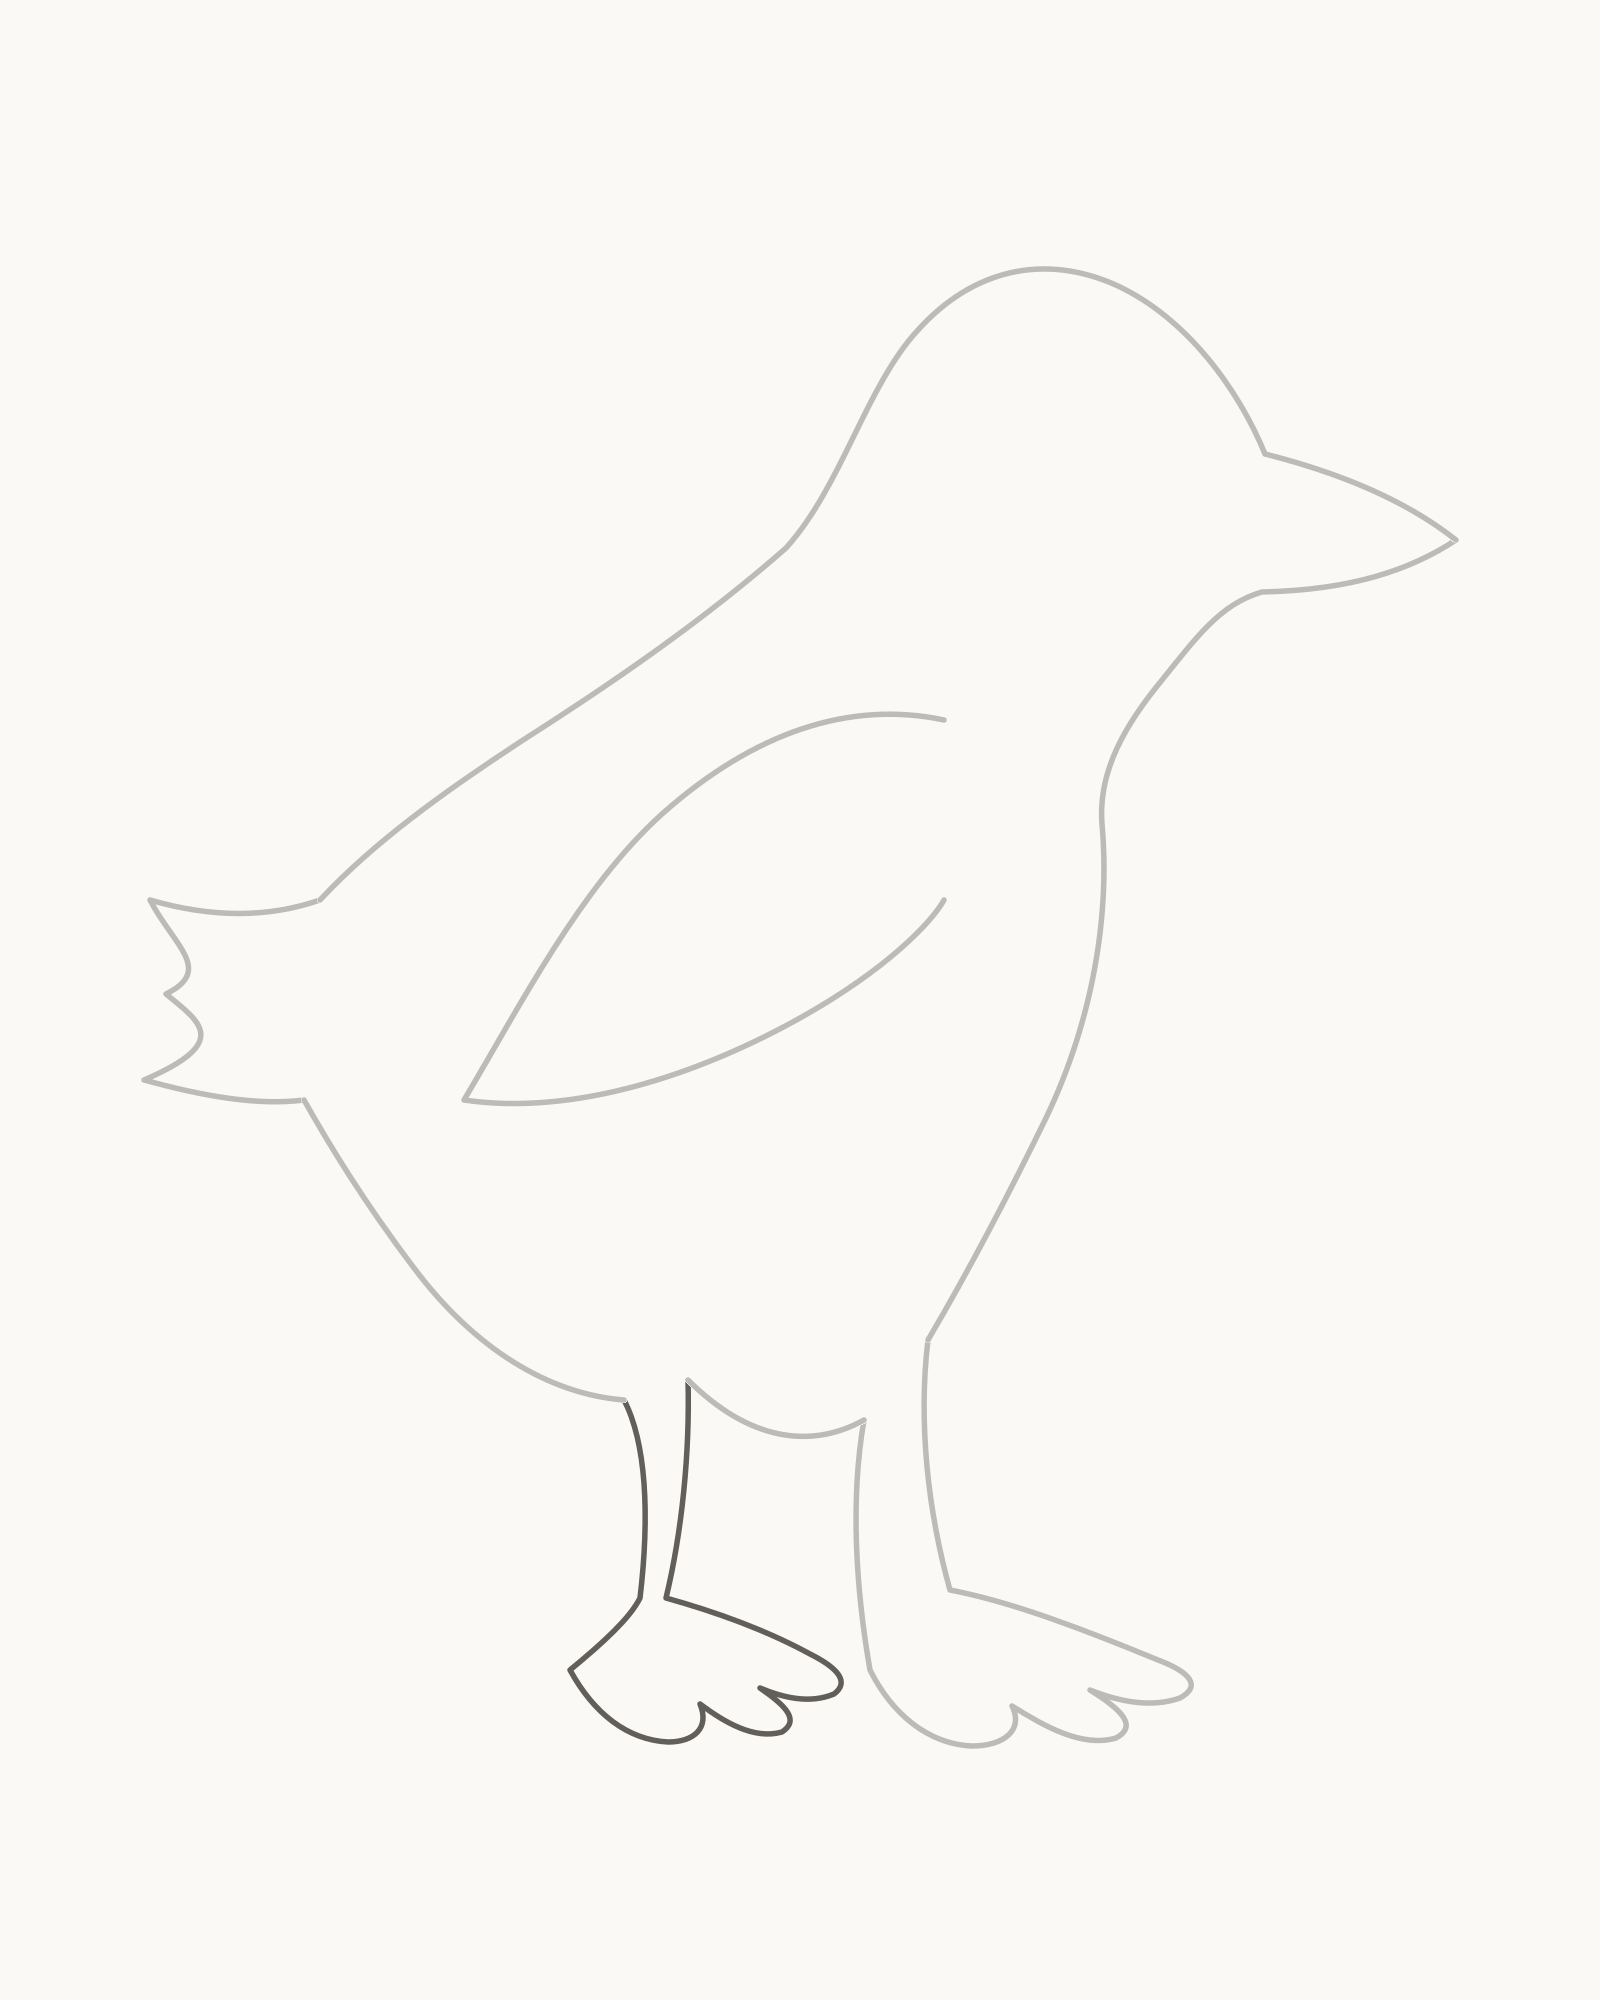
Stage 6 of 8. A subordinate far support remains traceable behind the near foot and completes the six-point total. - Far leg from rear gap
- Smaller foot behind and left
- 3 new toe points
- 6 points and 4 valleys total
Use the rear underside opening for the far support. Draw its short leg into a smaller foot positioned behind and a little left of the near foot. Give this foot exactly three unequal forward toe points and two shallow web valleys, then return cleanly to the other endpoint of its own body gap.
The new foot is subordinate, but it must remain traceable. Its three new points bring the finished total to exactly six toe points and four web valleys across the drawing. Both foot bottoms share the same invisible floor; their contours neither cross nor merge, and no third leg appears between them.
Look for this before moving on: each leg can be followed from a different body opening to its own foot, the farther foot is smaller but readable, the feet do not cross, and the total is three near points plus three far points.
If it goes wrong: keep the accepted near support untouched. Replace only the newest far-leg edge, concealed outer return or misplaced toe point. If the smaller foot disappears, adjust its latest outward turn locally instead of enlarging it until both feet match.
7. Set the eye and bill articulation
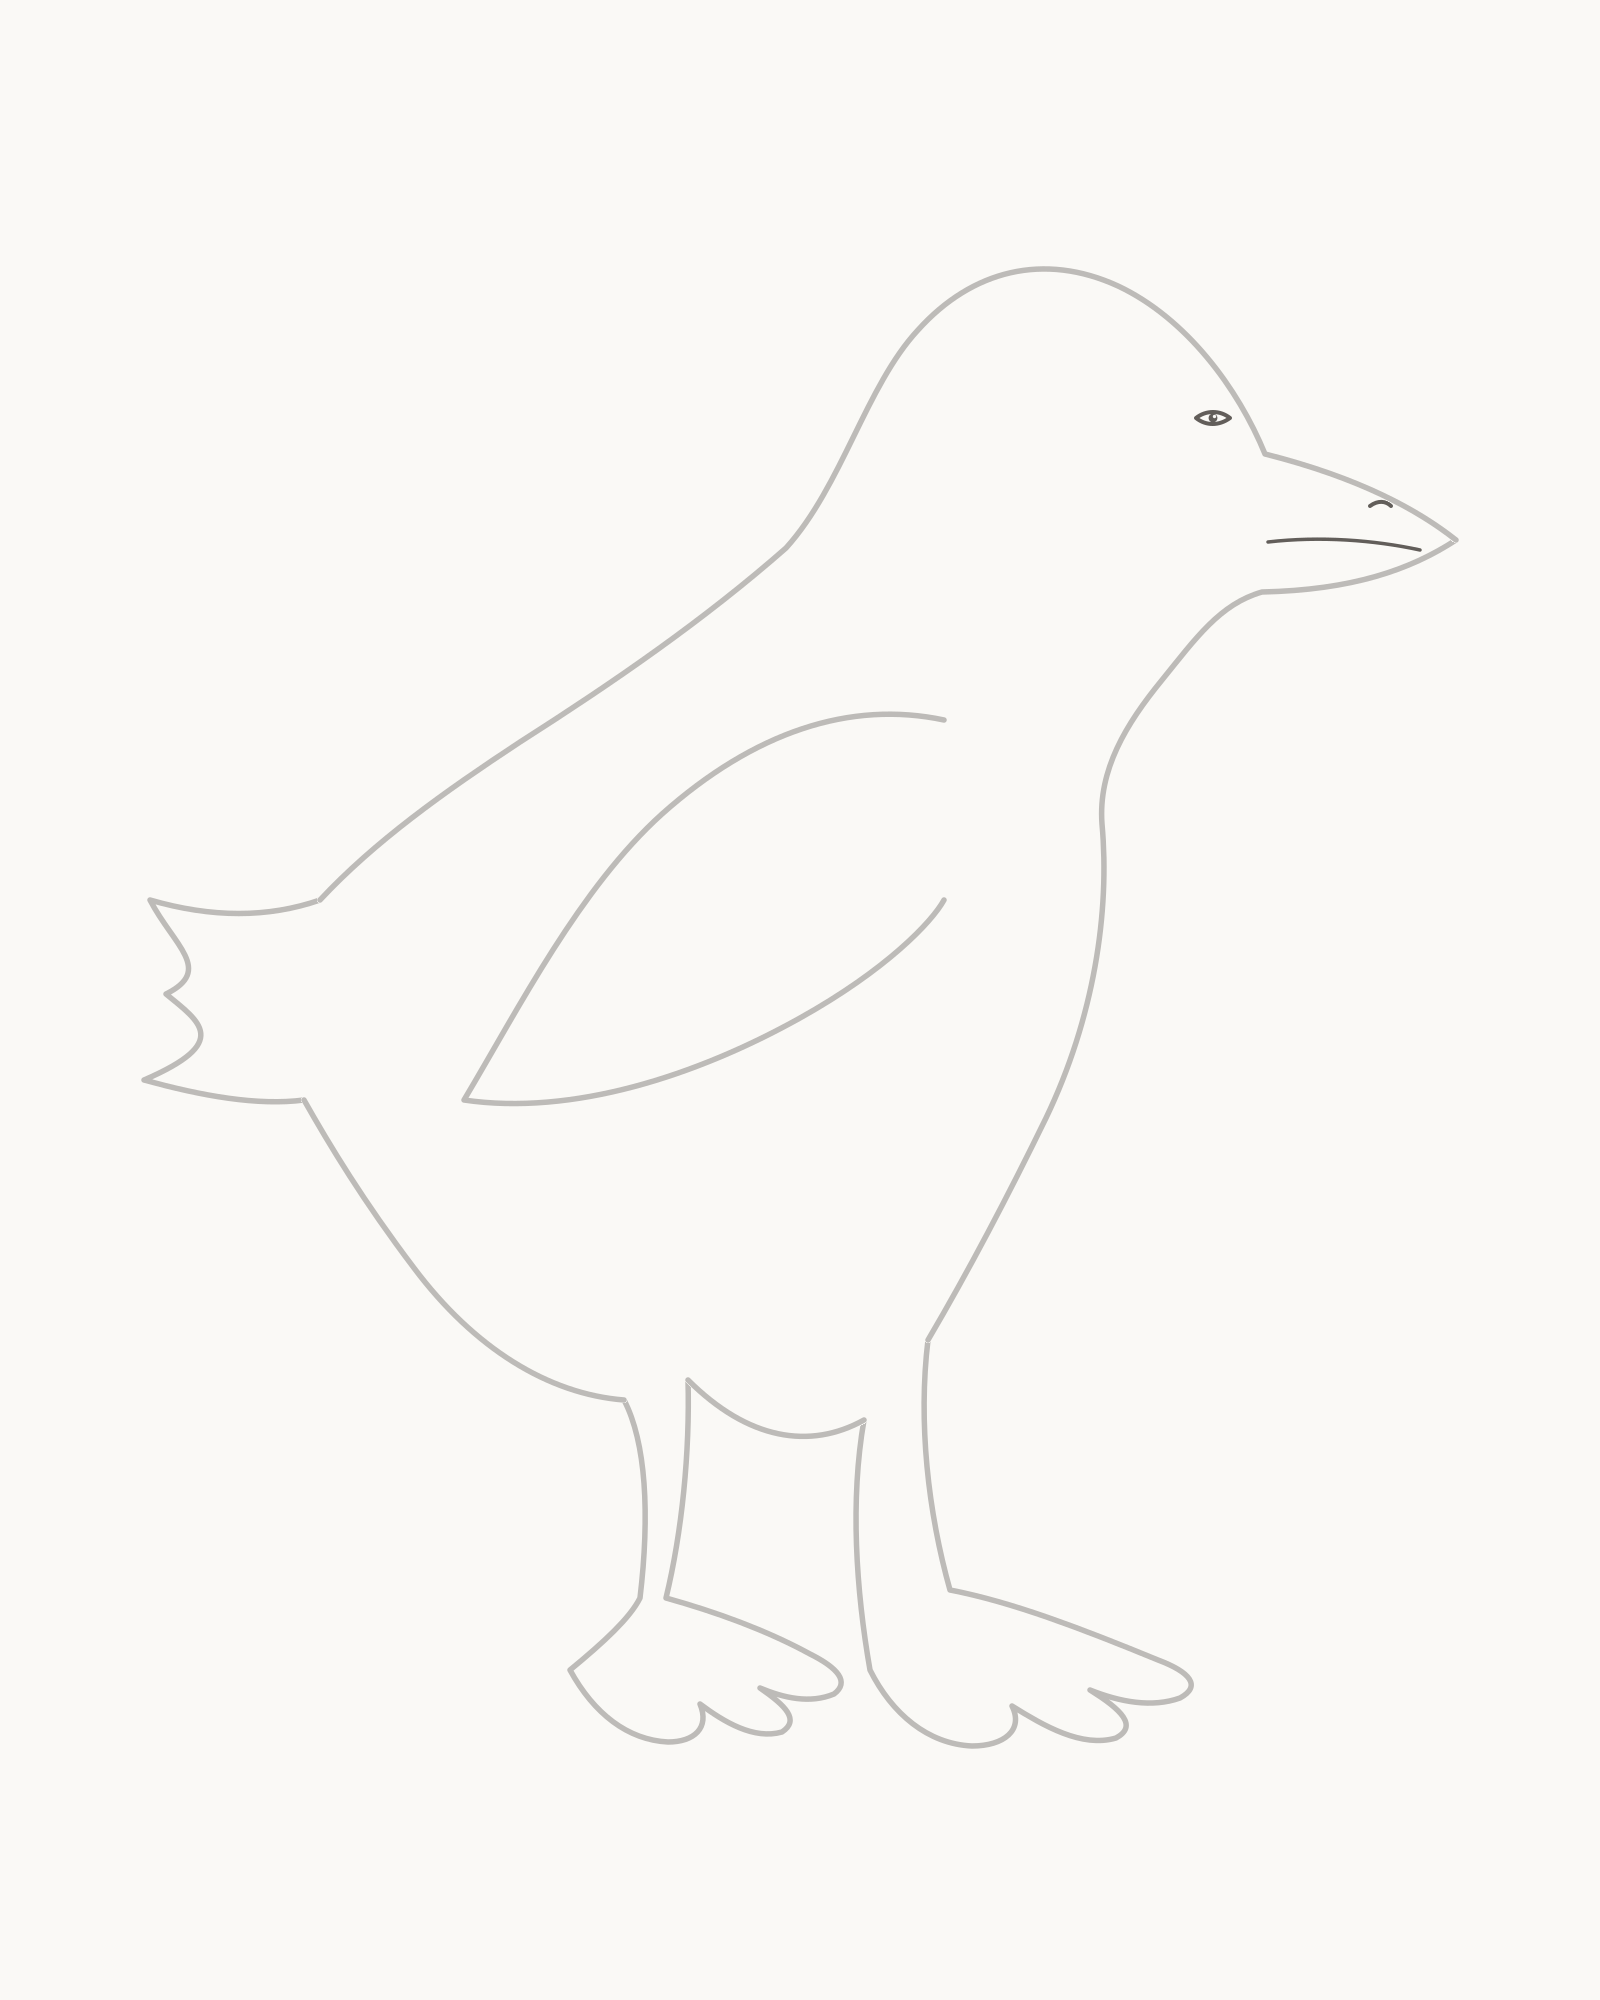
Stage 7 of 8. Three restrained face marks create a calm right-facing gaze and articulate the broad bill. - One near eye
- Protect minute pupil reserve
- One nostril
- Mouth seam stopping before tip
Place one small near eye around x76% / y21%. Keep its shape restrained and protect a minute unfilled reserve within the pupil. There is no second visible eye in this profile.
Add one small nostril inside the upper bill near x86% / y25%. Then draw the mouth seam from the face into the bill, stopping before the tip so the point remains structurally whole. Use the order eye → nostril → mouth seam and keep each feature inside the silhouette already established.
The expression should remain calm and observational. A large button eye, oversized highlight, smile or seam that splits the bill tip would pull the drawing towards a mascot rather than an adult mallard.
Look for this before moving on: one small eye directs the gaze right, the minute paper-colour reserve survives, the nostril sits inside the upper bill, and the open mouth seam ends before it reaches the bill point.
If it goes wrong: preserve the head and every successful facial feature. Replace only the newest oversized eye, filled reserve, misplaced nostril or overlong seam. Do not reshape the bill after adding the eye, and do not invent a second eye for symmetry.
8. Add five open adult-mallard landmarks
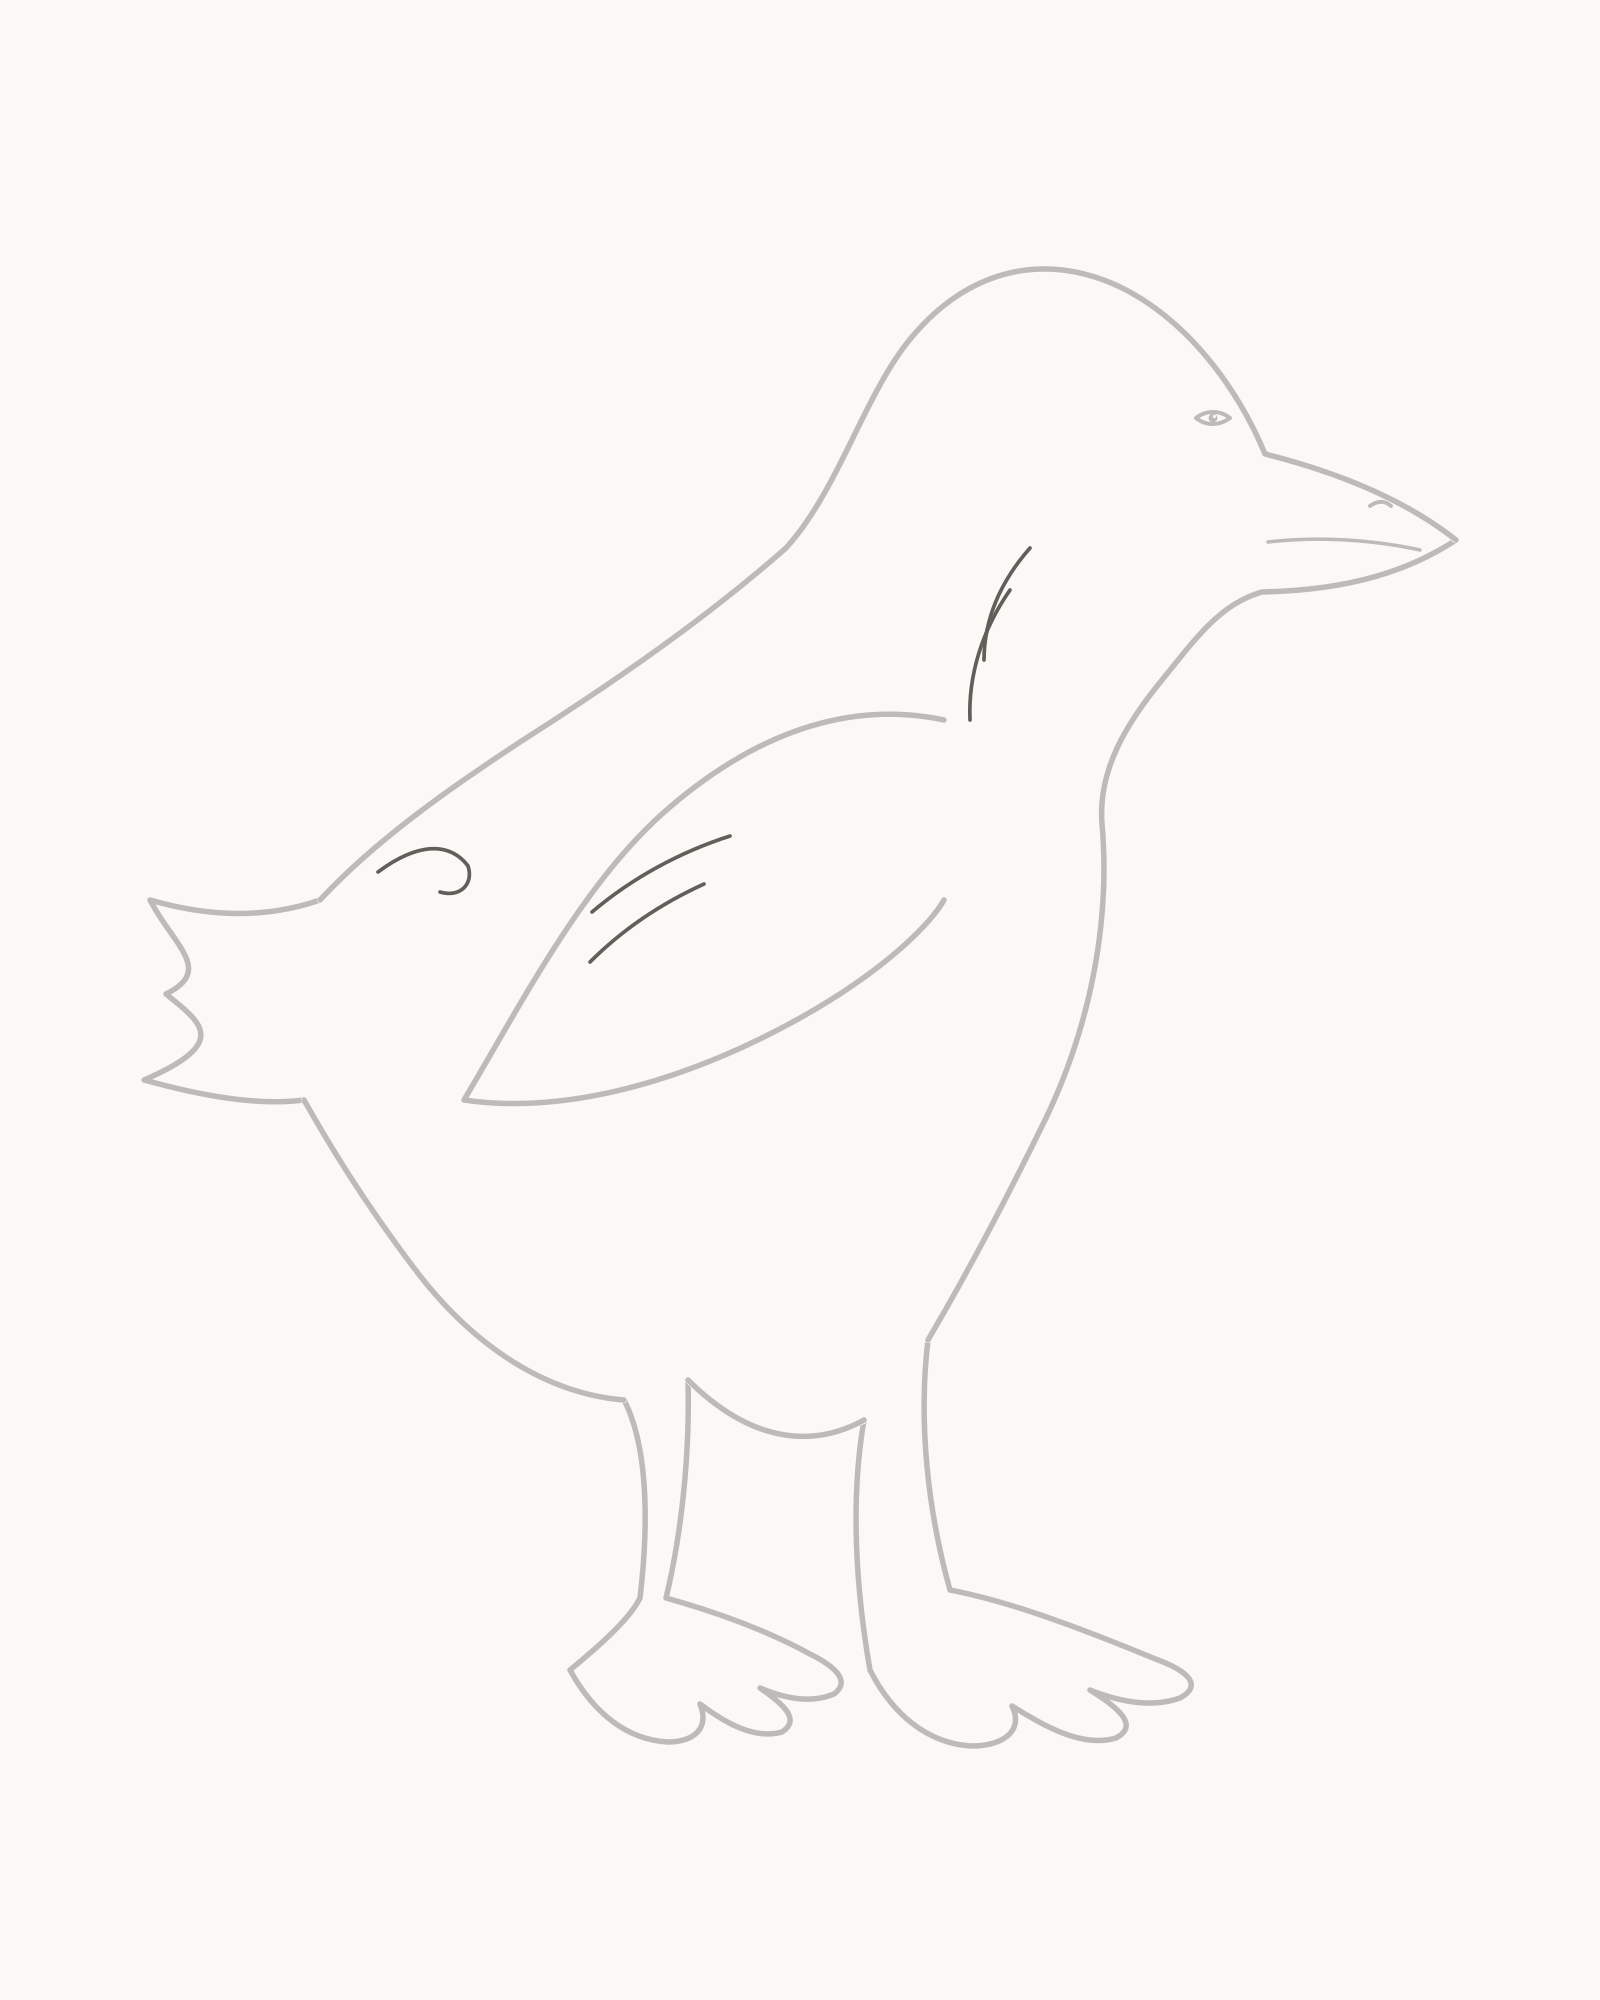
Stage 8 of 8. Five separate open curves clarify the adult male mallard without colour, fill or tonal modelling. - 2 open neck arcs
- 2 unequal wing bars
- 1 restrained tail curl
Add exactly five separate interior marks: two shallow neck-ring arcs, two short unequal wing-bar curves and one restrained curl above the attached tail fan. Work in that order so each group stays easy to count.
Keep all five curves open and surrounded by paper. The neck arcs do not meet to close a collar; the wing bars remain inside the near wing; and the rump curl neither touches the tail edge nor becomes a fourth tail point. These sparse lines help distinguish the adult male without depending on colour.
There is no shading in this stage. Do not hatch beside the marks, fill a colour patch, add repeated feather scallops or use an interior curve to cover a faulty wing or tail attachment. The geometry from Stage 7 remains fully visible.
Look for this before moving on: the new count is exactly two neck arcs + two wing bars + one tail curl = five open landmarks, every curve stays separate and non-tonal, and the silhouette still carries the drawing at first glance.
If it goes wrong: keep the complete Stage 7 drawing and every successful new landmark. Replace only the latest closed collar, touching wing bar, oversized curl or accidental extra line. A weak attachment should remain honest rather than being hidden under decoration.


Fix small construction problems
The duck looks like a duckling or rubber toy. Compare the compact head with the much longer body. Keep the bill wide and shallow, the eye small and the back low. Correct only the newest round or upright interval instead of enlarging the whole bird.
The bill seems pasted to the face. Trace the upper and lower edges back from their single shared tip. The forehead and throat should absorb those edges smoothly. Replace the newest abrupt junction rather than adding a dark outline around the bill.
The body looks unfinished after Stage 2. Point to both leg openings and the two tail roots. Stages 5 and 6 bridge the separate leg gaps; Stage 3 joins the tail roots. These intentional spaces should remain empty until their assigned forms arrive.
The tail resembles a crown. Check that all three unequal points sit between the fixed upper and lower rump roots. Shorten only the newest overlarge point and preserve a compact leftward fan instead of repeating identical spikes.
The wing looks like a loose leaf. Follow it from the forward shoulder root to the rear point and back to the lower root. Repair only the newest disconnected end. Darkening, feather texture or a mirrored second wing cannot create a genuine attachment.
The feet look pasted on or shoe-like. First confirm that each leg bridges its own belly opening. Then flatten the newest outer foot turn and recount the webbing: three points and two valleys per owner. Extra toe lines will not repair a missing ankle.
The far foot disappears. Begin at the rear body gap and trace the smaller support down. Restore only its newest hidden outer edge or crowded valley, leaving it subordinate to the near foot rather than scaling it up to match.
The last five marks resemble shading. Return to the two-plus-two-plus-one count. Preserve breathing room around the curves; replace only a recent hatch, joined shape or surplus stroke. The final duck remains entirely line-only.
Practise a different wing angle
On another sheet, repeat the duck at half size through Stage 3. Keep the same adult head, broad bill, long torso, three-point tail and planned leg openings. Then let the folded near wing's rear point sit slightly higher while keeping both shoulder roots fixed. That single controlled change tests attachment and balance without adding a second wing or changing the feet.
For another complete bird silhouette, continue with How to Draw a Bird. How to Draw a Fish is useful practice for a long profile, attached fins and controlled contour changes, while the full lesson directory is available at How to Draw.
Frequently Asked Questions
What is the easiest way to begin drawing a duck?
Place the whole upper silhouette before the eye, wing or feet. Compare the bill tip, crown, shoulder and upper tail root with the page, then connect them with one changing permanent contour.
How do I make this look like an adult mallard rather than a duckling?
Keep the head compact beside a long, low body. Use a broad shallow bill and one small eye instead of a round head, short triangular beak and oversized face. The final five open landmarks add adult-male cues without colour.
Why are there gaps under the body after Stage 2?
The two belly gaps belong to different legs and feet. Leaving their permanent endpoints open allows each support to connect cleanly when it arrives, without cutting through a closed body outline or covering an earlier mark.
Why is only one wing visible?
The duck is shown in strict side profile. The near folded wing is visible on the torso, while the far wing sits behind the body and is fully occluded. A second loop would contradict this viewpoint.
How many toe points should I draw?
Give the near webbed foot three unequal forward points in Stage 5, then add three more to the smaller far foot in Stage 6. The final total is six points and four shallow web valleys.
Are the five marks in the last stage shading?
No. They are two open neck arcs, two open wing bars and one open tail curl. Do not fill, hatch or blend around them; the finished result is still a line drawing.
Is the placement grid required?
No. It is an optional comparison tool that defaults off. Leave it off if judging positions directly feels comfortable, and do not copy the grid itself into the duck.
Should I erase guides or darken the finished outline?
Neither is part of this sequence. Every illustrated mark remains. Correct only the newest faulty segment before proceeding, and leave settled contours at their existing strength instead of tracing over the completed bird.
References
- Cornell Lab of Ornithology, Mallard identification. View source
- RSPB, Mallard. View source
- Audubon, Mallard field guide. View source
More DRAWING Guides

How to Draw a Rose: A Step by Step Guide

How to Draw a Tree: A Step by Step Guide

How to Draw Eyes: A Step by Step Guide

How to Draw Leaves: A Step by Step Guide

How to Draw Autumn Leaves: A Step by Step Guide

How to Draw Flowers: A Step by Step Guide

How to Draw a Lily: A Step by Step Guide

How to Draw a Sunflower: A Step by Step Guide

How to Draw a Tulip: A Step by Step Guide

How to Draw a Hibiscus: A Step by Step Guide

How to Draw a Daisy: A Step by Step Guide
