



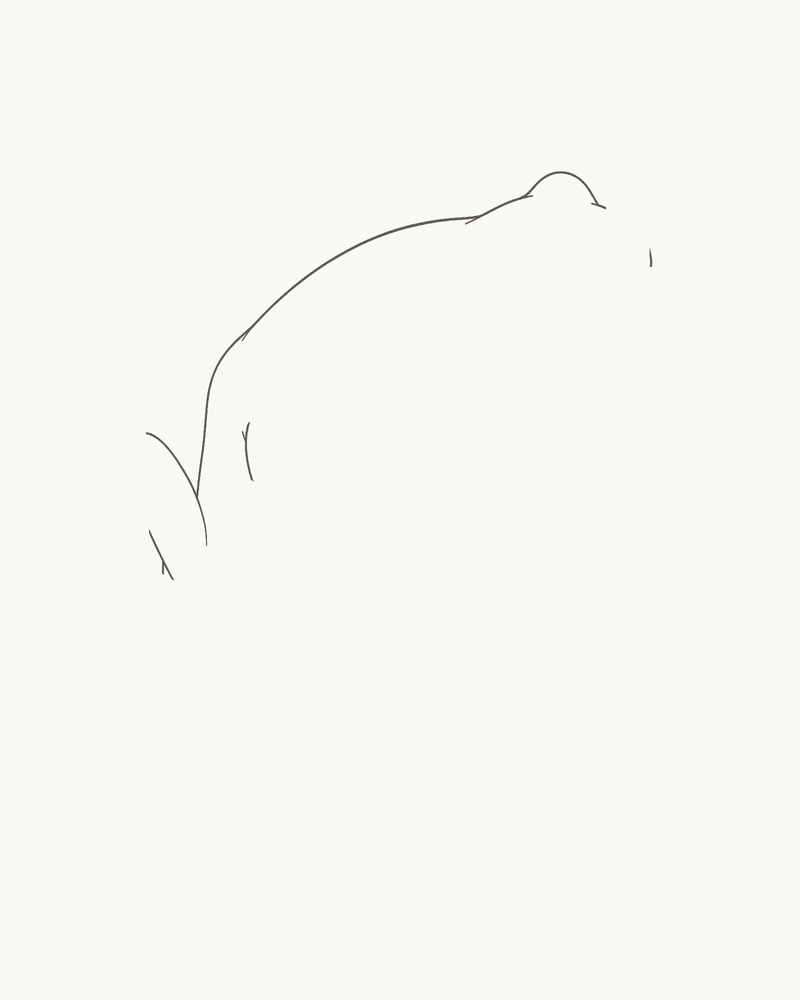
Draw one complete adult ground frog
Draw a complete adult ground frog crouching on an invisible dry surface and facing right. The eight stages build a broad head and compact body, attach four separately owned limbs, set one visible eye and finish with five quiet anatomy lines. The result is a clean line drawing without colour, skin texture or shading.
Difficulty: Beginner to intermediate
Time: Allow about 45–60 minutes. This is an explicitly untested editorial estimate, not a measured drawing session.
Medium: A pointed HB or No. 2 graphite pencil on smooth, unlined paper.
The folded hind legs and four small feet deserve more attention than the face. Each opening in the early contour belongs to a particular limb, and every mark accepted in one stage remains unchanged in the stages that follow. There is no body oval to erase, no outline to retrace and no texture used to hide a difficult joint.
This lesson uses a species-neutral adult rather than borrowing the distinctive pads, colours or proportions of one named frog. The American Museum of Natural History describes adult frogs in broad terms as short-bodied, neckless and tailless animals with powerful legs, while also stressing how much species vary. Those relationships are useful drawing checks: the head should flow into the body without a collar, the rear limbs should carry real visual weight, and a tail should not project from the adult silhouette.
The eye is small but structurally important. AMNH notes that most frogs have bulging eyes positioned on top of the head. Here, the visible eye sits inside a raised mound already established by the outer contour. It is not a circle balanced above the skull. The low three-quarter side view hides the far eye and makes the near side of the body slightly broader, so the finished frog does not become a symmetrical mascot.
The University of Michigan's Animal Diversity Web connects frogs' jumping ability with specialised hind-limb and ankle structure. You do not need anatomical labels to complete this lesson, but you do need to preserve a readable route from hip to knee, lower leg, heel, foot and toes. That is why the two hind limbs receive a full stage each and why scenery is not allowed to cover their attachments.
Materials
- Choose a sharp HB, an ordinary No. 2, or a mechanical pencil fitted with 0.5–0.7 mm lead.
- Use one vertical sheet with a smooth, unruled white or warm-white surface; inexpensive office stock works for a trial drawing.
- Keep a clean eraser nearby, but limit it to correcting the short section you have just added. The sequence has no planned erasing pass.
- A pencil sharpener.
- A scrap of paper for rehearsing one bent hind leg or a splayed foot before adding it to the drawing.
- An optional ruler for comparing the percentage cue or the separate grid with the paper edges. Do not use it to rule any part of the frog.
No tracing paper, compass, marker, blending tool, specialist graphite set, paint or printable is needed. Use light-to-moderate pressure and keep the line narrow enough for the small toe separations to remain clear. The illustrated stages use clean digital line; they do not simulate paper grain, graphite dust or a physical drawing session.
Before you draw
Turn the page vertically. The blunt snout points to the right, the rear hip sits to the left, and all four feet settle low on one imagined floor. Leave clear paper in front of the nose, above the eye mound, around the toes and behind the bent rear legs.
The optional placement grid begins switched off. If you want an extra comparison, locate the snout near x88% / y34%, the high point of the eye mound near x73% / y18%, the far-hind roots near x37% / y42% and x30% / y55%, and the upper near-hind root near x36% / y61%. These percentages describe the page, not measurements to draw as dots or guides.
“Near” identifies the side facing you; “far” identifies the partly hidden side. The far limbs are a little slimmer or smaller and sit behind their near partners. Four limb openings will appear around the body. Each is a deliberate pair of endpoints, not an unfinished patch to be closed and reopened.
The lesson keeps permanent contours throughout. When a fresh curve is inaccurate, replace only that newest section before moving on. Leave settled lines at their existing weight. The reserved upper-left light direction is only a consistency note: no cast shadow, hatch or tonal modelling appears in this line-only version.
1. Set the upper head, back and rear hip
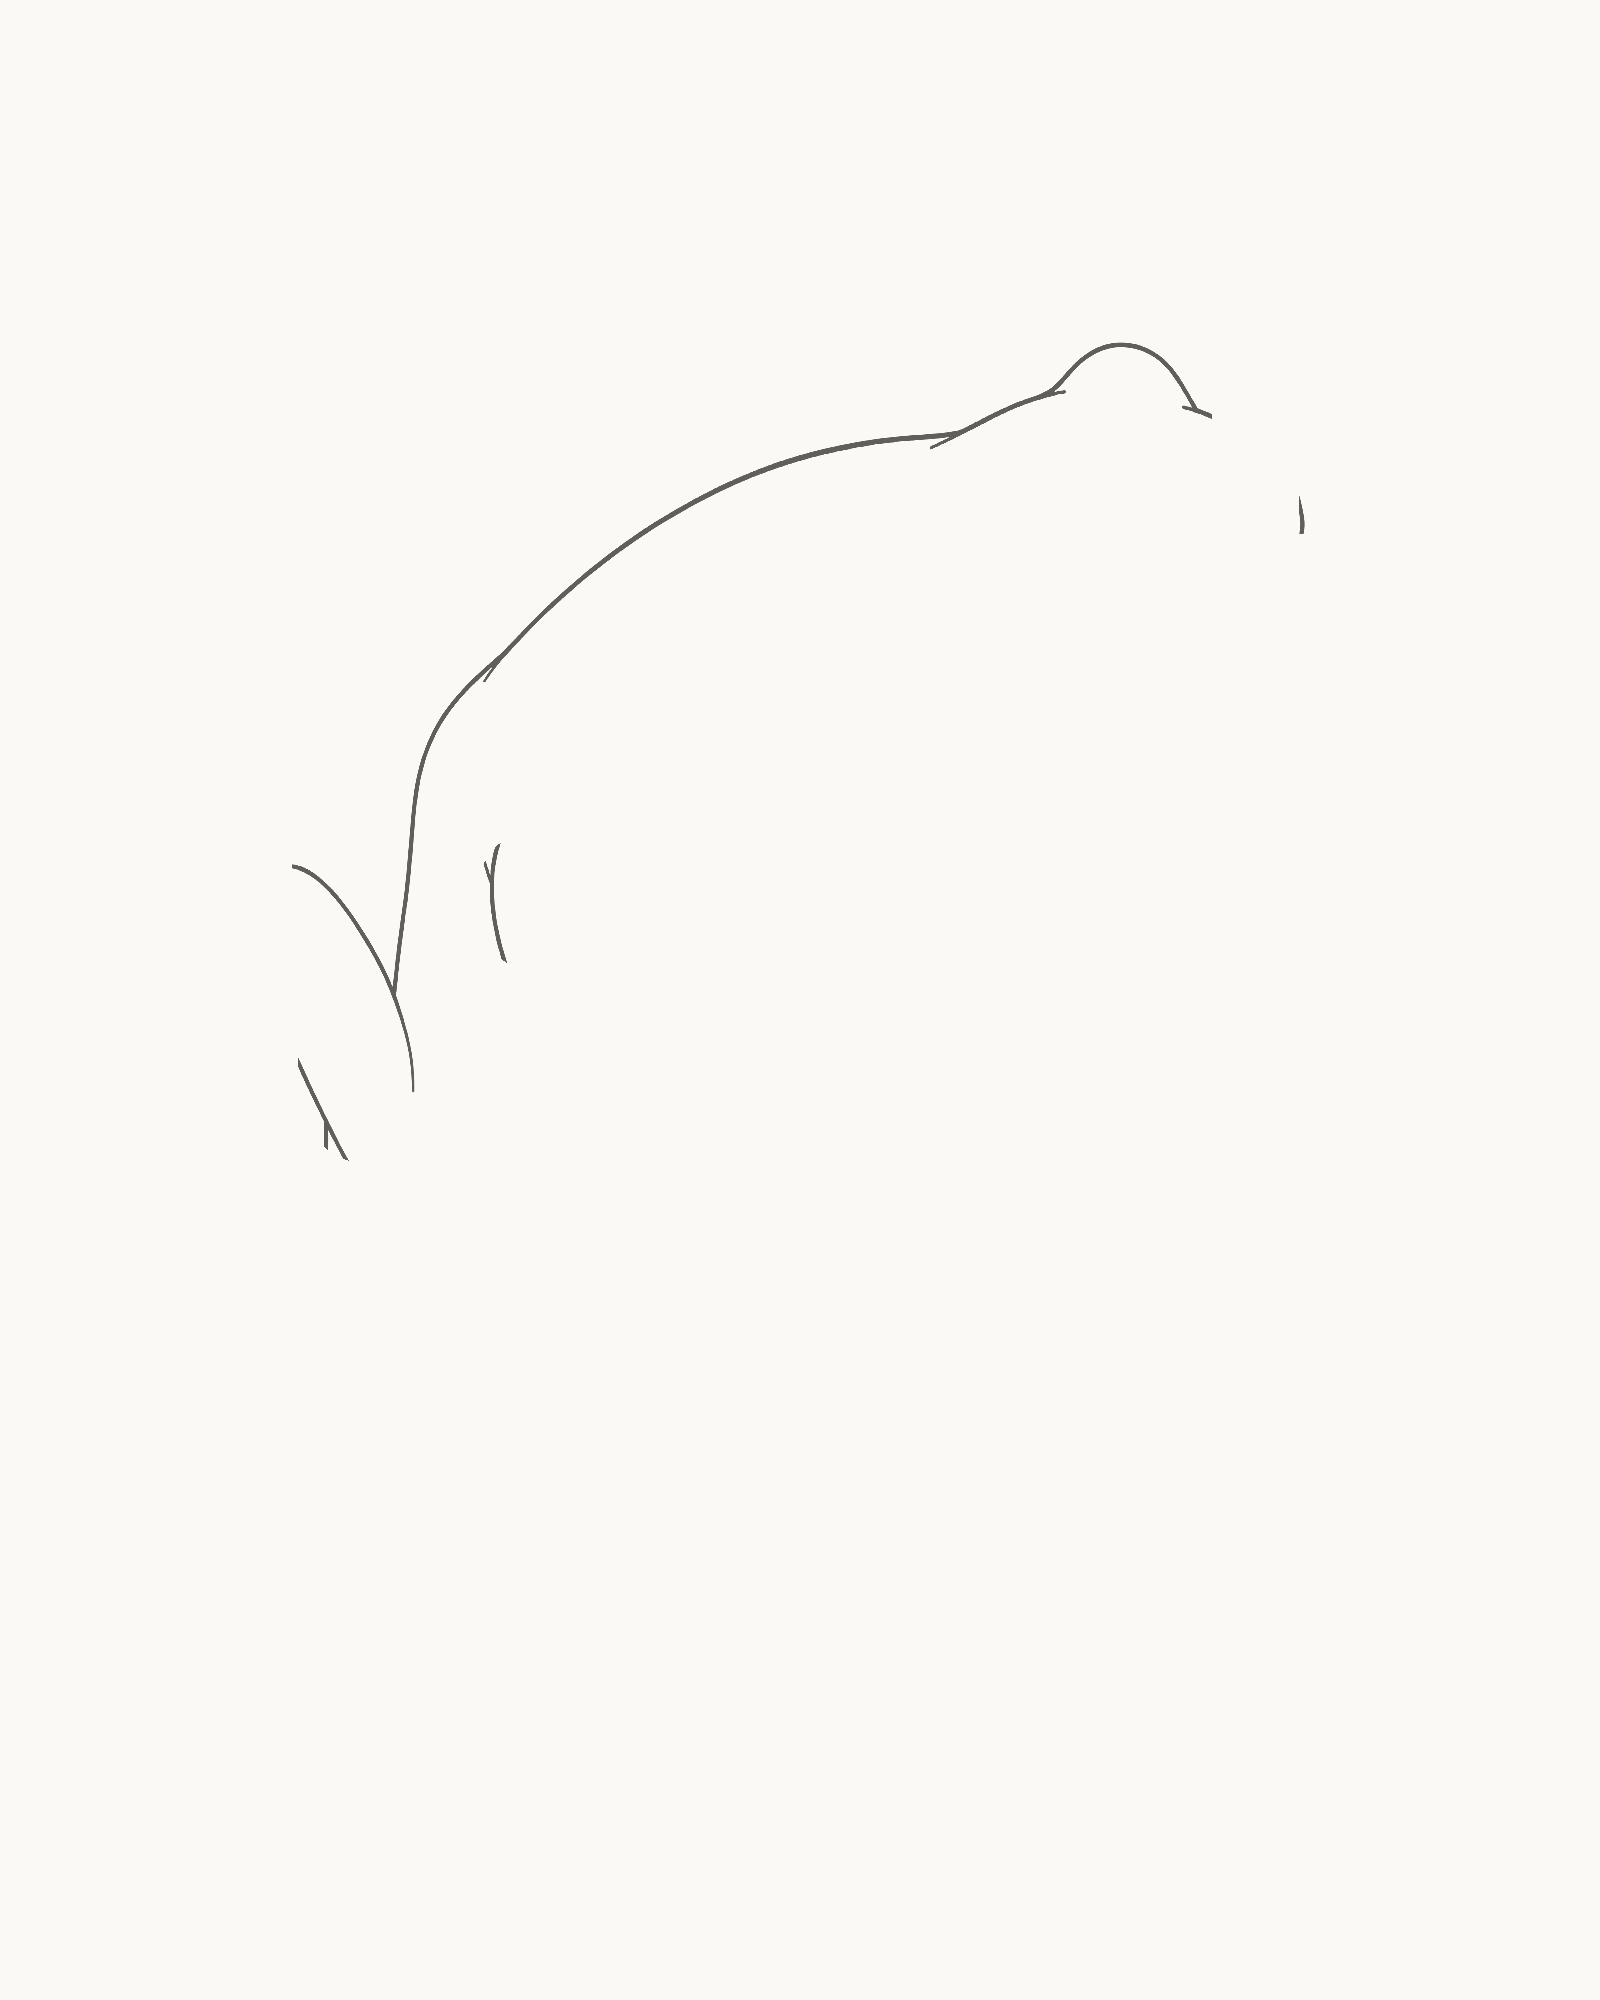
Stage 1 of 8. Two permanent upper intervals establish the head, eye mound, back, rear hip and hind-limb roots. 12345- 1 Snout x88% / y34%
- 2 Eye mound x73% / y18%
- 3–4 Far-hind roots x37% / y42% and x30% / y55%
- 5 Near-hind root x36% / y61%
Placement cue: compare these positions with the portrait page. Keep every number and point off the drawing. - Snout and eye mound
- Crown and back
- Far-hind opening
- Rear hip and near-hind root
Begin at the snout on the right. Work through the upper contour in controlled sections: shape the short upper snout, rise into the near-eye mound, pass across the crown and carry the back leftward to the upper far-hind root. Keep the head broad and low, with the mound joined naturally to it rather than perched above it.
For the second interval, start at the lower far-hind root, round the rear hip and stop at the upper near-hind root. Do not join the two endpoints across the far-hind opening. The rear turn should feel fuller than the head but should not become a separate mammal-like haunch.
The Stage 1 cue is snout to the right; eye mound joined to the upper head; both rear openings reserved. Use the long back to establish calm direction and the two short stops to establish ownership for the limbs that arrive later.
Look for this before moving on: the frog faces right, the eye mound grows from the head, the back flows into a compact high rear hip, both hind attachment spaces are intentional, and no contour or endpoint feels crowded by the page edge.
If it goes wrong: protect the interval that already works. Replace only the newest pointed nose, detached mound, stiff back bend or over-round hip between two stable points. Do not connect either hind opening simply to make the body look more finished.
2. Add the jaw, chest and belly intervals
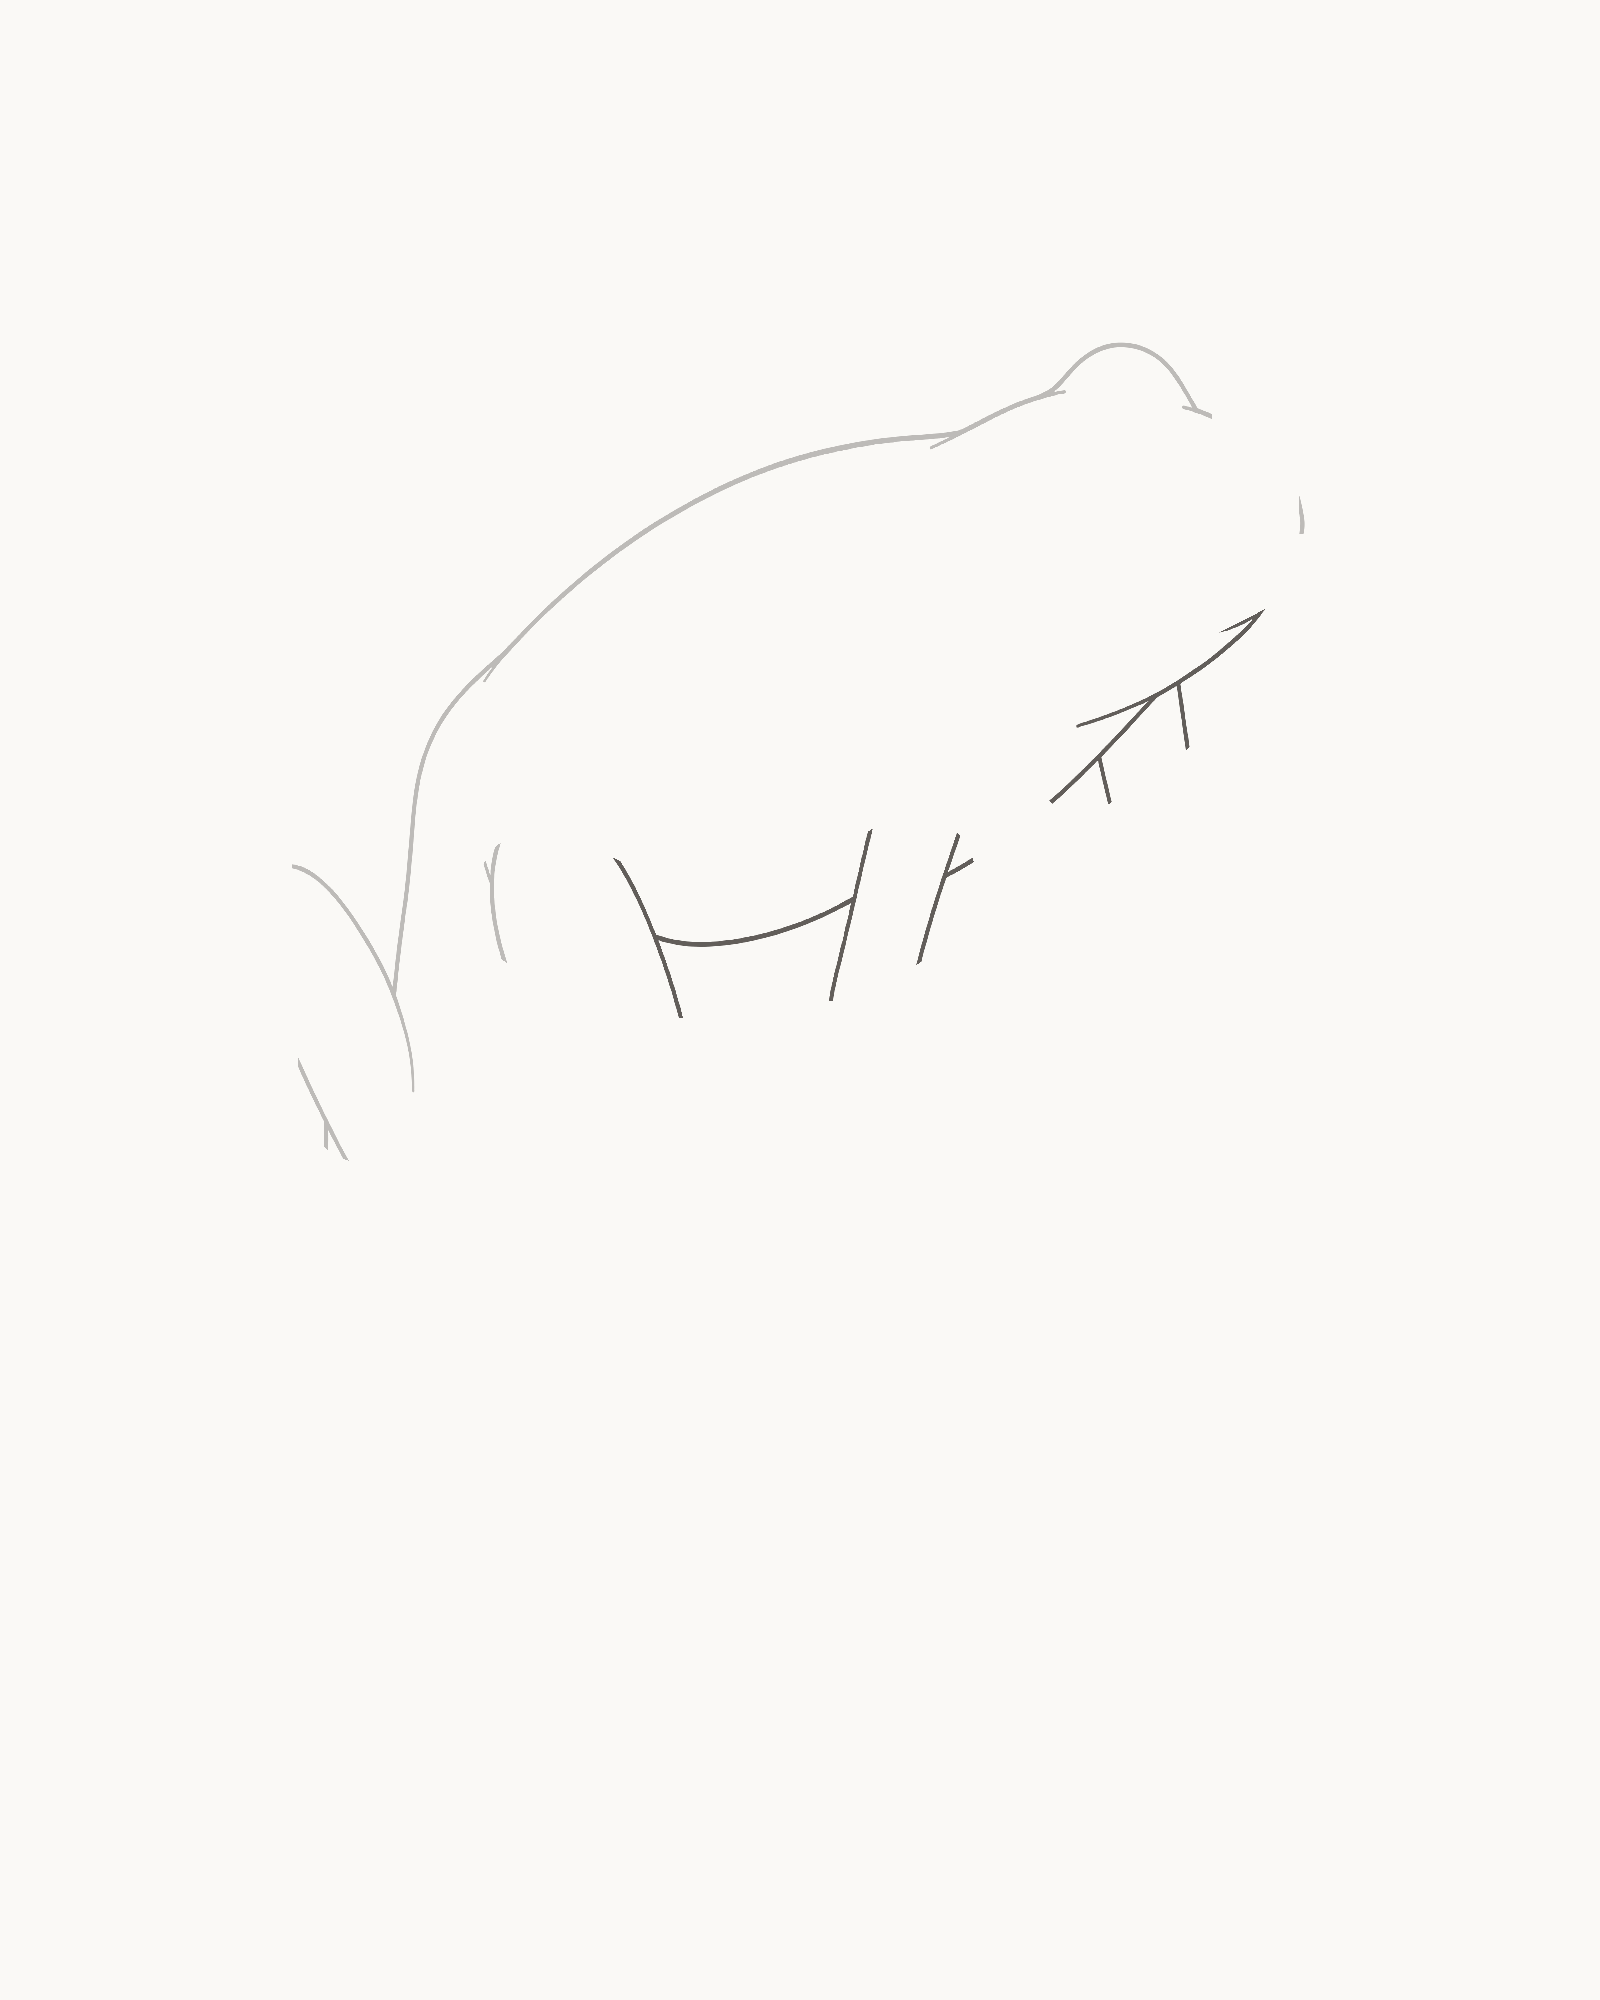
Stage 2 of 8. Three lower intervals complete the neckless body while preserving the far-fore, near-fore and near-hind openings. - Snout → jaw/chest → far-fore opening
- Far-fore lower root → near-fore upper root
- Near-fore lower root → belly → near-hind root
Return to the exact Stage 1 snout point. Draw the lower edge in this order: snout → lower jaw and chest → far-fore opening. Let the jaw pass into the chest without pinching a neck. Stop cleanly at the upper root of the far foreleg.
Next, draw the short interval from the lower far-fore root to the upper near-fore root. Then make the third interval from the lower near-fore root along the short, flatter belly to the lower near-hind root. The three fresh intervals complete the body mass while leaving separate spaces for the two forelegs and the near hind leg.
These gaps are planned permanent endpoints. They are not temporary breaks, and the body is not a closed oval waiting to be cut open. Later limbs bridge only their assigned pairs; no accepted contour is erased, shifted or traced over.
Look for this before moving on: upper and lower snout edges meet once, the head enters the torso without a collar, the belly is shorter and flatter than the back, and you can point separately to the far-fore, near-fore and near-hind openings.
If it goes wrong: leave Stage 1 and every successful new interval untouched. Replace only the latest doubled snout, pinched chest, ballooned belly or wrongly closed endpoint. Resolve a faulty new stop now instead of planning to rub through an older line later.
3. Build the smaller far hind leg
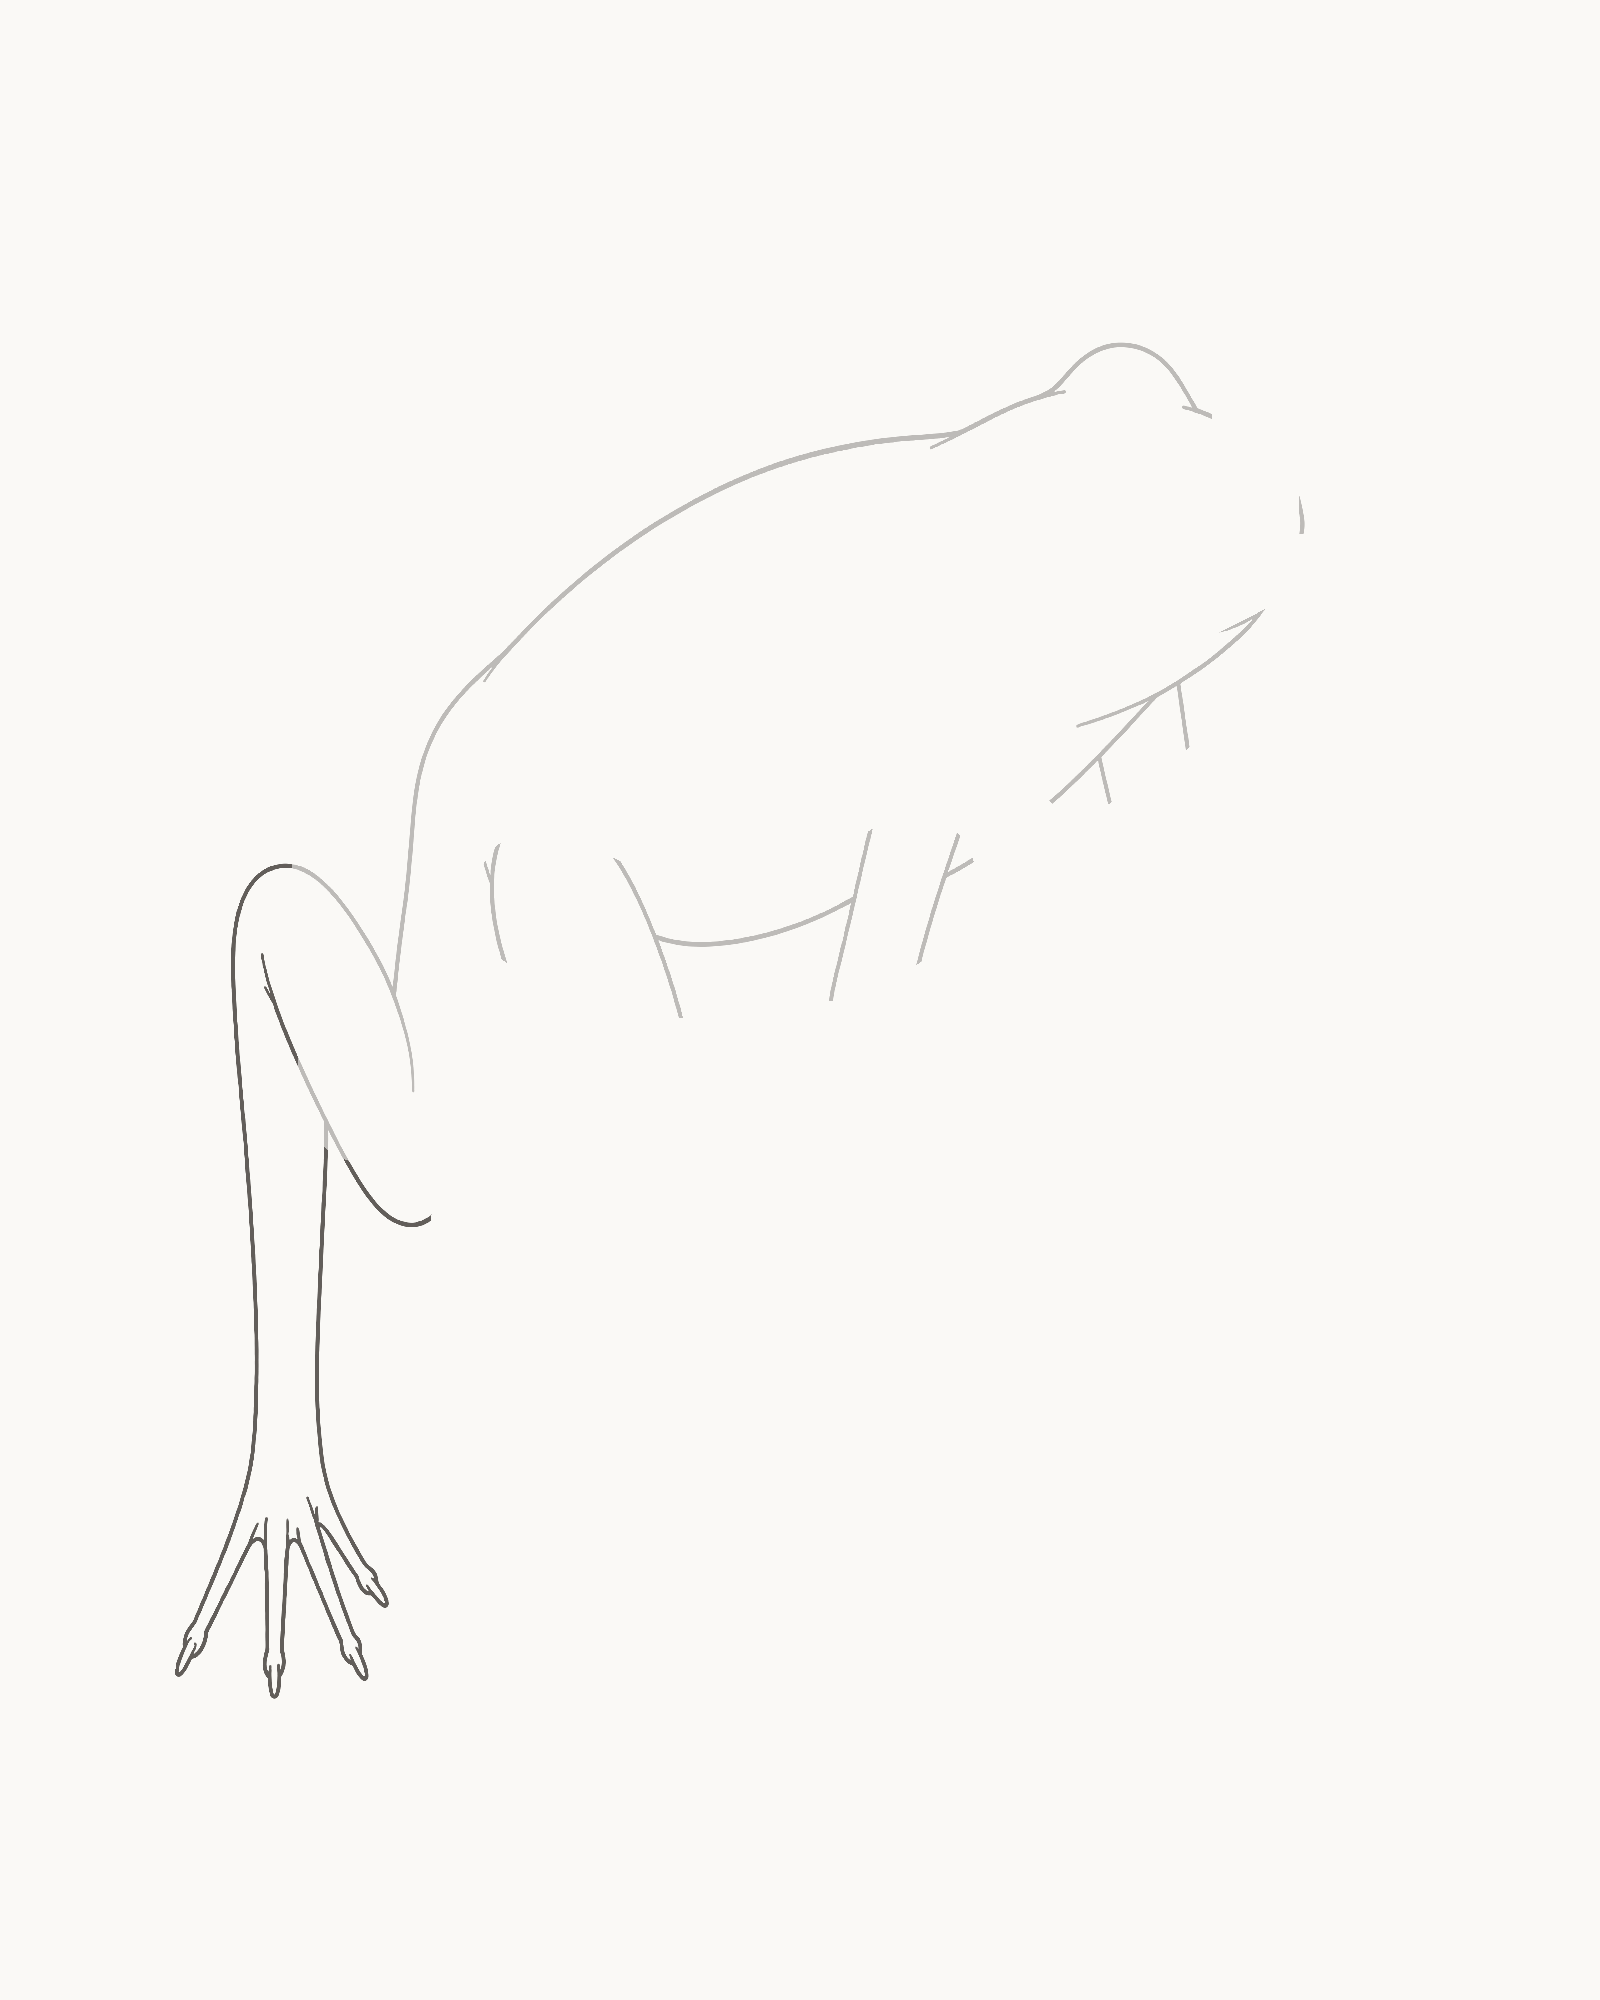
Stage 3 of 8. The subordinate far-hind chain bridges its fixed roots and reaches a four-tip foot on the invisible floor. - Bridge the far-hind roots
- Turn thigh into knee
- Fold lower leg to heel
- Set foot with 4 tips
Use only the far-hind opening at the left of the body. From its upper root, turn the thigh down and left towards the knee, fold the lower leg back towards the heel, then carry a long support down to the smaller far foot. Return through the other side of the limb until it meets the lower root.
Shape exactly four visible tapered digit tips on this far foot. The fourth is intentionally shorter and slightly higher than its neighbours, but it must still be possible to follow it to the same foot. Do not add a round pad, webbed fan or fifth visible tip to make the group more regular.
The full owner should read as one route: root, thigh, knee, lower leg, heel, foot and four tips. It sits behind the near hind leg that will arrive next, yet reaches the same invisible lower ground band.
Look for this before moving on: both fixed rear roots are connected by one traceable folded chain, the foot reaches the implied floor, four separate tips can be counted, and the new limb does not attach to the belly or float beside the hip.
If it goes wrong: keep the body and any sound part of the new limb. Replace only the newest reversed bend, disconnected support, floating foot or crowded digit. Do not lengthen an older body contour to chase a misplaced leg.
4. Add the dominant near hind leg
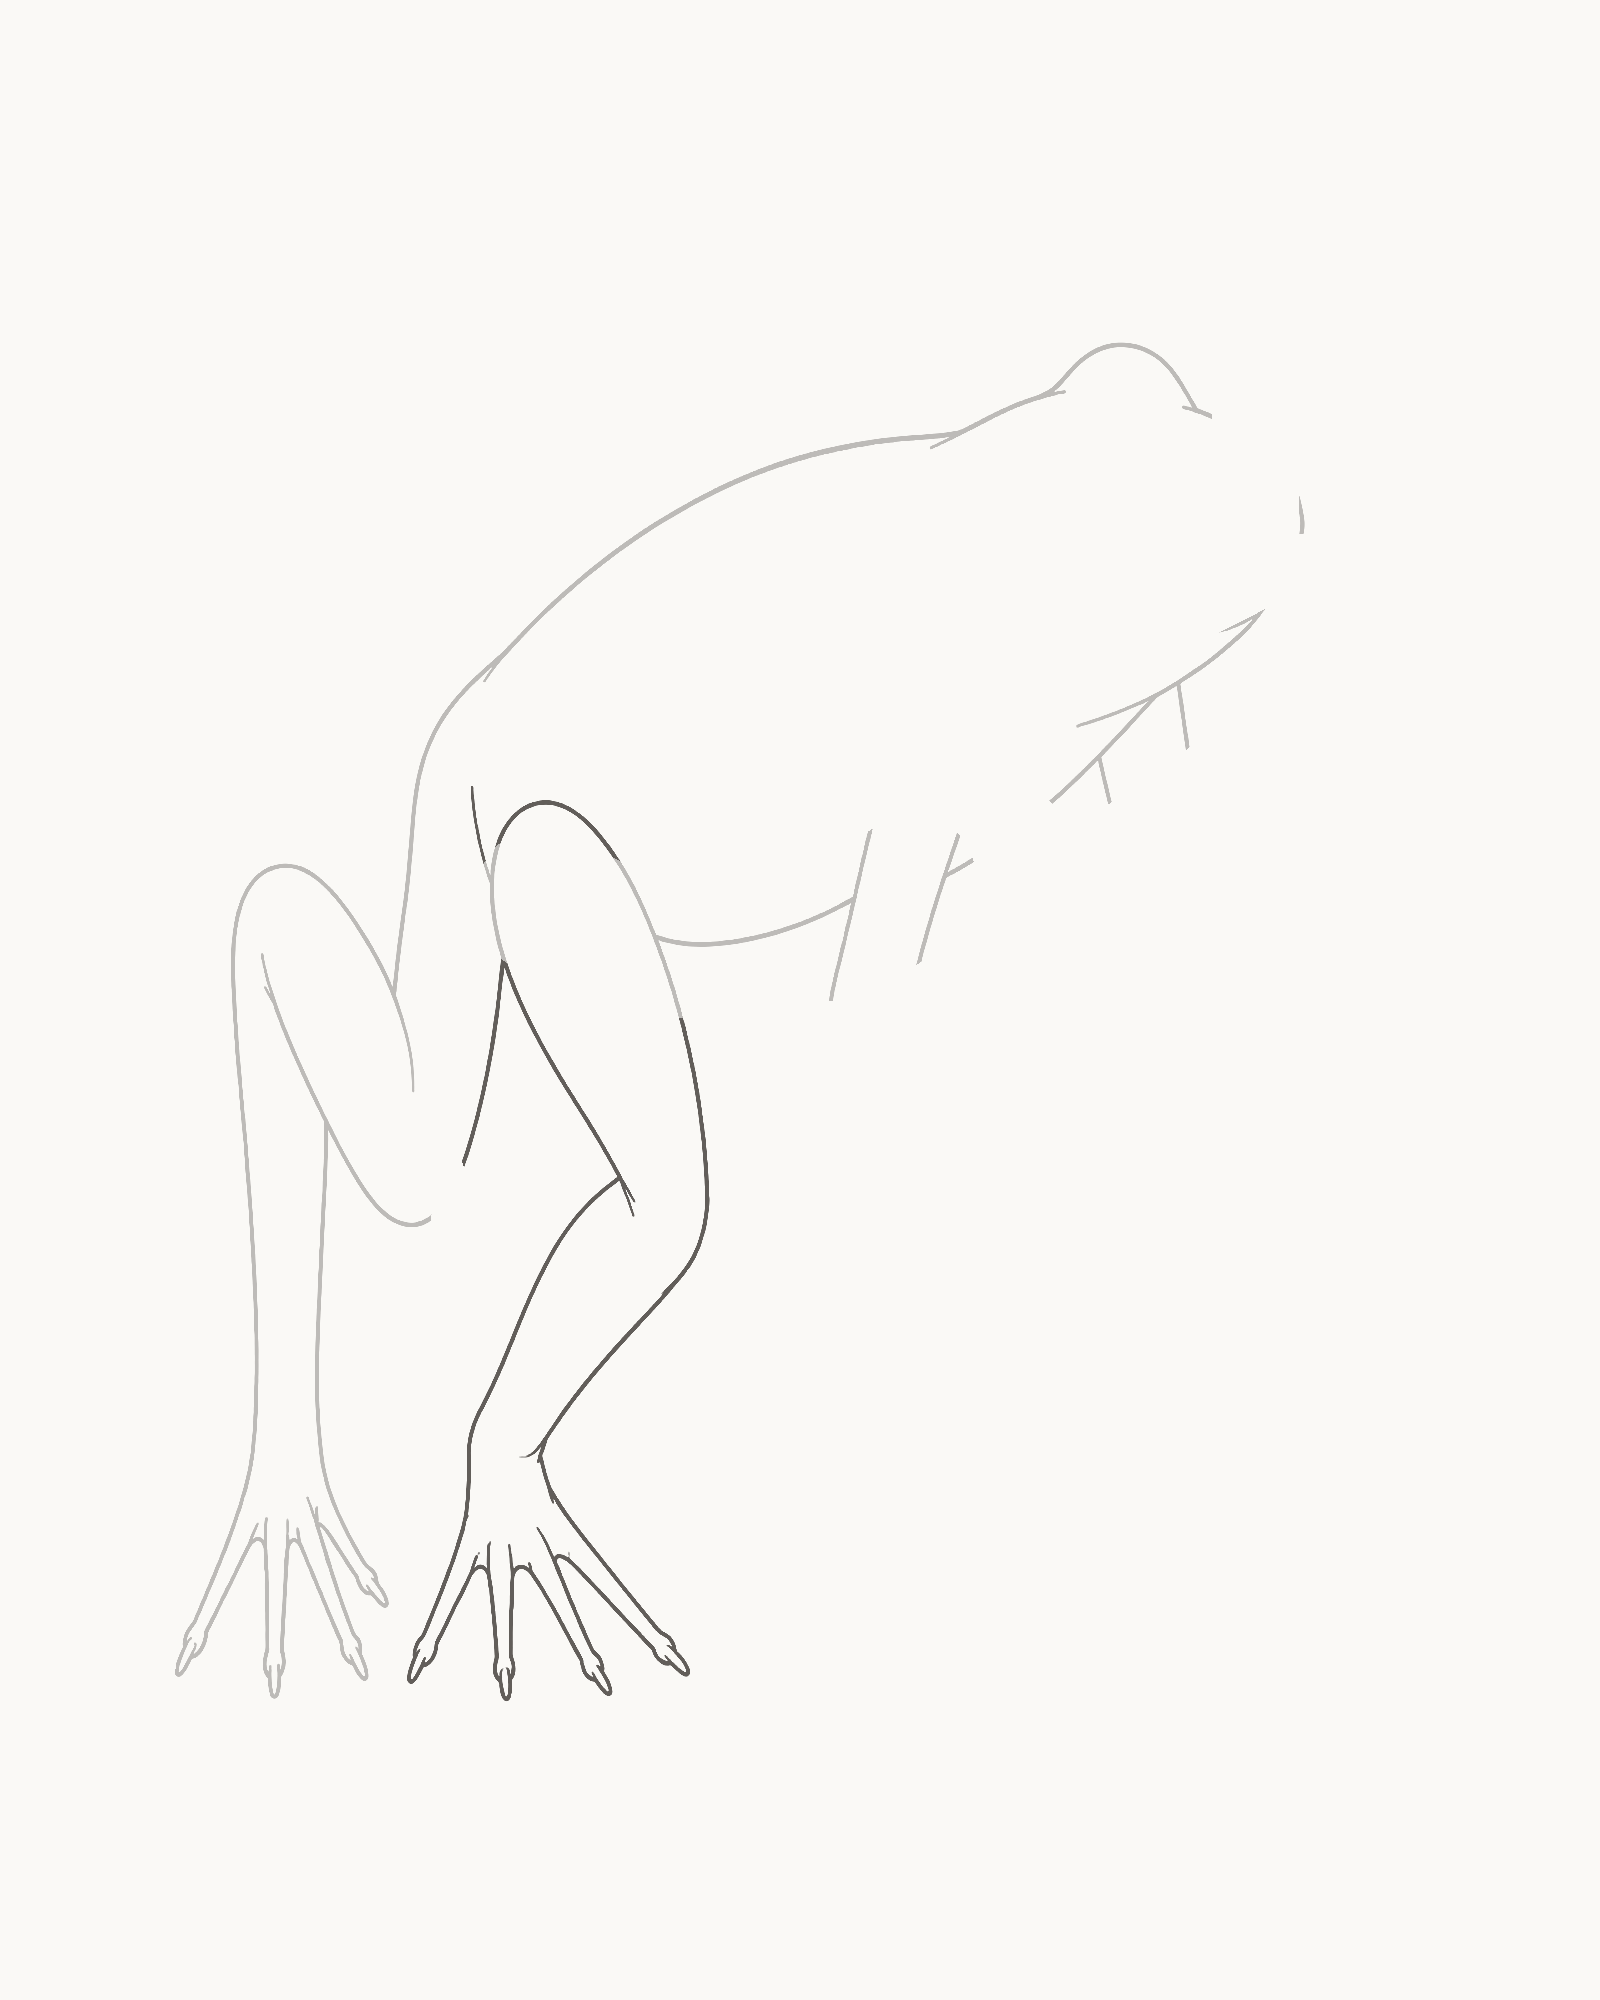
Stage 4 of 8. The larger near-hind Z-chain remains separate from the far owner and completes nine visible hind tips. - Bridge the near-hind roots
- Shape thigh and knee
- Fold lower leg to heel
- Set larger foot with 5 tips
Now bridge the near-hind opening with the larger visible leg. Let the upper thigh swell down and forward towards its knee, fold the lower leg back towards the heel, then turn the foot right along the same imagined floor as the far foot. Return to the lower near-hind root without crossing the accepted limb behind it.
Give this larger foot exactly five visible tapered tips. Change their length and spacing gently rather than setting them out like a comb. The near leg should read as a continuous Z-shaped fold, with enough open paper between the two hind feet to keep their ownership clear.
At this point the rear pair contains nine visible tips: four on the smaller far foot and five on the dominant near foot. That is a viewpoint count for this drawing, not a general anatomy claim.
Look for this before moving on: both near-hind roots meet, the thigh, knee, lower leg and heel form one believable route, the larger foot rests beside rather than over the far foot, and the two owners retain a four-plus-five count.
If it goes wrong: preserve Stage 3. Replace only the latest near-limb turn, misplaced heel, crossing foot edge or incorrect fifth tip. Avoid making both legs match; their unequal scale and angles are what establish depth.
5. Place the slender far foreleg
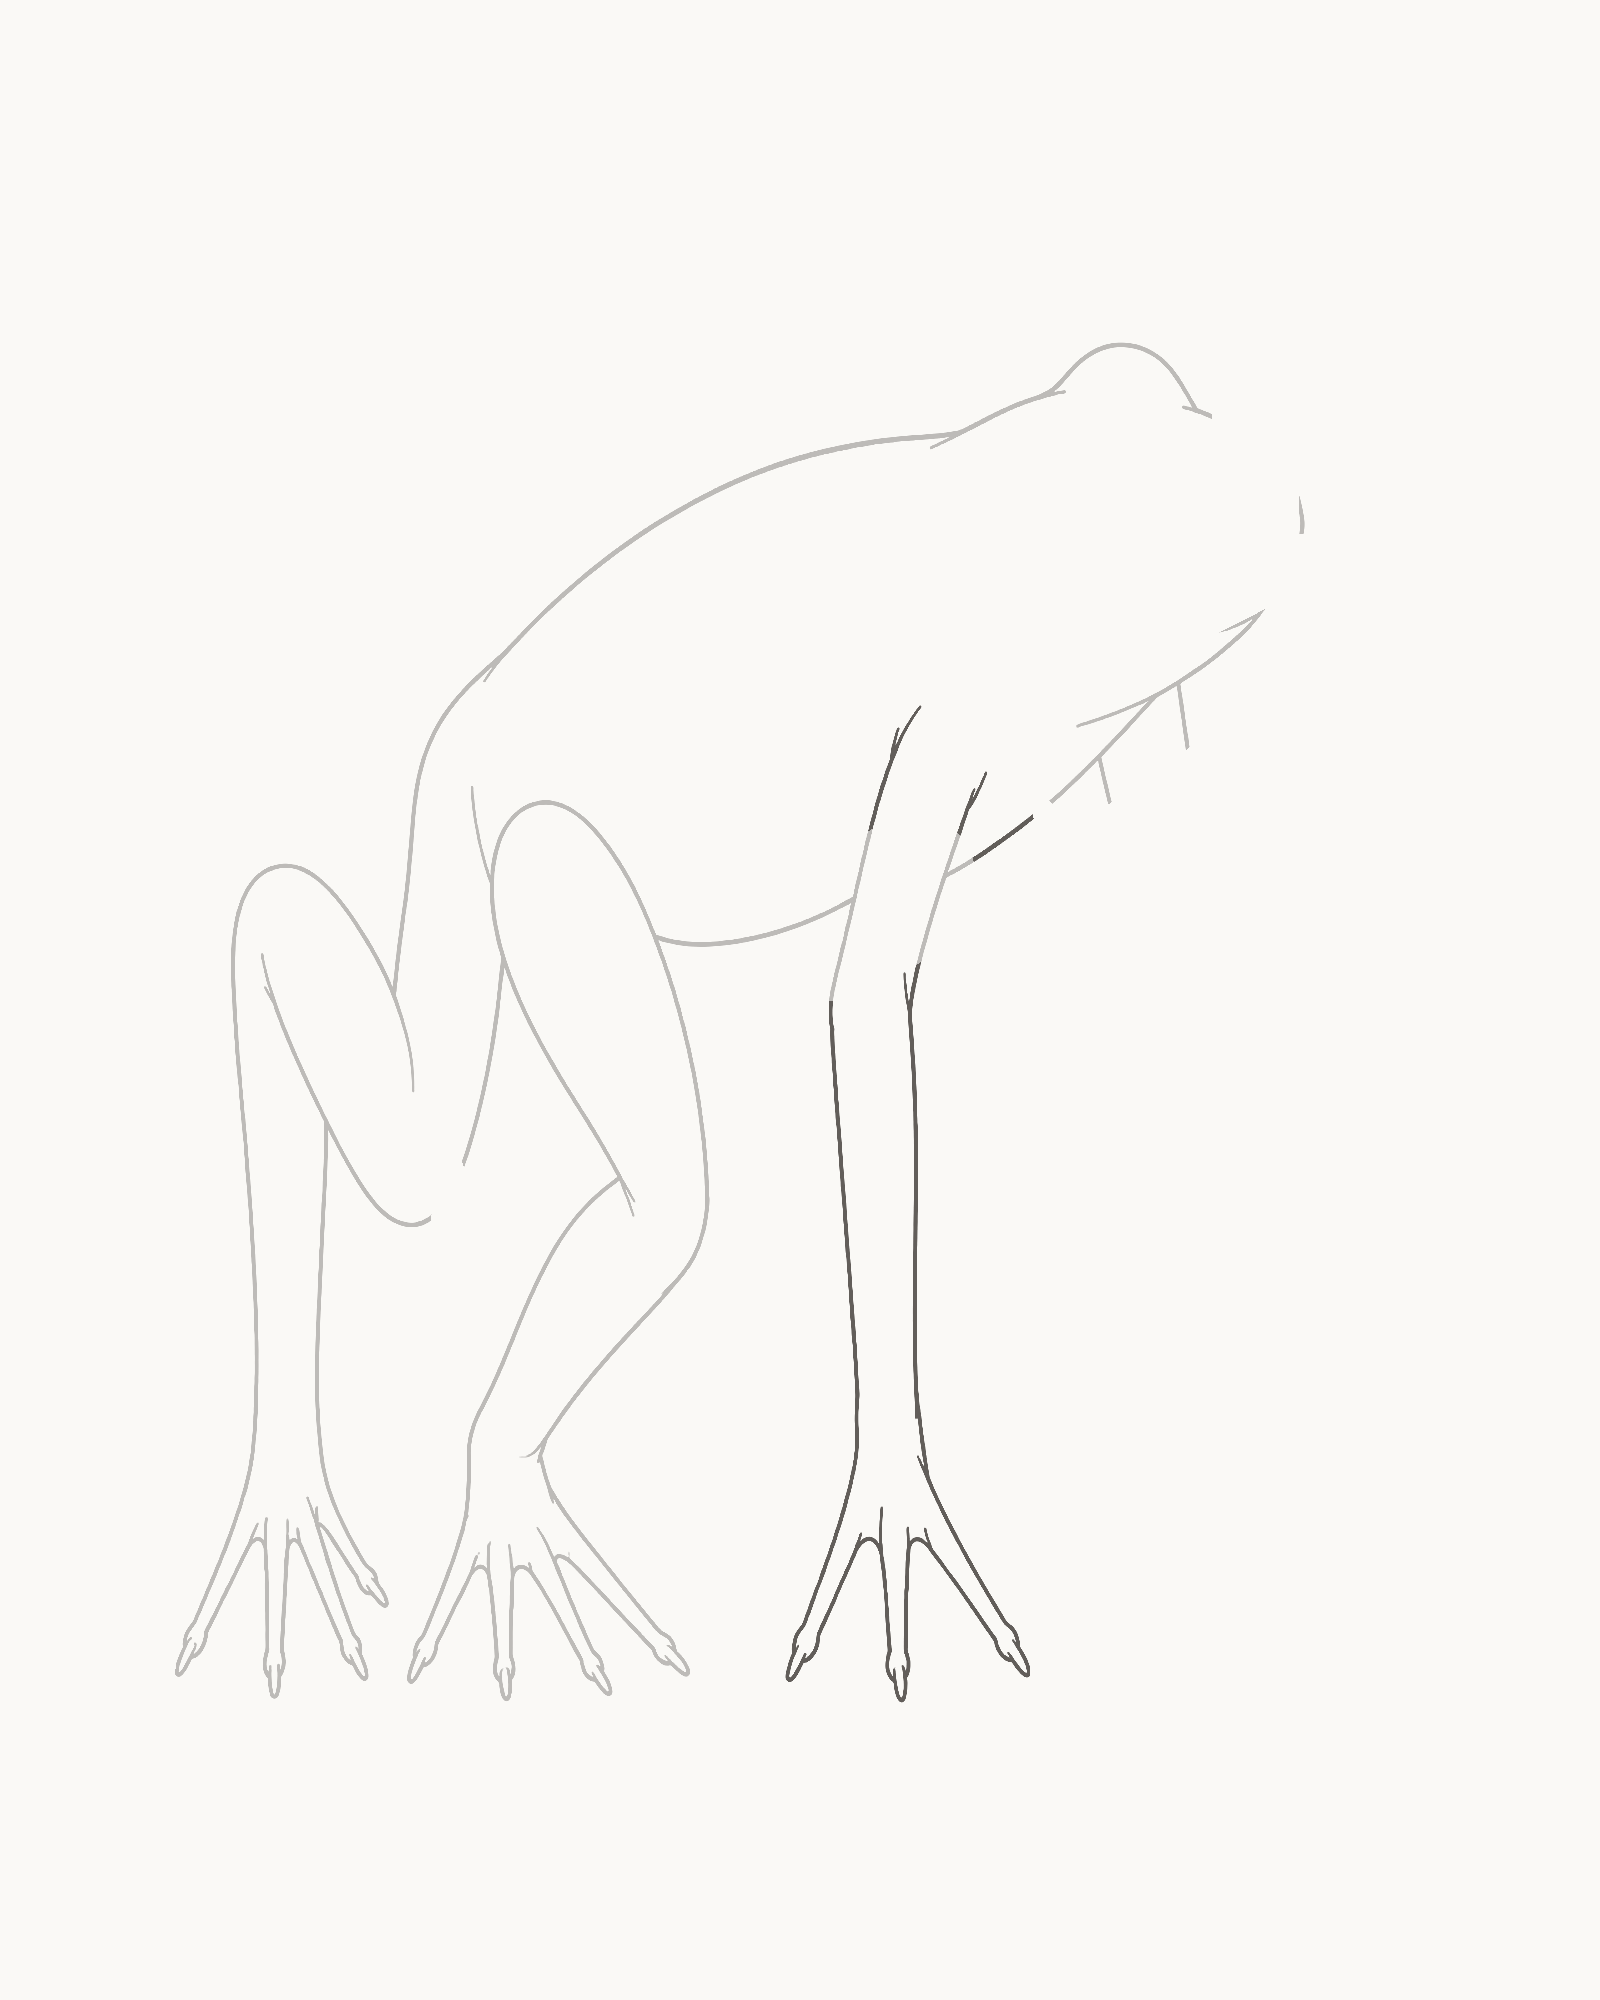
Stage 5 of 8. One slim far support closes only its assigned chest gap and adds a separate three-tip forefoot. - Join the far-fore roots
- Carry the slim support down
- Finish with 3 visible tips
Find the higher of the two chest openings. Join its two roots with the far foreleg, letting the narrow support descend a little left before it reaches its own small foot. The two sides must return to different roots; they should not collapse into one central post.
Add exactly three visible tapered tips to the far forefoot. Keep this support behind the near body plane and slightly slimmer than the foreleg still to come. Although its upright reach is long, its attachment remains readable from chest to foot, and the foot settles on the same lower band as both hind feet.
Look for this before moving on: the far foreleg closes only its assigned gap, both root contacts are visible, the foot is separate from the hind feet, three tips can be traced to it, and no lower end hovers above the invisible floor.
If it goes wrong: hold the body and hind limbs still. Replace only the newest floating root, bowed support, pasted foot turn or extra tip. Do not thicken the leg or merge its sides to conceal a weak attachment.
6. Complete the near foreleg
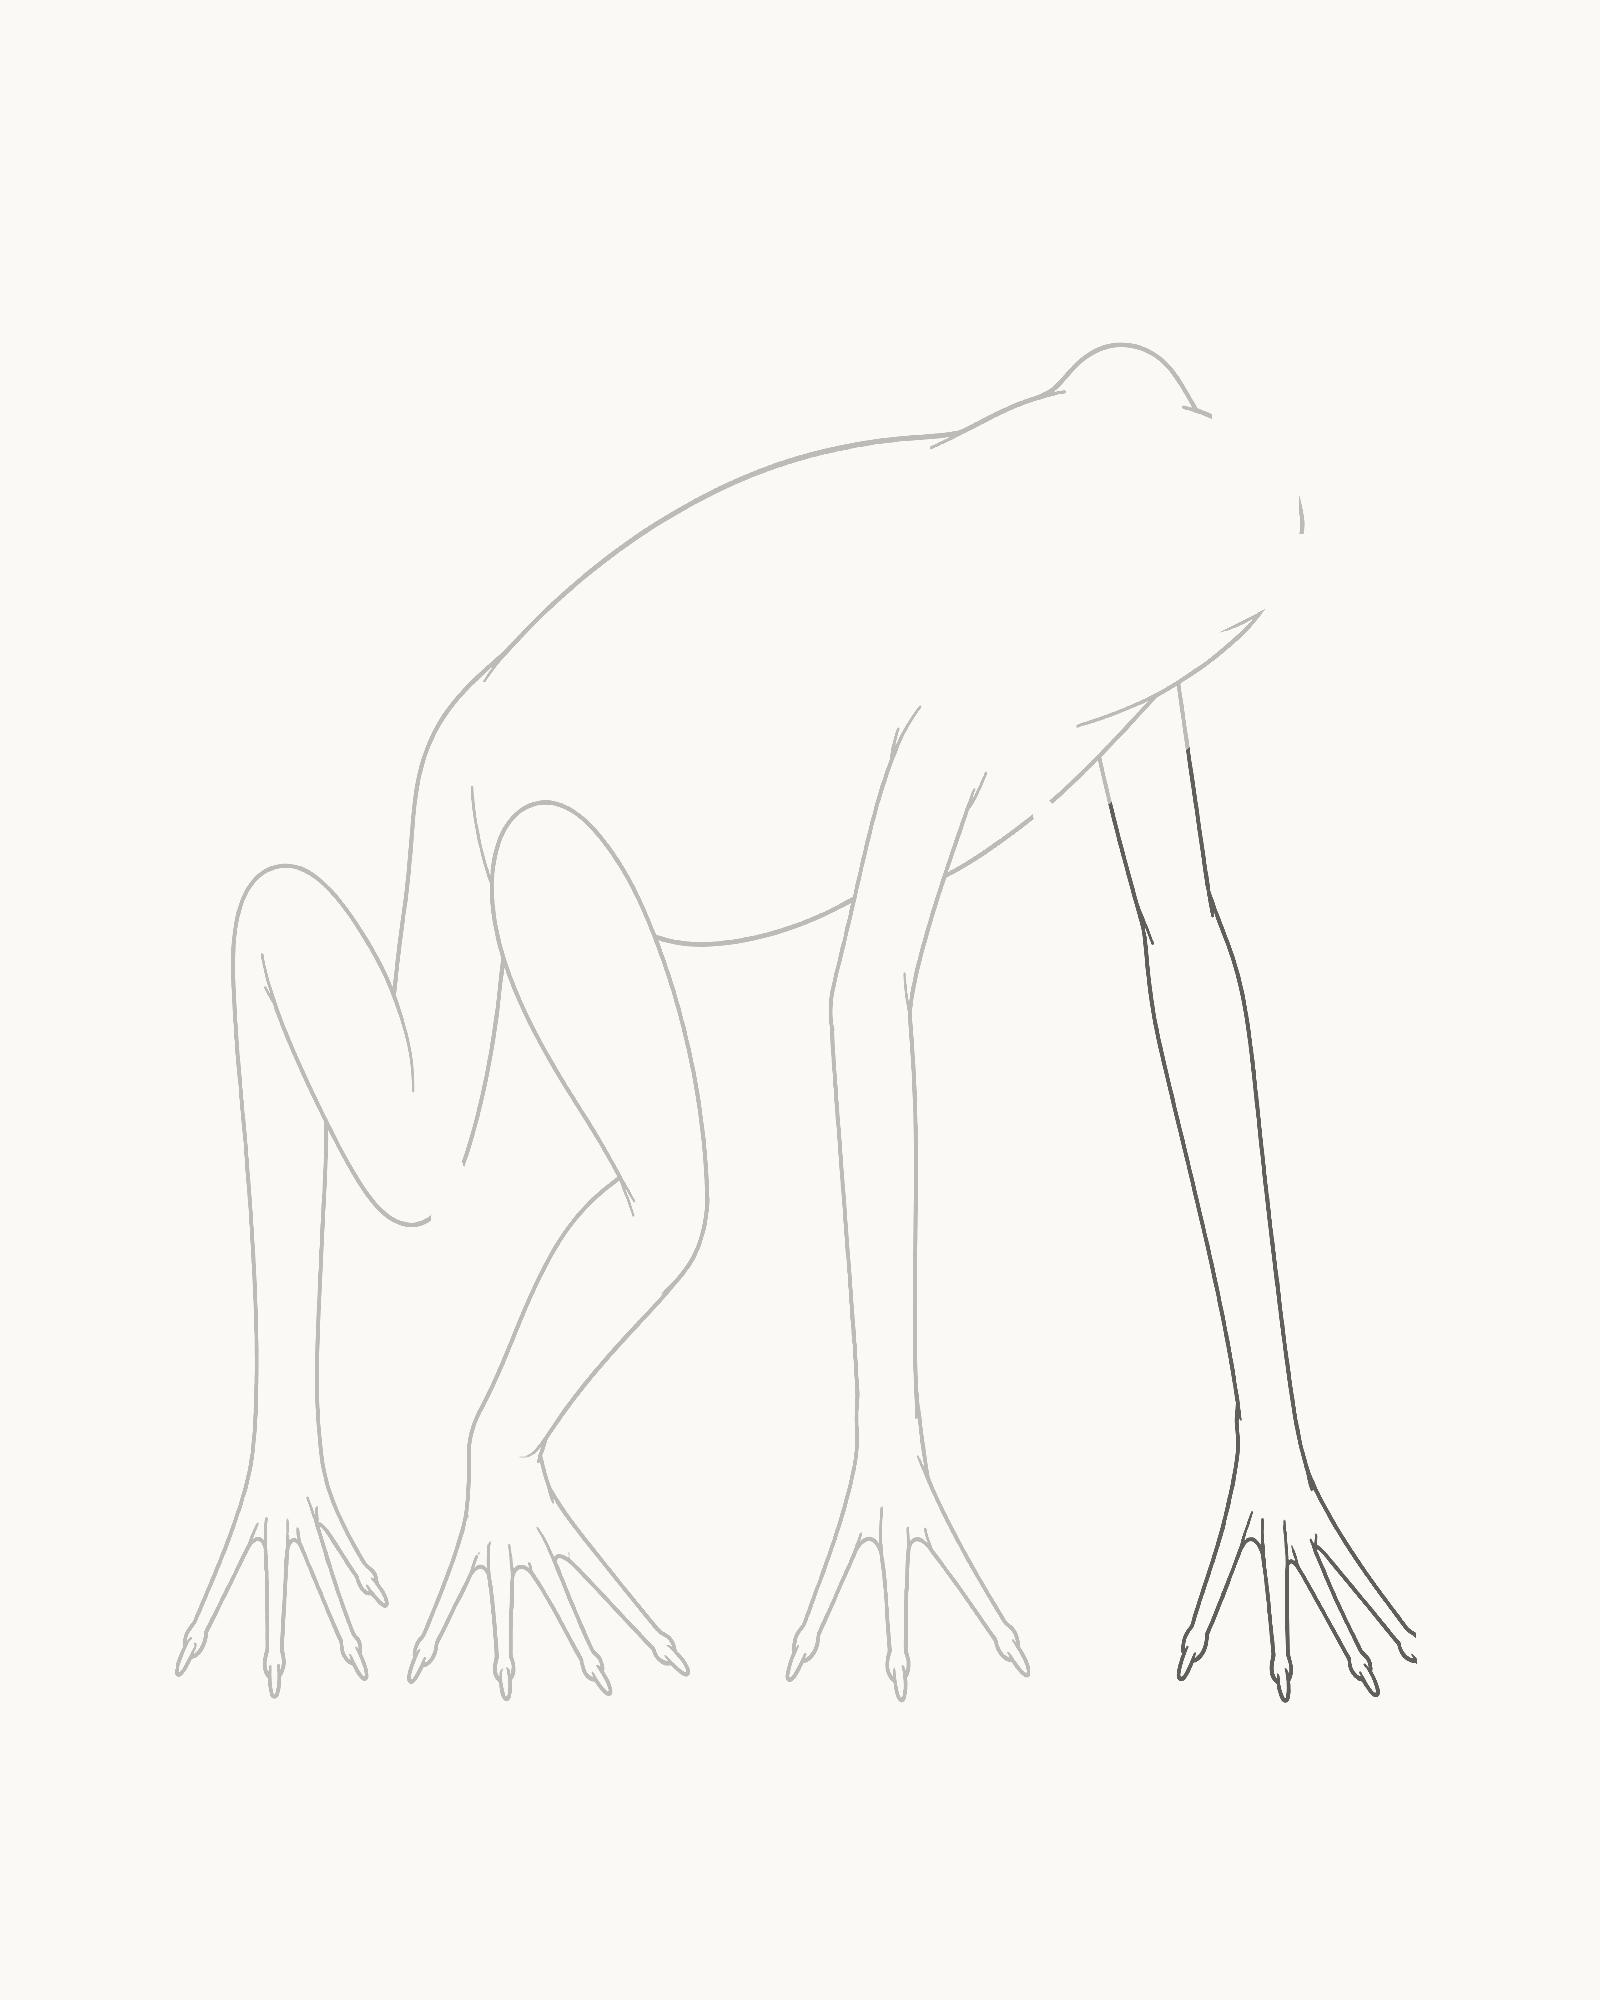
Stage 6 of 8. The stronger near support stays clear of the far foreleg and brings the image-specific total to sixteen tips. - Join the near-fore roots
- Angle the support right
- Finish with 4 new tips
Bridge the lower chest opening with the stronger near foreleg. Bring it down and slightly right to a separate foot, then return to the second root without crossing or sharing the far foreleg's attachment. The difference in direction helps the two supports remain readable at a small size.
Shape exactly four new tapered tips on the near forefoot. Across the whole drawing there are now sixteen visible tips: four far hind + five near hind + three far fore + four near fore. Keep the groups unequal and attached to their own feet rather than trying to make a symmetrical display.
All four feet should now settle within one very narrow imagined ground band. Do not draw a baseline, water edge, lily pad or shadow beneath them. The attachment geometry should carry the weight on its own.
Look for this before moving on: the near foreleg meets both of its roots, the two front supports remain distinct, the near foot has four tips, all sixteen tips have an obvious owner, and every load-bearing foot reaches the same floor.
If it goes wrong: leave the accepted far support untouched. Replace only the newest crossed root, mismatched lower edge, elevated foot or mistaken tip. A ground line would hide the symptom without repairing the new attachment.
7. Give the frog its gaze
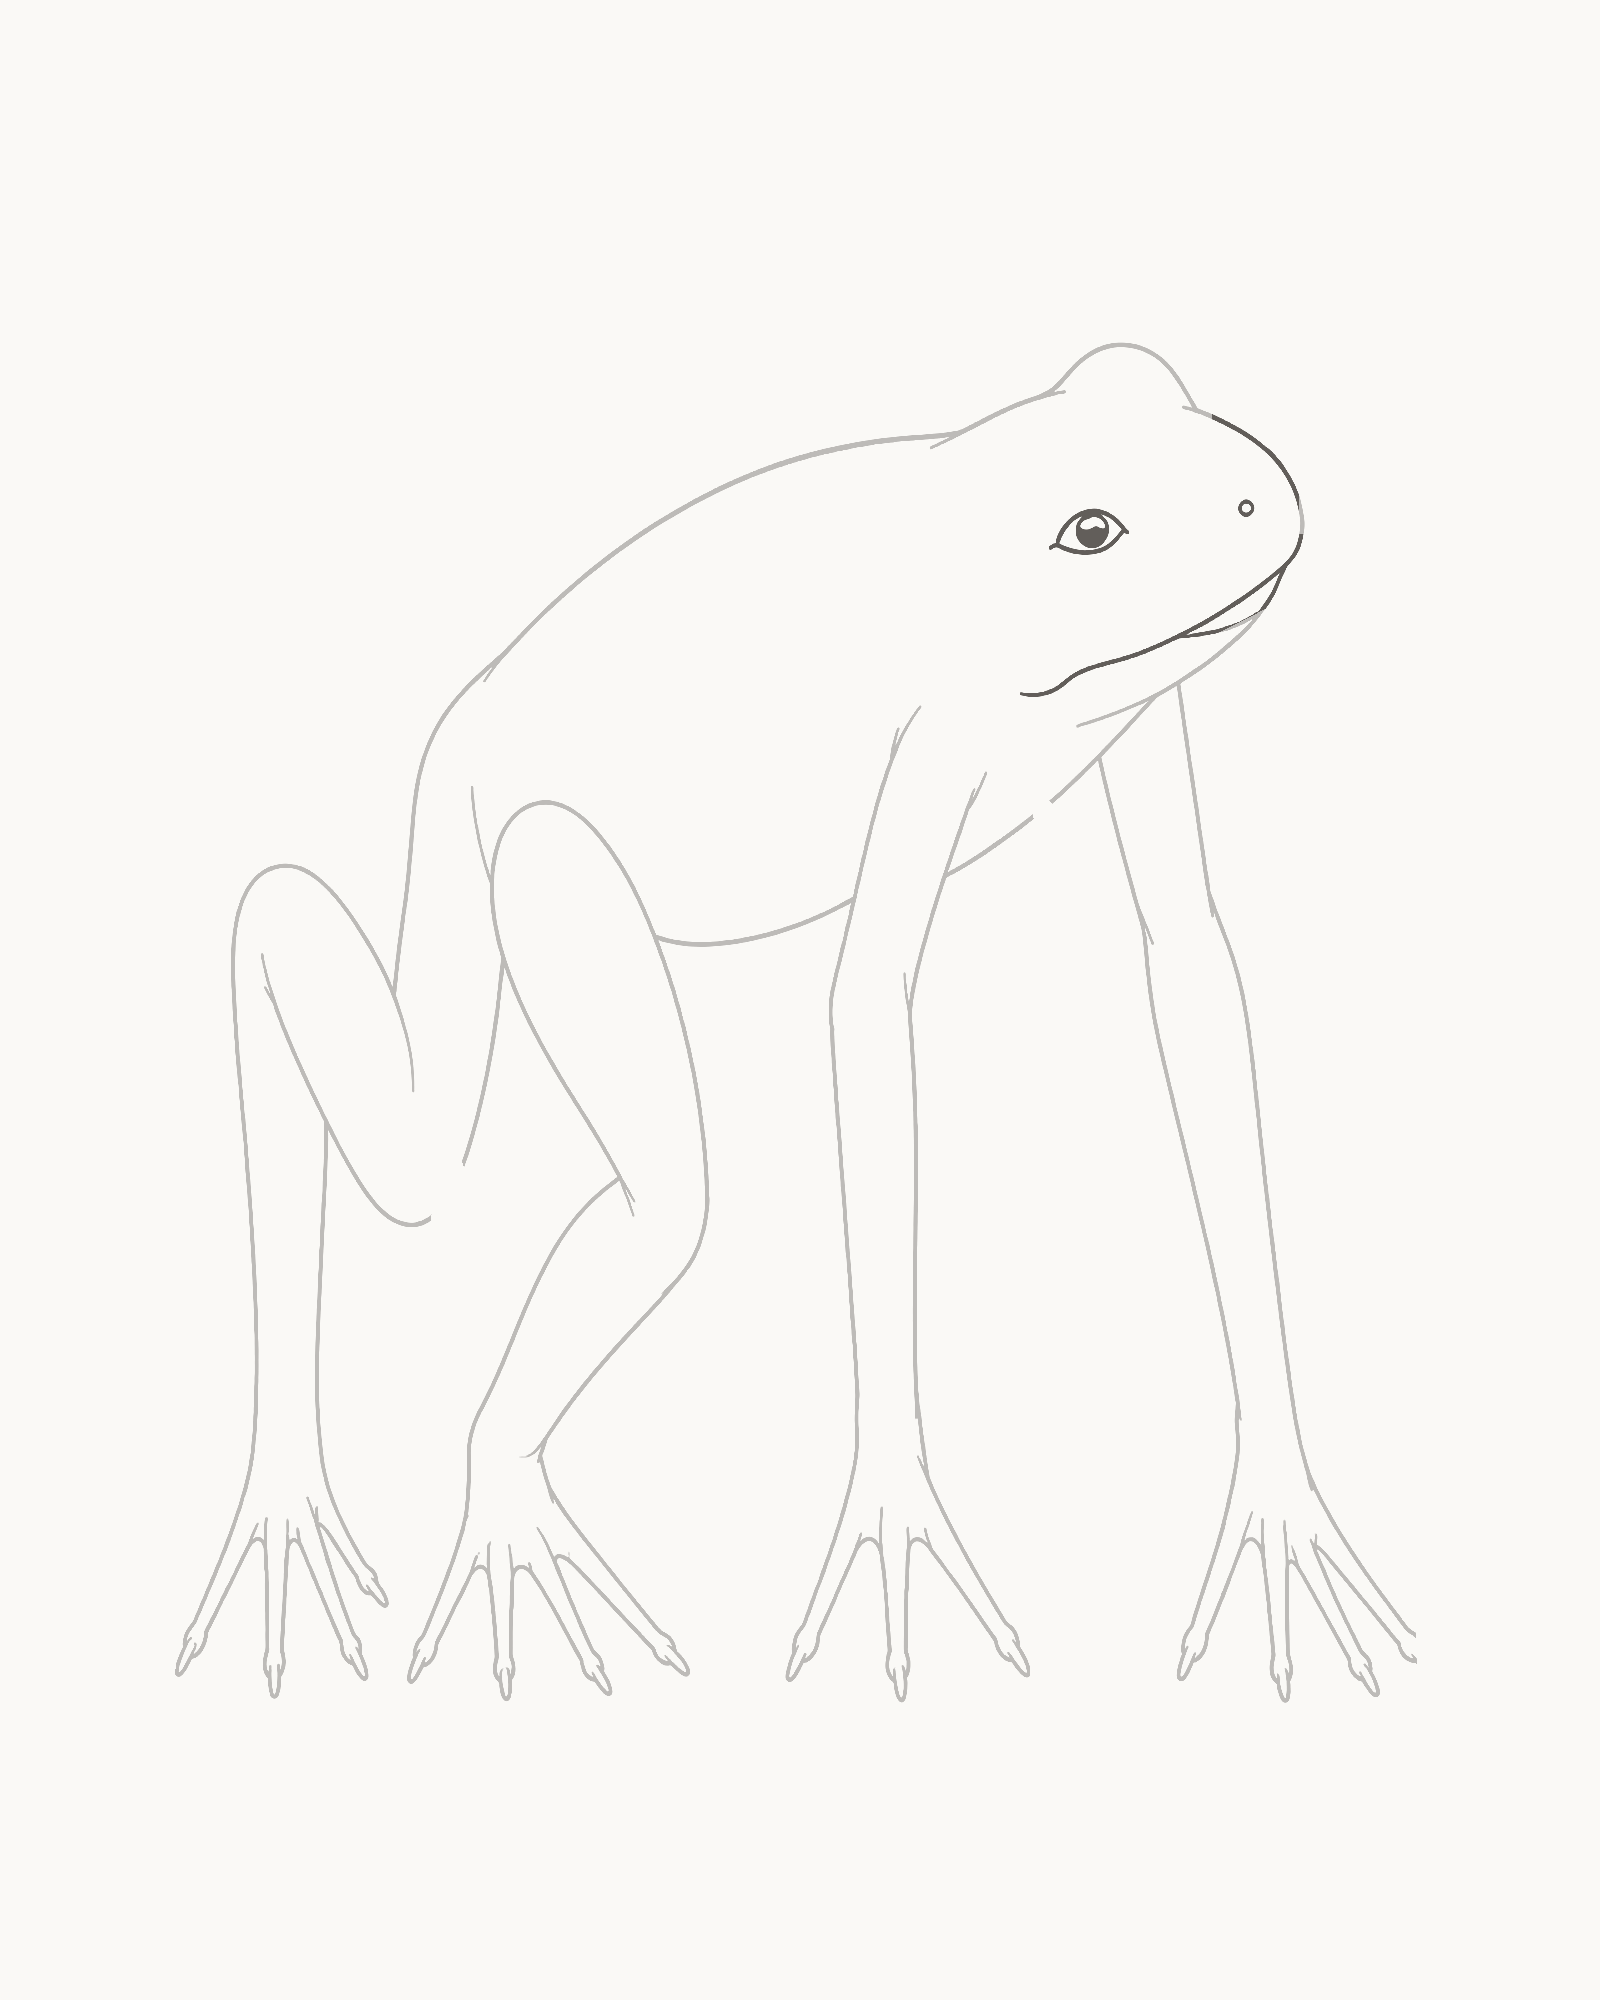
Stage 7 of 8. One integrated eye, one nostril and one restrained mouth seam establish a calm right-facing expression. - One near eye
- Protect the pupil reserve
- One nostril
- Open mouth seam
Place one small almond-shaped near eye inside the mound made in Stage 1. Add a tiny dark pupil while preserving a minute unfilled reserve. The far eye stays hidden beyond the crown in this three-quarter side view.
Set one small nostril inside the upper snout. Then draw a restrained open mouth seam below the eye, moving back towards the body but stopping before the head-to-body transition. The seam should articulate the blunt snout without forming a grin or altering the silhouette.
Use the order near eye → nostril → mouth seam. A slightly illustrative clarity is useful here, but keep the eye modest and structurally joined to the head rather than turning it into a button.
Look for this before moving on: one visible eye directs the gaze right, the tiny pupil reserve remains open, the nostril lies inside the snout, the mouth ends within the head, and no second eye or smiling expression appears.
If it goes wrong: preserve the completed body and limbs. Replace only the latest oversized eye, filled reserve, wandering nostril or overlong mouth line. Do not reshape the eye mound after placing the eye.
8. Add five open anatomy landmarks
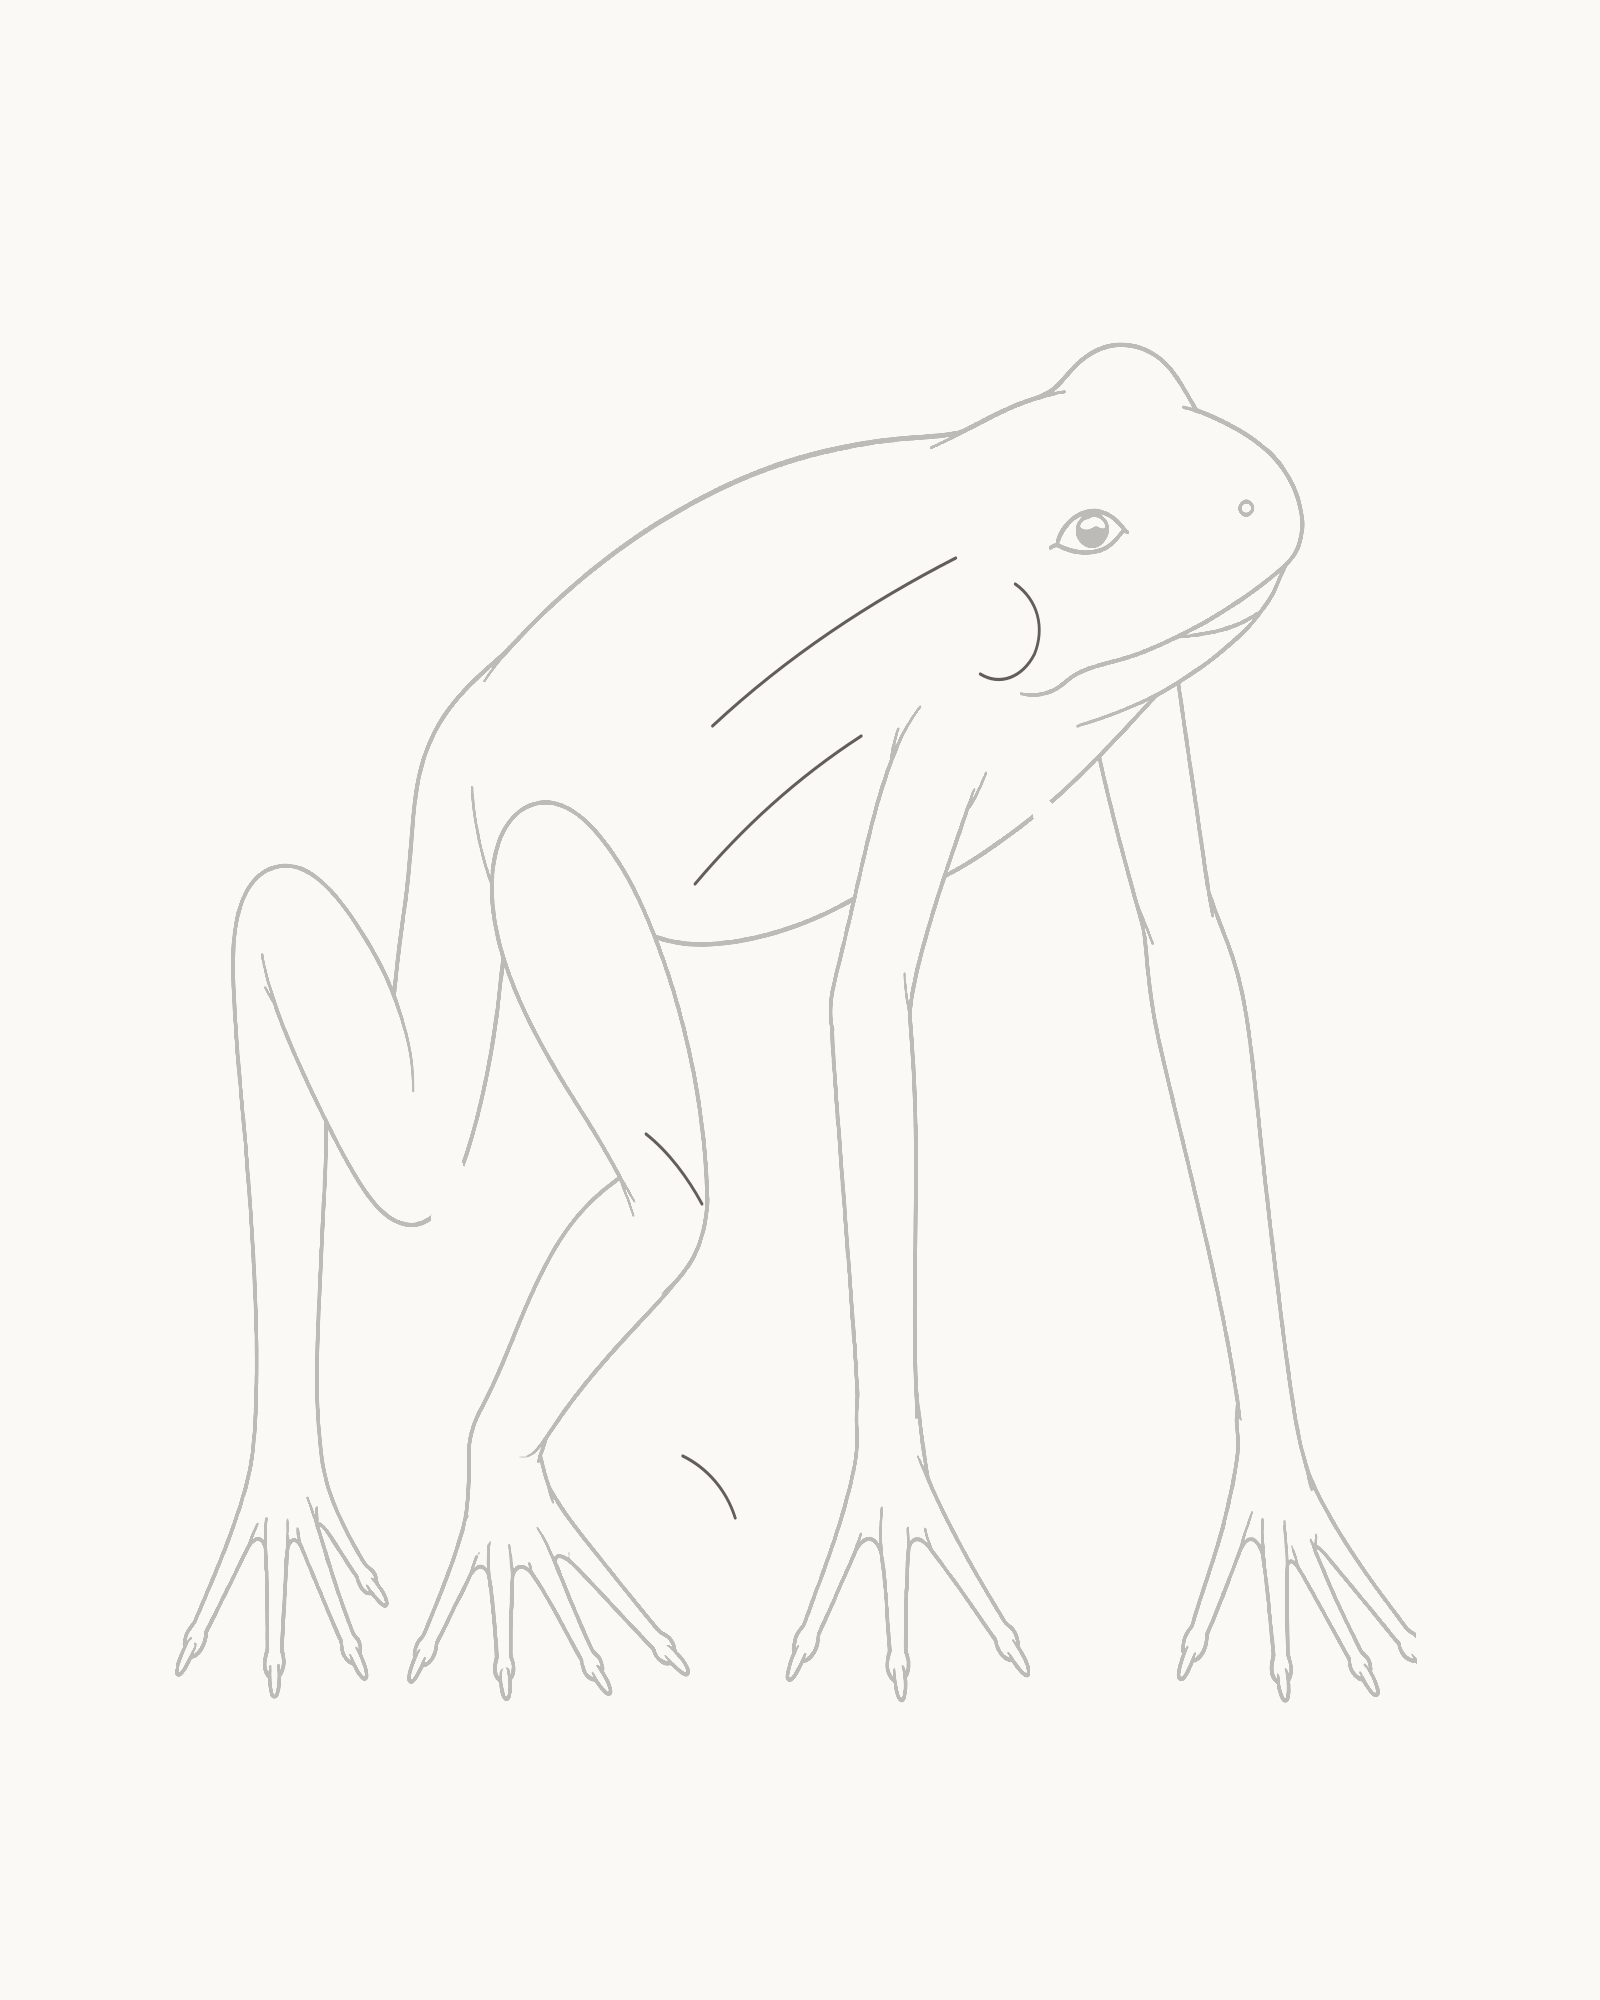
Stage 8 of 8. Five unequal open structural lines clarify the adult form without creating shading, texture or a closed badge. - Tympanum arc
- Back fold
- Flank fold
- Near-thigh fold
- Near-ankle fold
Finish with exactly five separate structural lines: one short tympanum arc behind the eye, one shallow fold following the back, one short flank fold, one fold inside the near thigh and one fold near the near ankle. Keep each line unequal, open and clearly surrounded by paper.
Use the count tympanum + back fold + flank fold + thigh fold + ankle fold = five open landmarks. None should touch the outer contour, another landmark or the eye. The tympanum is an arc, not a button-like disc, and the folds should clarify their owners without becoming a repeated skin pattern.
There is no shading in this stage. Do not hatch, stipple, fill, smudge or add bumps around these lines. The outer geometry and four attachments remain the reason the frog feels complete.
Look for this before moving on: exactly five new open lines can be counted, each belongs to a clear part of the frog, no tonal patch has formed, and the clean silhouette remains more prominent than the interior detail.
If it goes wrong: keep the complete Stage 7 drawing and all successful landmarks. Replace only the newest closed arc, touching fold, repeated mark or accidental hatch. Do not use an interior line to disguise an unresolved joint or floating foot.


Fix common construction problems
The frog looks like a mascot. Check the low wedge-shaped head, compact asymmetric torso and small single eye. Replace only the newest round head edge, oversized facial feature or mirrored curve. A smile, giant pupil or second eye will make the problem stronger.
A neck has appeared. Follow the crown into the back and the jaw into the chest. Both transitions should flow directly into the body. Correct the newest pinched interval rather than adding a collar line.
The Stage 2 body seems unfinished. Name each opening aloud: far fore, near fore and near hind. The earlier far-hind gap is already waiting at the rear. These are permanent attachment endpoints, not missing outline pieces.
A hind foot seems pasted on. Trace its owner from the body root through thigh, knee, lower leg and heel before reaching the foot. Restore only the newest missing turn. Extra toes or a darker outline cannot repair a broken joint chain.
The forelegs resemble one central post. Start at the chest and locate two different root pairs. The far support is slimmer and angles slightly left; the near support is stronger and heads right. Replace only the latest crossing or shared-looking edge.
One foot floats. Compare its lowest tips with the other three feet. Lower or reconnect only the newest foot or support segment until it meets the narrow invisible band. Do not add a visible ground line.
The digits look mechanical. Recount by owner—four, five, three, four—then vary the length and spacing inside the newest faulty group. Preserve the other feet rather than redrawing all sixteen tips.
The last details resemble texture. Return to the five named landmarks. Remove only a new surplus line or closed shape; keep open paper around each accepted curve. This is still a line drawing, not a pattern or shaded study.
Practise a lower crouch
On a fresh half-size sheet, repeat Stages 1 and 2 with the same right-facing head and the same four planned limb openings. Lower the rear hip slightly, then rehearse just the near hind leg so its knee spreads a little farther from the body while its foot remains on the common floor. Keep the eye, digit counts and other limb owners unchanged. This isolates one useful pose adjustment without inventing a different final stage for the main lesson.
For another study of attached webbed feet, try How to Draw a Duck. How to Draw a Rabbit offers a different folded-hind-leg problem. To compare how artists have represented the subject in finished works, visit the separate Frog Drawings gallery.
Frequently Asked Questions
What is the easiest way to start drawing a frog?
Place the upper head, eye mound, back and rear hip before adding the eye or any toes. Those first contours fix direction and scale while leaving the exact spaces the limbs will later bridge.
Why are there several gaps in the body outline?
Each gap belongs to a specific limb. The far hind, near hind, far fore and near fore supports connect to separate endpoint pairs. Keeping those endpoints open from the start avoids cutting into a closed outline later.
Why can I see only one eye?
The frog faces right in a low three-quarter side view. The near eye is visible inside its upper-head mound; the far eye lies beyond the crown and is hidden. Adding a second eye would change the viewpoint.
How many visible toes should the drawing have?
Use the image-specific count of four on the far hind foot, five on the near hind foot, three on the far forefoot and four on the near forefoot. That gives sixteen visible tips. It describes this view, not the full anatomy of every frog.
Should the feet have round pads or webbing?
No. This lesson depicts a species-neutral ground frog with tapered visible tips. Round tree-frog pads or duck-like web fans would introduce a different anatomical treatment.
Is the last stage a shading step?
No. Stage 8 adds one tympanum arc and four restrained fold lines. Leave each curve open and isolated; do not hatch, blend or fill around it.
Do I need the placement grid?
No. It is an optional comparison aid and defaults off. Use it only if the snout, eye mound or rear roots are hard to position, and never copy the grid into the drawing.
Should I erase guides or darken the final outline?
Neither action belongs to this sequence. The contours are permanent from the moment they appear. Replace only the newest faulty local segment, and leave established lines at the strength already shown.
References
- American Museum of Natural History, Frog Eyes. View source
- American Museum of Natural History, The Amazing Adaptable Frog. View source
- University of Michigan Animal Diversity Web, Anura. View source
More DRAWING Guides

How to Draw a Rose: A Step by Step Guide

How to Draw a Tree: A Step by Step Guide

How to Draw Eyes: A Step by Step Guide

How to Draw Leaves: A Step by Step Guide

How to Draw Autumn Leaves: A Step by Step Guide

How to Draw Flowers: A Step by Step Guide

How to Draw a Lily: A Step by Step Guide

How to Draw a Sunflower: A Step by Step Guide

How to Draw a Tulip: A Step by Step Guide

How to Draw a Hibiscus: A Step by Step Guide

How to Draw a Daisy: A Step by Step Guide
