



Draw one complete adult emperor penguin
Draw a complete adult emperor penguin standing calmly and facing right. Eight stages build the permanent upper silhouette, return around the open lower body, attach two separately owned flippers, ground two unequal feet, add the tail and face, then finish with three restrained plumage boundaries. The result is a clean line drawing with no colour, black fill or shading stage.
Difficulty: Beginner to intermediate
Time: Allow about 40–55 minutes. This is an explicitly untested editorial estimate, not a measured drawing session.
Medium: A pointed HB or No. 2 graphite pencil on smooth, unlined paper.
The beak junction, two flipper roots and small far foot need the closest comparison. Every mark shown in one stage remains in every stage that follows. No body oval is removed, no replacement outline is traced over the first, and uncertain joints stay visible rather than being buried beneath texture.
The broad identity comes from a small tapered head over a long, bottom-heavy body, a shallow projecting beak, paddle-like flippers and short legs ending in webbed feet. The Australian Antarctic Program’s emperor-penguin profile is useful for observing how beak, flippers and feet belong to one streamlined bird. National Geographic likewise describes penguins as flightless birds whose wings function as flippers in water. Here those visible relationships matter more than filling the body with dark tone.
Species choice matters as well. The Monterey Bay Aquarium’s African-penguin profile provides a useful contrast with the emperor reference: penguin species do not share one interchangeable face and body pattern. This lesson therefore keeps one adult-emperor treatment throughout. It does not combine a chick’s rounded proportions with another species’ markings.
The torso turns slightly towards you while the head stays close to profile. That is why only one eye is visible, the near flipper rests against the side and the far flipper projects more strongly behind the back. Keep this near-and-far ownership clear before adding any interior detail.
Materials
- Use a sharpened HB or No. 2 pencil. An ordinary 0.5 or 0.7 mm mechanical pencil is a suitable substitute.
- Pick an unruled sheet with a smooth white or warm-white surface and use it vertically. Everyday copier paper works for practice.
- Keep a clean eraser for replacing only the newest faulty segment. There is no scheduled cleanup or removal of construction lines.
- A pencil sharpener.
- Optional scrap paper for rehearsing the shallow beak wedge, one paddle-like flipper or a low three-toed foot.
- An optional ruler for comparing the separate grid or percentage cue with the page edges. It is not used to draw the penguin.
No compass, tracing paper, marker, blending tool, specialist graphite set, colour, paint, tablet, printable or video is required. Use light-to-moderate pressure: keep edges controllable and visible, but avoid a thick outlined-character effect.
Before you draw
Turn the paper vertically. The penguin occupies the central area, with the far flipper extending left and the beak pointing right. Leave clear paper above the crown, in front of the beak, beyond the flipper, around the tail and beneath both feet.
The optional grid defaults off and serves only as a placement aid. For Stage 1, compare five locations with the whole page: the beak tip near x82% / y23%, the crown near x61% / y11%, the two far-flipper roots near x42% / y31% and x35% / y48%, and the upper tail root near x31% / y72%. These are approximate page relationships, not dots to copy into the drawing.
“Near” means the side of the bird turned towards you. “Far” means the partly hidden side. The slim-looking near flipper has two roots on the visible side of the torso; it is not a leaf floating inside the belly. The more strongly projecting far flipper attaches at two separate points on the back and passes behind the body.
Both feet settle on the same invisible floor near the lower part of the page. The right-hand near foot is larger; the left-hand far foot is deliberately smaller and partly behind it. Do not add a ground line. The reserved upper-left light direction does not produce any hatch, shadow or tonal modelling in this line-only result.
1. Set the permanent upper silhouette
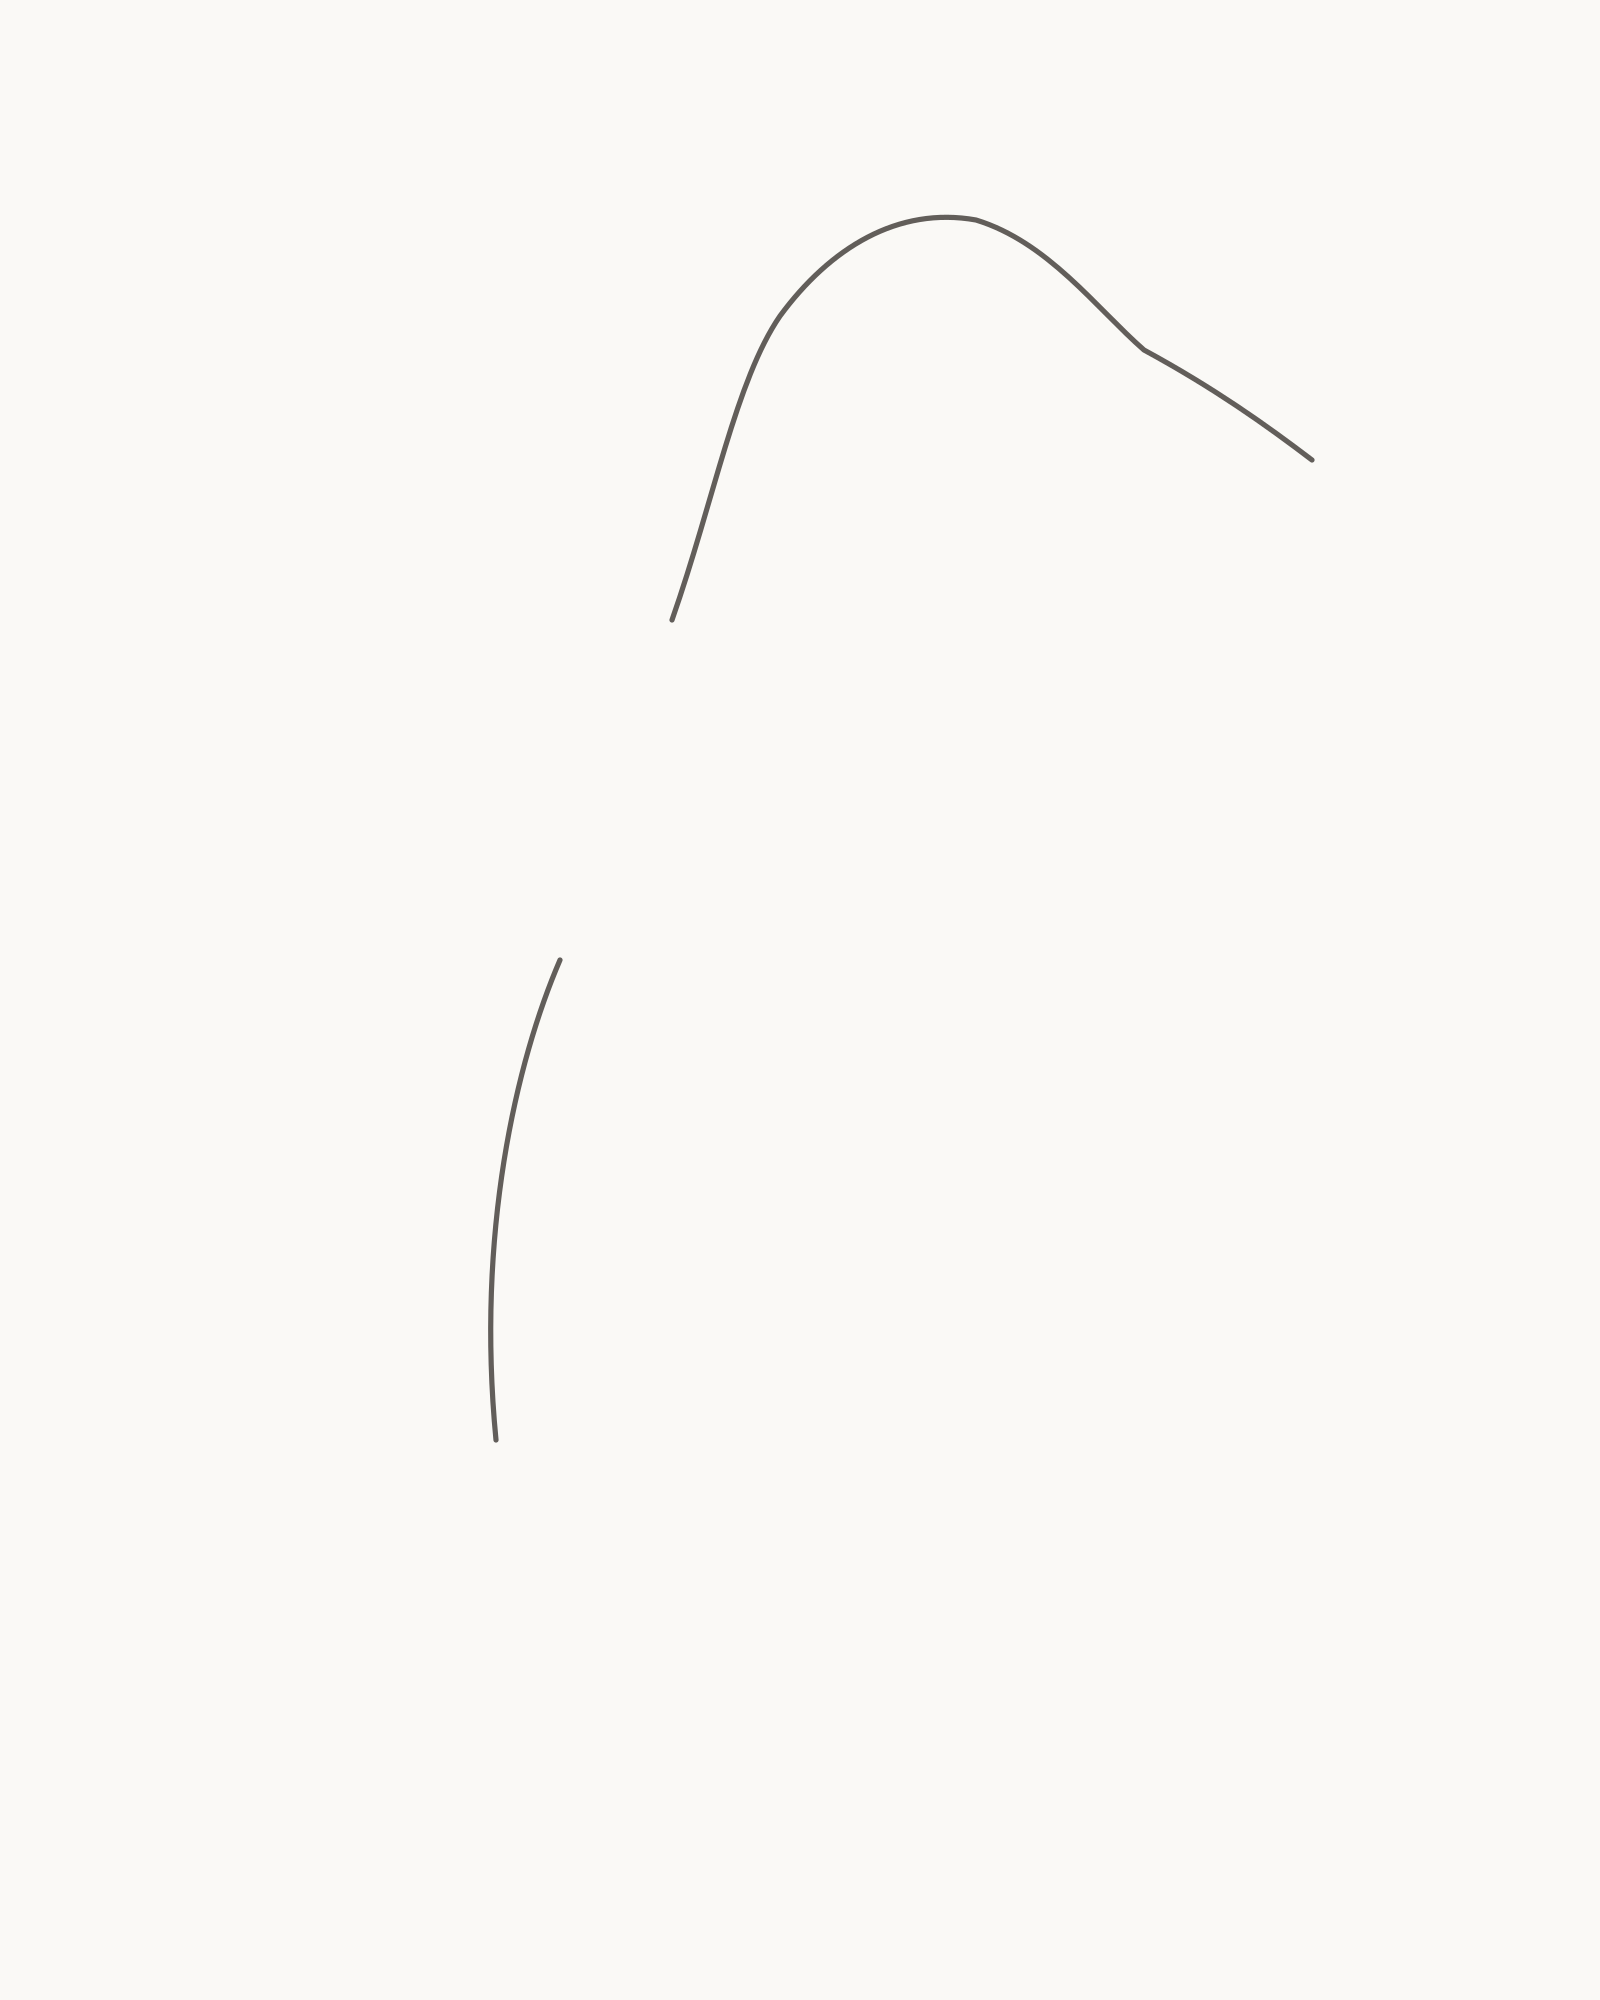
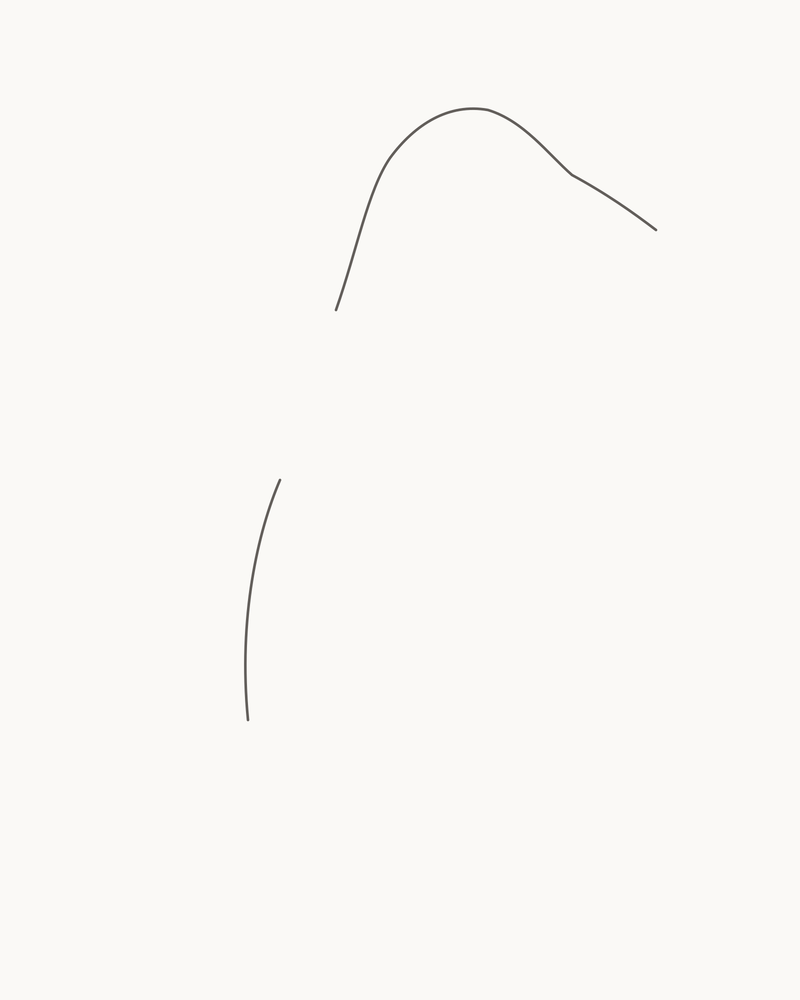
Stage 1 of 8. Two permanent intervals establish the shallow beak, compact adult crown, tall back and planned far-flipper opening. 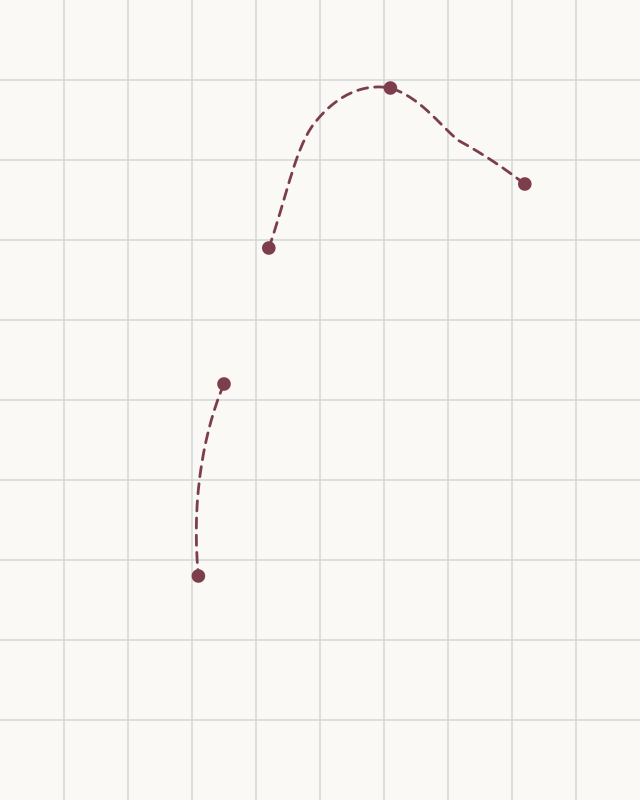
Placement cue: place the beak tip near x82% / y23%, crown near x61% / y11%, far-flipper roots near x42% / y31% and x35% / y48%, and upper tail root near x31% / y72%. Keep the cue off the drawing. - Beak tip and upper beak
- Forehead, crown and nape
- Stop at upper far-flipper root
- Back, rump and upper tail root
Begin at the beak tip near x82% / y23%. Draw leftward over the shallow upper beak, forehead and softly rounded crown. Continue through the nape and upper back, then stop at the upper root of the far flipper near x42% / y31%.
Start the second interval at the lower far-flipper root near x35% / y48%. Carry the line down the back and around the fuller rump, finishing at the upper tail root near x31% / y72%. The space between the two intervals is deliberate: Stage 3 will bridge it with the far flipper.
These are final outer contours, not a guide oval. Keep the head compact, the beak long and shallow, and the back gently changing direction. A round head, short triangle beak and perfect egg-shaped back would make the bird read as a chick or mascot.
Look for this before moving on: the beak points right without crowding the page, the crown is the highest point, the head remains small beside the long torso, the far-flipper opening is easy to identify, and the rump finishes above the future feet with room for the tail.
If it goes wrong: preserve the better interval. Replace only the newest rounded head section, spear-like beak edge, stiff back turn or misplaced endpoint between two stable points. Do not redraw both upper contours to correct one local bend.
2. Return around the lower body and preserve four openings
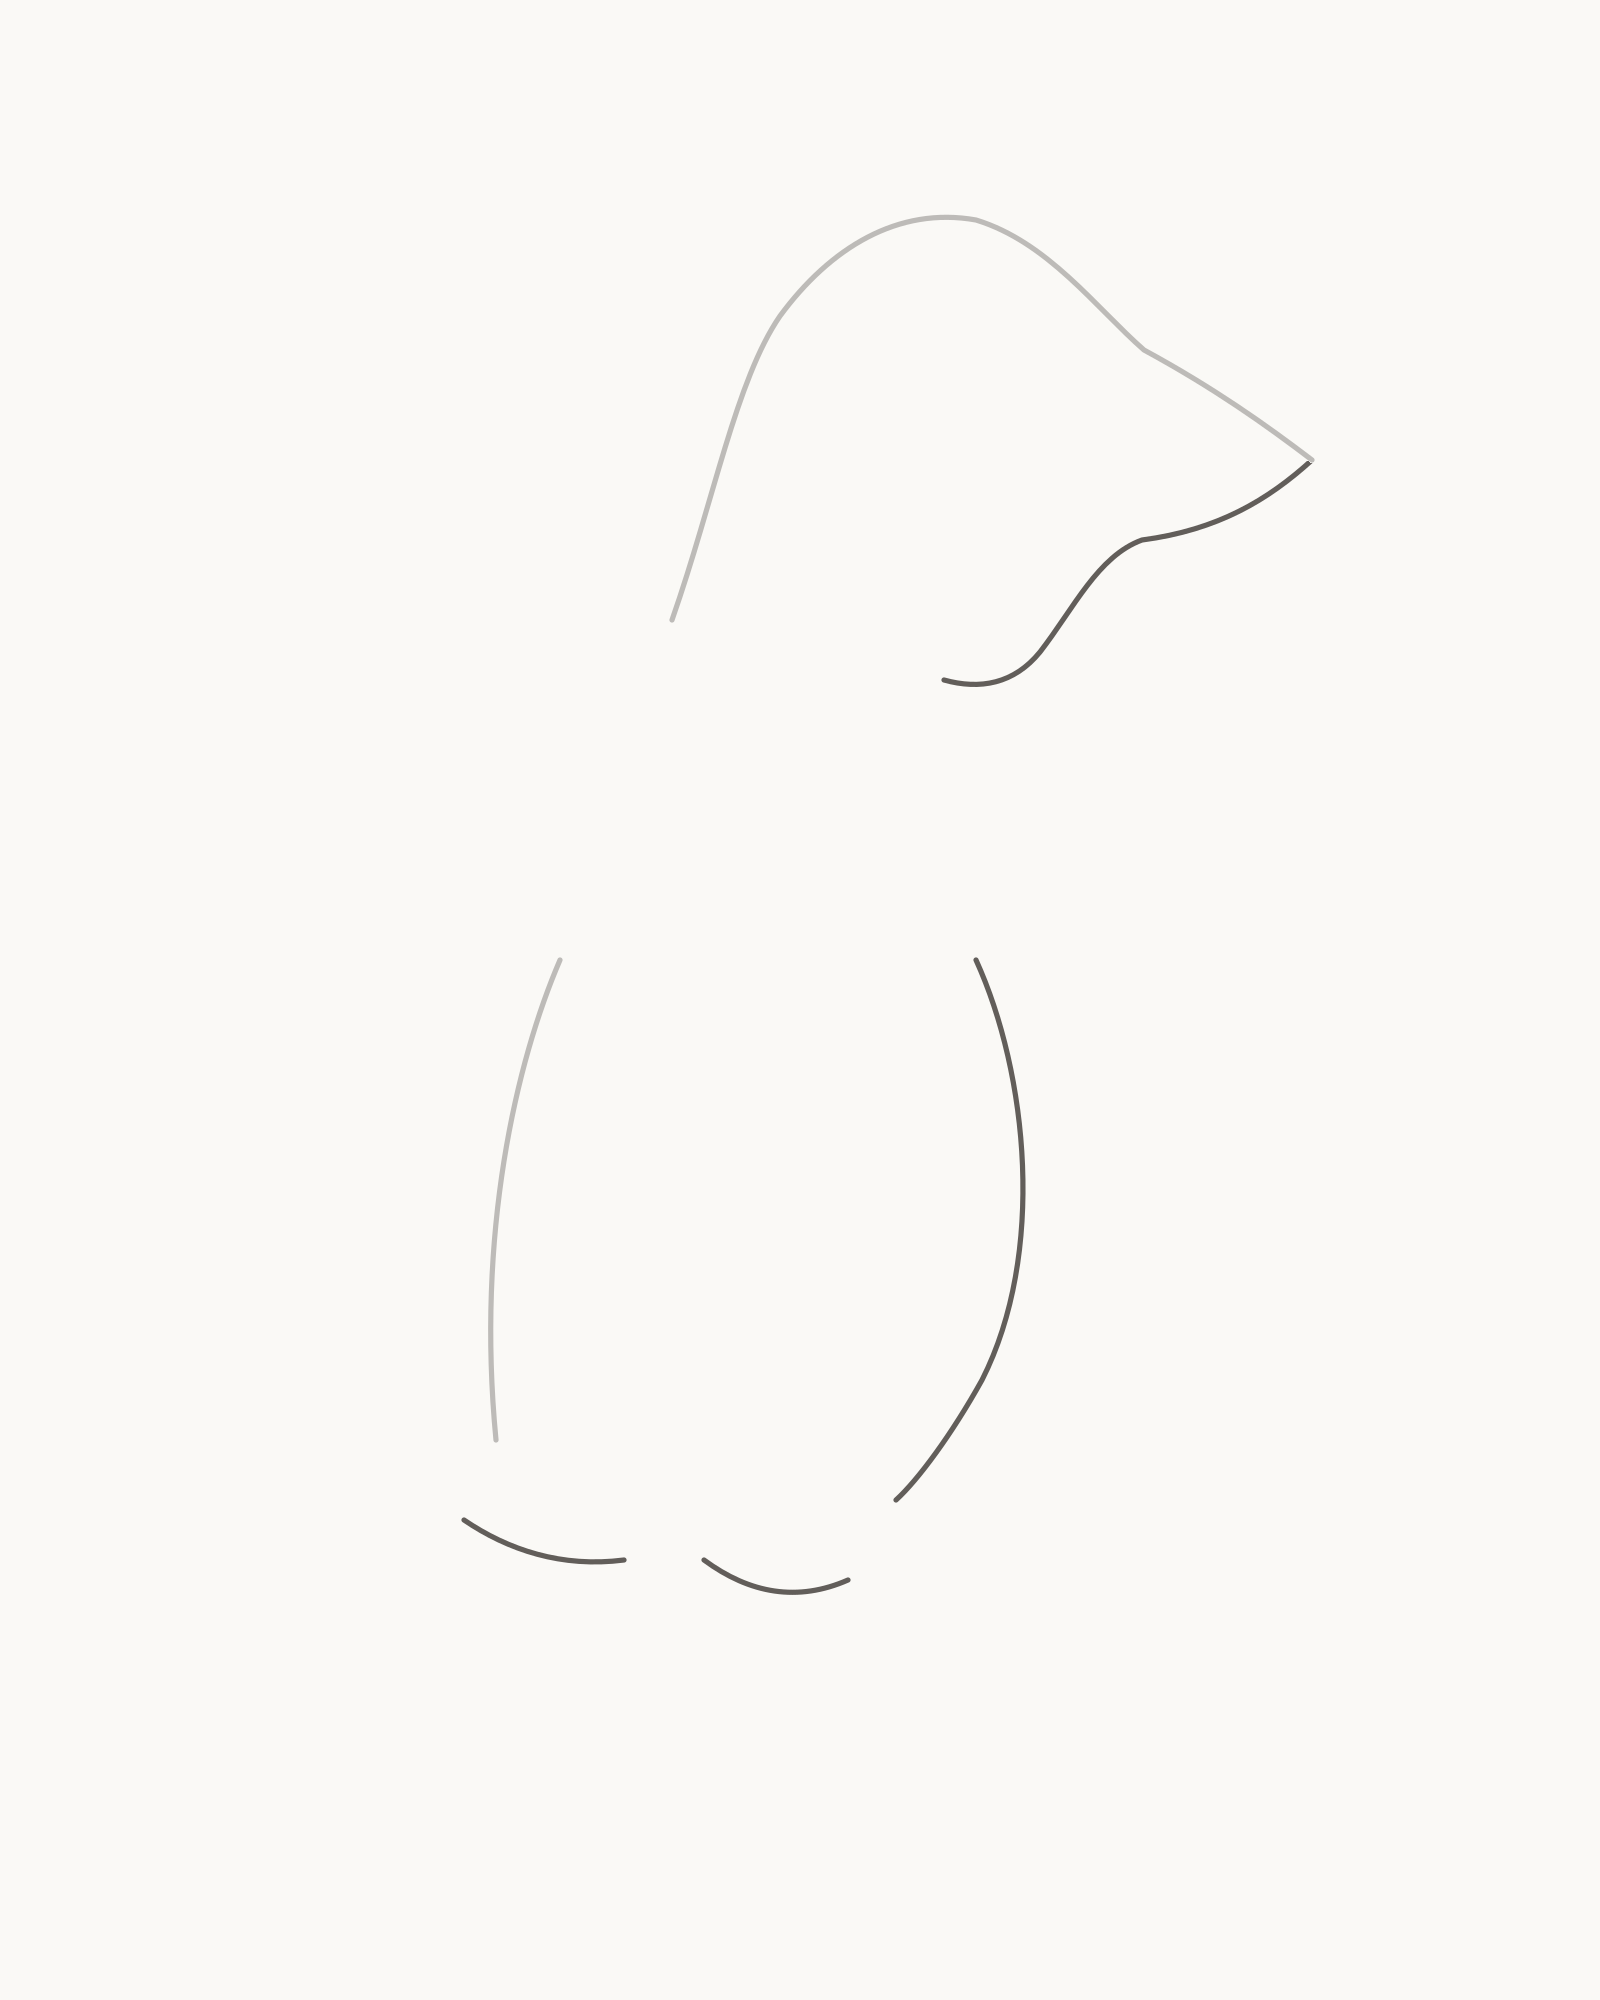
Stage 2 of 8. Four lower intervals complete the body mass while four attachment spaces remain deliberately open. - Beak tip → throat and chest → near-flipper root
- Lower near-flipper root → belly → near-leg opening
- Underside → far-leg opening
- Rear underside → lower tail root
Return to the exact Stage 1 beak tip. Draw the first lower interval in this order: beak tip → lower beak → throat and chest → near-flipper upper root. Meet the tip once, keep the throat smooth and stop before closing the space assigned to the near flipper.
Begin again at the lower near-flipper root. Continue lower near-flipper root → fuller belly → near-leg opening. The belly should widen below the chest rather than forming a second oval inside the back.
Add the short underside interval between the near-leg and far-leg openings. Then draw the rear underside from the lower side of the far-leg opening to the lower tail root. Stop there, leaving the upper and lower tail endpoints apart.
The lower body is deliberately open in four places: the near-flipper space, the near-leg space, the far-leg space and the tail space. Each opening is a pair of planned permanent endpoints. Later stages bridge those pairs; no contour will be cut, rubbed out or retraced.
Look for this before moving on: both beak edges meet at one clean tip, the throat enters a narrower upper chest, the lower belly is fuller, and all four openings can be pointed to separately. The body should read as one tall mass even though its attachment spaces remain open.
If it goes wrong: keep every accepted Stage 1 mark and successful lower interval. Replace only the newest doubled beak tip, abrupt throat, ballooned belly or wrongly closed segment. Correct a new endpoint now rather than planning to erase an older contour when its attachment arrives.
3. Attach two unequal flippers
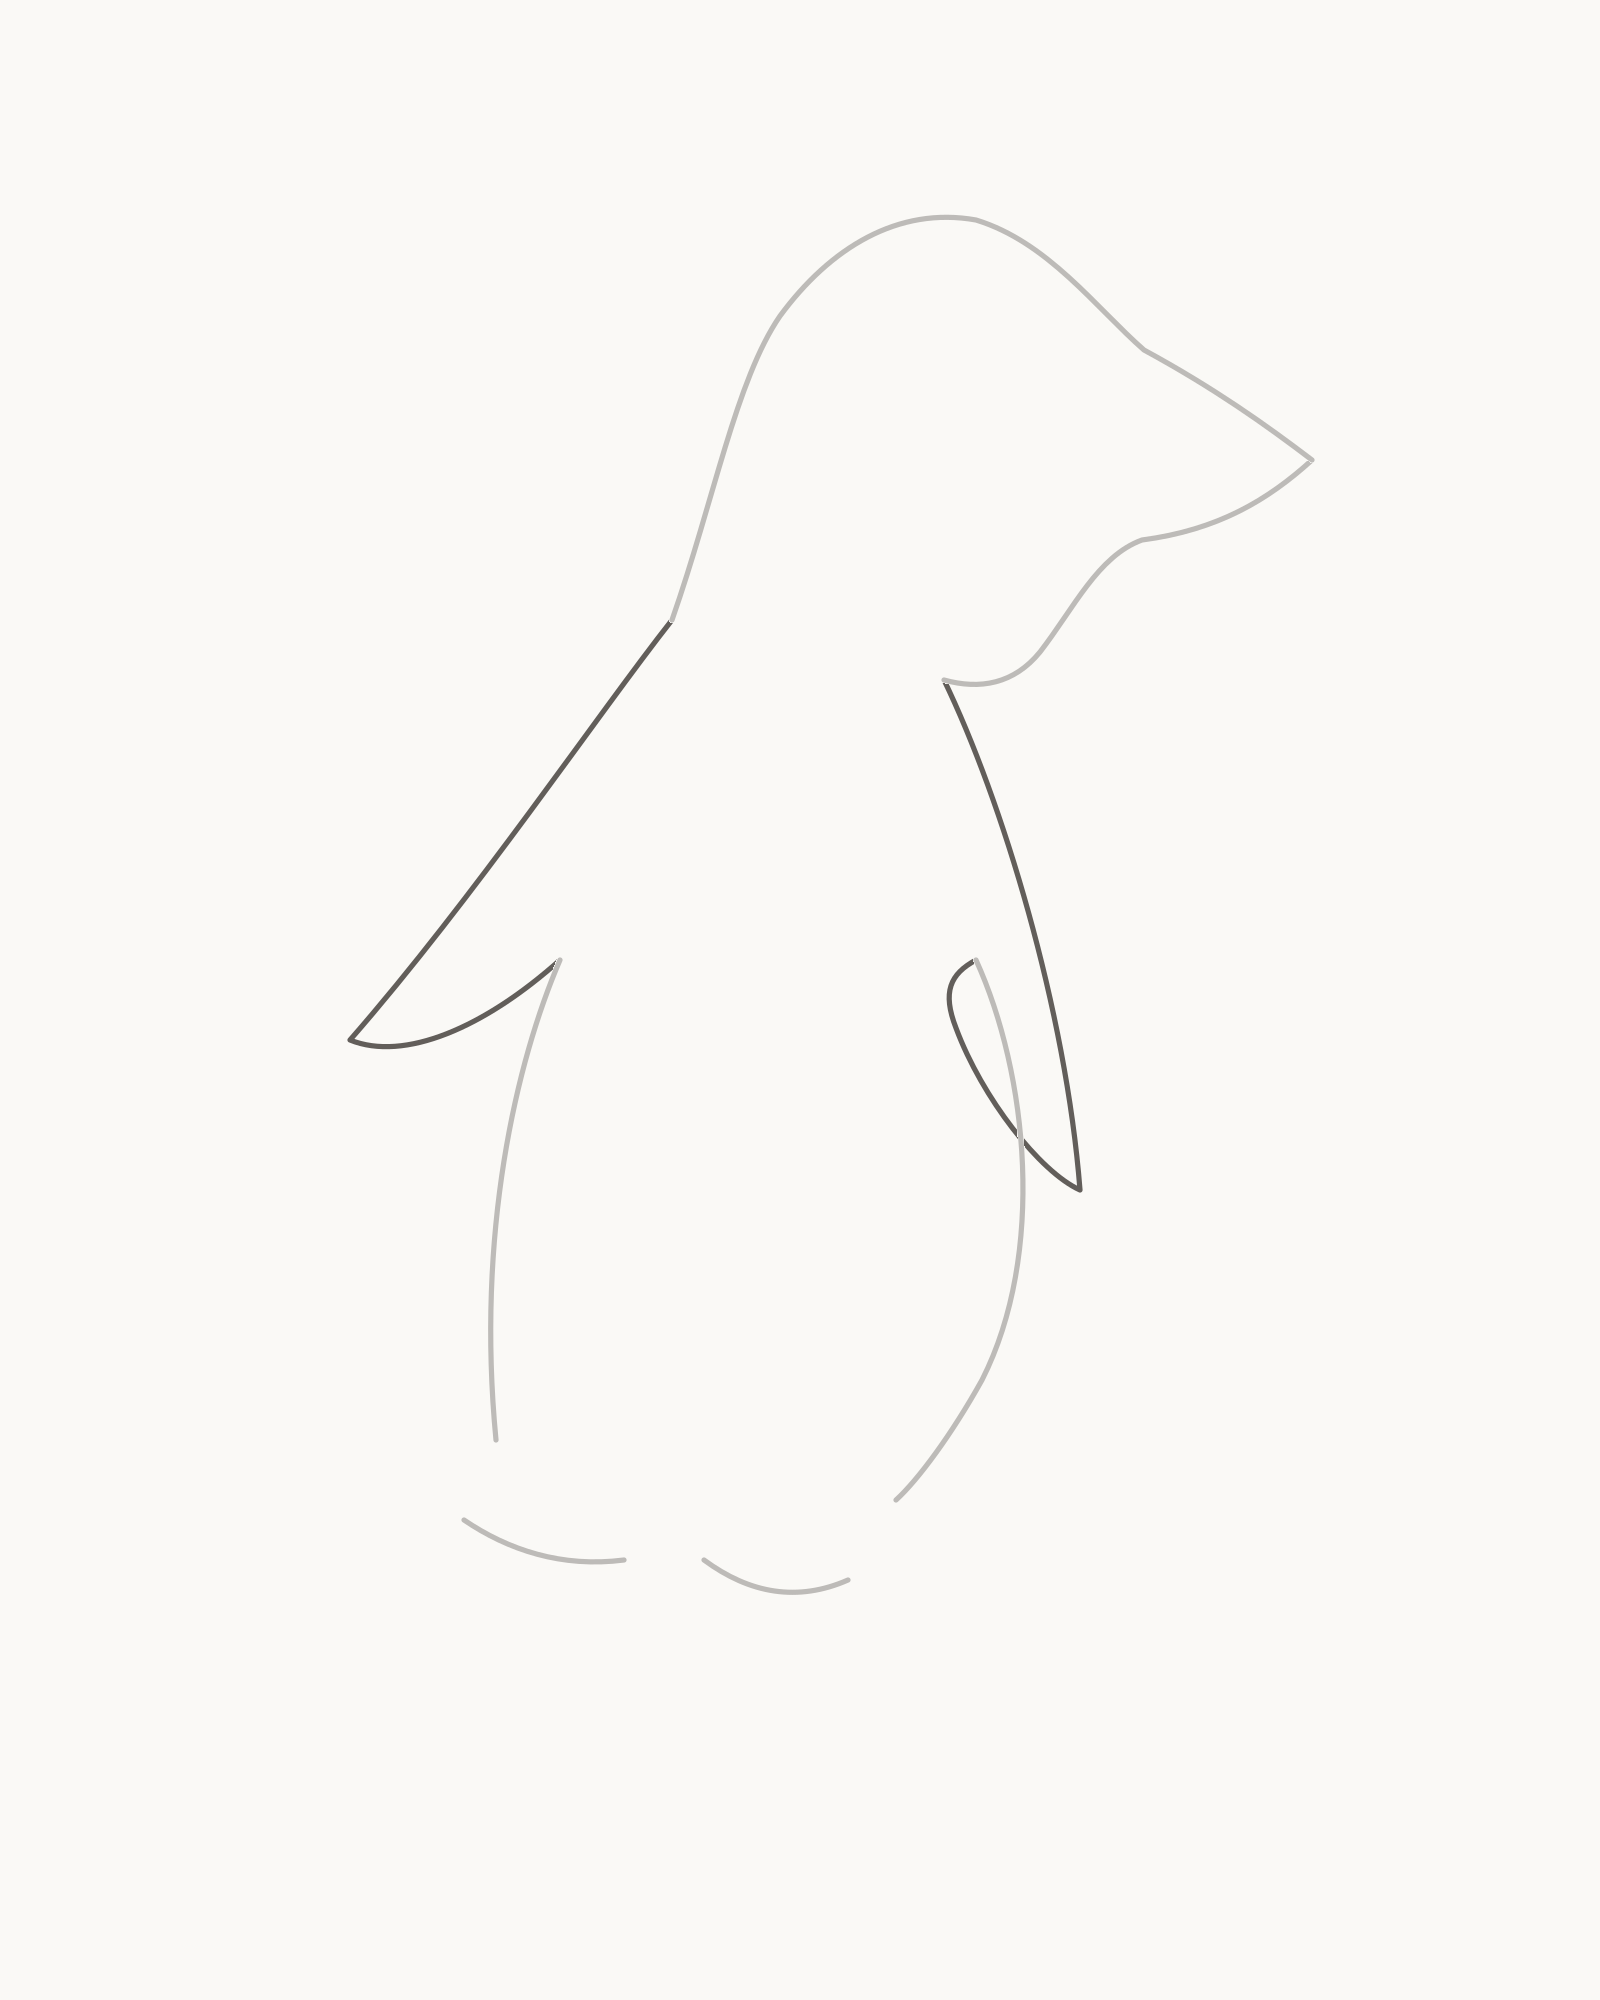
Stage 3 of 8. Two asymmetrical paddles bridge separate root pairs, with the near form resting against the side and the far form projecting behind. - Near upper root
- Near paddle and lower root
- Far upper root
- Projecting far paddle and lower root
Draw the near flipper at the visible right side of the torso. Bridge its two Stage 2 roots with a narrow paddle that drops and angles slightly back before returning to the lower root. Because it rests close to the body, it looks slim in this view. Make both roots traceable so the loop cannot be mistaken for a loose leaf inside the belly.
Now bridge the two Stage 1 back roots with the far flipper. It projects decisively left and down before turning back to the lower root. Its extension is stronger than the near flipper’s, yet it remains the farther form because the body interrupts it at the roots.
Do not mirror the two paddles. Their root heights, widths, tips and directions are different, and neither one touches a leg opening.
Look for this before moving on: each flipper joins the torso at two distinct endpoints, the near paddle lies against the visible side, the far paddle passes behind the back and projects farther left, and both tips clear the page and the future feet.
If it goes wrong: trace the newest flipper from upper root to tip and back to lower root. Replace only that floating join, sharp leaf point or mirrored curve. Keep the body and the correctly attached flipper unchanged; do not thicken a root to conceal a gap.
4. Add the near leg and webbed foot
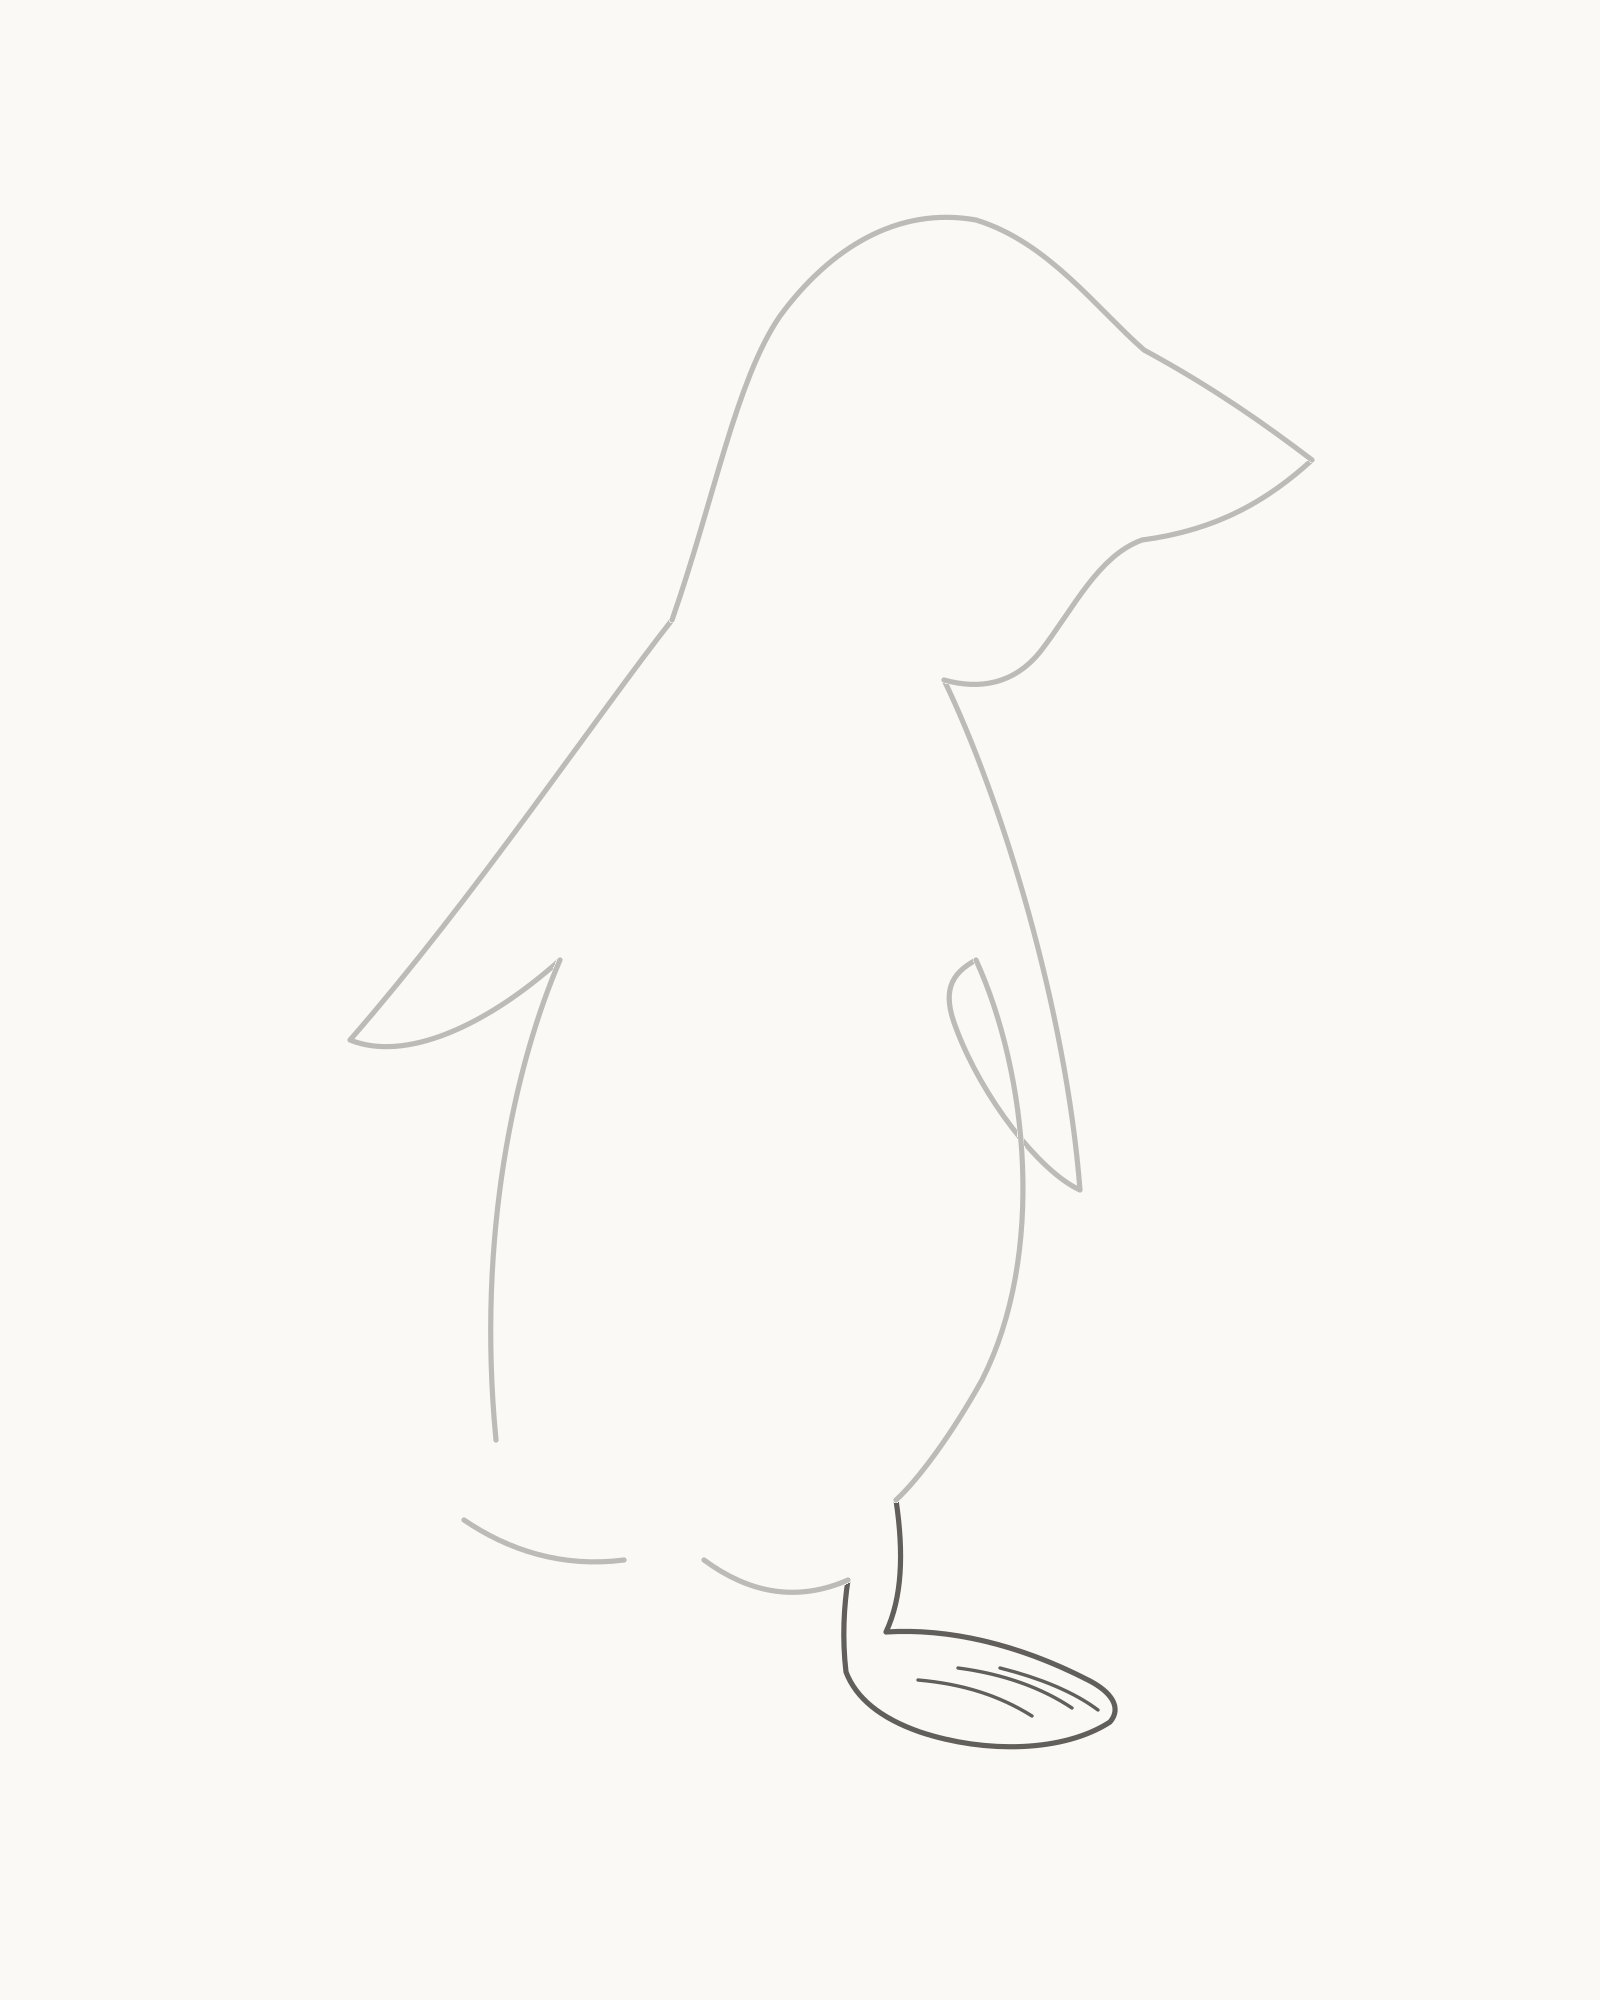
Stage 4 of 8. The main support bridges its body opening and extends right with three contained toe arcs. - Near leg outer edge
- Low foot extending right
- Rounded return to body
- 3 unequal toe arcs
The front body opening belongs to the near leg. Draw a short outer edge down from its upper endpoint. Turn into a low webbed foot that extends right, round the front and underside, then return through the inner leg edge to the lower endpoint of the opening.
Inside this foot, add exactly three unequal forward toe arcs. They follow the long direction of the foot and stop before its outer contour. Keep them separated rather than arranging three identical strokes like a comb.
The ankle is short because much of a penguin’s leg is concealed by the body. The foot still needs a continuous path into both ends of its assigned opening; it must not look pasted to the belly.
Look for this before moving on: the leg meets both body endpoints, the foot extends right and rests on the invisible floor, its outline stays low rather than shoe-like, and exactly three toe arcs remain inside the near foot.
If it goes wrong: preserve the body, flippers and any successful part of the new support. Replace only the newest ankle edge, foot turn or toe arc. Do not widen the body opening or redraw the belly to accommodate a loose foot.
5. Add the smaller far foot
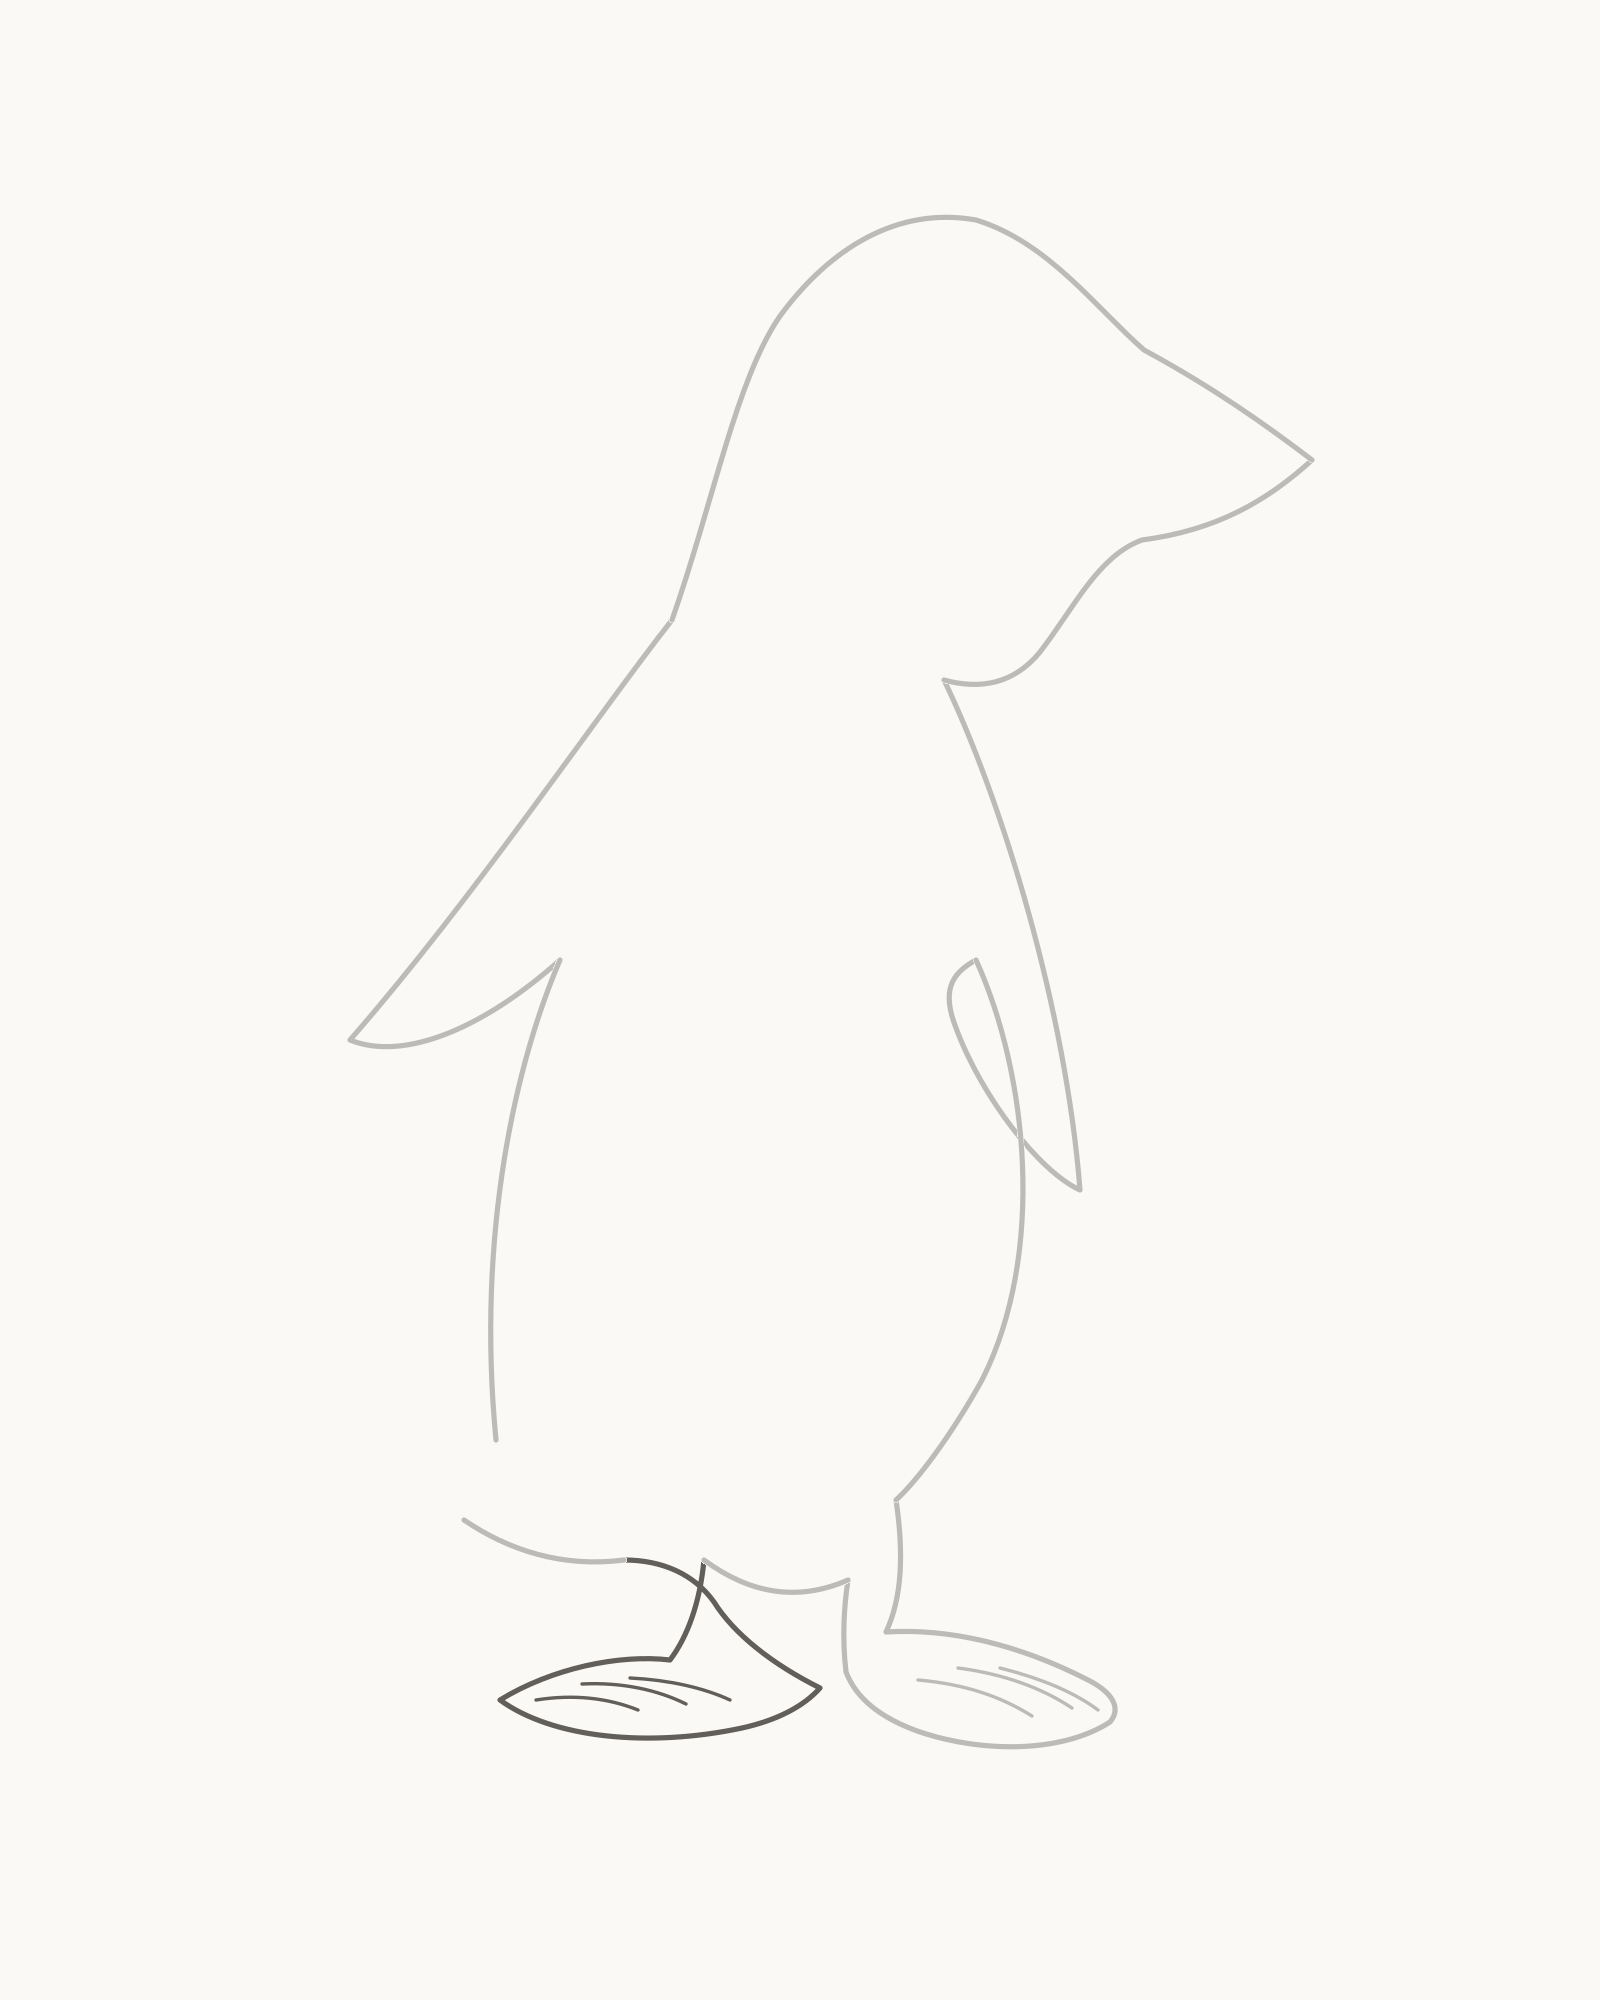
Stage 5 of 8. A subordinate far support stays separately traceable behind the near foot and brings the toe-arc count to six. - Far leg from rear opening
- Smaller foot behind and left
- Return to far body endpoint
- 3 new toe arcs; 6 total
Bridge the rear body opening with the far leg. Its short edges descend into a smaller foot positioned to the left and partly behind the near one. Keep a readable strip of open paper between the two owners wherever the overlap allows it.
Add three unequal forward toe arcs inside this far foot. They are new marks, bringing the total to exactly six: three in the near foot and three in the far foot. The far arcs may appear shorter at page width because the foot is deliberately subordinate, but each must stay within its own outline.
Both feet share one floor without crossing or merging. The smaller left foot is not a third loose shape; follow its leg upward to confirm that it belongs to the farther body opening.
Look for this before moving on: two legs can be traced to two different feet, the far foot is smaller but still legible, their bottoms settle at the same level, no contour crosses, and the full drawing contains exactly six toe arcs.
If it goes wrong: leave the accepted near foot untouched. Replace only the newest far-leg edge, crowded foot return or misplaced toe arc. If the far foot disappears, adjust its newest outer turn locally rather than enlarging it to match the near foot.
6. Join the short tail to the rump
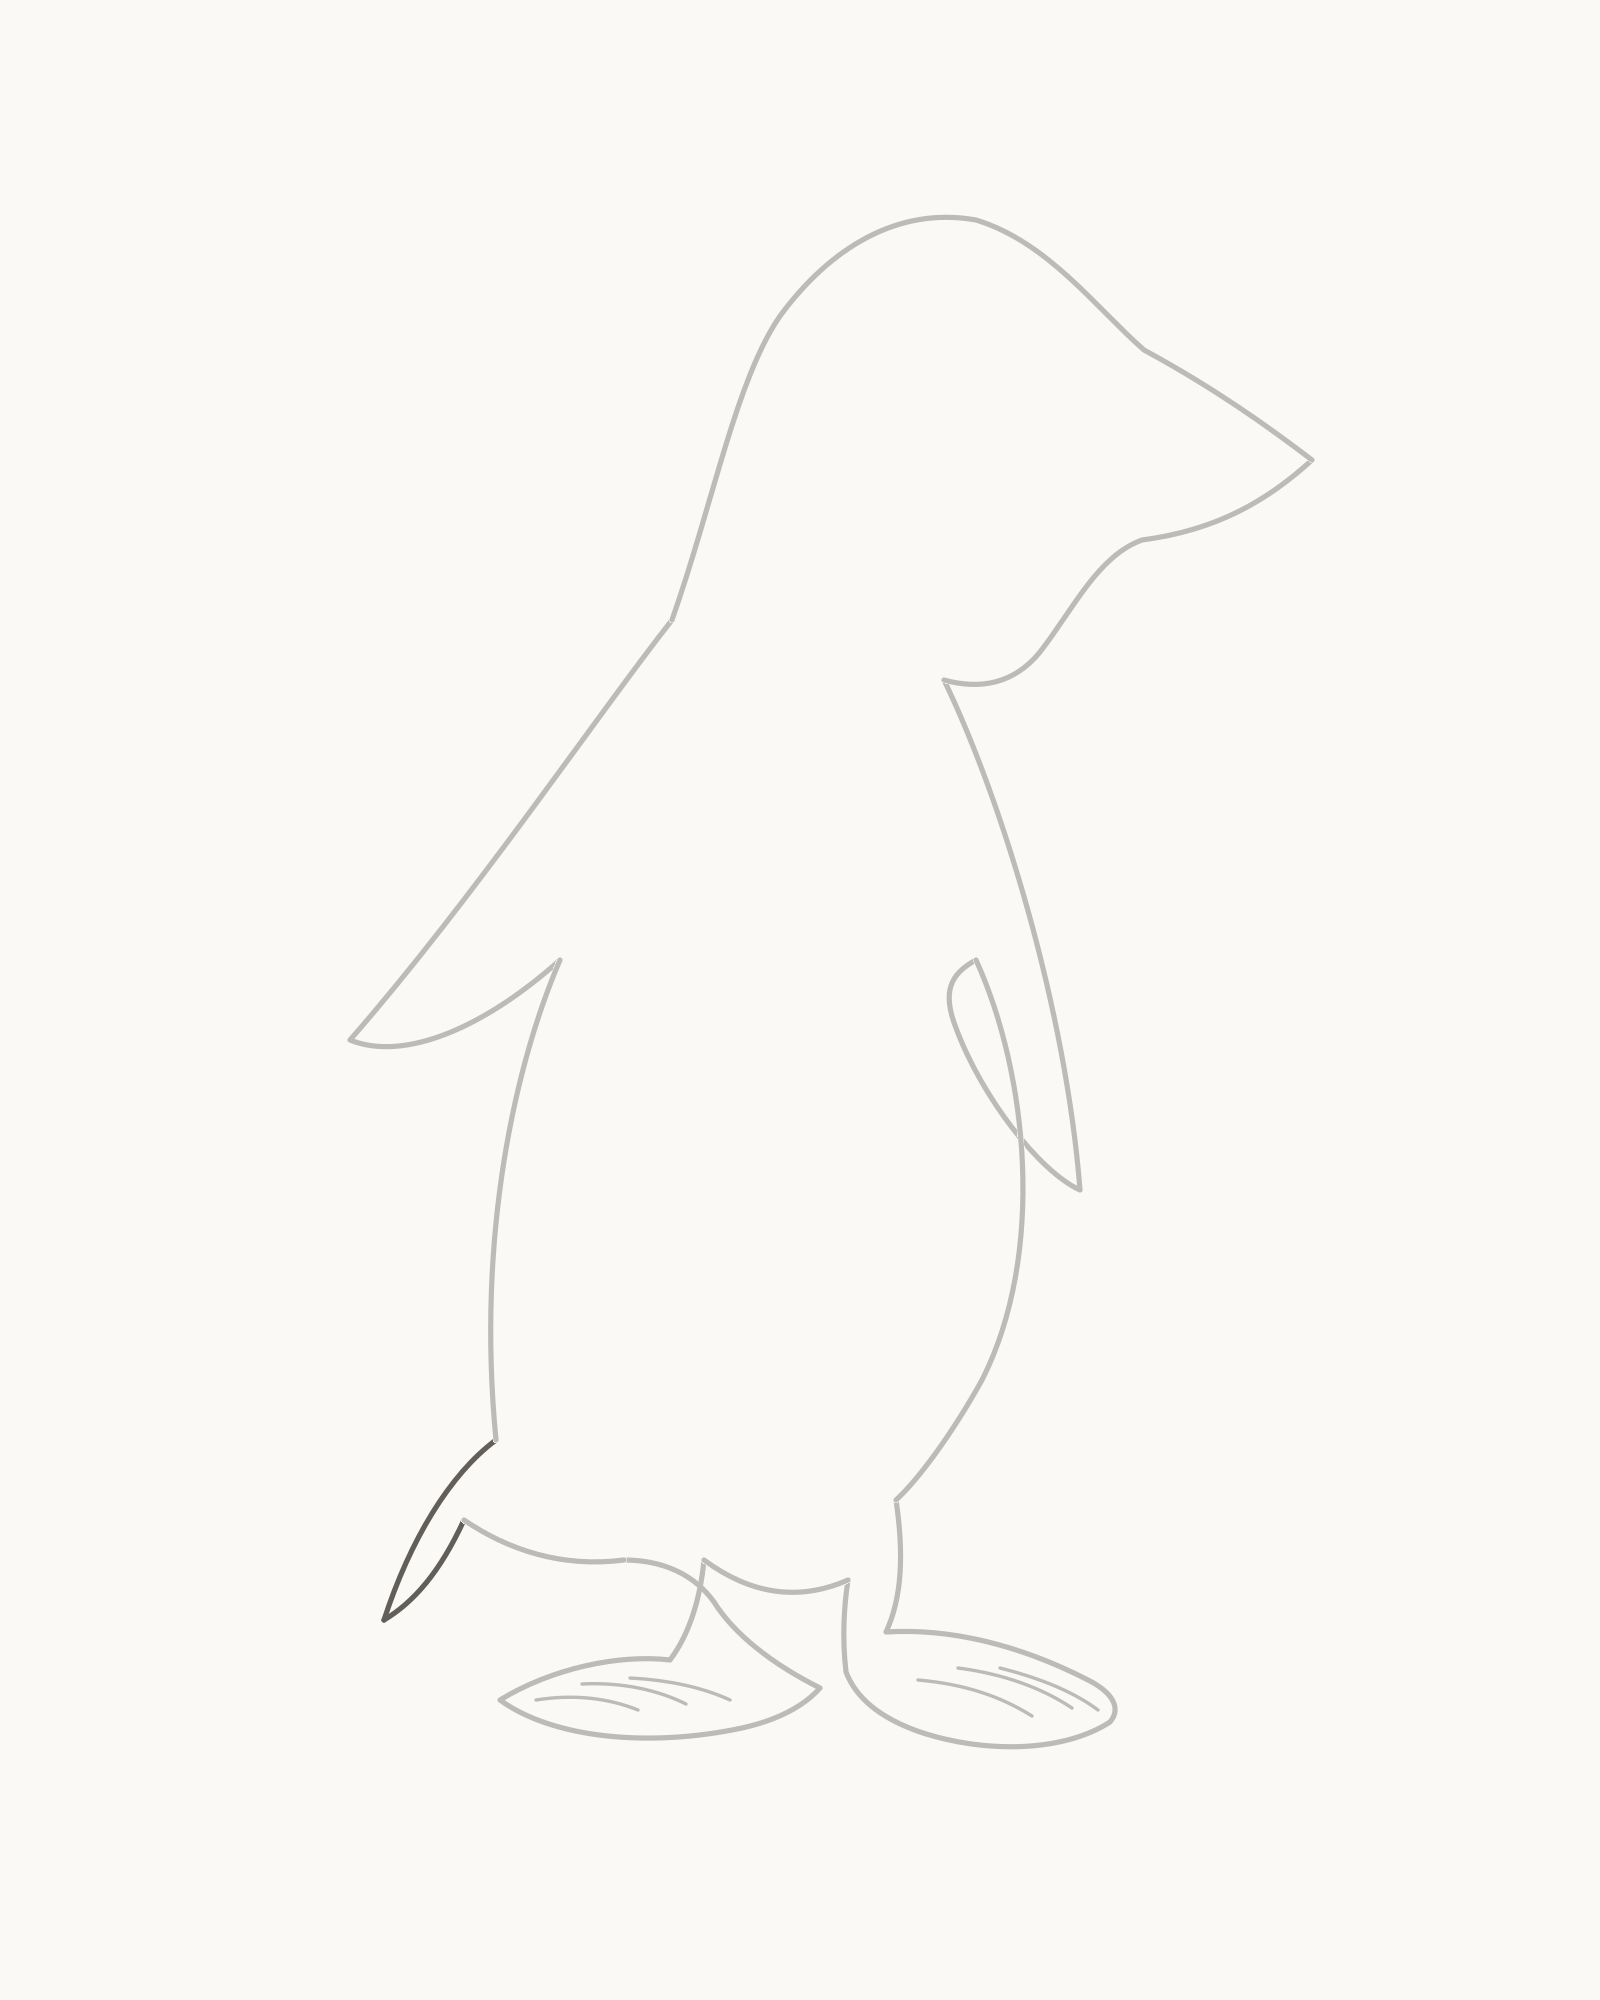
Stage 6 of 8. Two unequal curves bridge the fixed rump roots and meet at one softened down-left tip. - Upper tail root
- Short down-left curve
- One softened tip
- Return to lower tail root
Find the upper and lower tail-root endpoints left open by Stages 1 and 2. From the upper root, draw a short curve down and left towards a softened point. Return with a second, unequal curve to the lower root.
The tail is smaller than either flipper and remains clearly separated from the far foot by warm open paper. Its two rooted curves complete the outer silhouette; it is not an extra wing, spike or triangle pasted to the rump.
Look for this before moving on: both tail curves meet their original endpoints exactly, one compact tip points down-left, the shape stays subordinate to the flippers, and a clean gap remains between the tail and the smaller foot.
If it goes wrong: preserve both fixed roots and the better tail edge. Replace only the newest pointed, oversized or collared return. Do not move the rump or far foot, and do not add texture to make a weak junction seem connected.
7. Place the eye and articulate the beak
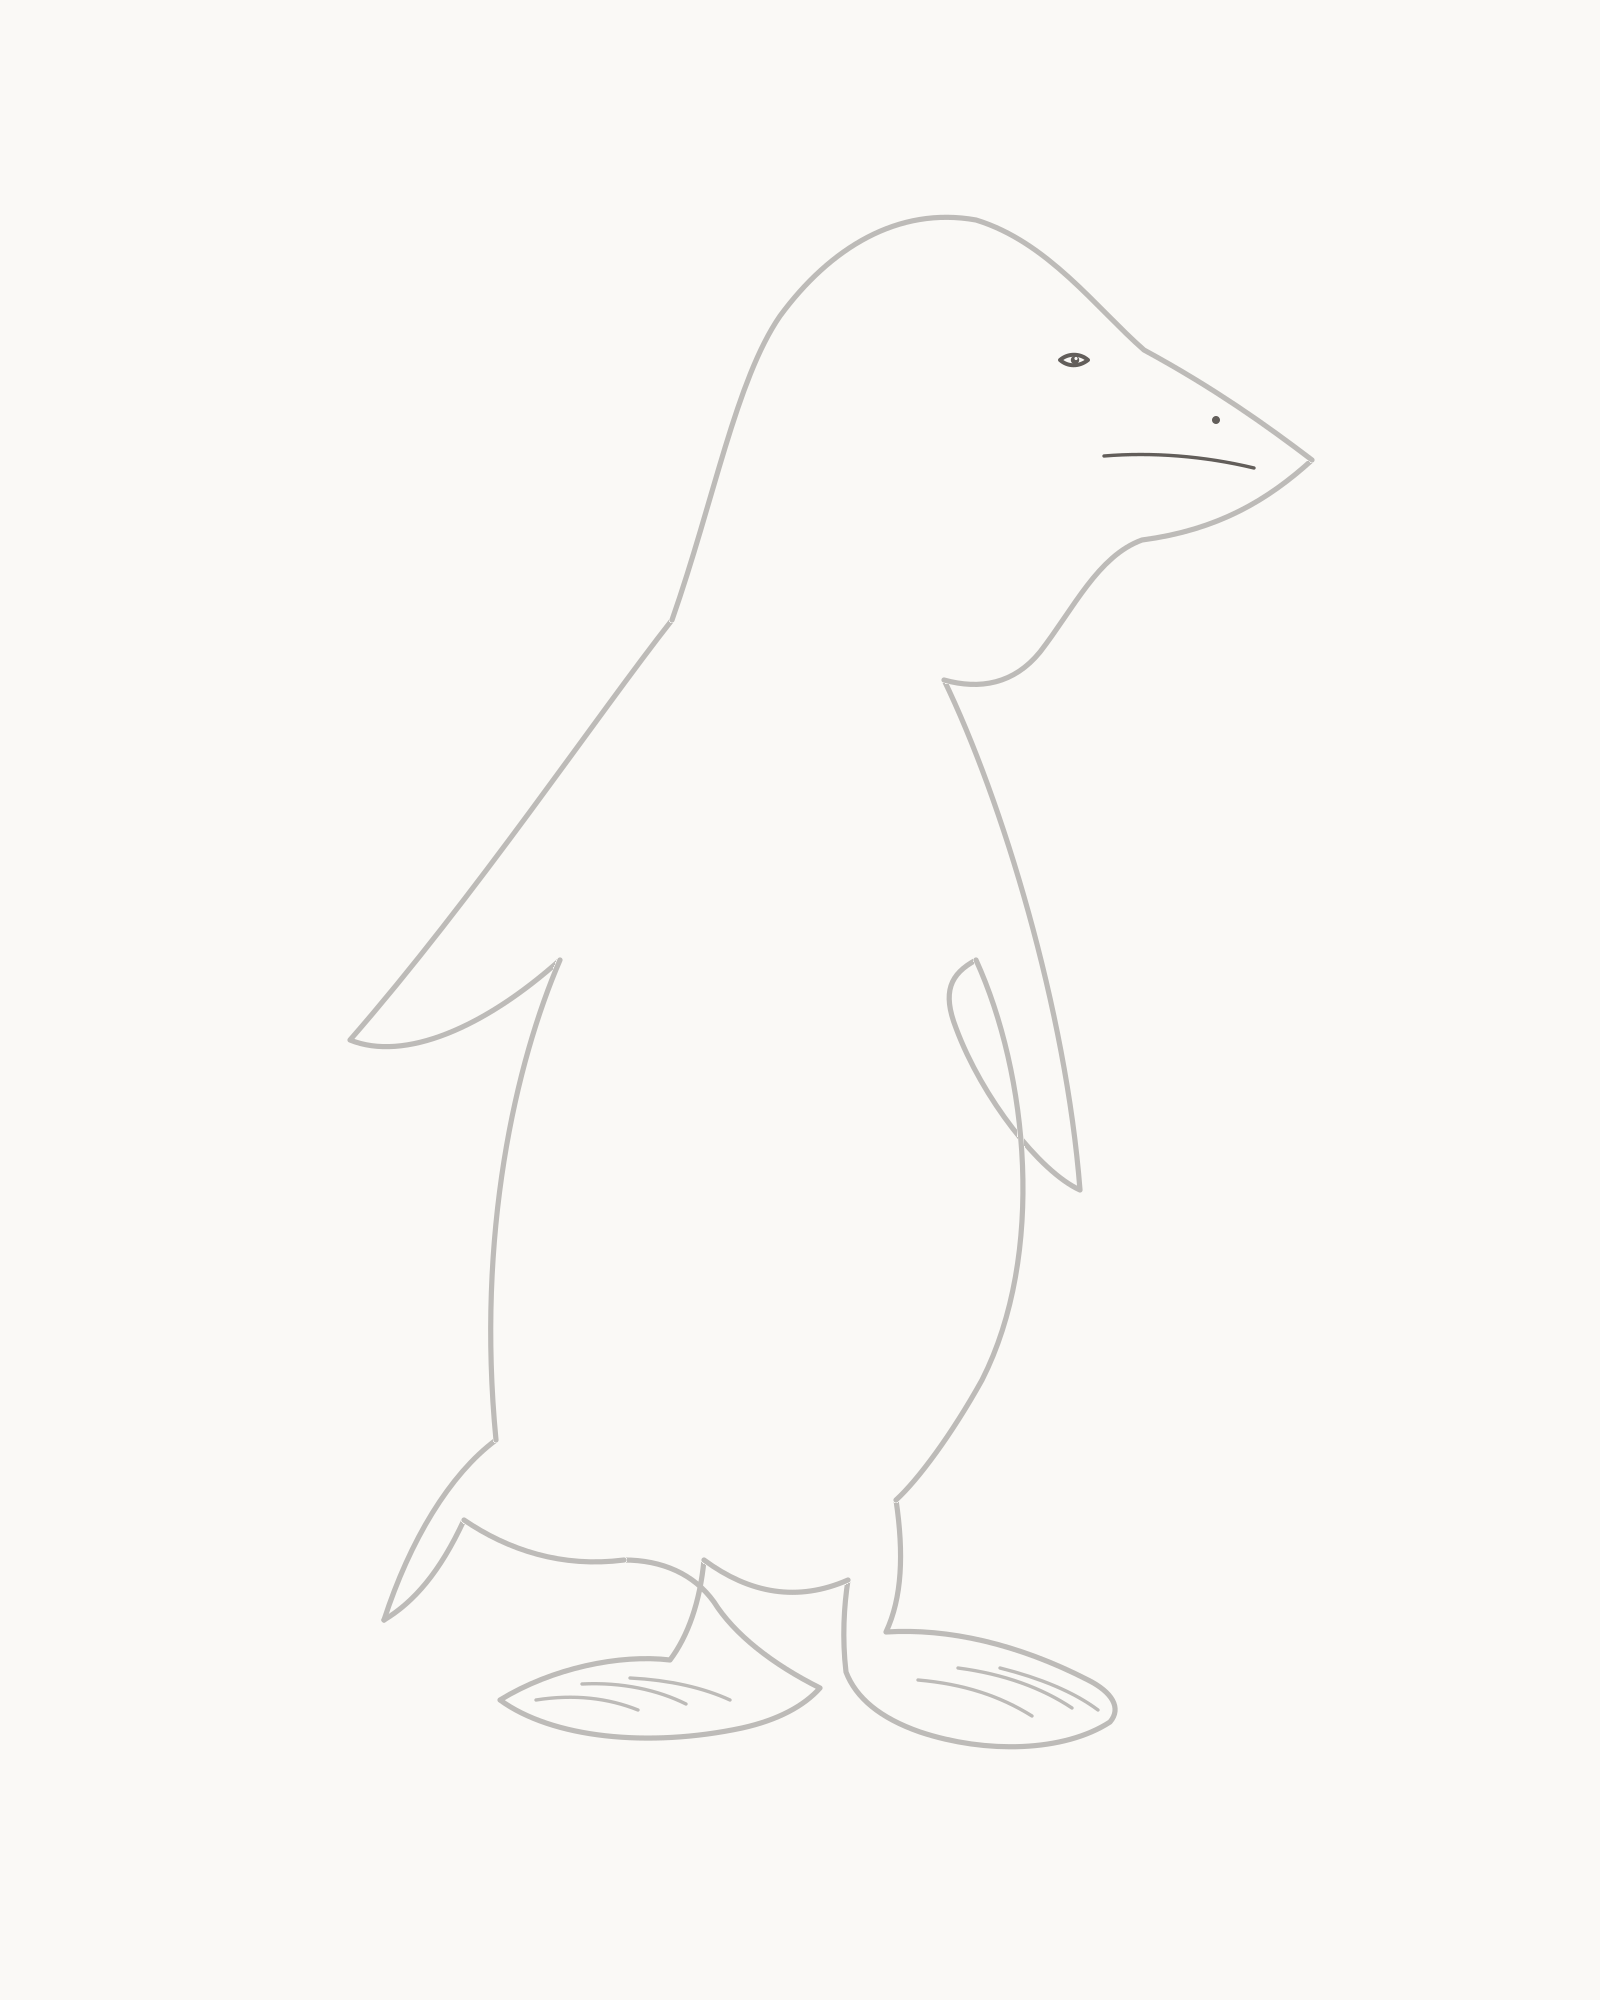
Stage 7 of 8. Three restrained facial details set a calm right-facing gaze without creating a cartoon expression. - One near eye
- Protect tiny pupil reserve
- One nostril
- Mouth seam stopping before tip
Set one small near eye around x67% / y18%. Keep the almond shape narrow and protect the minute unfilled reserve inside the tiny pupil. There is no second visible eye in this almost-profile head.
Place one minute nostril inside the upper beak near x76% / y21%. Then draw the internal mouth seam from the face towards the tip, stopping short of the point. The seam remains open and does not divide the beak into two mechanical halves.
Add the three facial details in this order: eye → nostril → mouth seam. Their restrained scale preserves an adult expression; a button eye, smile or large nostril would turn the head into a character face.
Look for this before moving on: one small eye directs the gaze right, the tiny paper-colour pupil reserve is still visible, the nostril sits inside the upper beak, and the mouth seam neither reaches nor crosses the beak tip.
If it goes wrong: keep the fixed head and each successful feature. Replace only the newest oversized eye, filled reserve, misplaced nostril or overlong seam. Never reshape the beak after the eye is in place or add a second eye to balance the face.
8. Map three open plumage boundaries
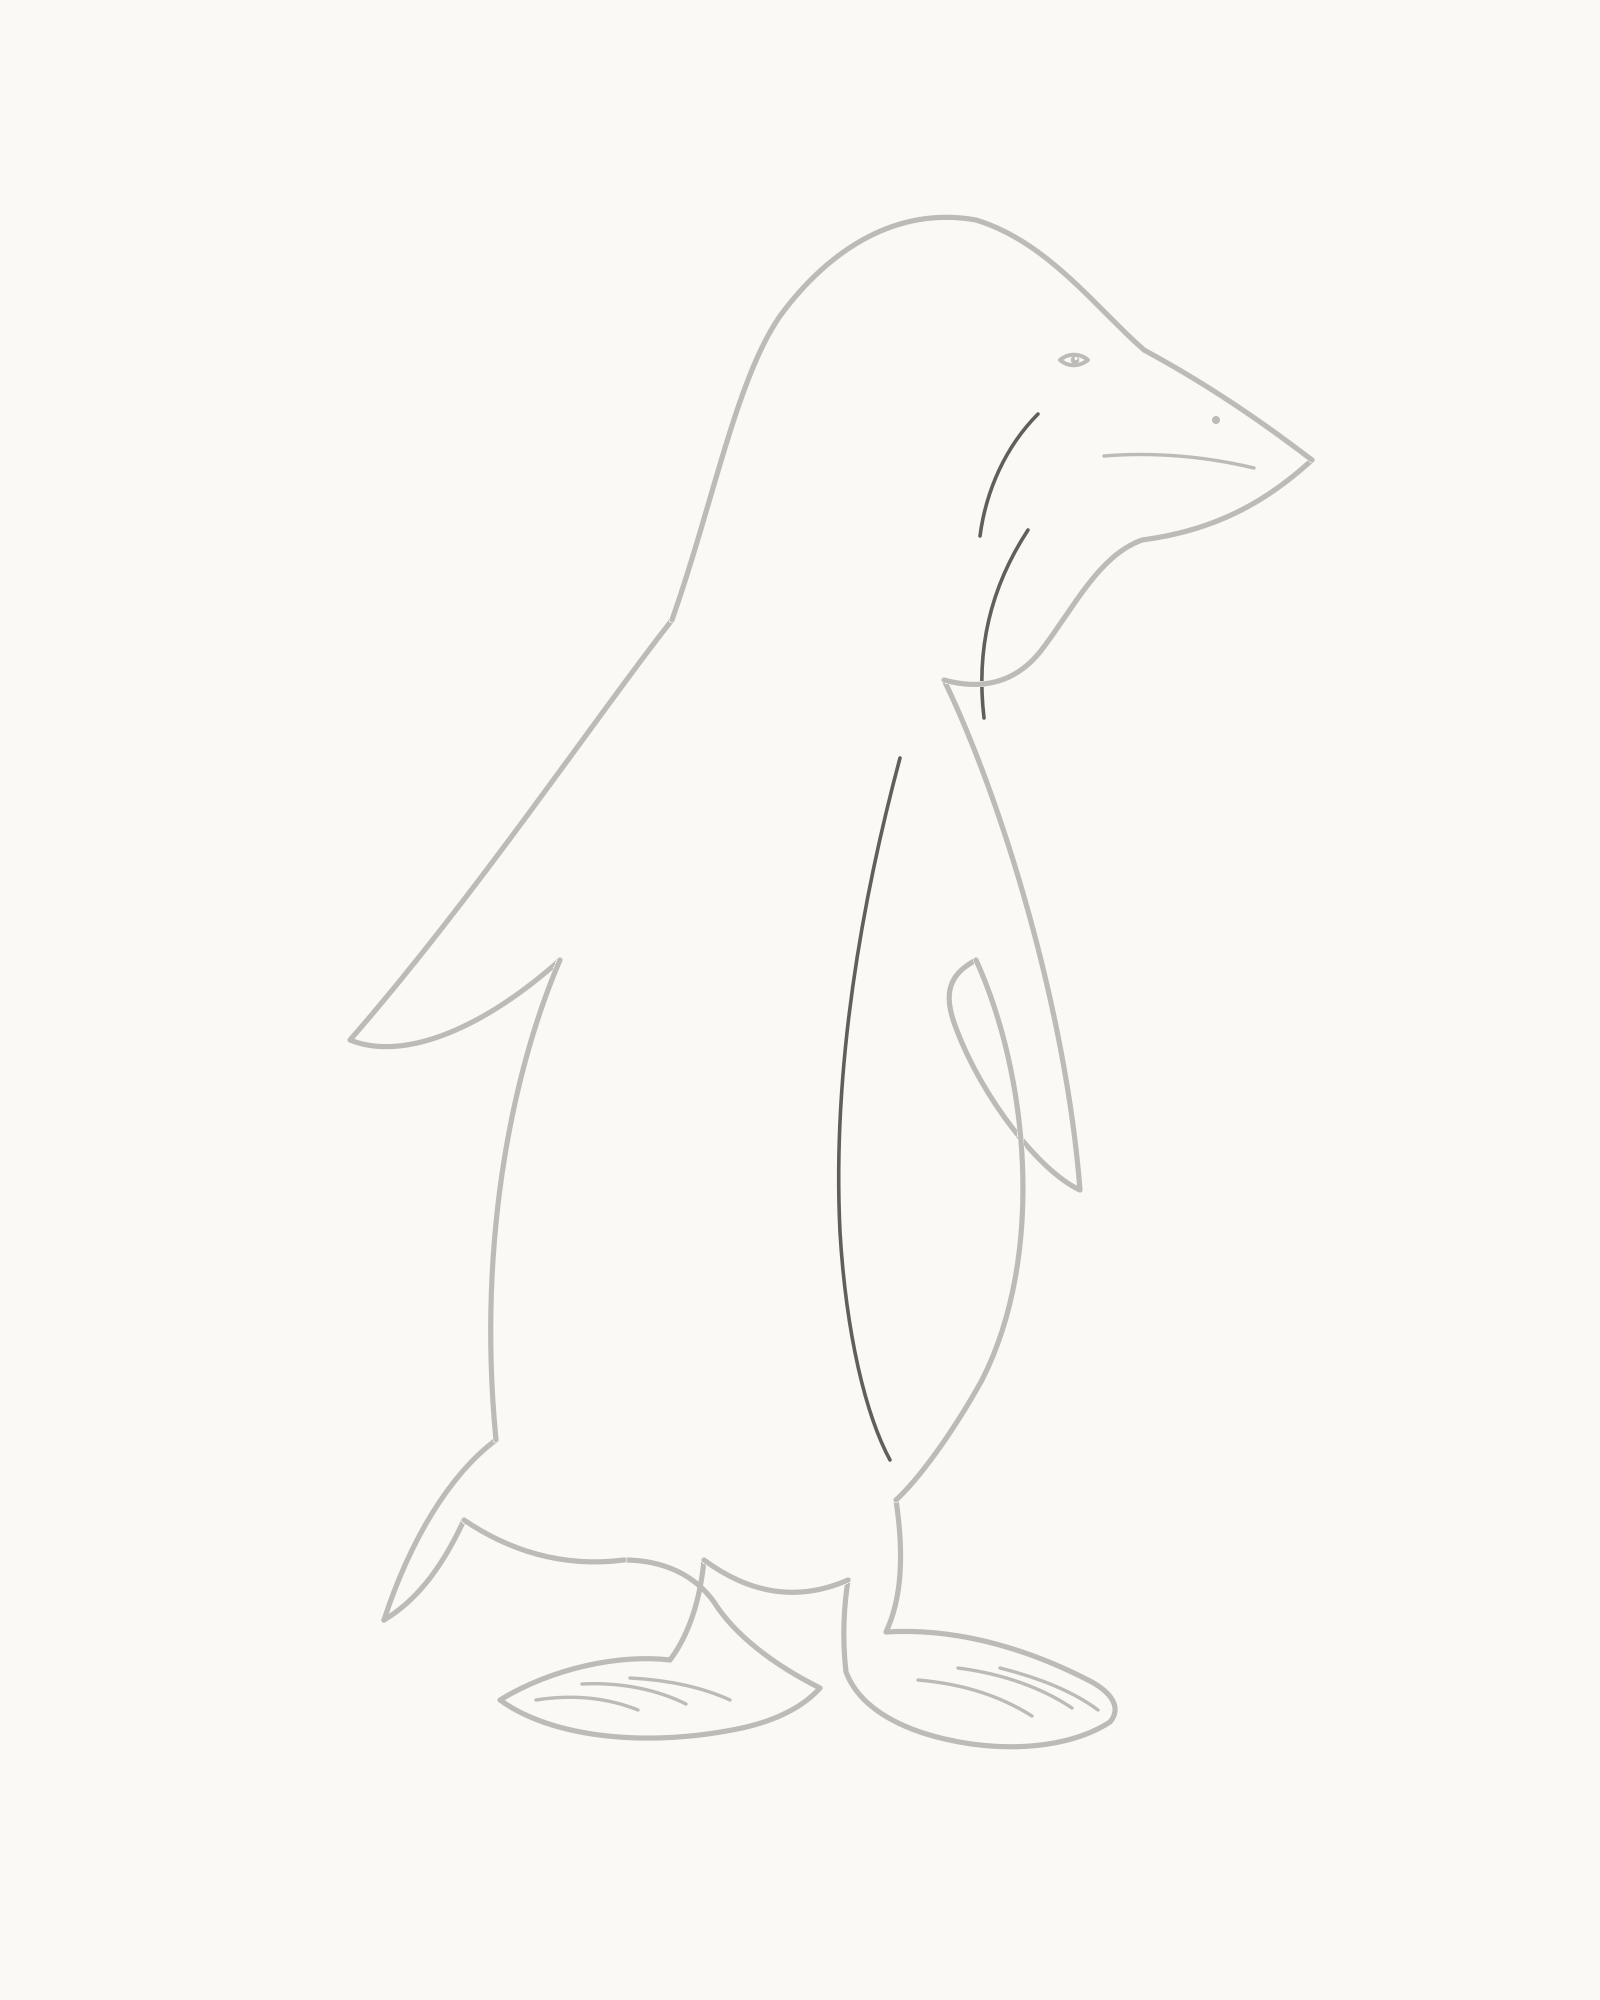
Stage 8 of 8. Three separate open curves map adult-emperor plumage areas without fill, hatching or tonal modelling. - Open cheek crescent
- Open neck/chest sweep
- Open belly boundary
Add exactly three separate curves. First place a short open crescent behind and below the eye. Next draw a longer neck-to-upper-chest sweep. Finish with one long belly boundary that begins below the chest and ends above the leg openings.
These marks indicate changes in adult-emperor plumage areas; they do not render the dark and light colours. Keep every curve open, unequal and isolated. None touches the eye, beak, flipper roots, feet, tail or outer silhouette, and no pair closes into a bib or badge.
There is no shading hidden in this stage. Do not hatch beside the boundaries, fill one side, add repeated feather marks or use a curve to conceal an attachment that still needs practice.
Look for this before moving on: the new count is exactly cheek + neck/chest + belly = three open boundaries, all three remain separate, the silhouette and attachments are still dominant, and no grey or enclosed tonal shape appears.
If it goes wrong: preserve the complete Stage 7 drawing and the successful new curves. Replace only the latest boundary if it closes, touches another feature or resembles a repeated decoration. A weak joint should remain visible rather than being hidden beneath extra lines.


Fix small construction problems
The penguin looks like a chick or mascot. Compare the compact head with the long pear-shaped torso. Keep the eye small, the beak shallow and projecting, and the lower body fuller than the chest. Correct only the newest overly round or symmetrical section.
The body looks unfinished after Stage 2. Identify the four planned openings. Stage 3 bridges both flipper spaces, Stages 4 and 5 close their own leg spaces, and Stage 6 joins the tail roots. An opening before its assigned attachment is intentional.
The near flipper resembles a leaf. Follow both ends into the visible side of the torso. Retain its close, downward position, but replace the newest root or tip if the loop floats. Do not darken the join or move the body to force a connection.
The far flipper looks like another tail. Trace it back to the two high roots in the back opening. Its strong leftward projection begins above the rump, while the actual tail is added much lower and remains considerably shorter.
The smaller foot disappears. Start at the rear leg opening and follow the far support to its left-hand foot. Restore only the newest obscured outer turn, keeping that foot smaller and its three toe arcs shorter than those in the near owner.
The feet look pasted on. Check that each short leg bridges both endpoints of its own body gap before examining the toes. Fix the newest ankle connection locally; more toe lines cannot repair a missing attachment.
The face looks too cute. Reduce only the newest oversized feature. Keep one small eye with a minute unfilled point, one tiny nostril and a mouth seam that stops before the tip. Do not add lashes, a smile or a second eye.
The last three curves look like shading. Return to the exact three-part count. Leave open paper around every boundary and remove only the newest hatch, closed loop or extra stroke. The finished image remains line-only.
Practise a different flipper position
On another sheet, repeat the penguin at half size through Stage 2. Keep the same adult head, beak, tall torso and planned openings, but let the far flipper project a little less horizontally. Join it to the same two back roots and keep the near flipper resting against the visible side. This single change tests whether the farther paddle still reads clearly without altering the feet, tail or plumage map.
For more practice with a complete bird silhouette, try How to Draw a Bird. How to Draw a Fish offers another exercise in a streamlined profile and separately attached fins, while the full practical collection is available at How to Draw.
Frequently Asked Questions
What is the easiest way to start drawing a penguin?
Place the whole upper silhouette before the eye or feet. Compare the beak tip, crown, two far-flipper roots and upper tail root with the page, then connect them using the two permanent Stage 1 intervals.
How do I make the penguin look like an adult rather than a chick?
Keep the head compact beside a long, bottom-heavy torso. Use one small eye and a shallow projecting beak instead of a round head, short triangle bill and oversized facial features.
Why is the body still open after Stage 2?
The four gaps are planned attachment spaces, not missing lines. They reserve two flippers, two legs and the two ends of the tail so each later form can join the body without erasing an oval or covering an old contour.
How can I keep both flippers attached?
Trace each flipper from one root, around its tip and back to its second root. The near one lies slim against the visible side; the far one projects left from a separate opening behind the back.
How many toe lines should the feet have?
Draw three unequal forward arcs inside the near foot in Stage 4 and three more inside the smaller far foot in Stage 5. The final total is six, and no arc crosses a foot outline.
Are the three final curves shading?
No. They are open boundaries that locate the cheek, neck/chest and belly plumage areas. Do not fill, hatch or blend around them; the completed result remains a line drawing.
Is the placement grid required?
No. It is an optional way to compare early positions with the page edges. Leave it switched off if direct visual comparison is comfortable, and never copy the grid itself into the penguin.
Should I erase guides or darken the outline at the end?
Neither is part of this method. All marks in the illustrated sequence stay in place. Deal with a faulty latest segment before adding more, and leave the settled lines at their existing strength instead of tracing over the complete bird.
References
- Australian Antarctic Program, Emperor penguin. View source
- National Geographic, Penguin facts and information. View source
- Monterey Bay Aquarium, African penguin. View source
More DRAWING Guides

How to Draw a Rose: A Step by Step Guide

How to Draw a Tree: A Step by Step Guide

How to Draw Eyes: A Step by Step Guide

How to Draw Leaves: A Step by Step Guide

How to Draw Autumn Leaves: A Step by Step Guide

How to Draw Flowers: A Step by Step Guide

How to Draw a Lily: A Step by Step Guide

How to Draw a Sunflower: A Step by Step Guide

How to Draw a Tulip: A Step by Step Guide

How to Draw a Hibiscus: A Step by Step Guide

How to Draw a Daisy: A Step by Step Guide
