 by Tom Gurney
Tom Gurney BSc (Hons) is an art history expert with over 20 years experience
Page created on September 3, 2026 / Page updated on September 13, 2026
Email: tomgurney1@gmail.com / Phone: +44 7429 011000
How Plank Grain and End Grain Change the Language of Relief Printing
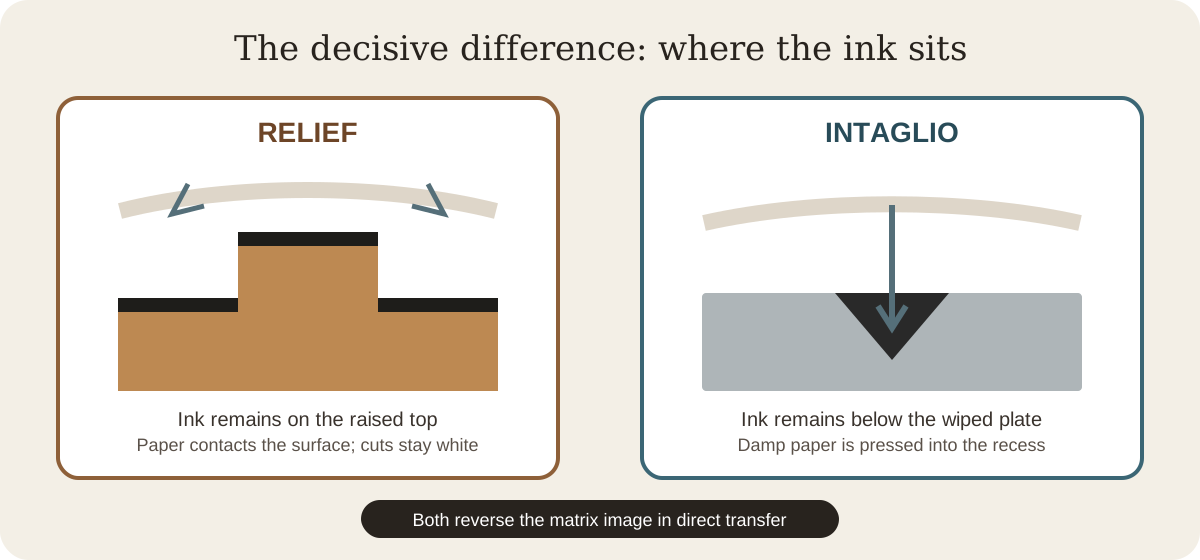
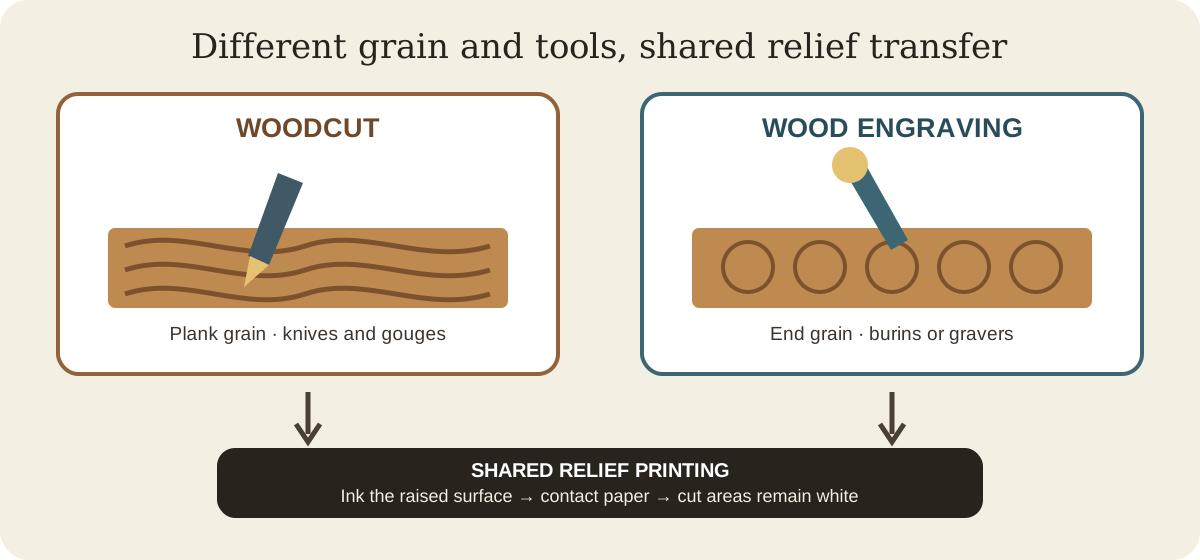
A woodcut is normally carved on the long-grain face of a plank with knives and gouges. A wood engraving is normally cut on the dense end grain of a block with burins or gravers. Both are relief processes: ink coats the surface that remains standing, while lowered cuts usually print as the colour of the paper.[1][2][3]
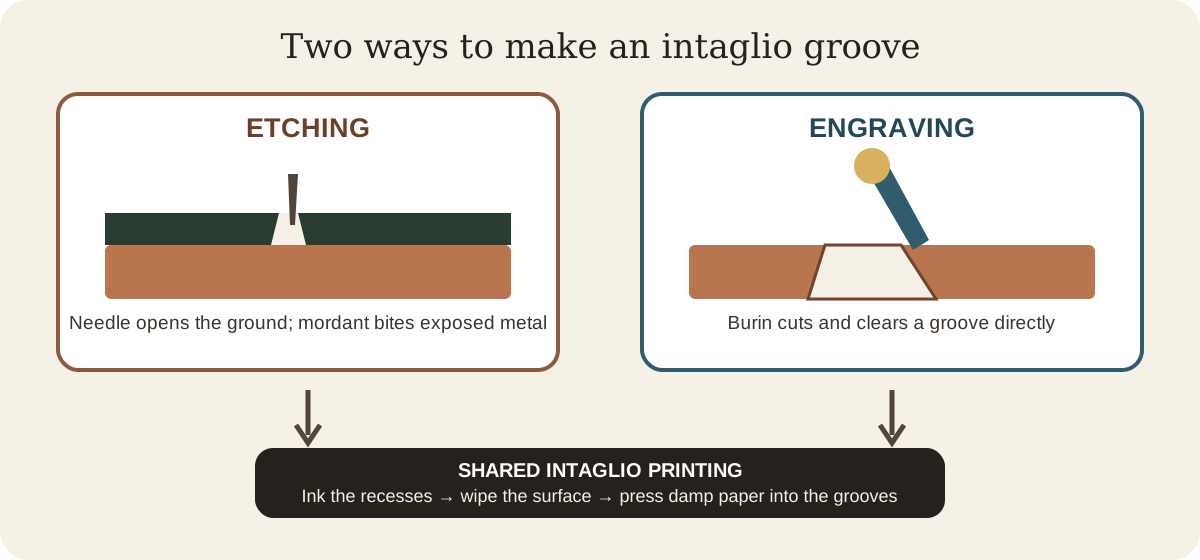
That last point prevents the most common mistake. Wood engraving is not intaglio simply because its maker uses an engraving tool. A copper engraving prints ink held inside burin-cut grooves; a wood engraving prints the uncut top around those grooves. The white cut, rather than the cut itself, is the principal mark transferred to the image.[3]
At a Glance
- Shared familyboth are relief processes that print from the raised wood surface.
- Woodcutcommonly works plank grain with knives and gouges across a comparatively yielding block.
- Wood engravingcommonly cuts dense end grain with burin-like tools for fine white-line detail.
- Printed lineuncut areas print; removed areas normally reveal the paper.
- Key warningtool, grain and catalogue evidence are stronger than assuming all fine detail is wood engraving.
Process Comparison: Woodcut and Wood Engraving
| Feature | Woodcut | Wood engraving |
|---|---|---|
| Normal block orientation | Plank or side grain, cut lengthwise with the tree | End grain, cut across the trunk or branch |
| Typical wood | Fruitwood and other workable planks | Dense hardwood, historically often boxwood |
| Typical tools | Knife, chisel and U- or V-gouge | Burin or graver in several profiles |
| Main working tendency | Preserve raised shapes and dark lines by clearing around them | Incise fine white lines and textures into a dark printable field |
| Ink position | On the raised block surface | On the raised block surface |
| Printing | Hand pressure, baren or relief press; compatible with type-height practice | Relief press or other surface contact; historically useful alongside type |
| Common contexts | European woodcuts, Japanese woodblock prints, modern artist prints | Book and periodical illustration, reproductive work, modern artist engravings |
| Identification caution | Fine detail and colour do not rule it out | Small scale and dense white line do not prove end grain by themselves |
These are historically grounded norms, not a law that overrides an object record. Blocks can be laminated, unusual tools can cross categories, and museums may retain terminology from older catalogues. When the medium line, block or workshop evidence is available, it outranks a guess based on appearance.[1][3]
The British Museum's terminology makes the conventional material contrast explicit: hard end-grain wood, usually boxwood, with engraving tools versus a lengthwise block worked with knife and gouge. It also records a cultural naming boundary—Japanese impressions are traditionally called woodblock prints. This precision is useful, but it should guide description rather than encourage an unsupported claim about a block that has not survived.[10]
How a woodcut block is made and printed
The maker transfers or draws a design on the smooth face of a plank. Cutting removes the regions intended to remain blank. Knives can define an edge; V-gouges open narrow channels; broader gouges clear larger areas. Every ridge and island left at the original height can receive ink, so an unsupported sliver may break and an accidentally removed area cannot simply be printed back.[1][2]
Ink is rolled across the top without filling the hollows. Paper is placed against the block and pressed, rubbed or burnished. The image reverses in transfer. Unlike an intaglio plate, which needs damp paper forced down into grooves, a relief block asks the sheet to contact a comparatively level inked surface. It can therefore be printed in the same general press arrangement as raised type.[1]
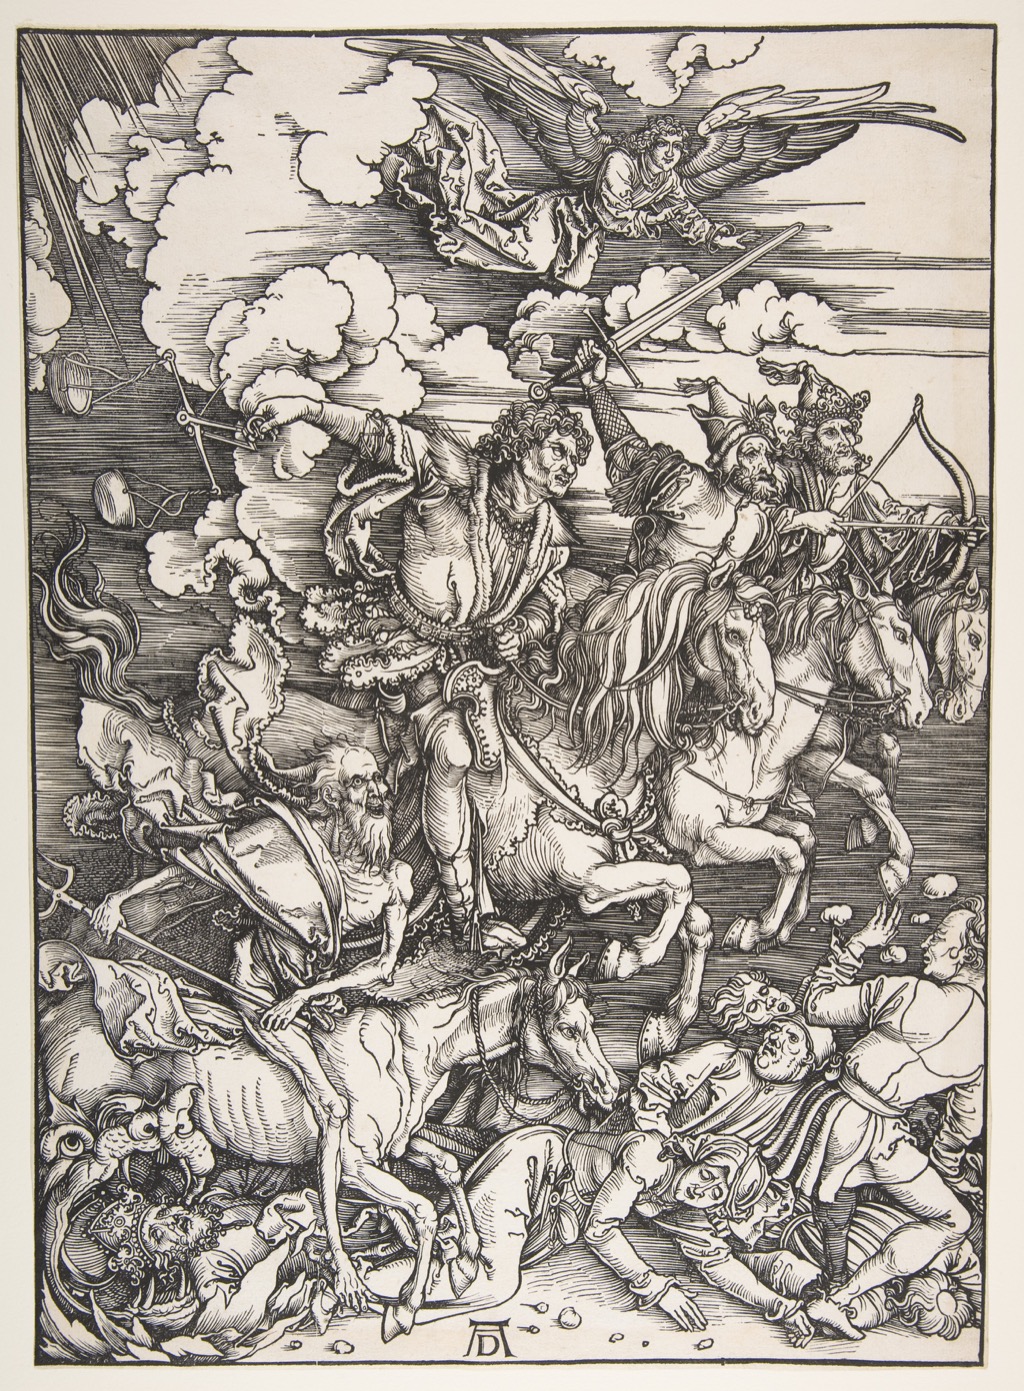
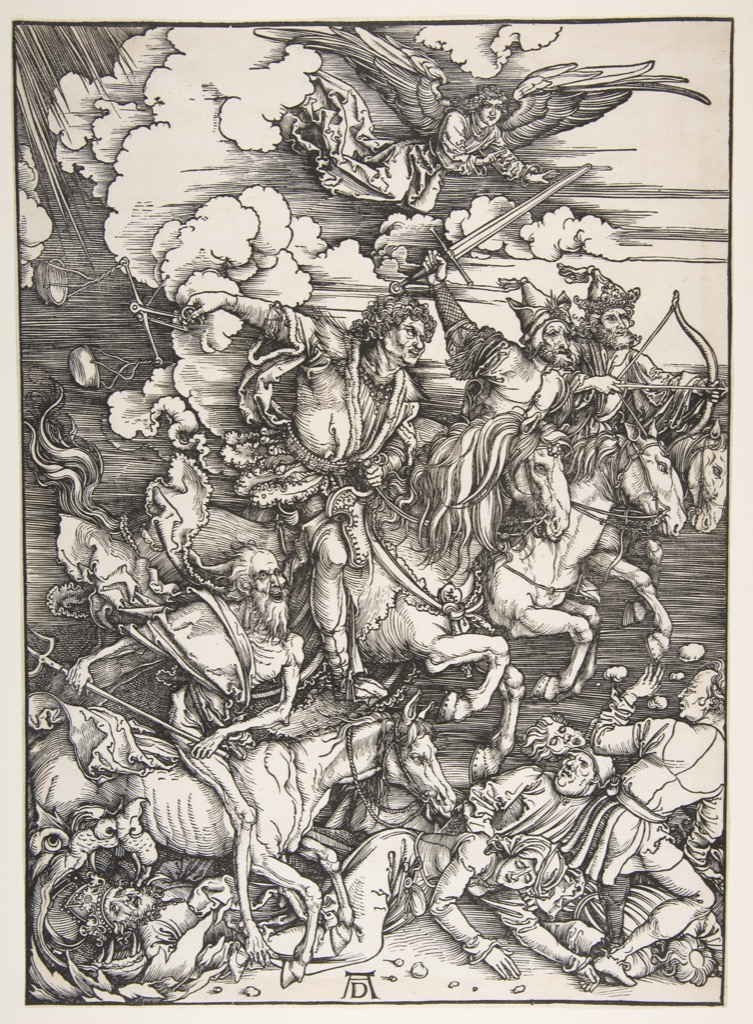
Albrecht Dürer's prints show how far plank-grain woodcut could be driven. The Four Horsemen, from The Apocalypse of 1498 builds movement through preserved black contours, parallel hatching and compact knots of line. White clouds, highlights and intervals are cleared wood. The Met identifies the sheet as a woodcut, and the force of its detail is a warning against treating “fine” as a synonym for wood engraving.[6]
Japanese woodblock print is related terminology
Museums commonly catalogue Japanese relief prints as woodblock prints, not merely woodcuts. The shared physical principle remains: areas of a wooden matrix are cleared, raised passages are inked, and paper receives the reversed design. Multicolour prints normally require separately cut and registered blocks, with a key block often establishing outlines.[1]
Hokusai's The Top of Mount Fuji, about 1800, is recorded by the Met as “Woodblock print; ink and color on paper.” Separate muted colour areas sit inside an economical linear design of travellers, pack animals, trees and the mountain. The record's wording is worth preserving: it locates the work in Japanese practice instead of forcing every relief print into a European label.[7]
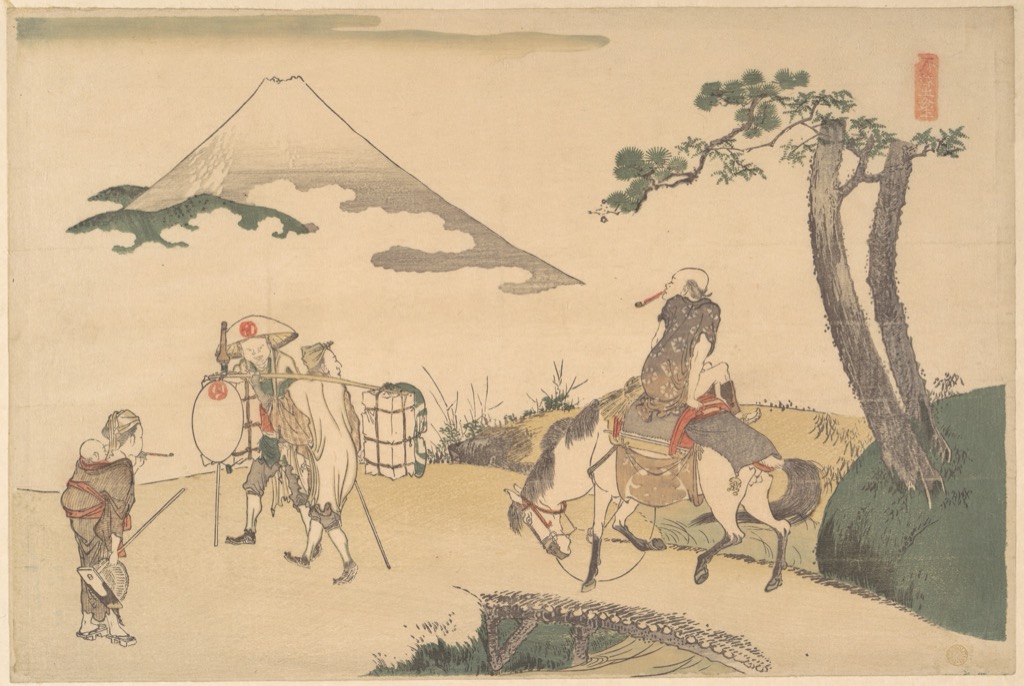
For more of that tradition, see Hokusai's ukiyo-e woodblock prints. Colour does not distinguish woodblock from wood engraving in principle. It records additional inkings, blocks or workshop decisions.
How wood engraving changes the block
End grain exposes a compact field of fibres rather than long bands running across the working face. A burin can travel in many directions without continually following or crossing prominent plank grain. Dense hardwood also supports small surviving points and webs between cuts. This allowed engravers to make close white hatchings, dots and flickering textures on blocks suited to text printing.[3][4]
Traditional boxwood imposed a practical scale. The Met's history of Winslow Homer's prints describes blocks cut across the grain and brought to approximately type height, so image and movable type could pass through the press together. Because suitably dense boxwood was difficult to obtain in large widths, bigger illustrations could be assembled from accurately fitted pieces. A complex published image might therefore begin as one design, be divided across sections for cutting, then reunite as a single printable block.[11]
This construction explains why a faint seam in an impression can be evidence of manufacture rather than damage to the subject. It also separates image size from tool fineness: end grain supported minute marks, but the available timber and press imposed their own limits. Later reproductive technologies could duplicate a block for longer print runs, further distancing a magazine impression from the artist's original drawing.
The tool is pushed through the surface, but the resulting furrow is not filled with ink. It becomes white because the roller passes over it. A broader burin or several adjacent cuts can open a light; untouched surface prints dark. This encourages a “white-line” way of thinking: light is actively engraved into a block that could otherwise print as a solid dark field.[3]
The small print Men seated around a punch bowl, with a hunter offering a toast demonstrates the scale at which that vocabulary could operate. The Met dates it 1790–1828, calls it a wood engraving and cautiously attributes the engraving to Thomas Bewick, possibly after Thomas Rowlandson. Narrow white intervals separate coats, furniture, dogs, wall prints and faces inside a sheet only 6.2 by 9.7 centimetres.[8]
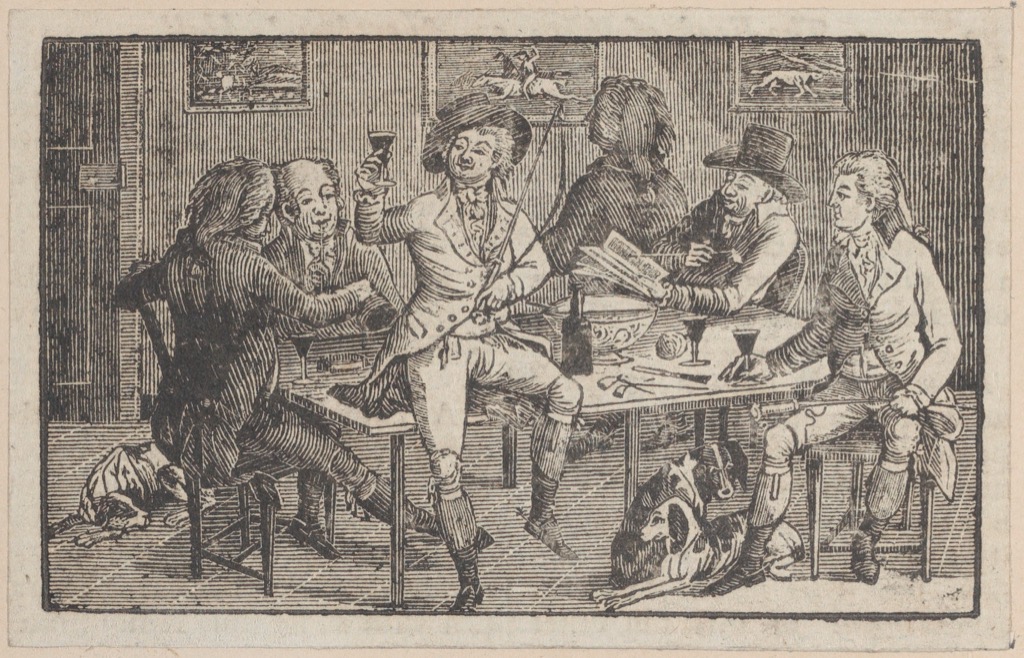
Attribution matters here. The question mark before Bewick and “possibly after” Rowlandson are evidence, not clutter. They show that an object record can distinguish uncertain cutter and designer roles even when the physical print survives clearly.
Black line and white line
Traditional explanations often contrast the black-line woodcut with white-line wood engraving. In a black-line design, the cutter clears space around drawn lines so those raised lines accept ink. In white-line work, the engraver's cuts themselves appear as light marks inside a printable dark mass.[3]
This is a productive account of working logic, but not a foolproof visual test. A woodcutter can clear thin white strokes with a V-tool. A wood engraver can leave black contours. Skilled makers combine solids, outlines and textures, and a photographic reproduction can conceal surface clues. Grain direction, block construction, tools, documented roles and catalogue medium together make the stronger identification.
Also distinguish wood engraving from engraving on metal. Both may use burins, but only the latter is normally intaglio. If a glossary defines engraving solely by tool, it misses the decisive question: does ink transfer from the top surface or from the groove?
Wood engraving and illustrated publishing
End-grain blocks could carry intricate tonal translations and print in a typographic press. Nineteenth-century publishers used them extensively for books and illustrated newspapers. A designer supplied an image; specialist engravers interpreted it as printable surface; printers and publishers completed the chain. The published print may therefore be “after” the named artist rather than cut by that artist.[4]
Translation was not neutral tracing. A draughtsman's grey wash or pencil shading had to become printable arrangements of surviving black surface and cut white intervals. Engravers selected hatch direction, density and interruption to imitate tone while keeping fragile ridges intact. On a large joined block, several cutters could work on different sections; consistency then depended on shared conventions and editorial supervision. Credits such as drawn by, after, engraved by, printed by and published by describe different intellectual and manual contributions.[11]
The Army of the Potomac—A Sharp-Shooter on Picket Duty, issued in Harper's Weekly on 15 November 1862, is catalogued by the Met as a wood engraving after Winslow Homer. Dense networks of white and black strokes describe pine needles, bark, cloth, gunmetal and distance. The medium served reproduction and mass circulation, but the sheet's spatial tension depends on purposeful translation, not mechanical copying.[9]
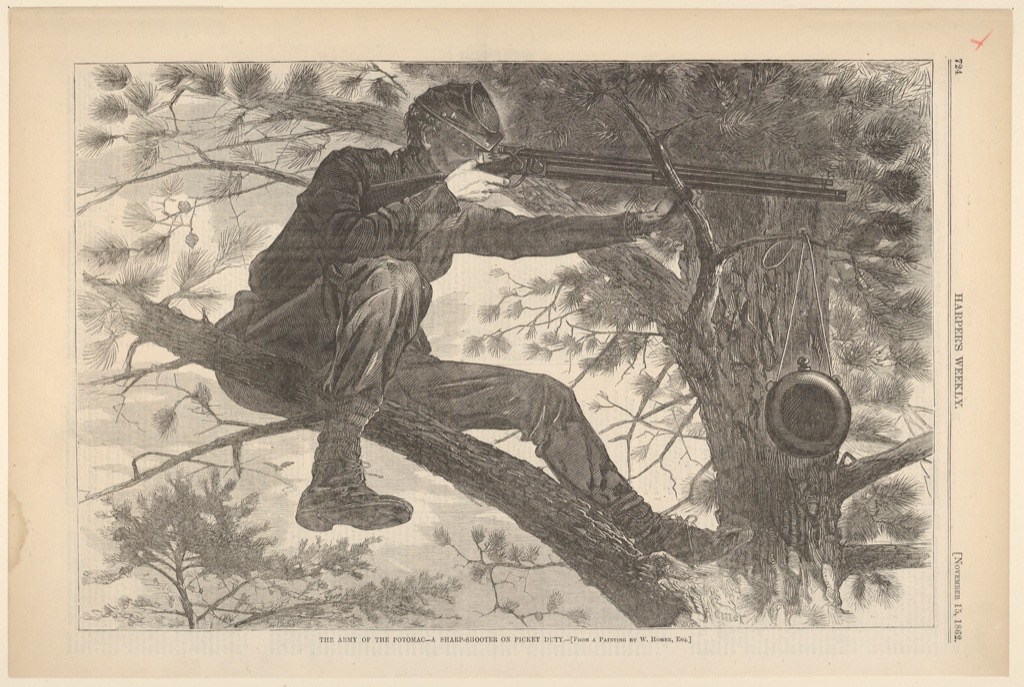
“After Winslow Homer” does not mean Homer had no relation to the design, nor does it identify the unnamed block engraver. It states the role supported by the catalogue. Do not silently upgrade after to by, especially on a page explaining a collaborative reproduction process.
How to tell them apart
- Read the medium line first. Look for woodcut, woodblock print, wood engraving and combined-process wording.
- Check whether a block survives. Visible long grain supports plank-grain woodcut; a tight end-grain field supports wood engraving.
- Look for tool behaviour. Sweeping cleared troughs and knife-defined edges often support woodcut; extremely fine white hatching in several directions often supports wood engraving.
- Ask what prints. In both processes, raised surface carries ink. A white burin line in wood is not an ink-filled intaglio groove.
- Preserve roles. Artist, designer, cutter, engraver, printer and publisher may be different people.
- Do not use fineness alone. Dürer's woodcuts can be extraordinarily intricate.
- Do not use colour alone. Japanese and European woodblocks can use multiple registered colours; wood engraving can also be printed in colour.
- Treat online images cautiously. Scale, paper texture, embossing and ink body can disappear on screen.
Historical development
Relief printing from wood existed in East Asia centuries before European image printing. In Europe, woodcut served textiles and, by the early fifteenth century, images on paper, playing cards and books. Its raised blocks could share a press with movable type. Dürer elevated the large independent and serial woodcut without abandoning that reproductive infrastructure.[1][5]
Japanese colour woodblock production joined designer, block cutter, printer and publisher. By the later eighteenth century, registered blocks could build complex palettes. The history is not a single European progression from crude woodcut to refined engraving; different workshop systems developed their own sophisticated solutions.[1]
Thomas Bewick is closely associated with exploiting end-grain blocks around the turn of the nineteenth century. Wood engraving then became central to illustrated publishing before photomechanical processes displaced much commercial work. Twentieth-century artists revived it as a self-conscious fine-art and book medium.[3][4]
For the larger map of matrices and transfer principles, see Printmaking Techniques.
Watch Two Ways of Cutting and Printing Wood
Choose a Royal Academy wood-engraving demonstration, the Natural History Museum on Bewick, or Harvard's colour woodcut reconstruction.
How to Make a Wood Engraving
Watch end-grain preparation, burin cutting, inking and printing in an artist-led sequence.
Watch on YouTubeFrequently Asked Questions
Relief. Ink lies on the uncut surface of the wooden block. The engraved furrows normally remain uninked and print white.
No. Plank grain is the standard historical distinction, but construction and terminology vary. Use physical and catalogue evidence for a specific object.
Dense end grain supports small surviving points, and burins can cut controlled lines in many directions. Skill, wood, scale and printing still affect the result.
It shares relief mechanics, but woodblock print is the usual institutional term and should be preserved when citing a record.
No. Designers, specialist cutters or engravers, printers and publishers often collaborated. After and other role labels should not be removed.
Rarely. White-line density and fine detail are clues, not proof. Medium records, surviving blocks, tools and workshop evidence are stronger.
Discussion
Which example best reveals the grain, tool or white-line logic of its block—and which shows why fine detail alone cannot securely name the process?
Reader Insights
The word engraving names the cutting method here, not the recessed printing family used by metal engraving.
Plank grain and gouges often support woodcut; dense end grain and burins support wood engraving.
Wood engraving's durable, type-high blocks made fine images practical within illustrated publishing.
Join the Conversation
Share one precise observation or a useful museum example below.
References
- Victoria and Albert Museum, “What is print?” Updated 17 April 2024. View source
- National Gallery of Art, “Printmaking Basics.” View source
- Metropolitan Museum of Art, How Prints Look. View source
- Metropolitan Museum of Art, Guide to the Collections: Prints. View source
- Victoria and Albert Museum, “Recreating early-Renaissance playing cards.” View source
- Metropolitan Museum of Art, Albrecht Dürer, The Four Horsemen, from “The Apocalypse”, 1498, woodcut, object 19.73.209. View source
- Metropolitan Museum of Art, Katsushika Hokusai, The Top of Mount Fuji, ca. 1800, woodblock print; ink and color on paper, object JP1012. View source
- Metropolitan Museum of Art, (?) Thomas Bewick, Men seated around a punch bowl, with a hunter offering a toast, 1790–1828, wood engraving, object 59.533.147. View source
- Metropolitan Museum of Art, after Winslow Homer, The Army of the Potomac—A Sharp-Shooter on Picket Duty, 15 November 1862, wood engraving, object 29.88.3(5). View source
- British Museum, “wood-engraving,” Collections Online terminology scope note. View source
- Metropolitan Museum of Art, Winslow Homer: A Selection of Prints, Drawings and Watercolors from The Metropolitan Museum of Art. View source